Chapter 6. View Controllers
An iOS app’s interface is dynamic, and with good reason. On the desktop, an application’s windows can be big, and there can be more than one of them, so there’s room for lots of interface. With iOS, everything needs to fit on a single display consisting of a single window, which in the case of the iPhone can be almost forbiddingly tiny. The iOS solution is to introduce, at will, completely new interface — a new view, possibly with an elaborate hierarchy of subviews — replacing or covering the previous interface.
For this to work, regions of interface material — often the entire contents of the screen — must come and go in an agile fashion that is understandable to the user. There will typically be a logical, structural, and functional relationship between the view that was present and the view that replaces or covers it, and this relationship will need to be maintained behind the scenes, in your code, as well as being indicated to the user: multiple views may be pure alternatives or siblings of one another, or one view may be a temporary replacement for another, or views may be like successive pages of a book. Animation is often used to emphasize and clarify these relationships as one view is superseded by another. Navigational interface and a vivid, suggestive gestural vocabulary give the user an ability to control what’s seen and an understanding of the possible options: a tab bar whose buttons summon alternate views, a back button or a swipe gesture for returning to a previously visited view, a tap on an interface element to dive deeper into a conceptual world, a Done or Cancel button to escape from a settings screen, and so forth.
In iOS, the management of this dynamic interface is performed through view controllers. A view controller is an instance of UIViewController. Actually, a view controller is most likely to be an instance of a UIViewController subclass; the UIViewController class is designed to be subclassed, and you are very unlikely to use a plain vanilla UIViewController object without subclassing it. You might write your own UIViewController subclass; you might use a built-in UIViewController subclass such as UINavigationController or UITabBarController; or you might subclass a built-in UIViewController subclass such as UITableViewController (Chapter 8).
A view controller manages a single view (which can, of course, have subviews); its view property points to the view it manages. This is the view controller’s main view, or simply its view. A view controller’s main view has no explicit pointer to the view controller that manages it, but a view controller is a UIResponder and is in the responder chain just above its view, so it is the view’s next responder.
View Controller Responsibilities
A view controller’s most important responsibility is its view. A view controller must have a view; it is useless without one. If that view is to be useful, it must somehow get into the interface, and hence onto the screen; a view controller is usually responsible for seeing to that, too, but typically not the view controller whose view this is; rather, this will be taken care of by some view controller whose view is already in the interface. In many cases, this will happen automatically (I’ll talk more about that in the next section), but you can participate in the process, and for some view controllers you may have to do the work yourself. A view that comes may also eventually go, and the view controller responsible for putting a view into the interface will then be responsible also for removing it.
A view controller will typically provide animation of the interface as a view comes or goes. Built-in view controller subclasses and built-in ways of summoning or removing a view controller and its view come with built-in animations. We are all familiar, for example, with tapping something to make new interface slide in from the side of the screen, and then later tapping a back button to make that interface slide back out again. In cases where you are responsible for getting a view controller’s view onto the screen, you are also responsible for providing the animation. And you can take complete charge of the animation even for built-in view controllers.
View controllers, working together, can save and restore state automatically. This feature helps you ensure that if your app is terminated in the background and subsequently relaunched, it will quickly resume displaying the same interface that was showing when the user last saw it.
The most powerful view controller is the root view controller. This is the view controller managing the root view, the view that sits at the top of the view hierarchy, as the one and only direct subview of the main window, acting as the superview for the rest of our app’s interface. I described in Chapter 1 how this view controller attains its lofty position: it is assigned to the window’s rootViewController property. The window then takes that view controller’s main view, gives it the correct frame (resizing it if necessary), and makes it its own subview.
The root view controller bears ultimate responsibility for two important decisions about the behavior of your app:
- Rotation of the interface
-
The user can rotate the device, and you might like the interface to rotate in response, to compensate. This decision is made, in large part, by the root view controller.
- Manipulation of the status bar
-
The status bar is actually a secondary window belonging to the runtime, but the runtime consults the root view controller as to whether the status bar should be present and, if so, whether its text should be light or dark.
Above and beyond all this, view controllers are typically the heart of any app, by virtue of their role in the model–view–controller architecture: view controllers are controllers (hence the name). Views give the user something to tap, and display data for the user to see; they are view. The data itself is model. But the logic of determining, at any given moment, what views are shown, what data those views display, and what the response to the user’s gestures should be, is controller logic. Typically, that means view controller logic. In any app, view controllers will be the most important controllers — frequently, in fact, the only controllers. View controllers are where you’ll put the bulk of the code that actually makes your app do what your app does.
View Controller Hierarchy
There is always one root view controller, along with its view, the root view. There may also be other view controllers, each of which has its own main view. Such view controllers are subordinate to the root view controller. In iOS, there are two subordination relationships between view controllers:
- Parentage (containment)
-
A view controller can contain another view controller. The containing view controller is the parent of the contained view controller; the contained view controller is a child of the containing view controller. A containment relationship between two view controllers is reflected in their views: the child view controller’s view, if it is in the interface at all, is a subview (at some depth) of the parent view controller’s view.
The parent view controller is responsible for getting a child view controller’s view into the interface, by making it a subview of its own view, and (if necessary) for removing it later. Introduction of a view, removal of a view, and replacement of one view with another often involve a parent view controller managing its children and their views.
A familiar example is the navigation interface: the user taps something and new interface slides in from the side, replacing the current interface. Figure 6-1 shows the TidBITS News app displaying a typical iPhone interface, consisting of a list of story headlines and summaries. This interface is managed by a parent view controller (a UINavigationController) with a child view controller whose view is the list of headlines and summaries. If the user taps an entry in the list, the whole list will slide away to one side and the text of that story will slide in from the other side; the parent view controller has added a new child view controller, and has manipulated the views of its children to bring about this animated change of the interface. The parent view controller itself, meanwhile, stays put — and so does its own view, which functions as a stable superview of the child view controllers’ views.
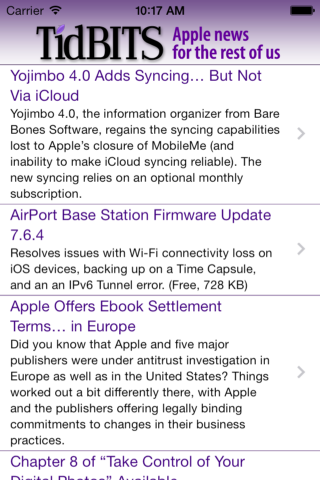
Figure 6-1. The TidBITS News app
- Presentation (modal views)
-
A view controller can present another view controller. The first view controller is the presenting view controller (not the parent) of the second; the second view controller is the presented view controller (not a child) of the first. The second view controller’s view replaces or covers, completely or partially, the first view controller’s view.
The name of this mechanism, and of the relationship between the view controllers involved, has changed over time. In iOS 4 and before, the presented view controller was called a modal view controller, and its view was a modal view; there is an analogy here to the desktop, where a window is modal if it sits in front of, and denies the user access to, the rest of the interface until it is explicitly dismissed. The terms presented view controller and presented view are more recent and more general, but the historical term “modal” still appears in the documentation and in the API.
A presented view controller’s view does indeed sometimes look rather like a desktop modal view; for example, it might have a button such as Done or Save for dismissing the view, the implication being that this is a place where the user must make a decision and can do nothing else until the decision is made. However, as I’ll explain later, that isn’t the only use of a presented view controller.
There is thus a hierarchy of view controllers. In a properly constructed iOS app, there should be exactly one root view controller, and it is the only nonsubordinate view controller — it has neither a parent view controller nor a presenting view controller. Any other view controller, if its view appears in the interface, must be either a child view controller of some parent view controller or a presented view controller of some presenting view controller.
Moreover, there is a clear relationship between the view hierarchy and the view controller hierarchy. Recall that, for a parent view controller and child view controller, the child’s view, if present in the interface, must be a subview of the parent’s view. Similarly, for a presenting view controller and presented view controller, the presented view controller’s view is either a subview of, or completely replaces, the presenting view controller’s view. In this way, the actual views of the interface form a hierarchy dictated by and parallel to some portion of the view controller hierarchy: every view visible in the interface owes its presence to a view controller’s view, either because it is a view controller’s view, or because it’s a subview of a view controller’s view.
The place of a view controller’s view in the view hierarchy will often be automatic. You might never need to put a UIViewController’s view into the view hierarchy manually. You’ll manipulate view controllers; their hierarchy and their built-in functionality will construct and manage the view hierarchy for you.
For example, in Figure 6-1, we see two interface elements:
-
The navigation bar, containing the TidBITS logo.
-
The list of stories, which is actually a UITableView.
I will describe how all of this comes to appear on the screen through the view controller hierarchy and the view hierarchy (Figure 6-2):
-
The app’s root view controller is a UINavigationController; the UINavigationController’s view is the window’s sole immediate subview (the root view). The navigation bar is a subview of that view.
-
The UINavigationController contains a second UIViewController — a parent–child relationship. The child is a custom UIViewController subclass; its view is what occupies the rest of the window, as another subview of the UINavigationController’s view. That view is the UITableView. This architecture means that when the user taps a story listing in the UITableView, the whole table will slide out, to be replaced by the view of a different UIViewController, while the navigation bar stays.

Figure 6-2. The TidBITS News app’s initial view controller and view hierarchy
In Figure 6-2, notice the word “automatic” in the two large right-pointing arrows associating a view controller with its view. This is intended to tell you how the view controller’s view became part of the view hierarchy. The UINavigationController’s view became the window’s subview automatically, by virtue of the UINavigationController being the window’s rootViewController. The custom UIViewController’s view became the UINavigationController’s view’s subview automatically, by virtue of the UIViewController being the UINavigationController’s child.
Sometimes, you’ll write your own parent view controller class. In that case, you will be doing the kind of work that the UINavigationController was doing in that example, so you will need to put a child view controller’s view into the interface manually, as a subview (at some depth) of the parent view controller’s view.
I’ll illustrate with another app of mine (Figure 6-3). The interface displays a flashcard containing information about a Latin word, along with a toolbar (the dark area at the bottom) where the user can tap an icon to choose additional functionality.
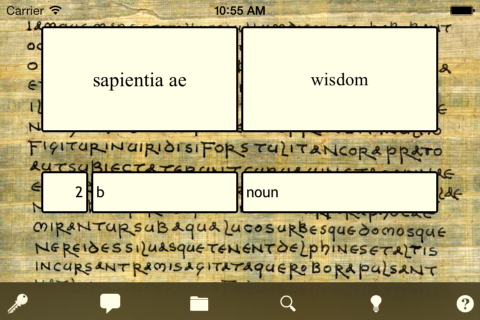
Figure 6-3. A Latin flashcard app
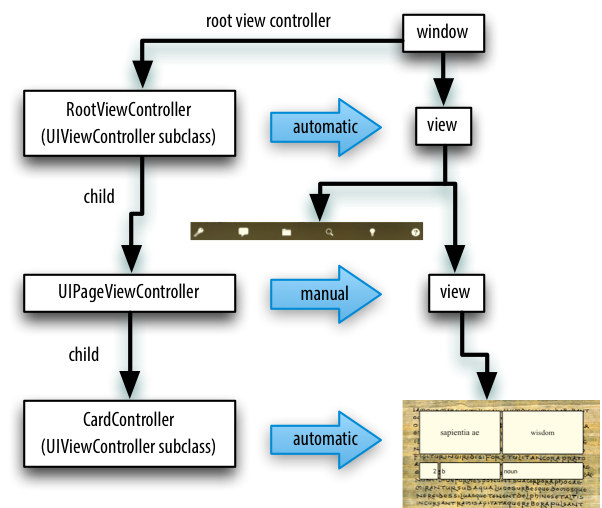
Figure 6-4. The Latin flashcard app’s initial view controller and view hierarchy
Again, I will describe how the interface shown in Figure 6-3 comes to appear on the screen through the view controller hierarchy and the view hierarchy (Figure 6-4). The app actually contains over a thousand of these Latin words, and I want the user to be able to navigate between flashcards to see the next or previous word; there is an excellent built-in view controller for this purpose, the UIPageViewController. However, that’s just for the card; the toolbar at the bottom stays there, so the toolbar can’t be inside the UIPageViewController’s view. Therefore:
-
The app’s root view controller is my own UIViewController subclass, which I call RootViewController; its view contains the toolbar, and is also to contain the UIPageViewController’s view. My RootViewController’s view becomes the window’s subview (the root view) automatically, by virtue of the RootViewController’s being the window’s
rootViewController. -
In order for the UIPageViewController’s view to appear in the interface, since it is not the root view controller, it must be some view controller’s child. There is only one possible parent — my RootViewController. My RootViewController must function as a custom parent view controller, with the UIPageViewController as its child. So I have made that happen, and I have therefore also had to put the UIPageViewController’s view manually into my RootViewController’s view.
-
I hand the UIPageViewController an instance of my CardController class (another UIViewController subclass) as its child, and the UIPageViewController displays the CardController’s view automatically.
Finally, here’s an example of a presented view controller. My Latin flashcard app has a second mode, where the user is drilled on a subset of the cards in random order; the interface looks very much like the first mode’s interface (Figure 6-5), but it behaves completely differently.
Figure 6-5. The Latin flashcard app, in drill mode

Figure 6-6. The Latin flashcard app’s drill mode view controller and view hierarchy
To implement this, I have another UIViewController subclass, DrillViewController; it is structured very much like RootViewController. When the user is in drill mode, a DrillViewController is being presented by the RootViewController, meaning that the DrillViewController’s interface takes over the screen automatically: the DrillViewController’s view, with its whole subview hierarchy, including the views of the DrillViewController’s children in the view controller hierarchy, replaces the RootViewController’s view and its whole subview hierarchy (Figure 6-6). The RootViewController and its hierarchy of child view controllers remains in place, but the corresponding view hierarchy is not in the interface; it will be returned to the interface automatically when we leave drill mode (because the presented DrillViewController is dismissed), and the situation will look like Figure 6-4 once again.
For any app that you write, for every moment in the lifetime of that app, you should be able to construct a diagram showing the hierarchy of view controllers and charting how each view controller’s view fits into the view hierarchy. The diagram should be similar to mine! The view hierarchy should run in neat parallel with the view controller hierarchy; there should be no crossed wires or orphan views. And every view controller’s view should be placed automatically into the view hierarchy, except in the following two situations:
-
The view controller is the child of your custom parent view controller. There is a complicated parent–child dance you have to do. See “Container View Controllers”.
-
You’re doing a custom transition animation. See “Custom Transition”.
View Controller Creation
A view controller is an instance like any other instance, and it is created like any other instance — by instantiating its class. You might perform this instantiation in code; in that case, you will of course have to initialize the instance properly as you create it. Here’s an example from one of my own apps:
let llc = LessonListController(terms: self.data)
let nav = UINavigationController(rootViewController: llc)
In that example, LessonListController is my own UIViewController subclass, so I have called its designated initializer, which I myself have defined; UINavigationController is a built-in UIViewController subclass, and I have used one of its convenience initializers.
Alternatively, a view controller instance might come into existence through the loading of a nib. To make it possible to get a view controller into the nib in the first place, view controllers are included among the object types available through the Object library in the nib editor.
It is legal, though in practice not common, for a .xib file to contain a view controller. A .storyboard file, on the other hand, is chock full of view controllers; view controllers are the basis of a storyboard’s structure, with each scene consisting of and corresponding to one view controller object. A view controller in a storyboard will go into a nib file in the built app, and that nib file will be loaded when the view controller instance is needed. Usually, that happens automatically. Nevertheless, a view controller in a storyboard is an ordinary nib object and, if it is to be used in the running app, will be instantiated through the loading of the nib just like any other nib object. I’ll give full details on how and why a view controller is instantiated from a storyboard later in this chapter.
Once a view controller comes into existence, it must be retained so that it will persist. This will happen automatically when the view controller is assigned a place in the view controller hierarchy that I described in the previous section. A view controller assigned as a window’s rootViewController is retained by the window. A view controller assigned as another view controller’s child is retained by the parent view controller. A presented view controller is retained by the presenting view controller. The parent view controller or presenting view controller then takes ownership, and will release the other view controller in good order when it is no longer needed.
Here’s an example, from one of my apps, of view controllers being instantiated and then being retained by being placed into the view controller hierarchy:
let llc = LessonListController(terms: self.data)let nav = UINavigationController(rootViewController: llc)
self.present(nav, animated: true)
That’s the same code I showed a moment ago, extended by one line. It comes from a view controller class called RootViewController. Here’s how view controller creation and memory management works in those three lines:
I instantiate LessonListController.
I instantiate UINavigationController, and I assign the LessonListController instance to the UINavigationController instance as its child; the navigation controller retains the LessonListController instance and takes ownership of it.

I present the UINavigationController instance on
self, a RootViewController instance; the RootViewController instance is the presenting view controller, and it retains and takes ownership of the UINavigationController instance as its presented view controller. The RootViewController instance itself is already the window’srootViewController, and is retained by the window — and so the view controller hierarchy is safely established.
All of this sounds straightforward, but it is worth dwelling on, because things can go wrong. It is quite possible, if things are mismanaged, for a view controller’s view to get into the interface while the view controller itself is allowed to go out of existence. This must not be permitted. If such a thing happens, at the very least the view will apparently misbehave, failing to perform its intended functionality, because that functionality is embodied by the view controller, which no longer exists. (I’ve made this mistake, so I speak from experience here.) If you instantiate a view controller in code, you should immediately ask yourself who will be retaining this view controller.
How a View Controller Obtains Its View
Initially, when it first comes into existence, a view controller has no view. A view controller is a small, lightweight object; a view is a relatively heavyweight object, involving interface elements that can occupy a significant amount of memory. Therefore, a view controller postpones obtaining its view until it has to do so, namely, when it is asked for the value of its view property. At that moment, if its view property is nil, the view controller sets about obtaining its view. (We say that a view controller loads its view lazily.) Typically, this happens because the time has come to put the view controller’s view into the interface.
In working with a newly instantiated view controller, be careful not to refer to its view property if you don’t need to, since this can trigger the view controller’s obtaining its view prematurely. (As usual, I speak from experience here.) To learn whether a view controller has a view without causing it to load its view, consult its isViewLoaded property. You can refer to a view controller’s view safely, without loading it, as its viewIfLoaded (an Optional); you can also cause the view controller to load its view explicitly, rather than as a side effect of mentioning its view, by calling loadViewIfNeeded.
As soon as a view controller has its view, its viewDidLoad method is called. If this view controller is an instance of your own UIViewController subclass, viewDidLoad is your opportunity to modify the contents of this view — to populate it with subviews, to tweak the subviews it already has, and so forth — as well as to perform other initializations of the view controller consonant with its acquisition of a view. The view property is now pointing to the view, so it is safe to refer to self.view. Bear in mind, however, that the view may not yet be part of the interface! In fact, it almost certainly is not. (To confirm this, check whether self.view.window is nil.) Thus, for example, you cannot necessarily rely on the dimensions of the view at this point to be the dimensions that the view will assume when it becomes visible in the interface. Performing certain customizations prematurely in viewDidLoad is a common beginner mistake. I’ll have more to say about that later in the chapter.
Before viewDidLoad will be called, however, the view controller must obtain its view. The question of where and how the view controller will get its view is often crucial. In some cases, to be sure, you won’t care about this; in particular, when a view controller is an instance of a built-in UIViewController subclass such as UINavigationController or UITabBarController, its view is out of your hands — you might never even have cause to refer to this view over the entire course of your app’s lifetime — and you simply trust that the view controller will somehow generate its view. But when the view controller is an instance of your own subclass of UIViewController, and when you yourself will design or modify its view, it becomes essential to understand the process whereby a view controller gets its view.
This process is not difficult to understand, but it is rather elaborate, because there are multiple possibilities. Most important, this process is not magic. Yet it quite possibly causes more confusion to beginners than any other matter connected with iOS programming. Therefore, I will explain it in detail. The more you know about the details of how a view controller gets its view, the deeper and clearer will be your understanding of the entire workings of your app, its view controllers, its .storyboard and .xib files, and so on.
The main alternatives are as follows:
-
The view may be instantiated in the view controller’s own code, manually.
-
The view may be created as an empty generic view, automatically.
-
The view may be loaded from a nib file.
In the rest of this section, I’ll demonstrate each of these three ways in which a view controller can obtain its view. For purposes of the demonstration, we’ll need a view controller that we instantiate manually (as opposed to a view controller that comes automatically from a storyboard, as explained in the next section). Since I haven’t yet described how to do anything with a view controller other than make it the window’s rootViewController, this view controller will be the window’s rootViewController. If you want to follow along with hands-on experimentation, you can start with a clean project created from the Single View app template. The template includes a storyboard and a UIViewController subclass called ViewController, but we’re going to ignore both of those, behaving as if the storyboard didn’t exist: we’ll create our own UIViewController subclass instance — which I’ll call RootViewController — and make it the root view controller (as described in Chapter 1 and Appendix B). When you launch the project, you’ll see RootViewController’s view, thus proving that the view controller has successfully obtained its view.
Manual View
To supply a UIViewController’s view manually, in code, override its loadView method. Your job here is to obtain an instance of UIView (or a subclass of UIView) and assign it to self.view. You must not call super (for reasons that I’ll make clear later on).
Let’s try it:
-
We need a UIViewController subclass, so choose File → New → File; specify iOS → Source → Cocoa Touch Class. Click Next.
-
Name the class RootViewController, and specify that it is to be a UIViewController subclass. Uncheck “Also create XIB file” (if it happens to be checked). Click Next.
-
Confirm that we’re saving into the appropriate folder and group, and that these files will be part of the app target. Click Create.
We now have a RootViewController class, and we proceed to edit its code. In RootViewController.swift, we’ll implement loadView. To convince ourselves that the example is working correctly, we’ll give the view that we create manually an identifiable color, and we’ll put some interface inside it, namely a “Hello, World” label:
override func loadView() {
    let v = UIView()
    v.backgroundColor = .green
    self.view = v
    let label = UILabel()
    v.addSubview(label)
    label.text = "Hello, World!"
    label.autoresizingMask = [
        .flexibleTopMargin,
        .flexibleLeftMargin,
        .flexibleBottomMargin,
        .flexibleRightMargin]
    label.sizeToFit()
    label.center = CGPoint(v.bounds.midX, v.bounds.midY)
    label.frame = label.frame.integral
}
In order to see that that code works, we need to instantiate RootViewController and place that instance into our view controller hierarchy. As I explained a moment ago, we’ll do that by making RootViewController the app’s root view controller. Edit AppDelegate.swift to look like this:
import UIKit
@UIApplicationMain
class AppDelegate : UIResponder, UIApplicationDelegate {
    var window : UIWindow?
    func application(_ application: UIApplication,
        didFinishLaunchingWithOptions
        launchOptions: [UIApplicationLaunchOptionsKey : Any]?)
        -> Bool {
            self.window = self.window ?? UIWindow()
            let theRVC = RootViewController() // *
            self.window!.rootViewController = theRVC // *
            self.window!.backgroundColor = .white
            self.window!.makeKeyAndVisible()
            return true
        }
}
The two starred lines are the key: we instantiate RootViewController and make that instance the app’s root view controller. Build and run the app. Sure enough, there’s our green background and our “Hello, world” label!
When we created our view controller’s view (self.view), we never gave it a reasonable frame. This is because we are relying on someone else to frame the view appropriately. In this case, the “someone else” is the window, which responds to having its rootViewController property set to a view controller by framing the view controller’s view appropriately as the root view before putting it into the window as a subview. In general, it is the responsibility of whoever puts a view controller’s view into the interface to give the view the correct frame — and this will never be the view controller itself (although under some circumstances the view controller can express a preference in this regard). Indeed, the size of a view controller’s view may be changed as it is placed into the interface, and you must keep in mind, as you design your view controller’s view and its subviews, that this can happen. (That’s why, in the preceding code, I used autoresizing to keep the label centered in the view, no matter how the view may be resized.)
Generic Automatic View
We should distinguish between creating a view and populating it. The preceding example fails to draw this distinction. The lines that create our RootViewController’s view are merely these:
let v = UIView()
self.view = v
Everything else configures and populates the view, turning it green and putting a label into it. A more appropriate place to populate a view controller’s view is its viewDidLoad implementation, which, as I’ve already mentioned, is called after the view exists and can be referred to as self.view. We could therefore rewrite the preceding example like this (just for fun, I’ll use autolayout this time):
override func loadView() {
    let v = UIView()
    self.view = v
}
override func viewDidLoad() {
    super.viewDidLoad()
    let v = self.view!
    v.backgroundColor = .green
    let label = UILabel()
    v.addSubview(label)
    label.text = "Hello, World!"
    label.translatesAutoresizingMaskIntoConstraints = false
    NSLayoutConstraint.activate([
        label.centerXAnchor.constraint(equalTo:v.centerXAnchor),
        label.centerYAnchor.constraint(equalTo:v.centerYAnchor)
    ])
}
But if we’re going to do that, we can go even further and remove our implementation of loadView entirely! It turns out that if you don’t implement loadView, and if no view is supplied in any other way, then UIViewController’s default implementation of loadView will do exactly what we are doing: it creates a generic UIView object and assigns it to self.view.
If we needed our view controller’s view to be a particular UIView subclass, that wouldn’t be acceptable; but in this case, our view controller’s view is a generic UIView object, so it is acceptable. Comment out or delete the entire loadView implementation from the preceding code, and build and run the app; our example still works!
View in a Separate Nib
In the preceding examples, we supplied and designed our view controller’s view in code. That works, but of course we’re missing out on the convenience of configuring and populating the view by designing it graphically in Xcode’s nib editor. So now let’s see how a view controller can obtain its view, ready-made, from a nib file.
To make this work, the nib file must be properly configured in accordance with the demands of the nib-loading mechanism. The view controller instance will already have been created. It will load the nib, setting itself as the nib’s owner. The nib itself must be prepared to match this situation. In the nib, the owner object must have same class as the view controller, and its view outlet must point to the view object in the nib. Thus, when the view controller loads the nib, it automatically obtains its view through the nib-loading mechanism!
Tip
For details of the nib-loading mechanism, see my other book, iOS 10 Programming Fundamentals with Swift.
Suppose the nib is a .xib file. (Storyboards are discussed in the next section.) In a .xib file, the owner object is the File’s Owner proxy object. Therefore, in a .xib file that is to serve as the source of a view controller’s view, the following two things must be true:
-
The File’s Owner class must be set to a UIViewController subclass corresponding to the class of the view controller whose view this will be. This will also cause the File’s Owner to have a
viewoutlet. -
The File’s Owner proxy object’s
viewoutlet must be connected to the view.
Let’s try it. We can use the example we’ve already developed, with our RootViewController class. Delete the implementation of loadView (if you haven’t already) and viewDidLoad from RootViewController.swift, because we want the view to come from a nib and we’re going to populate it in the nib. Then:
-
Choose File → New → File and specify iOS → User Interface → View. This will be a .xib file containing a UIView object. Click Next.
-
Name the file MyNib (meaning MyNib.xib). Confirm the appropriate folder and group, and make sure that the file will be part of the app target. Click Create.
-
Edit MyNib.xib. Prepare it in the way I described a moment ago:
-
Select the File’s Owner object; in the Identity inspector, set its class to RootViewController.
-
Connect the File’s Owner
viewoutlet to the View object.
-
-
Design the view. To make it clear that this is not the same view we were creating previously, perhaps you should give the view a red background color (in the Attributes inspector). Drag a UILabel into the middle of the view and give it some text, such as “Hello, World!”
When our RootViewController instance wants its view, we want it to load the MyNib nib. To make it do that, we must associate this nib with our RootViewController instance. Recall these two lines from application(_:didFinishLaunchingWithOptions:) in AppDelegate.swift:
let theRVC = RootViewController()
self.window!.rootViewController = theRVC
We’re going to change the first of those two lines. A UIViewController has a nibName property that tells it what nib, if any, it should load to obtain its view. However, we are not allowed to set the nibName property of theRVC (it is read-only). Instead, as we instantiate the view controller, we use the designated initializer, init(nibName:bundle:), like this:
let theRVC = RootViewController(nibName:"MyNib", bundle:nil)
self.window!.rootViewController = theRVC
(The nil argument to the bundle: parameter specifies the main bundle, which is almost always what you want.)
To prove that this works, build and run. The red background appears! Our view is loading from the nib.
Now I’m going to describe a shortcut, based on the name of the nib. It turns out that if the nib name passed to init(nibName:bundle:) is nil, a nib will be sought automatically with the same name as the view controller’s class. Moreover, UIViewController’s init() turns out to be a convenience initializer: it actually calls init(nibName:bundle:), passing nil for both arguments.
This means, in effect, that we can return to using init() to initialize the view controller, provided that the nib file’s name matches the name of the view controller class.
Let’s try it. Rename MyNib.xib to RootViewController.xib, and change the code that instantiates and initializes our RootViewController back to what it was before:
let theRVC = RootViewController()
self.window!.rootViewController = theRVC
Build and run. It works!
Warning
The automatic search for an eponymous nib fails in iOS 8 (for code written in Swift). Workarounds are provided in earlier editions of this book.
There’s an additional aspect to this shortcut based on the name of the nib. It seems ridiculous that we should end up with a nib that has “Controller” in its name merely because our view controller, as is so often the case, has “Controller” in its name. A nib, after all, is not a controller. It turns out that the runtime, in looking for a view controller’s corresponding nib, will in fact try stripping “Controller” off the end of the view controller class’s name. Thus, we can name our nib file RootView.xib instead of RootViewController.xib, and it will still be properly associated with our RootViewController instance.
When we created our UIViewController subclass, RootViewController, we saw in the Xcode dialog a checkbox offering to create an eponymous .xib file at the same time: “Also create XIB file.” We deliberately unchecked it. Suppose we had checked it; what would have happened? In that case, Xcode would have created RootViewController.swift and RootViewController.xib. Moreover, it would have configured RootViewController.xib for us: the File’s Owner’s class would already be set to the view controller’s class, RootViewController, and its view outlet would already be hooked up to the view. Thus, this view controller and .xib file are ready for use together: you instantiate the view controller with a nil nib name, and it gets its view from the eponymous nib.
Tip
The .xib file created by Xcode in response to checking “Also create XIB file” does not have “Controller” stripped off the end of its name; you can rename it manually later (I generally do) if the default name bothers you.
Another convention involving the nib name has to do with the rules for loading resources by name generally. The same naming rule that I mentioned in Chapter 2 for an image file extended by the suffix ~ipad applies to nib files. A nib file named RootViewController~ipad.xib will be loaded on an iPad when a nib named "RootViewController" is sought. This principle can greatly simplify your life when you’re writing a universal app, as you can easily use one nib on iPhone and another nib on iPad — though you might not need to do that, since conditional interface design, described in Chapter 1, may permit you to construct an interface differing on iPad and iPhone in a single nib.
Summary
We are now in a position to summarize the sequence whereby a view controller’s view is obtained. It turns out that the entire process is driven by loadView:
-
When the view controller first decides that it needs its view,
loadViewis always called:-
If we override
loadView, we supply and set theviewin code, and we do not callsuper. Therefore the process of seeking a view comes to an end. -
If we don’t override
loadView, UIViewController’s built-in default implementation ofloadViewtakes over, and performs the rest of the process.
-
-
UIViewController’s default implementation of
loadViewlooks for a nib:-
If the view controller was instantiated with an explicit
nibName:, a nib with that name is sought, and the process comes to an end. (If there is no such nib, the app will crash at launch.) -
If the view controller was instantiated with a nil
nibName:, then:-
An eponymous nib is sought. If it is found, it is loaded and the process comes to an end.
-
If the view controller’s name ends in “Controller,” an eponymous nib without the “Controller” is sought. If it is found, it is loaded and the process comes to an end.
-
-
-
If we reach this point, UIViewController’s default implementation of
loadViewcreates a generic UIView.
How Storyboards Work
By default, a storyboard uses the third approach to supply a view controller with its view: the view is loaded from a nib. To understand how this works, distinguish between what you see in a storyboard and what really happens. A scene in a storyboard looks like a view controller’s view. Actually, if you look more closely at what the scene represents, it is a view controller and its view. When the app is built and the storyboard is compiled into a .storyboardc bundle, the scene is split into two nibs:
- View controller nib
-
The first nib contains just the view controller. This works because a view controller can itself be a nib object.
- View nib
-
The second nib contains the view, its subviews, and any other top-level objects such as gesture recognizers. The view nib has a special name, such as 01J-lp-oVM-view-Ze5-6b-2t3.nib. It is correctly configured: its File’s Owner class is the view controller’s class, with its
viewoutlet hooked to the view.
We can thus divide the tale of how storyboards work into two phases, corresponding to how each of those nibs gets loaded.
How a View Controller Nib is Loaded
To instantiate a view controller from a storyboard’s view controller nib, we have only to load that nib. The view controller is the nib’s sole top-level object. Loading a nib provides a reference to the instances that come from the nib’s top-level objects, so now we have a reference to the view controller instance.
Loading a view controller nib from a storyboard starts with a reference to the storyboard. You can get a reference to a storyboard either by calling the UIStoryboard initializer init(name:bundle:) or through the storyboard property of a view controller that has already been instantiated from that storyboard.
When a view controller instance stored in a storyboard nib is needed, the nib can be loaded and the view controller instantiated in one of four main ways:
- Initial view controller
-
At most one view controller in the storyboard is designated the storyboard’s initial view controller (also called its entry point). To instantiate that view controller, call the UIStoryboard instance method
instantiateInitialViewController. The view controller instance is returned.For an app with main storyboard, that happens automatically at launch time. The main storyboard is designated the app’s main storyboard by the Info.plist key “Main storyboard file base name” (
UIMainStoryboardFile). As the app launches,UIApplicationMaingets a reference to this storyboard by calling the UIStoryboard initializerinit(name:bundle:), instantiates its initial view controller by callinginstantiateInitialViewController, and makes that instance the window’srootViewController. - By identifier
-
A view controller in a storyboard can be assigned an arbitrary string identifier; this is its Storyboard ID in the Identity inspector. To instantiate that view controller, call the UIStoryboard instance method
instantiateViewController(withIdentifier:). The view controller instance is returned. - By relationship
-
A parent view controller in a storyboard may have immediate children, such as a UINavigationController and its initial child view controller. The nib editor will show a relationship connection between them. When the parent is instantiated (the source of the relationship), the initial children (the destination of the relationship) are instantiated automatically at the same time.
- By triggered segue
-
A view controller in a storyboard may be (or may contain) the source of a segue whose destination is a future child view controller or a future presented view controller. When the segue is triggered and performed, it instantiates the destination view controller.
Thus, you can set up your app in such a way that a storyboard is the source of every view controller that your app will ever instantiate. Indeed, by starting with a main storyboard and by configuring relationships and triggered segues in the storyboard, you can arrange that every view controller your app will ever need will be instantiated automatically. One downside to that sort of configuration is that the storyboard can become large and overwhelming. To prevent that from happening, you can use a storyboard for some view controllers but instantiate other view controllers in code (perhaps getting their views from corresponding .xib files). Another way to keep storyboards small is to have multiple storyboards containing different view controllers; in fact, a segue in one storyboard can lead through a storyboard reference to a view controller in another storyboard, which will then be loaded automatically.
I’ll go into much greater detail about storyboards and segues and storyboard references later in this chapter.
How a View Nib is Loaded
One way or another, a view controller has now been instantiated from its storyboard nib — but its view has not. Views are loaded lazily, as we know. Sooner or later, the view controller will probably want its view (typically because it is time to put that view into the interface). How will it get it?
Recall that the view nib has been assigned a special name. Well, there’s something I didn’t tell you: the view controller, in its nib, was handed that special name, so that when it was instantiated, its nibName property was set to the name of the view nib.
Thus, when the view controller wants its view, it loads it in the normal way! It has a non-nil nibName, so it looks for a nib by that name — and finds it. The nib is loaded and the view becomes the view controller’s view.
This is true for every scene. A storyboard consists ultimately of pairs of nib files, each pair consisting of a view controller and its view. As a result, a storyboard has all the memory management advantages of nib files: none of these nib files are loaded until the instances that they contain are needed, and they can be loaded multiple times to give additional instances of the same nib objects. At the same time, you get the convenience of being able to see and edit a lot of your app’s interface simultaneously in one place.
You don’t have to use the default scene structure in a storyboard. The default is that a view controller in a storyboard scene contains its view — but you can delete the view. If you do, then that view controller will obtain its view in any of the other ways we’ve already discussed: by an implementation of loadView in the code of that view controller class, or by loading an eponymous nib file (which you supply as a .xib file) — or even, if all of that fails, by creating a generic UIView.
Warning
There’s no way in a .storyboard file to specify, as the source of a view controller’s view, a .xib file with a different name from the view controller’s class; the nib editor lacks the NIB Name field in a view controller’s Attributes inspector when you’re working in a storyboard. I presume that this is because Apple fears you might break the automatic relationship between a view controller and its specially named view nib.
View Resizing
A view controller’s view is likely to be resized:
-
When it is put into the interface
-
When the app rotates
-
When the surrounding interface changes; for example, when a navigation bar gets taller or shorter, appears or disappears
Other views can be resized as well, of course, but typically this is a direct consequence of the resizing of a view controller’s view, of which they are subviews. Apple describes views and view controllers as adaptive to size changes.
Because a view controller is a controller, it is typically the locus of logic for helping the interface to cope with all this resizing. A view controller has properties and receives events connected to the resizing of its view, so that it can respond when such resizing takes place, and can even help dictate the arrangement of the interface if needed.
View Size in the Nib Editor
When you design your interface in the nib editor, every view controller’s view has to be displayed at some definite size. But that size may not be the size at which the view will appear at runtime. If you design the interface only for the size you see in the nib editor, you can get a rude surprise when you actually run the app and the view appears at some other size. Failing to take account of this possibility is a common beginner mistake. On the contrary, you should assume that the size at which a view controller’s main view is portrayed in the nib editor canvas is probably not the size it will assume at runtime.
In the nib editor, you can display the view at the size of any actual device. You can also specify an orientation. Using the Simulated Metrics pop-up menus in the Attributes inspector, you can even adjust for the presence or absence of interface elements that can affect layout (status bar, top bar, bottom bar). But no single device size, orientation, or metrics can reflect all the possible sizes the view may assume when the app runs on different devices, in different orientations, and with different surroundings.
To compensate for this uncertainty, you should take advantage of autolayout, along with conditional interface (see “Conditional Interface Design”), together with the nib editor’s ability to switch between displaying different device sizes (using the View As button at the lower left of the canvas), to make sure that your layout is coming out as you hope in every size and orientation. Your code can also take a hand in layout, and later in this chapter I’ll talk about where you might put such code; in that case you’ll probably need to run in the simulators of different device sizes to see your code at work.
Bars and Underlapping
A view controller’s view will often have to adapt to the presence of bars at the top and bottom of the screen:
- The status bar is underlapped
-
The status bar is transparent, so that the region of a view behind it is visible through it. The root view, and any other fullscreen view, must occupy the entire window, including the status bar area, the top of the view being visible behind the transparent status bar. You’ll want to design your view so that its top doesn’t contain any interface objects that will be overlapped by the status bar.
- Top and bottom bars may be underlapped
-
The top and bottom bars displayed by a navigation controller (navigation bar, toolbar) or tab bar controller (tab bar) can be translucent. When they are, your view controller’s view is, by default, extended behind the translucent bar, underlapping it. Again, you’ll want to design your view so that this underlapping doesn’t conceal any of your view’s important interface.
The status bar may be present or absent. Top and bottom bars may be present or absent, and, if present, their height can change. How will your interface cope with such changes? The primary coping mechanism is the view controller’s layout guides.
Recall (from Chapter 1) that a view controller supplies two properties, its topLayoutGuide and its bottomLayoutGuide. The edges of these guide objects move automatically at runtime to reflect the view’s environment:
topLayoutGuide-
The
topLayoutGuide’s bottom is positioned as follows:-
If there is a status bar and no top bar, at the bottom of the status bar.
-
If there is a top bar, at the bottom of the top bar.
-
If there is no top bar and no status bar, at the top of the view.
-
bottomLayoutGuide-
The
bottomLayoutGuide’s top is positioned as follows:-
If there is a bottom bar, at the top of the bottom bar.
-
If there is no bottom bar, at the bottom of the view.
-
The easiest way to involve the layout guides in your view layout is through autolayout and constraints. By constraining a view by its top to the bottom of the topLayoutGuide, or by its bottom to the top of the bottomLayoutGuide, you guarantee that the view will move when the layout guide changes. Such constraints are easy to form in the nib editor — they are the default. When you’re using anchor notation for creating a constraint in code, you’ll use the topLayoutGuide’s bottomAnchor and the bottomLayoutGuide’s topAnchor.
If you need actual numbers in order to perform layout-related calculations, a layout guide’s spacing from the corresponding edge of the view controller’s main view is reported by its length property. If you are constructing a constraint relative to the height of a layout guide, you can use its heightAnchor property.
Warning
The layout guides are subviews of the view controller’s main view, imposed by the view controller. Do not assume that the subviews you add to a view controller’s main view are its only subviews!
Status bar visibility
The default behavior of the status bar is that it is present, except in landscape orientation on an iPhone, where it is absent. The root view controller, as I mentioned at the start of this chapter, gets a say in this behavior; it also determines the look of the status bar when present. Your UIViewController subclass can override any of the following properties (your override will be a computed variable with a getter function):
preferredStatusBarStyle-
Your choices (UIStatusBarStyle) are
.defaultand.lightContent, meaning dark text and light text, respectively. Use light text for legibility if the view content underlapping the status bar is dark. prefersStatusBarHidden-
A value of
truemakes the status bar invisible; a value offalsemakes the status bar visible, even in landscape orientation on an iPhone. (Your getter can return the result of a call tosuperto get the default behavior.) childViewControllerForStatusBarStylechildViewControllerForStatusBarHidden-
Used to delegate the decision on the status bar style or visibility to a child view controller’s
preferredStatusBarStyleorprefersStatusBarHidden. For example, a tab bar controller implements these properties to allow your view controller to decide the status bar style and visibility when your view controller’s view occupies the tab bar controller’s view. Thus, your view controller gets to make the decisions even though the tab bar controller is the root view controller.
You are not in charge of when these properties are consulted, but you can provide a nudge: if the situation has changed and one of these properties would now give a different answer, call setNeedsStatusBarAppearanceUpdate on your view controller. If this call is inside an animations function, the change in the look of the status bar will be animated with the specified duration. The character of the animation from visible to invisible (and vice versa) is set by your view controller’s override of preferredStatusBarUpdateAnimation; the value you return (UIStatusBarAnimation) can be .fade, .slide, or .none.
When you toggle the visibility of the status bar, the top layout guide will move up or down by 20 points. If your main view has subviews with constraints to the top layout guide, those subviews will move. If this happens when the main view is visible, the user will see this movement as a jump. That is probably not what you want. To prevent it, call layoutIfNeeded on your view in the same animations function in which you call setNeedsStatusBarAppearanceUpdate; your layout update will then be animated together with the change in status bar visibility. In this example, a button’s action method toggles the visibility of the status bar with smooth animation:
var hide = false
override var prefersStatusBarHidden : Bool {
    return self.hide
}
@IBAction func doButton(_ sender: Any) {
    self.hide = !self.hide
    UIView.animate(withDuration:0.4) {
        self.setNeedsStatusBarAppearanceUpdate()
        self.view.layoutIfNeeded()
    }
}
Extended layout
If your UIViewController’s parent is a navigation controller or tab bar controller, you can govern whether its view underlaps a top bar (navigation bar) or bottom bar (toolbar, tab bar) with these UIViewController properties:
edgesForExtendedLayout-
A UIRectEdge. The default is
.all, meaning that this view controller’s view will underlap a translucent top bar or a translucent bottom bar. The other extreme is.none, meaning that this view controller’s view won’t underlap top and bottom bars. Other possibilities are.top(underlap translucent top bars only) and.bottom(underlap translucent bottom bars only). extendedLayoutIncludesOpaqueBars-
If
true, then ifedgesForExtendedLayoutpermits underlapping of bars, those bars will be underlapped even if they are opaque. The default isfalse, meaning that only translucent bars are underlapped.
Resizing Events
A UIViewController receives events that notify it of pending view size changes. (Trait collections, size classes, and view layout events were discussed in Chapter 1.)
The following events are associated primarily with rotation of the interface (as well as with iPad multitasking; see Chapter 9); UIViewController receives them by virtue of adopting the appropriate protocol:
willTransition(to:with:)(UIContentContainer protocol)-
The first parameter is the new trait collection (a UITraitCollection). Sent when the app is about to undergo a change in the trait collection (because the size classes will change). Common examples are rotation of 90 degrees on an iPhone, or a change between fullscreen and splitscreen on an iPad. This event is not sent on launch or when your view controller’s view is first embedded into the interface. If you override this method, call
super. viewWillTransition(to:with:)(UIContentContainer protocol)-
The first parameter is the new size (a CGSize). Sent when the app is about to undergo rotation (even if the rotation turns out to be 180 degrees and the size won’t actually change) or an iPad multitasking size change. The old size is still available as
self.view.bounds.size. This event is not sent on launch or when your view controller’s view is first embedded into the interface. If you override this method, callsuper. traitCollectionDidChange(_:)(UITraitEnvironment protocol)-
Sent after the trait collection changes. The parameter is the old trait collection; the new trait collection is available as
self.traitCollection. Sent after the trait collection changes, including on launch or when the trait collection is set for the first time (in which case the old trait collection will benil).
(The with: parameter in the first two methods is a transition coordinator; I’ll describe its use later in this chapter.)
In addition, a UIViewController receives these events related to the layout of its view:
updateViewConstraints-
The view is about to be told to update its constraints (
updateConstraints), including at application launch. If you override this method, callsuper. viewWillLayoutSubviewsviewDidLayoutSubviews-
These events surround the moment when the view is sent
layoutSubviews, including at application launch.
In a situation where all these events are sent, the order is:
-
willTransition(to:with:)(the trait collection) -
viewWillTransition(to:with:)(the size) -
updateViewConstraints -
traitCollectionDidChange(_:) -
viewWillLayoutSubviews -
viewDidLayoutSubviews
There is no guarantee that any of these events, if sent, will be sent exactly once. Your code should take some care to do nothing if nothing relevant has changed.
Warning
Your view can be resized under many circumstances, such as the showing and hiding of a navigation bar that isn’t underlapped, without viewWillTransition(to:with:) being sent. Thus, to detect these changes, you’ll have to fall back on layout events such as viewWillLayoutSubviews. I regard this as a flaw in the iOS view controller event architecture.
Rotation
Your app can rotate, moving its top to correspond to a different edge of the device’s screen. Rotation expresses itself in two ways:
- The status bar orientation changes
-
You can hear about this (though this will rarely be necessary) by way of these app delegate events and notifications:
-
application(_:willChangeStatusBarOrientation:duration:) -
.UIApplicationWillChangeStatusBarOrientationnotification -
application(_:didChangeStatusBarOrientation:) -
.UIApplicationDidChangeStatusBarOrientationnotification
The current orientation (which is also the app’s current orientation) is available from the UIApplication as its
statusBarOrientation; the app delegate methods also provide the other orientation (the one we are changing to or from, respectively) as the second parameter. Possible values (UIInterfaceOrientation) are:-
.portrait -
.portraitUpsideDown -
.landscapeLeft -
.landscapeRight
Two global convenience functions,
UIInterfaceOrientationIsLandscapeandUIInterfaceOrientationIsPortrait, take a UIInterfaceOrientation and return a Bool. -
- The view controller’s view is resized
-
The view controller receives events related to resizing, as I described in the preceding section. These may or may not include a change in the trait collection. Thus, the most general way to learn that rotation is taking place is by detecting the size change, through
viewWillTransition(to:with:). On the other hand, you are more likely to care about a 90 degree rotation on an iPhone than any other kind of rotation, and in that case detection of the trait collection change, throughwillTransition(to:with:), may be appropriate.
There are two complementary uses for rotation:
- Compensatory rotation
-
The app rotates to compensate for the orientation of the device, so that the app appears right way up with respect to how the user is holding the device.
- Forced rotation
-
The app rotates when a particular view appears in the interface, or when the app launches, to indicate that the user needs to rotate the device in order to view the app the right way up. This is typically because the interface has been specifically designed, in the face of the fact that the screen is not square, to appear in just one orientation (portrait or landscape).
In the case of the iPhone, no law says that your app has to perform compensatory rotation. Most of my iPhone apps do not do so; indeed, I have no compunction about doing just the opposite, namely forced rotation. My view controller views often look best in just one orientation (either just portrait or just landscape), and they stubbornly stay there regardless of how the user holds the device. A single app may contain view controller views that work best in different orientations; thus, my app forces the user to rotate the device differently depending on what view is being displayed. This is reasonable, because the iPhone is small and easily reoriented with a twist of the user’s wrist, and it has a natural right way up. iPhone apps do not generally rotate to an upside-down orientation, because the user is unlikely to hold the device that way.
On the other hand, Apple thinks of an iPad as having no natural top, and would prefer iPad apps to rotate to at least two opposed orientations (such as portrait with the button on the bottom and portrait with the button on the top), and preferably to all four possible orientations, so that the user isn’t restricted in how the device is held.
It’s trivial to let your app rotate to two opposed orientations, because once the app is set up to work in one of them, it can work with no change in the other. But allowing a single interface to rotate between two orientations that are 90 degrees apart is trickier, because its dimensions must change — roughly speaking, its height and width are transposed — and this may require a change of layout and might even call for more substantial alterations, such as removal or addition of part of the interface. A good example is the behavior of Apple’s Mail app on the iPad: in landscape, the master pane and the detail pane appear side by side, but in portrait, the master pane is removed and must be summoned as a temporary overlay on top of the detail pane.
Permitting compensatory rotation
By default, when you create an Xcode project, the resulting app will perform compensatory rotation in response to the user’s rotation of the device. For an iPhone app, this means that the app can appear with its top at the top of the device or either of the two sides of the device. For an iPad app, this means that the app can assume any orientation.
If the default behavior isn’t what you want, it is up to you to change it. There are three levels at which you can make changes:
-
The app itself, in its Info.plist, may declare once and for all every orientation the interface will ever be permitted to assume. It does this under the “Supported interface orientations” key,
UISupportedInterfaceOrientations(supplemented, for a universal app, by “Supported interface orientations (iPad),”UISupportedInterfaceOrientations~ipad). These keys can be set through checkboxes when you edit the app target, in the General tab. -
The app delegate may implement the
application(_:supportedInterfaceOrientationsFor:)method, returning a bitmask listing every orientation the interface is permitted to assume. This list overrides the Info.plist settings. Thus, the app delegate can do dynamically what the Info.plist can do only statically.application(_:supportedInterfaceOrientationsFor:)is called at least once every time the device rotates. -
The top-level view controller — that is, the root view controller, or a view controller presented fullscreen — may override the
supportedInterfaceOrientationsproperty, returning a bitmask listing a set of orientations that intersects the set of orientations permitted by the app or the app delegate. The resulting intersection will then be the set of orientations permitted at that moment. This intersection must not be empty; if it is, your app will crash (with a useful message: “Supported orientations has no common orientation with the application”).supportedInterfaceOrientationsis consulted at least once every time the device rotates.The top-level view controller can also override
shouldAutorotate. This is a Bool, and the default istrue.shouldAutorotateis consulted at least once every time the device rotates; if it returnsfalse, the interface will not rotate to compensate at this moment, andsupportedInterfaceOrientationsis not consulted.
Warning
Built-in parent view controllers, when they are the top-level view controller, do not automatically consult their children about rotation. If your view controller is a child view controller of a UITabBarController or a UINavigationController, it has no direct say in how the app rotates. Those parent view controllers, however, do consult their delegates about rotation, as I’ll explain later.
A UIViewController class method attemptRotationToDeviceOrientation prompts the runtime to do immediately what it would do if the user were to rotate the device, namely to walk the three levels I’ve just described and, if the results permit rotation of the interface to match the current device orientation, to rotate the interface. This would be useful if, say, your view controller had previously returned false from shouldAutorotate, but is now for some reason prepared to return true and wants to be asked again, immediately.
The bitmask you return from application(_:supportedInterfaceOrientationsFor:) or supportedInterfaceOrientations is a UIInterfaceOrientationMask. It may be one of these values, or multiple values combined:
-
.portrait -
.landscapeLeft -
.landscapeRight -
.portraitUpsideDown -
.landscape(a combination of.leftand.right) -
.all(a combination of.portrait,.upsideDown,.left, and.right) -
.allButUpsideDown(a combination of.portrait,.left, and.right)
For example:
override var supportedInterfaceOrientations : UIInterfaceOrientationMask {
    return .portrait
}
If your code needs to know the current physical orientation of the device (as opposed to the current orientation of the app), it can ask the device:
let orientation = UIDevice.current.orientation
Possible results (UIDeviceOrientation) are .unknown, .portrait, and so on. Global convenience functions UIDeviceOrientationIsPortrait and UIDeviceOrientationIsLandscape take a UIDeviceOrientation and return a Bool.
Warning
Because of the iPad multitasking architecture (Chapter 9), an iPad app that doesn’t permit all four orientations must include in its Info.plist the UIRequiresFullScreen key with a value of YES, so as to opt out of multitasking. Moreover, if the app’s Info.plist does not include UIRequiresFullScreen and does permit all four orientations, then supportedInterfaceOrientations and shouldAutorotate are never consulted, presumably because the answer is known in advance.
Initial orientation
I’ve talked about how to determine what orientations your app can support in the course of its lifetime; but what about its initial orientation, the very first orientation your app will assume when it launches?
On the iPad, an app has no fixed initial orientation. iPad apps are supposed to be more or less orientation-agnostic, so the app will launch into whatever permitted orientation is closest to the device’s current orientation at launch time.
An iPhone app would like to launch into portrait, but it may launch into landscape for various reasons, depending on how the device is held and whether the Info.plist includes portrait orientation (UIInterfaceOrientationPortrait):
- Device is held in landscape
-
If both your Info.plist and your initial root view controller permit portrait orientation, but the user is holding the device in a landscape orientation that is also permitted, then the app will launch normally, correctly, and fully into portrait orientation, appearing to the user in portrait, and will then almost immediately afterward visibly rotate to landscape. This is essentially no different than if the user had been holding the device in portrait orientation while launching your app and then rotated it to landscape later.
There is no initial rotation as the app launches directly into portrait, so no initial rotation events arrive: the app launches, and layout is performed. Then rotation into landscape is signalled by trait and size changes, and layout is performed again.
- Launch does not allow portrait
-
If your Info.plist does not include portrait orientation, then the app launches directly into landscape. Which landscape orientation the app will prefer is dictated by the order in which the landscape orientations are listed in the Info.plist. If, say, the first listing is “Landscape (left home button)” (
UIInterfaceOrientationLandscapeLeft), but the user is holding the device in landscape with the Home button at the right, then the app will launch directly into landscape upside down (from the user’s point of view), and will then visibly rotate 180 degrees.There is no initial rotation as the app launches directly into landscape, so no initial rotation events arrive: the app launches, and layout is performed. If there is then a 180-degree rotation, the app signals a size change.
- Launch allows portrait but root view controller does not
-
If your Info.plist does include portrait orientation but your initial root view controller does not permit portrait orientation, then the app will start out in portrait orientation but will rotate to landscape. The order of orientations listed in the Info.plist makes no difference: the app will initially appear to the user as if the home button were on the right, and if in fact it is on the left, the app will then visibly rotate 180 degrees.
There is an initial rotation during launch as the app changes from portrait to landscape, and this will be signalled by a trait collection change but no size change; then layout is performed. If there is then a 180-degree rotation, the app signals a size change.
(This behavior, introduced in iOS 9, is different from how things worked in iOS 8 and before, where the order of orientations in the Info.plist mattered. I regard the new behavior as somewhat incoherent. A possible workaround is to exclude portrait orientation from the Info.plist but include it in your implementation of
application(_:supportedInterfaceOrientationsFor:); launch behavior will then be identical to the preceding case.)
View Controller Manual Layout
A view controller governs its main view, and may well take charge of populating it with subviews and configuring those subviews. What if that involves participating manually in the layout of those subviews? As we have seen, a view controller’s view can be resized, both as the view is first put into the interface and later as the app runs and is rotated. Where should your view controller’s layout code be placed in order to behave coherently in the face of these potential size changes?
Let’s start with the problem of initial layout. There is a natural temptation to perform initial layout-related tasks in viewDidLoad. This method is extraordinarily convenient. It is guaranteed to be called exactly once in the life of the view controller; that moment is as early as possible in the life of the view controller; and at that time, the view controller has its view, and if it got that view from a nib, properties connected to outlets from that nib have been set. So this seems like the perfect place for initializations. And so it is — but initialization and layout are not the same thing.
Remember, at the time viewDidLoad is called, the view controller’s view has been loaded, but it has not yet been inserted into the interface! The view has not yet been fully resized for the first time, and initial layout has not yet taken place. Thus, you cannot do anything here that depends upon knowing the dimensions of the view controller’s view or any other nib-loaded view — for the simple reason that you do not know them. It is a capital mistake to assume that you do know them, and beginners often make this mistake.
Here’s an elementary (and artificial) example. Suppose we wish, in code, to create a small black square subview and place it at the top of our view controller’s main view, centered horizontally. A naïve attempt might look like this:
override func viewDidLoad() {
    super.viewDidLoad()
    let v = UIView(frame:CGRect(0,0,10,10))
    v.backgroundColor = .black
    v.center = CGPoint(self.view.bounds.width/2,5)
    self.view.addSubview(v)
}
That code assumes that self.view.bounds.width at the time viewDidLoad is called is the width that our main view will have after it is resized and the user sees it. That might be true, but then again it might not. That code is asking for trouble. You should not be doing layout in viewDidLoad. It’s too soon.
However, you can certainly create and insert this black subview in viewDidLoad and configure it for future layout. For example, it is perfectly fine, and completely normal, to insert a view and give it autolayout constraints:
let v = UIView()
v.translatesAutoresizingMaskIntoConstraints = false
v.backgroundColor = .black
self.view.addSubview(v)
NSLayoutConstraint.activate([
    v.widthAnchor.constraint(equalToConstant: 10),
    v.heightAnchor.constraint(equalToConstant: 10),
    v.topAnchor.constraint(equalTo: self.view.topAnchor),
    v.centerXAnchor.constraint(equalTo: self.view.centerXAnchor)
])
That is not a case of doing manual layout in viewDidLoad. The constraints are not layout; they are instructions as to how this view should be sized and positioned by the runtime when layout does happen, as I explained in Chapter 1. Autoresizing would work fine here too; if you center the black subview horizontally and give it an autoresizing mask that keeps it centered regardless of future changes in the main view’s size, all will be well.
Clearly, if you can lay out your views with constraints or autoresizing, either in code in viewDidLoad or in the nib editor, you should do so. Even if you want to respond to a change in size classes, you may be able to do so by means of conditional views and constraints, configured entirely in the nib editor. But let’s say that, for some reason, you can’t do that or you don’t want to. Let’s say you want to govern this view’s layout actively and entirely in view controller code. Where should that code go?
Let’s start with the question of where to put code that positions the black square subview initially. The primary layout-related messages we are guaranteed to get in our view controller as the app launches are traitCollectionDidChange(_:) and viewWillLayoutSubviews. Of these, I prefer viewWillLayoutSubviews; after all, its very name means that we are about to perform layout on our subviews, meaning that our main view itself has achieved its initial size.
However, we then face the problem that viewWillLayoutSubviews may be called many times over the life of our view controller. Moreover, when it is called, layout is about to happen; we mustn’t impinge on that process or do more work than we absolutely have to. In this case, a sensible implementation is to use a property flag to make sure we initialize only once; in this case, I’ll set an Optional, which will serve both as a flag and as a future reference to this view:
weak var blackSquare : UIView?
override func viewWillLayoutSubviews() {
    if self.blackSquare == nil { // both reference and flag
        let v = UIView(frame:CGRect(0,0,10,10))
        v.backgroundColor = .black
        v.center = CGPoint(self.view.bounds.width/2,5)
        self.view.addSubview(v)
        self.blackSquare = v
    }
}
The black square will now certainly be horizontally centered at launch time. This brings us to our second problem — how to deal with subsequent rotation. Presume that we want to keep the black subview horizontally centered in response to further changes in our main view’s size.
For that, we have a choice of two primary events — willTransition(to:with:) (the trait collection) and viewWillTransition(to:with:) (the size).
How to choose between the two methods? The question here is, do you want to respond to rotation on iPhone only, or on both iPhone and iPad? The trouble with the trait collection is that it doesn’t change when the iPad rotates. Therefore, if you want to learn about iPad rotation, you will need to be notified of the size change. Let’s say this is a universal app, and we want to do layout during rotation on iPad as well as iPhone. So we’re going to implement viewWillTransition(to:with:).
Second, how should our implementation work? We should not assume, just because we are called, that the size is actually changing; this method is called even on rotations of 180 degrees. And if we are going to reposition our black subview, we should not reposition it immediately, in part because the size change hasn’t happened yet, and in part because the subview will then jump to its new position, whereas we want to animate the change as part of the rotation animation. With constraint-based layout, the repositioning is part of the rotation animation, because layout performed during an animation is itself animated. We want our manual layout to behave like that.
The solution lies in the second parameter. This is a UIViewControllerTransitionCoordinator, whose job is to perform the rotation animation and to attach to it any animations we care to supply. To do that, we call the coordinator’s method animate(alongsideTransition:completion:). The first parameter is an animations function; the second is an optional completion function to be executed when the rotation is over, which I’ll take advantage of in a later example.
Here’s our implementation, making use of the transition coordinator to animate our subview’s position change:
override func viewWillTransition(to sz: CGSize,
    with coordinator: UIViewControllerTransitionCoordinator) {
        super.viewWillTransition(to:sz, with:coordinator)
        if sz != self.view.bounds.size {
            coordinator.animate(alongsideTransition:{ _ in
                self.blackSquare?.center = CGPoint(sz.width/2,5)
            })
        }
}
In that example, our manual layout was distributed over two events, viewWillLayoutSubviews and viewWillTransition(to:with:) (the size). Sometimes, it is necessary to involve three events, implementing willTransition(to:with:) (the trait collection) as well. In this next example, I have a large green rectangle that should occupy the left one-third of the interface, but only when we are in landscape orientation (the main view’s width is larger than its height) and only when we are in a .regular horizontal size class (we might be on an iPhone 6 Plus but not on any other kind of iPhone). This rectangle should come and go in a smooth animated fashion, of course; let’s decide to have it appear from, or vanish off to, the left of the interface.
Clearly we have to implement viewWillTransition(to:with:) (the size), in order to hear about rotation on an iPad. But we will also need to implement willTransition(to:with:) (the trait collection), in order to know what our horizontal size class is about to be. If there is going to be change of size class, we will hear about the trait collection transition before we hear about the size transition, so we’ll store the trait collection information in a property where the size transition method can learn about it.
We’re going to have three properties: a lazy UIView property to ensure that we have a green view when we first need one (in real life, this would construct whatever this interface element really is); a Bool flag so that we don’t run our initial viewWillLayoutSubviews code more than once; and the upcoming trait collection. And I’ll factor my test for whether the green view should appear into a utility function:
lazy var greenView : UIView = {
    let v = UIView()
    v.backgroundColor = .green
    return v
}()
var firstTime = true
var nextTraitCollection = UITraitCollection()
func greenViewShouldAppear(size sz: CGSize) -> Bool {
    let tc = self.nextTraitCollection
    if tc.horizontalSizeClass == .regular {
        if sz.width > sz.height {
            return true
        }
    }
    return false
}
Our implementation of willTransition(to:with:) merely keeps self.nextTraitCollection updated:
override func willTransition(to newCollection: UITraitCollection,
    with coordinator: UIViewControllerTransitionCoordinator) {
        super.willTransition(to:newCollection, with:coordinator)
        self.nextTraitCollection = newCollection
}
Now for our actual manual layout. We need to decide about the green view at launch time, so we implement viewWillLayoutSubviews, using our flag to make sure we decide only once. The implementation is simple: either we place the green view into the interface or we don’t:
override func viewWillLayoutSubviews() {
    if self.firstTime {
        self.firstTime = false
        self.nextTraitCollection = self.traitCollection
        let sz = self.view.bounds.size
        if self.greenViewShouldAppear(size:sz) {
            let v = self.greenView
            v.frame = CGRect(0,0,sz.width/3, sz.height)
            self.view.addSubview(v)
        }
    }
}
The implementation of viewWillTransition(to:with:) is more complicated. We want to participate in the animation rotation, so the work must be done in a call to animate(alongsideTransition:completion:). Moreover, there are two distinct cases: either we insert the green view off to the left of the interface and animate it rightward onto the scene, or we animate the existing green view leftward off the scene and (in the completion function) remove it from the interface:
override func viewWillTransition(to sz: CGSize,
    with coordinator: UIViewControllerTransitionCoordinator) {
        super.viewWillTransition(to:sz, with:coordinator)
        if sz != self.view.bounds.size {
            if self.greenView.window != nil {
                if !self.greenViewShouldAppear(size:sz) {
                    coordinator.animate(alongsideTransition: { _ in
                        let f = self.greenView.frame
                        self.greenView.frame =
                            CGRect(-f.width,0,f.width,f.height)
                    }) { _ in
                        self.greenView.removeFromSuperview()
                    }
                }
            } else {
                if self.greenViewShouldAppear(size:sz) {
                    self.greenView.frame =
                        CGRect(-sz.width/3,0,sz.width/3,sz.height)
                    self.view.addSubview(self.greenView)
                    coordinator.animate(alongsideTransition: { _ in
                        self.greenView.frame.origin = CGPoint.zero
                    })
                }
            }
        }
}
(This tripartite implementation is complicated, but unfortunately I see no way around it. Things were much simpler in iOS 7 and before, where your view controller received rotation events with rotate in their names. In iOS 8, those events were replaced by the willTransition events, and there’s no change of trait collection when an iPad rotates, so you have to bend over backward to handle all the possibilities coherently.)
Presented View Controller
Back when the only iOS device was an iPhone, a presented view controller was called a modal view controller. When a modal view controller was presented, the root view controller remained in place, but its view was taken out of the interface and the modal view controller’s view was used instead. Thus, this was the simplest way to replace the entire interface with a different interface.
You can see why this configuration is characterized as “modal.” The presented view controller’s view has, in a sense, blocked access to the “real” view, the root view controller’s view. The user is forced to work in the presented view controller’s view, until the modal view controller is dismissed — its view is removed and the “real” view is visible again — similar to a modal dialog in a desktop application, where the user can’t do anything else but work in the dialog as long as it is present. A presented view controller’s view often reinforces this analogy with obvious dismissal buttons with titles like Save, Done, or Cancel.
The color picker view in my own Zotz! app is a good example (Figure 6-7); this is an interface that says, “You are now configuring a color, and that’s all you can do; change the color or cancel, or you’ll be stuck here forever.” The user can’t get out of this view without tapping Cancel or Done, and the view that the user was previously using is visible as a blur behind this view, waiting for the user to return to it.
Figure 6-7. A modal view
Figure 6-5, from my Latin flashcard app, is another example of a presented view. It has a Cancel button, and the user is in a special “mode,” performing a drill exercise rather than scrolling through flashcards.
Nevertheless, the “modal” characterization is not always apt. A presented view controller might be no more than a technique that you, the programmer, have used to alter the interface; it might not feel “modal” at all. A presented view controller’s view may have a complex interface; it may have child view controllers; it may present yet another view controller; it may take over the interface permanently, with the user never returning to the interface that it replaced. Furthermore, the range of ways in which a presented view controller’s view can be displayed now goes far beyond merely replacing the root view controller’s view. For example:
-
Instead of replacing the entire interface, a presented view controller’s view can replace a subview within the existing interface.
-
A presented view controller’s view may cover the existing interface only partially, while the existing interface is never removed.
Presentation and Dismissal
The two key methods for presenting and dismissing a view controller are:
present(_:animated:completion:)-
To make a view controller present another view controller, you send the first view controller this message, handing it the second view controller, which you will probably instantiate for this very purpose. (The first view controller is very typically
self.)We now have two view controllers that stand in the relationship of being one another’s
presentingViewControllerandpresentedViewControllerrespectively. The presented view controller is retained, and its view effectively replaces or covers the presenting view controller’s view in the interface (I’ll talk later about ways to refine that arrangement). dismiss(animated:completion:)-
The “presented” state of affairs described in the previous paragraph persists until the presenting view controller is sent this message. The presented view controller’s view is then removed from the interface, the original interface is restored, and the presented view controller is released; it will thereupon typically go out of existence, together with its view, its child view controllers and their views, and so on.
As the view of the presented view controller appears, and again when it is dismissed, there’s an option for animation to be performed as the transition takes place (the animated: argument, a Bool). The completion: parameter, which can be nil, lets you supply a function to be run after the transition (including the animation) has occurred. I’ll talk later about how to govern the nature of the animation.
The presenting view controller (the presented view controller’s presentingViewController) is not necessarily the view controller to which you sent present(_:animated:completion:). It will help if we distinguish three roles that view controllers can play in presenting a view controller:
- Presented view controller
-
The first argument to
present(_:animated:completion:). - Original presenter
-
The view controller to which
present(_:animated:completion:)was sent. Apple sometimes refers to this view controller as the source; “original presenter” is my own term.The presented view controller is set as the original presenter’s
presentedViewController. - Presenting view controller
-
The view controller whose view is replaced or covered by the presented view controller’s view. By default, it is the view controller whose view is the entire interface — namely, either the root view controller or an already existing presented view controller. It might not be the same as the original presenter.
This view controller is set as the presented view controller’s
presentingViewController. The presented view controller is set as the presenting view controller’spresentedViewController. (Thus, the presented view controller might be thepresentedViewControllerof two different view controllers.)
The receiver of dismiss(animated:completion:) may be any of those three objects; the runtime will use the linkages between them to transmit the necessary messages up the chain on your behalf to the presentingViewController.
You can test whether a view controller’s presentedViewController or presentingViewController is nil to learn whether presentation is occurring. For example, a view controller whose presentingViewController is nil is not a presented view controller at this moment.
A view controller can have at most one presentedViewController. If you send present(_:animated:completion:) to a view controller whose presentedViewController isn’t nil, nothing will happen and the completion function is not called (and you’ll get a warning from the runtime). However, a presented view controller can itself present a view controller, so there can be a chain of presented view controllers.
If you send dismiss(animated:completion:) to a view controller in the middle of a presentation chain — a view controller that has both a presentingViewController and a presentedViewController — then its presentedViewController is dismissed.
If you send dismiss(animated:completion:) to a view controller whose presentedViewController is nil and that has no presentingViewController, nothing will happen (not even a warning in the console), and the completion function is not called.
Let’s make one view controller present another. We could do this simply by connecting one view controller to another in a storyboard with a modal segue, but I don’t want you to do that: a modal segue calls present(_:animated:completion:) for you, whereas I want you to call it yourself.
So start with an iPhone project made from the Single View app template. This contains one view controller class, called ViewController. Our first move must be to add a second view controller class, an instance of which will function as the presented view controller:
-
Choose File → New → File and specify iOS → Source → Cocoa Touch Class. Click Next.
-
Name the class SecondViewController, make sure it is a subclass of UIViewController, and check the XIB checkbox so that we can design this view controller’s view quickly and easily in the nib editor. Click Next.
-
Confirm the folder, group, and app target membership, and click Create.
-
Edit SecondViewController.xib, and do something there to make the view distinctive, so that you’ll recognize it when it appears; for example, give it a red background color.
-
In ViewController.swift, add some code that instantiates SecondViewController and presents it:
@IBAction func doPresent(_ sender: Any?) { let svc = SecondViewController(nibName: nil, bundle: nil) self.present(svc, animated:true) } -
Finally, let’s put a button into the interface that triggers
doPresent. Edit Main.storyboard and add a button to the ViewController’s view’s interface. Connect that button to ViewController’sdoPresent.
Run the project. In ViewController’s view, tap the button. SecondViewController’s view slides into place over ViewController’s view.
In our lust for instant gratification, we have neglected to provide a way to dismiss the presented view controller. If you’d like to do that, edit SecondViewController.xib, put a button into SecondViewController’s view, and connect it to an action method in SecondViewController.swift:
@IBAction func doDismiss(_ sender: Any?) {
    self.presentingViewController!.dismiss(animated:true)
}
Run the project. You can now alternate between ViewController’s view and SecondViewController’s view, presenting and dismissing in turn. Go ahead and play for a while with your exciting new app; I’ll wait.
Configuring a Presentation
This section describes some configurable aspects of how a view controller’s view behaves as the view controller is presented.
Transition style
When a view controller is presented and later when it is dismissed, a simple animation of its view can be performed, according to whether the animated: parameter of the corresponding method is true. There are a few different built-in animation types (modal transition styles) to choose from.
Note
Instead of choosing a simple built-in modal transition style, you can supply your own animation, as I’ll explain later in the chapter.
Your choice of built-in transition style is not passed as a parameter when presenting or dismissing a view controller; rather, it is attached beforehand to a presented view controller as its modalTransitionStyle property. This value can be set in code or in the nib editor. Your choices (UIModalTransitionStyle) are:
.coverVertical(the default)-
The view slides up from the bottom to cover the presenting view controller’s view on presentation and down to reveal it on dismissal. The “bottom” is defined differently depending on the orientation of the device and the orientations the view controllers support.
.flipHorizontal-
The view flips on the vertical axis as if the two views were the front and back of a piece of paper. The “vertical axis” is the device’s long axis, regardless of the app’s orientation.
This transition style provides one of those rare occasions where the user may directly glimpse the window behind the transitioning views. You may want to set the window’s background color appropriately.
.crossDissolve-
The views remain stationary, and one fades into the other.
.partialCurl-
The presenting view controller’s view curls up like a page in a notepad to reveal the presented view controller’s view.
Warning
In iOS 7 and before, an image of the .partialCurl curl remains covering the top-left region of the presented view; if the user clicks on the curl, dismiss(animated:completion:) is called on the original presenter. In iOS 8 and later, the curl is not visible, but tapping where it would be dismisses the presented view controller anyway! That will probably surprise and confuse the user; for that reason, I recommend avoiding .partialCurl entirely.
Presentation style
By default, the presented view controller’s view occupies the entire screen, completely replacing that of the presenting view controller. But you can choose from some other built-in options expressing how the presented view controller’s view should cover the screen (modal presentation styles).
Note
Instead of choosing a simple built-in modal presentation style, you can customize the presentation to place the presented view controller’s view anywhere you like, as I’ll explain later in this chapter.
To choose a presentation style, set the presented view controller’s modalPresentationStyle property. This value can be set in code or in the nib editor. Your choices (UIModalPresentationStyle) are:
.fullScreen-
The default. The presenting view controller is the root view controller or a fullscreen presented view controller, and its view — meaning the entire interface — is replaced.
.overFullScreen-
Similar to
.fullScreen, but the presenting view controller’s view is not replaced; instead, it stays where it is, possibly being visible during the transition, and remaining visible behind the presented view controller’s view if the latter has some transparency. .pageSheet-
Similar to
.fullScreen, but in portrait orientation on the iPad it’s a little shorter (leaving a gap behind the status bar), and in landscape orientation on the iPad and the iPhone 6 Plus it’s also narrower, with the presenting view controller’s view remaining partially visible (and dimmed) behind it. Treated as.fullScreenon the iPhone (including the iPhone 6 Plus in portrait). .formSheet-
Similar to
.pageSheet, but on the iPad it’s even smaller, allowing the user to see more of the presenting view controller’s view behind it. As the name implies, this is intended to allow the user to fill out a form (Apple describes this as “gathering structured information from the user”). On the iPhone 6 Plus in landscape, indistinguishable from.pageSheet. Treated as.fullScreenon the iPhone (including the iPhone 6 Plus in portrait).
Tip
A .formSheet presented view controller, even on an iPad, has a .compact horizontal size class.
.currentContext-
The presenting view controller can be any view controller, such as a child view controller. The presented view controller’s view replaces the presenting view controller’s view, which may have been occupying only a portion of the screen. I’ll explain in a moment how to specify the presenting view controller.
.overCurrentContext-
Like
.currentContext, but the presented view controller’s view covers the presenting view controller’s view rather than replacing it. Again, this may mean that the presented view controller’s view now covers only a portion of the screen..overCurrentContextwill often be a better choice than.currentContext, because some subviews don’t behave well when automatically removed from their superview and restored later.
When the presented view controller’s modalPresentationStyle is .currentContext or .overCurrentContext, a decision has to be made by the runtime as to what view controller should be the presenting view controller. This will determine what view will be replaced or covered by the presented view controller’s view. The decision involves another UIViewController property, definesPresentationContext (a Bool), and possibly still another UIViewController property, providesPresentationContextTransitionStyle. Here’s how the decision operates:
-
Starting with the original presenter (the view controller to which
present(_:animated:completion:)was sent), we walk up the chain of parent view controllers, looking for one whosedefinesPresentationContextproperty istrue. If we find one, that’s the one; it will be thepresentingViewController, and its view will be replaced or covered by the presented view controller’s view.(If we don’t find one, things work as if the presented view controller’s
modalPresentationStylehad been.fullScreen.) -
If, during the search just described, we find a view controller whose
definesPresentationContextproperty istrue, we look to see if that view controller’sprovidesPresentationContextTransitionStyleproperty is alsotrue. If so, that view controller’smodalTransitionStyleis used for this transition animation, instead of using the presented view controller’smodalTransitionStyle.
To illustrate, I need a parent–child view controller arrangement to work with. This chapter hasn’t yet discussed any parent view controllers in detail, but the simplest is UITabBarController, which I discuss in the next section, and it’s easy to create a working app with a UITabBarController-based interface, so that’s the example I’ll use.
-
Start with the Tabbed app template. It provides three view controllers — the UITabBarController and two children, FirstViewController and SecondViewController.
-
As in the previous example, I want us to create and present the presented view controller manually, rather than letting the storyboard do it automatically; so make a new view controller class with an accompanying .xib file, to use as a presented view controller — call it ExtraViewController.
-
In ExtraViewController.xib, give the view a distinctive background color, so you’ll recognize it when it appears.
-
In the storyboard, put a button in the First View Controller view (First Scene), and connect it to an action method in FirstViewController.swift that summons the new view controller as a presented view controller:
@IBAction func doPresent(_ sender: Any?) {
    let vc = ExtraViewController(nibName: nil, bundle: nil)
    vc.modalTransitionStyle = .flipHorizontal
    self.present(vc, animated: true)
}
Run the project and tap the button. Observe that the presented view controller’s view occupies the entire interface, covering even the tab bar; it replaces the root view, because the presentation style is .fullScreen. The presenting view controller is the root view controller, which is the UITabBarController.
Now change the code to look like this:
@IBAction func doPresent(_ sender: Any?) {
    let vc = ExtraViewController(nibName: nil, bundle: nil)
    vc.modalTransitionStyle = .flipHorizontal
    self.definesPresentationContext = true // *
    vc.modalPresentationStyle = .currentContext // *
    self.present(vc, animated: true)
}
Run the project and tap the button. The presented view controller’s view replaces only the first view controller’s view; the tab bar remains visible. That’s because the presented view controller’s modalPresentationStyle is .currentContext, and definesPresentationContext is true in FirstViewController, which is the original presenter. Thus the search for a context stops in FirstViewController, which thus becomes the presenting view controller — meaning that the presented view replaces FirstViewController’s view instead of the root view.
We can also override the presented view controller’s transition animation through the modalTransitionStyle property of the presenting view controller:
@IBAction func doPresent(_ sender: Any?) {
    let vc = ExtraViewController(nibName: nil, bundle: nil)
    vc.modalTransitionStyle = .flipHorizontal
    self.definesPresentationContext = true
    self.providesPresentationContextTransitionStyle = true // *
    self.modalTransitionStyle = .coverVertical // *
    vc.modalPresentationStyle = .currentContext
    self.present(vc, animated: true)
}
Because the presenting view controller’s providesPresentationContextTransitionStyle is true, the transition uses the .coverVertical animation belonging to the presenting view controller, rather than the .flipHorizontal animation of the presented view controller.
When a view controller is presented, if its presentation style is not .fullScreen, a question arises of whether its status bar properties (prefersStatusBarHidden and preferredStatusBarStyle) should be consulted. By default, the answer is no, because this view controller is not the top-level view controller. To make the answer be yes, set this view controller’s modalPresentationCapturesStatusBarAppearance to true.
Configuration in the nib editor
Most of what I’ve described so far can be configured in a .storyboard or .xib file. A view controller’s Attributes inspector lets you set its transition style and presentation style, as well as definesPresentationContext and providesPresentationContextTransitionStyle.
If you’re using a storyboard, you can configure one view controller to present another view controller by connecting them with a Present Modally segue; to do the presentation, you trigger the segue (or give the user a way to trigger it) instead of calling present(_:animated:completion:). The segue’s Attributes inspector lets you set the presentation style and transition style (and whether there is to be animation). Dismissal is a little more involved; either you must dismiss the presented view controller in code, by calling dismiss(animated:completion:), or you must use an unwind segue. I’ll discuss triggered segues and unwind segues in detail later in this chapter.
Communication with a Presented View Controller
In real life, it is highly probable that the original presenter will have additional information to impart to the presented view controller as the latter is created and presented, and that the presented view controller will want to pass information back to the original presenter as it is dismissed. Knowing how to arrange this exchange of information is very important.
Passing information from the original presenter to the presented view controller is usually easy, because the original presenter typically has a reference to the presented view controller before the latter’s view appears in the interface. For example, suppose the presented view controller has a public data property. Then the original presenter can easily set this property, especially if the original presenter is the one instantiating the presented view controller in the first place:
@IBAction func doPresent(_ sender: Any?) {
    let svc = SecondViewController(nibName: nil, bundle: nil)
    svc.data = "This is very important data!" // *
    self.present(svc, animated:true)
}
Indeed, if you’re instantiating the presented view controller in code, as we are here, you might even give its class a designated initializer that accepts — and thus requires — this data. In my Latin vocabulary app, for example, I’ve given DrillViewController a designated initializer init(data:) precisely so that whoever creates it must pass it the data it will need to do its job while it exists.
Passing information back from the presented view controller to the original presenter is a more interesting problem. The presented view controller will need to know who the original presenter is, but it doesn’t automatically have a reference to it (the original presenter, remember, is not necessarily the same as the presentingViewController). Moreover, the presented view controller will need to know the signature of some method, implemented by the original presenter, which it can call in order to hand over the information — and this needs to work regardless of the original presenter’s class.
The standard solution is to use delegation, as follows:
-
The presented view controller defines a protocol declaring a method that the presented view controller wants to call before it is dismissed.
-
The original presenter conforms to this protocol: it declares adoption of the protocol, and it implements the required method.
-
The presented view controller provides a means whereby it can be handed a reference to an object conforming to this protocol. Think of that reference as the presented view controller’s delegate. Very often, this will be a property — perhaps called
delegate— typed as the protocol. (Such a property should probably be weak, since an object usually has no business retaining its delegate.) -
As the original presenter creates and configures the presented view controller, it hands the presented view controller a reference to itself, in its role as adopter of the protocol, by assigning itself as the presented view controller’s delegate.
This sounds elaborate, but with practice you’ll find yourself able to implement it very quickly. And you can see why it works: because its delegate is typed as the protocol, the presented view controller is guaranteed that this delegate, if it has one, implements the method declared in the protocol. Thus, the desired communication from the presented view controller to whoever configured and created it is assured.
Let’s modify our earlier example — the one where the root view controller, ViewController, presents SecondViewController — to embody this architecture. First, edit SecondViewController.swift to look like this:
protocol SecondViewControllerDelegate : class {
    func accept(data:Any!)
}
class SecondViewController : UIViewController {
    var data : Any?
    weak var delegate : SecondViewControllerDelegate?
    @IBAction func doDismiss(_ sender: Any?) {
        self.delegate?.accept(data:"Even more important data!")
    }
}
It is now ViewController’s job to adopt the SecondViewControllerDelegate protocol, and to set itself as the SecondViewController’s delegate. If it does so, then when the delegate method is called, ViewController will be handed the data, and it should then dismiss the SecondViewController:
class ViewController : UIViewController, SecondViewControllerDelegate {
    @IBAction func doPresent(_ sender: Any?) {
        let svc = SecondViewController(nibName: nil, bundle: nil)
        svc.data = "This is very important data!"
        svc.delegate = self // *
        self.present(svc, animated:true)
    }
    func accept(data:Any!) {
        // do something with data here
        self.dismiss(animated:true)
    }
}
That is a perfectly satisfactory implementation, and we could stop at this point. For completeness, I’ll just show a variation that I consider slightly better. One might object that too much responsibility rests upon the original presenter (the delegate): it is sent the data and then it must also dismiss the presented view controller. Perhaps the presented view controller should hand back any data and should then dismiss itself (as it did in my earlier example). Even better, the presented view controller should hand back any data automatically, regardless of how it is dismissed.
We can arrange that by putting all the responsibility on the presented view controller:
-
Edit ViewController’s
accept(data:)so that it accepts the data and no more — that is, delete theself.dismisscall. -
Back in SecondViewController, we will implement both the task of dismissal and the task of handing back the data, separately. To make the latter task automatic, SecondViewController will arrange to hear about its own dismissal by implementing
viewWillDisappear(discussed later in this chapter), which will then callaccept(data:)to ensure that the data is handed across. There is more than one reason whyviewWillDisappearmight be called; we can ensure that this really is the moment of our own dismissal by consultingisBeingDismissed.
Here is what SecondViewController should look like now:
protocol SecondViewControllerDelegate : class {
    func accept(data:Any!)
}
class SecondViewController : UIViewController {
    var data : Any?
    weak var delegate : SecondViewControllerDelegate?
    @IBAction func doDismiss(_ sender: Any?) {
        self.presentingViewController!.dismiss(animated:true)
    }
    override func viewWillDisappear(_ animated: Bool) {
        super.viewWillDisappear(animated)
        if self.isBeingDismissed {
            self.delegate?.accept(data:"Even more important data!")
        }
    }
}
If you’re using a storyboard and a Present Modally segue, things are a bit different. You don’t have access to the presented view controller at the moment of creation; instead, in the original presenter (the source of the segue) you implement prepare(for:sender:) as a moment when the original presenter and the presented view controller will meet, and the former can hand across any needed data, set itself as delegate, and so forth. If you dismiss the presented view controller automatically by way of an unwind segue, the same is true in reverse: the presented view controller calls the delegate method in its own prepare(for:sender:). I’ll give more details later in this chapter.
Adaptive Presentation
When a view controller with a modalPresentationStyle of .pageSheet or .formSheet is about to appear, you get a second opportunity to change its effective modalPresentationStyle, and even to substitute a different view controller, based on the current trait collection environment. This is called adaptive presentation. The idea is that your presented view controller might appear one way for certain trait collections and another way for others — for example, on an iPad as opposed to an iPhone.
To implement adaptive presentation, you use a view controller’s presentation controller (presentationController, a UIPresentationController). Before presenting a view controller, you set its presentation controller’s delegate (adopting the UIAdaptivePresentationControllerDelegate protocol). Before the presented view controller’s view appears, the delegate is sent these messages:
adaptivePresentationStyle(for:traitCollection:)-
Asks for a modal presentation style. The first parameter is the presentation controller; you can consult its
presentationStyleto learn what themodalPresentationStylewould be. Return.noneif you don’t want to change the presentation style. presentationController(_:willPresentWithAdaptiveStyle:transitionCoordinator:)-
Called just before the presentation takes place. If the
adaptiveStyle:is.none, adaptive presention is not going to take place. presentationController(_:viewControllerForAdaptivePresentationStyle:)-
Called only if adaptive presention is going to take place. Return a view controller to be presented, substituting it for the current presented view controller (or
nilto keep the current presented view controller).
What adaptations are you permitted to perform? First, as I’ve already said, the original modalPresentationStyle should be .pageSheet or .formSheet. It isn’t illegal to try to adapt from other presentation styles, but it isn’t going to work either. Then the possibilities are as follows:
- Adapt sheet to full screen
-
You can adapt
.pageSheetor.formSheetto.fullScreenor.overFullScreen.(If the trait collection’s horizontal size class is
.compact— an iPhone, including an iPhone 6 Plus in portrait — then if you adapt.pageSheetor.formSheetto.pageSheet,.currentContext,.overCurrentContext, or even.popover, the runtime behaves as if you had adapted to.fullScreen.) - Adapt page sheet to form sheet
-
You can adapt
.pageSheetto.formSheet.On an iPad, the difference is clearly visible; on an iPhone 6 Plus in landscape, the two sheet types are indistinguishable.
On an iPhone (including an iPhone 6 Plus in portrait), the result is something a little unusual and unexpected. It’s similar to
.pageSheeton the iPad in portrait orientation: it is full width, but a little shorter than full height, leaving a gap behind the status bar. (You can also obtain this configuration by adapting.pageSheetor.formSheetto.none.)
For example, here’s how to present a view controller as a .pageSheet on iPad but as .overFullScreen on iPhone:
extension ViewController : UIAdaptivePresentationControllerDelegate {
    @IBAction func doPresent(_ sender: Any?) {
        let svc = SecondViewController(nibName: nil, bundle: nil)
        svc.modalPresentationStyle = .pageSheet
        svc.presentationController!.delegate = self // *
        self.present(svc, animated:true)
    }
    func adaptivePresentationStyle(for controller: UIPresentationController,
        traitCollection: UITraitCollection) -> UIModalPresentationStyle {
            if traitCollection.horizontalSizeClass == .compact {
                return .overFullScreen
            }
            return .none // don't adapt
    }
}
Now let’s extend that example by also replacing the view controller presented on iPad with a different view controller to be presented on iPhone (this method won’t be called when adaptivePresentationStyle returns .none):
extension ViewController : UIAdaptivePresentationControllerDelegate {
    func presentationController(_ controller: UIPresentationController,
        viewControllerForAdaptivePresentationStyle: UIModalPresentationStyle)
        -> UIViewController? {
            let newvc = ThirdViewController(nibName: nil, bundle: nil)
            return newvc
    }
}
In real life, of course, when substituting a different view controller, you might need to prepare it before returning it (for example, giving it data and setting its delegate). A common scenario is to return the same view controller wrapped in a navigation controller; I’ll illustrate in Chapter 9.
Presentation and Rotation
When the presenting view controller is the top-level view controller — the root view controller, or a fullscreen presented view controller — the presented view controller becomes the new top-level view controller. This means that its supportedInterfaceOrientations is consulted and honored. If these supportedInterfaceOrientations do not intersect with the app’s current orientation, the app’s orientation will rotate, as the presented view appears, to an orientation that the presented view controller supports — and the same thing will be true in reverse when the presented view controller is dismissed.
Thus, a presented view controller allows you to force the interface to rotate. In fact, a presented view controller is the only officially sanctioned way to force the interface to rotate.
Forced rotation is a perfectly reasonable thing to do, especially on the iPhone, where the user can easily rotate the device to compensate for the new orientation of the interface. Some views work better in portrait than landscape, or better in landscape than portrait (especially on the small screen). Forced rotation lets you ensure that each view appears only in the orientation in which it works best.
The presented view controller’s supportedInterfaceOrientations bitmask might permit multiple possible orientations. The view controller may then also wish to specify which of those multiple orientations it should have initially when it is presented. To do so, override preferredInterfaceOrientationForPresentation; this property is consulted before supportedInterfaceOrientations, and its value is a single UIInterfaceOrientation (not a bitmask).
Tab Bar Controller
A tab bar (UITabBar, see also Chapter 12) is a horizontal bar containing items. Each item is a UITabBarItem; it displays, by default, an image and a title. At all times, exactly one of these items is selected (highlighted); when the user taps an item, it becomes the selected item.
If there are too many items to fit on a tab bar, the excess items are automatically subsumed into a final More item. When the user taps the More item, a list of the excess items appears, and the user can select one; the user can also be permitted to edit the tab bar, determining which items appear in the tab bar itself and which ones spill over into the More list.
A tab bar is an independent interface object, but it is most commonly used in conjunction with a tab bar controller (UITabBarController, a subclass of UIViewController) to form a tab bar interface. The tab bar controller displays the tab bar at the bottom of its own view. From the user’s standpoint, the tab bar items correspond to views; when the user selects a tab bar item, the corresponding view appears, filling the remainder of the space. The user is thus employing the tab bar to choose an entire area of your app’s functionality. In reality, the UITabBarController is a parent view controller; you give it child view controllers, which the tab bar controller then contains, and the views summoned by tapping the tab bar items are the views of those child view controllers.
Familiar examples of a tab bar interface on the iPhone are Apple’s Clock app and Music app.
You can get a reference to the tab bar controller’s tab bar through its tabBar property. In general, you won’t need this. When using a tab bar interface by way of a UITabBarController, you do not interact (as a programmer) with the tab bar itself; you don’t create it or set its delegate. You provide the UITabBarController with children, and it does the rest; when the UITabBarController’s view is displayed, there’s the tab bar along with the view of the selected item. You can, however, customize the look of the tab bar (see Chapter 12 for details).
If a tab bar controller is the top-level view controller, it determines your app’s compensatory rotation behavior. To take a hand in that determination without having to subclass UITabBarController, make one of your objects the tab bar controller’s delegate (UITabBarControllerDelegate) and implement these methods, as needed:
-
tabBarControllerSupportedInterfaceOrientations(_:) -
tabBarControllerPreferredInterfaceOrientationForPresentation(_:)
A top-level tab bar controller also determines your app’s status bar appearance. However, a tab bar controller implements
childViewControllerForStatusBarStyle and childViewControllerForStatusBarHidden so that the actual decision is relegated to the child view controller whose view is currently being displayed. Thus, your preferredStatusBarStyle and prefersStatusBarHidden are consulted and obeyed.
Tab Bar Items
For each view controller you assign as a tab bar controller’s child, you’re going to need a tab bar item, which will appear as its representative in the tab bar. This tab bar item will be your child view controller’s tabBarItem. A tab bar item is a UITabBarItem; this is a subclass of UIBarItem, an abstract class that provides some of its most important properties, such as title, image, and isEnabled.
There are two ways to make a tab bar item:
- By borrowing it from the system
-
Instantiate UITabBarItem using
init(tabBarSystemItem:tag:), and assign the instance to your child view controller’stabBarItem. Consult the documentation for the list of available system items. Unfortunately, you can’t customize a system tab bar item’s title; you must accept the title the system hands you. (You can’t work around this restriction by somehow copying a system tab bar item’s image.) - By making your own
-
Instantiate UITabBarItem using
init(title:image:tag:)and assign the instance to your child view controller’stabBarItem. Alternatively, use the view controller’s existingtabBarItemand set itsimageandtitle. Instead of setting thetitleof thetabBarItem, you can set thetitleproperty of the view controller itself; doing this automatically sets thetitleof its currenttabBarItem(unless the tab bar item is a system tab bar item), though the converse is not true.You can add a separate
selectedImagelater, or possibly by initializing withinit(title:image:selectedImage:). TheselectedImagewill be displayed in place of the normalimagewhen this tab bar item is selected in the tab bar.
The image (and selectedImage) for a tab bar item should be a 30×30 PNG; if it is larger, it will be scaled down as needed. By default, it will be treated as a transparency mask (a template): the hue of its pixels will be ignored, and the transparency of its pixels will be combined with the tab bar’s tintColor, which may be inherited from higher up the view hierarchy. However, you can instead display the image as is, and not as a transparency mask, by deriving an image whose rendering mode is .alwaysOriginal (see Chapter 2).
You can also give a tab bar item a badge (see the documentation on the badgeValue property). Other ways in which you can customize the look of a tab bar item are discussed in Chapter 12. For example, you can control the font and style of the title, or you can give it an empty title and offset the image.
Configuring a Tab Bar Controller
Basic configuration of a tab bar controller is very simple: just hand it the view controllers that will be its children. To do so, collect those view controllers into an array and set the UITabBarController’s viewControllers property to that array. The view controllers in the array are now the tab bar controller’s child view controllers; the tab bar controller is the parent of the view controllers in the array. The tab bar controller is also the tabBarController of the view controllers in the array and of all their children; thus a child view controller at any depth can learn that it is contained by a tab bar controller and can get a reference to that tab bar controller. The tab bar controller retains the array, and the array retains the child view controllers.
Here’s a simple example from one of my apps, in which I construct and display a tab bar interface in code:
func application(_ application: UIApplication,
    didFinishLaunchingWithOptions
    launchOptions: [UIApplicationLaunchOptionsKey : Any]?)
    -> Bool {
        self.window = self.window ?? UIWindow()
        let vc1 = GameBoardController()
        let vc2 =
            UINavigationController(rootViewController:SettingsController())
        let tabBarController = UITabBarController()
        tabBarController.viewControllers = [vc1, vc2]
        tabBarController.selectedIndex = 0
        tabBarController.delegate = self
        self.window!.rootViewController = tabBarController
        self.window!.makeKeyAndVisible()
        return true
}
The tab bar controller’s tab bar will automatically display the tabBarItem of each child view controller. The order of the tab bar items is the order of the view controllers in the tab bar controller’s viewControllers array. Thus, a child view controller will probably want to configure its tabBarItem property early in its lifetime, so that the tabBarItem is ready by the time the view controller is handed as a child to the tab bar controller. Observe that viewDidLoad is not early enough! That’s because the view controllers (other than the initially selected view controller) have no view when the tab bar controller initially appears. Thus it is common to implement an initializer for this purpose.
Here’s an example from the same app as the previous code (in the GameBoardController class):
init() {
    super.init(nibName:nil, bundle:nil)
    // tab bar configuration
    self.tabBarItem.image = UIImage(named: "game")
    self.title = "Game"
}
If you change the tab bar controller’s view controllers array later in its lifetime and you want the corresponding change in the tab bar’s display of its items to be animated, call setViewControllers(_:animated:).
Initially, by default, the first child view controller’s tab bar item is selected and its view is displayed. To ask the tab bar controller which tab bar item the user has selected, you can couch your query in terms of the child view controller (selectedViewController) or by index number in the array (selectedIndex). You can also set these properties to switch between displayed child view controllers programmatically. (In fact, it is legal to set a tab bar controller’s tab bar’s isHidden to true and take charge of switching between children yourself — though if that’s your desired architecture, a UIPageViewController might be more appropriate.)
Note
You can supply an animation when a tab bar controller’s selected tab item changes, as one child view controller’s view is replaced by another. I’ll discuss that topic later in the chapter.
You can also set the UITabBarController’s delegate (adopting UITabBarControllerDelegate). The delegate gets messages allowing it to prevent a given tab bar item from being selected, and notifying it when a tab bar item is selected and when the user is customizing the tab bar from the More item.
If the tab bar contains few enough items that it doesn’t need a More item, there won’t be one, and the tab bar won’t be user-customizable. If there is a More item, you can exclude some tab bar items from being customizable by setting the customizableViewControllers property to an array that lacks them; setting this property to nil means that the user can see the More list but can’t rearrange the items. Setting the viewControllers property sets the customizableViewControllers property to the same value, so if you’re going to set the customizableViewControllers property, do it after setting the viewControllers property. The moreNavigationController property can be compared with the selectedViewController property to learn whether the user is currently viewing the More list; apart from this, the More interface is mostly out of your control, but I’ll discuss some sneaky ways of customizing it in Chapter 12.
(If you allow the user to rearrange items, you would presumably want to save the new arrangement and restore it the next time the app runs. You might use UserDefaults for this; you could also take advantage of the built-in automatic state saving and restoration facilities, discussed later in this chapter.)
You can configure a UITabBarController in a .storyboard or .xib file. The UITabBarController’s contained view controllers can be set directly — in a storyboard, there will be a “view controllers” relationship between the tab bar controller and each of its children — and the contained view controllers will be instantiated together with the tab bar controller. Moreover, each contained view controller has a Tab Bar Item; you can select this and set many aspects of the tabBarItem, such as its system item or its title, image, selected image, and tag, directly in the nib. (If a view controller in a nib doesn’t have a Tab Bar Item and you want to configure this view controller for use in a tab bar interface, drag a Tab Bar Item from the Object library onto the view controller.)
To start a project with a main storyboard that has a UITabBarController as its root view controller, begin with the Tabbed app template.
Navigation Controller
A navigation bar (UINavigationBar, see also Chapter 12) is a horizontal bar displaying a center title and a right button. When the user taps the right button, the navigation bar animates, sliding its interface out to the left and replacing it with a new interface that enters from the right. The new interface displays a back button at the left side, and a new center title — and possibly a new right button. The user can tap the back button to go back to the first interface, which slides in from the left; or, if there’s a right button in the second interface, the user can tap it to go further forward to a third interface, which slides in from the right.
The successive interfaces of a navigation bar thus behave like a stack. In fact, a navigation bar does represent an actual stack — an internal stack of navigation items (UINavigationItem). It starts out with one navigation item: the root or bottom item of the stack. Since there is just one navigation item, this is also the top item of the stack (the navigation bar’s topItem). It is the top item whose interface is always reflected in the navigation bar. When the user taps a right button, a new navigation item is pushed onto the stack; it becomes the top item, and its interface is seen. When the user taps a back button, the top item is popped off the stack, and what was previously the next item beneath it in the stack — the back item (the navigation bar’s backItem) — becomes the top item, and its interface is seen.
The state of the stack is thus reflected in the navigation bar’s interface. The navigation bar’s center title comes automatically from the top item, and its back button comes from the back item. (See Chapter 12 for a complete description.) Thus, the title tells the user what item is current, and the left side is a button telling the user what item we would return to if the user were to tap that button. The animations reinforce this notion of directionality, giving the user a sense of position within a chain of items.
A navigation bar is an independent interface object, but it is most commonly used in conjunction with a navigation controller (UINavigationController, a subclass of UIViewController) to form a navigation interface. Just as there is a stack of navigation items in the navigation bar, there is a stack of view controllers in the navigation controller. These view controllers are the navigation controller’s children, and each navigation item belongs to a view controller — it is a view controller’s navigationItem.
The navigation controller performs automatic coordination of the navigation bar and the overall interface. Whenever a view controller comes to the top of the navigation controller’s stack, its view is displayed in the interface. At the same time, its navigationItem is automatically pushed onto the top of the navigation bar’s stack — and is thus displayed in the navigation bar. Moreover, the animation in the navigation bar is reinforced by animation of the interface as a whole: by default, a view controller’s view slides into the main interface from the left or right just as its navigation item slides into the navigation bar from the left or right.
Note
You can supply a different animation when a view controller is pushed onto or popped off of a navigation controller’s stack. I’ll discuss this topic later in the chapter.
Your code can control the overall navigation, so in real life, the user may well navigate to the right, not by tapping the right button in the navigation bar, but by tapping something inside the main interface, such as a listing in a table view. (Figure 6-1 is a navigation interface that works this way.) In this situation, your app is deciding in real time, in response to the user’s tap, what the next view controller should be; typically, you won’t even create the next view controller until the user asks to navigate to it. The navigation interface thus becomes a master–detail interface.
Conversely, you might put a view controller inside a navigation controller just to get the convenience of the navigation bar, with its title and buttons, even when no actual navigation is going to take place.
You can get a reference to the navigation controller’s navigation bar through its navigationBar property. In general, you won’t need this. When using a navigation interface by way of a UINavigationController, you do not interact (as a programmer) with the navigation bar itself; you don’t create it or set its delegate. You provide the UINavigationController with children, and it does the rest, handing each child view controller’s navigationItem to the navigation bar for display and showing the child view controller’s view each time navigation occurs. You can, however, customize the look of the navigation bar (see Chapter 12 for details).
A navigation interface may also optionally display a toolbar at the bottom. A toolbar (UIToolbar) is a horizontal view displaying a row of items. As in a navigation bar, a toolbar item may provide information, or it may be something the user can tap. A tapped item is not selected, as in a tab bar; rather, it represents the initiation of an action, like a button. You can get a reference to a UINavigationController’s toolbar through its toolbar property. The look of the toolbar can be customized (Chapter 12). In a navigation interface, however, the contents of the toolbar are determined automatically by the view controller that is currently the top item in the stack: they are its toolbarItems.
Note
A UIToolbar can also be used independently, and often is. It then typically appears at the bottom on an iPhone — Figure 6-3 has a toolbar at the bottom — but often appears at the top on an iPad, where it plays something of the role that the menu bar plays on the desktop. When a toolbar is displayed by a navigation controller, though, it always appears at the bottom.
A familiar example of a navigation interface is Apple’s Settings app on the iPhone. The Mail app on the iPhone is a navigation interface that includes a toolbar.
If a navigation controller is the top-level view controller, it determines your app’s compensatory rotation behavior. To take a hand in that determination without having to subclass UINavigationController, make one of your objects the navigation controller’s delegate (UINavigationControllerDelegate) and implement these methods, as needed:
-
navigationControllerSupportedInterfaceOrientations(_:) -
navigationControllerPreferredInterfaceOrientationForPresentation(_:)
A top-level navigation controller also determines your app’s status bar appearance. However, a navigation controller implements childViewControllerForStatusBarHidden so that the actual decision is relegated to the child view controller whose view is currently being displayed.
Your child view controllers can implement preferredStatusBarStyle, and the navigation controller’s childViewControllerForStatusBarStyle defers to its top child view controller — but only if the navigation bar is hidden. If the navigation bar is showing, the navigation controller sets the status bar style based on the navigation bar’s barStyle — to .default if the bar style is .default, and to .lightContent if the bar style is .black. So the way for your view controller to set the status bar style is to set the navigation controller’s navigation bar style.
Bar Button Items
The items in a UIToolbar or a UINavigationBar are bar button items — UIBarButtonItem, a subclass of UIBarItem. A bar button item comes in one of two broadly different flavors:
- Basic bar button item
-
The bar button item behaves like a simple button.
- Custom view
-
The bar button item has no inherent behavior, but has (and displays) a
customView.
UIBarItem is not a UIView subclass. A basic bar button item is button-like, but it has no frame, no UIView touch handling, and so forth. A UIBarButtonItem’s customView, however, is a UIView — indeed, it can be any kind of UIView. Thus, a bar button item with a customView can display any sort of view in a toolbar or navigation bar, and that view can implement touch handling as appropriate, or it can be informational.
Let’s start with the basic bar button item (no custom view). A bar button item, like a tab bar item, inherits from UIBarItem the title, image, and isEnabled properties. The title text color, by default, comes from the bar button item’s tintColor, which may be inherited from the bar itself or from higher up the view hierarchy. Assigning an image removes the title. The image should usually be quite small; Apple recommends 22×22. By default, it will be treated as a transparency mask (a template): the hue of its pixels will be ignored, and the transparency of its pixels will be combined with the bar button item’s tintColor. However, you can instead display the image as is, and not as a transparency mask, by deriving an image whose rendering mode is .alwaysOriginal (see Chapter 2).
A basic bar button item has a style property (UIBarButtonItemStyle); this will usually be .plain. The alternative, .done, causes the title to be bold. You can further refine the title font and style. In addition, a bar button item can have a background image; this will typically be a small, resizable image, and can be used to provide a border. Full details appear in Chapter 12.
A bar button item also has target and action properties. These contribute to its button-like behavior: tapping a bar button item can trigger an action method elsewhere.
There are three ways to make a bar button item:
- By borrowing it from the system
-
Make a UIBarButtonItem with
init(barButtonSystemItem:target:action:). Consult the documentation for the list of available system items; they are not the same as for a tab bar item. You can’t assign a title or change the image. (But you can change the tint color or assign a background image.) - By making your own basic bar button item
-
Make a UIBarButtonItem with
init(title:style:target:action:)or withinit(image:style:target:action:).An additional initializer,
init(image:landscapeImagePhone:style:target:action:), lets you supply two images, one for portrait orientation, the other for landscape orientation; this is because by default, the bar’s height might change when the interface is rotated. Alternatively, you can use size class–aware images to handle this situation (see Chapter 2). - By making a custom view bar button item
-
Make a UIBarButtonItem with
init(customView:), supplying a UIView that the bar button item is to display. The bar button item has no action and target; the UIView itself must somehow implement button behavior if that’s what you want. For example, thecustomViewmight be a UISegmentedControl, but then it is the UISegmentedControl’s target and action that give it button behavior.
Bar button items in a toolbar are horizontally positioned automatically by the system. You can provide hints to help with this positioning. If you know that you’ll be changing an item’s title dynamically, you’ll probably want its width to accommodate the longest possible title right from the start; to arrange that, set the possibleTitles property to a Set of strings that includes the longest title. Alternatively, you can supply an absolute width. Also, you can incorporate spacers into the toolbar; these are created with init(barButtonSystemItem:target:action:), but they have no visible appearance, and cannot be tapped. Place .flexibleSpace system items between the visible items to distribute the visible items equally across the width of the toolbar. There is also a .fixedSpace system item whose width lets you insert a space of defined size.
Navigation Items and Toolbar Items
What appears in a navigation bar (UINavigationBar) depends upon the navigation items (UINavigationItem) in its stack. In a navigation interface, the navigation controller will manage the navigation bar’s stack for you, but you must still configure each navigation item by setting properties of the navigationItem of each child view controller. The UINavigationItem properties are as follows (see also Chapter 12):
titleortitleView-
Determines what is to appear in the center of the navigation bar when this navigation item is at the top of the stack.
The
titleis a string. Setting the view controller’stitleproperty sets thetitleof thenavigationItemautomatically, and is usually the best approach.The
titleViewcan be any kind of UIView; if set, it will be displayed instead of thetitle. ThetitleViewcan implement further UIView functionality; for example, it can be tappable. Even if you are using atitleView, you should still give your view controller atitle, as it will be needed for the back button when a view controller is pushed onto the stack on top of this one.Figure 6-1 shows the TidBITS News master view, with the navigation bar displaying a
titleViewwhich is a (tappable) image view; the master view controller’stitle, which is"TidBITS", is therefore not displayed. In the TidBITS News detail view controller’s navigation item, thetitleViewis a UISegmentedControl providing a Previous and Next button; when it is pushed onto the stack, the back button displays the master view controller’stitle(Figure 6-8).

Figure 6-8. A segmented control in the center of a navigation bar
prompt-
An optional string to appear centered above everything else in the navigation bar. The navigation bar’s height will be increased to accommodate it.
rightBarButtonItemorrightBarButtonItems-
A bar button item or, respectively, an array of bar button items to appear at the right side of the navigation bar; the first item in the array will be rightmost.
In Figure 6-8, the text size button is a right bar button item; it has nothing to do with navigation, but is placed here merely because space is at a premium on the small iPhone screen.
backBarButtonItem-
When a view controller is pushed on top of this view controller, the navigation bar will display at its left a button pointing to the left, whose title is this view controller’s
title. That button is this view controller’s navigation item’sbackBarButtonItem. That’s right: the back button displayed in the navigation bar belongs, not to the top item (thenavigationItemof the current view controller), but to the back item (thenavigationItemof the view controller that is one level down in the stack). In Figure 6-8, the back button in the detail view is the master view controller’s default back button, displaying itstitle.The vast majority of the time, the default behavior is the behavior you’ll want, and you’ll leave the back button alone. If you wish, though, you can customize the back button by setting a view controller’s
navigationItem.backBarButtonItemso that it contains an image, or a title differing from the view controller’stitle. The best technique is to provide a new UIBarButtonItem whose target and action arenil; the runtime will add a correct target and action, so as to create a working back button. Here’s how to create a back button with a custom image instead of a title:let b = UIBarButtonItem( image:UIImage(named:"files"), style:.plain, target:nil, action:nil) self.navigationItem.backBarButtonItem = bA Bool property,
hidesBackButton, allows the top navigation item to suppress display of the back item’s back bar button item. If you set this totrue, you’ll probably want to provide some other means of letting the user navigate back.The visible indication that the back button is a back button is a left-pointing chevron (the back indicator) that’s separate from the button itself. This chevron can also be customized, but it’s a feature of the navigation bar, not the bar button item: set the navigation bar’s
backIndicatorImageandbackIndicatorTransitionMask. (I’ll give an example in Chapter 12.) But if the back button is assigned a background image — not an internal image, as in the example I just gave, but a background image, by callingsetBackButtonBackgroundImage— then the back indicator is removed; it is up to the background image to point left, if desired.
leftBarButtonItemorleftBarButtonItems-
A bar button item or, respectively, an array of bar button items to appear at the left side of the navigation bar; the first item in the array will be leftmost. The
leftItemsSupplementBackButtonproperty, if set totrue, allows both the back button and one or more left bar button items to appear.
A view controller’s navigation item can have its properties set at any time while being displayed in the navigation bar. This (and not direct manipulation of the navigation bar) is the way to change the navigation bar’s contents dynamically. For example, in one of my apps, we play music from the user’s library using interface in the navigation bar. The titleView is a progress view (UIProgressView, Chapter 12) that needs updating every second to reflect the playback position in the current song, and the right bar button should be either the system Play button or the system Pause button, depending on whether we are paused or playing. So I have a timer that periodically checks the state of the music player; observe how we access the progress view and the right bar button by way of self.navigationItem:
// change the progress view
let prog = self.navigationItem.titleView!.subviews[0] as! UIProgressView
if let item = self.nowPlayingItem {
    let current = self.mp.currentPlaybackTime
    let total = item.playbackDuration
    prog.progress = Float(current / total)
} else {
    prog.progress = 0
}
// change the bar button
let whichButton : UIBarButtonSystemItem? = {
    switch self.mp.currentPlaybackRate {
    case 0..<0.1:
        return .play
    case 0.1...1.0:
        return .pause
    default:
        return nil
    }
}()
if let which = whichButton {
    let bb = UIBarButtonItem(barButtonSystemItem: which,
        target: self, action: #selector(doPlayPause))
    self.navigationItem.rightBarButtonItem = bb
}
Each view controller to be pushed onto the navigation controller’s stack is responsible also for supplying the items to appear in the navigation interface’s toolbar, if there is one. To configure this, set the view controller’s toolbarItems property to an array of UIBarButtonItem instances. You can change the toolbar items even while the view controller’s view and current toolbarItems are showing, optionally with animation, by sending setToolbarItems(_:animated:) to the view controller.
Configuring a Navigation Controller
You configure a navigation controller by manipulating its stack of view controllers. This stack is the navigation controller’s viewControllers array property, though you will rarely need to manipulate that property directly.
The view controllers in a navigation controller’s viewControllers array are the navigation controller’s child view controllers; the navigation controller is the parent of the view controllers in the array. The navigation controller is also the navigationController of the view controllers in the array and of all their children; thus a child view controller at any depth can learn that it is contained by a navigation controller and can get a reference to that navigation controller. The navigation controller retains the array, and the array retains the child view controllers.
The normal way to manipulate a navigation controller’s stack is by pushing or popping one view controller at a time. When the navigation controller is instantiated, it is usually initialized with init(rootViewController:); this is a convenience method that assigns the navigation controller a single initial child view controller, the root view controller that goes at the bottom of the stack:
let fvc = FirstViewController()
let nav = UINavigationController(rootViewController:fvc)
Instead of init(rootViewController:), you might choose to create the navigation controller with init(navigationBarClass:toolbarClass:), in order to set a custom subclass of UINavigationBar or UIToolbar. Typically, this will be in order to customize the appearance of the navigation bar and toolbar; sometimes you’ll create, say, a UIToolbar subclass for no other reason than to mark this kind of toolbar as needing a certain appearance. I’ll explain about that in Chapter 12. If you use this initializer, you’ll have to set the navigation controller’s root view controller separately.
You can also set the UINavigationController’s delegate (adopting UINavigationControllerDelegate). The delegate receives messages before and after a child view controller’s view is shown.
A navigation controller will typically appear on the screen initially containing just its root view controller, and displaying its root view controller’s view. There will be no back button, because there is no back item; there is nowhere to go back to. Subsequently, when the user asks to navigate to a new view, you (typically meaning code in the current view controller) obtain the next view controller (typically by creating it) and push it onto the stack by calling pushViewController(_:animated:) on the navigation controller. The navigation controller performs the animation, and displays the new view controller’s view:
let svc = SecondViewController(nibName: nil, bundle: nil)
self.navigationController!.pushViewController(svc, animated: true)
The command for going back is popViewController(animated:), but you might never need to call it yourself; when the user taps the back button to navigate back, the runtime will call it for you. When a view controller is popped from the stack, the viewControllers array removes and releases the view controller, which is usually permitted to go out of existence at that point.
Alternatively, there’s a second way to push a view controller onto the navigation controller’s stack, without referring to the navigation controller: show(_:sender:). This UIViewController method lets the caller be agnostic about the current interface situation; for example, it pushes onto a navigation controller if the view controller to which it is sent is in a navigation interface, but performs view controller presentation if not. I’ll talk more about this method in Chapter 9; meanwhile, I’ll continue using pushViewController(_:animated:) in my examples.
Instead of tapping the back button, the user can go back by dragging a pushed view controller’s view from the left edge of the screen. This is actually a way of calling popViewController(animated:), with the difference that the animation is interactive. (Interactive view controller transition animation is the subject of the next section.) The UINavigationController uses a UIScreenEdgePanGestureRecognizer to detect and track the user’s gesture. You can obtain a reference to this gesture recognizer as the navigation controller’s interactivePopGestureRecognizer; thus you can disable the gesture recognizer and prevent this way of going back, or you can mediate between your own gesture recognizers and this one (see Chapter 5).
You can manipulate the stack more directly if you wish. You can call popViewController(animated:) explicitly; to pop multiple items so as to leave a particular view controller at the top of the stack, call popToViewController(_:animated:), or to pop all the items down to the root view controller, call popToRootViewController(animated:). All of these methods return the popped view controller (or view controllers, as an array), in case you want to do something with them.
To set the entire stack at once, call setViewControllers(_:animated:). You can access the stack through the viewControllers property. Manipulating the stack directly is the only way, for instance, to delete or insert a view controller in the middle of the stack.
The view controller at the top of the stack is the topViewController; the view controller whose view is displayed is the visibleViewController. Those will normally be the same, but they needn’t be, as the topViewController might present a view controller, in which case the presented view controller will be the visibleViewController. Other view controllers can be accessed through the viewControllers array by index number. The root view controller is at index 0; if the array’s count is c, the back view controller (the one whose navigationItem.backBarButtonItem is currently displayed in the navigation bar) is at index c-2.
The topViewController may need to communicate with the next view controller as the latter is pushed onto the stack, or with the back view controller as it itself is popped off the stack. The problem is parallel to that of communication between an original presenter and a presented view controller, which I discussed earlier in this chapter (“Communication with a Presented View Controller”), so I won’t say more about it here.
A child view controller will probably want to configure its navigationItem early in its lifetime, so as to be ready for display in the navigation bar by the time the view controller is handed as a child to the navigation controller. Apple warns (in the UIViewController class reference, under navigationItem) that loadView and viewDidLoad are not appropriate places to do this, because the circumstances under which the view is needed are not related to the circumstances under which the navigation item is needed. Apple’s own code examples routinely violate this warning, but it is probably best to override a view controller initializer for this purpose.
A navigation controller’s navigation bar is accessible as its navigationBar, and can be hidden and shown with setNavigationBarHidden(_:animated:). (It is possible, though not common, to maintain and manipulate a navigation stack through a navigation controller whose navigation bar never appears.) Its toolbar is accessible as its toolbar, and can be hidden and shown with setToolbarHidden(_:animated:).
A view controller also has the power to specify that its ancestor’s bottom bar (a navigation controller’s toolbar, or a tab bar controller’s tab bar) should be hidden as this view controller is pushed onto a navigation controller’s stack. To do so, set the view controller’s hidesBottomBarWhenPushed property to true. The trick is that you must do this very early, before the view loads; the view controller’s initializer is a good place. The bottom bar remains hidden from the time this view controller is pushed to the time it is popped, even if other view controllers are pushed and popped on top of it in the meantime.
A navigation controller can perform automatic hiding and showing of its navigation bar (and, if normally shown, its toolbar) in response to various situations, as configured by properties:
- When tapped
-
If the navigation controller’s
hidesBarsOnTapistrue, a tap that falls through the top view controller’s view is taken as a signal to toggle bar visibility. The relevant gesture recognizer is the navigation controller’sbarHideOnTapGestureRecognizer. - When swiped
-
If the navigation controller’s
hidesBarsOnSwipeistrue, an upward or downward swipe respectively hides or shows the bars. The relevant gesture recognizer is the navigation controller’sbarHideOnSwipeGestureRecognizer. - In landscape
-
If the navigation controller’s
hidesBarsWhenVerticallyCompactistrue, bars are automatically hidden when the app rotates to landscape on the iPhone (andhidesBarsOnTapis treated astrue, so the bars can be shown again by tapping). - When the user is typing
-
If the navigation controller’s
hidesBarsWhenKeyboardAppearsistrue, bars are automatically hidden when the onscreen keyboard appears (see Chapter 10).
You can configure a UINavigationController, or any view controller that is to serve in a navigation interface, in a .storyboard or .xib file. In the Attributes inspector, use a navigation controller’s Bar Visibility and Hide Bars checkboxes to determine the presence of the navigation bar and toolbar. The navigation bar and toolbar are themselves subviews of the navigation controller, and you can configure them with the Attributes inspector as well. A navigation controller’s root view controller can be specified; in a storyboard, there will be a “root view controller” relationship between the navigation controller and its root view controller. The root view controller is automatically instantiated together with the navigation controller.
A view controller in a .storyboard or .xib file has a Navigation Item where you can specify its title, its prompt, and the text of its back button. (If a view controller in a nib doesn’t have a Navigation Item and you want to configure this view controller for use in a navigation interface, drag a Navigation Item from the Object library onto the view controller.) You can drag Bar Button Items into a view controller’s navigation bar in the canvas to set the left buttons and right buttons of its navigationItem. Moreover, the Navigation Item has outlets, one of which permits you to set its titleView. Similarly, you can give a view controller Bar Button Items that will appear in the toolbar.
To start an iPhone project with a main storyboard that has a UINavigationController as its root view controller, begin with the Master–Detail app template. Alternatively, start with the Single View app template, remove the existing view controller from the storyboard, and add a Navigation Controller in its place. Unfortunately, the nib editor assumes that the navigation controller’s root view controller should be a UITableViewController. If that’s not the case, here’s a better way: start with the Single View app template, select the existing view controller, and choose Editor → Embed In → Navigation Controller. A view controller to be subsequently pushed onto the navigation stack can be configured in the storyboard as the destination of a push segue; I’ll talk more about that later in the chapter.
Custom Transition
You can customize certain built-in transitions between view controller views:
- Tab bar controller
-
When a tab bar controller changes which of its child view controllers is selected, by default there is no animation; you can add a custom animation.
- Navigation controller
-
When a navigation controller pushes or pops a child view controller, by default there is a sideways sliding animation; you can replace this with a custom animation.
- Presented view controller
-
When a view controller is presented or dismissed, there is a limited set of built-in animations; you can supply a custom animation. Moreover, you can customize the ultimate size and position of the presented view, and how the presenting view is seen behind it; you can also provide intermediate views that remain during the presentation.
Given the extensive animation resources of iOS (see Chapter 4), this is an excellent chance for you to provide your app with variety and distinction. The view of a child view controller pushed onto a navigation controller’s stack needn’t arrive sliding from the side; it can expand by zooming from the middle of the screen, drop from above and fall into place with a bounce, snap into place like a spring, or whatever else you can dream up. A familiar example is Apple’s Calendar app, which transitions from a year to a month, in a navigation controller, by zooming in.
A custom transition animation can optionally be interactive — meaning that it is driven in real time by the user’s gesture. The user does not merely tap and cause an animation to take place; the user performs an extended gesture and gradually summons the new view to supersede the old one. The user can thus participate in the progress of the transition. A familiar example is the way a navigation controller’s view can be popped by dragging from the leading edge of the screen. Another example is the Photos app, which lets the user pinch a photo, in a navigation controller, to pop to the album containing it.
New in iOS 10, a custom transition animation can be interruptible. You can provide a way for the user to pause the animation, possibly interact with the animated view by means of a gesture, and then resume (or cancel) the animation.
Noninteractive Custom Transition Animation
In the base case, you provide a custom animation that is not interactive. Configuring your custom animation requires three steps:
-
Before the transition begins, you must have given the view controller in charge of the transition a delegate.
-
As the transition begins, the delegate will be asked for an animation controller. You will supply a reference to some object adopting the UIViewControllerAnimatedTransitioning protocol (or
nilto specify that the default animation, if any, should be used). -
The animation controller will be sent these messages:
transitionDuration(using:)-
The animation controller must return the duration of the custom animation.
animateTransition(using:)-
The animation controller should perform the animation.
interruptibleAnimator(using:)-
Optional; if implemented, the animation controller should return an object adopting the UIViewImplicitlyAnimating protocol, which may be a property animator.
animationEnded(_:)-
Optional; if implemented, the animation controller may perform cleanup following the animation.
Here’s the strategy we’ll use to implement the animation controller methods. We’ll implement all four of them, as follows:
transitionDuration(using:)-
We’ll return a constant.
animateTransition(using:)-
We’ll call
interruptibleAnimator(using:)to obtain a property animator and tell it to start animating. interruptibleAnimator(using:)-
We’ll form the property animator and return it. We’ll also assign the property animator to an instance property of our view controller, so that it persists throughout the animation. That way, if we are asked for the animator again during this animation, we can just return the instance property.
animationEnded(_:)-
We’ll clean up any instance properties; at a minimum, we’ll set our property animator to
nil.
Now let’s get down to the nitty-gritty of what the interruptibleAnimator implementation actually does to form the property animator’s animation. In general, a custom transition animation works as follows:
-
The
using:parameter is an object called the transition context (adopting the UIViewControllerContextTransitioning protocol). By querying the transition context, you can obtain:-
The container view, an already existing view within which all the action is to take place.
-
The outgoing and incoming view controllers.
-
The outgoing and incoming views. These are probably the main views of the outgoing and incoming view controllers, but you should obtain the views directly from the transition context, just in case they aren’t. The outgoing view is already inside the container view.
-
The initial
frameof the outgoing view, and the ultimateframewhere the incoming view must end up.
-
-
Having gathered this information, your mission is to put the incoming view into the container view and animate it in such a way as to end up at its correct ultimate
frame. You may also animate the outgoing view if you wish. -
When the animation ends, your completion function must call the transition context’s
completeTransitionto tell it that the animation is over. In response, the outgoing view is removed automatically and the animation comes to an end (and ouranimationEndedwill be called).
As a simple example, I’ll use the transition between two child view controllers of a tab bar controller, when the user taps a different tab bar item. By default, this transition isn’t animated; one view just replaces the other. Let’s animate the transition.
A possible custom animation is that the new view controller’s view should slide in from one side while the old view controller’s view should slide out the other side. The direction of the slide should depend on whether the index of the new view controller is greater or less than that of the old view controller. Let’s implement that.
Take the steps in order. First, configure a delegate for the tab bar controller. Assume that the tab bar controller is our app’s root view controller. For simplicity, I’ll set its delegate in code, in the app delegate’s application(_:didFinishLaunchingWithOptions:), and I’ll make that delegate be the app delegate itself:
(self.window!.rootViewController as! UITabBarController).delegate = self
On to the second step. The app delegate, in its role as UITabBarControllerDelegate, will be sent a message whenever the tab bar controller is about to change view controllers. That message is:
-
tabBarController(_:animationControllerForTransitionFrom:to:)
We must return our animation controller, namely, some object implementing UIViewControllerAnimatedTransitioning. I’ll return self. Here we go:
func tabBarController(_ tabBarController: UITabBarController,
    animationControllerForTransitionFrom fromVC: UIViewController,
    to toVC: UIViewController) -> UIViewControllerAnimatedTransitioning? {
        return self
}
(There is no particular reason why the animation controller should be self; I’m just using self to keep things simple. The animation controller can be any object — even a dedicated lightweight object instantiated just to govern this transition. There is also no particular reason why the animation controller should be the same object every time this method is called; depending on the circumstances, we could readily provide a different animation controller, or we could return nil to use the default transition — meaning, in this case, no animation.)
On to the third step! Here we are in the animation controller (UIViewControllerAnimatedTransitioning). Our first job is to reveal in advance the duration of our animation:
func transitionDuration(using ctx: UIViewControllerContextTransitioning?)
    -> TimeInterval {
        return 0.4
}
(Again, the value returned needn’t be a constant; we could decide on the duration based on the circumstances. But the value returned here must be the same as the duration of the animation we’ll actually be constructing in interruptibleAnimator.)
As promised, our animateTransition simply calls interruptibleAnimator and tells the resulting animator to animate:
func animateTransition(using ctx: UIViewControllerContextTransitioning) {
    let anim = self.interruptibleAnimator(using: ctx)
    anim.startAnimation()
}
At last we come to interruptibleAnimator itself:
func interruptibleAnimator(
    using ctx: UIViewControllerContextTransitioning)
    -> UIViewImplicitlyAnimating {
        // ...
}
I take a plodding, boilerplate approach, and I suggest you do the same. First, look to see if we’ve already formed this property animator. There is a danger that interruptibleAnimator may be called multiple times during the animation, and in that case we don’t want to reconfigure the animator and form it again; we want to return the same animator. So we have a property, self.anim, typed as an Optional wrapping a UIViewImplicitlyAnimating object. If that isn’t nil, we unwrap it and return it, and that’s all:
if self.anim != nil {
    return self.anim!
}
If we haven’t returned, we need to form the property animator. First, we thoroughly query the transition context ctx to learn all about the parameters of this animation:
let vc1 = ctx.viewController(forKey:.from)!
let vc2 = ctx.viewController(forKey:.to)!
let con = ctx.containerView
let r1start = ctx.initialFrame(for:vc1)
let r2end = ctx.finalFrame(for:vc2)
let v1 = ctx.view(forKey:.from)!
let v2 = ctx.view(forKey:.to)!
Now we can prepare for our intended animation. In this case, we are sliding the views, so we need to decide the final frame of the outgoing view and the initial frame of the incoming view. We are sliding the views sideways, so those frames should be positioned sideways from the initial frame of the outgoing view and the final frame of the incoming view, which the transition context has just given us. Which side they go on depends upon the relative place of these view controllers among the children of the tab bar controller — is this to be a leftward slide or a rightward slide? Since the animation controller is the app delegate, we can get a reference to the tab bar controller the same way we did before:
let tbc = self.window!.rootViewController as! UITabBarController
let ix1 = tbc.viewControllers!.index(of:vc1)!
let ix2 = tbc.viewControllers!.index(of:vc2)!
let dir : CGFloat = ix1 < ix2 ? 1 : -1
var r1end = r1start
r1end.origin.x -= r1end.size.width * dir
var r2start = r2end
r2start.origin.x += r2start.size.width * dir
Now we’re ready to animate! We put the second view controller’s view into the container view at its initial frame, and animate our views:
v2.frame = r2start
con.addSubview(v2)
let anim = UIViewPropertyAnimator(duration: 0.4, curve: .linear) {
    v1.frame = r1end
    v2.frame = r2end
}
We must not neglect to supply the completion function that calls completeTransition:
anim.addCompletion { _ in
    ctx.completeTransition(true)
}
Our property animator is now formed. We retain it in our self.anim property, and we also return it:
self.anim = anim
return anim
That’s all there is to it. Our example animation wasn’t very complex, but an animation needn’t be complex to be interesting, significant, and helpful to the user; I use this exact same animation in my own apps, and I think it enlivens and clarifies the transition. And even a more complex animation would be implemented along the same basic lines. One possibility that I didn’t illustrate in my example is that you are free to introduce additional views temporarily into the container view during the course of the animation; you’ll probably want to remove them in the completion function. For example, you might make some interface object appear to migrate from one view controller’s view into the other (in reality you’d probably use a snapshot view; see Chapter 1).
Interactive Custom Transition Animation
With an interactive custom transition animation, the idea is that we track something the user is doing, typically by means of a gesture recognizer (see Chapter 5), and perform the “frames” of the transition in response.
(There are actually two ways to write an interactive custom transition animation. One is to use an object that I call a percent driver, which is an instance of the built-in UIPercentDrivenInteractiveTransition class. The other is to implement interactivity yourself. Thanks to the iOS 10 property animator, the second way is just as easy as the first way — in a very real sense, the property animator is a sort of percent driver — so I won’t discuss the first way.)
To make a custom transition animation interactive, you supply, in addition to the animation controller, an interaction controller. This is an object adopting the UIViewControllerInteractiveTransitioning protocol. This object needn’t be the same as the animation controller, though in my examples it will be. This, in turn, causes the runtime to call the interaction controller’s startInteractiveTransition(_:) instead of the animation controller’s animateTransition(using:).
Thus, configuring your custom animation requires the following steps:
-
Before the transition begins, you must have given the view controller in charge of the transition a delegate.
-
You’ll have a gesture recognizer that tracks the interactive gesture. When the gesture recognizer recognizes, it triggers the transition.
-
As the transition begins, the delegate will be asked for an animation controller and you’ll return a UIViewControllerAnimatedTransitioning object.
-
If you didn’t return
nilas the animation controller, the delegate will also be asked for an interaction controller. You’ll return a UIViewControllerInteractiveTransitioning object (ornilif you don’t want interactivity). -
If you didn’t return
nilas the interaction controller, the transition is now interactive! In addition to the animation controller messages, the interaction controller will be sentstartInteractiveTransition(_:). -
The gesture recognizer continues by constantly updating the transition context, by calling
updateInteractiveTransition(_:), as well managing the frames of the animation. -
Sooner or later the gesture will end. At this point, we must decide whether to declare the transition completed or cancelled. A typical approach is to say that if the user performed more than half the full gesture, that constitutes completion; otherwise, it constitutes cancellation. We finish the animation accordingly.
-
The animation is now completed, and its completion function is called. We must call the transition context’s
finishInteractiveTransitionorcancelInteractiveTransition, and then callcompleteTransition(_:), with the argument stating whether the transition was finished or cancelled. OuranimationEndedis then called, and we clean up.
As an example, I’ll describe how to make an interactive version of the tab bar controller transition animation that we developed in the previous section, such that the user can drag from the edge of the screen to bring the tab bar controller’s adjacent view controller in from the right or from the left. All the code we’ve already written can be left more or less as is! In fact, we can easily expand the previous example so that the transition is either noninteractive (the user taps a tab bar item, just as before) or interactive (the user drags from one edge).
I’m going to need two more instance properties, in addition to self.anim:
var interacting = false
var anim : UIViewImplicitlyAnimating?
var context : UIViewControllerContextTransitioning?
The self.interacting property will be used a signal that our transition is to be interactive. The self.context property is needed because the gesture recognizer’s action method is going to need access to the transition context. (Sharing the transition context through a property may seem ugly, but the elegant alternatives would make the example more complicated, so we’ll just do it this way.)
To track the user’s gesture, I’ll put a pair of UIScreenEdgePanGestureRecognizers into the interface. The gesture recognizers are attached to the tab bar controller’s view (tbc.view), as this will remain constant while the views of its view controllers are sliding across the screen. In addition to making myself the target for the gesture recognizers’ action messages, I also make myself their delegate so I can dictate which gesture recognizer is applicable to the current situation:
let sep =
    UIScreenEdgePanGestureRecognizer(target:self, action:#selector(pan))
sep.edges = UIRectEdge.right
tbc.view.addGestureRecognizer(sep)
sep.delegate = self
let sep2 =
    UIScreenEdgePanGestureRecognizer(target:self, action:#selector(pan))
sep2.edges = UIRectEdge.left
tbc.view.addGestureRecognizer(sep2)
sep2.delegate = self
Acting as the delegate of the two gesture recognizers, we prevent either pan gesture recognizer from operating unless there is another child of the tab bar controller available on that side of the current child:
func gestureRecognizerShouldBegin(_ g: UIGestureRecognizer) -> Bool {
    let tbc = self.window!.rootViewController as! UITabBarController
    var result = false
    if (g as! UIScreenEdgePanGestureRecognizer).edges == .right {
        result = (tbc.selectedIndex < tbc.viewControllers!.count - 1)
    } else {
        result = (tbc.selectedIndex > 0)
    }
    return result
}
If the gesture recognizer action method pan is called, our interactive transition animation is to take place. I’ll break down the discussion according to the gesture recognizer’s states. In .began, I raise the self.interacting flag and trigger the transition by changing the tab bar controller’s selectedIndex:
func pan(_ g:UIScreenEdgePanGestureRecognizer) {
    switch g.state {
    case .began:
        self.interacting = true
        let tbc = self.window!.rootViewController as! UITabBarController
        if g.edges == .right {
            tbc.selectedIndex = tbc.selectedIndex + 1
        } else {
            tbc.selectedIndex = tbc.selectedIndex - 1
        }
    // ...
    }
}
The transition begins. We are asked for our animation controller and our transition controller; we will supply a transition controller only if the self.interacting flag was raised (and if the self.interacting flag is not raised, the user tapped a tab bar item and everything is like the preceding example):
func tabBarController(_ tabBarController: UITabBarController,
    animationControllerForTransitionFrom fromVC: UIViewController,
    to toVC: UIViewController) -> UIViewControllerAnimatedTransitioning? {
        return self
}
func tabBarController(_ tabBarController: UITabBarController,
    interactionControllerFor ac: UIViewControllerAnimatedTransitioning)
    -> UIViewControllerInteractiveTransitioning? {
        return self.interacting ? self : nil
}
We are interactive, so our startInteractiveTransition(_:) is called instead of our animateTransition(using:). It sets up our other two instance properties; so now we have our transition context and our property animator. But it does not tell the property animator to animate! We are interactive; that means we intend to manage the “frames” of the animation ourselves:
func startInteractiveTransition(_ ctx:UIViewControllerContextTransitioning){
    self.context = ctx
    self.anim = self.interruptibleAnimator(using: ctx)
}
We are now back in the gesture recognizer’s action method, in the .changed state. We calculate the completed percentage of the gesture, and update both the property animator’s “frame” and the transition context:
case .changed:
    let v = g.view!
    let delta = g.translation(in:v)
    let percent = abs(delta.x/v.bounds.size.width)
    self.anim?.fractionComplete = percent
    self.context?.updateInteractiveTransition(percent)
Finally, the gesture ends. This is where the use of the property animator really pays off. Our goal is to “hurry home” to the start of the animation or the end of the animation, depending on how far the user got through the gesture. Well, with a property animator, that’s really easy (see “Canceling a View Animation”):
case .ended:
    let anim = self.anim as! UIViewPropertyAnimator
    anim.pauseAnimation()
    if anim.fractionComplete < 0.5 {
        anim.isReversed = true
    }
    anim.continueAnimation(
        withTimingParameters:
        UICubicTimingParameters(animationCurve:.linear),
        durationFactor: 0.2)
The animation comes to an end, and the completion function that we gave our property animator in interruptibleAnimator is called. This is the one place in our interruptibleAnimator that needs to be a little different from the preceding example; we must send different messages to the transition context, depending on whether we finished to the end or reversed to the start:
anim.addCompletion { finish in
    if finish == .end {
        ctx.finishInteractiveTransition()
        ctx.completeTransition(true)
    } else {
        ctx.cancelInteractiveTransition()
        ctx.completeTransition(false)
    }
}
Finally, our animationEnded is called, and we clean up our instance properties:
func animationEnded(_ transitionCompleted: Bool) {
    self.interacting = false
    self.context = nil
    self.anim = nil
}
You may be asking: why must we keep talking to our transition context throughout the process, calling updateInteractiveTransition throughout the progress of the gesture, and finishInteractiveTransition or cancelInteractiveTransition at the end? For a tab bar controller’s transition, these calls have little or no significance. But in the case, say, of a navigation controller, the animation has a component separate from what you’re doing — the change in the appearance of the navigation bar, as the old title departs and the new title arrives and so forth. The transition context needs to coordinate that animation with the interactive gesture and with your animation. So you need to keep telling it where things are in the course of the interaction.
Interruptible Custom Transition Animation
A property animator (UIViewPropertyAnimator) makes interruptible animations possible. While a view is in the middle of being animated, the property animator implements touchability of the animated view, and allows you to pause the animation. You can incorporate these features into a custom transition animation.
As an example, I’ll describe a navigation controller custom push animation that will be interruptible. A custom transition animation for a navigation controller is similar to a custom transition animation for a tab bar controller, so there’s no need to repeat the details from the preceding examples. The chief difference is that a navigation controller delegate has its own methods that will be called to discover whether there’s an animation controller and an interaction controller:
-
navigationController(_:animationControllerFor:from:to:) -
navigationController(_:interactionControllerFor:)
In the first method, the for: parameter is a UINavigationControllerOperation, allowing you to distinguish a push from a pop.
In my example, we’re going to have a custom push animation without a custom pop animation; to keep things simple, the animation won’t be interactive:
func navigationController(_ navigationController: UINavigationController,
    animationControllerFor operation: UINavigationControllerOperation,
    from fromVC: UIViewController, to toVC: UIViewController)
    -> UIViewControllerAnimatedTransitioning? {
        if operation == .push {
            return self
        }
        return nil
}
Warning
Returning nil for the pop animation controller, as in the preceding code, will cause the built-in swipe-to-pop interactive transition to stop working. I regard this as a bug.
The user will tap as usual to trigger the push transition (a push segue, or pushViewController, or show). Our delegate method is called and returns an animation controller, so the animation controller’s transitionDuration and animateTransition are called. Our animateTransition calls interruptibleAnimator, which, if the instance property self.anim doesn’t already exist, creates the property animator, stores it in self.anim, and returns it; animateTransition then starts the property animator’s animation. So far, this is exactly like the tab bar controller example from the preceding section. In fact, they are so exactly alike that there is no need for me to show you any of that code! Just imagine that we have implemented interruptibleAnimator to provide a UIViewPropertyAnimator that animates the pushed view controller’s view onto the scene somehow.
Now I’ll make that animation interruptible. I’ll allow the user to grab the animated view and drag it around. To keep things simple, when the user lets go of the view, I’ll just finish the animation. (The idea is silly, but it demonstrates interruptibility.)
The animated view can be grabbed because I’ve given it a pan gesture recognizer — and because the property animator makes the view touchable during animation. The gesture recognizer’s action method starts by pausing the property animator, and then proceeds as for any draggable-view action method:
func drag (_ g : UIPanGestureRecognizer) {
    let v = g.view!
    switch g.state {
    case .began:
        self.anim?.pauseAnimation()
        fallthrough
    case .changed:
        let delta = g.translation(in:v.superview)
        var c = v.center
        c.x += delta.x; c.y += delta.y
        v.center = c
        g.setTranslation(.zero, in: v.superview)
    // ...
    }
}
(If this were an interactive transition, my .began case would also need to call the transition context’s pauseInteractiveTransition.)
The interesting part is what happens when the user lets go of the draggable view. We want to continue animating from here to the goal. When I created the property animator in interruptibleAnimator, I stored the transition context in a property, self.context; now, I query the transition context to learn what the goal is:
case .ended:
    let anim = self.anim as! UIViewPropertyAnimator
    let ctx = self.context!
    let vc2 = ctx.viewController(forKey:.to)!
    anim.addAnimations {
        v.frame = ctx.finalFrame(for: vc2)
    }
    let factor = 1 - anim.fractionComplete
    anim.continueAnimation(withTimingParameters: nil, durationFactor: factor)
When the animation reaches its end, the property animator’s completion function is called, and it calls the transition context’s completeTransition; our animationEnded is then called, and we clean up by setting self.anim and self.context to nil.
Custom Presented View Controller Transition
Customizing what happens when a view controller is presented is more complex, and more powerful, than customizing a tab bar controller or navigation controller transition. With a presented view controller, you can customize not only the animation but also the final position of the presented view. Moreover, you can introduce extra views which remain in the scene while the presented view is presented, and are not removed until after dismissal is complete; for example, if the presented view is smaller than the presenting view and covers it only partially, you might add a dimming view between them, to darken the presenting view (just as a .formSheet presentation does).
What the runtime must do while a view is being presented in order to make the presentation customizable is also more complex. There is no existing view to serve as the container view; therefore, when the presentation starts, the runtime must construct the container view and insert it into the interface and leave it there for only as long as the view remains presented. In the case of a .fullScreen presentation, the runtime must also rip the presenting view out of the interface and insert it into the container view, because you might want the presenting view to participate in the animation. For other styles of presentation, the container view is in front of the presenting view, which can’t be animated and is left in place as the presentation proceeds.
The work of customizing a presentation is distributed between two objects: the animation controller (or interaction controller) on the one hand, and the presentation controller on the other. The idea is that the animation controller should be responsible for only the animation, the movement of the presented view into its final position. The determination of that final position is the job of the presentation controller. The presentation controller is also responsible for inserting any extra views, such as a dimming view, into the container view; Apple says that the animation controller animates the content, while the presentation controller animates the “chrome.” This distribution of responsibilities simplifies considerably the task of customizing the animation itself.
Customizing the animation
I’ll start with a situation where we don’t need to use the presentation controller: all we want to do is customize the animation part of a built-in presentation style. The steps are almost completely parallel to how we customized a tab bar controller animation:
-
Give the presented view controller a delegate. This means that we set the presented view controller’s
transitioningDelegateproperty to an object adopting the UIViewControllerTransitioningDelegate protocol. -
The delegate will be asked for an animation controller, and will return an object adopting the UIViewControllerAnimatedTransitioning protocol. Unlike a tab bar controller or navigation controller, a presented view controller’s view undergoes two animations — the presentation and the dismissal — and therefore the delegate is asked separately for controllers:
-
animationController(forPresented:presenting:source:) -
interactionControllerForPresentation(using:) -
animationController(forDismissed:) -
interactionControllerForDismissal(using:)
You are free to customize just one animation, leaving the other at the default by not providing a controller for it.
-
-
The animation controller will implement
transitionDurationandanimateTransitionandinterruptibleAnimatorandanimationEndedas usual.
To illustrate, let’s say we’re running on an iPad, and we want to present a view using the .formSheet presentation style. But instead of using any of the built-in animation types (transition styles), we’ll have the presented view appear to grow from the middle of the screen.
The only mildly tricky step is the first one. The problem is that the transitioningDelegate must be set very early in the presented view controller’s life — before the presentation begins. But the presented view controller doesn’t exist before the presentation begins. The most reliable approach, therefore, is for the presented view controller to assign its own delegate in its own initializer:
required init?(coder aDecoder: NSCoder) {
    super.init(coder:aDecoder)
    self.transitioningDelegate = self
}
On to step two. The transitioning delegate is asked for an animation controller; here, I’ll have it supply self once again, and I’ll do this only for the presentation, leaving the dismissal to use the default animation (and I’m not making this example interactive, so I don’t implement the interactionController methods):
func animationController(forPresented presented: UIViewController,
    presenting: UIViewController, source: UIViewController)
    -> UIViewControllerAnimatedTransitioning? {
        return self
}
Finally, step three — the actual animation. Our implementations of transitionDuration, animateTransition, and animationEnded are the usual boilerplate. The animation itself is created in interruptibleAnimator. It is extremely simple, because we don’t care about the .from view controller, which remains in place during the presentation (indeed, its view isn’t even in the container view):
func interruptibleAnimator(using ctx: UIViewControllerContextTransitioning)
    -> UIViewImplicitlyAnimating {
        if self.anim != nil {
            return self.anim!
        }
        let vc2 = ctx.viewController(forKey:.to)
        let con = ctx.containerView
        let r2end = ctx.finalFrame(for:vc2!)
        let v2 = ctx.view(forKey:.to)!
        v2.frame = r2end
        v2.transform = CGAffineTransform(scaleX: 0.1, y: 0.1)
        v2.alpha = 0
        con.addSubview(v2)
        let anim = UIViewPropertyAnimator(duration: 0.4, curve: .linear) {
            v2.alpha = 1
            v2.transform = .identity
        }
        anim.addCompletion { _ in
            ctx.completeTransition(true)
        }
        self.anim = anim
        return anim
}
If we customize both animation and dismissal using the same animation controller, there is a complication: the roles of the view controllers are reversed in the mind of the transition context. On presentation, the presented view controller is the .to view controller, but on dismissal, it is the .from view controller. For a presentation that isn’t .fullScreen, the unused view is nil, so you can distinguish the cases by structuring your code like this:
let v1 = ctx.view(forKey:.from)
let v2 = ctx.view(forKey:.to)
if let v2 = v2 { // presenting
    // ...
} else if let v1 = v1 { // dismissing
    // ...
}
Customizing the presentation
Now let’s involve the presentation controller: we will customize the final frame of the presented view controller’s view, and we’ll even add some “chrome” to the presentation. This will require some additional steps:
-
In addition to setting a
transitioningDelegate, we must set the presented view controller’smodalPresentationStyleto.custom. -
The result of the preceding step is that the delegate (our adopter of UIViewControllerTransitioningDelegate) is sent an additional message:
-
presentationController(forPresented:presenting:source:)
(The
source:parameter is what I have termed the “original presenter.”) Your mission is to return an instance of a custom UIPresentationController subclass. This will then be the presented view controller’s presentation controller during the course of this presentation, from the time presentation begins to the time dismissal ends. You must create this instance by calling (directly or indirectly) the designated initializer:-
init(presentedViewController:presenting:)
-
-
By overriding appropriate methods in your UIPresentationController subclass, you participate in the presentation, dictating the presented view’s final position (
frameOfPresentedViewInContainerView) and adding “chrome” to the presentation as desired.
Tip
It is perfectly legal for the transitioning delegate to supply a custom presentation controller and no animation controller! In that case, a default animation will be performed, but the presented view will end up at the position your custom presentation controller dictates. This is a good example of the delightful “separation of powers” of the presentation controller and the animation controller.
The UIPresentationController has properties pointing to the presentingViewController as well the presentedViewController and the presentedView, plus the presentationStyle set by the presented view controller. It also obtains the containerView, which it subsequently communicates to the animation controller’s transition context. It has some methods and properties that you can override in your subclass; you only need to override the ones that require customization for your particular implementation:
frameOfPresentedViewInContainerView-
The final position of the presented view. If there is an animation controller, it will receive this from the transition context’s
finalFrame(for:)method. presentationTransitionWillBeginpresentationTransitionDidEnddismissalTransitionWillBegindismissalTransitionDidEnd-
Use these events as signals to add or remove “chrome” (extra views) to the container view.
containerViewWillLayoutSubviewscontainerViewDidLayoutSubviews-
Use these layout events as signals to update the “chrome” views if needed.
shouldPresentInFullscreen-
The default is
true; a value offalseturns this presentation into a.currentContextpresentation. shouldRemovePresentersView-
The default is
false, except that of course it istruefor a standard.fullScreenpresentation, meaning that the presenting view is ripped out of the interface at the end of the presentation transition. You can returntruefor a custom presentation, but it would be rare to do this; even if the presented view completely covers the presenting view, there is no harm in leaving the presenting view in place.
A presentation controller is not a view controller, but UIPresentationController adopts some protocols that UIViewController adopts, and thus gets the same resizing-related messages that a UIViewController gets, as I described earlier in this chapter. It adopts UITraitEnvironment, meaning that it has a traitCollection and participates in the trait collection inheritance hierarchy, and receives the traitCollectionDidChange(_:) message. It also adopts UIContentContainer, meaning that it receives willTransition(to:with:) and viewWillTransition(to:with:).
In addition, a presentation controller functions as the parent of the presented view controller, and can override its inherited trait collection and respond to changes in its preferredContentSize, as I’ll explain later.
To illustrate the use of a custom presentation controller, I’ll expand the preceding example to implement a custom presentation style that looks like a .formSheet even on an iPhone. The first step is to set the presentation style to .custom at the same time that we set the transitioning delegate:
required init?(coder aDecoder: NSCoder) {
    super.init(coder:aDecoder)
    self.transitioningDelegate = self
    self.modalPresentationStyle = .custom // *
}
The result (step two) is that the extra delegate method is called so that we can provide a custom presentation controller, and we do so:
func presentationController(forPresented presented: UIViewController,
    presenting: UIViewController?, source: UIViewController)
    -> UIPresentationController? {
        let pc = MyPresentationController(
            presentedViewController: presented, presenting: presenting)
        return pc
}
Everything else happens in our implementation of MyPresentationController. To make the presentation look like a .formSheet, we inset the presented view’s frame:
override var frameOfPresentedViewInContainerView : CGRect {
    return super.frameOfPresentedViewInContainerView.insetBy(dx:40, dy:40)
}
We could actually stop at this point! The presented view now appears in the correct position. However, the presenting view is appearing undimmed behind it. Let’s add dimming, by inserting a translucent dimming view into the container view. Note that we are careful to deal with the possibility of subsequent rotation:
override func presentationTransitionWillBegin() {
    let con = self.containerView!
    let shadow = UIView(frame:con.bounds)
    shadow.backgroundColor = UIColor(white:0, alpha:0.4)
    con.insertSubview(shadow, at: 0)
    shadow.autoresizingMask = [.flexibleWidth, .flexibleHeight]
}
Again, this works perfectly, but now I don’t like what happens when the presented view is dismissed: the dimming view vanishes suddenly at the end of the dismissal. I’d rather have the dimming view fade out, and I’d like it to fade out in coordination with the dismissal animation. The way to arrange that is through the object vended by the presented view controller’s transitionCoordinator method. This object is just like the transition coordinator I’ve already discussed earlier in this chapter in connection with resizing events and rotation: in particular, we can call its animate(alongsideTransition:completion:) method to add our own animation:
override func dismissalTransitionWillBegin() {
    let con = self.containerView!
    let shadow = con.subviews[0]
    let tc = self.presentedViewController.transitionCoordinator!
    tc.animate(alongsideTransition: { _ in
        shadow.alpha = 0
    })
}
Once again, we could stop at this point. But I’d like to add a further refinement. A .formSheet view has rounded corners. I’d like to make our presented view look the same way:
override var presentedView : UIView? {
    let v = super.presentedView!
    v.layer.cornerRadius = 6
    v.layer.masksToBounds = true
    return v
}
Finally, for completeness, it would be nice, during presentation, to dim the appearance of any button titles and other tinted interface elements visible through the dimming view, to emphasize that they are disabled:
override func presentationTransitionDidEnd(_ completed: Bool) {
    let vc = self.presentingViewController
    let v = vc.view
    v?.tintAdjustmentMode = .dimmed
}
override func dismissalTransitionDidEnd(_ completed: Bool) {
    let vc = self.presentingViewController
    let v = vc.view
    v?.tintAdjustmentMode = .automatic
}
Transition Coordinator
Earlier in this chapter, we encountered resizing-related methods such as viewWillTransition(to:with:), whose second parameter is a UIViewControllerTransitionCoordinator. As I suggested at that time, you can use this transition coordinator to add your own animation to the runtime’s animation when the app rotates. Now it turns out that the view controller itself can obtain its transition coordinator during a view controller transition, through its transitionCoordinator property.
The transition coordinator adopts the UIViewControllerTransitionCoordinatorContext protocol, just like the transition context; indeed, it is a kind of wrapper around the transition context. Thus, in effect, view controllers can find out about the transition they are involved in.
In addition to the methods that it implements by virtue of adopting the UIViewControllerTransitionCoordinatorContext protocol, a transition coordinator implements the following methods:
animate(alongsideTransition:completion:)-
Takes an animations function and a completion function. The animation you supply is incorporated into the transition coordinator’s animation. Returns a Bool, informing you in case your commands couldn’t be animated. Both functions receive the transition context as a parameter. (See also “View Controller Manual Layout”, where I discussed this method in connection with rotation.)
A view controller’s use of this method will typically be to add animation of its view’s internal interface as part of a transition animation. This works equally for a custom animation or a built-in animation; in fact, the point is that the view controller can behave agnostically with regard to how its own view is being animated. In this example, a presented view controller animates part of its interface into place as the animation proceeds (whatever that animation may be):
override func viewWillAppear(_ animated: Bool) {
    super.viewWillAppear(animated)
    if let tc = self.transitionCoordinator {
        tc.animate(alongsideTransition:{ _ in
            self.buttonTopConstraint.constant += 200
            self.view.layoutIfNeeded()
        })
    }
}
notifyWhenInteractionChanges(_:)-
The parameter is a function to be called; the transition context is the function’s parameter. New in iOS 10, this method supersedes
notifyWhenInteractionEnds(_:). The older method arranged for your function to be called when the user abandons an interactive gesture and the transition is about to be either completed or cancelled. This is useful particularly if the interactive transition is being cancelled, as it may well be that what your view controller wants to do will differ in this situation. The new method is needed because an interactive transition might be interruptible; your function is now called whenever the transition changes between being interactive and being noninteractive.In this example, a navigation controller has pushed a view controller, and now the user is popping it interactively (using the default drag-from-the-left-edge gesture). If the user cancels, the back view controller can hear about it, like this:
override func viewWillAppear(_ animated: Bool) {
    super.viewWillAppear(animated)
    let tc = self.transitionCoordinator
    tc?.notifyWhenInteractionChanges { ctx in
        if ctx.isCancelled {
            // ...
        }
    }
}
Warning
I have not found any occasion when the child of a tab bar controller has a non-nil transition coordinator (perhaps because this transition has no built-in animation). I regard this as a bug.
Page View Controller
A page view controller (UIPageViewController) is like a book that can be viewed only one page at a time. The user, by a gesture, can navigate in one direction or the other to see the next or the previous page, successively — like turning the pages of a book.
Actually, a page view controller only seems to have multiple pages. In reality, it has only the one page that the user sees at any given moment. That page is its child view controller’s view. The page view controller has only one child view controller at a time; it navigates by releasing its existing child view controller and replacing it with another. This is a very efficient architecture: it makes no difference whether the page view controller lets the user page through three pages or ten thousand pages, because each page is created in real time, on demand, and exists only as long as the user is looking at it.
The page view controller’s children are its viewControllers, and there will always be at most one of them. The page view controller is its current child’s parent.
(Okay, I lied. There is a special configuration in which a page view controller can have two pages at a time. In that case, it really looks like a book. I’ll describe this configuration in a moment.)
Preparing a Page View Controller
To create a UIPageViewController, use its designated initializer:
-
init(transitionStyle:navigationOrientation:options:)
Here’s what the parameters mean:
transitionStyle:-
The animation type during navigation (UIPageViewControllerTransitionStyle). Your choices are:
-
.pageCurl -
.scroll(sliding)
-
navigationOrientation:-
The direction of navigation (UIPageViewControllerNavigationOrientation). Your choices are:
-
.horizontal -
.vertical
-
options:-
A dictionary. Possible keys are:
UIPageViewControllerOptionSpineLocationKey-
If you’re using the page curl transition, this is the position of the pivot line around which those page curl transitions rotate. The value (UIPageViewControllerSpineLocation) is one of the following:
-
.min(left or top) -
.mid(middle; this is the configuration where there are two children, and two pages are shown at once) -
.max(right or bottom)
-
UIPageViewControllerOptionInterPageSpacingKey-
If you’re using the scroll transition, this is the spacing between successive pages, visible as a gap during the transition (the default is 0).
You configure the page view controller’s initial content by handing it its initial child view controller(s). You do that by calling this method:
-
setViewControllers(_:direction:animated:completion:)
Here’s what the parameters mean:
viewControllers:-
An array of one view controller — unless you’re using the page curl transition and the
.midspine location, in which case it’s an array of two view controllers. direction:-
The animation direction (UIPageViewControllerNavigationDirection). This probably won’t matter when you’re assigning the page view controller its initial content, as you are not likely to want any animation. Possible values are:
-
.forward -
.backward
-
animated:,completion:-
A Bool and a completion function.
To allow the user to page through the page view controller, and to supply the page view controller with a new page at that time, you also assign the page view controller a dataSource, which should conform to the UIPageViewControllerDataSource protocol. The dataSource is told whenever the user starts to change pages, and should respond by immediately providing another view controller whose view will constitute the new page. Typically, the data source will create this view controller on the spot.
Here’s a minimal example. Each page in the page view controller is to portray an image of a named Pep Boy. The first question is where the pages will come from. My data model consists of an array (self.pep) of the string names of the three Pep Boys:
let pep : [String] = ["Manny", "Moe", "Jack"]
To match these, I have three eponymous image files, portraying each Pep Boy. I’ve also got a UIViewController subclass called Pep, capable of displaying a Pep Boy. I initialize a Pep object with Pep’s designated initializer init(pepBoy:), supplying the name of a Pep Boy from the array; the Pep object sets its own boy property:
init(pepBoy boy:String) {
    self.boy = boy
    super.init(nibName: nil, bundle: nil)
}
Pep’s viewDidLoad then fetches the corresponding image and assigns it as the image of a UIImageView within its own view:
override func viewDidLoad() {
    super.viewDidLoad()
    self.pic.image = UIImage(named:self.boy.lowercased())
}
At any given moment, then, our page view controller will have one Pep instance as its child, and thus will portray a Pep Boy. Here’s how I create the page view controller itself (in my app delegate):
// make a page view controller
let pvc = UIPageViewController(
    transitionStyle: .scroll, navigationOrientation: .horizontal)
// give it an initial page
let page = Pep(pepBoy: self.pep[0])
pvc.setViewControllers([page], direction: .forward, animated: false)
// give it a data source
pvc.dataSource = self
// put its view into the interface
self.window!.rootViewController = pvc
The page view controller is a UIViewController, and its view must get into the interface by standard means. You can make the page view controller the window’s rootViewController, as I do here; you can make it a presented view controller; you can make it a child view controller of a tab bar controller or a navigation controller. If you want the page view controller’s view to be a subview of a custom view controller’s view, that view controller must be a custom container view controller, as I’ll describe later.
Page View Controller Navigation
We now have a page view controller’s view in our interface, itself containing and displaying the view of one Pep view controller that is its child. In theory, we have three pages, because we have three Pep Boys and their images — but the page view controller knows about only one of them. Just as with a navigation controller, you don’t supply (or even create) a page until the moment comes to navigate to it. When that happens, one of these data source methods will be called:
-
pageViewController(_:viewControllerAfter:) -
pageViewController(_:viewControllerBefore:)
The job of those methods is to return the requested successive view controller — or nil, to signify that there is no further page in this direction. Your strategy for doing that will depend on how your model maintains the data.
My data is an array of unique strings, so all I have to do is find the previous name or the next name in the array. Here’s one of my data source methods:
func pageViewController(_ pvc: UIPageViewController,
    viewControllerAfter vc: UIViewController) -> UIViewController? {
        let boy = (vc as! Pep).boy
        let ix = self.pep.index(of:boy)! + 1
        if ix >= self.pep.count {
            return nil
        }
        return Pep(pepBoy: self.pep[ix])
The other data source method is completely parallel, so there’s no point showing it. We now have a working page view controller! The user, with a sliding gesture, can page through it, one page at a time. When the user reaches the first page or the last page, it is impossible to go further in that direction.
You can also, at any time, call setViewControllers to change programmatically what page is being displayed, possibly with animation. In this way, you can “jump” to a page other than a successive page (something that the user cannot do with a gesture).
Page indicator
If you’re using the scroll style, the page view controller will optionally display a page indicator (a UIPageControl, see Chapter 12). The user can look at this to get a sense of what page we’re on, and can tap to the left or right of it to navigate. To get the page indicator, you must implement two more data source methods; they are consulted in response to setViewControllers. We called that method initially to configure the page view controller; if we never call it again (because the user simply keeps navigating to the next or previous page), these data source methods won’t be called again either, but they don’t need to be: the page view controller will thenceforth keep track of the current index on its own. Here’s my implementation for the Pep Boy example:
func presentationCount(for pvc: UIPageViewController) -> Int {
    return self.pep.count
}
func presentationIndex(for pvc: UIPageViewController) -> Int {
    let page = pvc.viewControllers![0] as! Pep
    let boy = page.boy
    return self.pep.index(of:boy)!
}
Unfortunately, the page view controller’s page indicator by default has white dots and a clear background, so it is invisible in front of a white background. You’ll want to customize it to change that. There is no direct access to it, so it’s simplest to use the appearance proxy (Chapter 12). For example:
let proxy = UIPageControl.appearance()
proxy.pageIndicatorTintColor = UIColor.red.withAlphaComponent(0.6)
proxy.currentPageIndicatorTintColor = .red
proxy.backgroundColor = .yellow
Navigation gestures
If you’ve assigned the page view controller the .pageCurl transition style, the user can navigate by tapping at either edge of the view or by dragging across the view. These gestures are detected through two gesture recognizers, which you can access through the page view controller’s gestureRecognizers property. The documentation suggests that you might change where the user can tap or drag by attaching them to a different view, and other customizations are possible as well. In this code, I change the behavior of a .pageCurl page view controller (pvc) so that the user must double tap to request navigation:
for g in pvc.gestureRecognizers {
    if let g = g as? UITapGestureRecognizer {
        g.numberOfTapsRequired = 2
    }
}
Of course you are also free to add to the user’s stock of gestures for requesting navigation. You can supply any controls or gesture recognizers that make sense for your app, and respond by calling setViewControllers. For example, if you’re using the .scroll transition style, there’s no tap gesture recognizer, so the user can’t tap at either edge of the page view controller’s view to request navigation. Let’s change that. I’ve added invisible views at either edge of my Pep view controller’s view, with tap gesture recognizers attached. When the user taps, the tap gesture recognizer fires, and the action method posts a notification whose object is the tap gesture recognizer:
@IBAction func tap (_ sender: UIGestureRecognizer?) {
    NotificationCenter.default.post(name:.tap, object: sender)
}
In the app delegate, where the page view controller management code is, I have registered to receive this notification. When it arrives, I use the tap gesture recognizer’s view’s tag to learn which view was tapped; I then navigate accordingly:
NotificationCenter.default.addObserver(
    forName:.tap, object: nil, queue: .main) { n in
        let g = n.object as! UIGestureRecognizer
        let which = g.view!.tag
        let vc0 = pvc.viewControllers![0]
        guard let vc = (which == 0 ?
            self.pageViewController(pvc, viewControllerBefore: vc0) :
            self.pageViewController(pvc, viewControllerAfter: vc0))
            else {return}
        let dir : UIPageViewControllerNavigationDirection =
            which == 0 ? .reverse : .forward
        pvc.setViewControllers([vc], direction: dir, animated: true)
    }
}
Other Page View Controller Configurations
It is possible to assign a page view controller a delegate (UIPageViewControllerDelegate), which gets an event when the user starts turning the page and when the user finishes turning the page, and can change the spine location dynamically in response to a change in device orientation. As with a tab bar controller’s delegate or a navigation controller’s delegate, a page view controller’s delegate also gets messages allowing it to specify the page view controller’s rotation policy, so there’s no need to subclass UIPageViewController solely for that purpose.
One further bit of configuration applicable to a .pageCurl page view controller is the isDoubleSided property. If it is true, the next page occupies the back of the previous page. The default is false, unless the spine is in the middle, in which case it’s true and can’t be changed. Your only option here, therefore, is to set it to true when the spine isn’t in the middle, and in that case the back of each page would be a sort of throwaway page, glimpsed by the user during the page curl animation.
A page view controller in a storyboard lets you configure its transition style, navigation orientation, page spacing, spine location, and isDoubleSided property. (It also has delegate and data source outlets, but you’re not allowed to connect them to other view controllers, because you can’t draw an outlet from one scene to another in a storyboard.) It has no child view controller relationship, so you can’t set the page view controller’s initial child view controller in the storyboard; you’ll have to complete the page view controller’s initial configuration in code.
Container View Controllers
UITabBarController, UINavigationController, and UIPageViewController are built-in parent view controllers: you hand them a child view controller and they put that child view controller’s view into the interface for you, inside their own view. What if you want your own view controller to do the same thing?
Back in iOS 3 and 4, that was illegal; the only way a view controller’s view could get into the interface was if a built-in parent view controller put it there. You could put a view into the interface, of course — but not a view controller’s view. (Naturally, developers ignored this restriction, and got themselves into all kinds of difficulties.) In iOS 5, Apple introduced a coherent way for you to create your own parent view controllers, which can legally manage child view controllers and put their views into the interface — provided you follow certain rules. A custom parent view controller of this sort is called a container view controller.
An example appears in Figure 6-3 — and the way that interface is constructed is explained in Figure 6-4. We have a page view controller, but it is not the root view controller, and its view does not occupy the entire interface. How is that achieved? We have our own view controller, RootViewController, which acts as a container view controller. The page view controller is its child. Therefore, RootViewController is permitted — as long it follows the rules — to put the page view controller’s view into the interface, as a subview of its own view.
That’s a simple example, and simplicity might be sufficient. But you can take advantage of container view controllers to achieve powerful and complex view controller hierarchies. Your own view controller becomes like one of the built-in parent view controllers, except that you get to define what it does — what it means for a view controller to be a child of this kind of parent view controller, how many children it has, which of its children’s views appear in the interface and where they appear, and so on. A container view controller can also participate actively in the business of trait collection inheritance and view resizing.
Adding and Removing Children
A view controller has a childViewControllers array. This is what gives it the power to be a parent! You must not, however, just wantonly populate this array. A child view controller needs to receive certain definite events at particular moments:
-
As it becomes a child view controller
-
As its view is added to and removed from the interface
-
As it ceases to be a child view controller
Therefore, to act as a parent view controller, your UIViewController subclass must fulfill certain responsibilities:
- Adding a child
-
When a view controller is to become your view controller’s child, your view controller must do these things, in this order:
-
Send
addChildViewController(_:)to itself, with the child as argument. The child is automatically added to yourchildViewControllersarray and is retained. -
Get the child view controller’s view into the interface (as a subview of your view controller’s view), if that’s what adding a child view controller means.
-
Send
didMove(toParentViewController:)to the child with your view controller as its argument.
-
- Removing a child
-
When a view controller is to cease being your view controller’s child, your view controller must do these things, in this order:
-
Send
willMove(toParentViewController:)to the child with anilargument. -
Remove the child view controller’s view from your interface.
-
Send
removeFromParentViewControllerto the child. The child is automatically removed from yourchildViewControllersarray and is released.
-
This is a clumsy and rather confusing dance. The underlying reason for it is that a child view controller must always receive willMove(toParentViewController:) followed by didMove(toParentViewController:) (and your own child view controllers can take advantage of these events however you like). But it turns out that you don’t always send both these messages explicitly, because:
-
addChildViewController(_:)sendswillMove(toParentViewController:)for you automatically. -
removeFromParentViewControllersendsdidMove(toParentViewController:)for you automatically.
Thus, in each case you must send manually the other message, the one that adding or removing a child view controller doesn’t send for you — and of course you must send it so that everything happens in the correct order, as dictated by the rules I just listed.
When you do this dance correctly, the proper parent–child relationship results: the container view controller can refer to its children as its childViewControllers, and any child has a reference to the parent as its parent. If you don’t do it correctly, all sorts of bad things can happen; in a worst-case scenario, the child view controller won’t even survive, and its view won’t work correctly, because the view controller was never properly retained as part of the view controller hierarchy (see “View Controller Hierarchy”). So do the dance correctly!
Example 6-1 provides a schematic approach for how to obtain an initial child view controller and put its view into the interface, where no child view controller’s view was previously. (Alternatively, a storyboard can do this work for you, with no code, as I’ll explain later in this chapter.)
Example 6-1. Adding an initial child view controller
let vc = // whatever; this is the initial child view controller
self.addChildViewController(vc) // "will" called for us
// insert view into interface between "will" and "did"
self.view.addSubview(vc.view)
vc.view.frame = // whatever, or use constraints
// when we call add, we must call "did" afterward
vc.didMove(toParentViewController: self)
In many cases, the situation I’ve just described is all you’ll need. You have a parent view controller and a child view controller, and they are paired permanently, for the lifetime of the parent. That’s how Figure 6-3 behaves: RootViewController has a page view controller as its child, and the page view controller’s view as its own view’s subview, for the entire lifetime of the app.
To show how that’s done, I’ll use the same the page view controller that I used in my earlier examples, the one that displays Pep Boys. My root view controller will be called RootViewController. I’ll create and configure my page view controller as a child of RootViewController, in RootViewController’s viewDidLoad:
let pep : [String] = ["Manny", "Moe", "Jack"]
override func viewDidLoad() {
    super.viewDidLoad()
    let pvc = UIPageViewController(
        transitionStyle: .scroll, navigationOrientation: .horizontal)
    pvc.dataSource = self
    self.addChildViewController(pvc)
    self.view.addSubview(pvc.view)
    // ... configure frame or constraints here ...
    pvc.didMove(toParentViewController: self)
    let page = Pep(pepBoy: self.pep[0])
    pvc.setViewControllers([page], direction: .forward, animated: false)
}
It is also possible to replace one child view controller’s view in the interface with another (comparable to how UITabBarController behaves when a different tab bar item is selected). The simplest, most convenient way to do that is for the parent view controller to send itself this message:
-
transition(from:to:duration:options:animations:completion:)
That method manages the stages in good order, adding the view of one child view controller (to:) to the interface before the transition and removing the view of the other child view controller (from:) from the interface after the transition, and seeing to it that the child view controllers receive lifetime events (such as viewWillAppear(_:)) at the right moment. Here’s what the last three arguments are for:
options:-
A bitmask (UIViewAnimationOptions) comprising the same possible options that apply to any view transition (see “Transitions”).
animations:-
An animations function that may be used for view animations other than the transition animation specified in the
options:argument. Alternatively, if none of the built-in transition animations is suitable, you can animate the views yourself here; they are both in the interface during this function. completion:-
This function will be important if the transition involves the removal or addition of a child view controller. At the time when
transitionis called, both view controllers must be children of the parent view controller; so if you’re going to remove one of the view controllers as a child, you’ll do it in the completion function. Similarly, if you owe a new child view controller adidMove(toParentViewController:)call, you’ll use the completion function to fulfill that debt.
Here’s an example. To keep things simple, suppose that our view controller has just one child view controller at a time, and displays the view of that child view controller within its own view. So let’s say that when our view controller is handed a new child view controller, it substitutes that new child view controller for the old child view controller and replaces the old child view controller’s view with the new child view controller’s view. Here’s code that does that correctly; the view controllers are fromvc and tovc:
// we have already been handed the new view controller
// set up the new view controller's view's frame
tovc.view.frame = // ... whatever
// must have both as children before we can transition between them
self.addChildViewController(tovc) // "will" called for us
// when we call remove, we must call "will" (with nil) beforehand
fromvc.willMove(toParentViewController: nil)
// then perform the transition
self.transition(
    from:fromvc, to:tovc,
    duration:0.4, options:.transitionFlipFromLeft,
    animations:nil) { _ in
        // when we call add, we must call "did" afterward
        tovc.didMove(toParentViewController: self)
        fromvc.removeFromParentViewController() // "did" called for us
}
If we’re using constraints to position the new child view controller’s view, where will we set up those constraints? Before transition is too soon, as the new child view controller’s view is not yet in the interface. The completion function is too late: if the view is added with no constraints, it will have no initial size or position, so the animation will be performed and then the view will suddenly seem to pop into existence as we provide its constraints. The animations function turns out to be a very good place:
// must have both as children before we can transition between them
self.addChildViewController(tovc) // "will" called for us
// when we call remove, we must call "will" (with nil) beforehand
fromvc.willMove(toParentViewController: nil)
// then perform the transition
self.transition(
    from:fromvc, to:tovc,
    duration:0.4, options:.transitionFlipFromLeft,
    animations: {
        tovc.view.translatesAutoresizingMaskIntoConstraints = false
        // ... configure tovc.view constraints here ...
    }) { _ in
        // when we call add, we must call "did" afterward
        tovc.didMove(toParentViewController: self)
        fromvc.removeFromParentViewController() // "did" called for us
}
Alternatively, you can use a layout-related event, such as viewWillLayoutSubviews; still, I prefer the animations function, as it is called just once at exactly the right moment.
If the built-in transition animations are unsuitable, you can omit the options: argument and provide your own animation in the animations function, at which time both views are in the interface. In this example, I animate a substitute view (an image view showing a snapshot of tovc.view) to grow from the top left corner; then I configure the real view’s constraints and remove the substitute:
// tovc.view.frame is already set
let r = UIGraphicsImageRenderer(size:tovc.view.bounds.size)
let im = r.image { ctx in
    let con = ctx.cgContext
    tovc.view.layer.render(in:con)
}
let iv = UIImageView(image:im)
iv.frame = CGRect.zero
self.view.addSubview(iv)
tovc.view.alpha = 0 // hide the real view
// must have both as children before we can transition between them
self.addChildViewController(tovc) // "will" called for us
// when we call remove, we must call "will" (with nil) beforehand
fromvc.willMove(toParentViewController: nil)
// then perform the transition
self.transition(
    from:fromvc, to:tovc,
    duration:0.4, // no options:
    animations: {
        iv.frame = tovc.view.frame // animate bounds change
        // ... configure tovc.view constraints here ...
    }) { _ in
        tovc.view.alpha = 1
        iv.removeFromSuperview()
        // when we call add, we must call "did" afterward
        tovc.didMove(toParentViewController: self)
        fromvc.removeFromParentViewController() // "did" called for us
}
If your parent view controller is going to be consulted about the status bar (whether it should be shown or hidden, and if shown, whether its text should be light or dark), it can elect to defer the decision to one of its children, by overriding these properties (just as a UITabBarController does):
-
childViewControllerForStatusBarStyle -
childViewControllerForStatusBarHidden
Container View Controllers, Traits, and Resizing
A container view controller participates in trait collection inheritance and view resizing. In fact, you may well insert a container view controller into your view controller hierarchy for no other purpose than to engage in such participation.
Thus far, I have treated trait collection inheritance as immutable; and for the most part, it is. A UITraitEnvironment (an object with a traitCollection property: UIScreen, UIView, UIViewController, or UIPresentationController) ultimately gets its trait collection from the environment, and the environment is simply a fact. Nevertheless, a parent view controller has the amazing ability to lie to a child view controller about the environment, thanks to this method:
-
setOverrideTraitCollection(_:forChildViewController:)
The first parameter is a UITraitCollection that will be combined with the inherited trait collection and communicated to the specified child.
This is a UIViewController instance method, so only view controllers have this mighty power. Moreover, you have to specify a child view controller, so only parent view controllers have this mighty power. However, UIPresentationController has a similar power, through its overrideTraitCollection property; setting this property combines the override trait collection with the inherited collection and communicates it to the presented view controller.
Why would you want to do such a thing as lie to a child view controller about its environment? Well, imagine that we’re writing an iPad app, and we have a view controller whose view can appear either fullscreen or as a small subview of a parent view controller’s main view. The view’s interface might need to be different when it appears in the smaller size. You could configure that using size classes (conditional constraints) in the nib editor, with one interface for a .regular horizontal size class (iPad) and another interface for a .compact horizontal size class (iPhone). Then, when the view is to appear in its smaller size, we lie to its view controller and tell it that this is an iPhone:
let vc = // the view controller we're going to use as a child
self.addChildViewController(vc) // "will" called for us
let tc = UITraitCollection(horizontalSizeClass: .compact)
self.setOverrideTraitCollection(tc, forChildViewController: vc) // heh heh
vc.view.frame = // whatever
self.view.addSubview(vc.view)
vc.didMove(toParentViewController: self)
Apple’s own motivating example involves UISplitViewController, a class that behaves differently depending on its trait environment. For example, by lying to a split view controller and making it believe we’re on an iPad, you can cause the split view controller to look like a split view controller (displaying two subviews, such as a master table view and a detail view) even on an iPhone. I’ll talk more about that in Chapter 9.
A parent view controller sets the size of a child view controller’s view. A child view controller, however, can express a preference as to what size it would like its view to be, by setting its own preferredContentSize property. The chief purpose of this property is to be consulted by a parent view controller when this view controller is its child. This property is a preference and no more; no law says that the parent must consult the child, or that the parent must obey the child’s preference.
If a view controller’s preferredContentSize is set while it is a child view controller, the runtime automatically communicates this fact to the parent view controller, by calling this UIContentContainer method:
-
preferredContentSizeDidChange(forChildContentContainer:)
The parent view controller may implement this method to consult the child’s preferredContentSize and change the child’s view’s size in response. Again, no law requires the parent to do this. This method, and the preferredContentSize property, are ways of allowing a child view controller a voice in its view’s size; it is the parent who dictates what that size will actually be.
A parent view controller, as an adopter of the UIContentContainer protocol (along with UIPresentationController), is also responsible for communicating to its children that their sizes are changing and what their new sizes will be. It is the parent view controller’s duty to implement this method:
size(forChildContentContainer:withParentContainerSize:)-
Should be implemented to return each child view controller’s correct size at any moment. Failure to implement this method will cause the child view controller to be handed the wrong size in its implementation of
viewWillTransition(to:with:)— it will be given the parent’s new size rather than its own new size!
If your parent view controller implements viewWillTransition(to:with:), calling super is sufficient to get the same message passed on to the children. This works even if your implementation explicitly changed the size of a child view controller at this time, provided that you implemented size(forChildContentContainer:withParentContainerSize:) to return the new size.
Peek and Pop
On a device with 3D touch, if the user can tap to trigger a transition to a new view controller, you can permit the user to do a partial press to preview the new view controller’s view from within the current view controller’s view, without actually performing the transition. The user can then either back off the press completely, in which case the preview vanishes, or do a full press, in which case the transition is performed. Apple calls this peek and pop.
Apple’s own apps use peek and pop extensively throughout the interface. For example, in the Mail app, viewing a mailbox’s list of messages, the user can peek at a message’s content; in the Calendar app, viewing a month, the user can peek at a day’s events; and so on.
The preview during peek and pop is only a preview; the user can’t interact with it. (For example, in the Mail app, the user can see the start of a previewed message, but can’t scroll it.) In effect, the preview is just a snapshot. However, to give the preview some additional functionality, it can be accompanied by menu items, similar to an action sheet (see Chapter 13). The user slides the preview upward to reveal the menu items, and can then tap a menu item to perform its action — still without performing the full transition. (For example, in the Mail app, the user can mark the message as read.) The user can then tap the preview to back out and return to the original view controller — still without ever having performed the full transition.
To implement peek and pop, your source view controller (the one that the user would transition from if the full transition were performed) must register by calling this method:
registerForPreviewing(with:sourceView:)-
The first parameter is an object adopting the UIViewControllerPreviewingDelegate protocol; this will typically be
self. The second parameter is a view containing as subviews all the tappable areas that you want the user to be able to press in order to summon a preview.This method also returns a value, a system-supplied context manager conforming to the UIViewControllerPreviewing protocol. However, for straightforward peek and pop you won’t need to capture this object; it will be supplied again in the delegate method calls.
Your UIViewControllerPreviewingDelegate adopter must implement two methods:
previewingContext(_:viewControllerForLocation:)-
The user is pressing within the
sourceViewyou supplied inregisterForPreviewing. The first parameter is the context manager I mentioned a moment ago. The second parameter, thelocation:, is the point where the user is pressing, insourceViewcoordinates. If it is within an area corresponding to a tappable element for which you want to trigger peek and pop, then you should do the following:-
Set the context manager’s
sourceRectto the frame of the tappable element, insourceViewcoordinates. The reason you have to do this is that the runtime has not bothered to do any hit-testing; all it knows or cares about is that the user is pressing within yoursourceView. -
Instantiate the destination view controller and return it. The runtime will snapshot the view controller’s view and present that snapshot as the preview.
If the user is not pressing within a tappable area, or if for any other reason you don’t want any peek and pop, return
nil. -
previewingContext(_:commit:)-
The user, while previewing, has continued to press harder and has reached full force. Your job is now to perform the actual transition, just as if the user had tapped the tappable area. The first parameter is the context manager; the second parameter is the view controller you provided in the previous delegate method. Typically, the second parameter is all you need; this is the view controller instance to transition to, and you just perform the transition.
Here’s a simple (and somewhat artificial) example. I’ll reuse my Pep view controller from the earlier page view controller examples. Suppose I have a container view controller; its child is to be a Pep view controller, and I’ll display that child view controller’s view inside the container view controller’s view. I also have three buttons: Manny, Moe, and Jack. The user can tap a button, and that Pep Boy will be displayed as the child view controller’s view. All three buttons have the same control event action method, using the button title to decide which Pep Boy to display:
@IBAction func doShowBoy(_ sender : UIButton) {
    let title = sender.title(for: .normal)!
    let pep = Pep(pepBoy: title)
    self.transitionContainerTo(pep)
}
func transitionContainerTo(_ pep:Pep) {
    let oldvc = self.childViewControllers[0]
    pep.view.frame = self.container.bounds
    self.addChildViewController(pep)
    oldvc.willMove(toParentViewController: nil)
    self.transition(
        from: oldvc, to: pep,
        duration: 0.2, options: .transitionCrossDissolve,
        animations: nil) { _ in
            pep.didMove(toParentViewController: self)
            oldvc.removeFromParentViewController()
    }
}
Now I want to implement peek and pop for those three buttons. To make things simpler, the buttons are the arranged subviews of a stack view, self.stackView. I’ll register for previewing in my container view controller’s viewDidLoad:
override func viewDidLoad() {
    super.viewDidLoad()
    self.registerForPreviewing(with: self, sourceView: self.stackView)
}
In the first delegate method, I hit-test the press location; if the user is pressing on a button, I set the context manager’s sourceRect, instantiate the correctly configured Pep view controller, and return it:
func previewingContext(_ ctx: UIViewControllerPreviewing,
    viewControllerForLocation loc: CGPoint) -> UIViewController? {
        let sv = ctx.sourceView
        guard let button =
            sv.hitTest(loc, with: nil) as? UIButton else {return nil}
        let title = button.title(for: .normal)!
        let pep = Pep(pepBoy: title)
        ctx.sourceRect = button.frame
        return pep
}
In the second delegate method, I simply perform the transition, exactly as if the user had tapped a button:
func previewingContext(_ ctx: UIViewControllerPreviewing,
    commit vc: UIViewController) {
        if let pep = vc as? Pep {
            self.transitionContainerTo(pep)
        }
}
Tip
Alternatively, you can configure peek and pop in a storyboard, with no need for any code. In the nib editor, select a triggered segue emanating from a tappable interface object (an action segue) and check the Peek & Pop checkbox in the Attributes inspector.
Suppose now that we also want menu items to accompany the preview. That is the job of the destination view controller. All it has to do is override the previewActionItems property to supply an array of UIPreviewActionItems. A UIPreviewActionItem can be a UIPreviewAction, which is basically a simple tappable menu item. Alternatively, it can be a UIPreviewActionGroup, consisting of an array of UIPreviewActions; this looks like a menu item, but when the user taps it the menu items vanish and are replaced by the group’s menu items, giving in effect a second level of menu hierarchy. A UIPreviewActionItem can have a style: .default, .selected (the menu item has a checkmark), or .destructive (the menu item has a warning red color).
In this example (in the Pep view controller), I demonstrate the use of a UIPreviewActionGroup and the .selected style. The user can tap a Colorize menu item to see a secondary menu of three possible colors; tapping one of those will presumably somehow colorize this Pep Boy, but I haven’t bothered to implement that in the example. The user can also tap a Favorite menu item to make this Pep Boy the favorite one (implemented through UserDefaults); if this Pep Boy is already the favorite one, this menu item has a checkmark:
override var previewActionItems: [UIPreviewActionItem] {
    // example of submenu (group)
    let col1 = UIPreviewAction(title:"Blue", style: .default) {
        action, vc in // ...
    }
    let col2 = UIPreviewAction(title:"Green", style: .default) {
        action, vc in // ...
    }
    let col3 = UIPreviewAction(title:"Red", style: .default) {
        action, vc in // ...
    }
    let group = UIPreviewActionGroup(
        title: "Colorize", style: .default, actions: [col1, col2, col3])
    // example of selected style
    let favKey = "favoritePepBoy"
    let style : UIPreviewActionStyle =
        self.boy == UserDefaults.standard.string(forKey:favKey) ?
        .selected : .default
    let fav = UIPreviewAction(title: "Favorite", style: style) {
        action, vc in
        if let pep = vc as? Pep {
            UserDefaults.standard.set(pep.boy, forKey:favKey)
        }
    }
    return [group, fav]
}
Observe that the function we pass to the UIPreviewAction initializer receives as parameters the UIPreviewAction and the view controller instance (so that you can refer to the view controller without causing a retain cycle). I take advantage of the latter in the Favorite menu item implementation, pulling out the boy instance property string to use as the value saved into user defaults, thus identifying which Pep Boy is now the favorite.
Tip
Instead of peek and pop, you can use a UIPreviewInteraction (“3D Touch Press Gesture”) to drive a view controller custom transition animation. The structure of your code can be identical to that of any other interactive custom transition animation, the only difference being that you have a UIPreviewInteraction and its delegate methods instead of a gesture recognizer and its action method.
Storyboards
Throughout this chapter, I’ve been describing how to create a view controller and present it or make it another view controller’s child manually, entirely in code. But if you’re using a storyboard, you will often (or always) allow the storyboard to do those things for you automatically. A storyboard can be helpful and convenient in this regard, though not, perhaps, for the reasons one might expect. It doesn’t necessarily reduce the amount of code you’ll have to write; indeed, in some cases using a storyboard may compel you to write more code, and in a less readable and maintainable way, than if you were creating your view controllers manually. But a storyboard does clarify the relationships between your view controllers over the course of your app’s lifetime. Instead of having to hunt around in each of your classes to see which class creates which view controller and when, you can view and manage the chain of view controller creation graphically in the nib editor. Figure 6-9 shows the storyboard of a small test app.
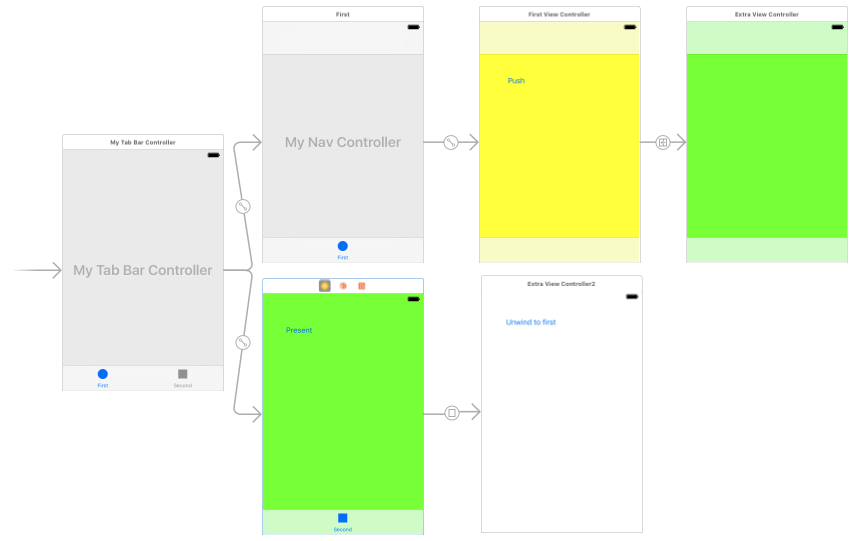
Figure 6-9. The storyboard of an app
A storyboard, as I’ve already explained, is basically a collection of view controller nibs (scenes) and view nibs. Each view controller is instantiated from its own nib, as needed, and will then obtain its view, as needed — typically from a view nib that you’ve configured in the same storyboard by editing the view controller’s view. I described this process in detail in “How Storyboards Work”. As I explained there, a view controller can be instantiated from a storyboard in various ways:
- Manual instantiation
-
Your code can instantiate a view controller manually from a storyboard, by calling one of these methods:
-
instantiateInitialViewController -
instantiateViewController(withIdentifier:)
-
- Initial view controller
-
If your app has a main storyboard, as specified by its Info.plist, that storyboard’s initial view controller will be instantiated and assigned as the window’s
rootViewControllerautomatically as the app launches. To specify that a view controller is a storyboard’s initial view controller, check the “Is Initial View Controller” checkbox in its Attributes inspector. This will cause any existing initial view controller to lose its initial view controller status. The initial view controller is distinguished graphically in the canvas by an arrow pointing to it from the left, and in the document outline by the presence of the Storyboard Entry Point. - Relationship
-
Two built-in parent view controllers can specify their children directly in the storyboard, setting their
viewControllersarray:-
UITabBarController can specify multiple children (its “view controllers”).
-
UINavigationController can specify its single initial child (its “root view controller”).
To add a view controller as a
viewControllerschild to one of those parent view controller types, Control-drag from the parent view controller to the child view controller; in the little HUD that appears, choose the appropriate listing under Relationship Segue. The result is a relationship whose source is the parent and whose destination is the child. The destination view controller will be instantiated automatically when the source view controller is instantiated, and will be assigned into itsviewControllersarray, thus making it a child and retaining it. -
- Triggered segue
-
A triggered segue configures a future situation, when the segue will be triggered. At that time, one view controller that already exists will cause the instantiation of another, bringing the latter into existence automatically. Two types of triggered segue are particularly common; they have special names in the nib editor if your storyboard’s “Use Trait Variations” checkbox is checked in the File inspector:
- Show (without trait variations: “push”)
-
The future view controller will be pushed onto the stack of the navigation controller of which the existing view controller is already a child.
The name “show” comes from the
show(_:sender:)method, which pushes a view controller onto the parent navigation controller if there is one, but behaves adaptively if there is not (I’ll talk more about that in Chapter 9). This means that a “show” segue from a view controller that is not a navigation controller’s child will present the future view controller rather than pushing it, as there is no navigation stack to push onto. Setting up a “show” segue without a navigation controller and then wondering why there is no push is a common beginner mistake. - Present modally (without trait variations: “modal”)
-
The future view controller will be a presented view controller (and the existing view controller will be its original presenter).
Unlike a relationship, a triggered segue does not have to emanate from a view controller; it can emanate from certain kinds of gesture recognizer, or from an appropriate view (such as a button or a table view cell) in the first view controller’s view. This is a graphical shorthand signifying that the segue should be triggered, bringing the second view controller into existence, when a tap or other gesture occurs.
To create a triggered segue, Control-drag from the view in the first view controller, or from the first view controller itself, to the second view controller. In the little HUD that appears, choose the type of segue you want (listed under Action Segue if you dragged from a button, or Manual Segue if you dragged from the view controller).
Triggered Segues
A triggered segue is a true segue. (Relationships are not really segues at all.) The most common types, as I’ve just explained, are a push segue (show) or a modal segue (present modally). A segue is a full-fledged object, an instance of UIStoryboardSegue, and it can be configured in the nib editor through its Attributes inspector. In a storyboard, however, it is not a nib object, in the sense that it is not instantiated by the loading of a nib, and it cannot be pointed to by an outlet. Rather, it will be instantiated when the segue is triggered, at which time its designated initializer will be called, namely init(identifier:source:destination:).
A segue’s source and destination are the two view controllers between which it runs. The segue is directional, so the source and destination are clearly distinguished. The source view controller is the one that will exist already, before the segue is triggered; the destination view controller will be instantiated together with the segue itself, when the segue is triggered.
A segue’s identifier is a string. You can set this string for a segue in a storyboard through its Attributes inspector; this can be useful when you want to trigger the segue manually in code (you’ll specify it by means of its identifier), or when you have code that can receive a segue as parameter and you need to distinguish which segue this is.
Triggered segue behavior
The default behavior of a segue, when it is triggered, is exactly the behavior of the corresponding manual transition described earlier in this chapter:
- Push segue
-
The segue is going to call
pushViewController(_:animated:)for you (if we are in a navigation interface). To setanimated:tofalse, uncheck the Animates checkbox in the Attributes inspector.
- Modal segue
-
The segue is going to call
present(_:animated:completion:)for you. To setanimated:tofalse, uncheck the Animates checkbox in the Attributes inspector. Other presentation options, such as the modal presentation style and the modal transition style, can be set in the destination view controller’s Attributes inspector or in the segue’s Attributes inspector (the segue settings will override the destination view controller settings).
(As I mentioned earlier, if a triggered segue emanates from a tappable interface object, its Attributes inspector will have a Peek & Pop checkbox, which you can check to configure peek and pop for this transition automatically.)
You can further customize a triggered segue’s behavior by providing your own UIStoryboardSegue subclass. The key thing is that you must implement your custom segue’s perform method, which will be called after the segue is triggered and instantiated, in order to do the actual transition from one view controller to another. Starting in Xcode 7 and iOS 9, you can do this even for a push segue or a modal segue: in the Attributes inspector for the segue, you specify your UIStoryboardSegue subclass, and in that subclass, you call super in your perform implementation.
Let’s say, for example, that you want to add a custom transition animation to a modal segue. You can do this by writing a segue class that makes itself the destination controller’s transitioning delegate in its perform implementation before calling super:
class MyCoolSegue: UIStoryboardSegue {
    override func perform() {
        let dest = self.destination
        dest.modalPresentationStyle = .custom
        dest.transitioningDelegate = self
        super.perform()
    }
}
The rest is then exactly as in “Custom Presented View Controller Transition”. MyCoolSegue’s animationController(forPresented:...) and animationController(forDismissed:) will be called, as well as its presentationController(forPresented:...) if implemented, and we are now off to the races with a custom presented view controller transition. All the code can live inside MyCoolSegue, resulting in a pleasant encapsulation of functionality.
You can also create a completely custom segue. To do so, in the HUD when you Control-drag to create the segue, ask for a Custom segue, and then, in the Attributes inspector, specify your UIStoryboardSegue subclass. Again, you must override perform, but now you don’t call super — the whole transition is completely up to you! Your perform implementation can access the segue’s identifier, source, and destination properties. The destination view controller has already been instantiated, but that’s all; doing something with this view controller so as to make it a child view controller or presented view controller, retaining it and causing its view to appear in the interface, is entirely up to your code.
How a segue is triggered
A triggered segue will be triggered in one of two ways:
- Through a user gesture
-
If a segue emanates from a gesture recognizer or from a tappable view, it becomes an action segue, meaning that it will be triggered automatically when the tap or other gesture occurs.
Your source view controller class can prevent an action segue from being triggered. To do so, override this method:
shouldPerformSegue(withIdentifier:sender:)-
Sent when an action segue is about to be triggered. Returns a Bool (and the default is
true), so if you don’t want this segue triggered on this occasion, returnfalse.
- In code
-
If a segue emanates from a view controller as a whole, then triggering it is up to your code. Send this message to the source view controller:
performSegue(withIdentifier:sender:)-
Triggers a segue whose source is this view controller. The segue will need an identifier in the storyboard so that you can specify it here!
shouldPerformSegue(withIdentifier:sender:)will not be called, because if you didn’t want the segue triggered, you wouldn’t have calledperformSeguein the first place.
View controller communication
When a segue is triggered, the destination view controller is instantiated automatically; your code does not instantiate it. This raises a crucial question: how on earth are you going to communicate between the source view controller and the destination view controller? This, you’ll remember, was the subject of an earlier section of this chapter (“Communication with a Presented View Controller”), where I used this code as an example:
let svc = SecondViewController(nibName: nil, bundle: nil)
svc.data = "This is very important data!"
svc.delegate = self
self.present(svc, animated:true)
In that code, the first view controller creates the second view controller, and therefore has a reference to it at that moment. Thus, it has an opportunity to communicate with it, passing along some data to it, and setting itself as its delegate, before presenting it. With a modal segue, however, the second view controller is instantiated for you, and the segue itself is going to call present(_:animated:completion:). So when and how will the first view controller be able to set svc.data and set itself as svc’s delegate?
The answer is that, after a segue has instantiated the destination view controller but before the segue is actually performed, the source view controller is sent prepare(for:sender:). The first parameter is the segue, and the segue has a reference to the destination view controller — so this is the moment when the source view controller and the destination view controller meet! The source view controller can thus perform configurations on the destination view controller, hand it data, and so forth. The source view controller can work out which segue is being triggered by examining the segue’s identifier and destination properties, and the sender is the interface object that was tapped to trigger the segue (or, if performSegue(withIdentifier:sender:) was called in code, whatever object was supplied as the sender: argument).
So, for example:
override func prepare(for segue: UIStoryboardSegue, sender: Any?) {
    if segue.identifier == "second" {
        let svc = segue.destination as! SecondViewController
        svc.data = "This is very important data!"
        svc.delegate = self
    }
}
This solves the communication problem. Unfortunately, it solves it in a clumsy way; prepare(for:sender:) feels like a blunt instrument. The destination arrives typed as a generic UIViewController, and it is up to your code to know its actual type, cast it, and configure it. Moreover, if more than one segue emanates from a view controller, they are all bottlenecked through the same prepare(for:sender:) implementation, which thus devolves into an ugly collection of conditions to distinguish them. I regard this as a flaw in the storyboard architecture.
Container Views and Embed Segues
The only parent view controllers for which you can create relationship segues specifying their children in a storyboard are the built-in UITabBarController and UINavigationController. That’s because the nib editor understands how they work. If you write your own custom container view controller, the nib editor doesn’t even know that your view controller is a container view controller, so it can’t be the source of a relationship segue.
Nevertheless, you can perform some initial parent–child configuration of your custom container view controller in a storyboard, if your situation conforms to these assumptions:
-
Your parent view controller will have one initial child view controller.
-
You want the child view controller’s view placed somewhere in the parent view controller’s view.
Those are reasonable assumptions, and you can work around them if they don’t quite give the desired effect. For example, if your parent view controller is to have additional children, you can always add them later, in code; and if the child view controller’s view is not to be initially visible in the parent view controller’s view, you can always hide it.
To configure your parent view controller in a storyboard, drag a Container View object from the Object library into the parent view controller’s view in the canvas. The result is a view, together with an embed segue leading from it to an additional child view controller. You can then assign the child view controller its correct class in its Identity inspector. Alternatively, delete the child view controller, replace it with a different view controller, and Control-drag from the container view to this view controller and, in the HUD, specify an embed segue.
When an embed segue is triggered, the destination view controller is instantiated and made the source view controller’s child, and its view is placed exactly inside the container view as its subview. Thus, the container view is not only a way of generating the embed segue, but also a way of specifying where you want the child view controller’s view to go. The entire child-addition dance is performed correctly and automatically for you: addChildViewController(_:) is called, the child’s view is put into the interface, and didMove(toParentViewController:) is called.
An embed segue is a triggered segue. It can have an identifier, and the standard messages are sent to the source view controller when the segue is triggered. At the same time, it has this similarity to a relationship: when the source (parent) view controller is instantiated, the runtime wants to trigger the segue automatically, instantiating the child view controller and embedding its view in the container view now. If that isn’t what you want, override shouldPerformSegue(withIdentifier:sender:) in the parent view controller to return false for this segue, and call performSegue(withIdentifier:sender:) later when you do want the child view controller instantiated.
The parent view controller is sent prepare(for:sender:) before the child’s view loads. At this time, the child has not yet been added to the parent’s childViewControllers array. If you allow the segue to be triggered when the parent view controller is instantiated, then by the time the parent’s viewDidLoad is called, the child’s viewDidLoad has already been called, the child has already been added to the parent’s childViewControllers, and the child’s view is already inside the parent’s view.
If you subsequently want to replace the child view controller’s view with another child view controller’s view in the interface, you will do so in code, probably by calling transition(from:to:duration:options:animations:completion:) as I described earlier in this chapter. If you really want to, you can configure this through a storyboard as well, by using a custom segue and a UIStoryboardSegue subclass.
Storyboard References
Starting in Xcode 7 and iOS 9, when you create a segue in the storyboard (a triggered segue or a relationship), you don’t have to Control-drag to a view controller as the destination; instead, you can Control-drag to a storyboard reference which you have previously placed in the canvas of this storyboard. A storyboard reference is a placeholder for a specific view controller. Thus, instead of a large and complicated network of segues running all over your storyboard, possibly crisscrossing in confusing ways, you can effectively jump through the storyboard reference to the actual destination view controller.
To specify what view controller a storyboard reference stands for, you need to perform two steps:
-
Select the view controller and, in the Identity inspector, give it a Storyboard ID.
-
Select the storyboard reference and, in the Attributes inspector, enter that same Storyboard ID as its Referenced ID.
But wait — there’s more! The referenced view controller doesn’t even have to be in the same storyboard as the storyboard reference. You can use a storyboard reference to jump to a view controller in a different storyboard. This allows you to organize your app’s interface into multiple storyboards. That was always possible, but loading any storyboards apart from the automatically loaded main storyboard was up to you (in code). With a storyboard reference that leads into a different storyboard, that storyboard is loaded automatically.
To configure a storyboard reference to refer to a view controller in a different storyboard, use the Storyboard pop-up menu in its Attributes inspector. The rule is that if you specify the Storyboard but not the Referenced ID, the storyboard reference stands for the target storyboard’s initial view controller (the one marked as the Storyboard Entry Point in that storyboard’s document outline). If you do specify the Referenced ID, then of course the storyboard reference stands for the view controller with that Storyboard ID in the target storyboard. (I find that as a practical matter, things work best if you always specify both the storyboard reference’s Storyboard and its Referenced ID.)
Unwind Segues
Here’s an interesting puzzle: Storyboards and segues would appear to be useful only half the time, because segues are asymmetrical. There is a push segue but no pop segue. There is a present modally segue but no dismiss segue.
The reason, in a nutshell, is that you can’t possibly use a normal segue to mean “go back.” Triggering a triggered segue instantiates the destination view controller; it creates a new view controller instance. But when dismissing a presented view controller or popping a pushed view controller, we don’t need any new view controller instances. We want to return, somehow, to an existing instance of a view controller.
The solution is an unwind segue. An unwind segue does let you express the notion “go back” in a storyboard. Basically, it lets you jump to any view controller that is already instantiated further up your view controller hierarchy, destroying the source view controller and any intervening view controllers in good order.
Warning
A common mistake among beginners is to make a triggered segue from view controller A to view controller B, and then try to express the notion “go back” by making another triggered segue from view controller B to view controller A. The result is a cycle of segues, with presentation piled on presentation, or push piled on push, one view controller instantiated on top of another on top of another. Do not construct a cycle of segues. (Unfortunately, the nib editor doesn’t alert you to this mistake.)
Creating an unwind segue
Before you can create an unwind segue, you must implement an unwind method in the class of any view controller represented in the storyboard. This should be a method marked @IBAction as a hint to the storyboard editor, and taking a single parameter, a UIStoryboardSegue. You can call it unwind if you like, but the name doesn’t really matter:
@IBAction func unwind(_ seg:UIStoryboardSegue!) {
    // ...
}
Think of this method as a marker, specifying that the view controller in which it appears can be the destination for an unwind segue. It is, in fact, a little more than a marker: it will also be called when the unwind segue is triggered. But its marker functionality is much more important — so much so that, in many cases, you won’t give this method any code at all. Its presence, and its name, are what matters.
Now you can create an unwind segue. Doing so involves the use of the Exit proxy object that appears in every scene of a storyboard. Control-drag from the view controller you want to go back from, or from something like a button in that view controller’s view, connecting it to the Exit proxy object in the same scene (Figure 6-10). A little HUD appears, listing all the known unwind methods (similar to how action methods are listed in the HUD when you connect a button to its target). Click the name of the unwind method you want. You have now made an unwind segue, bound to that unwind method.
Figure 6-10. Creating an unwind segue
How an unwind segue works
When the unwind segue is triggered, the following steps are performed:
-
If this is an action segue, the source view controller’s
shouldPerformSegue(withIdentifier:sender:)is called — just as for a normal segue. This is your chance to stop the whole process dead at this point by returningfalse. -
The name of the unwind method to which the unwind segue is bound is only a name. The unwind segue’s actual destination view controller is unknown! Therefore, the runtime now starts walking up the view controller hierarchy looking for a destination view controller. Put simply, the first view controller it finds that implements the unwind method will, by default, be the destination view controller.
Assume that the destination view controller has been found. (I’ll explain how it is found in a moment.) Then we proceed to perform the segue, as follows:
-
The source view controller’s
prepare(for:sender:)is now called — just as for a normal segue. The two view controllers are now in contact (because the other view controller is the segue’sdestination). This is an opportunity for the source view controller to hand information to the destination view controller before being destroyed! (Thus, an unwind segue is an alternative to delegation as a way of putting one view controller into communication with another: see “Communication with a Presented View Controller”.) -
The destination view controller’s unwind method is called. Its parameter is the segue; this segue can be identified through its
identifierproperty. The two view controllers are now in contact again (because the other view controller is the segue’ssource). It is perfectly reasonable, as I’ve already said, for the unwind method body to be empty; the unwind method’s real purpose is to mark this view controller as the destination view controller. -
The segue is actually performed, destroying the source controller and any intervening view controllers up to (but not including) the destination view controller, in good order.
Now I’ll go back and explain in detail how the destination view controller is found, and how the segue is actually performed. This is partly out of sheer interest — they are both devilishly clever — and partly in case you need to customize the process. (You can skip the discussion if you’re satisfied with how your unwind segue is working.)
Warning
What I’m about to describe is applicable to iOS 9 and later. It is not backward compatible to earlier systems; in fact, Apple has revised unwind segues, sometimes quite dramatically, with each major iOS update since they were introduced in iOS 6.
How the destination view controller is found
The process of locating the destination view controller starts by walking up the view controller hierarchy. What do I mean by “up” the hierarchy? Well, every view controller has either a parent or a presentingViewController, so the next view controller up the hierarchy is that view controller. However, it might also be necessary to walk back down the hierarchy, to a child (at some depth) of one of the parents we encounter.
Here’s how the walk proceeds:
-
At each step up the view controller hierarchy, the runtime sends this view controller the following event:
-
allowedChildViewControllersForUnwinding(from:)
This view controller’s job is to supply an array of its own direct children. The array can be empty, but it must be an array. To do so, the view controller calls this method:
-
childViewControllerContaining(_:)
This tells the view controller which of its own children is, or is the ultimate parent of, the source view controller. We don’t want to go down that branch of the view hierarchy; that’s the branch we just came up. So this view controller subtracts that view controller from the array of its own child view controllers, and returns the resulting array.
-
-
There are two possible kinds of result from the previous step (the value returned from
allowedChildViewControllers...):- There are children
-
If the previous step yielded an array with one or more child view controllers in it, the runtime performs step 1 on all of them (stopping if it finds the destination), thus going down the view hierarchy.
- There are no children
-
If, on the other hand, the previous step yielded an empty array, the runtime asks this same view controller the following question:
-
canPerformUnwindSegueAction(_:from:withSender:)
The default implementation of this method is simply to call
responds(to:)onself, asking whether this view controller contains an implementation of the unwind method we’re looking for. The result is a Bool. If it istrue, we stop. This is the destination view controller. If it isfalse, we continue with the search up the view controller hierarchy, finding the next view controller and performing step 1 again. -
A moment’s thought will reveal that the recursive application of this algorithm will eventually arrive at an existing view controller instance with an implementation of the unwind method if there is one. Okay, maybe a moment’s thought didn’t reveal that to you, so here’s an actual example. I’ll use the app whose storyboard is pictured in Figure 6-9. Its root view controller is a UITabBarController with two children:
-
The first tab bar controller child is a UINavigationController with a root view controller called FirstViewController, which has a push segue to another view controller called ExtraViewController.
-
The second tab bar controller child is called SecondViewController, which has a modal segue to another view controller called ExtraViewController2.
The unwind method is in FirstViewController, and is called iAmFirst(_:). The corresponding unwind segue, whose action is "iAmFirst:", is triggered from a button in ExtraViewController2. Assume that the user starts in the tab bar controller’s first view controller, where she triggers the push segue, thus showing ExtraViewController. She then switches to the tab bar controller’s second view controller, where she triggers the modal segue, thus showing ExtraViewController2. All the view controllers pictured in Figure 6-9 now exist simultaneously.
The user now taps the button in ExtraViewController2 and thus triggers the "iAmFirst:" unwind segue. What will happen? First, ExtraViewController2 is sent shouldPerformSegue(withIdentifier:sender:) and returns true, permitting the segue to go forward. The runtime now needs to walk the view controller hierarchy and locate the iAmFirst(_:) method. Here’s how it does that:
-
We start by walking up the view hierarchy. We thus arrive at the original presenter from which ExtraViewController2 was presented, namely SecondViewController.
The runtime sends
allowedChildViewControllersForUnwinding(from:)to SecondViewController; SecondViewController has no children, so it returns an empty array.So the runtime also asks SecondViewController
canPerformUnwindSegueActionto find out whether this is the destination — but SecondViewController returnsfalse, so we know this is not the destination. -
We therefore proceed up the view hierarchy to SecondViewController’s parent, the UITabBarController. The runtime sends the UITabBarController
allowedChildViewControllersForUnwinding(from:).The UITabBarController has two child view controllers, namely the UINavigationController and SecondViewController — but one of them, SecondViewController, contains the source (as it discovers by calling
childViewControllerContaining(_:)). Therefore the UITabBarController returns an array containing just one child view controller, namely the UINavigationController. -
The runtime has received an array with a child in it; it therefore proceeds down the view hierarchy to that child, the UINavigationController, and asks it the same question:
allowedChildViewControllersForUnwinding(from:).The navigation controller has two children, namely FirstViewController and ExtraViewController, and neither of them is or contains the source, so it returns an array containing both of them.
-
The runtime has received an array with two children in it. It therefore notes down that it now has two hierarchy branches to explore, and proceeds down the hierarchy to explore them:
-
The runtime starts with ExtraViewController, asking it
allowedChildViewControllersForUnwinding(from:). ExtraViewController has no children, so the reply is an empty array.So the runtime asks ExtraViewController
canPerformUnwindSegueActionto find out whether this is the destination — but ExtraViewController repliesfalse, so we know this is not the destination. -
So much for that branch of the UINavigationController’s children; we’ve reached a dead end. So the runtime proceeds to the other branch, namely FirstViewController. The runtime asks FirstViewController
allowedChildViewControllersForUnwinding(from:). FirstViewController has no children, so the reply is an empty array.So the runtime asks
canPerformUnwindSegueActionto find out whether this is the destination — and FirstViewController repliestrue. We’ve found the destination view controller!
-
The destination having been found, the runtime now sends prepare(for:sender:) to the source, and then calls the destination’s unwind method, iAmFirst(_:). We are now ready to perform the segue.
How an unwind segue is performed
The way an unwind segue is performed is just as ingenious as how the destination is found. During the walk, the runtime remembers the walk. Thus, it knows where all the presented view controllers are, and it knows where all the parent view controllers are. Thus we have a path of presenting view controllers and parent view controllers between the source and the destination. The runtime then proceeds as follows:
-
For any presented view controllers on the path, the runtime itself calls
dismiss(animated:completion:)on the presenting view controller. -
For any parent view controllers on the path, the runtime tells each of them, in turn, to
unwind(for:towardsViewController:).
The second parameter of unwind(for:towardsViewController:) is the direct child of this parent view controller leading down the branch where the destination lives. This child might or might not be the destination, but that’s no concern of this parent view controller. Its job is merely to get us onto that branch, whatever that may mean for this kind of parent view controller. A moment’s thought will reveal (don’t you wish I’d stop saying that?) that if each parent view controller along the path of parent view controllers does this correctly, we will in fact end up at the destination, releasing in good order all intervening view controllers that need to be released. This procedure is called incremental unwind.
Thus, the unwind procedure for our example runs as follows:
-
The runtime sends
dismiss(animated:completion:)to the root view controller, namely the UITabBarController. Thus, ExtraViewController2 is destroyed in good order. -
The runtime sends
unwind(for:towardsViewController:)to the UITabBarController. The second parameter is the tab bar controller’s first child, the UINavigationController. The UITabBarController therefore changes itsselectedViewControllerto be the UINavigationController. -
The runtime sends
unwind(for:towardsViewController:)to the UINavigationController. The second parameter is the FirstViewController. The navigation controller therefore pops its stack down to the FirstViewController. Thus, ExtraViewController is destroyed in good order, and we are back at the FirstViewController — which is exactly what was supposed to happen.
Unwind segue customization
Knowing how an unwind segue works, you can see how to intervene in and customize the process:
-
In a custom view controller that contains an implementation of the unwind method, you might implement
canPerformUnwindSegueAction(_:from:withSender:)to returnfalseinstead oftrueso that it doesn’t become the destination on this occasion. -
In a custom parent view controller, you might implement
allowedChildViewControllersForUnwinding(from:). In all probability, your implementation will consist simply of listing yourchildViewControllers, callingchildViewControllerContaining(_:)to find out which of your children is or contains the source, subtracting that child from the array, and returning the array — just as the built-in parent view controllers do. -
In a custom parent view controller, you might implement
unwind(for:towardsViewController:). The second parameter is one of your current children; you will do whatever it means for this parent view controller to make this the currently displayed child.
In allowedChildViewControllersForUnwinding(from:) and childViewControllerContaining(_:), the parameter is not a UIStoryboardSegue. It’s an instance of a special value class called a UIStoryboardUnwindSegueSource, which has no other job than to communicate, in these two methods, the essential information about the unwind segue needed to make a decision. It has a source, a sender, and an unwindAction (the Selector specified when forming the unwind segue).
View Controller Lifetime Events
As views come and go, driven by view controllers and the actions of the user, events arrive that give your view controller the opportunity to respond to the various stages of its own existence and the management of its view. By overriding these methods, your UIViewController subclass can perform appropriate tasks at appropriate moments. Here’s a list:
viewDidLoad-
The view controller has obtained its view. See the discussion earlier in this chapter of how a view controller gets its view. Recall that this does not mean that the view is in the interface or that it has been given its correct size.
willTransition(to:with:)viewWillTransition(to:with:)traitCollectionDidChange(_:)-
The view controller’s view is being resized or the trait environment is changing (or both). See the discussion of resizing events earlier in this chapter. Your implementation of the first two methods should call
super. updateViewConstraintsviewWillLayoutSubviewsviewDidLayoutSubviews-
The view is receiving
updateConstraintsandlayoutSubviewsevents. See Chapter 1, and the discussion of resizing events earlier in this chapter. Your implementation ofupdateViewConstraintsshould callsuper. willMove(toParentViewController:)didMove(toParentViewController:)-
The view controller is being added or removed as a child of another view controller. See the discussion of container view controllers earlier in this chapter.
viewWillAppear(_:)viewDidAppear(_:)viewWillDisappear(_:)viewDidDisappear(_:)-
The view is being added to or removed from the interface. This includes being supplanted by another view controller’s view or being restored through the removal of another view controller’s view. A view that has appeared is in the window; it is part of your app’s active view hierarchy. A view that has disappeared is not in the window; its
windowisnil. You should callsuperin your override of any of these four methods; if you forget to do so, things may go wrong in subtle ways.To distinguish more precisely why your view is appearing or disappearing, consult any of these properties of the view controller:
-
isBeingPresented -
isBeingDismissed -
isMovingToParentViewController -
isMovingFromParentViewController
-
A good way to get a sense for when these events are useful is to examine some situations in which they normally occur. Take, for example, a UIViewController being pushed onto the stack of a navigation controller. It receives, in this order, the following messages:
-
willMove(toParentViewController:) -
viewWillAppear(_:) -
updateViewConstraints -
traitCollectionDidChange(_:) -
viewWillLayoutSubviews -
viewDidLayoutSubviews -
viewDidAppear(_:) -
didMove(toParentViewController:)
(There is then a second round of layout messages.)
When this same UIViewController is popped off the stack of the navigation controller, it receives, in this order, the following messages:
-
willMove(toParentViewController:)(with parameternil) -
viewWillDisappear(_:) -
viewDidDisappear(_:) -
didMove(toParentViewController:)(with parameternil)
Disappearance, as I mentioned a moment ago, can happen because another view controller’s view supplants this view controller’s view. For example, consider a UIViewController functioning as the top (and visible) view controller of a navigation controller. When another view controller is pushed on top of it, the first view controller gets these messages:
-
viewWillDisappear(_:) -
viewDidDisappear(_:) -
didMove(toParentViewController:)
The converse is also true. For example, when a view controller is popped from a navigation controller, the view controller that was below it in the stack (the back view controller) receives these messages:
-
viewWillAppear(_:) -
viewDidAppear -
didMove(toParentViewController:)
Incoherencies in View Controller Events
Unfortunately, the exact sequence of events and the number of times they will be called for any given view controller transition situation sometimes seems nondeterministic or incoherent. For example:
-
Sometimes
didMove(toParentViewController:)arrives without a correspondingwillMove(toParentViewController:). -
Sometimes
didMove(toParentViewController:)arrives even though this view controller was previously the child of this parent and remains the child of this parent. -
Sometimes the layout events
updateViewConstraints,viewWillLayoutSubviews, andviewDidLayoutSubviewsarrive more than once for the same view controller for the same transition. -
Sometimes
viewWillAppear(_:)orviewWillDisappear(_:)arrives without a correspondingviewDidAppear(_:)orviewDidDisappear(_:). A notable case in point is when an interactive transition animation begins and is cancelled.
I regard all such behaviors as bugs, but Apple clearly does not. The best advice I can offer is that you should try to structure your code in such a way that incoherencies of this sort don’t matter.
Appear and Disappear Events
The appear and disappear events are particularly appropriate for making sure that a view reflects the model or some form of saved state whenever it appears. Changes to the interface performed in viewDidAppear(_:) or viewWillDisappear(_:) may be visible to the user as they occur! If that’s not what you want, use the other member of the pair. For example, in a certain view containing a long scrollable text, I want the scroll position to be the same when the user returns to this view as it was when the user left it, so I save the scroll position in viewWillDisappear(_:) and restore it in viewWillAppear(_:) — not viewDidAppear(_:), where the user might see the scroll position jump.
These methods are useful also when something must be true exactly so long as a view is in the interface. For example, a repeating Timer that must be running while a view is present can be started in the view controller’s viewDidAppear(_:) and stopped in its viewWillDisappear(_:). (This architecture also allows you to avoid the retain cycle that could result if you waited to invalidate the timer in a deinit that might otherwise never arrive.)
A view does not disappear if a presented view controller’s view merely covers it rather than supplanting it. For example, a view controller that presents another view controller using the .formSheet presentation style gets no lifetime events during presentation and dismissal.
A view does not disappear merely because the app is backgrounded and suspended. Once suspended, your app might be killed. So you cannot rely on viewWillDisappear(_:) or viewDidDisappear(_:) alone for saving data that the app will need the next time it launches. If you are to cover every case, you may need to ensure that your data-saving code also runs in response to an application lifetime event such as applicationWillResignActive or applicationDidEnterBackground (and see Appendix A for a discussion of the application lifetime events).
Event Forwarding to a Child View Controller
A custom container view controller, as I explained earlier, must effectively send willMove(toParentViewController:) and didMove(toParentViewController:) to its children manually.
It must also forward resizing events to its children. This will happen automatically if you call super in your implementation of the willTransition methods. Conversely, if you implement these methods, failure to call super may prevent them from being forwarded correctly to the child view controller.
The appear and disappear events are normally passed along automatically. However, you can take charge by overriding this property:
shouldAutomaticallyForwardAppearanceMethods-
If you override this property to return
false, you are responsible for seeing that the fourappearanddisappearmethods are called on your view controller’s children. You do not do this by calling these methods directly. The reason is that you have no access to the correct moment for sending them. Instead, you call these two methods on your child view controller:-
beginAppearanceTransition(_:animated:); the first parameter is a Bool saying whether this view controller’s view is about to appear (true) or disappear (false) -
endAppearanceTransition
-
Here’s what to do if you’ve implemented shouldAutomaticallyForwardAppearanceMethods to return false. There are two main occasions on which your custom container view controller must forward appear and disappear events to a child.
First, what happens when your custom container view controller’s own view itself appears or disappears? If it has a child view controller’s view within its own view, it must implement and forward all four appear and disappear events to that child. You’ll need an implementation along these lines, for each of the four events:
override func viewWillAppear(_ animated: Bool) {
    super.viewWillAppear(animated)
    let child = // whatever
    if child.isViewLoaded && child.view.superview != nil {
        child.beginAppearanceTransition(true, animated: true)
    }
}
override func viewDidAppear(_ animated: Bool) {
    super.viewDidAppear(animated)
    let child = // whatever
    if child.isViewLoaded && child.view.superview != nil {
        child.endAppearanceTransition()
    }
}
(The implementations for viewDidAppear(_:) and viewDidDisappear(_:) are similar, except that the first argument for beginAppearanceTransition is false.)
Second, what happens when you swap one view controller’s child for another in your interface? Apple warns that you should not call the UIViewController method transition(from:...); instead, you perform the transition animation directly, calling beginAppearanceTransition(_:animated:) and endAppearanceTransition yourself.
A minimal correct implementation might involve the UIView transition class method (see Chapter 4). Here’s an example of a parent view controller swapping one child view controller and its view for another, while taking charge of notifying the child view controllers of the appearance and disappearance of their views. I’ve put asterisks to call attention to the additional method calls that forward the appear and disappear events to the children (fromvc and tovc):
self.addChildViewController(tovc) // "will" called for us
fromvc.willMove(toParentViewController: nil)
fromvc.beginAppearanceTransition(false, animated:true) // *
tovc.beginAppearanceTransition(true, animated:true) // *
UIView.transition(
    from:fromvc.view, to:tovc.view,
    duration:0.4, options:.transitionFlipFromLeft) {_ in
        tovc.endAppearanceTransition() // *
        fromvc.endAppearanceTransition() // *
        tovc.didMove(toParentViewController: self)
        fromvc.removeFromParentViewController()
}
View Controller Memory Management
Memory is at a premium on a mobile device. Thus you want to minimize your app’s use of memory. Your motivations are partly altruistic and partly selfish. While your app is running, other apps are suspended in the background; you want to keep your memory usage as low as possible so that those other apps have room to remain suspended and the user can readily switch to them from your app. You also want to prevent your own app from being terminated! If your app is backgrounded and suspended while using a lot of memory, it may be terminated in the background when memory runs short. If your app uses an inordinate amount of memory while in the foreground, it may be summarily killed before the user’s very eyes.
One strategy for avoiding using too much memory is to release any memory-hogging objects you’re retaining if they are not needed at this moment. Because a view controller is the basis of so much of your application’s architecture, it is likely to be a place where you’ll concern yourself with releasing unneeded memory.
One of your view controller’s most memory-intensive objects is its view. Fortunately, the iOS runtime manages a view controller’s view’s memory for you. If a view controller’s view is not in the interface, it can be temporarily dispensed with. In such a situation, if memory is getting tight, then even though the view controller itself persists, and even though it retains its actual view, the runtime may release its view’s backing store (the cached bitmap representing the view’s drawn contents). The view will then be redrawn when and if it is to be shown again later.
In addition, if memory runs low, your view controller may be sent this message:
didReceiveMemoryWarning-
Sent to a view controller to advise it of a low-memory situation. It is preceded by a call to the app delegate’s
applicationDidReceiveMemoryWarning, together with a.UIApplicationDidReceiveMemoryWarningnotification posted to any registered objects. You are invited to respond by releasing any data that you can do without. Do not release data that you can’t readily and quickly recreate! The documentation advises that you should callsuper.
If you’re going to release data in didReceiveMemoryWarning, you must concern yourself with how you’re going to get it back. A simple and reliable mechanism is lazy loading — a getter that reconstructs or fetches the data if it is nil.
For example, suppose we have a property myBigData which might be a big piece of data. We make this a calculated property, storing the real data in a private property (I’ll call it _myBigData). Our calculated property’s setter simply writes through to the private property. In didReceiveMemoryWarning, we write myBigData out as a file to disk (Chapter 22) and set myBigData to nil — thus setting _myBigData to nil as well, and releasing the big data from memory. The getter for myBigData implements lazy loading: if we try to get myBigData when _myBigData is nil, we attempt to fetch the data from disk — and if we succeed, we delete it from disk (to prevent stale data):
private var _myBigData : Data! = nil
var myBigData : Data! {
    set (newdata) { self._myBigData = newdata }
    get {
        if _myBigData == nil {
            let fm = FileManager.default
            let f =
                fm.temporaryDirectory.appendingPathComponent("myBigData")
            if let d = try? Data(contentsOf:f) {
                self._myBigData = d
                do {
                    try fm.removeItem(at:f)
                } catch {
                    print("Couldn't remove temp file")
                }
            }
        }
        return self._myBigData
    }
}
func saveAndReleaseMyBigData() {
    if let myBigData = self.myBigData {
        let fm = FileManager.default
        let f =
            fm.temporaryDirectory.appendingPathComponent("myBigData")
        try? myBigData.write(to:f)
        self.myBigData = nil
    }
}
override func didReceiveMemoryWarning() {
    super.didReceiveMemoryWarning()
    self.saveAndReleaseMyBigData()
}
When your big data can be reconstructed from scratch on demand, you can take advantage of the built-in NSCache class, which is like a dictionary with the ability to clear out its own entries automatically under memory pressure. As in the previous example, a calculated property can be used as a façade:
private let _cache = NSCache<NSString, NSData>()
var cachedData : Data {
    let key = "somekey" as NSString
    var data = self._cache.object(forKey:key) as? Data
    if data != nil {
        return data!
    }
    data = // ... recreate data ...
    self._cache.setObject(data! as NSData, forKey: key)
    return data!
}
Another built-in class that knows how to clear itself out is NSPurgeableData. It is a subclass of NSMutableData that adopts the NSDiscardableContent protocol (which your own classes can also adopt). NSCache knows how to work with classes that adopt NSDiscardableContent, or you can use such classes independently. To signal that the data should be discarded, send your object discardContentIfPossible. Wrap any access to data in calls to beginContentAccess and endContentAccess; the former returns a Bool to indicate whether the data was accessible. The tricky part is getting those access calls right; when you create an NSPurgeableData, you must send it an unbalanced endContentAccess to make its content discardable:
private var _purgeable = NSPurgeableData()
var purgeabledata : Data {
    if self._purgeable.beginContentAccess() && self._purgeable.length > 0 {
        let result = self._purgeable.copy() as! Data
        self._purgeable.endContentAccess()
        return result
    } else {
        let data = // ... recreate data ...
        self._purgeable = NSPurgeableData(data:data)
        self._purgeable.endContentAccess()
        return data
    }
}
(For more about NSCache and NSPurgeableData, see the “Caching and Purgeable Memory” chapter of Apple’s Memory Usage Performance Guidelines.)
At an even lower level, you can store your data on disk (in some reasonable location such the Caches directory) and read it using the Data initializer init(contentsOfURL:options:) with an options: argument .alwaysMapped. This creates a memory-mapped data object, which has the remarkable feature that it isn’t considered to belong to your memory at all; the system has no hesitation in clearing it from RAM, because it is backed through the virtual memory system by the file on disk, and will be read back into memory automatically when you next access it. This is suitable only for large immutable data, because small data runs the risk of fragmenting a virtual memory page.
To test low-memory circumstances artificially, run your app in the Simulator and choose Hardware → Simulate Memory Warning. I don’t believe this has any actual effect on memory, but a memory warning of sufficient severity is sent to your app, so you can see the results of triggering your low-memory response code, including the app delegate’s applicationDidReceiveMemoryWarning and your view controller’s didReceiveMemoryWarning.
Another approach, which works also on a device, is to call an undocumented method. First, define a dummy protocol to make the selector legal:
@objc protocol Dummy {
    func _performMemoryWarning()
}
Now you can send that selector to the shared application:
UIApplication.shared.perform(#selector(Dummy._performMemoryWarning))
(Be sure to remove that code when it is no longer needed for testing, as the App Store won’t accept it.)
You will also wish to concern yourself with releasing memory when your app is about to be suspended. If your app has been backgrounded and suspended and the system later discovers it is running short of memory, it will go hunting through the suspended apps, looking for memory hogs that it can kill in order to free up that memory. If the system decides that your suspended app is a memory hog, it isn’t politely going to wake your app and send it a memory warning; it’s just going to terminate your app in its sleep. The time to be concerned about releasing memory, therefore, is before the app is suspended. You’ll probably want your view controller to be registered with the shared application to receive .UIApplicationDidEnterBackground. The arrival of this notification is an opportunity to release any easily restored memory-hogging objects, such as myBigData in the previous example:
override func viewDidLoad() {
    super.viewDidLoad()
    NotificationCenter.default.addObserver(self,
        selector: #selector(backgrounding),
        name: .UIApplicationDidEnterBackground,
        object: nil)
}
func backgrounding(_ n:Notification) {
    self.saveAndReleaseMyBigData()
}
Tip
A very nice feature of NSCache is that it evicts its objects automatically when your app goes into the background.
Testing how your app’s memory behaves in the background isn’t easy. In a WWDC 2011 video, an interesting technique is demonstrated. The app is run under Instruments on a device, using the virtual memory instrument, and is then backgrounded by pressing the Home button, thus revealing how much memory it voluntarily relinquishes at that time. Then a special memory-hogging app is launched on the device: its interface loads and displays a very large image in a UIImageView. Even though your app is backgrounded and suspended, the virtual memory instrument continues to track its memory usage, and you can see whether further memory is reclaimed under pressure from the demands of the memory-hogging app in the foreground.
State Restoration
When the user leaves your app and then later returns to it, one of two things might have happened in the meantime:
- Your app was suspended
-
Your app was suspended in the background, and remained suspended while the user did something else. When the user returns to your app, the system simply unfreezes your app, and there it is, looking just as it did when the user left it.
- Your app was terminated
-
Your app was suspended in the background, and then, as the user worked with other apps, a moment came where the system decided it needed the resources (such as memory) being held by your suspended app. Therefore it terminated your app. When the user returns to your app, the app launches from scratch.
The user, however, doesn’t know the difference between those two things, so why should the app behave differently some of the time? Ideally, your app, when it comes to the foreground, should always appear looking as it did when the user left it, even if in fact it was terminated while suspended in the background. Otherwise, as the WWDC 2013 video on this topic puts it, the user will feel that the app has “lost my place.”
That’s where state restoration comes in. Your app has a state at every moment: some view controller’s view is occupying the screen, and views within it are displaying certain values (for example, a certain switch is set to On, or a certain table view is scrolled to a certain position). The idea of state restoration is to save that information when the app goes into the background, and use it to make all those things true again if the app is subsequently launched from scratch.
iOS provides a general solution to the problem of state restoration. This solution is centered around view controllers, which makes sense, since view controllers are the heart of the problem. What is the user’s “place” in the app, which we don’t want to “lose”? It’s the chain of view controllers that got us to where we were when the app was backgrounded, along with the configuration of each one. The goal of state restoration must therefore be to reconstruct all existing view controllers, initializing each one into the state it previously had.
Note that state, in this sense, is neither user defaults nor data. If something is a preference, store it in UserDefaults. If something is data, keep it in a file (Chapter 22). Don’t misuse the state saving and restoration mechanism for such things. The reason for this is not only conceptual; it’s also because saved state can be lost. You don’t want to commit anything to the state restoration mechanism if it would be a disaster to have lost it the next time the app launches.
For example, suppose the user kills your app outright by double-clicking the Home button to show the app switcher interface and flicking your app’s snapshot upward; the system will throw away its state. Similarly, if your app crashes, the system will throw away its state. In both cases, the system assumes that something went wrong, and doesn’t want to launch your app into what might be a troublesome saved state. Instead, your app will launch cleanly, from the beginning. There’s no problem for the user, barring a mild inconvenience — as long as the only thing that gets thrown away is state.
How to Test State Restoration
To test whether your app is saving and restoring state as you expect:
-
Run the app from Xcode as usual, in the Simulator or on a device.
-
At some point, in the Simulator or on the device, click the Home button (Hardware → Home in the Simulator). This causes the app to be suspended in good order, and state is saved.
-
Now, back in Xcode, stop the running project (Product → Stop).
-
Run the project again. If there is saved state, it is restored.
(To test the app’s behavior from a truly cold start, delete it from the Simulator or device. You might need to do this after changing something about the underlying save-and-restore model.)
Apple also provides some debugging tools (look for “restorationArchiveTool for iOS” at https://developer.apple.com/download/more/):
restorationArchiveTool-
A command-line tool letting you examine a saved state archive in textual format. The archive is in a folder called Saved Application State in your app’s sandboxed Library. See Chapter 22 for more about the app’s sandbox, and how to copy it to your computer from a device.
- StateRestorationDebugLogging.mobileconfig
-
A configuration profile. When installed on a device, it causes the console to dump information as state saving and restoration proceeds.
- StateRestorationDeveloperMode.mobileconfig
-
A configuration profile. When installed on a device, it prevents the state archive from being jettisoned after unexpected termination of the app (a crash, or manual termination through the app switcher interface). This can allow you to test state restoration a bit more conveniently.
To install a .mobileconfig file on a device, the simplest approach is to email it to yourself on the device and tap the file in the Mail message. You can subsequently delete the file, if desired, through the Settings app.
Participating in State Restoration
Built-in state restoration is an opt-in technology: it operates only if you explicitly tell the system that you want to participate in it. To do so, you take three basic steps:
- Implement app delegate methods
-
The app delegate must implement these methods to return
true:-
application(_:shouldSaveApplicationState:) -
application(_:shouldRestoreApplicationState:)
(Naturally, your code can instead return
falseto prevent state from being saved or restored on some particular occasion.) -
- Implement
application(_:willFinishLaunchingWithOptions:) -
Although it is very early,
application(_:didFinishLaunchingWithOptions:)is too late for state restoration. Your app needs its basic interface before state restoration begins. The solution is to use a different app delegate method,application(_:willFinishLaunchingWithOptions:).Typically, you can just change
didtowillin the name of this method, keeping your existing code unchanged. However, your implementation must callmakeKeyAndVisibleexplicitly on the window! Otherwise, the interface doesn’t come into existence soon enough for restoration to happen during launch. - Provide restoration IDs
-
Both UIViewController and UIView have a
restorationIdentifierproperty, which is a string. Setting this string to a non-nilvalue is your signal to the system that you want this view controller (or view) to participate in state restoration. If a view controller’srestorationIdentifierisnil, neither it nor any subsequent view controllers down the chain will be saved or restored. (A nice feature of this architecture is that it lets you participate partially in state restoration, omitting some view controllers by not assigning them a restoration identifier.)You can set the
restorationIdentifiermanually, in code; typically you’ll do that early in a view controller’s lifetime. If a view controller or view is instantiated from a nib, you’ll want to set the restoration identifier in the nib editor; the Identity inspector has a Restoration ID field for this purpose. If you’re using a storyboard, it’s a good idea, in general, to make a view controller’s restoration ID in the storyboard the same as its storyboard ID; in fact, it’s such a good idea that the storyboard editor provides a checkbox, “Use Storyboard ID,” that makes the one value automatically the same as the other.
In the case of a simple storyboard-based app, where each needed view controller instance can be reconstructed directly from the storyboard, those steps alone can be sufficient to bring state restoration to life, operating correctly at the view controller level. Let’s test it! Start with a storyboard-based app with the following architecture (Figure 6-11):
-
A navigation controller.
-
Its root view controller, connected by a relationship from the navigation controller. Call its class RootViewController.
-
A presented view controller, connected by a modal segue from a Present button in RootViewController’s view. Call its class PresentedViewController. Its view contains a Dismiss button.
-
-
A second view controller, connected by a push segue from a Push button in RootViewController’s view. Call its class SecondViewController.
-
The very same presented view controller (PresentedViewController), also connected by a modal segue from a Present button in the second view controller’s view.
-
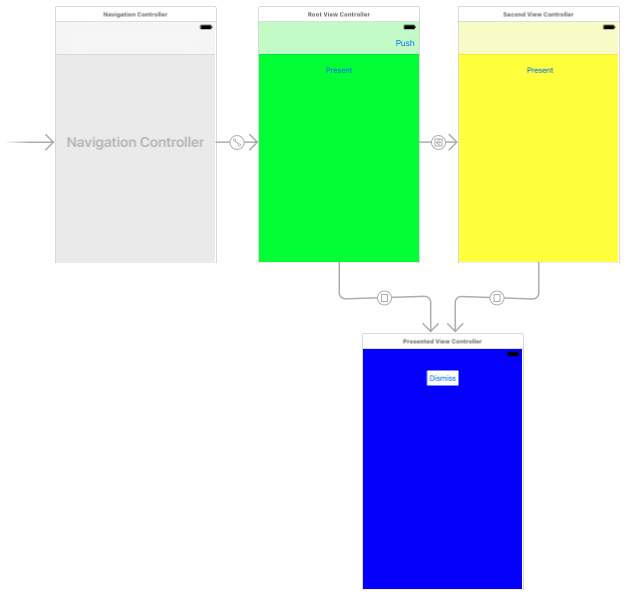
Figure 6-11. Architecture of an app for testing state restoration
This storyboard-based app runs perfectly with just about no code at all; all we need is an empty implementation of an unwind method in RootViewController and SecondViewController so that we can create an unwind segue from the PresentedViewController’s Dismiss button.
We will now make this app implement state restoration:
-
In the app delegate, change the name of
application(_:didFinishLaunchingWithOptions:)toapplication(_:willFinishLaunchingWithOptions:), and insert this line of code:self.window?.makeKeyAndVisible()
-
In the app delegate, implement these two methods to return
true:-
application(_:shouldSaveApplicationState:) -
application(_:shouldRestoreApplicationState:)
-
-
In the storyboard, give restoration IDs to all four view controller instances: let’s call them
"nav","root","second", and"presented".
That’s all! The app now saves and restores state. When we run the app, navigate to any view controller, quit, and later relaunch, the app appears in the same view controller it was in when we quit.
Tip
Before calling makeKeyAndVisible, it may also be useful to assign the window a restoration identifier: self.window?.restorationIdentifier = "window". This might not make any detectable difference, but in some cases it can help restore size class information.
Restoration ID, Identifier Path, and Restoration Class
Having everything done for us by the storyboard reveals nothing about what’s really happening. To learn more, let’s rewrite the example without using the storyboard. Implement the same architecture using code alone:
// AppDelegate.swift:
func application(_ application: UIApplication,
    didFinishLaunchingWithOptions
    launchOptions: [UIApplicationLaunchOptionsKey : Any]?)
    -> Bool {
        self.window = self.window ?? UIWindow()
        let rvc = RootViewController()
        let nav = UINavigationController(rootViewController:rvc)
        self.window!.rootViewController = nav
        self.window!.backgroundColor = .white
        self.window!.makeKeyAndVisible()
        return true
}

// RootViewController.swift:
override func viewDidLoad() {
    super.viewDidLoad()
    // ... color view background, create buttons ...
}
func doPresent(_ sender: Any?) {
    let pvc = PresentedViewController()
    self.present(pvc, animated:true)
}
func doPush(_ sender: Any?) {
    let svc = SecondViewController()
    self.navigationController!.pushViewController(svc, animated:true)
}

// SecondViewController.swift:
override func viewDidLoad() {
    super.viewDidLoad()
    // ... color view background, create button ...
}
func doPresent(_ sender: Any?) {
    let pvc = PresentedViewController()
    self.present(pvc, animated:true)
}

// PresentedViewController.m:
override func viewDidLoad() {
    super.viewDidLoad()
    // ... color view background, create button ...
}
func doDismiss(_ sender: Any?) {
    self.presentingViewController!.dismiss(animated:true)
}
That’s a working app. Now let’s start adding state restoration, just as before:
-
In the app delegate, change the name of
application(_:didFinishLaunchingWithOptions:)toapplication(_:willFinishLaunchingWithOptions:). -
In the app delegate, implement these two methods to return
true:-
application(_:shouldSaveApplicationState:) -
application(_:shouldRestoreApplicationState:)
-
-
Give all four view controller instances restoration IDs: let’s call them
"nav","root","second", and"presented". We’ll have to do this in code. We’re creating each view controller instance manually, so we may as well assign itsrestorationIdentifierin the next line, like this:let rvc = RootViewController() rvc.restorationIdentifier = "root" let nav = UINavigationController(rootViewController:rvc) nav.restorationIdentifier = "nav"
And so on.
Run the app. We are not getting state restoration. Why not?
The reason is that the restorationIdentifier alone is not sufficient to tell the state restoration mechanism what to do as the app launches. The restoration mechanism knows the chain of view controller classes that needs to be generated, but it is up to us to generate the instances of those classes. (Our storyboard-based example didn’t exhibit this problem, because the storyboard itself was the source of the instances.) To do that, we need to know about the identifier path and the restoration class.
Identifier path
The restorationIdentifier serves as a guide during restoration as to what view controller is needed at each point in the view controller hierarchy. Any particular view controller instance, given its position in the view controller hierarchy, is uniquely identified by the sequence of restorationIdentifier values of all the view controllers (including itself) in the chain that leads to it. Those restorationIdentifier values, taken together and in sequence, constitute the identifier path for any given view controller instance.
Each identifier path is, in fact, merely an array of strings. In effect, the identifier paths are like a trail of breadcrumbs that you left behind as you created each view controller while the app was running, and that will now be used to identify each view controller again as the app launches.
For example, if we launch the app and press the Push button and then the Present button, then all four view controllers have been instantiated; those instances are identified as:
-
["nav"] -
["nav", "root"] -
["nav", "second"] -
["nav", "presented"](because the navigation controller is the actual presenting view controller)
Observe that a view controller’s identifier path is not a record of the full story of how we got here. It’s just an identifier! The state-saving mechanism uses those identifiers to save a relational tree, which does tell the full story. For example, if the app is suspended in the current situation, then the state-saving mechanism will record the true state of affairs, namely that the root view controller (["nav"]) has two children (["nav", "root"] and ["nav", "second"]) and a presented view controller (["nav", "presented"]).
Now consider what the state restoration mechanism needs to do when the app has been suspended and killed, and comes back to life, from the situation I just described. We need to restore four view controllers; we know their identifiers and mutual relationships. State restoration doesn’t start until after application(_:willFinishLaunchingWithOptions:). So when the state restoration mechanism starts examining the situation, it discovers that the ["nav"] and ["nav", "root"] view controller instances have already been created! However, the view controller instances for ["nav", "second"] and ["nav", "presented"] must also be created now. The state restoration mechanism doesn’t know how to do that — so it’s going to ask your code for the instances.
Restoration class
The state restoration mechanism needs to ask your code for the view controller instances that haven’t been created already. But what code should it ask? One way of specifying this is for you to provide a restoration class for each view controller instance that is not restored by the time application(_:willFinishLaunchingWithOptions:) returns. Here’s how you do that:
-
Give the view controller a
restorationClass. Typically, this will be the view controller’s own class, or the class of the view controller responsible for creating this view controller instance. -
Implement the class method
viewController(withRestorationIdentifierPath:coder:)on the class named by each view controller’srestorationClassproperty, returning a view controller instance as specified by the identifier path. Very often, the implementation will be to instantiate the view controller directly and return that instance. -
Specify formally that each class named as a
restorationClassimplements the UIViewControllerRestoration protocol. (If you omit this step, you’ll get a helpful warning message at runtime: “Restoration class for view controller does not conform to UIViewControllerRestoration protocol.”)
Let’s make our PresentedViewController and SecondViewController instances restorable. I’ll start with PresentedViewController. Our app can have two PresentedViewController instances (though not simultaneously) — the one created by RootViewController, and the one created by SecondViewController. Let’s start with the one created by RootViewController.
Since RootViewController creates and configures a PresentedViewController instance, it can reasonably act also as the restoration class for that instance. In its implementation of viewController(withRestorationIdentifierPath:coder:), RootViewController should then create and configure a PresentedViewController instance exactly as it was doing before we added state restoration to our app — except for putting it into the view controller hierarchy! The state restoration mechanism itself, remember, is responsible for assembling the view controller hierarchy; our job is merely to supply any needed view controller instances.
So RootViewController now must adopt UIViewControllerRestoration, and will contain this code:
func doPresent(_ sender: Any?) {
    let pvc = PresentedViewController()
    pvc.restorationIdentifier = "presented"
    pvc.restorationClass = type(of:self) // *
    self.present(pvc, animated:true)
}
class func viewController(withRestorationIdentifierPath ip: [Any],
    coder: NSCoder) -> UIViewController? {
        var vc : UIViewController? = nil
        let last = ip.last as! String
        switch last {
        case "presented":
            let pvc = PresentedViewController()
            pvc.restorationIdentifier = "presented"
            pvc.restorationClass = self
            vc = pvc
        default: break
        }
        return vc
}
You can see what I mean when I say that the restoration class must do exactly what it was doing before state restoration was added. Clearly this situation has led to some annoying code duplication, so let’s factor out the common code. In doing so, we must bear in mind that doPresent is an instance method, whereas viewController(withRestorationIdentifierPath:coder:) is a class method; our factored-out code must therefore be a class method, so that they can both call it:
class func makePresentedViewController () -> UIViewController {
    let pvc = PresentedViewController()
    pvc.restorationIdentifier = "presented"
    pvc.restorationClass = self
    return pvc
}
func doPresent(_ sender: Any?) {
    let pvc = type(of:self).makePresentedViewController()
    self.present(pvc, animated:true)
}
class func viewController(withRestorationIdentifierPath ip: [Any],
    coder: NSCoder) -> UIViewController? {
        var vc : UIViewController? = nil
        let last = ip.last as! String
        switch last {
        case "presented":
            vc = self.makePresentedViewController()
        default: break
        }
        return vc
}
The structure of our viewController(withRestorationIdentifierPath:coder:) is typical. We test the identifier path — usually, it’s sufficient to examine its last element — and return the corresponding view controller; ultimately, we are also prepared to return nil, in case we are called with an identifier path we can’t interpret. We can also return nil deliberately, to tell the restoration mechanism, “Go no further; don’t restore the view controller you’re asking for here, or any view controller further down the same path.”
Continuing in the same vein, we expand RootViewController still further to make it also the restoration class for SecondViewController, and SecondViewController can make itself the restoration class for the PresentedViewController instance that it creates. There’s no conflict in the notion that both RootViewController and SecondViewController can fulfill the role of PresentedViewController restoration class, as we’re talking about two different PresentedViewController instances. (The details are left as an exercise for the reader.)
The app now performs state saving and restoration correctly!
App delegate instead of restoration class
I said earlier that the state restoration mechanism can ask your code for needed instances in two ways. The second way is that you implement this method in your app delegate:
-
application(_:viewControllerWithRestorationIdentifierPath:coder:)
If you implement that method, it will be called for every view controller that doesn’t have a restoration class. This works in a storyboard-based app, and thus is a chance for you to intervene and prevent the restoration of a particular view controller on a particular occasion (by returning nil). Be prepared to receive identifier paths for an existing view controller! If that happens, return the existing view controller — don’t make a new one (and don’t return nil).
Restoring View Controller State
I have explained how the state restoration mechanism creates a view controller and places it into the view controller hierarchy. But at that point, the work of restoration is only half done. What about the state of that view controller?
A newly restored view controller probably won’t have the data and property values it was holding at the time the app was terminated. The history of the configuration of this view controller throughout the time the app was previously running is not magically recapitulated during restoration. It is up to each view controller, therefore, to restore its own state when it itself is restored. And in order to do that, it must previously save its own state when the app is backgrounded. The state saving and restoration mechanism provides a way of helping your view controllers do this, through the use of a coder (an NSCoder object). Think of this coder as a box in which the view controller is invited to place its valuables for safekeeping, and from which it can retrieve them later. Each of these valuables needs to be identified, so it is tagged with a key (an arbitrary string) when it is placed into the box, and is then later retrieved by using the same key, much as in a dictionary.
Anyone who has anything to save at the time it is handed a coder can do so by calling encode(_:forKey:). If an object’s class doesn’t adopt the NSCoding protocol, you may have to archive it to a Data object before you can encode it. However, views and view controllers can be handled by the coder directly, because they are treated as references. Whatever was saved in the coder can later be extracted using the same key. You can call decodeObject(forKey:) and cast down as needed, or you can call a specialized method corresponding to the expected type, such as decodeFloat(forKey:).
The keys do not have to be unique across the entire app; they only need to be unique for a particular view controller. Each object that is handed a coder is handed its own personal coder. It is handed this coder at state saving time, and it is handed the same coder (that is, a coder with the same archived objects and keys) at state restoration time.
Here’s the sequence of events involving coders:
- Saving state
-
When it’s time to save state (as the app is about to be backgrounded), the state saving mechanism provides coders as follows:
-
The app delegate is sent
application(_:shouldSaveApplicationState:). The coder is the second parameter. -
The app delegate is sent
application(_:willEncodeRestorableStateWith:). The coder is the second parameter, and in fact it is the same coder as in the previous step, because this is the same object (the app delegate). -
Each view controller down the chain, starting at the root view controller, is sent
encodeRestorableState(with:). The coder is the parameter. The implementation should callsuper. Each view controller gets its own coder.
-
- Restoring state
-
When it’s time to restore state (as the app is launched), the state restoration mechanism provides coders as follows:
-
The app delegate is sent
application(_:shouldRestoreApplicationState:). The coder is the second parameter. -
As each view controller down the chain is to be created, one of these methods is called (as I’ve already explained); the coder is the one appropriate to the view controller that’s to be created:
-
The restoration class’s
viewController(withRestorationIdentifierPath:coder:), if the view controller has a restoration class. -
Otherwise, the app delegate’s
application(_:viewControllerWithRestorationIdentifierPath:coder:).
-
-
Each view controller down the chain, starting at the root view controller, is sent
decodeRestorableState(with:). The coder is the parameter. The implementation should callsuper. -
The app delegate is sent
application(_:didDecodeRestorableStateWith:). The coder is the second parameter, and is the same one sent toapplication(_:shouldRestoreApplicationState:).
-
The UIStateRestoration.h header file describes five built-in keys that are available from every coder during restoration:
UIStateRestorationViewControllerStoryboardKey-
A reference to the storyboard from which this view controller came, if any.
UIApplicationStateRestorationBundleVersionKey-
Your Info.plist
CFBundleVersionstring at the time of state saving. UIApplicationStateRestorationUserInterfaceIdiomKey-
An NSNumber wrapping a UIUserInterfaceIdiom value, either
.phoneor.pad, telling what kind of device we were running on when state saving happened. You can extract this information as follows:let key = UIApplicationStateRestorationUserInterfaceIdiomKey if let idiomraw = coder.decodeObject(forKey: key) as? Int { if let idiom = UIUserInterfaceIdiom(rawValue:idiomraw) { if idiom == .phone { // ... } } } UIApplicationStateRestorationTimestampKey-
A Date telling when state saving happened.
UIApplicationStateRestorationSystemVersionKey-
A NSString telling the system version under which state saving happened.
One purpose of these keys is to allow your app to opt out of state restoration, wholly or in part, because the archive is too old, was saved on the wrong kind of device (and presumably migrated to this one by backup and restore), and so forth.
A typical implementation of encodeRestorableState(with:) and decodeRestorableState(with:) will concern itself with properties and interface views. decodeRestorableState(with:) is guaranteed to be called after viewDidLoad, so you know that viewDidLoad won’t overwrite any direct changes to the interface performed in decodeRestorableState(with:).
To illustrate, I’ll add state saving and restoration to my earlier UIPageViewController example, the one that displays a Pep Boy on each page. Recall how that example is architected. The project has no storyboard. The code defines just two classes, the app delegate and the Pep view controller. The app delegate creates a UIPageViewController and makes it the window’s root view controller, and makes itself the page view controller’s data source; its self.pep instance property holds the data model, which is just an array of string Pep Boy names. The page view controller’s data source methods create and supply an appropriate Pep instance whenever a page is needed for the page view controller, along these lines:
// ... work out index of new name ...
return Pep(pepBoy: self.pep[ix])
The challenge is to restore the Pep object displayed in the page view controller as the app launches. One solution involves recognizing that a Pep object is completely configured once created, and it is created just by handing it the name of a Pep Boy in its designated initializer, which becomes its boy property. Thus we can mediate between a Pep object and a mere string, and all we really need to save and restore is that string.
All the additional work, therefore, can be performed in the app delegate.
We save and restore the current Pep Boy name in the app delegate’s encode and decode methods:
func application(_ application: UIApplication,
    willEncodeRestorableStateWith coder: NSCoder) {
        let pvc = self.window!.rootViewController as! UIPageViewController
        let boy = (pvc.viewControllers![0] as! Pep).boy
        coder.encode(boy, forKey:"boy")
}
func application(_ application: UIApplication,
    didDecodeRestorableStateWith coder: NSCoder) {
        let boyMaybe = coder.decodeObject(forKey:"boy")
        guard let boy = boyMaybe as? String else {return}
        let pvc = self.window!.rootViewController as! UIPageViewController
        let pep = Pep(pepBoy: boy)
        pvc.setViewControllers([pep], direction: .forward, animated: false)
}
A second, more general solution is to make our Pep view controller class itself capable of saving and restoration. This means that every view controller down the chain from the root view controller to our Pep view controller must have a restoration identifier. In our simple app, there’s just one such view controller, the UIPageViewController; the app delegate can assign it a restoration ID when it creates it:
let pvc = UIPageViewController(
    transitionStyle: .scroll, navigationOrientation: .horizontal)
pvc.restorationIdentifier = "pvc" // *
We’ll have a Pep object assign itself a restoration ID in its own designated initializer. The Pep object will also need a restoration class; as I mentioned earlier, this can perfectly well be the Pep class itself, and that seems most appropriate here:
required init(pepBoy boy:String) { // *
    self.boy = boy
    super.init(nibName: nil, bundle: nil)
    self.restorationIdentifier = "pep" // *
    self.restorationClass = type(of:self) // *
}
The only state that a Pep object needs to save is its boy string, so we implement encodeRestorableState to do that. We don’t need to implement decodeRestorableState, because the coder that will come back to us in viewController(withRestorationIdentifierPath:coder:) contains the boy string, and once we use it to create the Pep instance, the Pep instance is completely configured. This is a class method, and it can’t call an initializer on self unless that initializer is marked as required; we did mark it required (in the previous code):
override func encodeRestorableState(with coder: NSCoder) {
    super.encodeRestorableState(with:coder)
    coder.encode(self.boy, forKey:"boy")
}
class func viewController(withRestorationIdentifierPath ip: [Any],
    coder: NSCoder) -> UIViewController? {
        let boy = coder.decodeObject(forKey:"boy") as! String
        return self.init(pepBoy: boy)
}
Now comes a surprise. We run the app and test it, and we find that we’re not getting saving and restoration of our Pep object. It isn’t being archived; its encodeRestorableState(with:) isn’t even being called! The reason is that the state saving mechanism doesn’t work automatically for a UIPageViewController and its children (or for a custom container view controller and its children, for that matter). It is up to us to see to it that the current Pep object is archived.
To do so, we can archive and unarchive the current Pep object in an implementation of encodeRestorableState(with:) and decodeRestorableState(with:) that is being called. For our app, that would have to be in the app delegate. The code we’ve written so far has all been necessary to make the current Pep object archivable and restorable; now the app delegate will make sure that it is archived and restored:
func application(_ application: UIApplication,
    willEncodeRestorableStateWith coder: NSCoder) {
        let pvc = self.window!.rootViewController as! UIPageViewController
        let pep = pvc.viewControllers![0] as! Pep
        coder.encode(pep, forKey:"pep")
}
func application(_ application: UIApplication,
    didDecodeRestorableStateWith coder: NSCoder) {
        let pepMaybe = coder.decodeObject(forKey:"pep")
        guard let pep = pepMaybe as? Pep else {return}
        let pvc = self.window!.rootViewController as! UIPageViewController
        pvc.setViewControllers([pep], direction: .forward, animated: false)
}
This solution may seem rather heavyweight, but it isn’t. We’re not really archiving an entire Pep instance; it’s just a reference. The Pep instance that arrives in application(_:didDecodeRestorableStateWith:) was never in the archive; it is the instance created by Pep’s implementation of viewController(withRestorationIdentifierPath:coder:).
Restoration Order of Operations
When you implement state saving and restoration for a view controller, the view controller ends up with two different ways of being configured. One way involves the view controller lifetime events I discussed earlier (“View Controller Lifetime Events”). The other involves the state restoration events I’ve been discussing here. You want your view controller to be correctly configured no matter whether this view controller is undergoing state restoration or not.
Before state saving and restoration, you were probably configuring your view controller, at least in part, in viewWillAppear(_:) and viewDidAppear(_:). So you’d like to know when these will arrive during state restoration in relation to decodeRestorableState(with:). But you don’t know; it might be before or after decodeRestorableState(with:). In fact, you don’t even know whether viewDidAppear(_:) will arrive: it might well never arrive, even if viewWillAppear(_:) arrives. This is another of those view controller lifetime event incoherencies I complained about earlier in this chapter.
Fortunately, there’s another view controller event I haven’t mentioned yet: applicationFinishedRestoringState. If you implement this method in a view controller subclass, it will be called if and only if we’re doing state restoration, at a time when all view controllers have already been sent decodeRestorableState(with:).
Thus, the known order of events during state restoration is like this:
-
application(_:shouldRestoreApplicationState:) -
application(_:viewControllerWithRestorationIdentifierPath:coder:) -
viewController(withRestorationIdentifierPath:coder:), in order down the chain -
viewDidLoad, in order down the chain; possibly interleaved with the foregoing -
decodeRestorableState(with:), in order down the chain -
application(_:didDecodeRestorableStateWith:) -
applicationFinishedRestoringState, in order down the chain
You still don’t know when viewWillAppear(_:) and viewDidAppear(_:) will arrive, or whether viewDidAppear(_:) will arrive at all. But in applicationFinishedRestoringState you can reliably finish configuring your view controller and your interface.
A typical situation is that you will want to update your interface after all properties have been set. So you’ll factor out your interface-updating code into a single method. Now there are two possibilities, and they are both handled coherently:
- We’re not restoring state
-
Properties will be set through initialization and configuration, and then
viewWillAppear(_:)calls your interface-updating method. - We are restoring state
-
Properties will be set by
decodeRestorableState(with:), and thenapplicationFinishedRestoringStatecalls your interface-updating method.
There is still some indeterminacy as to what’s going to happen, but the interface-updating method can mediate that indeterminacy by checking for two things that can go wrong:
- It is called too soon
-
The interface-updating method should check to see that the properties have in fact been set; if not, it should just return. It will be called again when the properties have been set.
- It is called unnecessarily
-
The interface-updating method might run twice in quick succession with the same set of properties. This is not a disaster, but if you don’t like it, you can prevent it by comparing the properties to the interface and return if the interface has already been configured with these properties.
Tip
If your app has additional state restoration work to do on a background thread (Chapter 24), the documentation says you should call UIApplication’s extendStateRestoration as you begin and completeStateRestoration when you’ve finished. The idea is that if you don’t call completeStateRestoration, the system can assume that something has gone wrong and will throw away the saved state information in case it is faulty.
Restoration of Other Objects
A view will participate in automatic saving and restoration of state if its view controller does, and if it itself has a restoration identifier. Some built-in UIView subclasses have built-in restoration abilities. For example, a scroll view that participates in state saving and restoration will automatically return to the point to which it was scrolled previously. You should consult the documentation on each UIView subclass to see whether it participates usefully in state saving and restoration, and I’ll mention a few significant cases when we come to discuss those views in later chapters.
In addition, an arbitrary object can be made to participate in automatic saving and restoration of state. There are three requirements for such an object:
-
The object’s class must adopt the UIStateRestoring protocol. This declares three optional methods:
-
encodeRestorableState(with:) -
decodeRestorableState(with:) -
applicationFinishedRestoringState
-
-
When the object is created, someone must register it with the runtime by calling this UIApplication class method:
-
registerObject(forStateRestoration:restorationIdentifier:)
-
-
Someone who participates in state saving and restoration, such as a view controller, must make the archive aware of this object by storing a reference to it in the archive (typically in
encodeRestorableState(with:)) — much as we did with the Pep object earlier.
So, for example, here’s an NSObject subclass Thing with a word property, that participates in state saving and restoration:
class Thing : NSObject, UIStateRestoring {
    var word = ""
    func encodeRestorableState(with coder: NSCoder) {
        coder.encode(self.word, forKey:"word")
    }
    func decodeRestorableState(with coder: NSCoder) {
        self.word = coder.decodeObject(forKey:"word") as! String
    }
    func applicationFinishedRestoringState() {
        // not used
    }
}
And here’s a view controller with an Optional Thing property (self.thing):
class func makeThing () -> Thing {
    let thing = Thing()
    UIApplication.registerObject(
        forStateRestoration: thing, restorationIdentifier: "thing")
    return thing
}
override func awakeFromNib() {
    super.awakeFromNib()
    self.thing = type(of:self).makeThing()
}
override func encodeRestorableState(with coder: NSCoder) {
    super.encodeRestorableState(with:coder)
    coder.encode(self.thing, forKey: "mything") // *
}
The starred line is crucial; it introduces our Thing object to the archive and brings its UIStateRestoring methods to life. The result is that if we background the app while an instance of this view controller exists, and if state restoration is performed on the next launch, the view controller’s Thing has the same word that it had before; the Thing has participated in state saving and restoration along with the view controller that owns it.
There is an optional objectRestorationClass property of the restorable object, and an object(withRestorationIdentifierPath:coder:) method that the designated class must implement. The class in question should formally adopt the UIObjectRestoration protocol. Its implementation of object(withRestorationIdentifierPath:coder:) should return the restorable object, by creating it or pointing to it; alternatively, it can return nil to prevent restoration. If you want to assign an objectRestorationClass, you’ll have to declare the property:
var objectRestorationClass: UIObjectRestoration.Type?
However, our Thing object was restorable even without an objectRestorationClass! Presumably, just calling registerObject sufficiently identifies this object to the runtime.
Another optional property of the restorable object is restorationParent. Again, if you want to assign to it, you’ll have to declare it:
var restorationParent: UIStateRestoring?
The purpose of the restoration parent is to give the restorable object an identifier path. For example, if we have a chain of view controllers with a path ["nav", "second"], then if that last view controller is the restorationParent of our Thing object, the Thing object’s identifier path in object(withRestorationIdentifierPath:coder:) will be ["nav", "second", "thing"], rather than simply ["thing"]. This is useful if we are worried that ["thing"] alone will not uniquely identify this object.
Snapshot Suppression
When your app is backgrounded, the system takes a snapshot of your interface. It is used in the app switcher interface, and as a launch image when your app is resumed. But what happens if your app is killed in the background and relaunched?
If your app isn’t participating in state restoration, then its default launch image is used. This makes sense, because your app is starting from scratch. But if your app is participating in state restoration, then the snapshot is used as a launch image. This makes sense, too, because the interface that was showing when the app was backgrounded is presumably the very interface your state restoration process is about to restore.
However, you might decide, while saving state, that there is reason not to use the system’s snapshot when relaunching. (Perhaps there is something in your interface that would be inappropriate to display when the app is subsequently launched.) In that case, you can call the UIApplication instance method ignoreSnapshotOnNextApplicationLaunch. When the app launches with state restoration, the user will see your app’s default launch image, followed by a change to the restored interface. They may not match, but at least there is a nice cross-dissolve between them.
By the same token, if the view controller whose view was showing at state saving time is not restorable (it has no restoration ID), then if the app is killed in the background and subsequently launches with state restoration, the restoration mechanism knows that the snapshot taken at background time doesn’t match the interface we’re about to restore to, so the user will initially see your app’s default launch image.