Chapter 9. iPad Interface
This chapter discusses some iOS interface features that differ between the iPad and the iPhone.
Popovers and split views are forms of interface designed originally for the iPad. In iOS 7 and before, they existed only on the iPad. Starting in iOS 8, both became available also on the iPhone, where they can either adapt — appearing in an altered form, more appropriate to the smaller screen — or appear just as they do on the iPad.
iPad multitasking, introduced in iOS 9, is an interface confined to a subset of iPad models, where two apps can occupy the screen simultaneously.
Popovers
A popover is a sort of secondary window or dialog: it displays a view layered on top of the main interface. It is usually associated, through a sort of arrow, with a view in the main interface, such as the button that the user tapped to summon the popover. It might be effectively modal, preventing the user from working in the rest of the interface; alternatively, it might vanish if the user taps outside it.
A popover can bring to the larger iPad the smaller, more lightweight flavor of the iPhone. For example, in my LinkSame app, both the settings view (where the user configures the game) and the help view (which describes how to play the game) are popovers (Figure 9-1). On the iPhone, both these views would occupy the entire screen; for each, we’d need a way to navigate to it, and then the user would have to return to the main interface afterward. But with the larger iPad screen, neither view is large enough, or important enough, to occupy the entire screen exclusively. As popovers, they are characterized as smaller, secondary views that the user summons temporarily and then dismisses.

Figure 9-1. Two popovers
A popover, in iOS 8 and later, is actually a form of presented view controller — a presented view controller with a modalPresentationStyle of .popover (which I didn’t tell you about in Chapter 6). Among the advantages of this architecture are:
- Memory management
-
In iOS 7 and before, it was necessary to create a UIPopoverController and retain it explicitly. A presented view controller, on the other hand, is retained automatically by its presenting view controller.
- Singularity
-
In iOS 7 and before, nothing enforced Apple’s guideline that a maximum of one popover at a time should be shown. A presented view controller, on the other hand, enforces it automatically (a view controller can’t have more than one presented view controller at a time).
- Adaptibility
-
In iOS 7 and before, a popover was illegal on the iPhone. Your universal app therefore had to be filled with conditional code: “If we’re running on an iPad, show this view controller as a popover; otherwise, make it a presented view controller.” Dismissal and cleanup were conditional too, and could be even harder to manage. A presented view controller, on the other hand, can adapt. A
.popoverpresented view controller, like a.formSheetpresented view controller, is automatically treated by default as.fullScreenon the iPhone. Moreover, if you don’t want the default, you don’t have to accept it; it is legal for a popover to appear on the iPhone as a popover.
Tip
A view controller presented as a popover has a .compact horizontal size class, even on an iPad.
To show a popover, you’re going to present a view controller. Before that presentation takes place, you’ll turn this into a popover presentation by setting the view controller’s modalPresentationStyle to .popover:
let vc = MyViewController()
vc.modalPresentationStyle = .popover
self.present(vc, animated: true)
This, however, is insufficient; without a little further configuration, that code will crash at runtime when the popover is presented. The additional configuration is performed through the UIPopoverPresentationController (a UIPresentationController subclass) that is responsible for showing this popover. Setting the view controller’s modalPresentationStyle to .popover causes its presentationController to become a UIPopoverPresentationController, and its popoverPresentationController points to that same UIPopoverPresentationController.
Arrow Source and Direction
At a minimum, the UIPopoverPresentationController needs you to set one of the following:
barButtonItem-
A bar button item in the interface, with which the popover should be associated. The popover’s arrow will point to this bar button item. Typically, this will be the bar button item that was tapped in order to summon the popover (as in Figure 9-1).
sourceView,sourceRect-
A UIView in the interface, along with the CGRect in that view’s coordinate system, with which the popover should be associated. The popover’s arrow will point to this rect. Typically, the
sourceViewwill be the view that was tapped in order to summon the popover, and thesourceRectwill be itsbounds.
Thus, here’s a minimal popover presentation that actually works; the popover is summoned by tapping a UIButton in the interface, and this is that button’s action method:
@IBAction func doButton(_ sender: Any) {
    let vc = MyViewController()
    vc.modalPresentationStyle = .popover
    self.present(vc, animated: true)
    if let pop = vc.popoverPresentationController {
        let v = sender as! UIView
        pop.sourceView = v
        pop.sourceRect = v.bounds
    }
}
(Observe that it is legal and effective to finish configuring the popover after presenting it. That’s because the presentation hasn’t actually started yet, as your code has not yet come to an end.)
In addition to the arrow source, you can set the desired arrow direction, as the popover presentation controller’s permittedArrowDirections. This is a bitmask with possible values .up, .down, .left, and .right. The default is .any, comprising all four bitmask values; this will usually be what you want.
Popover Size and Position
The presentation of the popover won’t fail if you don’t supply a size for the popover, but you probably will want to supply one, as the default is unlikely to be desirable. This information is provided through the presented view controller’s preferredContentSize.
Recall (from Chapter 6) that a view controller can use its preferredContentSize to communicate to a parent view controller the size that it would like to be. The popover presentation controller is a presentation controller (UIPresentationController), and is therefore also a UIContentContainer; the presentation controller acts as the parent of the presented view controller, and in this situation will consult the presented view controller’s wishes and will try to respect them.
I’m deliberately leaving open the question of who will set the presented view controller’s preferredContentSize and when. The presented view controller might set its own value here; its viewDidLoad is a reasonable place, or, if the view controller is instantiated from a nib, the nib editor provides Content Size fields in the Attributes inspector. Alternatively, you can set the presented view controller’s preferredContentSize as you present it:
if let pop = vc.popoverPresentationController {
    let v = sender as! UIView
    pop.sourceView = v
    pop.sourceRect = v.bounds
    vc.preferredContentSize = CGSize(200,500)
}
It is possible to change the presented view controller’s preferredContentSize while the popover is showing. The popover presentation controller will hear about this (through the mechanism discussed in Chapter 6) and will respond by changing the popover’s size, with animation.
If the popover is a navigation controller, the navigation controller will look at its current view controller’s preferredContentSize, adjust for the presence of the navigation bar, and set its own preferredContentSize appropriately. This is delightful, but it is probably unwise to press it too far; subsequently pushing or popping a view controller with a different preferredContentSize may not work as you expect — to be precise, the popover’s width will change to match the new preferred width, but the popover’s height will change only if the new preferred height is taller. (It is possible to work around this by resetting the navigation controller’s preferredContentSize in a navigation controller delegate method.)
Warning
In theory, it should also be possible to set the popover presentation controller’s popoverLayoutMargins as a way of encouraging the popover to keep a certain distance from the edges of the presenting view controller’s view. In fact, however, my experience is that this setting is ignored; I regard this as a bug.
Popover Appearance
By default, a popover presentation controller takes charge of the background color of the presented view controller’s view, including the arrow, as well the navigation bar in a navigation interface. If the resulting color isn’t to your taste, you can set the popover presentation controller’s backgroundColor; this sets the arrow color as well. In a navigation interface, you can change the navigation bar’s color separately, and customize the position and appearance of the navigation bar’s bar button items (see Chapter 12).
You can also customize the outside of the popover — that is, the “frame” surrounding the content, including the arrow. To do so, you set the UIPopoverPresentationController’s popoverBackgroundViewClass to your own subclass of UIPopoverBackgroundView (a UIView subclass) — at which point you can achieve just about anything you want, including the very silly popover shown in Figure 9-2.
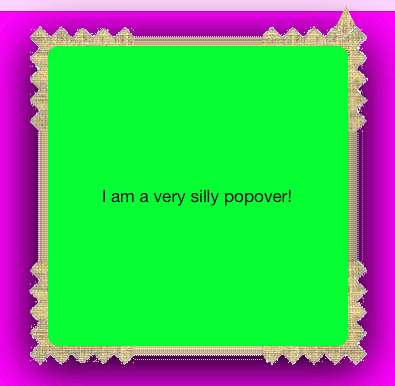
Figure 9-2. A very silly popover
Configuring your UIPopoverBackgroundView subclass is a bit tricky, because this single view is responsible for drawing both the arrow and the frame. Thus, in a complete and correct implementation, you’ll have to draw differently depending on the arrow direction, which you can learn from the UIPopoverBackgroundView’s arrowDirection property.
I’ll give a simplified example in which I cheat by assuming that the arrow direction will be .up. I start by defining two class-level constants, ARBASE and ARHEIGHT, and two instance properties, arrOff and arrDir; with the help of these, I implement four inherited members that we are required to override:
class MyPopoverBackgroundView : UIPopoverBackgroundView {
    static let ARBASE : CGFloat = 20
    static let ARHEIGHT : CGFloat = 20
    var arrOff : CGFloat
    var arrDir : UIPopoverArrowDirection
    // we are required to implement all these
    override class func arrowBase() -> CGFloat {
        return self.ARBASE
    }
    override class func arrowHeight() -> CGFloat {
        return self.ARHEIGHT
    }
    override var arrowDirection : UIPopoverArrowDirection {
        get { return self.arrDir }
        set { self.arrDir = newValue }
    }
    override var arrowOffset : CGFloat {
        get { return self.arrOff }
        set { self.arrOff = newValue }
    }
    // ...
}
Now I’ll implement draw(_:). Its job is to draw the frame and the arrow. Drawing the frame is easy; here, I divide the view’s overall rect into two areas, the arrow area on top and the frame area on the bottom, and I draw the frame into the bottom area as a resizable image (Chapter 2):
override func draw(_ rect: CGRect) {
    let linOrig = UIImage(named: "linen")!
    let capw = linOrig.size.width / 2.0 - 1
    let caph = linOrig.size.height / 2.0 - 1
    let lin = linOrig.resizableImage(
        withCapInsets:UIEdgeInsetsMake(caph, capw, caph, capw),
        resizingMode:.tile)
    // ... draw arrow here ...
    let (_,body) = rect.divided(
        atDistance: type(of:self).ARHEIGHT, from: .minYEdge)
    lin.draw(in:body)
}
We could, in fact, stop at this point. Our popover would then have no arrow, but that’s no disaster; many developers dislike the arrow and seek a way to remove it, and this constitutes a legal way. However, let’s continue by drawing the arrow. As I said a moment ago, I’ll cheat by assuming that our arrow direction is .up.
My arrow will consist simply of a texture-filled isosceles triangle, with an excess base consisting of a rectangle joining it to the frame. The runtime has set the arrowOffset property to tell us where to draw the arrow: this offset measures the positive distance between the center of the view’s edge and the center of the arrow. However, the runtime will have no hesitation in setting the arrowOffset all the way at the edge of the view, or even beyond its bounds (in which case it won’t be drawn); to prevent this, I provide a maximum offset limit:
let con = UIGraphicsGetCurrentContext()!
con.saveGState()
// clamp offset
var propX = self.arrowOffset
let limit : CGFloat = 22.0
let maxX = rect.size.width/2.0 - limit
if propX > maxX { propX = maxX }
if propX < limit { propX = limit }
// draw the point
let klass = type(of:self)
con.translateBy(x: rect.size.width/2.0 + propX - klass.ARBASE/2.0, y: 0)
con.move(to:CGPoint(0, klass.ARHEIGHT))
con.addLine(to:CGPoint(klass.ARBASE / 2.0, 0))
con.addLine(to:CGPoint(klass.ARBASE, klass.ARHEIGHT))
con.closePath()
// draw the base
con.addRect(CGRect(0,klass.ARHEIGHT,klass.ARBASE,15))
con.clip()
lin.draw(at:CGPoint(-40,-40))
con.restoreGState()
Finally, the thickness of the four sides of the frame is dictated by implementing the contentViewInsets class method:
override class func contentViewInsets() -> UIEdgeInsets {
    return UIEdgeInsetsMake(20,20,20,20)
}
Passthrough Views
When you’re configuring your popover, you’ll want to plan ahead for how the popover is to be dismissed. The default is that the user can tap anywhere outside the popover to dismiss it, and this will often be what you want. You can, however, modify this behavior in two ways:
- UIPopoverPresentationController’s
passthroughViewsproperty -
An array of views in the interface behind the popover; the user can interact normally with these views while the popover is showing, and the popover will not be dismissed.
What happens if the user taps a view that is not listed in the
passthroughViewsarray depends on theisModalInPopoverproperty. - UIViewController’s
isModalInPopoverproperty -
If this is
truefor the presented view controller (or for its current child view controller, as in a tab bar interface or navigation interface), then if the user taps outside the popover on a view not listed in the popover presentation controller’spassthroughViews, nothing happens (the popover is not dismissed). The default isfalse.Clearly, if you’ve set this property to
true, you’ve removed the user’s ability to dismiss the popover by tapping anywhere outside it. You would then presumably provide some other way of letting the user dismiss the popover — typically, a button inside the popover which the user can then tap in order to calldismiss(animated:completion:).
Warning
The claim made by the documentation that isModalInPopover prevents all user interaction outside a popover is wrong. The user can still interact with a view listed in the passthroughViews, even if isModalInPopover is true.
Unfortunately — and I can’t believe I’m still having to warn about this after all these years — if a popover is summoned by the user tapping a UIBarButton item in a toolbar, other UIBarButtonItems in that toolbar are automatically turned into passthrough views! This means that, while the popover is showing, the user can tap any other button in the toolbar — including a button that summons another popover, which is illegal (you can’t present a view controller when you’re already presenting a view controller).
Working around this annoying problem is not easy. Setting the popover presentation controller’s passthroughViews to nil or an empty array just after presenting it doesn’t help; your setting is overridden by the runtime. My rather hacky solution is to provide some extra delay, so as to assert my will after the runtime:
if let pop = vc.popoverPresentationController {
    // ... other configurations go here ...
    delay(0.1) {
        pop.passthroughViews = nil
    }
}
Popover Presentation, Dismissal, and Delegate
Because a popover is just a form of presented view controller, it is shown with present(_:animated:completion:). Similarly, if you want to dismiss a popover in code, rather than letting the user dismiss it by tapping outside it, you’ll dismiss it with dismiss(animated:completion:).
Messages to the popover presentation controller’s delegate (UIPopoverPresentationControllerDelegate) provide further information and control. Typically, you’ll set the delegate in the same place you’re performing the other configurations:
if let pop = vc.popoverPresentationController {
    // ... other configurations go here ...
    pop.delegate = self
}
The three most commonly used delegate methods are:
prepareForPopoverPresentation(_:)-
The popover is being presented. There is time to perform further initial configurations here (but this method is still called too early for you to work around the
passthroughViewsissue I discussed a moment ago). popoverPresentationControllerShouldDismissPopover(_:)-
The user is dismissing the popover by tapping outside it. Return
falseto prevent dismissal. Not called when you dismiss the popover in code. popoverPresentationControllerDidDismissPopover(_:)-
The user has dismissed the popover by tapping outside it. The popover is gone from the screen and dismissal is complete, even though the popover presentation controller still exists. Not called when you dismiss the popover in code.
The delegate methods provide the popover presentation controller as parameter, and if necessary you can probably identify the popover more precisely by querying it further. For example, you can learn what view controller is being presented by examining its presentedViewController, or what interface object its arrow is connected to by examining its sourceView or barButtonItem.
The delegate methods make up for the fact that, when the user dismisses the popover, you don’t have the sort of direct information and control that you get from calling dismiss(animated:completion:) and setting a completion function. If the user can dismiss the popover either by tapping outside the popover or by tapping an interface item that calls dismiss(animated:completion:), you may have to duplicate some code in order to cover all cases.
For example, consider the first popover shown in Figure 9-1. It has a Done button and a Cancel button; the idea here is that the user sets up a desired game configuration and then, while dismissing the popover, either saves it (Done) or doesn’t (Cancel). My approach is to save the user’s configuration into UserDefaults in real time as the user works within the popover; for example, if the user changes the Style by tapping Animals, I write this change into UserDefaults then and there (in my implementation of tableView(_:didSelectRowAt:)). So far, so good; but what if the user then cancels? To prepare for that possibility, I copy the relevant user defaults into a property (self.oldDefs) before the popover appears:
let ud = UserDefaults.standard
self.oldDefs = ud.dictionaryWithValues(
    forKeys: [Default.style, Default.size, Default.lastStage])
If the user taps Done, I dismiss the popover, clear out that property, and proceed to start a new game:
func startNewGame() { // user tapped Done
    self.dismiss(animated: true) {
        self.oldDefs = nil
        self.prepareNewStage(nil)
    }
}
If the user taps Cancel, I dismiss the popover, restore the defaults from the property, and clear out the property:
func cancelNewGame() { // user tapped Cancel
    self.dismiss(animated: true)
    if (self.oldDefs != nil) {
        let ud = UserDefaults.standard
        ud.setValuesForKeys(self.oldDefs)
        self.oldDefs = nil
    }
}
But what if the user taps outside the popover? I interpret that as cancellation. So I’ve implemented the shouldDismiss delegate method to duplicate what I would have done if the user had tapped Cancel:
func popoverPresentationControllerShouldDismissPopover(
    _ pop: UIPopoverPresentationController) -> Bool {
        if (self.oldDefs != nil) {
            let ud = UserDefaults.standard
            ud.setValuesForKeys(self.oldDefs)
            self.oldDefs = nil
        }
        return true
}
There is one further delegate method:
popoverPresentationController(_:willRepositionPopoverTo:in:)-
Called because the popover’s
sourceViewis involved in new layout activity. Typically, this is because the interface is rotating. Theto:andin:parameters are mutable pointers representing the popover’ssourceRectandsourceViewrespectively; so you can change them (through theirpointeeproperties), thus changing the attachment of the arrow.
Adaptive Popovers
Back in iOS 7 and before, popovers were confined to the iPad. If you tried to summon a popover on an iPhone, you’d crash. This meant that you had to summon your view controller in two different ways, conditioned on the environment — for example, as a popover on iPad, but as a presented view controller on iPhone. Thus, you had to write two interleaved sets of code. And it wasn’t just a matter of summoning the view controller; you had the same problem on dismissal, because a popover and a presented view controller were dismissed in two different ways.
In iOS 8 and later, however, a popover is a presented view controller. So much for that problem! Moreover, this presented view controller is adaptive. By default, in a horizontally compact environment (such as an iPhone), the .popover modal presentation style will be treated as .fullScreen; what appears as a popover on the iPad will appear as a fullscreen presented view on the iPhone, completely replacing the interface. Thus, by default, with no extra code, you’ll get something eminently sensible on both types of device.
Sometimes, however, the default is not quite what you want. A case in point appears in Figure 9-1. The popover on the right, containing our help info, has no internal button for dismissal. It doesn’t need one on the iPad, because the user can dismiss the popover by tapping outside it. But this is a universal app. Unless we take precautions, the same help info will appear on the iPhone as a fullscreen presented view — and the user will have no way to dismiss it.
Clearly, we need a Done button that appears inside the presented view controller’s view — but only on the iPhone.
To achieve this, we can take advantage of UIPresentationController delegate methods. A UIPopoverPresentationController is also a UIPresentationController — and you can set its delegate (UIAdaptivePresentationControllerDelegate). The adaptive presentation delegate methods (see “Adaptive Presentation”) thus spring to life, allowing you to tweak how the popover adapts, and how it behaves when it adapts. The trick is that you must set the presentation controller’s delegate before calling present(_:animated:completion:); otherwise, the adaptive presentation delegate methods won’t be called.
For example, we can implement the delegate method presentationController(_:viewControllerForAdaptivePresentationStyle:) to substitute a different view controller. This might be nothing but the old view controller wrapped in a UINavigationController! If our view controller has a navigationItem with a working Done button, the problem is now solved: on the iPhone, there’s a navigation bar at the top of the interface, and the Done button appears in it:
@IBAction func doHelp(_ sender : AnyObject?) {
    let vc = MyHelpViewController()
    vc.modalPresentationStyle = .popover
    vc.preferredContentSize = CGSize(width: 450,height: 800)
    if let pop = vc.popoverPresentationController {
        pop.delegate = self // *
    }
    self.present(vc, animated: true)
    if let pop = vc.popoverPresentationController {
        pop.permittedArrowDirections = .any
        if let sender = sender as? UIBarButtonItem {
            pop.barButtonItem = sender
        }
        delay (0.1) {
            pop.passthroughViews = nil
        }
    }
}
func presentationController(_ controller: UIPresentationController,
    viewControllerForAdaptivePresentationStyle
    style: UIModalPresentationStyle) -> UIViewController? {
        if style != .popover {
            let vc = controller.presentedViewController
            let nav = UINavigationController(rootViewController: vc)
            let b = UIBarButtonItem(barButtonSystemItem: .done,
                target: self, action: #selector(dismissHelp))
            vc.navigationItem.rightBarButtonItem = b
            return nav
        }
        return nil
}
The outcome is that in a .regular horizontal size class we get a popover that can be dismissed by tapping outside it; otherwise, we get a fullscreen presented view controller that can be dismissed with a Done button.
You can also implement the adaptivePresentationStyle(for:traitCollection:) delegate method to customize how the popover adapts. In a .compact horizontal size class, you don’t have to return .fullScreen; you can return some other adaptive presentation style. One possibility is to return .none — in which case the presented view controller will be a popover even on iPhone:
func adaptivePresentationStyle(for controller: UIPresentationController,
    traitCollection: UITraitCollection) -> UIModalPresentationStyle {
        return .none
}
Popover Segues
If you’re using a storyboard, you can draw (Control-drag) a segue from the button (or view controller) that is to summon the popover to the view controller that is to be the popover, and specify “popover presentation” as the segue type. The result is a popover segue. (This feature requires that your storyboard be using trait variations.)
The segue, as it is triggered, configures the presentation just as you would configure it in code. It instantiates and initializes the presented view controller, sets its modal presentation style to .popover, and presents it. To perform additional configurations, you can implement prepare(for:sender:): obtain the segue’s destination, get a reference to its popoverPresentationController, and configure it. At the time prepare(for:sender:) is called, the presentation has not yet begun, so you can successfully set the popover presentation controller’s delegate here if desired. You can set its passthroughViews too, but you’ll still have to provide a delay if your goal is to overcome the default behavior of bar button items:
override func prepare(for segue: UIStoryboardSegue, sender: Any?) {
    if segue.identifier == "MyPopover" {
        let dest = segue.destination
        if let pop = dest.popoverPresentationController {
            pop.delegate = self
            delay(0.1) {
                pop.passthroughViews = nil
            }
        }
    }
}
You’ll notice that I didn’t set the sourceView or barButtonItem in that code; that’s because those properties can be set in the nib editor, in the segue’s Attributes inspector, and so can the permittedArrowDirections. (You can also set the passthrough views in the nib editor, but not in such a way as to override the unwanted default bar button item behavior; thus, I’ve had to do that in code.)
The popover version of an unwind segue is dismissal of the popover. Thus, both presentation and dismissal can be managed through the storyboard.
A further possibility is to specify a custom segue class. As I discussed in Chapter 6, your perform method can call super, so it can concentrate on things that are specific to this segue. Thus, for example, I can create a popover segue that encapsulates our workaround for the passthroughViews issue:
class MyPopoverSegue: UIStoryboardSegue {
    override func perform() {
        let dest = self.destination
        if let pop = dest.popoverPresentationController {
            delay(0.1) {
                pop.passthroughViews = nil
            }
        }
        super.perform()
    }
}
Popover Presenting a View Controller
A popover can present a view controller internally; you’ll specify a modalPresentationStyle of .currentContext or .overCurrentContext, because otherwise the presented view will be fullscreen by default (see Chapter 6). In iOS 7 and before, it was necessary to restrict the modal transition style to .coverVertical; in iOS 8, that restriction was lifted.
This raises the question of what happens when the user taps outside a popover that is currently presenting a view controller and displaying its view internally. Unfortunately, different systems behave differently. Here’s a sample:
- iOS 7 and before
-
Nothing happens;
isModalInPopoveristrue.
- iOS 8.1
-
The entire popover, including the internal presented view controller, is dismissed.
- iOS 8.3
-
The internal presented view controller is dismissed, while the popover remains.
- iOS 9 and later
-
Like iOS 8.1.
In my opinion, the iOS 7 behavior was correct. Presented view controllers are supposed to be modal. They don’t spontaneously dismiss themselves because the user taps elsewhere; there has to be some internal interface, such as a Done button or a Cancel button, that the user must tap in order to dismiss the view controller and proceed. You can restore the iOS 7 behavior by implementing the delegate method popoverPresentationControllerShouldDismissPopover(_:) to prevent dismissal if the popover is itself presenting a view controller:
func popoverPresentationControllerShouldDismissPopover(
    _ pop: UIPopoverPresentationController) -> Bool {
        let ok = pop.presentedViewController.presentedViewController == nil
        return ok
}
Split Views
A split view appears in its typical configuration on the iPad as a combination of two views, usually a narrow view and a wide view. Under the hood, there is a split view controller (UISplitViewController); the two views are the main views of its two child view controllers. The child view controllers are the split view controller’s viewControllers. A UIViewController that is a child, at any depth, of a UISplitViewController has a reference to the UISplitViewController through its splitViewController property.
The split view controller manages its children’s views differently depending on the orientation of the device:
- The iPad is in landscape orientation
-
The two views appear side by side.
- The iPad is in portrait orientation
-
There are two possibilities:
-
Both views continue to appear side by side; the second view is narrower than in landscape orientation, because the screen is narrower, but it is still usually wider than the first view. Apple’s Settings app is an example.
-
Only the second view appears, with an option to summon the first view from the left as an overlay, either by tapping a bar button item or by swiping from left to right. Apple’s Mail app is an example (Figure 9-3).
-

Figure 9-3. A familiar split view interface
A split view typically expresses a master–detail architecture. The narrower first view is a UITableView where the user is presented with a list (the master). The user taps an item of that list to specify what should appear in the wider second view (the detail). We may thus speak of the two children of the split view controller as the master view controller and the detail view controller. Officially speaking, they are the primary and secondary view controllers.
On the smaller iPhone screen, a master–detail interface would usually be expressed as a navigation interface: the user sees the master list, which occupies the entire interface, and taps an item of the list to navigate to the corresponding detail view, which again occupies the entire interface — because the detail view controller has been pushed onto the navigation stack. On the larger iPad screen, that interface seems overblown and unnecessary: there is room, especially in landscape orientation, for the master view and the detail view to appear simultaneously. In the split view interface, that’s exactly what happens.
In iOS 8 and later, a split view interface is adaptive. This means that a single UISplitViewController can create and manage both interfaces on both types of device:
- On the iPad
-
The split view interface appears as a side-by-side master–detail split view in landscape, and possibly as a detail view with a temporary master view overlay in portrait.
- On the iPhone
-
The master view appears as the root view of a navigation controller; the detail view, when summoned, is pushed onto the navigation stack.
If a split view controller is the top-level view controller, it determines your app’s compensatory rotation behavior. To take a hand in that determination without having to subclass UISplitViewController, make one of your objects the split view controller’s delegate (UISplitViewControllerDelegate) and implement these methods, as needed:
-
splitViewControllerSupportedInterfaceOrientations(_:) -
splitViewControllerPreferredInterfaceOrientationForPresentation(_:)
A split view controller does not relegate decisions about the status bar appearance to its children. Thus, for example, to hide the status bar when a split view controller is the root view controller, you will have to subclass UISplitViewController. Alternatively, you might wrap the split view controller in a custom container view controller, as I describe later in this chapter.
Expanded Split View Controller (iPad)
Xcode’s Master–Detail app template will give you an adaptive UISplitViewController with no work on your part, but for pedagogical purposes I’ll start by constructing a split view architecture entirely in code. We’ll get it working on the iPad before proceeding to the iPhone version. For reasons that will be clear later, a split view controller on the iPad, by default, is called an expanded split view controller. An expanded split view controller has two child view controllers, as I’ve already described.
Our master view (owned by MasterViewController) will be a table view listing the names of the three Pep Boys. Our detail view (owned by DetailViewController) will contain a single label displaying the name of the Pep Boy selected in the master view.
Our first cut at writing MasterViewController merely displays the table view:
class MasterViewController: UITableViewController {
    let model = ["Manny", "Moe", "Jack"]
    override func viewDidLoad() {
        super.viewDidLoad()
        self.tableView.register(UITableViewCell.self,
            forCellReuseIdentifier: "Cell")
    }
    override func numberOfSections(in tableView: UITableView) -> Int {
        return 1
    }
    override func tableView(_ tableView: UITableView,
        numberOfRowsInSection section: Int) -> Int {
            return model.count
    }
    override func tableView(_ tableView: UITableView,
        cellForRowAt indexPath: IndexPath) -> UITableViewCell {
            let cell = tableView.dequeueReusableCell(
                withIdentifier:"Cell", for: indexPath)
            cell.textLabel!.text = model[indexPath.row]
            return cell
    }
}
DetailViewController, in its viewDidLoad implementation, puts the label (self.lab) into the interface; it also has a public boy string property whose value appears in the label. We are deliberately agnostic about the order of events; our interface works correctly regardless of whether boy is set before or after viewDidLoad is called:
class DetailViewController: UIViewController {
    var lab : UILabel!
    var boy : String = "" {
        didSet {
            if self.lab != nil {
                self.lab.text = self.boy
            }
        }
    }
    override func viewDidLoad() {
        super.viewDidLoad()
        self.view.backgroundColor = .white
        let lab = UILabel()
        lab.translatesAutoresizingMaskIntoConstraints = false
        self.view.addSubview(lab)
        NSLayoutConstraint.activate([
            lab.topAnchor.constraint(
                equalTo: self.view.topAnchor, constant: 100),
            lab.centerXAnchor.constraint(
                equalTo: self.view.centerXAnchor)
        ])
        self.lab = lab
        self.lab.text = self.boy
    }
}
Our app delegate constructs the interface by making a UISplitViewController, giving it its two initial children, and putting its view into the window:
func application(_ application: UIApplication,
    didFinishLaunchingWithOptions
    launchOptions: [UIApplicationLaunchOptionsKey : Any]?) -> Bool {
        self.window = self.window ?? UIWindow()
        let svc = UISplitViewController()
        svc.viewControllers = [MasterViewController(), DetailViewController()]
        self.window!.rootViewController = svc
        self.window!.backgroundColor = .white
        self.window!.makeKeyAndVisible()
        return true
}
In a sense, this is already a working split view interface. In landscape orientation, the two views appear side by side. In portrait orientation, only the detail view appears; but the master view can be summoned by swiping from left to right, and can be dismissed by tapping outside it.
However, the app doesn’t do anything. In particular, when we tap on a Pep Boy’s name in the master view, the detail view doesn’t change. Let’s add that code (to MasterViewController):
override func tableView(_ tableView: UITableView,
    didSelectRowAt indexPath: IndexPath) {
        let detail = DetailViewController()
        detail.boy = model[indexPath.row]
        self.showDetailViewController(detail, sender: self)
}
The last line is a major surprise. We have not implemented any showDetailViewController(_:sender:) method; yet we are able to send this message to ourselves, and it works: the new, correctly configured detail view seamlessly replaces the existing detail view, causing the selected Pep Boy’s name to appear in the interface. How can this be? This method effectively walks up the view controller hierarchy, looking for someone to handle it. (I’ll discuss the details later.) Our DetailViewController can’t handle it, but its parent view controller, the UISplitViewController, can! It responds by making the specified view controller its second child.
Our app still doesn’t quite look like a standard master–detail view interface. The usual thing is for both the master view and the detail view to contain a navigation bar. The detail view in portrait orientation can then display in its navigation bar a left button that summons the master view, so that the user doesn’t have to know about the swipe gesture. This button is vended by the UISplitViewController, through the displayModeButtonItem property. Thus, to construct the interface properly, we need to change our app delegate code as follows:
let svc = UISplitViewController()
let master = MasterViewController()
master.title = "Pep" // *
let nav1 = UINavigationController(rootViewController:master) // *
let detail = DetailViewController()
let nav2 = UINavigationController(rootViewController:detail) // *
svc.viewControllers = [nav1, nav2]
self.window!.rootViewController = svc
let b = svc.displayModeButtonItem // *
detail.navigationItem.leftBarButtonItem = b // *
Having made that adjustment, we must also adjust our MasterViewController code. Consider what will happen when the user taps a Pep Boy name in the master view. At the moment, we are making a new DetailViewController and making it the split view controller’s second child. That is now wrong; we must make a new UINavigationController instead, with a new DetailViewController as its child. Moreover, this new DetailViewController doesn’t automatically have the displayModeButtonItem as its leftBarButtonItem — we have to set it:
override func tableView(_ tableView: UITableView,
    didSelectRowAt indexPath: IndexPath) {
        let detail = DetailViewController()
        detail.boy = model[indexPath.row]
        let b = self.splitViewController?.displayModeButtonItem
        detail.navigationItem.leftBarButtonItem = b // *
        detail.navigationItem.leftItemsSupplementBackButton = true // *
        let nav = UINavigationController(rootViewController: detail) // *
        self.showDetailViewController(nav, sender: self)
}
When the app is in landscape orientation with the two views displayed side by side, the displayModeButtonItem automatically hides itself. So our iPad split view implementation is finished!
Collapsed Split View Controller (iPhone)
Astoundingly, if we now launch our existing app on iPhone, it works almost perfectly! There’s a navigation interface. Tapping a Pep Boy’s name in the master view pushes the new detail view controller onto the navigation stack, with its view displaying that name. The detail view’s navigation bar has a back button that pops the detail view controller and returns us to the master view.
The only thing that isn’t quite right is that the app launches with the detail view showing, rather than the master view. To fix that, we first add one line to our app delegate’s application(_:didFinishLaunchingWithOptions:) to assign a delegate to the UISplitViewController:
let svc = UISplitViewController()
svc.delegate = self // *
We then implement one delegate method:
func splitViewController(_ svc: UISplitViewController,
    collapseSecondary vc2: UIViewController,
    onto vc1: UIViewController) -> Bool {
        return true
}
That’s all; on the iPhone, the app now behaves correctly!
To understand what that delegate method does, you need to know more about how the split view controller works. It adopts one of two states: it is either collapsed or expanded, in accordance with its isCollapsed property. This distinction corresponds to whether or not the environment’s trait collection has a .compact horizontal size class: if so, the split view controller collapses. Thus, the split view controller collapses as it launches on an iPhone.
An expanded split view controller, as we can see on the iPad, has two child view controllers. But a collapsed split view controller has only one child view controller. Thus, as the app launches on the iPhone, and the split view controller collapses, it must remove one child view controller. But which one? To find out, the split view controller asks its delegate how to proceed. In particular, it calls these delegate methods:
primaryViewController(forCollapsing:)-
The collapsed split view controller will have only one child view controller. What view controller should this be? By default, it will be the current first view controller, but you can implement this method to return a different answer.
splitViewController(_:collapseSecondary:onto:)-
The collapsing split view controller is going to remove its second view controller, leaving its first view controller as its only child view controller. Return
trueto permit this to happen.If this method returns
false(the default), the split view controller sendscollapseSecondaryViewController(_:for:)to the first view controller. What happens to the second view controller is now up to the first view controller.
Our first view controller is a UINavigationController, which has a built-in response to collapseSecondaryViewController(_:for:) — namely, it pushes the specified secondary view controller onto its own stack. That is not what we want; in our case, we would then end up launching with the detail view showing on the iPhone, as we’ve already seen. Therefore, we implement splitViewController(_:collapseSecondary:onto:) to return true. Thus, we permit the split view controller to remove its second view controller, so that we end up launching with the master view showing on the iPhone.
Our app has now launched on the iPhone. How does it work after that? Its root view controller is the split view controller. The split view controller has one child — a UINavigationController which, in turn, has one child, namely our MasterViewController. Thus, the table view is visible in a navigation interface. The user taps a row of the table, and our code sends showDetailViewController(_:sender:) to the MasterViewController. As I mentioned before, the result is a walk up the view controller hierarchy, looking for someone to handle this method. Here’s what happens:
-
MasterViewController doesn’t handle it, so we proceed to its parent, the UINavigationController.
-
UINavigationController doesn’t handle it either! So we proceed to its parent, the UISplitViewController.
-
UISplitViewController does handle this message, in one of two ways, depending on its state:
- The split view controller is expanded
-
The split view controller accepts the specified view controller and substitutes it as its own second view controller. The second view controller’s view is displayed, so the user now sees it as the detail view. That is what happened when our app ran on the iPad.
- The split view controller is collapsed
-
The split view controller sends
show(_:sender:)to its first view controller. The first view controller happens to be a UINavigationController, and we already know (from Chapter 6) how it responds: it pushes the specified view controller onto its stack. That is what happens when our app runs on the iPhone.
Note
In a standard split view controller architecture, the second view controller is a UINavigationController. On an iPhone, therefore, we are pushing a UINavigationController onto a UINavigationController’s stack. This is an odd thing to do, but thanks to some internal voodoo, the parent UINavigationController will do the right thing: in displaying this child’s view, it turns to the child UINavigationController’s topViewController and displays its view (and its navigationItem), and the child UINavigationController’s navigation bar never gets into the interface. Do not imitate this architecture in any other context!
Expanding Split View Controller (iPhone 6 Plus)
The iPhone 6 Plus is a hybrid case: it’s horizontally compact in portrait orientation, but not in landscape orientation. Thus, in effect, the split view controller thinks it’s on an iPhone when the iPhone 6 Plus is in portrait, but it thinks it has been magically moved over to an iPad when the iPhone 6 Plus interface rotates to landscape. Thus, the split view controller alternates between isCollapsed being true and false on a single device. In portrait, the split view displays a single navigation interface, with the master view controller at its root, like an iPhone. In landscape, the master and detail views are displayed side by side, like an iPad.
When the app, running on the iPhone 6 Plus, rotates to portrait, or if it launches into portrait, the split view controller collapses, going through the very same procedure I just described for an iPhone. But when it rotates to landscape, it performs the opposite of collapsing — which Apple, not surprisingly, describes as expanding. As the split view controller expands, it has the inverse of the problem it has when it collapses: a collapsed split view controller has just one child view controller, but an expanded split view controller has two child view controllers. Where will this second child view controller come from, and how should it be incorporated? To find out, the split view controller asks its delegate how to proceed:
primaryViewController(forExpanding:)-
The collapsed split view controller has just one child. The expanded split view controller will have two children. What view controller should be its first child view controller? By default, it will be the current child view controller, but you can implement this method to return a different answer.
splitViewController(_:separateSecondaryFrom:)-
What view controller should be the expanded split view controller’s second child view controller? Implement this method to return that view controller.
If you don’t implement this method, or if you return
nil, the split view controller sendsseparateSecondaryViewController(for:)to the first view controller. This method returns a view controller, ornil. If it returns a view controller, the split view controller makes that view controller its second view controller.
The default response of a plain vanilla UIViewController to separateSecondaryViewController(for:) is to return nil. A UINavigationController, however, pops its own topViewController and returns that view controller. Thus, when our app is rotated from portrait to landscape, exactly the right thing happens: if the navigation controller has pushed a DetailViewController onto its stack, it now pops it and hands it to the split view controller, which displays its view as the detail view!
One other new feature of our app’s behavior on the iPhone 6 Plus is that the displayModeButtonItem is present in landscape (whereas it disappears automatically on an iPad in landscape). It takes on a new form: instead of appearing as a “back” chevron, it’s an “expand” symbol (two arrows pointing away from each other). When the user taps it, the master view is hidden and the detail view occupies the entire screen — and the displayModeButtonItem changes to a chevron. Tapping the chevron toggles back the other way: the master view is shown again.
An interesting problem arises when we rotate from landscape to portrait on the iPhone 6 Plus. Suppose we’re in landscape (.regular horizontal size class) and the user is looking at the detail view controller. Now the user rotates to portrait (.compact horizontal size class). The split view controller collapses. Without extra precautions, we’ll end up displaying the master view controller — because we went to the trouble of arranging that, back when we thought the only way to collapse was to launch into a .compact horizontal size class:
func splitViewController(_ svc: UISplitViewController,
    collapseSecondary vc2: UIViewController,
    onto vc1: UIViewController) -> Bool {
        return true
}
The result is that the user’s place in the application has been lost. I think we can solve this satisfactorily simply by having the split view controller’s delegate keep track of whether the user has ever chosen a detail view. I’ll use an instance property, self.didChooseDetail:
override func tableView(_ tableView: UITableView,
    didSelectRowAt indexPath: IndexPath) {
        // ... as before ...
        let del = UIApplication.shared.delegate as! AppDelegate
        del.didChooseDetail = true
}
When the split view controller collapses, the split view controller’s delegate uses that instance property to decide what to do — that is, whether to display the master view controller or the detail view controller:
func splitViewController(_ svc: UISplitViewController,
    collapseSecondary vc2: UIViewController,
    onto vc1: UIViewController) -> Bool {
        return !self.didChooseDetail
}
Customizing a Split View Controller
Properties of a UISplitViewController allow it to be customized:
presentsWithGesture-
A Bool. If
false, the left-to-right swipe gesture that shows the master view in portrait orientation on an iPad is disabled. The default istrue. preferredDisplayMode-
The display mode describes how an expanded split view controller’s primary view is displayed. Set this property to change the current display mode of an expanded split view controller programmatically, or set it to
.automaticto allow the display mode to adopt its default value. To learn the actual display mode being used, ask for the currentdisplayMode.An expanded split view controller has three possible display modes (UISplitViewControllerDisplayMode):
.allVisible-
The two views are shown side by side.
.primaryHidden-
The primary view is not present.
.primaryOverlay-
The primary view is shown as a temporary overlay in front of the secondary view.
The default automatic behaviors are:
- iPad in landscape
-
The
displayModeButtonItemis hidden, and the display mode is.allVisible. - iPad in portrait
-
The
displayModeButtonItemis shown, and the display mode toggles between.primaryHiddenand.primaryOverlay. - iPhone 6 Plus in landscape
-
The
displayModeButtonItemis shown, and the display mode toggles between.primaryHiddenand.allVisible.
preferredPrimaryColumnWidthFraction-
Sets the master view width in
.allVisibleand.primaryOverlaydisplay modes, as a percentage of the whole split view (between0and1). Your setting may have no effect unless you also constrain the width limits absolutely through theminimumPrimaryColumnWidthandmaximumPrimaryColumnWidthproperties. To specify the default width, useUISplitViewControllerAutomaticDimension. To learn the actual width being used, ask for the currentprimaryColumnWidth.
You can also track and govern the display mode with these delegate methods:
splitViewController(_:willChangeTo:)-
The
displayModeof an expanded split view controller is about to change, meaning that its first view controller’s view will be shown or hidden. You might want to alter the interface somehow in response. targetDisplayModeForAction(in:)-
Called whenever something happens that might affect the display mode, such as:
-
The split view controller is showing for the first time.
-
The interface is rotating.
-
The user summons or dismisses the primary view.
Return a display mode to specify what the user’s tapping the
displayModeButtonItemshould subsequently do (and, by extension, how the button is portrayed), or.automaticto accept what the split view controller would normally do. -
Customizations on a more structural level are performed through the other delegate methods. For example, there might be additional view controllers present, or you might use a split view controller in some completely different way, so that the default collapsed version of a split view controller might not be appropriate. Thus you would implement the delegate methods I described in the preceding sections to determine how the view controller structure should be rearranged when the split view controller collapses and expands:
-
primaryViewController(forCollapsing:) -
splitViewController(_:collapseSecondary:onto:) -
primaryViewController(forExpanding:) -
splitViewController(_:separateSecondaryFrom:)
Also, your custom view controller can implement collapseSecondaryViewController(_:for:) and separateSecondaryViewController(for:), so that it can take a hand in what happens during collapsing and expanding when it is the primary view controller.
After collapsing or expanding, a UISplitViewController emits the .UIViewControllerShowDetailTargetDidChange notification.
Split View Controller in a Storyboard
To see how to configure a split view controller in a storyboard, make a new project from the Universal version of the Master–Detail app template and study the storyboard that it provides. This storyboard contains essentially the same configuration I created in code at the start of this section. The split view controller has two relationships, “master view controller” and “detail view controller,” specifying its two children. Those two children are both navigation controllers. The first navigation controller has a “root view controller” relationship to a MasterViewController, which is a UITableViewController; the second has a “root view controller” relationship to a DetailViewController (Figure 9-4).
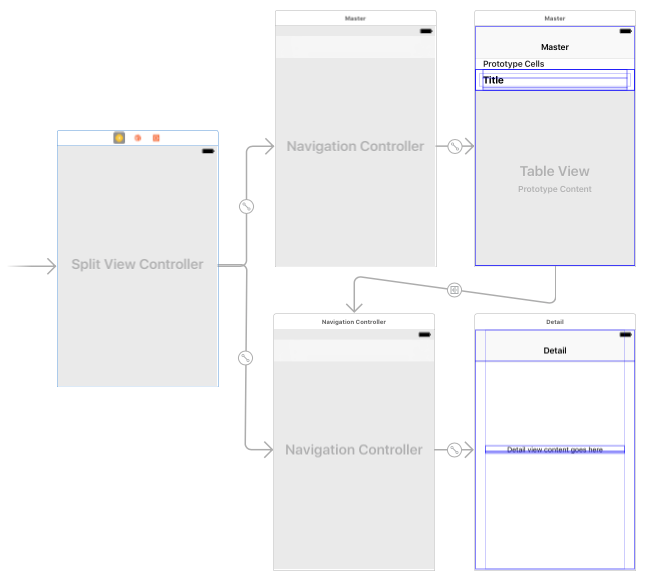
Figure 9-4. How the storyboard configures a split view interface
There’s one more object in the storyboard, and it’s the interesting object: from the prototype table view cell in the master table view comes a segue triggered by the user selecting the cell — a “show detail” segue whose destination is the detail navigation controller. It should now be clear what a “show detail” segue does: it calls showDetailViewController(_:sender:). As you know, this means that when the split view controller is expanded, the newly instantiated detail navigation controller will replace the split view controller’s second child view controller; when the split view controller is collapsed, the newly instantiated detail navigation controller will be pushed onto the master navigation controller’s stack.
Unfortunately, that’s not the end of the initial configuration required to get this split view controller to work. The app delegate template code also configures and adds the displayModeButtonItem; to do this, it must verbosely obtain a reference to the split view controller and to the detail view controller:
let splitViewController =
    self.window!.rootViewController as! UISplitViewController
let navigationController =
    splitViewController.viewControllers[
        splitViewController.viewControllers.count-1]
            as! UINavigationController
navigationController.topViewController!.navigationItem.leftBarButtonItem =
    splitViewController.displayModeButtonItem
Similarly, the master view controller, when the “show detail” segue is triggered, must verbosely get a reference to the detail view controller in order to deal with the displayModeButtonItem, as well as to pass the data on to the new view controller:
override func prepare(for segue: UIStoryboardSegue, sender: Any?) {
    if segue.identifier == "showDetail" {
        if let indexPath = self.tableView.indexPathForSelectedRow {
            let controller =
                (segue.destination as! UINavigationController)
                    .topViewController as! DetailViewController
            controller.detailItem = object
            controller.navigationItem.leftBarButtonItem =
                self.splitViewController?.displayModeButtonItem
            controller.navigationItem.leftItemsSupplementBackButton = true
        }
    }
}
That sort of thing is error-prone and opaque. The problem is that the architecture has been constructed automatically, behind the code’s back, and so the code must scramble to get references to the pieces of that architecture. Moreover, the template still needs all the rest of the code we developed earlier in the chapter: for example, the split view controller still needs a delegate so that it can implement splitViewController(_:collapseSecondary:onto:). Finally, the split view controller in the storyboard has no configurable properties in the Attributes inspector; if you want to set its preferredPrimaryColumnWidthFraction and so forth, you must still do that in code.
Therefore, I avoid instantiating a split view controller in the storyboard. I prefer to create and assemble my split view controller entirely in code. Code that creates a view controller manually has a direct reference to that view controller, and is clearer and cleaner.
Setting the Collapsed State
The split view controller can be in a collapsed or an expanded state — its isCollapsed property can be true or false. But this property is read-only. How, then, would you set the collapsed state? For example, perhaps you want side-by-side display of the two child view controllers’ views in landscape even on an iPhone. How would you arrange that?
The split view controller decides which state to adopt depending on the environment — in particular, whether the current trait collection’s horizontal size class is .compact. The solution, therefore, is to lie to the split view controller about its trait collection environment, effectively making it believe, for example, that it’s on an iPad even though it’s really on an iPhone.
You can do that by interposing your own custom container view controller above the split view controller in the view controller hierarchy — typically, as the split view controller’s direct parent. You can then send your container view controller the setOverrideTraitCollection(_:forChildViewController:) message, thus causing it to pass the trait collection of your choosing down the view controller hierarchy to the split view controller.
In this example, our container view controller is the app’s root view controller; its child is a split view controller. The split view controller’s view completely occupies the container view controller’s view (in other words, the container’s own view is never seen independently; the container view controller exists solely in order to manage the split view controller). Early in the life of the app, the container view controller configures the split view controller and lies to it about the environment:
override func viewWillLayoutSubviews() {
    if !self.didInitialSetup {
        self.didInitialSetup = true
        let svc = self.childViewControllers[0] as! UISplitViewController
        svc.preferredDisplayMode = .allVisible
        svc.preferredPrimaryColumnWidthFraction = 0.5
        svc.maximumPrimaryColumnWidth = 500
        let traits = UITraitCollection(traitsFrom: [
            UITraitCollection(horizontalSizeClass: .regular)
        ])
        self.setOverrideTraitCollection(traits,
            forChildViewController: svc)
    }
}
The result is that the split view controller displays both its children’s views side by side, both in portrait and landscape, like the Settings app on the iPad, even on the iPhone.
Another possibility, based on Apple’s AdaptivePhotos sample code, might be to make the iPhone behave like an iPhone 6 Plus, with a .regular horizontal size class in landscape (the split view controller expands) but a .compact horizontal size class in portrait (the split view controller collapses):
override func viewWillTransition(to size: CGSize,
    with coordinator: UIViewControllerTransitionCoordinator) {
        let svc = self.childViewControllers[0] as! UISplitViewController
        if size.width > size.height {
            let traits = UITraitCollection(traitsFrom: [
                UITraitCollection(horizontalSizeClass: .regular)
            ])
            self.setOverrideTraitCollection(traits,
                forChildViewController: svc)
        } else {
            self.setOverrideTraitCollection(nil,
                forChildViewController: svc)
        }
        super.viewWillTransition(to: size, with: coordinator)
}
View Controller Message Percolation
The master–detail architecture that I’ve been using as an example throughout this discussion uses showDetailViewController(_:sender:) as the standard response to the user tapping an entry in the master list. However, I have not been sending this message directly to the split view controller; instead, I’ve sent it to self (the master view controller), with an assurance that the message will percolate up to the split view controller. It’s now time to talk in more detail about this percolation process.
iOS provides a generalized architecture for percolating a message up the view controller hierarchy. The heart of this architecture is the method targetViewController(forAction:sender:), where the action: parameter is the selector for the method we’re inquiring about. This method, using some deep introspective voodoo, looks to see whether the view controller to which the message was sent overrides the UIViewController implementation of the method in question. If so, it returns self; if not, it effectively recurses up the view controller hierarchy, returning the result of calling the same method with the same parameters on its parent view controller or presenting view controller — or nil if no view controller is ultimately returned to it.
Tip
A view controller subclass that does override the method in question but does not want to be the target view controller can implement the UIResponder method canPerformAction(_:withSender:) to return false.
The idea is that any UIViewController method can be implemented so as to percolate up the view controller hierarchy in this way, analogously to how the responder chain operates. In particular, two UIViewController methods are implemented in this way — namely, show(_:sender:) and showDetailViewController(_:sender:).
These two methods are implemented to call targetViewController(forAction:sender:). If this returns a target, they send themselves to that target. If it doesn’t return a target, they call present(_:animated:completion:).
Thus, what actually happens when the master view controller sends showDetailViewController(_:sender:) to self is as follows:
-
The master view controller doesn’t implement any override of
showDetailViewController(_:sender:); it inherits the UIViewController implementation, which is called. -
The
showDetailViewController(_:sender:)implementation inherited from UIViewController callstargetViewController(forAction:sender:)onself(here, the master view controller). -
targetViewController(forAction:sender:)sees that the method in question, namelyshowDetailViewController(_:sender:), is not overridden by this view controller (the master view controller); so it callstargetViewController(forAction:sender:)on the parent view controller, which is a UINavigationController. -
Now we’re looking at the UINavigationController.
targetViewController(forAction:sender:)sees that the method in question, namelyshowDetailViewController(_:sender:), is not overridden by this view controller either! So it callstargetViewController(forAction:sender:)on its parent view controller, which is a UISplitViewController. -
Now we’re looking at the UISplitViewController. It turns out that UISplitViewController does override the UIViewController implementation of
showDetailViewController(_:sender:)!Thus,
targetViewController(forAction:sender:)in the split view controller returnsself, and all the nested calls totargetViewController(forAction:sender:)return, with the split view controller as the result. -
We are now back in
showDetailViewController(_:sender:), originally sent to the master view controller. From its call totargetViewController(forAction:sender:), it has acquired a target — the split view controller. So it finishes by sendingshowDetailViewController(_:sender:)to the split view controller.
The flexibility illustrated here is what allows the two methods, show(_:sender:) and showDetailViewController(_:sender:), to work differently depending on how the view controller to which they are originally sent is situated in the view controller hierarchy. Two built-in UIViewController subclasses override one or both of these methods, and thus, if they are further up the view controller hierarchy than the view controller on which these methods are called, they will take charge of what happens:
- UINavigationController
show(_:sender:) -
UINavigationController implements
show(_:sender:)to callpushViewController(_:animated:).Thus, if you send
show(_:sender:)to a view controller whose parent is a UINavigationController, it is the navigation controller’s implementation that will be called, meaning that the parameter view controller is pushed onto the stack. But if you sendshow(_:sender:)to a view controller without a parent that overrides this method, the default implementation is used, meaning that the parameter view is presented. - UISplitViewController
showDetailViewController(_:sender:) -
UISplitViewController implements
showDetailViewController(_:sender:)as follows. First, it calls the delegate methodsplitViewController(_:showDetail:sender:); if the delegate returnstrue, UISplitViewController does nothing. (In that case, you would be responsible for getting the parameter view controller’s view into the interface.) Otherwise:- If the split view controller is expanded
-
It replaces its second child view controller with the parameter view controller.
- If the split view controller is collapsed
-
If its first (and only) child view controller is a UINavigationController, it sends
show(_:sender:)to it.Otherwise, it calls
present(_:animated:completion:).
- UISplitViewController
show(_:sender:) -
UISplitViewController implements
show(_:sender:)as follows. First, it calls the delegate methodsplitViewController(_:show:sender:); if the delegate returnstrue, UISplitViewController does nothing. (In that case, you would be responsible for getting the parameter view controller’s view into the interface.) Otherwise:- If the split view controller is expanded
-
If the
sender:is its first view controller, the split view controller replaces the first view controller with the parameter view controller.Otherwise, it replaces its second view controller with the parameter view controller.
- If the split view controller is collapsed
-
It calls
present(_:animated:completion:).
Now that you understand the percolation mechanism, perhaps you’d like to know whether your own custom methods can participate in it. They can! Extend UIViewController to implement your method such that it calls targetViewController(forAction:sender:) on self and sends the action method to the target if there is one. For example:
extension UIViewController {
    func showHide(_ sender: Any?) {
        if let target = self.targetViewController(
            forAction:#selector(showHide), sender: sender) {
                target.showHide(self)
        }
    }
}
In that example, I don’t know what any particular UIViewController subclass’s override of showHide(_:) may do, and I don’t care! What matters is that if showHide(_:) is sent to a view controller that doesn’t override it, it will percolate up the view controller hierarchy until we find a view controller that does override it, and it is that override that will be called.
iPad Multitasking
Starting in iOS 9, certain models of iPad can perform a kind of multitasking where the windows of two different apps can appear simultaneously.
There are two multitasking modes:
- Slideover
-
One app appears in a narrow format in front of the other, occupying roughly one-third of the screen’s width. The rear app is deactivated but not backgrounded or suspended.
- Splitscreen
-
The two apps appear side by side; they are both active simultaneously. The app on the right might have the same size as the front app in slideover mode, or, if the device is held in landscape orientation, the two apps might divide the screen width equally. This multitasking mode is available on an even narrower range of iPad models.
Your iPad or Universal app, by default, will participate in iPad multitasking if it is built against iOS 9 or later, permits all four orientations, and uses a launch screen storyboard or .xib. If you would like your app to opt out of participation in iPad multitasking, you can set the Info.plist key UIRequiresFullScreen to YES. An app that doesn’t participate in iPad multitasking can still be deactivated while another app appears in front of it in slideover mode, but it cannot itself appear as the front app in slideover mode, and it cannot be involved in splitscreen mode at all.
What actually changes when your app’s size is changed is the size of its window. Thus, iPad multitasking is a situation where the app’s window bounds can be different from screen bounds. Moreover, if the app appears on the right, the window origin is shifted to the right. This makes no difference to the window’s frame; a window has no frame distinct from its bounds, because it has no superview. But it makes a difference to the relationship between, say, a button’s position in window coordinates and its position in screen coordinates. Fortunately, this difference is unlikely to matter to your code, as it is improbable that you were ever concerned with either of those values to begin with.
What will likely matter to your app is that the reduced app sizes may be accompanied by a change in the trait collection. In particular:
- Your app is on the left
-
Your app might have a
.compacthorizontal size class, depending on how large this iPad’s screen is and what orientation the iPad is in, and whether the app occupies half or two-thirds (roughly) of the screen. - Your app is on the right
-
There are two cases to distinguish:
- Your app occupies half the screen
-
Your app might have a
.compacthorizontal size class, depending on how large this iPad’s screen is. - Your app is in narrow format
-
Your app definitely has a
.compacthorizontal size class.
It follows that if your app participates in iPad multitasking:
-
It can be launched or summoned into a
.compacthorizontal size class situation even on an iPad. -
It can be toggled between a
.compacthorizontal size class and a.regularhorizontal size class even on an iPad (and without an accompanying rotation).
When your app’s window changes size because of multitasking, your view controller will receive viewWillTransition(to:with:) to report the size change. It may receive this event more than once, and it will receive it while the app is inactive. If the size change also involves a transition from one horizontal size class to another, then of course your view controller will also receive willTransition(to:with:) and traitCollectionDidChange(_:) to report the trait collection change, also while the app is inactive.
If your app is a universal app, it is probably prepared already to respond coherently to these events. Thus, it can probably participate in iPad multitasking with no significant change. You can’t assume that a .compact horizontal size class means you’re on an iPhone, but you probably weren’t thinking in those terms anyway — and even if you were, you can still detect what kind of device you are really on simply by looking at the trait collection’s userInterfaceIdiom.
If a view controller has been presented, then if the size transition involves a trait collection transition, the view controller will adapt. Thus, for example, a .formSheet or .popover presented view controller will, by default, turn into a .fullScreen presented view controller as the app transitions from a .regular horizontal size class to .compact — and will then change back again as the app transitions back to .regular. And of course you can take a hand in how it adapts by functioning as the presentation controller’s delegate.
Similarly, in a split view controller interface, the split view controller will collapse and expand as the app transitions from a .regular horizontal size class to .compact and back again. This is no different from the ability of a split view controller to collapse and expand when an iPhone 6 Plus is rotated, and the same precautions will take care of it satisfactorily.
Nor should you be overly concerned about the absolute size that your app’s interface might assume. It’s true that, from a purely numerical point of view, iPad multitasking introduces your app to some new size possibilities. Even more dramatic are the differences in the ratio between the longer and shorter dimensions of your app’s size, which can range on the large iPad Pro from a roughly square 1.04 all the way up to a very tall and narrow 3.6. Clearly, however, it would be foolish to concern yourself with these sizes explicitly. If this is a universal app, then you are already taking care of a wide range of possible sizes through size classes and autolayout, and you probably won’t have to do anything new to cover these new sizes. At the same time, designing an interface that looks decent and can be operated correctly on such a wide range of ratios can be something of a challenge.
Another important challenge introduced by iPad multitasking is the possibility that your app will effectively be frontmost at the same time as some other app. This means that the other app can be using both the processor (especially the main thread) and memory at a time when your app is not suspended. For this to work, all apps participating in iPad multitasking need to be on their best behavior, adhering to best practices with regard to threading (see Chapter 24) and memory usage (see “View Controller Memory Management”).