Chapter 12. Controls and Other Views
This chapter discusses all UIView subclasses provided by UIKit that haven’t been discussed already. It’s remarkable how few of them there are; UIKit exhibits a notable economy of means in this regard.
Additional UIView subclasses, as well as UIViewController subclasses that create interface, are provided by other frameworks. There will be examples in Part III.
UIActivityIndicatorView
An activity indicator (UIActivityIndicatorView) appears as the spokes of a small wheel. You set the spokes spinning with startAnimating, giving the user a sense that some time-consuming process is taking place. You stop the spinning with stopAnimating. If the activity indicator’s hidesWhenStopped is true (the default), it is visible only while spinning.
An activity indicator comes in a style, its activityIndicatorViewStyle; if it is created in code, you’ll set its style with init(activityIndicatorStyle:). Your choices (UIActivityIndicatorViewStyle) are:
-
.whiteLarge -
.white -
.gray
An activity indicator has a standard size, which depends on its style. Changing its size in code changes the size of the view, but not the size of the spokes. For bigger spokes, you can resort to a scale transform.
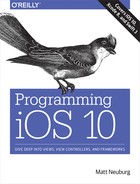
You can assign an activity indicator a color; this overrides the color assigned through the style. An activity indicator is a UIView, so you can set its backgroundColor; a nice effect is to give an activity indicator a contrasting background color and to round its corners by way of the view’s layer (Figure 12-1).

Figure 12-1. A large activity indicator
Here’s some code from a UITableViewCell subclass in one of my apps. In this app, it takes some time, after the user taps a cell to select it, for me to construct the next view and navigate to it; to cover the delay, I show a spinning activity indicator in the center of the cell while it’s selected:
override func setSelected(_ selected: Bool, animated: Bool) {
    if selected {
        let v = UIActivityIndicatorView(activityIndicatorStyle:.whiteLarge)
        v.color = .yellow
        DispatchQueue.main.async {
            v.backgroundColor = UIColor(white:0.2, alpha:0.6)
        }
        v.layer.cornerRadius = 10
        v.frame = v.frame.insetBy(dx: -10, dy: -10)
        let cf = self.contentView.convert(self.bounds, from:self)
        v.center = CGPoint(cf.midX, cf.midY);
        v.tag = 1001
        self.contentView.addSubview(v)
        v.startAnimating()
    } else {
        if let v = self.viewWithTag(1001) {
            v.removeFromSuperview()
        }
    }
    super.setSelected(selected, animated: animated)
}
If activity involves the network, you might want to set UIApplication’s isNetworkActivityIndicatorVisible to true. This displays a small spinning activity indicator in the status bar. The indicator is not reflecting actual network activity; if it’s visible, it’s spinning. Be sure to set it back to false when the activity is over.
An activity indicator is simple and standard, but you can’t change the way it’s drawn. One obvious alternative would be a UIImageView with an animated image, as described in Chapter 4. Another solution is a CAReplicatorLayer, a layer that makes multiple copies of its sublayer; by animating the sublayer, you animate the copies. This is a very common approach (in fact, it wouldn’t surprise me to hear that UIActivityIndicatorView is implemented using CAReplicatorLayer). For example:
let lay = CAReplicatorLayer()
lay.frame = CGRect(0,0,100,20)
let bar = CALayer()
bar.frame = CGRect(0,0,10,20)
bar.backgroundColor = UIColor.red.cgColor
lay.addSublayer(bar)
lay.instanceCount = 5
lay.instanceTransform = CATransform3DMakeTranslation(20, 0, 0)
let anim = CABasicAnimation(keyPath: #keyPath(CALayer.opacity))
anim.fromValue = 1.0
anim.toValue = 0.2
anim.duration = 1
anim.repeatCount = .infinity
bar.add(anim, forKey: nil)
lay.instanceDelay = anim.duration / Double(lay.instanceCount)
self.view.layer.addSublayer(lay)
lay.position = CGPoint(
    self.view.layer.bounds.midX, self.view.layer.bounds.midY)
Our single red vertical bar (bar) is replicated to make five red vertical bars. We repeatedly fade the opacity of the bar to 0, but because we’ve set the replicator layer’s instanceDelay, the replicated bars fade in sequence, so that the darkest bar appears to be marching repeatedly to the right (Figure 12-2).
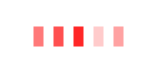
Figure 12-2. A custom activity indicator
UIProgressView
A progress view (UIProgressView) is a “thermometer,” graphically displaying a percentage. It is often used to represent a time-consuming process whose percentage of completion is known (if the percentage of completion is unknown, you’re more likely to use an activity indicator). But it’s good for static percentages too. In one of my apps, I use a progress view to show the current position within the song being played by the built-in music player; in another app, which is a card game, I use a progress view to show how many cards are left in the deck.
A progress view comes in a style, its progressViewStyle; if the progress view is created in code, you’ll set its style with init(progressViewStyle:). Your choices (UIProgressViewStyle) are:
-
.default -
.bar
A .bar progress view is intended for use in a UIBarButtonItem, as the title view of a navigation item, and so on. Both styles by default draw the thermometer extremely thin — just 2 pixels and 3 pixels, respectively. (Figure 12-3 shows a .default progress view.) Changing a progress view’s frame height directly has no visible effect on how the thermometer is drawn. Under autolayout, to make a thicker thermometer, supply a height constraint with a larger value (thus overriding the intrinsic content height). Alternatively, subclass UIProgressView and override sizeThatFits(_:).

Figure 12-3. A progress view
The fullness of the thermometer is the progress view’s progress property. This is a value between 0 and 1, inclusive; you’ll usually need to do some elementary arithmetic in order to convert from the actual value you’re reflecting to a value within that range. (It is also a Float; in Swift, you may have to coerce explicitly.) A change in progress value can be animated by calling setProgress(_:animated:). For example, to reflect the number of cards remaining in a deck of 52 cards:
let r = self.deck.cards.count
self.prog.setProgress(Float(r)/52, animated: true)
The default color of the filled portion of a progress view is the tintColor (which may be inherited from higher up the view hierarchy). The default color for the unfilled portion is gray for a .default progress view and transparent for a .bar progress view. You can customize the colors; set the progress view’s progressTintColor and trackTintColor, respectively. This can also be done in the nib editor.
Alternatively, you can customize the image used to draw the filled portion of the progress view, its progressImage, along with the image used to draw the unfilled portion, the trackImage. This can also be done in the nib editor. Each image must be stretched to the length of the filled or unfilled area, so you’ll want to use a resizable image.
Here’s a simple example from one of my apps (Figure 12-4):

Figure 12-4. A thicker progress view using a custom progress image
self.prog.backgroundColor = .black
self.prog.trackTintColor = .black
let r = UIGraphicsImageRenderer(size:CGSize(10,10))
let im = r.image { ctx in
    let con = ctx.cgContext
    con.setFillColor(UIColor.yellow.cgColor)
    con.fill(CGRect(0, 0, 10, 10))
    let r = con.boundingBoxOfClipPath.insetBy(dx: 1,dy: 1)
    con.setLineWidth(2)
    con.setStrokeColor(UIColor.black.cgColor)
    con.stroke(r)
    con.strokeEllipse(in: r)
}.resizableImage(withCapInsets:UIEdgeInsetsMake(4, 4, 4, 4),
    resizingMode:.stretch)
self.prog.progressImage = im
Warning
That code works in iOS 9 and later, and in iOS 7.0 and before. But in between, from iOS 7.1 through all versions of iOS 8, it breaks; setting the progressImage has no effect. A possible workaround, which is extremely fragile and hacky, is to try to find the UIImageView that is intended to hold the UIProgressView’s progressImage and set its image directly.
For maximum flexibility, you can design your own UIView subclass that draws something similar to a thermometer. Figure 12-5 shows a simple custom thermometer view; it has a value property, and you set this to something between 0 and 1 and call setNeedsDisplay to make the view redraw itself. Here’s its draw(_:) code:
override func draw(_ rect: CGRect) {
    let c = UIGraphicsGetCurrentContext()!
    UIColor.white.set()
    let ins : CGFloat = 2.0
    let r = self.bounds.insetBy(dx: ins, dy: ins)
    let radius : CGFloat = r.size.height / 2.0
    let cgpi = CGFloat.pi
    let path = CGMutablePath()
    path.move(to:CGPoint(r.maxX - radius, ins))
    path.addArc(center:CGPoint(radius+ins, radius+ins),
        radius: radius, startAngle: -cgpi/2.0, endAngle: cgpi/2.0,
        clockwise: true)
    path.addArc(center:CGPoint(r.maxX - radius, radius+ins),
        radius: radius, startAngle: cgpi/2.0, endAngle: -cgpi/2.0,
        clockwise: true)
    path.closeSubpath()
    c.addPath(path)
    c.setLineWidth(2)
    c.strokePath()
    c.addPath(path)
    c.clip()
    c.fill(CGRect(r.origin.x, r.origin.y, r.width * self.value, r.height))
}

Figure 12-5. A custom progress view
Your custom view doesn’t have to look like a thermometer. For instance, Apple’s Music app, in some iOS versions, shows the current playing position within an album’s song by drawing the arc of a circle (Figure 12-6). This effect is easily achieved by setting the strokeEnd of a CAShapeLayer with a circular path (and possibly a rotation transform, to start the circle at the top).

Figure 12-6. A circular custom progress view
A progress view has an observedProgress property. This is an instance of Progress, a class that abstracts the notion of task progress: it has a totalUnitCount property and a completedUnitCount property, and their ratio generates its fractionCompleted, which can be tracked with KVO and can thus be used to update a UIProgressView. The UIProgressView observedProgress property, however, saves you the trouble of using KVO; its fractionCompleted is automatically used to update this progress view.
The power of Progress comes from two features:
- Unification
-
Often, an operation’s progress is distributed over multiple methods. A network download is an obvious case in point: the expected size, the accumulated data, and the fact of completion are reported in three different delegate methods. A single Progress object, visible to all these methods, provides a unified locus where each method can play its part in updating the progress information.
- Composability
-
A Progress object can have child Progress objects. The progress of an operation reported to a child Progress automatically forms an appropriate fraction of the progress reported by the parent. Thus, a single Progress object, acting as the ultimate parent, can conglomerate the progress of numerous individual operations.
In general, there are three ways in which you might configure a UIProgressView’s observedProgress:
-
Set the UIProgressView’s
observedProgressdirectly to a Progress object created, vended, and updated by some other object that performs the operation. This has the advantage of simplicity, but we now have two objects with strong references to the same Progress object. -
Set the UIProgressView’s
observedProgressto a new Progress object. Also, configure some other object that performs the operation and also has a Progress object. Now set up an explicit parent–child relationship between the two Progress objects. You can do this from the point of view of the parent by callingaddChild(_:withPendingUnitCount:), or from the point of view of the child by creating it withinit(totalUnitCount:parent:pendingUnitCount:). -
Set the UIProgressView’s
observedProgressto a new Progress object. Now create and configure some other object that performs the operation and also has a Progress object, which it initializes in such a way that it becomes the child implicitly. To do so:-
Tell the prospective parent Progress to
becomeCurrent(withPendingUnitCount:). The notion “current” means that this Progress is waiting to accept another Progress as its child. -
Create the operation object, which initializes its Progress with
init(totalUnitCount:). As if by magic, this Progress becomes the other Progress’s child (because the other Progress is “current”). -
Tell the parent to
resignCurrent. This balances the earlierbecomeCurrent(withPendingUnitCount:)and brings the configuration to an end.
-
Here’s a simple illustration of the third approach. I’ve constructed a ProgressingOperation class that performs an operation that can be divided into stages:
class ProgressingOperation {
    let progress : Progress
    init(units:Int) {
        self.progress = Progress(totalUnitCount: Int64(units))
    }
    func start() {
        // ... whatever ...
    }
}
In the view controller that manages the UIProgressView (self.prog), I have a property (self.op) that is an Optional wrapping a ProgressingOperation:
var op : ProgressingOperation?
I begin the operation by configuring the progress view and the operation object, like this:
self.prog.progress = 0
self.prog.observedProgress = Progress.discreteProgress(totalUnitCount: 10)
self.prog.observedProgress?.becomeCurrent(withPendingUnitCount: 10)
self.op = ProgressingOperation(units:10) // automatically becomes child!
self.prog.observedProgress?.resignCurrent()
self.op!.start()
The ProgressingOperation’s progress is now the child of the UIProgressView’s observedProgress, and the view controller that configured everything takes its hands off: the rest will happen automatically. The ProgressingOperation object begins its operation. At each stage, it increments its own self.progress.completedUnitCount. This change percolates up to the parent Progress belonging to our UIProgressView, which increases its own progress to match, moving the visible thermometer. Moreover, the change in the visible thermometer is animated.
UIPickerView
A picker view (UIPickerView) displays selectable choices using a rotating drum metaphor. Starting in iOS 9, its default height is adaptive: the default height is 162 in an environment with a .compact vertical size class (an iPhone in landscape orientation) and 216 otherwise. Also starting in iOS 9, you are free to set the height; in earlier systems, there were restrictions that would thwart your attempts to set a picker view’s height outside an undocumented range, but these have now been removed. A picker view’s width is generally up to you.
Each drum, or column, is called a component. Your code configures the UIPickerView’s content through its data source (UIPickerViewDataSource) and delegate (UIPickerViewDelegate), which are usually the same object. Your data source and delegate must answer questions similar to those posed by a UITableView (Chapter 8):
numberOfComponents(in:)-
How many components (drums) does this picker view have?
pickerView(_:numberOfRowsInComponent:)-
How many rows does this component have? The first component is numbered
0. pickerView(_:titleForRow:forComponent:)pickerView(_:attributedTitleForRow:forComponent:)pickerView(_:viewForRow:forComponent:reusing:)-
What should this row of this component display? The first row is numbered
0. You can supply a simple string, an attributed string (Chapter 10), or an entire view such as a UILabel; but you should supply every row of every component the same way.The
reusing:parameter, if notnil, is supposed to be a view that you supplied for a row now no longer visible, giving you a chance to reuse it, much as cells are reused in a table view. In actual fact, thereusing:parameter is alwaysnil. Views don’t leak — they go out of existence in good order when they are no longer visible — but they aren’t reused. I regard this as a bug.
Here’s the code for a UIPickerView (Figure 12-7) that displays the names of the 50 U.S. states, stored in an array. We implement pickerView(_:viewForRow:forComponent:reusing:) just because it’s the most interesting case; as our views, we supply UILabel instances. The state names appear centered because the labels are centered within the picker view:
func numberOfComponents(in pickerView: UIPickerView) -> Int {
    return 1
}
func pickerView(_ pickerView: UIPickerView,
    numberOfRowsInComponent component: Int) -> Int {
        return self.states.count
}
func pickerView(_ pickerView: UIPickerView,
    viewForRow row: Int,
    forComponent component: Int,
    reusing view: UIView?) -> UIView {
        let lab = UILabel() // reusable view is always nil
        lab.text = self.states[row]
        lab.backgroundColor = .clear
        lab.sizeToFit()
        return lab
}

Figure 12-7. A picker view
The delegate may further configure the UIPickerView’s physical appearance by means of these methods:
-
pickerView(_:rowHeightForComponent:) -
pickerView(_:widthForComponent:)
The delegate may implement pickerView(_:didSelectRow:inComponent:) to be notified each time the user spins a drum to a new position. You can also query the picker view directly by sending it selectedRow(inComponent:).
You can set the value to which any drum is turned using selectRow(_:inComponent:animated:). Other handy picker view methods allow you to request that the data be reloaded, and there are properties and methods to query the picker view’s structure:
-
reloadComponent(_:) -
reloadAllComponents -
numberOfComponents -
numberOfRows(inComponent:) -
view(forRow:forComponent:)
By implementing pickerView(_:didSelectRow:inComponent:) and calling reloadComponent(_:), you can make a picker view where the values displayed by one drum depend dynamically on what is selected in another. For example, one can imagine extending our U.S. states example to include a second drum listing major cities in each state; when the user switches to a different state in the first drum, a different set of major cities appears in the second drum.
UISearchBar
A search bar (UISearchBar) is essentially a wrapper for a text field; it has a text field as one of its subviews, though there is no official access to it. It is displayed by default as a rounded rectangle containing a magnifying glass icon, where the user can enter text (Figure 12-8). It does not, of itself, do any searching or display the results of a search; a common interface involves displaying the results of a search as a table, and the UISearchController class makes this easy to do (see Chapter 8).

Figure 12-8. A search bar with a search results button
A search bar’s current text is its text property. It can have a placeholder, which appears when there is no text. A prompt can be displayed above the search bar to explain its purpose. Delegate methods (UISearchBarDelegate) notify you of editing events; for their use, compare the text field and text view delegate methods discussed in Chapter 10:
-
searchBarShouldBeginEditing(_:) -
searchBarTextDidBeginEditing(_:) -
searchBar(_:textDidChange:) -
searchBar(_:shouldChangeTextIn:replacementText:) -
searchBarShouldEndEditing(_:) -
searchBarTextDidEndEditing(_:)
A search bar has a barStyle (UIBarStyle):
-
.default, a flat light gray background and a white search field -
.black, a black background and a black search field
In addition, there’s a searchBarStyle property (UISearchBarStyle):
-
.default, as already described -
.prominent, identical to.default -
.minimal, transparent background and dark transparent search field
Alternatively, you can set a search bar’s barTintColor to change its background color; if the bar style is .black, the barTintColor will also tint the search field itself. An opaque barTintColor is a way to make a search bar opaque. The tintColor property, meanwhile, whose value may be inherited from higher up the view hierarchy, governs the color of search bar components such as the Cancel button title and the flashing insertion cursor.
A search bar can also have a custom backgroundImage; this will be treated as a resizable image. The full setter method is setBackgroundImage(_:for:barMetrics:); I’ll talk later about what the parameters mean. The backgroundImage overrides all other ways of determining the background, and the search bar’s backgroundColor, if any, appears behind it — though under some circumstances, if the search bar’s isTranslucent is false, the barTintColor may appear behind it instead.
The search field area where the user enters text can be offset with respect to its background, using the searchFieldBackgroundPositionAdjustment property; you might do this, for example, if you had enlarged the search bar’s height and wanted to position the search field within that height. The text can be offset within the search field with the searchTextPositionAdjustment property.
You can also replace the image of the search field itself; this is the image that is normally a rounded rectangle. To do so, call setSearchFieldBackgroundImage(_:for:); the second parameter is a UIControlState (even though a search bar is not a control). According to the documentation, the possible states are .normal and .disabled; but the API provides no way to disable a search field, so what does Apple have in mind here? The only way I’ve found is to cycle through the search bar’s subviews, find the text field, and disable that:
for v in self.sb.subviews[0].subviews {
    if let tf = v as? UITextField {
        tf.isEnabled = false
        break
    }
}
The search field image will be drawn vertically centered in front of the background and behind the contents of the search field (such as the text); its width will be adjusted for you, but it is up to you choose an appropriate height, and to ensure an appropriate background color so the user can read the text.
A search bar displays an internal cancel button automatically (normally an X in a circle) if there is text in the search field. Internally, at its right end, a search bar may display a search results button (showsSearchResultsButton), which may be selected or not (isSearchResultsButtonSelected), or a bookmark button (showsBookmarkButton); if you ask to display both, you’ll get the search results button. These buttons vanish if text is entered in the search bar so that the cancel button can be displayed. There is also an option to display a Cancel button externally (showsCancelButton, or call setShowsCancelButton(_:animated:)). The internal cancel button works automatically to remove whatever text is in the field; the other buttons do nothing, but delegate methods notify you when they are tapped:
-
searchBarResultsListButtonClicked(_:) -
searchBarBookmarkButtonClicked(_:) -
searchBarCancelButtonClicked(_:)
You can customize the images used for the search icon (a magnifying glass, by default) and any of the internal right icons (the internal cancel button, the search results button, and the bookmark button) with setImage(_:for:state:). The images will be resized for you, except for the internal cancel button, for which about 20×20 seems to be a good size. The icon in question (the for: parameter) is specified as follows (UISearchBarIcon):
-
.search -
.clear(the internal cancel button) -
.bookmark -
.resultsList
The documentation says that the possible state: values are .normal and .disabled, but this is wrong; the choices are .normal and .highlighted. The highlighted image appears while the user taps on the icon (except for the search icon, which isn’t a button). If you don’t supply a normal image, the default image is used; if you supply a normal image but no highlighted image, the normal image is used for both. Setting isSearchResultsButtonSelected to true reverses the search results button’s behavior: it displays the highlighted image, but when the user taps it, it displays the normal image. To change an icon’s location, call setPositionAdjustment(_:for:).
A search bar may also display scope buttons (see the example in Chapter 8). These are intended to let the user alter the meaning of the search; precisely how you use them is up to you. To make the scope buttons appear, use the showsScopeBar property; the button titles are the scopeButtonTitles property, and the currently selected scope button is the selectedScopeButtonIndex property. The delegate is notified when the user taps a different scope button:
-
searchBar(_:selectedScopeButtonIndexDidChange:)
The overall look of the scope bar can be heavily customized. Its background is the scopeBarBackgroundImage, which will be stretched or tiled as needed. To set the background of the smaller area constituting the actual buttons, call setScopeBarButtonBackgroundImage(_:for:); the states (the for: parameter) are .normal and .selected. If you don’t supply a separate .selected image, a darkened version of the .normal image is used. If you don’t supply a resizable image, the image will be made resizable for you; the runtime decides what region of the image will be stretched behind each button.
The dividers between the buttons are normally vertical lines, but you can customize them as well: call setScopeBarButtonDividerImage(_:forLeftSegmentState:rightSegmentState:). A full complement of dividers consists of three images, one when the buttons on both sides of the divider are normal (unselected) and one each when a button on one side or the other is selected; if you supply an image for just one state combination, it is used for the other two state combinations. The height of the divider image is adjusted for you, but the width is not; you’ll normally use an image just a few pixels wide.
The text attributes of the titles of the scope buttons can customized by calling setScopeBarButtonTitleTextAttributes(_:for:). The attributes are simply the attributes dictionary of an NSAttributedString (Chapter 10).
Tip
It may appear that there is no way to customize the external Cancel button, but in fact, although you’ve no official direct access to it through the search bar, the Cancel button is a UIBarButtonItem and you can customize it using the UIBarButtonItem appearance proxy, discussed later in this chapter.
By combining the various customization possibilities, a completely unrecognizable search bar of inconceivable ugliness can easily be achieved (Figure 12-9). Let’s be careful out there.

Figure 12-9. A horrible search bar
The problem of allowing the keyboard to appear without covering the search bar is exactly as for a text field (Chapter 10). Text input properties of the search bar configure its keyboard and typing behavior like a text field as well.
When the user taps the Search key in the keyboard, the delegate is notified, and it is then up to you to dismiss the keyboard (resignFirstResponder) and perform the search:
-
searchBarSearchButtonClicked(_:)
A common interface is a search bar at the top of the screen. On the iPad, a search bar can be embedded as a bar button item’s view in a toolbar at the top of the screen. On the iPhone, a search bar can be a navigation item’s titleView. In Chapter 9, I gave an example of a search bar in a navigation bar. A search bar used in this way, however, has some limitations: for example, there may be no room for a prompt, scope buttons, or an external Cancel button, and you might not be able to assign it a background image or change its barTintColor.
Alternatively, a UISearchBar can itself function as a top bar, without being inside any other bar. If you use a search bar in this way, you’ll want its height to be extended automatically under the status bar; I’ll explain later in this chapter how to arrange that.
UIControl
UIControl is a subclass of UIView whose chief purpose is to be the superclass of several further built-in classes (controls) and to endow them with common behavior.
The most important thing that controls have in common is that they automatically track and analyze touch events (Chapter 5) and report them to your code as significant control events by way of action messages. Each control implements some subset of the possible control events. The control events (UIControlEvents) are:
-
.touchDown -
.touchDownRepeat -
.touchDragInside -
.touchDragOutside -
.touchDragEnter -
.touchDragExit -
.touchUpInside -
.touchUpOutside -
.touchCancel -
.valueChanged -
.editingDidBegin -
.editingChanged -
.editingDidEnd -
.editingDidEndOnExit -
.allTouchEvents -
.allEditingEvents -
.allEvents
The control events also have informal names that are visible in the Connections inspector when you’re editing a nib. I’ll mostly use the informal names in the next couple of paragraphs.
Control events fall roughly into three groups: the user has touched the screen (Touch Down, Touch Drag Inside, Touch Up Inside, etc.), edited text (Editing Did Begin, Editing Changed, etc.), or changed the control’s value (Value Changed).
Apple’s documentation is rather coy about which controls normally emit actions for which control events, so here’s a list obtained through experimentation:
- UIButton
-
All Touch events.
- UIDatePicker
-
Value Changed.
- UIPageControl
-
All Touch events, Value Changed.
- UIRefreshControl
-
Value Changed.
- UISegmentedControl
-
Value Changed.
- UISlider
-
All Touch events, Value Changed.
- UISwitch
-
All Touch events, Value Changed.
- UIStepper
-
All Touch events, Value Changed.
- UITextField
-
All Touch events except the Up events, and all Editing events (see Chapter 10 for details).
- UIControl (generic)
-
All Touch events.
Starting in iOS 9, a control also has a primary control event, a UIControlEvent called .primaryActionTriggered. The primary control event is Value Changed for all controls except for UIButton, where it is Touch Up Inside, and UITextField, where it is Did End On Exit.
For each control event that you want to hear about, you attach to the control one or more target–action pairs. You can do this in the nib editor or in code.
For any given control, each control event and its target–action pairs form a dispatch table. The following methods and properties permit you to manipulate and query the dispatch table:
-
addTarget(_:action:for:) -
removeTarget(_:action:for:) -
actions(forTarget:forControlEvent:) -
allTargets -
allControlEvents(a bitmask of control events with at least one target–action pair attached)
An action method (the method that will be called on the target when the control event occurs) may adopt any of three signatures, whose parameters are:
-
The control and the UIEvent
-
The control only
-
No parameters
The second signature is by far the most common. It’s unlikely that you’d want to dispense altogether with the parameter telling you which control sent the control event. On the other hand, it’s equally unlikely that you’d want to examine the original UIEvent that triggered this control event, since control events deliberately shield you from dealing with the nitty-gritty of touches. (I suppose you might, on rare occasions, have some reason to examine the UIEvent’s timestamp.)
When a control event occurs, the control consults its dispatch table, finds all the target–action pairs associated with that control event, and reports the control event by sending each action message to the corresponding target.
Note
The action messaging mechanism is actually more complex than I’ve just stated. The UIControl does not really send the action message directly; rather, it tells the shared application to send it. When a control wants to send an action message reporting a control event, it calls its own sendAction(_:to:for:) method. This in turn calls the shared application instance’s sendAction(_:to:from:for:), which actually sends the specified action message to the specified target. In theory, you could call or override either of these methods to customize this aspect of the message-sending architecture, but it is extremely unlikely that you would do so.
To make a control emit its action message(s) corresponding to a particular control event right now, in code, call its sendActions(for:) method (which is never called automatically by the runtime). For example, suppose you tell a UISwitch programmatically to change its setting from Off to On. This doesn’t cause the switch to report a control event, as it would if the user had slid the switch from Off to On; if you wanted it to do so, you could use sendActions(for:), like this:
self.sw.setOn(true, animated: true)
self.sw.sendActions(for:.valueChanged)
You might also use sendActions(for:) in a subclass to customize the circumstances under which a control reports control events. I’ll give an example later in this chapter.
A control has isEnabled, isSelected, and isHighlighted properties; any of these can be true or false independently of the others. Together, they correspond to the control’s state, which is reported as a bitmask of three possible values (UIControlState):
-
.highlighted -
.disabled -
.selected
A fourth state, .normal, corresponds to a zero state bitmask, and means that isEnabled is true, and isSelected and isHighlighted are both false.
A control that is not enabled does not respond to user interaction. Whether the control also portrays itself differently, to cue the user to this fact, depends upon the control. For example, a disabled UISwitch is faded; but a rounded rect text field gives the user no cue that it is disabled. The visual nature of control selection and highlighting, too, depends on the control. Neither highlighting nor selection make any difference to the appearance of a UISwitch, but a highlighted UIButton usually looks quite different from a nonhighlighted UIButton.
A control has contentHorizontalAlignment and contentVerticalAlignment properties. These matter only if the control has content that can be aligned. You are most likely to use them in connection with a UIButton to position its title and internal image.
A text field (UITextField) is a control; see Chapter 10. A refresh control (UIRefreshControl) is a control; see Chapter 8. The remaining controls are covered here, and then I’ll give a simple example of writing your own custom control.
UISwitch
A switch (UISwitch, Figure 12-10) portrays a Bool value: it looks like a sliding switch, and its isOn property is either true or false. The user can slide or tap to toggle the switch’s setting. When the user changes the switch’s setting, the switch reports a Value Changed control event. To change the isOn property’s value with accompanying animation, call setOn(_:animated:).

Figure 12-10. A switch
A switch has only one size (51×31); any attempt to set its size will be ignored.
You can customize a switch’s appearance by setting these properties:
onTintColor-
The color of the track when the switch is at the On setting.
thumbTintColor-
The color of the slidable button.
tintColor-
The color of the outline when the switch is at the Off setting.
A switch’s track when the switch is at the Off setting is transparent, and can’t be customized. I regard this as a bug. (Changing the switch’s backgroundColor is not a successful workaround, because the background color shows outside the switch’s outline.)
Warning
The UISwitch properties onImage and offImage, added in iOS 6 after much clamoring (and hacking) by developers, were unfortunately withdrawn in iOS 7, making a UISwitch once again almost impossible to customize to any appreciable degree. I regard this as a bug.
UIStepper
A stepper (UIStepper, Figure 12-11) lets the user increase or decrease a numeric value: it looks like two buttons side by side, one labeled (by default) with a minus sign, the other with a plus sign. The user can tap or hold a button, and can slide a finger from one button to the other as part of the same interaction with the stepper. It has only one size (94×29). It maintains a numeric value, which is its value. Each time the user increments or decrements the value, it changes by the stepper’s stepValue. If the minimumValue or maximumValue is reached, the user can go no further in that direction, and to show this, the corresponding button is disabled — unless the stepper’s wraps property is true, in which case the value goes beyond the maximum by starting again at the minimum, and vice versa.
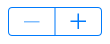
Figure 12-11. A stepper
As the user changes the stepper’s value, a Value Changed control event is reported. Portraying the numeric value itself is up to you; you might, for example, use a label or (as here) a progress view:
@IBAction func doStep(_ sender: Any!) {
    let step = sender as! UIStepper
    self.prog.setProgress(
        Float(step.value / (step.maximumValue - step.minimumValue)),
        animated:true)
}
If a stepper’s isContinuous is true (the default), a long touch on one of the buttons will update the value repeatedly; the updates start slowly and get faster. If the stepper’s autorepeat is false, the updated value is not reported as a Value Changed control event until the entire interaction with the stepper ends; the default is true.
The appearance of a stepper can be customized. The color of the outline and the button captions is the stepper’s tintColor, which may be inherited from further up the view hierarchy. You can also dictate the images that constitute the stepper’s structure with these methods:
-
setDecrementImage(_:for:) -
setIncrementImage(_:for:) -
setDividerImage(_:forLeftSegmentState:rightSegmentState:) -
setBackgroundImage(_:for:)
The images work similarly to a search bar’s scope bar (described earlier in this chapter). The background images should probably be resizable. They are stretched behind both buttons, half the image being seen as the background of each button. If the button is disabled (because we’ve reached the value’s limit in that direction), it displays the .disabled background image; otherwise, it displays the .normal background image, except that it displays the .highlighted background image while the user is tapping it. You’ll probably want to provide all three background images if you’re going to provide any; the default is used if a state’s background image is nil. You’ll probably want to provide three divider images as well, to cover the three combinations of one or neither segment being highlighted. The increment and decrement images, replacing the default minus and plus signs, are composited on top of the background image; they are treated as template images, colored by the tintColor, unless you explicitly provide an .alwaysOriginal image. If you provide only a .normal image, it will be adjusted automatically for the other two states. Figure 12-11 shows a customized stepper.

Figure 12-12. A customized stepper
UIPageControl
A page control (UIPageControl) is a row of dots; each dot is called a page, because it is intended to be used in conjunction with some other interface that portrays something analogous to pages, such as a UIScrollView with its isPagingEnabled set to true. Coordinating the page control with this other interface is usually up to you; see Chapter 7 for an example. A UIPageViewController in scroll style can optionally display a page control that’s automatically coordinated with its content (Chapter 6).
The number of dots is the page control’s numberOfPages. To learn the minimum size required for a given number of pages, call size(forNumberOfPages:). You can make the page control wider than the dots to increase the target region on which the user can tap. The user can tap to one side or the other of the current page’s dot to increment or decrement the current page; the page control then reports a Value Changed control event.
The dot colors differentiate the current page, the page control’s currentPage, from the others; by default, the current page is portrayed as a solid dot, while the others are slightly transparent. You can customize a page control’s pageIndicatorTintColor (the color of the dots in general) and currentPageIndicatorTintColor (the color of the current page’s dot); you will almost certainly want to do this, as the default dot color is white, which under normal circumstances may be hard to see.
It is possible to set a page control’s backgroundColor; you might do this to show the user the tappable area, or to make the dots more clearly visible by contrast.
If a page control’s hidesForSinglePage is true, the page control becomes invisible when its numberOfPages changes to 1.
If a page control’s defersCurrentPageDisplay is true, then when the user taps to increment or decrement the page control’s value, the display of the current page is not changed. A Value Changed control event is reported, but it is up to your code to handle this action and call updateCurrentPageDisplay. A case in point might be if the user’s changing the current page triggers an animation, and you don’t want the current page dot to change until the animation ends.
UIDatePicker
A date picker (UIDatePicker) looks like a UIPickerView (discussed earlier in this chapter), but it is not a UIPickerView subclass; it uses a UIPickerView to draw itself, but it provides no official access to that picker view. Its purpose is to express the notion of a date and time, taking care of the calendrical and numerical complexities so that you don’t have to. When the user changes its setting, the date picker reports a Value Changed control event.
A UIDatePicker has one of four modes (datePickerMode), determining how it is drawn (UIDatePickerMode):
.time-
The date picker displays a time; for example, it has an hour component and a minutes component.
.date-
The date picker displays a date; for example, it has a month component, a day component, and a year component.
.dateAndTime-
The date picker displays a date and time; for example, it has a component showing day of the week, month, and day, plus an hour component and a minutes component.
.countDownTimer-
The date picker displays a number of hours and minutes; for example, it has an hours component and a minutes component.
Exactly what components a date picker displays, and what values they contain, depends by default upon the user’s preferences in the Settings app (General → Language & Region → Region). For example, a U.S. time displays an hour numbered 1 through 12 plus minutes and AM or PM, but a British time displays an hour numbered 1 through 24 plus minutes. If the user changes the region format in the Settings app, the date picker’s display will change immediately.
A date picker has calendar and timeZone properties, respectively a Calendar and a TimeZone; these are nil by default, meaning that the date picker responds to the user’s system-level settings. You can also change these values manually; for example, if you live in California and you set a date picker’s timeZone to GMT, the displayed time is shifted forward by 8 hours, so that 11 AM is displayed as 7 PM (if it is winter).
Warning
Don’t change the timeZone of a .countDownTimer date picker; if you do, the displayed value will be shifted, and you will confuse the heck out of yourself (and your users).
The minutes component, if there is one, defaults to showing every minute, but you can change this with the minuteInterval property. The maximum value is 30, in which case the minutes component values are 0 and 30. An attempt to set the minuteInterval to a value that doesn’t divide evenly into 60 will be silently ignored.
The date represented by a date picker (unless its mode is .countDownTimer) is its date property, a Date. The default date is now, at the time the date picker is instantiated. For a .date date picker, the time by default is 12 AM (midnight), local time; for a .time date picker, the date by default is today. The internal value is reckoned in the local time zone, so it may be different from the displayed value, if you have changed the date picker’s timeZone.
The maximum and minimum values enabled in the date picker are determined by its maximumDate and minimumDate properties. Values outside this range may appear disabled. There isn’t really any practical limit on the range that a date picker can display, because the “drums” representing its components are not physical, and values are added dynamically as the user spins them. In this example, we set the initial minimum and maximum dates of a date picker (dp) to the beginning and end of 1954. We also set the actual date, so that the date picker will be set initially to a value within the minimum–maximum range:
dp.datePickerMode = .date
var dc = DateComponents(year:1954, month:1, day:1)
let c = Calendar(identifier:.gregorian)
let d1 = c.date(from: dc)!
dp.minimumDate = d1
dp.date = d1
dc.year = 1955
let d2 = c.date(from: dc)!
dp.maximumDate = d2
Warning
Don’t set the maximumDate and minimumDate properties values for a .countDownTimer date picker; if you do, you might cause a crash with an out-of-range exception.
To convert between a Date and a string, you’ll need a DateFormatter (see Apple’s Date and Time Programming Guide):
@IBAction func dateChanged(_ sender: Any) {
    let dp = sender as! UIDatePicker
    let d = dp.date
    let df = DateFormatter()
    df.timeStyle = .full
    df.dateStyle = .full
    print(df.string(from: d))
    // Tuesday, August 10, 1954 at 3:16:00 AM GMT-07:00
}
The value displayed in a .countDownTimer date picker is its countDownDuration; this is a TimeInterval, which is a Double representing a number of seconds, even though the minimum interval displayed is a minute. A .countDownTimer date picker does not actually do any counting down! You are expected to count down in some other way, and to use some other interface to display the countdown. The Timer tab of Apple’s Clock app shows a typical interface; the user configures the date picker to set the countDownDuration initially, but once the counting starts, the date picker is hidden and a label displays the remaining time.
Converting the countDownDuration from a TimeInterval to hours and minutes is up to you; if your purpose is to display a string, you could use a DateComponentsFormatter:
let t = dp.countDownDuration
let f = DateComponentsFormatter()
f.allowedUnits = [.hour, .minute]
f.unitsStyle = .abbreviated
if let s = f.string(from: t) {
    print(s) // "1h 12m"
}
Warning
A nasty bug makes the Value Changed event from a .countDownTimer date picker unreliable (especially just after the app launches, and whenever the user has tried to set the timer to zero). The workaround is not to rely on the Value Changed event; for example, provide a button in the interface that the user can tap to make your code read the date picker’s countDownDuration.
UISlider
A slider (UISlider) is an expression of a continuously settable value (its value, a Float) between some minimum and maximum (its minimumValue and maximumValue; they are 0 and 1 by default). It is portrayed as an object, the thumb, positioned along a track. As the user changes the thumb’s position, the slider reports a Value Changed control event; it may do this continuously as the user presses and drags the thumb (if the slider’s isContinuous is true, the default) or only when the user releases the thumb (if isContinuous is false). While the user is pressing on the thumb, the slider is in the .highlighted state. To change a slider’s value with animation of the thumb, call setValue(_:animated:) in an animations function; I’ll show an example in a moment.
A commonly expressed desire is to modify a slider’s behavior so that if the user taps on its track, the slider moves to the spot where the user tapped. Unfortunately, a slider does not, of itself, respond to taps on its track; such a tap doesn’t even cause it to report a Touch Up Inside control event. However, with a gesture recognizer, most things are possible; here’s the action method for a UITapGestureRecognizer attached to a UISlider:
func tapped(_ g:UIGestureRecognizer) {
    let s = g.view as! UISlider
    if s.isHighlighted {
        return // tap on thumb, let slider deal with it
    }
    let pt = g.location(in:s)
    let track = s.trackRect(forBounds: s.bounds)
    if !track.insetBy(dx: 0, dy: -10).contains(pt) {
        return // not on track, forget it
    }
    let percentage = pt.x / s.bounds.size.width
    let delta = Float(percentage) * (s.maximumValue - s.minimumValue)
    let value = s.minimumValue + delta
    delay(0.1) {
        UIView.animate(withDuration: 0.15) {
            s.setValue(value, animated:true) // animate sliding the thumb
        }
    }
}
A slider’s tintColor (which may be inherited from further up the view hierarchy) determines the color of the track to the left of the thumb. You can change the color of the thumb with the thumbTintColor property. You can change the color of the two parts of the track with the minimumTrackTintColor and maximumTrackTintColor properties.
To go further, you can provide your own thumb image and your own track image, along with images to appear at each end of the track, and you can override in a subclass the methods that position these.
The images at the ends of the track are the slider’s minimumValueImage and maximumValueImage, and they are nil by default. If you set them to actual images (which can also be done in the nib editor), the slider will attempt to position them within its own bounds, shrinking the drawing of the track to compensate.
You can change that behavior by overriding these methods in a subclass:
-
minimumValueImageRect(forBounds:) -
maximumValueImageRect(forBounds:) -
trackRect(forBounds:)
The bounds passed in are the slider’s bounds. In this example (Figure 12-13), we expand the track width to the full width of the slider, and draw the images outside the slider’s bounds. The images are still visible, because the slider does not clip its subviews to its bounds. In the figure, I’ve given the slider a background color so you can see how the track and images are related to its bounds:

Figure 12-13. Repositioning a slider’s images and track
override func maximumValueImageRect(forBounds bounds: CGRect) -> CGRect {
    return super.maximumValueImageRect(
        forBounds:bounds).offsetBy(dx: 31, dy: 0)
}
override func minimumValueImageRect(forBounds bounds: CGRect) -> CGRect {
    return super.minimumValueImageRect(
        forBounds: bounds).offsetBy(dx: -31, dy: 0)
}
override func trackRect(forBounds bounds: CGRect) -> CGRect {
    var result = super.trackRect(forBounds: bounds)
    result.origin.x = 0
    result.size.width = bounds.size.width
    return result
}
The thumb is also an image, and you set it with setThumbImage(_:for:). There are two chiefly relevant states, .normal and .highlighted. If you supply images for both, the thumb will change automatically while the user is dragging it. By default, the image will be centered in the track at the point represented by the slider’s current value; you can shift this position by overriding thumbRect(forBounds:trackRect:value:) in a subclass. In this example, the image is repositioned upward slightly (Figure 12-14):

Figure 12-14. Replacing a slider’s thumb
override func thumbRect(forBounds bounds: CGRect,
    trackRect rect: CGRect, value: Float) -> CGRect {
        return super.thumbRect(forBounds: bounds,
            trackRect: rect, value: value).offsetBy(dx: 0, dy: -7)
}
Enlarging or offsetting a slider’s thumb can mislead the user as to the area on which it can be touched to drag it. The slider, not the thumb, is the touchable UIControl; only the part of the thumb that intersects the slider’s bounds will be draggable. The user may try to drag the part of the thumb that is drawn outside the slider’s bounds, and will fail (and be confused). One solution is to increase the slider’s height; if you’re using autolayout, you can add an explicit height constraint in the nib editor, or override intrinsicContentSize in code (Chapter 1). Another solution is to subclass and use hit-test munging (Chapter 5):
override func hitTest(_ point: CGPoint, with e: UIEvent?) -> UIView? {
    let tr = self.trackRect(forBounds: self.bounds)
    if tr.contains(point) { return self }
    let r = self.thumbRect(
        forBounds: self.bounds, trackRect: tr, value: self.value)
    if r.contains(point) { return self }
    return nil
}
The track is two images, one appearing to the left of the thumb, the other to its right. They are set with setMinimumTrackImage(_:for:) and setMaximumTrackImage(_:for:). If you supply images both for .normal state and for .highlighted state, the images will change while the user is dragging the thumb.
The images should be resizable, because that’s how the slider cleverly makes it look like the user is dragging the thumb along a single static track. In reality, there are two images; as the user drags the thumb, one image grows horizontally and the other shrinks horizontally. For the left track image, the right end cap inset will be partially or entirely hidden under the thumb; for the right track image, the left end cap inset will be partially or entirely hidden under the thumb. Figure 12-15 shows a track derived from a single 15×15 image of a circular object (a coin):

Figure 12-15. Replacing a slider’s track
let coinEnd = UIImage(named:"coin")!.resizableImage(withCapInsets:
    UIEdgeInsetsMake(0,7,0,7), resizingMode: .stretch)
self.setMinimumTrackImage(coinEnd, for:.normal)
self.setMaximumTrackImage(coinEnd, for:.normal)
UISegmentedControl
A segmented control (UISegmentedControl, Figure 12-16) is a row of tappable segments; a segment is rather like a button. The user is thus choosing among options. By default (isMomentary is false), the most recently tapped segment remains selected. Alternatively (isMomentary is true), the tapped segment is shown as highlighted momentarily (by default, highlighted is indistinguishable from selected, but you can change that); afterward, no segment selection is displayed, though internally the tapped segment remains the selected segment.
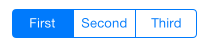
Figure 12-16. A segmented control
The selected segment can be set and retrieved with the selectedSegmentIndex property; when you set it in code, the selected segment remains visibly selected, even for an isMomentary segmented control. A selectedSegmentIndex value of UISegmentedControlNoSegment means no segment is selected. When the user taps a segment that isn’t already visibly selected, the segmented control reports a Value Changed event.
A segmented control’s change of selection is animatable; change the selection in an animations function, like this:
UIView.animateWithDuration(0.4, animations: {
    self.seg.selectedSegmentIndex = 1
})
To animate the change more slowly when the user taps on a segment, set the segmented control’s layer’s speed to a fractional value.
A segment can be separately enabled or disabled with setEnabled(_:forSegmentAt:), and its enabled state can be retrieved with isEnabledForSegment(at:). A disabled segment, by default, is drawn faded; the user can’t tap it, but it can still be selected in code.
A segment has either a title or an image; when one is set, the other becomes nil. An image is treated as a template image, colored by the tintColor, unless you explicitly provide an .alwaysOriginal image. The methods for setting and fetching the title and image for existing segments are:
-
setTitle(_:forSegmentAt:),titleForSegment(at:) -
setImage(_:forSegmentAt:),imageForSegment(at:)
You will also want to set the title or image when creating the segment. You can do this in code if you’re creating the segmented control from scratch, with init(items:), which takes an array each item of which is either a string or an image:
let seg = UISegmentedControl(items:
    [UIImage(named:"one")!.withRenderingMode(.alwaysOriginal), "Two"])
seg.frame.origin = CGPoint(30,30)
self.view.addSubview(seg)
Methods for managing segments dynamically are:
-
insertSegment(withTitle:at:animated:) -
insertSegment(with:at:animated:)(the parameter is a UIImage) -
removeSegment(at:animated:) -
removeAllSegments
The number of segments can be retrieved with the read-only numberOfSegments property.
A segmented control has a standard height; if you’re using autolayout, you can change the height through constraints or by overriding intrinsicContentSize — or by setting its background image, as I’ll describe in a moment.
If you’re using autolayout, the widths of all segments and the intrinsicContentSize width of the entire segmented control are adjusted automatically whenever you set a segment’s title or image. If the segmented control’s apportionsSegmentWidthsByContent property is false, segment sizes will be made equal to one another; if it is true, each segment will be sized individually to fit its content. Alternatively, you can set a segment’s width explicitly with setWidth(_:forSegmentAt:) (and retrieve it with widthForSegment(at:)); setting a width of 0 means that this segment is to be sized automatically.
To change the position of the content (title or image) within a segment, call setContentOffset(_:forSegmentAt:) (and retrieve it with contentOffsetForSegment(at:)).
The color of a segmented control’s outline, title text, and selection are dictated by its tintColor, which may be inherited from further up the view hierarchy.
Further methods for customizing a segmented control’s appearance are parallel to those for setting the look of a stepper or the scope bar portion of a search bar, both described earlier in this chapter. You can set the overall background, the divider image, the text attributes for the segment titles, and the position of segment contents:
-
setBackgroundImage(_:for:barMetrics:) -
setDividerImage(_:forLeftSegmentState:rightSegmentState:barMetrics:) -
setTitleTextAttributes(_:for:) -
setContentPositionAdjustment(_:forSegmentType:barMetrics:)
You don’t have to customize for every state, as the segmented control will use the .normal state setting for the states you don’t specify. As I mentioned a moment ago, setting a background image changes the segmented control’s height. The segmentType: parameter in the last method is needed because, by default, the segments at the two extremes have rounded ends (and, if a segment is the lone segment, both its ends are rounded); the argument (UISegmentedControlSegment) allows you distinguish between the various possibilities:
-
.any -
.left -
.center -
.right -
.alone
Here’s the code that achieved Figure 12-17. Selecting a segment automatically darkens the background image for us (similar to a button’s adjustsImageWhenHighlighted, described in the next section), so there’s no need to specify a separate selected image:

Figure 12-17. A segmented control, customized
// background, set desired height but make width resizable
// sufficient to set for Normal only
let sz = CGSize(100,60)
let im = UIGraphicsImageRenderer(size:sz).image {_ in
    UIImage(named:"linen")!.draw(in:CGRect(origin: .zero, size: sz))
}.resizableImage(
    withCapInsets: UIEdgeInsetsMake(0,10,0,10), resizingMode: .stretch)
self.seg.setBackgroundImage(im, for:.normal, barMetrics: .default)
// segment images, redraw at final size
let pep = ["manny", "moe", "jack"]
for (i, boy) in pep.enumerated() {
    let sz = CGSize(30,30)
    let im = UIGraphicsImageRenderer(size:sz).image {_ in
        UIImage(named:boy)!.draw(in:CGRect(origin: .zero, size: sz))
    }.withRenderingMode(.alwaysOriginal)
    self.seg.setImage(im, forSegmentAt: i)
    self.seg.setWidth(80, forSegmentAt: i)
}
// divider, set at desired width, sufficient to set for Normal only
let sz2 = CGSize(2,10)
let div = UIGraphicsImageRenderer(size:sz2).image { ctx in
    UIColor.white.set()
    ctx.fill(CGRect(origin: .zero, size: sz2))
}
self.seg.setDividerImage(div,
    forLeftSegmentState: .normal, rightSegmentState: .normal,
    barMetrics: .default)
UIButton
A button (UIButton) is a fundamental tappable control, which may contain a title, an image, and a background image (and may have a backgroundColor). A button has a type, and the initializer is init(type:). The types (UIButtonType) are:
.system-
The title text appears in the button’s
tintColor, which may be inherited from further up the view hierarchy; when the button is tapped, the title text color momentarily changes to a color derived from what’s behind it (which might be the button’sbackgroundColor). The image is treated as a template image, colored by thetintColor, unless you explicitly provide an.alwaysOriginalimage; when the button is tapped, the image (even if it isn’t a template image) is momentarily tinted to a color derived from what’s behind it. .detailDisclosure,.infoLight,.infoDark,.contactAdd-
Basically, these are all
.systembuttons whose image is set automatically to a standard image. The first three are an “i” in a circle, and the last is a Plus in a circle; the twoinfotypes are identical, and they differ from.detailDisclosureonly in that theirshowsTouchWhenHighlightedistrueby default. .custom-
There’s no automatic coloring of the title or image, and the image is a normal image by default.
There is no built-in button type with an outline (border), comparable to the Rounded Rect style of iOS 6 and before. You can add an outline — by adding a background image, for example, or by manipulating the button’s layer — but the default look of a button is the text or image alone. In one of my apps, I make a button appear as a rounded rectangle, entirely through settings in the nib editor:
-
In the Attributes inspector, I give the button a background color.
-
In the Identity inspector, I use the User Defined Runtime Attributes to set the button’s
layer.borderWidthto 2 and itslayer.cornerRadiusto 5.
I’ll give a more sophisticated example later in this chapter (see Figure 12-20).
A button has a title, a title color, and a title shadow color — or you can supply an attributed title, thus dictating these features and more in a single value through an NSAttributedString (Chapter 10).
Distinguish a button’s image, which is an internal image, from its background image. The background image, if any, is stretched, if necessary, to fill the button’s bounds (technically, its backgroundRect(forBounds:)). The internal image, on the other hand, if smaller than the button, is not resized. The button can have both a title and an image, if the image is small enough; in that case, the image is shown to the left of the title by default.
These six features — title, title color, title shadow color, attributed title, image, and background image — can all be made to vary depending on the button’s current state: .highlighted, .selected, .disabled, and .normal. The button can be in more than one state at once, except for .normal which means “none of the other states.” A state change, whether automatic (the button is highlighted while the user is tapping it) or programmatically imposed, will thus in and of itself alter a button’s appearance. The methods for setting these button features, therefore, all involve specifying a corresponding state — or multiple states, using a bitmask:
-
setTitle(_:for:) -
setTitleColor(_:for:) -
setTitleShadowColor(_:for:) -
setAttributedTitle(_:for:) -
setImage(_:for:) -
setBackgroundImage(_:for:)
Similarly, when getting these button features, you must either specify a single state you’re interested in or ask about the feature as currently displayed:
-
title(for:),currentTitle -
titleColor(for:),currentTitleColor -
titleShadowColor(for:),currentTitleShadowColor -
attributedTitle(for:),currentAttributedTitle -
image(for:),currentImage -
backgroundImage(for:),currentBackgroundImage
If you don’t specify a feature for a particular state, or if the button adopts more than one state at once, an internal heuristic is used to determine what to display. I can’t describe all possible combinations, but here are some general observations:
-
If you specify a feature for a particular state (highlighted, selected, or disabled), and the button is in only that state, that feature will be used.
-
If you don’t specify a feature for a particular state (highlighted, selected, or disabled), and the button is in only that state, the normal version of that feature will be used as fallback. (That’s why many examples earlier in this book have assigned a title for
.normalonly; this is sufficient to give the button a title in every state.) -
Combinations of states often cause the button to fall back on the feature for normal state. For example, if a button is both highlighted and selected, the button will display its normal title, even if it has a highlighted title, a selected title, or both.
A .system button with an attributed normal title will tint the title to the tintColor if you don’t give the attributed string a color, and will tint the title while highlighted to the color derived from what’s behind the button if you haven’t supplied a highlighted title with its own color. But a .custom button will not do any of that; it leaves control of the title color for each state completely up to you.
In addition, a UIButton has some properties determining how it draws itself in various states, which can save you the trouble of specifying different images for different states:
showsTouchWhenHighlighted-
If
true, then the button projects a circular white glow when highlighted. If the button has an internal image, the glow is centered behind it. Thus, this feature is suitable particularly if the button image is small and circular; for example, it’s the default behavior for an.infoLightor.infoDarkbutton. If the button has no internal image, the glow is centered at the button’s center. The glow is drawn on top of the background image or color, if any. adjustsImageWhenHighlighted-
In a
.custombutton, if this property istrue(the default), then if there is no separate highlighted image (and ifshowsTouchWhenHighlightedisfalse), the normal image is darkened when the button is highlighted. This applies equally to the internal image and the background image. (A.systembutton is already tinting its highlighted image, so this property doesn’t apply.) adjustsImageWhenDisabled-
If
true, then if there is no separate disabled image, the normal image is shaded when the button is disabled. This applies equally to the internal image and the background image. The default istruefor a.custombutton andfalsefor a.systembutton.
A button has a natural size in relation to its contents. If you’re using autolayout, the button can adopt that size automatically as its intrinsicContentSize, and you can modify the way it does this by overriding intrinsicContentSize in a subclass or by applying explicit constraints. If you’re not using autolayout and you create a button in code, send it sizeToFit or give it an explicit size; otherwise, the button may have size .zero. Creating a zero-size button and then wondering why the button isn’t visible in the interface is a common beginner mistake.
The title is a UILabel (Chapter 10), and the label features of the title can be accessed through the button’s titleLabel. For example, beginners often wonder how to make a button’s title consist of more than one line; the answer is obvious, once you remember that the title is displayed in a label: increase the button’s titleLabel.numberOfLines. In general, the label’s properties may be set, provided they do not conflict with existing UIButton features. For example, you can set the title’s font and shadowOffset by way of the label, but the title’s text, color, and shadow color should be set using the appropriate button methods specifying a button state. If the title is given a shadow in this way, then the button’s reversesTitleShadowWhenHighlighted property also applies: if true, the shadowOffset values are replaced with their additive inverses when the button is highlighted. The modern way, however, is to do that sort of thing through the button’s attributed title.
The internal image is drawn by a UIImageView (Chapter 2), whose features can be accessed through the button’s imageView. Thus, for example, you can change the internal image view’s alpha to make the image more transparent.
The internal position of the image and title as a whole are governed by the button’s contentVerticalAlignment and contentHorizontalAlignment (inherited from UIControl). You can also tweak the position of the image and title, together or separately, by setting the button’s contentEdgeInsets, titleEdgeInsets, or imageEdgeInsets. Increasing an inset component increases that margin; thus, for example, a positive top component makes the distance between that object and the top of the button larger than normal (where “normal” is where the object would be according to the alignment settings). The titleEdgeInsets or imageEdgeInsets values are added to the overall contentEdgeInsets values. So, for example, if you really wanted to, you could make the internal image appear to the right of the title by decreasing the left titleEdgeInsets and increasing the left imageEdgeInsets.
Four methods also provide access to the button’s positioning of its elements:
-
titleRect(forContentRect:) -
imageRect(forContentRect:) -
contentRect(forBounds:) -
backgroundRect(forBounds:)
These methods are called whenever the button is redrawn, including every time it changes state. The content rect is the area in which the title and image are placed. By default, the content rect and the background rect are the same. You can override these methods in a subclass to change the way the button’s elements are positioned.
Here’s an example of a customized button (Figure 12-18). In a UIButton subclass, we increase the button’s intrinsicContentSize to give it larger margins around its content, and we configure the background rect to shrink the button slightly when highlighted as a way of providing feedback (for sizeByDelta, see Appendix B):
override func backgroundRect(forBounds bounds: CGRect) -> CGRect {
    var result = super.backgroundRect(forBounds:bounds)
    if self.isHighlighted {
        result = result.insetBy(dx: 3, dy: 3)
    }
    return result
}
override var intrinsicContentSize : CGSize {
    return super.intrinsicContentSize.sizeByDelta(dw:25, dh: 20)
}
The button, which is a .custom button, is assigned an internal image and a background image from the same resizable image, along with attributed titles for the .normal and .highlighted states. The internal image glows when highlighted, thanks to adjustsImageWhenHighlighted.

Figure 12-18. A custom button
Custom Controls
If you create your own UIControl subclass, you automatically get the built-in Touch events; in addition, there are several methods that you can override in order to customize touch tracking, along with properties that tell you whether touch tracking is going on:
-
beginTracking(_:with:) -
continueTracking(_:with:) -
endTracking(_:with:) -
cancelTracking(with:) -
isTracking -
isTouchInside
To illustrate, I’ll give a simple example of creating a custom control. The main reason for doing this (rather than using, say, a UIView and gesture recognizers) would probably be to obtain the convenience of control events. Also, the touch-tracking methods, though not as high-level as gesture recognizers, are at least a level up from the UIResponder touch methods (Chapter 5): they track a single touch, and both beginTracking and continueTracking return a Bool, giving you a chance to stop tracking the current touch.
We’ll build a simplified knob control (Figure 12-19). The control starts life at its minimum position, with an internal angle value of 0; it can be rotated clockwise with a single finger as far as its maximum position, with an internal angle value of 5 (radians). To keep things simple, the words “Min” and “Max” appearing in the interface are actually labels; the control just draws the knob, and to rotate it we’ll apply a rotation transform.

Figure 12-19. A custom control
Our control is a UIControl subclass, MyKnob. It has a public CGFloat angle property, and a private CGFloat property self.initialAngle that we’ll use internally during rotation. Because a UIControl is a UIView, it can draw itself, which it does with an image file included in our app bundle:
override func draw(_ rect: CGRect) {
    UIImage(named:"knob")!.draw(in: rect)
}
We’ll need a utility function for transforming a touch’s Cartesian coordinates into polar coordinates, giving us the angle to be applied as a rotation to the view:
func pToA (_ t:UITouch) -> CGFloat {
    let loc = t.location(in: self)
    let c = CGPoint(self.bounds.midX, self.bounds.midY)
    return atan2(loc.y - c.y, loc.x - c.x)
}
Now we’re ready to override the tracking methods. beginTracking simply notes down the angle of the initial touch location. continueTracking uses the difference between the current touch location’s angle and the initial touch location’s angle to apply a transform to the view, and updates the angle property. endTracking triggers the Value Changed control event. So our first draft looks like this:
override func beginTracking(_ t: UITouch, with _: UIEvent?) -> Bool {
    self.initialAngle = pToA(t)
    return true
}
override func continueTracking(_ t: UITouch, with _: UIEvent?) -> Bool {
    let ang = pToA(t) - self.initialAngle
    let absoluteAngle = self.angle + ang
    self.transform = self.transform.rotated(by: ang)
    self.angle = absoluteAngle
    return true
}
override func endTracking(_: UITouch?, with _: UIEvent?) {
    self.sendActions(for: .valueChanged)
}
This works: we can put a MyKnob into the interface and hook up its Value Changed control event (this can be done in the nib editor), and sure enough, when we run the app, we can rotate the knob and, when our finger lifts from the knob, the Value Changed action method is called.
However, our class needs modification. When the angle is set programmatically, we should respond by rotating the knob; at the same time, we need to clamp the incoming value to the allowable minimum or maximum:
var angle : CGFloat = 0 {
    didSet {
        if self.angle < 0 {
            self.angle = 0
        }
        if self.angle > 5 {
            self.angle = 5
        }
        self.transform = CGAffineTransform(rotationAngle: self.angle)
    }
}
Now we should revise continueTracking. We no longer need to perform the rotation, since setting the angle will do that for us. On the other hand, we do need to clamp the gesture when the minimum or maximum rotation is exceeded. My solution is simply to stop tracking; in that case, endTracking will never be called, so we also need to trigger the Value Changed control event. Also, it might be nice to give the programmer the option to have the Value Changed control event reported continuously as continueTracking is called repeatedly; so we’ll add a public isContinuous Bool property and obey it:
override func continueTracking(_ t: UITouch, with _: UIEvent?) -> Bool {
    let ang = pToA(t) - self.initialAngle
    let absoluteAngle = self.angle + ang
    switch absoluteAngle {
    case -CGFloat.infinity...0:
        self.angle = 0
        self.sendActions(for: .valueChanged)
        return false
    case 5...CGFloat.infinity:
        self.angle = 5
        self.sendActions(for: .valueChanged)
        return false
    default:
        self.angle = absoluteAngle
        if self.isContinuous {
            self.sendActions(for: .valueChanged)
        }
        return true
    }
}
Bars
There are three bar types: navigation bar (UINavigationBar), toolbar (UIToolbar), and tab bar (UITabBar). They are often used in conjunction with a built-in view controller (Chapter 6):
-
A UINavigationController has a UINavigationBar.
-
A UINavigationController has a UIToolbar.
-
A UITabBarController has a UITabBar.
You can also use these bar types independently. You are most likely to do that with a UIToolbar, which is often used as an independent bottom bar. On the iPad, it can also be used as a top bar, adopting a role analogous to a menu bar on the desktop.
This section summarizes the facts about the three bar types — along with UISearchBar, which can act as a top bar — and about the items that populate them.
Bar Position and Bar Metrics
If a bar is to occupy the top of the screen, its apparent height should be increased to underlap the transparent status bar. To make this possible, iOS provides the notion of a bar position. The UIBarPositioning protocol, adopted by UINavigationBar, UIToolbar, and UISearchBar (the bars that can go at the top of the screen), defines one property, barPosition, whose possible values (UIBarPosition) are:
-
.any -
.bottom -
.top -
.topAttached
But barPosition is read-only, so how are you supposed to set it? Use the bar’s delegate! The delegate protocols UINavigationBarDelegate, UIToolbarDelegate, and UISearchBarDelegate all conform to UIBarPositioningDelegate, which defines one method, position(for:). This provides a way for a bar’s delegate to dictate the bar’s barPosition.
The rule is that the bar’s apparent height will be extended upward, so that its top can go behind the status bar, if the bar’s delegate returns .topAttached from its implementation of position(for:). To get the final position right, the bar’s top should also have a zero-length constraint to the view controller’s top layout guide. If you’re not using autolayout, then the bar’s top should have a y value of 20.
Tip
I say that a bar’s apparent height is extended upward, because in fact its height remains untouched. It is drawn extended upward, and this drawing is visible because the bar’s clipsToBounds is false. For this reason (and others), you should not set a top bar’s clipsToBounds to true.
A bar’s height is reflected also by its bar metrics. This refers to a change in the standard height of the bar in response to a change in the orientation of the app. This change is not a behavior of the bar itself; rather, it is performed automatically by a UINavigationController on its own navigation bar or toolbar in a .compact horizontal size class environment. The standard heights are 44 (.regular vertical size class) and 32 (.compact vertical size class). Possible bar metrics values are (UIBarMetrics):
-
.default -
.compact -
.defaultPrompt -
.compactPrompt
The compact metrics apply in a .compact vertical size class environment. The prompt metrics apply to a bar whose height is extended downward to accommodate prompt text (and to a search bar whose scope buttons are showing).
When you’re customizing a feature of a bar, you may find yourself calling a method that takes a bar metrics parameter, and possibly a bar position parameter as well. The idea is that you can customize that feature differently depending on the bar position and the bar metrics. But you don’t have to set that value for every possible combination of bar position and bar metrics; in general (though, unfortunately, the details are a little inconsistent), UIBarPosition.any and UIBarMetrics.default are treated as defaults that encompass any positions and metrics you don’t specify.
The interface object classes and their features that participate in this system are:
- UISearchBar
-
A search bar can function as a top bar and can have a prompt. You can set its background image.
- UINavigationBar
-
A navigation bar can function as a top bar, it can have a prompt, and its height in a navigation interface is changed automatically in a
.compacthorizontal size class environment depending on the vertical size class. You can set its background image. In addition, the vertical offset of its title can depend on the bar metrics. - UIToolbar
-
A toolbar can function as a top bar or a bottom bar, and its height in a navigation interface is changed automatically in a
.compacthorizontal size class environment depending on the vertical size class. You can set its background image. In addition, its shadow can depend on its bar position. - UIBarButtonItem
-
You can set a bar button item’s image, image inset, background image, title offset, and background offset, so as to depend upon the bar metrics of the containing bar, either a UINavigationBar or a UIToolbar (and the bar position is irrelevant).
Bar Appearance
A bar can be styled at three levels:
barStyle,isTranslucent-
The
barStyleoptions are (UIBarStyle):-
.default(flat white) -
.black(flat black)
The
isTranslucentproperty turns on or off the characteristic blurry translucency. The degree of translucency can vary from one device type to another; don’t expect complete control of a translucent bar’s appearance. -
barTintColor-
This property tints the bar with a solid color. Like the transparency color, you should not expect complete control of the resulting color. It is best to set the bar’s
isTranslucenttotrue; otherwise, odd things can happen. (For example, a toolbar whoseisTranslucentisfalsemay ignore the bar tint color and appear transparent instead.) backgroundImage-
The background image is set with
setBackgroundImage(_:for:barMetrics:). If the image is too large, it is sized down to fit; if it is too small, it is tiled by default, but you can change that behavior by supplying a resizable image.If a bar’s
isTranslucentisfalse, then thebarTintColormay appear behind the background image, but a translucent bar with a background image is transparent behind the image; thus, a background image provides maximum control over the appearance of the bar.
Tip
In a UINavigationController, there is a reason why you might set the navigation bar’s barStyle even if you are configuring the bar’s appearance in some other way — namely, because the navigation controller will pass this setting along in its implementation of preferredStatusBarStyle. In other words, you set the navigation controller’s navigation bar’s bar style as a way of setting the status bar’s bar style.
If you assign a bar a background image, you can also customize its shadow, which is cast from the bottom of the bar (if the bar is at the top) or the top of the bar (if the bar is at the bottom) on whatever is behind it. To do so, set the shadowImage property — except that a toolbar can be either at the top or the bottom, so its setter is setShadowImage(_:forToolbarPosition:), and the UIBarPosition determines whether the shadow should appear at the top or the bottom of the toolbar.
You’ll want a shadow image to be very small and very transparent; the image will be tiled horizontally. If you’re going to set the bar’s isTranslucent, you should do so after setting both the background image and the shadow image. You won’t see the shadow if the bar’s clipsToBounds is true. Here’s an example for a navigation bar:
do { // must set the background image if you want a shadow image
    let sz = CGSize(20,20)
    let r = UIGraphicsImageRenderer(size:sz)
    self.navbar.setBackgroundImage( r.image { ctx in
        UIColor(white:0.95, alpha:0.85).setFill()
        ctx.fill(CGRect(0,0,20,20))
    }, for:.any, barMetrics: .default)
}
do { // now we can set the shadow image
    let sz = CGSize(4,4)
    let r = UIGraphicsImageRenderer(size:sz)
    self.navbar.shadowImage = r.image { ctx in
        UIColor.gray.withAlphaComponent(0.3).setFill()
        ctx.fill(CGRect(0,0,4,2))
        UIColor.gray.withAlphaComponent(0.15).setFill()
        ctx.fill(CGRect(0,2,4,2))
    }
}
UIBarButtonItem
The only things that can appear inside a navigation bar or a toolbar — aside from a navigation bar’s title and prompt — are bar button items (UIBarButtonItem, a subclass of UIBarItem). This is not much of a limitation, however, because a bar button item can contain a custom view, which can be any type of UIView at all. A bar button item itself, however, is not a UIView subclass.
A bar button item may be instantiated with any of five methods:
-
init(barButtonSystemItem:target:action:) -
init(title:style:target:action:) -
init(image:style:target:action:) -
init(image:landscapeImagePhone:style:target:action:) -
init(customView:)
A bar button item’s image is treated by default as a template image, unless you explicitly provide an .alwaysOriginal image.
The style: options are (UIBarButtonItemStyle):
-
.plain -
.done(the title text is bold)
As I mentioned a moment ago, many aspects of a bar button item can be made dependent upon the bar metrics of the containing bar. Thus, you can initialize a bar button item with both an image and a landscapeImagePhone, the latter to be used when the bar metrics has compact in its name. A bar button item inherits from UIBarItem the ability to adjust the image position with imageInsets (and landscapeImagePhoneInsets), plus the isEnabled and tag properties. Recall from Chapter 6 that you can also set a bar button item’s possibleTitles and width properties, to determine its width.
A bar button item’s tintColor property tints the title text or template image of the button; it is inherited from the tintColor of the bar, or you can override it for an individual bar button item.
You can apply an attributes dictionary to a bar button item’s title, and you can give a bar button item a background image:
-
setTitleTextAttributes(_:for:)(inherited from UIBarItem) -
setTitlePositionAdjustment(_:for:) -
setBackgroundImage(_:for:barMetrics:) -
setBackgroundImage(_:for:style:barMetrics:) -
setBackgroundVerticalPositionAdjustment(_:for:)
In addition, these methods apply only if the bar button item is being used as a back button item in a navigation bar (as I’ll describe in the next section):
-
setBackButtonTitlePositionAdjustment(_:for:) -
setBackButtonBackgroundImage(_:for:barMetrics:) -
setBackButtonBackgroundVerticalPositionAdjustment(_:for:)
No bar button item style supplies an outline (border); the default look of a button is just the text or image. (The pre–iOS 7 bar button item .bordered style is deprecated, and its appearance is identical to .plain.) If you want an outline, you have to supply it yourself. For the left bar button item in the settings view of my Zotz! app (Figure 12-20), I use a custom view that’s a UIButton with a background image:

Figure 12-20. A bar button item with a border
let b = UIButton(type:.custom)
// ...
let r = UIGraphicsImageRenderer(size: CGSize(15,15))
let im = r.image { _ in
    let grad = CAGradientLayer()
    grad.frame = CGRect(0,0,15,15)
    grad.colors = [
        UIColor(red: 1, green: 1, blue: 0, alpha: 0.8).cgColor,
        UIColor(red: 0.7, green: 0.7, blue: 0.3, alpha: 0.8).cgColor
    ]
    let p = UIBezierPath(roundedRect: CGRect(0,0,15,15), cornerRadius: 8)
    p.addClip()
    grad.render(in: UIGraphicsGetCurrentContext()!)
    UIColor.black.setStroke()
    p.lineWidth = 2
    p.stroke()
}.resizableImage(
    withCapInsets: UIEdgeInsetsMake(7,7,7,7), resizingMode: .stretch)
b.setBackgroundImage(im, for: .normal)
let bb = UIBarButtonItem(customView: b)
self.navigationItem.leftBarButtonItem = bb
UINavigationBar
A navigation bar (UINavigationBar) is populated by navigation items (UINavigationItem). The UINavigationBar maintains a stack; UINavigationItems are pushed onto and popped off of this stack. Whatever UINavigationItem is currently topmost in the stack (the UINavigationBar’s topItem), in combination with the UINavigationItem just beneath it in the stack (the UINavigationBar’s backItem), determines what appears in the navigation bar:
title,titleView-
The
title(string) ortitleView(UIView) of thetopItemappears in the center of the navigation bar. prompt-
The
prompt(string) of thetopItemappears at the top of the navigation bar, whose height increases to accommodate it. rightBarButtonItem,rightBarButtonItemsleftBarButtonItem,leftBarButtonItems-
The
rightBarButtonItemandleftBarButtonItemappear at the right and left ends of the navigation bar. A UINavigationItem can have multiple right bar button items and multiple left bar button items; itsrightBarButtonItemsandleftBarButtonItemsproperties are arrays (of bar button items). The bar button items are displayed from the outside in: that is, the first item in theleftBarButtonItemsis leftmost, while the first item in therightBarButtonItemsis rightmost. If there are multiple buttons on a side, therightBarButtonItemis the first item of therightBarButtonItemsarray, and theleftBarButtonItemis the first item of theleftBarButtonItemsarray. backBarButtonItem-
The
backBarButtonItemof thebackItemappears at the left end of the navigation bar. It is automatically configured so that, when tapped, thetopItemis popped off the stack. If thebackItemhas nobackBarButtonItem, then there is still a back button at the left end of the navigation bar, taking its title from thetitleof thebackItem. However, if thetopItemhas itshidesBackButtonset totrue, the back button is suppressed. Also, unless thetopItemhas itsleftItemsSupplementBackButtonset totrue, the back button is suppressed if thetopItemhas aleftBarButtonItem.
The indication that the back button is a back button is supplied by the navigation bar’s backIndicatorImage, which by default is a left-pointing chevron appearing to the left of the back button. You can customize this image; the image that you supply is treated as a template image by default. If you set the backIndicatorImage, you must also supply a backIndicatorTransitionMaskImage. The purpose of the mask image is to indicate the region where the back button should disappear as it slides out to the left when a new navigation item is pushed onto the stack. For example, in Figure 12-21, the back button title, which is sliding out to the left, is visible to the right of the chevron but not to the left of the chevron; that’s because on the left side of the chevron it is masked out.

Figure 12-21. A back button animating to the left
In this example, I replace the chevron with a vertical bar. The vertical bar is not the entire image; the image is actually a wider rectangle, with the vertical bar at its right side. The mask is the entire wider rectangle, and is completely transparent; thus, the back button disappears as it passes behind the bar and stays invisible as it continues on to the left:
let sz = CGSize(10,20)
self.navbar.backIndicatorImage =
    UIGraphicsImageRenderer(size:sz).image { ctx in
        ctx.fill(CGRect(6,0,4,20))
    }
self.navbar.backIndicatorTransitionMaskImage =
    UIGraphicsImageRenderer(size:sz).image {_ in}
Changes to the navigation bar’s buttons can be animated by sending its topItem any of these messages:
-
setRightBarButton(_:animated:) -
setLeftBarButton(_:animated:) -
setRightBarButtonItems(_:animated:) -
setLeftBarButtonItems(_:animated:) -
setHidesBackButton(_:animated:)
UINavigationItems are pushed and popped with pushItem(_:animated:) and popItemAnimated(_:), or you can set all items on the stack at once with setItems(_:animated:).
You can determine the attributes dictionary for the title by setting the navigation bar’s titleTextAttributes, and you can shift the title’s vertical position by calling setTitleVerticalPositionAdjustment(for:).
When you use a UINavigationBar implicitly as part of a UINavigationController interface, the navigation controller is the navigation bar’s delegate. If you were to use a UINavigationBar on its own, you might want to supply your own delegate. The delegate methods are:
-
navigationBar(_:shouldPush:) -
navigationBar(_:didPush:) -
navigationBar(_:shouldPop:) -
navigationBar(_:didPop:)
This simple (and silly) example of a standalone UINavigationBar implements the legendary baseball combination trio of Tinker to Evers to Chance; see the relevant Wikipedia article if you don’t know about them (Figure 12-22, which also shows the custom back indicator and shadow I described earlier):
Figure 12-22. A navigation bar
override func viewDidLoad() {
    super.viewDidLoad()
    let ni = UINavigationItem(title: "Tinker")
    let b = UIBarButtonItem(title: "Evers", style: .plain,
        target: self, action: #selector(pushNext))
    ni.rightBarButtonItem = b
    self.navbar.items = [ni]
}
func pushNext(_ sender: Any) {
    let oldb = sender as! UIBarButtonItem
    let s = oldb.title!
    let ni = UINavigationItem(title:s)
    if s == "Evers" {
        let b = UIBarButtonItem(title:"Chance", style: .plain,
            target:self, action:#selector(pushNext))
        ni.rightBarButtonItem = b
    }
    self.navbar.pushItem(ni, animated:true)
}
UIToolbar
A toolbar (UIToolbar, Figure 12-23) is intended to appear at the bottom of the screen; on the iPad, it may appear at the top. It displays a row of UIBarButtonItems, which are its items. The items are displayed from left to right in the order in which they appear in the items array. You can set the items with animation by calling setItems(_:animated:). The items within the toolbar are positioned automatically; you can intervene in this positioning by using the system bar button items .flexibleSpace and .fixedSpace, along with the UIBarButtonItem width property.

Figure 12-23. A toolbar
UITabBar
A tab bar (UITabBar) displays tab bar items (UITabBarItem), its items, each consisting of an image and a name. To change the items with animation, call setItems(_:animated:).
The tab bar maintains a current selection among its items, its selectedItem, which is a UITabBarItem, not an index number; you can set it in code, or the user can set it by tapping on a tab bar item. To hear about the user changing the selection, implement tabBar(_:didSelect:) in the delegate (UITabBarDelegate).
You get some control over how the tab bar items are laid out:
itemPositioning-
There are three possible values (UITabBarItemPositioning):
.centered-
The items are crowded together at the center.
.fill-
The items are spaced out evenly.
.automatic-
On the iPad, the same as
.centered; on the iPhone, the same as.fill.
itemSpacing-
The space between items, if the positioning is
.centered. For the default space, specify0. itemWidth-
The width of the items, if the positioning is
.centered. For the default width, specify0.
You can set the image drawn behind the selected tab bar item to indicate that it’s selected, the selectionIndicatorImage.
A UITabBarItem is created with one of these methods:
-
init(tabBarSystemItem:tag:) -
init(title:image:tag:) -
init(title:image:selectedImage:)
UITabBarItem is a subclass of UIBarItem, so in addition to its title and image it inherits the ability to adjust the image position with imageInsets, plus the isEnabled and tag properties. The UITabBarItem itself adds the selectedImage property.
A tab bar item’s images are treated, by default, as template images. Its title text and template image are tinted with the tab bar’s tintColor when selected and with its unselectedItemTintColor otherwise. To get full control of the title color (and other text attributes), call setTitleTextAttributes(_:for:), inherited from UIBarItem; if you set a color for .normal and a color for .selected, the .normal color will be used when the item is deselected (unless you have set the tab bar’s unselectedItemTintColor). You can also adjust the title’s position with the titlePositionAdjustment property. To get full control of the image’s color, supply an .alwaysOriginal image for both the image and selectedImage.
Figure 12-24 is an example of a customized tab bar; I’ve set the selection indicator image (the checkmark) and the tint color of the tab bar, and the text attributes (including the color, when selected) of the tab bar items.

Figure 12-24. A tab bar
The user can be permitted to alter the contents of the tab bar, setting its tab bar items from among a larger repertoire of tab bar items. To summon the interface that lets the user do this, call beginCustomizingItems(_:), passing an array of UITabBarItems that may or may not appear in the tab bar. (To prevent the user from removing an item from the tab bar, include it in the tab bar’s items and don’t include it in the argument passed to beginCustomizingItems(_:).) A presented view with a Done button appears, behind the tab bar but in front of everything else, displaying the customizable items. The user can then drag an item into the tab bar, replacing an item that’s already there. To hear about the customizing view appearing and disappearing, implement delegate methods:
-
tabBar(_:willBeginCustomizing:) -
tabBar(_:didBeginCustomizing:) -
tabBar(_:willEndCustomizing:changed:) -
tabBar(_:didEndCustomizing:changed:)
A UITabBar on its own (outside a UITabBarController) does not provide any automatic access to the customization interface; it’s up to you. In this (silly) example, we populate a UITabBar with four system tab bar items and a More item; we also populate an instance property array with those same four system tab bar items, plus three more. When the user taps the More item, we show the customization interface with all seven tab bar items:
var items : [UITabBarItem] = {
    Array(1..<8).map {
        UITabBarItem(
            tabBarSystemItem:UITabBarSystemItem(rawValue:$0)!, tag:$0)
    }
}()
override func viewDidLoad() {
    super.viewDidLoad()
    self.tabbar.items = Array(self.items[0..<4]) +
        [UITabBarItem(tabBarSystemItem: .more, tag: 0)]
    self.tabbar.selectedItem = self.tabbar.items![0]
    self.tabbar.delegate = self
}
// delegate methods
func tabBar(_ tabBar: UITabBar, didSelect item: UITabBarItem) {
    if item.tag == 0 {
        // More button
        tabBar.selectedItem = nil
        tabBar.beginCustomizingItems(self.items)
    }
}
func tabBar(_ tabBar: UITabBar,
    didEndCustomizing items: [UITabBarItem], changed: Bool) {
        self.tabbar.selectedItem = self.tabbar.items![0]
}
When used in conjunction with a UITabBarController, the customization interface is provided automatically, in an elaborate way. If there are a lot of items, a More item is automatically present, and can be used to access the remaining items through a table view. In this table view, the user can select any of the excess items, navigating to the corresponding view; or the user can switch to the customization interface by tapping the Edit button. Figure 12-25 shows how a More list looks by default.
Figure 12-25. Automatically generated More list
The way this works is that the automatically provided More item corresponds to a UINavigationController with a root view controller (UIViewController) whose view is a UITableView. Thus, a navigation interface containing this UITableView appears through the tabbed interface when the user taps the More button. When the user selects an item in the table, the corresponding UIViewController is pushed onto the UINavigationController’s stack.
You can access this UINavigationController: it is the UITabBarController’s moreNavigationController. Through it, you can access the root view controller: it is the first item in the UINavigationController’s viewControllers array. And through that, you can access the table view: it is the root view controller’s view. This means you can customize what appears when the user taps the More button! For example, let’s make the navigation bar red with white button titles, and let’s remove the word More from its title:
let more = self.tabBarController.moreNavigationController
let list = more.viewControllers[0]
list.title = ""
let b = UIBarButtonItem()
b.title = "Back"
list.navigationItem.backBarButtonItem = b
more.navigationBar.barTintColor = .red
more.navigationBar.tintColor = .white
We can go even further by supplementing the table view’s data source with a data source of our own, thus proceeding to customize the table itself. This is tricky because we have no internal access to the actual data source, and we mustn’t accidentally disable it from populating the table. Still, it can be done. I’ll continue from the previous example by replacing the table view’s data source with an instance of my own MyDataSource, initializing it with a reference to the original data source object:
let tv = list.view as! UITableView
let mds = MyDataSource(originalDataSource: tv.dataSource!)
self.myDataSource = mds
tv.dataSource = mds
In MyDataSource, I’ll use message forwarding (see Apple’s Objective-C Runtime Programming Guide) so that MyDataSource acts as a front end for the original data source. MyDataSource will thus magically appear to respond to any message that the original data source responds to, and any message that arrives that MyDataSource can’t handle will be magically forwarded to the original data source. This way, the insertion of the MyDataSource instance as data source doesn’t break whatever the original data source does:
var orig : UITableViewDataSource
init(originalDataSource:UITableViewDataSource) {
    self.orig = originalDataSource
}
override func forwardingTarget(for aSelector: Selector) -> Any? {
    if self.orig.responds(to:aSelector) {
        return self.orig
    }
    return super.forwardingTarget(for:aSelector)
}
Finally, we’ll implement the two Big Questions required by the UITableViewDataSource protocol, to quiet the compiler. In both cases, we first pass the message along to the original data source (somewhat analogous to calling super); then we add our own customizations as desired. Here, as a proof of concept, I’ll change each cell’s text font (Figure 12-26):
Figure 12-26. Customized More list
func tableView(_ tv: UITableView, numberOfRowsInSection sec: Int) -> Int {
    return self.orig.tableView(tv, numberOfRowsInSection: sec)
}
func tableView(_ tableView: UITableView,
    cellForRowAt indexPath: IndexPath) -> UITableViewCell {
        let cell = self.orig.tableView(tableView, cellForRowAt: indexPath)
        cell.textLabel!.font = UIFont(name: "GillSans-Bold", size: 14)!
        return cell
}
Tint Color
The UIView and UIBarButtonItem tintColor property has a remarkable built-in feature: its value, if not set explicitly (or if set to nil), is inherited from its superview or containing bar. The idea is to simplify the task of giving your app a consistent overall appearance. Many built-in interface objects use the tintColor for some aspect of their appearance, as I’ve already described. For example, if a .system button’s tintColor is red, either because you’ve set it directly or because it has inherited that color from higher up the view hierarchy, it will have red title text by default.
This architecture works exactly the way you would expect:
- Inheritance
-
When you set the
tintColorof a view, that value is inherited by all subviews of that view. The ultimate superview is the window; thus, you can set thetintColorof your UIWindow instance, and its value will be inherited by every view that ever appears in your interface. - Overriding
-
The inherited
tintColorcan be overridden by setting a view’stintColorexplicitly. Thus, you can set thetintColorof a view partway down the view hierarchy so that it and all its subviews have a differenttintColorfrom the rest of the interface. In this way, you might subtly suggest that the user has entered a different world. - Propagation
-
If you change the
tintColorof a view, the change immediately propagates down the hierarchy of its subviews — except, of course, that a view whosetintColorhas been explicitly set to a color of its own is unaffected, along with its subviews.
Whenever a view’s tintColor changes, including when its tintColor is initially set at launch time, and including when you set it in code, this view and all its affected subviews are sent the tintColorDidChange message. A subview whose tintColor has previously been explicitly set to a color of its own isn’t affected, so it is not sent the tintColorDidChange message merely because its superview’s tintColor changes — the subview’s own tintColor didn’t change.
When you ask a view for its tintColor, what you get is the tintColor of the view itself, if its own tintColor has been explicitly set to a color, or else the tintColor inherited from higher up the view hierarchy. In this way, you can always learn what the effective tint color of a view is.
A UIView also has a tintAdjustmentMode. Under certain circumstances, such as the summoning of an alert (Chapter 13) or a popover (Chapter 9), the system will set the tintAdjustmentMode of the view at the top of the view hierarchy to .dimmed. This causes the tintColor to change to a variety of gray. The idea is that the tinting of the background should become monochrome, thus emphasizing the primacy of the view that occupies the foreground (the alert or popover). See “Custom Presented View Controller Transition” for an example of my own code making this change.
By default, this change in the tintAdjustmentMode propagates all the way down the view hierarchy, changing all tintAdjustmentMode values and all tintColor values — and sending all subviews the tintColorDidChange message. When the foreground view goes away, the system will set the topmost view’s tintAdjustmentMode to .normal, and that change, too, will propagate down the hierarchy.
This propagation behavior is governed by the tintAdjustmentMode of the subviews. The default tintAdjustmentMode value is .automatic, meaning that you want this view’s tintAdjustmentMode to adopt its superview’s tintAdjustmentMode automatically. When you ask for such a view’s tintAdjustmentMode, what you get is just like what you get for tintColor — you’re told the effective tint adjustment mode (.normal or .dimmed) inherited from up the view hierarchy.
If, on the other hand, you set a view’s tintAdjustmentMode explicitly to .normal or .dimmed, this tells the system that you want to be left in charge of the tintAdjustmentMode for this part of the hierarchy; the automatic propagation of the tintAdjustmentMode down the view hierarchy is prevented. To turn automatic propagation back on, set the tintAdjustmentMode back to .automatic.
You can take advantage of tintColorDidChange to make your custom UIView subclass behave like a built-in UIView subclass. For example, a .custom UIButton might not automatically dim the title text color. But the button’s tintColor is still being dimmed, even though that color isn’t being applied to the visible interface; thus, to imitate a .system UIButton, you can apply the tintColor yourself.
In this example, my UIButton has an attributed title, configured in the nib editor, so its title doesn’t automatically change color when the superview’s tintColor changes. But I want my button to participate in dimming. So I subclass UIButton and change the attributed title to a gray version of itself when the inherited tintAdjustmentMode changes to .dimmed:
class MySpecialButton : UIButton {
    var orig : NSAttributedString?
    var dim : NSAttributedString?
    override func awakeFromNib() {
        super.awakeFromNib()
        self.orig = self.attributedTitle(for:.normal)!
        let t = NSMutableAttributedString(
            attributedString: self.attributedTitle(for:.normal)!)
        t.addAttribute(NSForegroundColorAttributeName, value: UIColor.gray,
            range: NSMakeRange(0,t.length))
        self.dim = t
    }
    override func tintColorDidChange() {
        self.setAttributedTitle(
           self.tintAdjustmentMode == .dimmed ? self.dim : self.orig,
           for:.normal)
    }
}
Appearance Proxy
When you want to customize the look of an interface object, instead of sending a message to the object itself, you can send that message to an appearance proxy for that object’s class. The appearance proxy then passes that same message along to the actual future instances of that class. You’ll usually configure your appearance proxies once very early in the lifetime of the app, and never again. The app delegate’s application(_:didFinishLaunchingWithOptions:), before the app’s window has been displayed, is the most obvious and common location.
Like the tintColor that I discussed in the previous section, this architecture helps you give your app a consistent appearance, as well as saving you from having to write a lot of code. For example, instead of having to send setTitleTextAttributes(_:for:) to every UITabBarItem your app ever instantiates, you send it once to the appearance proxy, and it is sent to all future UITabBarItems for you:
UITabBarItem.appearance().setTitleTextAttributes([
    NSFontAttributeName:UIFont(name:"Avenir-Heavy", size:14)!
], for:.normal)
Also, the appearance proxy sometimes provides access to interface objects that might otherwise be difficult to refer to. For example, you don’t get direct access to a search bar’s external Cancel button, but it is a UIBarButtonItem and you can customize it through the UIBarButtonItem appearance proxy.
There are four class methods for obtaining an appearance proxy:
appearance-
Returns a general appearance proxy for the receiver class. The method you call on the appearance proxy will be applied generally to future instances of this class.
appearance(for:)-
The parameter is a trait collection. The method you call on the appearance proxy will be applied to future instances of the receiver class when the environment matches the specified trait collection.
appearance(whenContainedInInstancesOf:)-
The argument is an array of classes, arranged in order of containment from inner to outer. The method you call on the appearance proxy will be applied only to instances of the receiver class that are actually contained in the way you describe. The notion of what “contained” means is deliberately left vague; basically, it works the way you intuitively expect it to work.
appearance(for:whenContainedInInstancesOf:)-
A combination of the preceding two.
When configuring appearance proxy objects, specificity trumps generality. Thus, you could call appearance to say what should happen for most instances of some class, and call the other methods to say what should happen instead for certain instances of that class. Similarly, longer whenContainedInInstancesOf: chains are more specific than shorter ones.
For example, here’s some code from my Latin flashcard app (myGolden and myPaler are class properties defined by an extension on UIColor):
UIBarButtonItem.appearance().tintColor = .myGoldenUIBarButtonItem.appearance( whenContainedInInstancesOf: [UIToolbar.self]) .tintColor = .myPaler
UIBarButtonItem.appearance( whenContainedInInstancesOf: [UIToolbar.self, DrillViewController.self]) .tintColor = .myGolden
That means:
In general, bar button items should be tinted golden.
But bar button items in a toolbar are an exception: they should be tinted paler.

But bar button items in a toolbar in DrillViewController’s view are an exception to the exception: they should be tinted golden.
Sometimes, in order to express sufficient specificity, I find myself defining subclasses for no other purpose than to refer to them when obtaining an appearance proxy. For example, here’s some more code from my Latin flashcard app:
UINavigationBar.appearance().setBackgroundImage(marble2, for:.default)
// counteract the above for the black navigation bar
BlackNavigationBar.appearance().setBackgroundImage(nil, for:.default)
In that code, BlackNavigationBar is a UINavigationBar subclass that does nothing whatever. Its sole purpose is to tag one navigation bar in my interface so that I can refer to it in that code! Thus, I’m able to say, in effect, “All navigation bars in this app should have marble2 as their background image, unless they are instances of BlackNavigationBar.”
The ultimate in specificity is, of course, to customize the look of an instance directly. Thus, for example, if you set one particular UIBarButtonItem’s tintColor property, then setting the tint color by way of a UIBarButtonItem appearance proxy will have no effect on that particular bar button item.
Be warned, however, that not every message that can be sent to an instance of a class can be sent to that class’s appearance proxy. Unfortunately, the compiler can’t help you here; illegal code like this will compile, but will crash at runtime:
UIBarButtonItem.appearance().action = #selector(configureAppearance)
The problem is not that UIBarButtonItem has no action property; in the contrary, that code compiles because it does have an action property. But that property is not one that you can set by way of the appearance proxy, and the mistake isn’t caught until that line executes at runtime.
When in doubt, look at the class documentation; there should be a section that lists the properties and methods applicable to the appearance proxy for this class. For example, the UINavigationBar class documentation has a section called “Customizing the Bar Appearance,” the UIBarButtonItem class documentation has a section called “Customizing Appearance,” and so forth.