Chapter 17. The Disk Chapter
To make life easier for you, the terminology of objects on your computer screen precisely mirrors the terminology of the real world. You use the computer to create files, just as in the real world. You put those files into folders, just as in the real world. And you put those folders into filing cabinets—
Well, OK. The metaphor goes only so far.
There is a term for the larger storage entity that holds all those files and folders, though: disks.
Nobody uses floppy disks anymore, and even CDs and DVDs are rapidly disappearing. But spinning hard drives are still cheap, big, reliable, and common, and SSDs (solid-state drives) are popular in laptops, despite their relatively high cost and small capacity.
In any case, this chapter is all about storage and disks: cleanups, defragmentation, compression, encryption, analysis, and management.
Note:
Some of the features mentioned in this chapter—dynamic disks, disk compression, and EFS (encrypting file system)—all require the NTFS file system on your computer’s disk drives. That’s probably what you’re using on your main hard drive, because Windows 10 requires it.
But many other kinds of disks—memory cards, flash drives, and so on—use the older FAT32 file system instead. You won’t be able to use NTFS tricks on them.
Storage Sense: More Gigs, Yours Free
Your PC sits at the unhappy pinch point between two opposing trends: the growing size of today’s files (videos, photos, music) and the shrunken size of our available storage (the non–hard disks on today’s laptops).
But Windows 10 can help—by reclaiming swaths of wasted space on your drive.
The feature is called Storage Sense. Once you turn it on, it automatically deletes these kinds of files to make more room:
Temporary files. Various programs create invisible files in tucked-away places as “scratch pads” for the work they do. Unfortunately, they then sometimes forget to delete those files. Storage Sense to the rescue!
Recycle Bin files. Storage Sense autodeletes files you threw into the Bin more than 30 days ago (or 1 day, 14 days, or 60 days ago).
Forgotten downloads. If you downloaded stuff more than 30 days ago (or 1 day, 14 days, or 60 days ago) and then left it, unchanged, in the Downloads folder, Storage Sense figures it’s ripe for deleting.
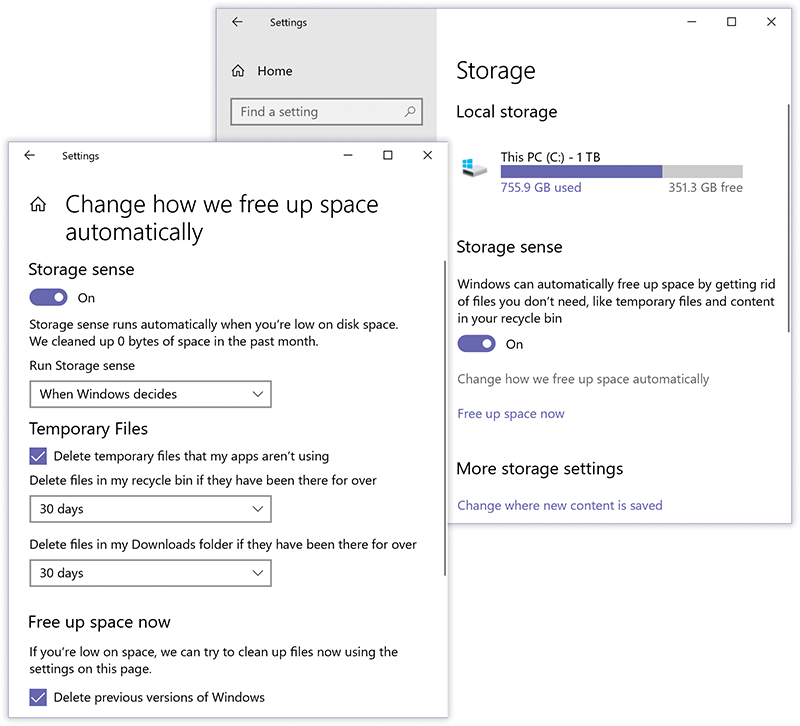
Figure 17-1. This page lets you control which items Storage Sense deletes, and when. It also shows you how much detritus it’s already swept away—and lets you conduct a sweep right now, rather than on its own schedule (“Free up space now”).
Old versions of Windows 10. If you upgraded to the Windows 10 April 2018 Update from an earlier Windows version, and everything seems to be going well, there may not be much point in keeping all those old gigabytes of Windows around. They do, after all, eat up 13 gigs per version.
If you like the idea of Storage Sense, open ![]() →
→![]() →System→Storage and turn it on.
→System→Storage and turn it on.
While you’re here, you can also visit “Change how we free up space automatically” to adjust the frequency of those deletions, or specify how old those Recycle Bin and Downloads items have to be before getting vaporized (see Figure 17-1).
What’s Eating Up Your Disk
As you can see in Figure 17-1, there’s a handy “how full is my disk” graph at the top of the ![]() →
→![]() →System→Storage screen. But that’s only the tip of the tip of the iceberg.
→System→Storage screen. But that’s only the tip of the tip of the iceberg.
You can click or tap that graph to view a breakdown of the kinds of files that are filling your hard drives: pictures, videos, music, documents, and so on (see Figure 17-2). Then you can select one of those graphs to drill down even further. Eventually, you burrow all the way to a details screen that lets you inspect the underlying storage-occupiers.
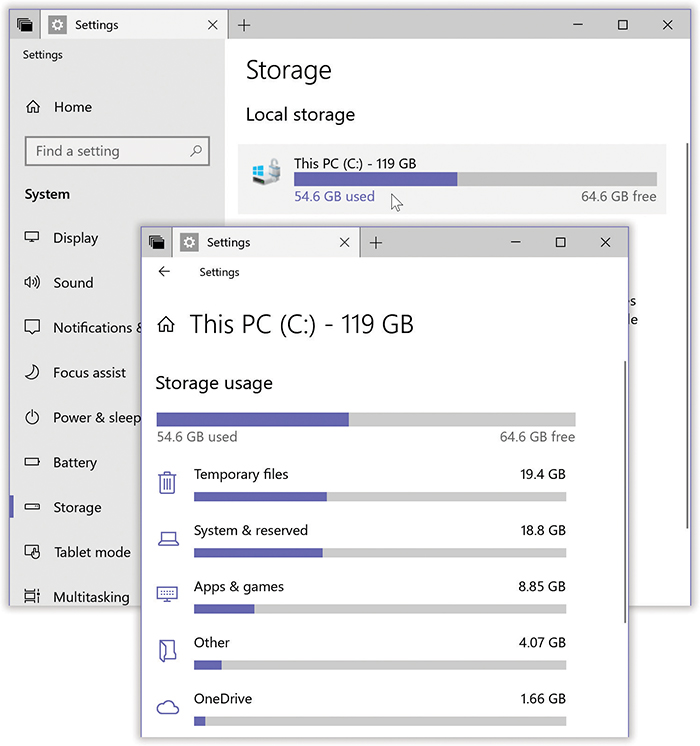
Figure 17-2. Top: To find this screen, open  →
→ →System→Storage. It’s a list of your drives and how full they are. Click one to open its details screen (bottom), where you see a breakdown of which kinds of files are eating up all your space. At this point, you can click one of the categories to open a File Explorer or Settings window, where you can inspect and delete the stuff that’s overrunning your storage.
Here are the primary categories Windows tallies up for your use:
System & reserved. These are the files that make up Windows. Select this graph to see how much space Windows, virtual memory, and your hibernation file (“POWER USERS’ CLINIC Bringing Back the Hibernate Command”) are using up.
Apps & games. Select this bar to open the “Apps & features” screen described in “Apps”, where it’s easy to start deleting programs you don’t need anymore.
Pictures, Music, Videos, Documents, Desktop, OneDrive. Hit one of these graphs, and then the corresponding View button, to open a File Explorer window containing that file type for inspection and cleaning. (These tallies show what’s in your Pictures, Music, Videos, Documents, and OneDrive folders. If you have pictures, music, video, and documents in other folders, they’re not counted here.)
Mail. “Manage mail” opens your Mail app, so you can delete some mail to save space.
Maps refers to offline maps (regions you’ve saved to your computer, so you can view them without an Internet connection later; see “Offline Maps”). Hit “Manage maps” to open a Settings page that lists your offline maps for easy purging.
Temporary files may offer the most fruitful spring cleaning of all. Here are links to those temporary files (cache files) that Windows doesn’t really need; your Downloads folder; your Recycle Bin; and “Previous versions of Windows”—whatever copy of Windows you upgraded to Windows 10. If you have no intention of going back, select “Delete previous versions” to reclaim a ton of space.
Now it’s easy to go on a cleaning binge, throwing out stuff you don’t need and reclaiming some storage space.
Disk Cleanup
As you use your computer, Windows litters your hard drive with temporary files. Programs, utilities, and websites scatter disposable files everywhere. If you could see your hard drive’s surface, it would eventually look like the floor of a minivan whose owners eat a lot of fast food.
If the problem is that your disk is running out of space, your first stop should be Storage Sense, described on the previous pages. But an older, less comprehensive app, Disk Cleanup (Figure 17-3), is still available; its specialty is removing temporary files.
To run Windows’ built-in housekeeper program, the quickest route is this: Do a search for disk cleanup; in the search results, click “Free up disk space by deleting unnecessary files.” (Disk Cleanup is also available in the Control Panel. Somewhere.)
The Disk Cleanup program dives right in. If you have more than one drive, it lets you choose the one you want to work on; then it goes to work, inspecting your drive and reporting on files you can safely remove.
Left to its own devices, it will clean up only your files. But if you’d like to clean up all the files on the computer, including Microsoft’s own detritus, click “Clean up system files.” Authenticate if necessary.
The Disk Cleanup box shown in Figure 17-3 appears when the inspection is over. Turn on the checkboxes of the file categories you’d like to have cleaned out, and then click OK to send them to the digital landfill.
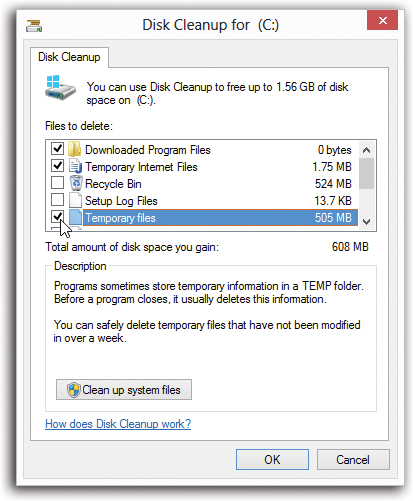
Figure 17-3. Disk Cleanup announces how much free space you stand to gain. After you’ve been using your PC for a while, it’s amazing how much crud you’ll find there—and how much space you can recover.
If you’re not sure what some of these categories are, a quick Google search will make all clear.
Disk Defragmenter
When you save a new file, Windows records its information onto the hard drive in small pieces called blocks. On a new PC, Windows lays the blocks end-to-end on the hard drive’s surface. Later, when you type more data into a document (thus enlarging it), the file no longer fits in the same space. Windows puts as much of the file in the original location as can fit, but it may have to store a few of its blocks in the next empty spot on the hard drive.
Ordinarily, you’ll never even notice that your files are getting chopped up in this way, since they open promptly and seamlessly. Windows keeps track of where it has stored the various pieces and reconstitutes them when necessary.
As your drive fills up, though, the free space that’s left is made up of smaller and smaller groups of blocks. Eventually, a new file may not fit in a single “parking place” on the hard drive’s surface, since there are no free spaces left large enough to hold it. Windows may have to store a file in several different areas of the disk, or even hundreds.
When you try to open such a fragmented file, the drive heads (which read the disk) must scamper all over the disk surface, rounding up each block in turn, which is slower than reading contiguous blocks one after the other. Over time, this file fragmentation gets worse and worse. Eventually, you wind up griping to your buddies or spouse that you need a new computer, because this one seems to have gotten so slow.
The solution: Disk Defragmenter, a program that puts together pieces of files that have become fragmented on your drive. The “defragger” also rearranges the files on your drives to make the operating system and programs load more quickly. A freshly defragged PC feels faster and more responsive than a heavily fragmented one.
Windows’ disk-defragging software runs automatically at regular intervals, in the tiny moments when you’re not actually typing or clicking. It’s like having someone take out your garbage for you whenever the can is full. Slow-PC syndrome should, therefore, be a much less frequent occurrence.
Tip:
Fragmentation doesn’t become noticeable except on hard drives that have been very full for quite a while. Don’t bother defragmenting your drive unless you’ve actually noticed it slowing down. The time you’ll spend waiting for Disk Defragmenter to do its job is much longer than the fractions of seconds caused by a little bit of file fragmentation.
And if you’re the lucky owner of a solid-state drive (SSD)—fast, quiet, pricier—defragmenting is so irrelevant, Windows doesn’t even do it. In fact, if Windows detects that you’re using an SSD, the Optimize button shown in Figure 17-4 performs a different operation. It does a trim, a cleanup that helps the drive identify areas that are now empty and available for new storage.
Defragging Settings
Even though Windows defrags your hard drive automatically in the background, you can still exert some control. For example, you can change the schedule, and you can trigger a defragmentation manually when you’re feeling like a control freak.
To reach the Optimize Drives main screen, do a search for defrag and select “Defragment and Optimize Drives” in the results. (You can also find Disk Defragmenter in the Control Panel, if you dig deep enough.) The Optimize Drives window opens (Figure 17-4).
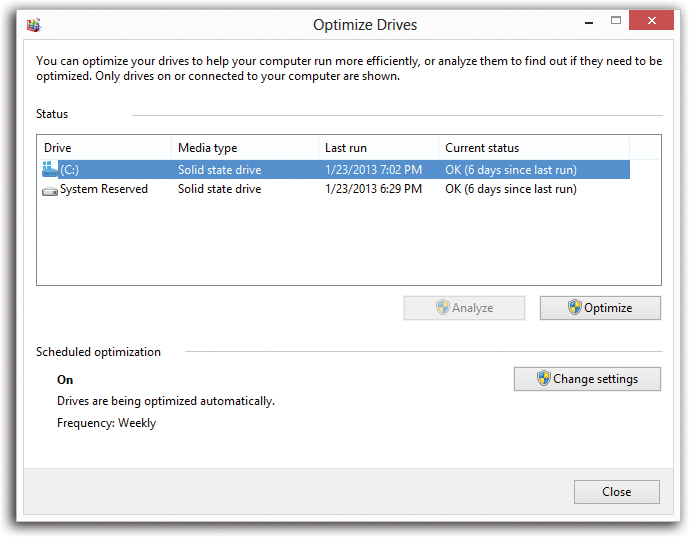
Figure 17-4. Unless there’s a good reason, you don’t want to schedule defragmentation. It’s a good idea to have Windows do it for you automatically—it’s like getting someone else to take out your trash.
Click Analyze to see how badly fragmented your disk is, or Optimize to start the defragging process. Depending on the size of your hard disk, your processor speed, and the amount of fragmentation, it will take anywhere from several minutes to several hours.
Hit “Change settings” to adjust the schedule (Weekly, Daily, or Monthly).
Tip:
During the defragmentation process (on a traditional hard drive), Windows picks up pieces of your files and temporarily sets them down in a different spot, like somebody trying to solve a jigsaw puzzle. If your hard drive is very full, then defragmenting will take a lot longer than if you have some empty space available—and if there’s not enough free disk space, Windows can’t do the job completely. Before you run Disk Defragmenter, use Storage Sense or Disk Cleanup and make as much free disk space as possible.
Hard Drive Checkups
It’s true: Things can occasionally go wrong on the surface of your hard drive. Maybe there’s a messed-up spot on its physical surface. Maybe, thanks to a system crash, power outage, or toddler playing with your surge suppressor, your computer gets turned off without warning, and some files are left open and stranded.
In the olden days, way back even before Windows XP, fixing your disk required running a program called ScanDisk, a utility designed to detect and, when possible, repair drive damage.
ScanDisk doesn’t exist in Windows 10. But its functions, and many more, have been overhauled. Many disk problems are automatically detected and automatically fixed—and most of them don’t require you to wait while the PC repairs itself. There’s a lot less downtime.
You can also check your disk on command—the old disk-checking procedure.
Right-click the icon of the hard drive you want to check (in the This PC window). From the shortcut menu, choose Properties; click the Tools tab, and click Check.
Note:
Geeks fondly refer to the feature described here as chkdsk (apparently named by someone with no vowels on his keyboard). You get to the geek-friendly, text-only version of it by typing chkdsk in a Command Prompt window. But the method described here is much better looking.
Disk Management
“Disk management” isn’t just a cool, professional-sounding skill—it’s the name of a built-in Windows maintenance program that lets you perform all kinds of operations on your hard disk. To open it, right-click the Start menu; from the shortcut menu, choose Disk Management. (Only Administrator account–holders are welcome.)
In either case, you arrive at the window shown in Figure 17-5. At first glance, it appears to be nothing more than a table of every disk (and partition of every disk) currently connected to your PC. In truth, the Disk Management window is a software toolkit that lets you operate on these drives.
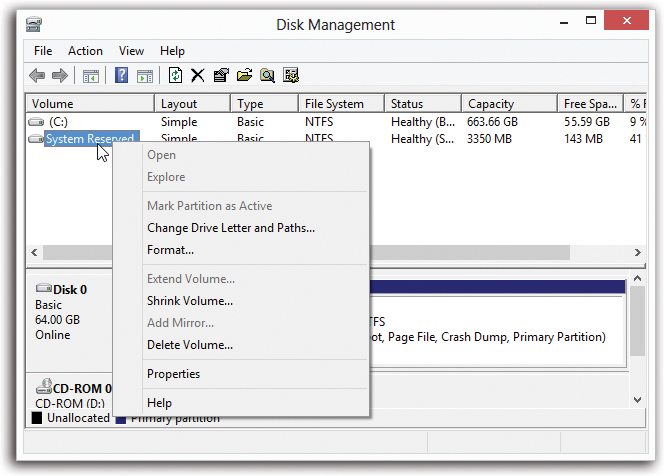
Figure 17-5. The Disk Management window does more than just display your drives; you can also operate on them by right-clicking. Don’t miss the View menu, by the way, which lets you change either the top or the bottom display. For example, you can make your PC display all your disks instead of your volumes. (There’s a difference; see “UP TO SPEED Volumes Defined”.)
Change a Drive Letter
As you’ve probably noticed, Windows assigns a drive letter to each disk drive associated with your PC. In the age of floppy disks, the floppy drives were always A: and B:. The primary internal hard drive is generally C:; your CD/DVD drive may be D: or E:; and so on. Among other places, you see these letters in parentheses following the names of your drives in the This PC window.
Windows generally assigns these letters in the order that you install new drives to your system. You’re not allowed to change the drive letter of any startup hard drive (the C: drive and, if you’re set up for dual booting, any other boot drives).
You can, however, override the other drives’ unimaginative Windows letter assignments easily enough, as shown in Figure 17-6. Your computer won’t run any faster, but you may feel a tiny surge of pride at how much better organized you feel.
Note:
If Windows is currently using files on the disk whose drive letter you’re trying to change, Disk Management might create the new drive letter assignment but leave the old one intact until the next time you restart the computer. This is an effort to not pull the rug out from under any open files.
Partition a New Drive
The vast majority of Windows PCs have only one hard drive, represented in the This PC window as a single icon.
Plenty of power users, however, delight in partitioning the hard drive—dividing its surface so that it appears on the screen as two different icons with two different names. At that point, you can live like a king, enjoying the following advantages (just like people who have two separate hard drives):
You can keep Windows 10 on one of them and Windows 8.1 (for example) on the other, so you can switch between the two at startup. This feature, called dual booting, is described in “POWER USERS’ CLINIC Dual Booting”.

Figure 17-6. Right-click a drive icon. From the shortcut menu, choose Change Drive Letter and Paths.
Top: In this dialog box, click Change.
Bottom: Next, choose a letter that hasn’t already been assigned. Click OK, and then approve your action in the confirmation box.
Note that if you change a drive’s letter, shortcut icons pointing to files on it no longer work. Programs that list Recently Used Documents on that drive get confused, too.
And although you can change the drive letter of a USB drive (like an external hard drive or a flash drive), it won’t stick. Next time you attach it, Windows will give it the first available letter.You can keep your operating system(s) separate from folders and files. In this way, you can perform a clean install of Windows (“The Clean Install”) onto one partition without having to worry about losing any of your important files or installation programs. Or you can keep your files safely on one partition while you install and reinstall different operating systems, or different versions of them, on the other.
Now, in earlier Windows days, partitioning a hard drive using the tools built into Windows required first erasing the hard drive completely. Fortunately, Windows’ Disk Management console can save you from that hassle, although making a backup before you begin is still a smart idea. (The short version: Right-click the disk’s icon in Disk Management; from the shortcut menu, choose Shrink Volume. In the Shrink dialog box, specify how much space you want to free up, and then click Shrink. Then turn the free space into a new volume, as described next.)
Note:
Partitioning is an advanced kind of surgery that involves erasing disks and moving lots of files around. Do not proceed unless you have a backup and you’re a technically confident soul.
Creating a partition
In the Disk Management window, free space (suitable for turning into a partition of its own) shows up with a black bar and the label “Unallocated.”
To create a new partition, right-click one of these unallocated segments. From the shortcut menu, choose New Simple Volume (if this option isn’t available, right-click the disk and choose Initialize Disk). A wizard appears; its screens ask you to make some decisions:
How big you want the volume to be. If you’re dividing up a 500 GB drive, for example, you might decide to make the first volume 300 GB and the second 200 GB. Begin by creating the 300 GB volume (right-clicking the big Unallocated bar). When that’s done, you see a smaller Unallocated chunk still left in the Disk Management window. Right-click it and choose New Simple Volume again, this time accepting the size the wizard proposes (which is all the remaining free space).
What drive letter you want to assign to it. Most of the alphabet is at your disposal.
What disk-formatting scheme you want to apply to it. Windows 10 requires NTFS for the system drive. It’s far safer and more flexible than the old FAT32 system.
Consider FAT32 only if, for example, you plan to dual-boot Windows 10 with Linux, Mac OS X, or an old version of Windows. (FAT32 might be the only file system all those operating systems can recognize simultaneously.)
When the wizard is through with you, it’s safe to close the window. A quick look at your This PC window confirms that you now have new “disks” (actually partitions of the same disk), which you can use for different purposes.
Turn a Drive into a Folder
Talk about techy! Most people could go their entire lives without needing this feature, or even imagining that it exists. But it’s there if you’re a power user and you want it.
Using the Paths feature of Disk Management, you can actually turn a hard drive (or partition) into a folder on another hard drive (or partition). These disks-disguised-as-folders are technically known as mounted drives, junction points, or drive paths.
This arrangement affords the following possibilities:
In effect, you can greatly expand the capacity of your main hard drive—by installing a second hard drive that masquerades as a folder on the first one.
You can turn a burned CD or DVD into a folder on your main hard drive, too—a handy way to fool your programs into thinking the files they’re looking for are still in the same old place on your hard drive. (You could pull this stunt in a crisis—when the “real” folder has become corrupted or has been thrown away.)
If you’re a power power user with lots of partitions, disks, and drives, you may feel hemmed in by the limitation of only 26 assignable letters (A through Z). Turning one of your disks into a mounted volume bypasses that limitation, because a mounted volume doesn’t need a drive letter at all.
A certain disk can be made to appear in more than one place at once. You could put all your MP3 files on a certain disk or a partition—and then make it show up as a folder in the Music folder of everyone who uses the computer.
Note:
You can create a mounted volume only on an NTFS-formatted hard drive.
To bring about this arrangement, visit the Disk Management window, and then right-click the icon of the disk or partition you want to turn into a mounted volume. From the shortcut menu, choose Change Drive Letter and Paths.
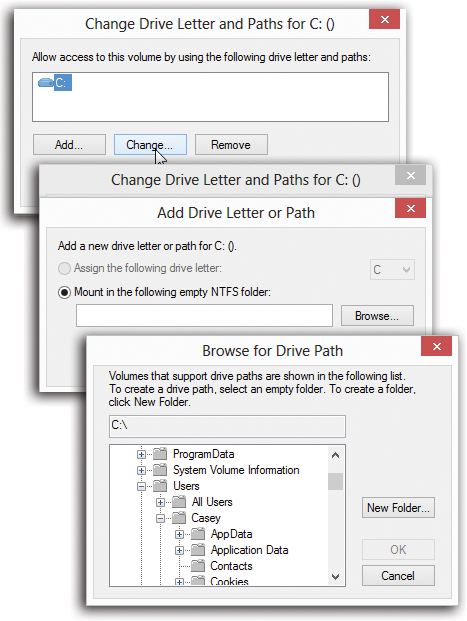
Figure 17-7. Here’s how to make a drive appear as a folder icon on any other drive: Designate an empty folder to be the receptacle—a metaphysical portal—for the drive’s contents.
In the Change Drive Letter and Paths dialog box (Figure 17-7, top), click Add; in the next dialog box (Figure 17-7, middle), click Browse. Navigate to and select an empty folder—the one that will represent the disk. (Click New Folder, shown at bottom in Figure 17-7, if you didn’t create one in advance.) Finally, click OK.
Once the deed is done, take time to note a few characteristics of a mounted volume:
The mounted volume may behave just like a folder, but its icon is a dead giveaway, since it still looks like a hard drive (or a CD drive, or a DVD drive, or whatever).
Still, if you’re in doubt about what it is, you can right-click it and choose Properties from the shortcut menu. You see that the Type information says “Mounted Volume” and the Target line identifies the disk from which it was made.
Avoid circular references, in which you turn two drives into folders on each other. Otherwise, you risk throwing programs into a spasm of infinite-loop thrashing.
To undo your mounted-drive effect, return to the Disk Management program and choose View→Drive Paths. You’re shown a list of all the drives you’ve turned into folders; click one and then click Remove. You’ve just turned that special, “I’m really a drive” folder into an ordinary folder.
Storage Spaces
For years, the data centers of big corporations have used RAID systems (Redundant Array of Independent Disks) for storage. A RAID array is a bunch of drives installed inside a single metal box; clever software makes them look to a computer like one big drive. Or three smaller ones, or fifty little ones—however the highly trained system administrator decides to chop them up.
And why bother? Because the files on a RAID system can be recovered even if one of the hard drives dies, thanks to a fancy encoding scheme. (Thus the “redundant” in the name.)
But RAID systems are complicated to set up and incredibly inflexible; you generally have to install all drives of the same type and capacity simultaneously. And if you decide to expand your array, you have to erase all the existing drives and reformat them.
A technical Windows feature called Storage Spaces offers the same benefits as RAID systems—for example, data safety even if one of the drives croaks—without anywhere near the same complexity or inflexibility. Your setup doesn’t require matching drives, and you can fiddle with the capacity at any time without having to reformat anything.
To get started, search for storage spaces, and open the Control Panel of that name. For step-by-step instructions, see the free downloadable PDF appendix “Storage Spaces” on this book’s “Missing CD” page at www.missingmanuals.com.
Dynamic Disks
Before Storage Spaces came along, there were other ways to tell Windows to treat multiple drives as one. There was Drive Extender, a more technical version of what we know today as Storage Spaces.
That feature is gone now, but dynamic disks, basic disks, and spanned volumes are still around—other methods of slicing and dicing your actual disks in clever ways.
If this older, more complex, decidedly more advanced topic interests you, a free bonus appendix to this chapter awaits, called “Dynamic Disks.” You can download it from this book’s “Missing CD” page at www.missingmanuals.com.
Encrypting Files and Folders
If your Documents folder contains nothing but laundry lists and letters to your mom, then data security is probably not a major concern for you. But if there’s some stuff on your hard drive that you’d rather keep private, Windows can help you out. The Encrypting File System (EFS) is an NTFS feature, available in the Pro and Enterprise versions of Windows, that stores your data in a coded format that only you can read.
The beauty of EFS is that it’s effortless and invisible to you, the authorized owner. Windows automatically encrypts your files before storing them on the drive, and decrypts them again when you want to read or modify them. Anyone else who signs into your computer, however, will find these files locked and off-limits.
If you’ve read ahead to Chapter 18, of course, you might be frowning in confusion. Isn’t keeping private files private the whole point of Windows’ accounts feature? Don’t Windows’ NTFS permissions (“NTFS Permissions: Protecting Your Stuff”) keep busybodies out already?
Yes, but encryption provides additional security. If, for example, you’re a top-level agent assigned to protect your government’s most closely guarded egg salad recipe, you can use NTFS permissions to deny all other people access to the file containing the information. Nobody but you can open the file.
However, a determined intruder from a foreign nation could conceivably boot the computer using another operating system—one that doesn’t recognize the NTFS permissions—and access the hard drive using a special program that reads the raw data stored there.
But if you had encrypted the file using EFS, that raw data would appear as gibberish, foiling your crafty nemesis.
Using EFS
You use EFS to encrypt your folders and files in much the same way that you use NTFS compression. To encrypt a file or a folder, open its Properties dialog box, click the Advanced button, turn on the “Encrypt contents to secure data” checkbox, and then click OK (see Figure 17-8).
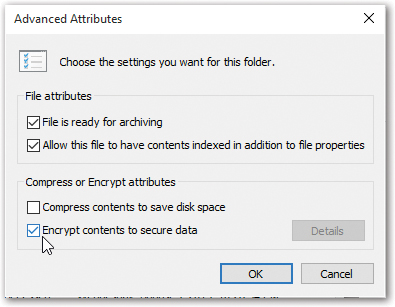
Figure 17-8. To encrypt a file or folder using EFS, turn on the “Encrypt contents to secure data” checkbox (at the bottom of its Properties dialog box). If you’ve selected a folder, a Confirm Attribute Changes dialog box appears, asking if you want to encrypt just that folder or everything inside it, too.
Depending on how much data you’ve selected, it may take some time for the encryption process to complete. Once the folders and files are encrypted, they appear in File Explorer in a different color from your compressed files (unless you’ve turned off the “Show encrypted or compressed NTFS files in color” option; see “View Tab”).
Note:
You can’t encrypt certain files and folders, such as system files, or any files in the system root folder (usually the Windows folder). You can’t encrypt files and folders on FAT32 drives, either.
Finally, note that you can’t both encrypt and compress the same file or folder. If you attempt to encrypt a compressed file or folder, Windows needs to decompress it first. You can, however, encrypt files that have been compressed using another technology, such as .zip files or compressed image files.
After your files have been encrypted, you may be surprised to see that, other than their color, nothing seems to have changed. You can open them the same way you always did, change them, and save them as usual. Windows is just doing its job: protecting these files with the minimum inconvenience to you.
Still, if you’re having difficulty believing that your files are now protected by an invisible force field, try signing off and back on again with a different user name and password. When you try to open an encrypted file now, a message cheerfully informs you that you don’t have the proper permissions to access the file.
EFS Rules
Any files or folders you move into an EFS-encrypted folder get encrypted, too. But dragging a file out of one doesn’t unprotect it; it remains encrypted as long as it’s on an NTFS drive. A protected file loses its encryption only in these circumstances:
You manually decrypt the file (by turning off the corresponding checkbox in its Properties dialog box).
You move it to a FAT32 or exFAT drive.
You transmit it via a network or email. When you attach the file to an email or send it across the network, Windows decrypts the file before sending it on its way.
By the way, EFS doesn’t protect files from being deleted. Even if passing evildoers can’t open your private file, they can still delete it—unless you’ve protected it using Windows’ permissions feature (“NTFS Permissions: Protecting Your Stuff”). Truly protecting important material involves using several security mechanisms in combination.
BitLocker Drive Encryption
EFS is a great way to keep prying eyes out of individual files. But Microsoft wouldn’t be Microsoft if it didn’t give you six variations on a theme. After all, when million-dollar corporate secrets are at stake, a determined, knowledgeable thief could swipe your laptop, nab your flash drive, or even steal the hard drive out of your desktop PC.
If security is that important for you, then you’ll be happy to know about BitLocker Drive Encryption. When you turn on this feature, your PC automatically encrypts (scrambles) everything on an entire drive, including all of Windows itself.
If the bad guy tries any industrial-strength tricks to get into the drive—trying to reprogram the startup routines, for example, or starting up from a different hard drive—BitLocker presents a steel-reinforced password screen. No password, no decryption.
In Windows 10, you also get BitLocker to Go—a disk-encryption feature especially for removable drives like USB flash drives. Even if you lose it or leave it behind, it’s worthless to anyone without the password.
You don’t notice much difference when BitLocker is turned on. You sign in as usual, clicking your name and typing your password. But if a malefactor ever gets his hands on the actual disk, he’ll be in for a disappointing surprise.
There are quite a few steps involved in setting up BitLocker, and it’s not something most people would ever bother with. So the step-by-step instructions are on the free downloadable PDF “BitLocker” appendix on this book’s “Missing CD” page at www.missingmanuals.com.