Chapter 8. The Windows Starter Apps
Even after a fresh installation of Windows, your computer teems with a rich array of preinstalled programs—as an infomercial might put it, they’re your free bonus gifts. And there are a lot of them.
Some are Microsoft Store apps, and some are traditional desktop programs. But in Windows 10, they all behave alike—so for your reference pleasure, they’re all described in this vast chapter. They may appear in your Start menu in various groups, under various headings (Figure 8-1). But in this chapter, they’re all alphabetical, for sanity’s sake.
Note:
This chapter covers every scrap of software that comes in your “All apps” menu, even the ones stored in subfolders like Windows Accessories. The exception: what’s in the Windows Administrative Tools folder (Component Services, Local Security Policy, ODBC Data Sources, and so on). Those are technical tools for people who write computer books, not read them.
The New, Unified Design of Apps
Among the other problems with Windows 8: the design of Microsoft Store (Windows Store) (Metro) (TileWorld) apps. They had no menus. They had few visible buttons. These apps didn’t really do anything—unless you knew about the secret, hidden strip of commands known as the App bar.
It appeared only if you swiped upward onto the screen from beneath it. A lot of people never realized that.
In Windows 10, Microsoft’s starter apps have all been redesigned. The App bar is gone. No more hidden controls. Let the celebration begin!
In fact, to make your life easier, Microsoft has blessed most of these apps with the same basic design. You’ll find it in the Alarms & Clock, Calendar, Food & Drink, Get Started, Groove Music, Mail, Maps, Microsoft Solitaire Collection, Movies & TV, News, People, Photos, Weather, and Xbox apps, to name a few.
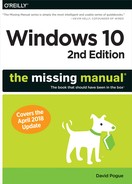
In this design, the app lives in a single window with a vertical menu column, always visible, hugging the left side (see Figure 8-1). It shows only icons, because they don’t take up much space.
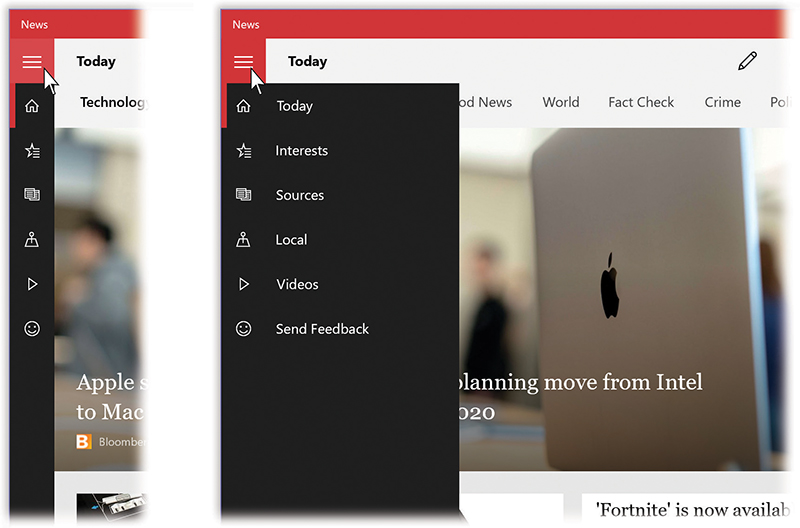
Figure 8-1. The new standard design for Microsoft’s built-in Windows apps (left) offers a black vertical menu column at the left side. If you use the app a lot, you’ll eventually learn what these icons do. In the meantime, the  icon expands the column, revealing the icons’ names (right).
In this pillar of options, you’ll find these consistent elements:
A
button at the top. Click to expand the column, revealing the icons’ names. (Internally, Microsoft calls the button the “hamburger button,” thanks to its resemblance to three horizontal layers of goodness.)Send Feedback (
 ). The smiley-face button opens the Feedback Hub app (“Feedback Hub”), where you can submit bugs, complaints, and compliments to Microsoft.
A bunch of icons. These vary by app, and they’re described in this chapter. If there are a lot of them, as in the Sports app, the menu column of icons may actually scroll.
At the bottom of the main column:
Sign out. This round photo represents you, and the Microsoft account you’ve used to sign in.
A Settings button at the very bottom. It opens a Settings panel, usually on the opposite side of the screen—on the right.
A ![]() button usually appears at the very top left corner of the window. That, of course, is your Back button. It gets you out of the current screen, and walks you back, back, back, eventually to the app’s main home screen. For example, if you’re using the Maps app, the
button usually appears at the very top left corner of the window. That, of course, is your Back button. It gets you out of the current screen, and walks you back, back, back, eventually to the app’s main home screen. For example, if you’re using the Maps app, the ![]() button backs you out of your directions, or Streetside, or Settings—and back to the main Maps display.
button backs you out of your directions, or Streetside, or Settings—and back to the main Maps display.
Tip:
In most Microsoft Store apps, there’s a keyboard shortcut for that ![]() button: Alt+
button: Alt+![]() .
.
Not all Microsoft Store apps adopt Microsoft’s suggestion of the left-side menu column, of course. But most of the built-in Windows apps do, so it’s worth cozying up to the idea now.
3D Builder
This oddball little app in your Windows Accessories folder is designed to work with 3D printers. You use it to design three-dimensional objects (or to modify the big library of starter shapes) that you’ll later print in plastic, using the companion Print 3D app.
Even though it’s a bare-bones app, there’s a lot to master; fortunately, the Help button takes you online to a series of video tutorials. Happy modeling!
Alarms & Clock
Don’t be deceived by the name. This app does let you set up alarms, and it does have a clock. But it does more—so much more. It’s also a timer and a stopwatch.
Alarm Tab
If you travel much, this feature could turn out to be one of your machine’s most useful functions. It’s reliable, it’s programmable, and it’s fun to use (Figure 8-2).
Note:
The alarm won’t play unless the machine is on and awake (unless your computer has a feature called InstantGo, which keeps networking and clock functions going even when the PC is asleep). Does that defeat the whole purpose? Come on—don’t be a killjoy.
Microsoft starts you off with a dummy alarm, set to 7 a.m., but switched off.
To change the time, click it to enter editing mode (Figure 8-2, right). Now you can edit the alarm’s name, time, repeat schedule, alarm sound, and snooze time.
When you finally hit the Save (![]() ) button, the Alarm screen lists your new alarm (Figure 8-2, left). Just tap the On/Off button to prevent an alarm from going off. It stays in the list, though, so you can quickly reactivate it another day, without having to redo the whole thing.
) button, the Alarm screen lists your new alarm (Figure 8-2, left). Just tap the On/Off button to prevent an alarm from going off. It stays in the list, though, so you can quickly reactivate it another day, without having to redo the whole thing.
You can hit the + button to set another alarm, if you like.
To edit an alarm, click it and proceed as described above; to delete it, click it and then tap ![]() .
.
When the alarm goes off, a notification appears on the screen, identifying the alarm and the time, and the sound rings.
You can snooze it or dismiss it (turn it off for good).
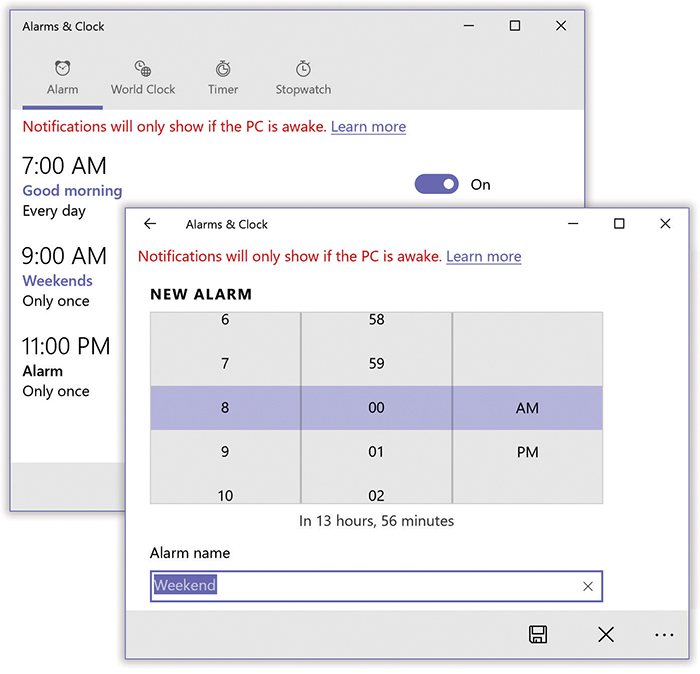
Figure 8-2. The Alarms & Clock app can’t wake the computer to wake you. So you should think of it more as a system to remind you of something while you’re actually working (and the computer is on and awake).
Left: Your list of alarms.
Right: Setting up a new alarm.
World Clock
The second tab of Alarms & Clock starts you out with one clock, showing the current time where you are.
The neat part is that you can set up several of these clocks and set each one to show the time in a different city. The result looks like the row of clocks in a hotel lobby, making you seem Swiss and precise.
By checking these clocks, you’ll know what time it is in some remote city, so you don’t wake somebody up at what turns out to be 3 a.m.
To specify which city’s time appears on the clock, hit the % button at lower right. Type in the city you want; as you type, a list of matching cities appears. Hit the one whose time you want to track.
As soon as you tap a city name, you return to the World Clock display, where your new city time appears. Here’s the fun you can have:
Zoom through time. As Figure 8-3 makes clear, this is an interactive set of clocks. You can scroll through time and watch them change.
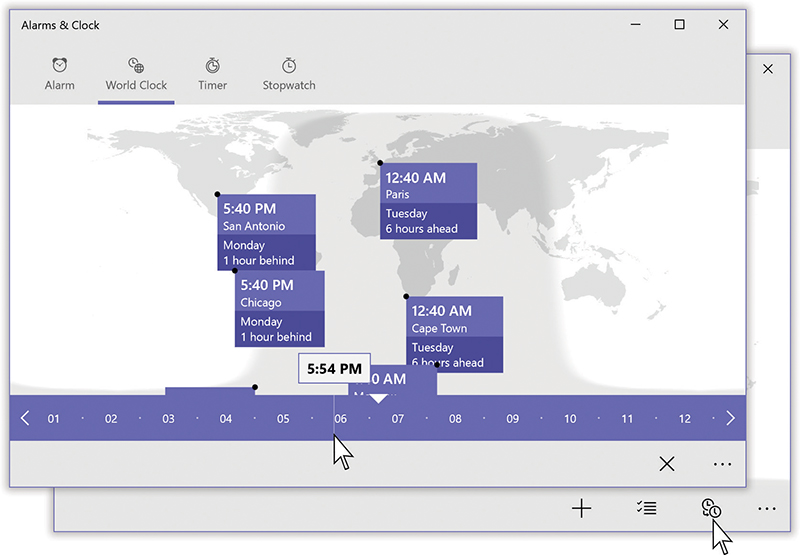
Figure 8-3. Bottom: Click the Compare icon to make the time ruler appear at the bottom of the screen.
Top: Drag that ruler with your finger, or use the < and > buttons, to zoom forward or backward in time. The cool curvy shadow across the world indicates whether it’s day (white) or night (dark), and the city tags show you what time or day—and even what new day—it is.Pin a clock to the Start menu. Right-click (or hold your finger down on) a city’s time. From the shortcut menu, choose Pin to Start. And presto: There, on the right side of your Start menu, a new tile appears. It will always show that city and its current time, for your quick-glancing pleasure.
Delete a clock. Right-click it (or hold your finger down on it). From the shortcut menu, choose Delete.
Timer
Countdown timers are everywhere in life. They measure the periods in sports and games, cooking times in the kitchen, penalties in hockey. The third tab in the Alarms & Clock app, Timer, is a countdown timer. You input a starting time, and it counts down to zero.
To set the timer, click the big digits; now you can change the name and the time of the timer. Hit the Save (![]() ) button.
) button.
Finally, hit ![]() . The timer counts down toward zero. You can hit the
. The timer counts down toward zero. You can hit the ![]() button to pause the countdown, if you like. You can also hit
button to pause the countdown, if you like. You can also hit ![]() to restart the countdown,
to restart the countdown, ![]() to start it over, or
to start it over, or ![]() to make the numbers big and bold enough to see from the moon.
to make the numbers big and bold enough to see from the moon.
When the timer runs out, you get a notification and a sound, which will keep chiming until you hit Dismiss.
Stopwatch
You’ve never met a prettier stopwatch than this one. Hit ![]() to begin timing something: a runner, a train, a long-winded person who’s arguing with you.
to begin timing something: a runner, a train, a long-winded person who’s arguing with you.
While the digits are flying by, you can tap the Lap button (![]() ) as often as you like. Each time, the Laps list identifies how much time elapsed since the last time you tapped Lap. It’s a way for you to compare, for example, how much time a runner is spending on each lap around a track. The large digits tell you how much time has elapsed since you started the stopwatch.
) as often as you like. Each time, the Laps list identifies how much time elapsed since the last time you tapped Lap. It’s a way for you to compare, for example, how much time a runner is spending on each lap around a track. The large digits tell you how much time has elapsed since you started the stopwatch.
Tap ![]() to freeze the counter; tap
to freeze the counter; tap ![]() to resume the timing. If you tap
to resume the timing. If you tap ![]() , you reset the counter to zero and erase all the lap times.
, you reset the counter to zero and erase all the lap times.
Calculator
It would be a little silly for a major operating system to come without a pocket calculator app, wouldn’t it? Yep.
Windows 10’s version has a scientific mode, a programmers’ mode, and a powerful list of conversions (time, power, pressure, area, length, speed, and so on). See Figure 8-4.
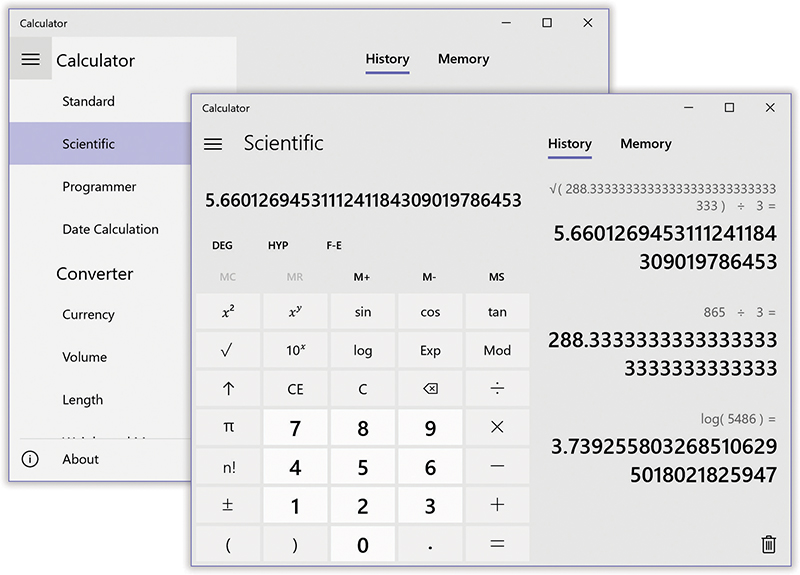
Figure 8-4. The Calculator (left) offers three modes: Standard, Scientific, and Programmer. You can press Alt+1, Alt+2, and Alt+3 for those modes.
Use the menu column to choose from a huge list of conversions: volume, length, weight, temperature, energy, area, speed, time, power, and so on. Once you’ve specified the conversion type, specify what units you want to convert to or from. Handy, really.
Calendar
Calendar is not so different from those “Hunks of the Midwest Police Stations” paper calendars that people leave hanging on the walls for months past their natural life spans.
But Calendar offers several advantages over paper calendars. For example:
It can automate the process of entering repeating events, such as weekly staff meetings or gym workouts.
Calendar can give you a gentle nudge (with a sound and a message) when an important appointment is approaching.
It can subscribe to online calendars from Outlook, Hotmail, or even your company’s Exchange calendar, so you have all your life’s agendas in one place.
Note:
There may already be stuff on your calendar the first time you open it—if, elsewhere in Windows, you’ve already entered account information for an online account. For example, if you’ve entered your Facebook details, then all your friends’ birthdays appear in Calendar automatically. You can, of course, turn off one account or another; read on.
That said, Calendar is among the simplest, most bare-bones calendar programs ever written. At least it won’t overwhelm you.
Working with Views
When you open Calendar, your first order of business is to point it to your existing online calendars: your corporate calendar (Exchange), one of Microsoft’s various free services (Outlook.com, Live.com, Hotmail, MSN), Google’s (Gmail), or even Apple’s (iCloud). (Yes, Apple’s. That sound you hear is hell freezing over.)
If you don’t already have one of these accounts, you can create a free Microsoft account on the spot.
Then you see something like Figure 8-5. Using the toolbar at top, you can switch among these views:
Day looks exactly like a day-at-a-time desk calendar. Scroll up and down to see the rest of the day.
Tip:
But wait, there’s a secret here! If you point to the Day button without clicking, you see the indicator for a drop-down menu. It offers “1 day,” “2 day,” and so on up to 6. It’s letting you specify how many Day columns fit on each screen. In other words, you have a middle ground between Day (1 column) and Work Week (5) or Week (7).
Week fills the main display area with seven columns, reflecting the current week (that is, Sunday through Saturday).
Tip:
This button, too, hides a drop-down menu. It offers “Work week,” which shows just five columns (Monday through Friday).
Month shows the entire month that contains today’s date.
Tip:
If you have a keyboard, you can instead hit Ctrl+Alt+1, +2, +3, +4, and +5 for Today, Day, Work Week, Week, and Month views.

Figure 8-5. The Windows calendar is very, very simple. Switch views using the icons at top. Turn categories on or off using the checkboxes at left. Point to an appointment (or tap with your finger) to see a pop-up details bubble, as shown here.
Navigating in any of the column views is easy and fun for the whole family:
Touchscreen: Swipe vertically to move through the hours, horizontally to move through the days.
Mouse: Turn the scroll wheel to move through the hours; add Shift to move through the days.
Keyboard: The
 and
and  keys go to the previous/next day, and the
  and
and  keys go to the previous/next hour.
In Month view, on the other hand, there’s only one way to scroll: Vertically, with your finger, keyboard, trackpad, or mouse.
Tip:
A compact calendar appears at the left side. You can use it to jump quickly to a date that’s far in the future (or in the past, if you like to rewrite history).
To jump back to today’s date, hit Today.
Making an Appointment: Quick Way
The basic calendar is easy to figure out. After all, with the exception of one unfortunate Gregorian incident, we’ve been using calendars successfully for centuries.
In Day, Week, or Month view, tap or click the correct time slot or date square. A little new-event box appears, where you can specify the name for your appointment (“Lunch with Chris” or whatever); start and end times (if, in fact, they’re not already correct); and a location. Click Done or press Enter. You’ve just created an appointment.
Making an Appointment: Detailed Way
That “click-to-make-a-one-hour-appointment” method is quick and easy. But what if there’s more to the story? What if you want a reminder? Or you want it to occur every week? Or you want to specify a calendar category (like Work or Home)?
In that case, you should open the more complete Details screen shown in Figure 8-6. Ways to open Details:
Open the small “new event” box first, as described already. Then hit “More details.”
Press Ctrl+N. Of course, this method is slower than the click-the-time-slot method, because you have to specify the time and date manually.
Click “New event” at the top-left corner of the screen. Once again, you have to specify the time and date manually.

Figure 8-6. Here’s where you both create a new appointment and edit an old one. When choosing the End time, the drop-down menu shows you how long the appointment will be if you choose each time (“30 minutes,” for example). Nice touch.
On the Details screen (Figure 8-6), you can specify everything about the new appointment:
Event name. For example, you might type Fly to Phoenix.
Calendar – [Account]. This is a drop-down menu on the right side of the “Event name” box. Beneath headings that represent your various calendar services—your Live.com account, Google, iCloud, Exchange, or whatever—you see whatever calendar categories you’ve created on that calendar service. You might see “Work – Gmail,” “Football Club – Gmail,” and “PTA Work – Outlook,” for example.
These color-coded subsets can be anything you like. One person might have calendars called Home, Work, and TV Reminders. Another might have Me, Spouse ’n’ Me, and The Kidz. A small business could have categories called Deductible Travel, R&D, and R&R.
(You can’t create or edit calendar categories in Calendar itself—only on the originating services.)
Tip:
You can, however, change the color associated with a category. Once you’re back at the main calendar screen, right-click (or hold your finger down on) the category’s name; choose from the palette that appears.
Location. This field makes a lot of sense; if you think about it, almost everyone needs to record where a meeting is to take place. You might type a reminder for yourself like My place, a specific address like 212 East 23, or some other helpful information, like a contact phone number or a flight number.
Start, End. Separate drop-down menus (and a drop-down calendar) let you specify a date and time that this event starts and stops.
All day. An “All day” event, of course, refers to something that has no specific time of day associated with it: a holiday, a birthday, a Windows book deadline. When you turn on this box, the name of the appointment jumps to the top of the day/week/month square, in the area reserved for this kind of thing.
Event description. In this big box, you can type or paste any text you like—driving directions, contact phone numbers, a call history, or whatever.
People. If the appointment is a meeting or some other gathering, you can type the participants’ names here. As you type, a list of matching names from your People app appears, to make it easy to choose the one you want. (You can also type out a full email address of anyone here.)
Once you’ve added a person’s name, you can add another, and then another. Later, when you’re finished creating this event, the Send button at top left will invite your lucky recipients via email. Each message comes with an iCal.ics attachment: a calendar-program invitation file. In many mail and calendar programs, opening this attachment automatically presents your invitation; the recipients can respond (by choosing the Accept, Maybe, or Decline buttons that appear in their calendar programs).
For each appointment, you can have even more fun with the options in the top toolbar. You can also indicate the following:
Show as. If you’re on a shared calendar—in an office, for example—the options in this drop-down menu are pretty standard: Free, Busy, Out of office, and Tentative.
For each event you put on your own calendar, you can use these tags to signal coworkers your availability for meetings or calls. Your colleagues won’t see what you’re doing during that block (“Haircut,” “Me time,” or whatever)—only that you’re “Busy.”
Reminder. This drop-down menu tells Calendar when to notify you when a certain appointment is about to begin. You can specify how much advance notice you want for this particular appointment. If it’s a TV show, a reminder five minutes before airtime is probably fine. If it’s a birthday, you might set up a warning a week in advance, so there’s time to buy a present.
Tip:
If you subscribe to the same calendar service on your phone, it’ll remind you when the time comes. In other words, these reminders aren’t useful only when you’re sitting at your desk.
Repeat. This button opens a new set of controls for recurring events: Daily, Weekly, and so on. Or you can turn on the day checkboxes to specify any more-complicated repeating pattern, like “Tuesdays and Wednesdays” or “First Monday of every month.”
You can also set an end date—a date when you want the repetitions to stop.
Private (
 ). If other people can see your chosen account (for example, if it’s an Exchange calendar you use at work), then turning on this box means they can’t see this particular appointment. Great for events like “Colonoscopy” or “Court date re: public nuisance charge.”
When you’re finished setting up the appointment, hit the “Save and close” button at top left, or press Ctrl+S. (If invitees are involved, that button may say “Send” or, if you’ve made changes, “Send update.”)
Your newly scheduled event now shows up on your calendar, complete with the color-coding that corresponds to the calendar category you’ve assigned.
Inspecting an Event
Usually, Calendar shows you only each appointment’s name. But if you tap it or (with the mouse) point without clicking, a little box pops out to show more detail—the location and name of the person who created the appointment, for example.
If it’s a meeting with other invitees, there’s a handy button there: “I’m running late.” One click, and boom: An outgoing email is written and addressed to everyone else who was invited to that meeting. Click Send and then run for the cab.
If it’s a repeating event, you have the choice of editing just that one event or the entire series of them.
Editing Events
To edit an event, just click it (with your mouse or trackpad) or tap it twice (with your finger). You return to the screen shown in Figure 8-6, where you can make any changes you like.
Rescheduling Events
If an event in your life gets rescheduled, you can drag an appointment block vertically in a Day- or Week-view column to make it later or earlier the same day, or horizontally to another date in any view. (If you reschedule a recurring event, Calendar asks if you want to change only this occurrence, or this one and all future ones.)
If something is postponed for, say, a month or two, you’re in trouble, since you can’t drag an appointment beyond its month window. You have no choice but to open the Edit box and edit the starting and ending dates or times—or just cut and paste the event to a different date.
Lengthening or shortening events
If a scheduled meeting becomes shorter or your lunch hour becomes a lunch hour-and-a-half (in your dreams!), changing the length of the representative calendar event is as easy as dragging in any column view (see Figure 8-7).
Tip:
In Week view, if you’ve grabbed the bottom edge of an appointment’s block so that the cursor changes, you can drag horizontally to make an appointment cross the midnight line and extend into a second day.
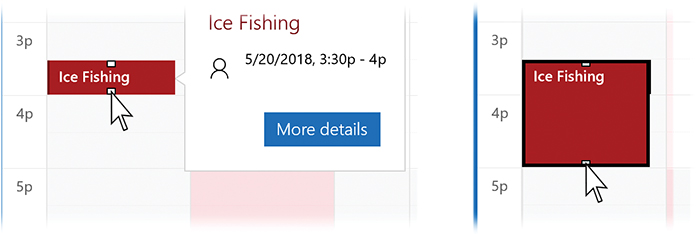
Figure 8-7. To make the drag handles appear at top and bottom, tap a block with your finger—or, with the mouse, point without clicking. You can now drag the event’s little white handle to make it take up more or less time on your calendar.
Deleting Events
To delete an appointment, open it and then hit Delete at the top.
If you’re opening a recurring event, like a weekly meeting, a drop-down menu offers “Delete one” (you want to operate on only that particular instance of the event) or “Delete all” (the whole series from that point forward).
If other people have been invited, then the button says “Cancel meeting” instead of Delete; they’ll be notified about the change. And when you hit that button, you’re invited to type a little message of apology or shame.
What’s in the Left-Side Panel
At the left side of Calendar, there’s a handy panel of options. (If you see only a narrow strip of icons, hit the ![]() at top left to open the panel.)
at top left to open the panel.)
There’s a mini calendar, for quick navigation of your life’s timeline. Below that: a list of your calendar accounts and the color-coded categories within them. By turning a category’s checkbox on or off, you can show or hide all appointments in that category. That’s an incredible way to wade through a crowded schedule to focus on, say, your kids’ events. (There’s an “Add calendars” button, too, for adding new calendar accounts.)
Below that: four icons. There’s Mail (because email is something you often do when you’re calendaring), Calendar (because you may want to switch back), People (opens your contacts list), and Settings. Read on.
Settings
If you choose ![]() at lower left, you open the Settings panel on the right edge of the window. Here you’ve got these categories:
at lower left, you open the Settings panel on the right edge of the window. Here you’ve got these categories:
Manage Accounts. Edit or delete any of your calendar accounts (Outlook, iCloud, Gmail, and so on).
Personalization. What color scheme do you prefer? Do you want black/dark-gray backgrounds (“Dark mode”), white/light-gray ones (“Light mode”), or whatever you picked for Windows itself (“Background, Colors, Themes, and Fonts”)? What wallpaper photo do you want for the background of Mail (has nothing to do with Calendar)?
Calendar Settings. Specify what you consider the first day of the week (affects how Month and Week views appear), which hours of the day you work (affects how Day view appears), and which days of the week you work (affects how “Work week” appears). You can also allow week numbers to appear on your calendar (as in, “Week 1” for the first days of January), or turn on Alternate Calendars (like Hebrew Lunar, Umm al-Qura, and so on) to make Calendar display a second label on every month and date.
If you have Outlook (the desktop app, the phone app, or a free Outlook.com account), you can also turn on Interesting Calendars. Those are canned sets of dates for TV program schedules, sports, concerts, and other events that Microsoft has put together for you. (From the drop-down menu, choose which of your calendar accounts you want to receive these Interesting items.)
Weather Settings. Choose your preferred temperature units (F or C).
What’s new. Opens a web page pointing out the new features in Mail and Calendar.
Help. Opens a web page where you’re offered some Help pages for using Calendar.
Trust Center. If this switch is on, you’re turning on “locally relevant content.” It will “provide functionality that’s relevant to your usage and preferences.”
But you knew that.
Feedback opens the Feedback Hub (“Feedback Hub”), to send suggestions to Microsoft.
About tells you your Calendar version.
Camera
Almost every tablet and laptop these days has a camera—sometimes two (front and back). Even some desktop PCs have webcams built in. Nobody is going to take professional portraits with these cameras, but they’re fine for video chats and Facebook snaps. Camera (Figure 8-8) is the app you use for taking pictures and videos. (If you don’t see the Camera app, it’s because your gadget doesn’t have a camera.)
Note:
The first time you open this app, Microsoft’s privacy team has your back. A message asks if it’s OK for Camera to know your location (so it can place-stamp the pictures) and if it’s allowed to use your camera and microphone. It’s just making sure that the camera isn’t opening on behalf of some nasty piece of spyware.
To take a picture, tap the ![]() button, or press the space bar or Enter.
button, or press the space bar or Enter.
A few cryptic icons haunt the edges of the window (they vary according to your machine’s camera features):
Top left: Change camera. This button appears only if your computer has cameras on both the front and the back—a common arrangement on tablets. (The back camera is for photography; the front camera is for video chats.) Each time you tap this button, your view switches to the other camera.
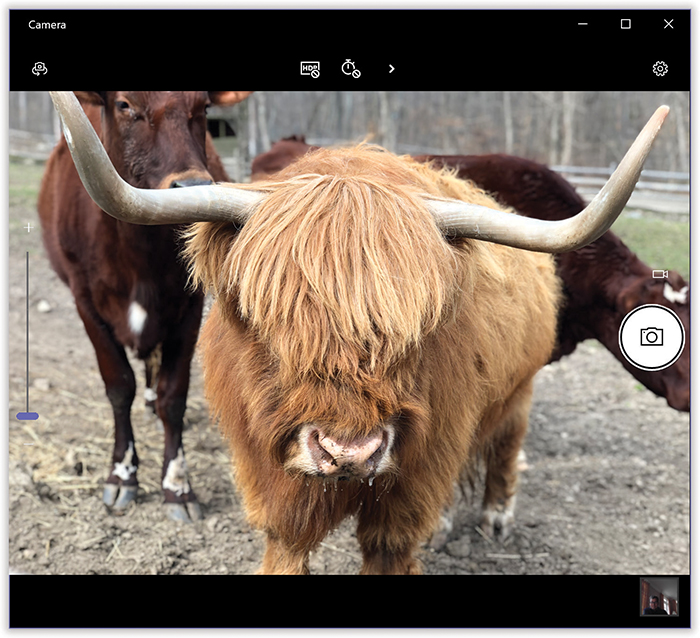
Figure 8-8. If you’re used to the 3-inch screen on the back of a digital camera, discovering that your new preview screen is the entire size of your tablet or laptop comes as quite a shock. In essence you’re seeing the finished photo before you even take it.
Left edge: Zoom slider. It’s generally a digital zoom, meaning that it works by enlarging the picture, degrading the quality.
Top center: HDR. In one regard, digital cameras are still pathetic: Compared with the human eye, they have terrible dynamic range. That’s the range from the brightest to darkest spots in a single scene. If you photograph someone standing in front of a bright window, you’ll get just a solid-black silhouette. The camera doesn’t have enough dynamic range to handle both the bright background and the person standing in front of it.
A partial solution: HDR (high dynamic range) photography. That’s when the camera takes three (or even more) photos—one each at dark, medium, and light exposure settings. Its software combines the best parts of all three, bringing details to both the shadows and the highlights. If you see this button, then your machine has a built-in feature that attempts to build an HDR shot automatically. This is the on/off switch.
Top Center: Self timer. Yes, kids, your machine has a self-timer. It works in both photo and video modes. It’s great for getting a self-portrait or a self-video when you don’t want to be right at the machine.
Tap this button once for a drop-down menu that offers two-, five-, or ten-second countdowns. Now when you hit the
 button, “3…2…1” countdown digits appear—and then the photo gets snapped, or the video begins.
Top Center: > (more controls). Opens a row of buttons for WB (white balance—that is, the photo’s overall color cast); ISO (light sensitivity—higher numbers add light to a dim scene, but increase the graininess); shutter speed (faster speeds freeze action better and eliminate blur, but may dim the scene); and exposure (overall lightness of the photo). When you select one of these buttons, a big control wheel appears at right that lets you dial in the setting you want for that setting. (“Auto” is always one of the options.)
Top right: Settings. The exact list of settings varies by PC. But a typical settings setup lets you specify what happens when you hold down the camera button (shoot video or capture rapid-fire burst-mode shots), the proportions of the photos you take (like 4 × 3, 3 × 2, or 16 × 9), what kind of composition gridlines you want superimposed on the preview, the quality and resolution of video you want to capture, whether you want image stabilization turned on, and so on.
“Time lapse” lets you turn on a feature that, in self-timer mode, keeps shooting photos automatically until you press the shutter button to stop it. “Capture living images” means that, when you take a picture, you’ll actually get a weird hybrid entity: a still photo with a one-second video attached (with sound). When you share it with another Windows 10 fan, they’ll see just what you see: a still photo that can “play back.” If you share it with anyone else, you’re asked whether you want to send it as a still photo or a one-second video.
The Camera Roll
To see the picture or video you’ve just captured, jump into the Camera Roll. It’s a special album that holds photos you took with this computer (as opposed to those you’ve rounded up from other sources).
The Camera Roll opens when you tap the lower-right screen icon, which looks like a miniature of your most recent snap. You’re now faced with handy buttons like Delete, Rotate, Crop, Edit, Print, and Share. Technically, you’re now in the Photos app, which is why you have to turn to “Editing Photos: The Mini Photoshop” to read about the functions of these buttons.
Character Map
Your computer is capable of creating hundreds of different typographical symbols—the currency symbols for the yen and British pound, diacritical markings for French and Spanish, various scientific symbols, trademark and copyright signs, and so on. Obviously, these symbols don’t appear on your keyboard; to provide enough keys, it would have to be the width of Wyoming. You can type the symbols, but they’re hidden behind the keys you do see.
The treasure map that reveals their locations is the Character Map (in your Windows Accessories folder). When opening this program, use the Font drop-down menu to specify the font you want to use (because every font contains a different set of symbols). Now you see every single symbol in the font. As you click on each symbol, a magnified version of it appears to help you distinguish among them. See Figure 8-9 for details on transferring a particular symbol to your document.
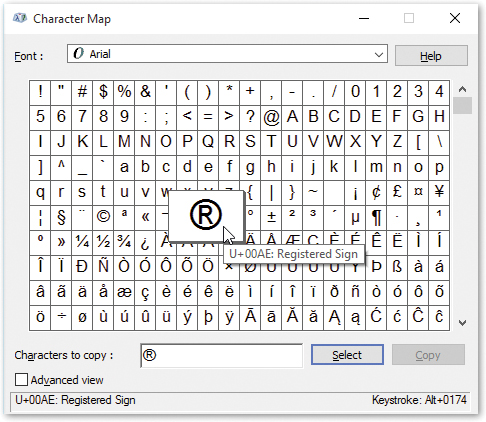
Figure 8-9. Double-click a character to transfer it to the “Characters to copy” box, as shown here. (Double-click several in a row if you want to capture a sequence of symbols.) You may have to scroll down quite a bit in some of today’s modern Unicode fonts, which contain hundreds of characters. Click Copy, and then close the window. When you’ve returned to your document, use the Paste command to insert the symbols.
Command Prompt
Command Prompt (in your Windows System folder) opens a command line interface: a black, empty screen with the time-honored C:> prompt where you can type out instructions to the computer. This is a world without icons, menus, or dialog boxes; even the mouse is almost useless.
Surely you can appreciate the irony. The whole breakthrough of Windows was that it eliminated the DOS command line interface that was still the ruling party on the computers of the day. Most nongeeks sighed with relief, delighted that they’d never have to memorize commands again. Yet here’s Microsoft’s supposedly ultramodern operating system, complete with a command line! What’s going on?
Actually, the command line never went away. At universities and corporations, professional computer nerds kept right on pounding away at the little C:> prompts, appreciating the efficiency and power such direct computer control afforded them.
You never have to use the command line. In fact, Microsoft has swept it far under the rug, expecting that most people will use the icons and menus of the regular desktop.
Tip:
Quickest way to open the Command Prompt: type command into the search box, and then press Enter.
If you have time and curiosity, however, the Command Prompt lets you access corners of Windows that you can’t get to from the regular desktop. (Commands for exploring network diagnostics are especially plentiful—ping, netstat, and so on.) It lets you perform certain tasks with much greater speed and efficiency than you’d get by clicking buttons and dragging icons. And it gives you a fascinating glimpse into the minds and moods of people who live and breathe computers.
Here are a few examples:
| Command | Purpose | Example |
|---|---|---|
| control | Opens a Control Panel applet | control date/time |
| ping | Checks to see if a server is responding | ping nytimes.com |
| ipconfig | Reveals your PC’s IP address | ipconfig |
| mkdir | Make directory (that is, create a folder) | mkdir Reports |
| copy | Copy files from one folder to another | copy c:Reports*.* Backup |
You can also type the true, secret name of any program to open it, quickly and efficiently, without having to mouse around through the Start menu. For example, you can type winword to open Word, or charmap to open Character Map.
To see the hundreds of commands at your disposal, consult the Internet, which is filled with excellent lists and explanations. To find them, Google Windows command line reference. You’ll find numerous ready-to-study websites that tell you what to type at the Command Prompt. (Here’s an example from Microsoft: http://bit.ly/bx0xo4.)
Connect
This simple app is the welcoming committee for Android-phone screen mirroring. That is, you can view what’s on your phone’s screen—on your PC’s screen. See “Projecting to Your PC”.
Control Panel
See “The Control Panel” for details on this ancient settings app (in your Windows System folder).
Cortana
Cortana, of course, is Windows 10’s voice-operated “personal assistant” (see Chapter 5). But opening this “app” in the Start menu does nothing more than open the Cortana home panel, as though you’d tapped the Cortana microphone button or pressed ![]() +C.
+C.
Feedback Hub
The New Microsoft isn’t some ivory tower; it seeks your input on bugs and design flaws at every turn. In fact, it’s dedicated a keystroke (![]() +F) to opening this app.
+F) to opening this app.
Most things you’re inclined to report have already been reported; millions of people are using Windows. That’s why, when you first choose the Feedback (![]() ) tab, you see a list of “trending” issues (things people are talking about)—and when you type your complaint into the “Give us feedback” box, you see matching, previously submitted gripes.
) tab, you see a list of “trending” issues (things people are talking about)—and when you type your complaint into the “Give us feedback” box, you see matching, previously submitted gripes.
If you hit “Add new feedback,” though, you get a full-blown reporting screen, complete with the option to attach a screenshot, a file, or your PC’s latest diagnostics file. If enough people agree with your report (and upvote it), Microsoft engineers may, in fact, take notice and fix the problem. Don’t expect a free T-shirt.
File Explorer
Here, in your Windows System folder, is the actual icon for the main file- and window-management interface described in Chapter 2.
Games
See “Microsoft Solitaire Collection” and “Xbox,” later in this chapter.
Get Help
Believe it or not, Windows 10 no longer comes with a built-in Help system. Instead, you can use the taskbar search box to find help by searching the web.
You also get this little app, though, which is something of a fakeout. “I’m Microsoft’s Virtual Agent,” says a smiling female cartoon, making you think you’re about to experience some kind of super-cool artificial-intelligence helper that understands plain English (Figure 8-10).

Figure 8-10. A for effort, Microsoft, but the Get Help virtual agent is virtually clueless about most questions. If you keep clicking “No” (that didn’t help me), you eventually get to options for reaching an actual person for actual help.
When you type your problem into the text box at bottom, though, you’ll quickly discover that the “virtual agent” is no more than a web search page. You get a bunch of links that include all kinds of results for operating systems, programs, and computers that don’t apply to you.
Fortunately, once you’ve struck out with the automated agent, you’re offered a “Talk to a person” link, with choices like “Call me back” (complete with estimated wait times), “Schedule a call,” “Chat” (including the number of people waiting their turns), and “Ask the community” (a bulletin board where you can see if other mere mortals know the answer to your question; patience is required).
Groove Music
At one time, Groove Music was Microsoft’s paid music service—its version of Spotify. In the end, Groove couldn’t find its groove, and Microsoft shut down the whole thing. Now, when you open up this old app, there’s an ad to download and install, if you can believe it, Spotify. That’s what Microsoft recommends for music subscriptions—the very service that killed off its own attempt.
Note:
The Groove Music app may still display nonfunctional vestiges of the old Groove service—buttons that say Download or “Make available offline,” for example. Just let them quietly rot by the side of the road.
The main menu column at left serves as the outline for the following pages’ worth of description.
Note:
Whenever music is playing, playback controls appear at the bottom of the window. They do just what you’d expect: Previous Song, Pause, Next Song, Volume, Shuffle, Repeat. There’s usually a scroll bar, too, showing where you are in the song and permitting you to skip to another spot.
Search
This search box finds everything from everywhere: songs, bands, albums; on your PC, in Microsoft’s music stores. As you type, a drop-down menu proposes name matches, to save you typing.
My Music
Here are all the physical music files (MP3 files, for example) that Groove has found in your Music folder or your OneDrive’s Music folder.
Note:
If certain files aren’t showing up, maybe they’re in a folder Windows isn’t looking for. Hit ![]() and then “Choose where we look for music” to show it the correct drive or folder.
and then “Choose where we look for music” to show it the correct drive or folder.
Use the Songs, Artists, or Albums buttons to specify how you want your music displayed. You see something like Figure 8-11.
In general, all three of these views are alike: They present all your music, grouped by album, performer, or individual song. At the top, four important controls appear:
Shuffle all. When turned on (appears in color), Groove Music will play back the music on this screen in random order. The number in parentheses shows you how many songs you’ve got.
Sort by. This drop-down menu lets you sort the music you’re examining by date, alphabetically by name, by year, by musical genre, or by performer.
Filter. This drop-down menu lets you show only the music files from one source or another: “Available offline” (you won’t need an Internet connection), “Streaming” (not actually on your computer—playing over the Internet), “Only on this device” (not showing what’s on your network or OneDrive), “On OneDrive,” “Purchased” (from the now-defunct Groove service), or “Groove Music Pass.” This item shows you whatever songs you’d downloaded from Groove Music while it was still alive and you were paying monthly.
Genre. Another drop-down menu. This one lets you see only the songs that are Country, Jazz, Pop, Rock, or whatever.
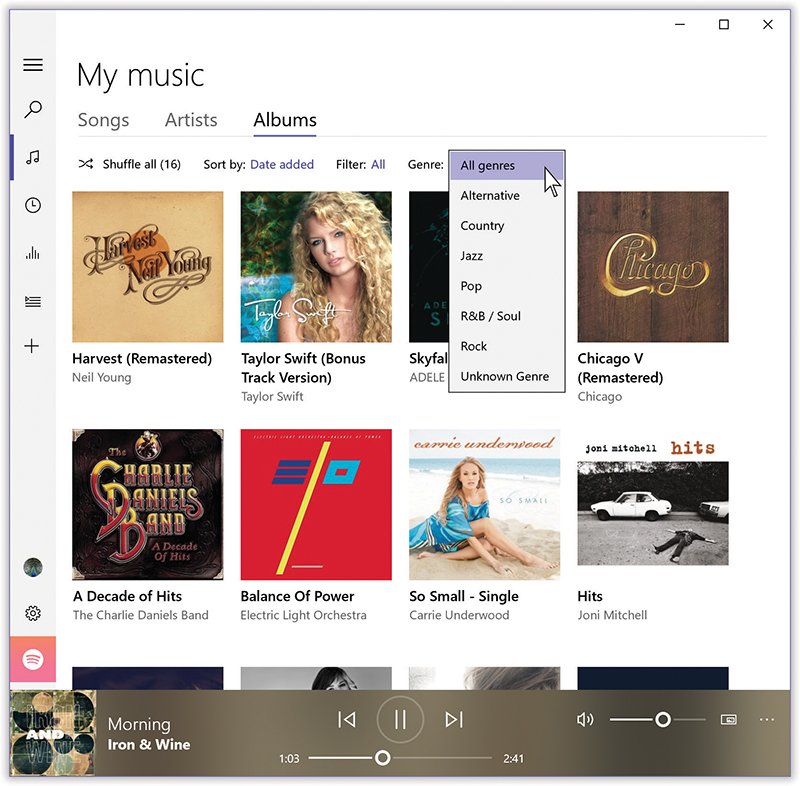
Figure 8-11. You can sort your music using the drop-down menus at top.
In Albums and Artists views, you see cover art like this. In Songs view, you see a simple table—a list—with columns for title, singer, album name, length, and year of release. The  button and + button (meaning “Add to a playlist”) also appear.
Whenever you’ve drilled all the way down to a list of songs (from a certain band or on a certain album, for example), checkboxes appear as you point to each song’s name. As soon as you start checking boxes, a strip of options appears at the bottom of the screen, referring to what you want to do with these selected musics: Play them, add them to a playlist (+), or delete them. There are also buttons for Cancel (select nothing) and “Select all.”
In Albums and Artists view, clicking or tapping takes you to further information screens, with options like Play, Add to (playlist), Show artist, Pin to Start, Edit Info, and Delete.
Recent Plays
Here’s a list of songs you’ve played lately.
Now Playing
Whenever music is playing, no matter how far you’ve meandered in Groove Music, the “Now playing” button in the list at left (![]() ) summons a full screen of information. It shows the album art, the list of songs from that album, and a “Save as a playlist” button.
) summons a full screen of information. It shows the album art, the list of songs from that album, and a “Save as a playlist” button.
Tip:
Groove Music’s taskbar icon sprouts basic playback controls that appear when you point to it (or tap with your finger).
Playlists
A playlist is a group of songs you’ve placed together, in a sequence that makes sense to you. One might consist of party tunes; another might hold romantic dinnertime music; a third might be drum-heavy workout cuts.
Creating playlists
To create a playlist, hit the + button next to the word Playlists in the list at left. Type a name for the playlist (“Rockout Toonz,” “Makeout Music,” whatever), and choose “Create playlist.”
Now a playlist icon called “Rockout Toonz” (or whatever you called your latest list) appears in the list of playlists at left. All you have to do is add songs to it. To do that, choose “+ Add to” at the top of the screen, or hit the + wherever you see it—on the “Now playing” screen, for example, next to any selected song name, or on the Albums and Artists pages for your collection.
Wherever it appears, it produces a drop-down menu of playlist names. Specify which playlist should be the new home for that song.
Editing, rearranging, and deleting playlists
To perform any kind of surgery to one of your playlists, select its name in the list at left.
The buttons below its name at the top of the screen let you add more songs (+), rename the playlist (![]() ), or delete it (choose … and then Delete).
), or delete it (choose … and then Delete).
You can also operate on the individual songs inside a playlist. Tap one of the songs; the – button next to the ![]() means “Delete this song” (from the playlist, not from your collection). You can also rearrange the songs by dragging them up or down the list.
means “Delete this song” (from the playlist, not from your collection). You can also rearrange the songs by dragging them up or down the list.
Tip:
Like many of the Microsoft Store apps, Groove Music is intended to be bare-bones and simple. It offers the basic functions and no more; for example, it doesn’t let you rip your audio CDs to your computer, edit song information, or create “smart playlists.”
If you’d prefer something a little fuller fledged, don’t forget that Windows Media Player is waiting for you back at the Windows desktop. Or you could download an even nicer, more complete free program like MusicBee. It’s available from this book’s “Missing CD” page at www.missingmanuals.com.
[Your Name]
The icon here reveals your name and account details.
Settings ( )
)
Here’s the full Settings page for Groove Music. Most of the options here are self-explanatory, but a few are worth noting:
Music on this PC. Here you tell the app which folders contain your music files. You can even import playlists from an existing copy of Apple’s iTunes.
Set Now Playing artist art as my lock screen. Cool: When your computer is sitting there, unused except as a jukebox, its Lock screen can show what’s playing right now.
Set Now Playing artist art as my wallpaper. Windows can even change your desktop wallpaper along with each song, showing the photo of the performer.
Mode. Do you prefer white text against black, or black on white?
Internet Explorer
For most purposes, Microsoft Edge (Chapter 9) is the Microsoft web browser you should use. It’s much faster, sleeker, and more secure than the Cro-Magnon browser Internet Explorer that came before it. (Or, better yet, use Google’s Chrome browser.)
But just in case there’s some legacy reason why you’re still married to a program that was born in 1995, Microsoft tucks it in here, in the Windows Accessories folder.
Magnifier
Magnifier, in your Windows Ease of Access folder, puts a floating magnifying-glass icon on your screen (Figure 8-12, top left). When you click it, you get the Magnifier toolbar (top right).
Magnifier creates various magnification effects—great when your eyes are tired or old, or when you’re trying to study something whose font is just too dang small.
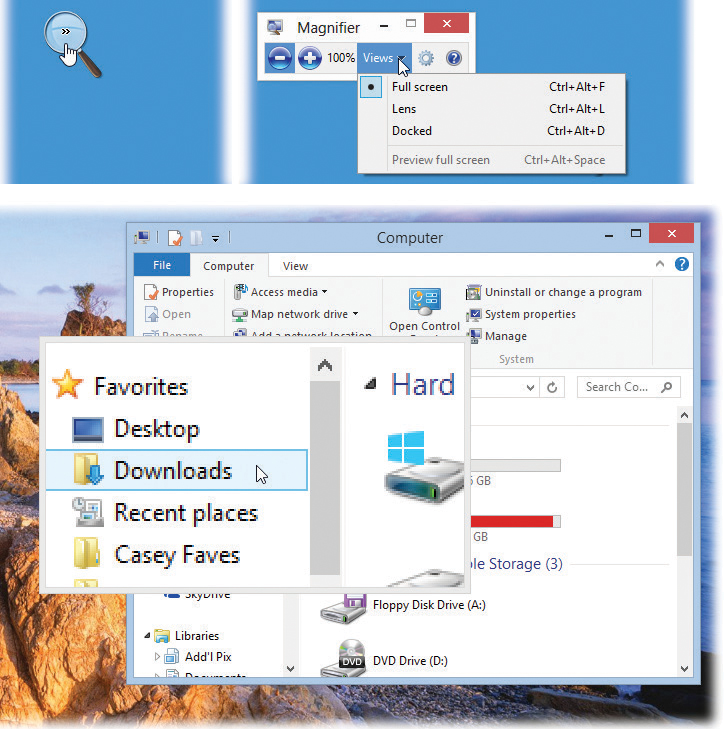
Figure 8-12. Top left: If you’d like to keep Magnifier handy, you can command it to shrink down to this tiny magnifying glass when you’re not using it. In  →→Ease of Access→Magnifier, turn on “Collapse to magnifying glass icon.”
Top right: In Lens or Docked modes, note that you can adjust the size of the magnified area by dragging its edge.
Bottom: In Docked mode, you can also tear the pane away from the edge of the screen so it becomes a floating window; just drag anywhere inside it.
Using the Views menu, you can choose “Full screen” (the entire screen image grows when you click the + button), “Lens” (you get a floating magnification inset that follows your cursor, as shown at bottom in Figure 8-12), or “Docked” (the top strip of the screen is one giant magnification inset; the rest of the screen is normal size).
In each case, the magnified area scrolls as you move your cursor, tab through a dialog box, or type, enlarging whatever part of the screen contains the action. Using Magnifier Settings (click the ![]() in the toolbar), you can specify how the magnification area should follow your cursor, change the zoom increments, set up Magnifier to open automatically when you sign in, invert the colors like a film negative, and so on. The Settings screen also reminds you of the keyboard shortcuts that let you operate these features.
in the toolbar), you can specify how the magnification area should follow your cursor, change the zoom increments, set up Magnifier to open automatically when you sign in, invert the colors like a film negative, and so on. The Settings screen also reminds you of the keyboard shortcuts that let you operate these features.
Tip:
Whenever Magnifier is turned on, you can zoom in or out with ![]() +plus or
+plus or ![]() +minus.
+minus.
The built-in Windows 10 Mail app is easy to use, it’s beautiful, and—especially if you have a touchscreen—it offers a fast, fluid way to work. It gets its own chapter in this book: Chapter 10.
Maps
Now that Windows is also a tablet operating system, a Maps program is more or less a must-have.
Maps (which is powered by Bing, which is powered by HERE Technologies) lets you type in any address or point of interest in the United States or many other countries and see it plotted on a map. It can give you spoken turn-by-turn driving directions, just like a dashboard GPS unit. It also gives you a live national Yellow Pages business directory and real-time traffic-jam alerts, if you have an Internet connection. You have a choice of a street-map diagram or actual aerial photos, taken by satellite.
Meet Maps
When you open the Maps app, you see—a map.
Note:
You may also see a question: Maps asks you if it’s allowed to use your current location, so it can show you where you are. The only reason to choose Block is if you think it’s creepy that Maps, and by extension Microsoft, knows where you are.
You can scroll in any direction. You can also zoom in or out, using any of the usual techniques (two-finger pinch or spread; turn the mouse’s scroll wheel). You can also double-tap or double-click to zoom into a particular spot.
Tip:
At the top of the Maps window (or bottom, depending on the window size), a toolbar of useful controls appears (see Figure 8-13). Among them: A … button with Share, Print, and Settings options. Settings contains some useful controls: kilometers versus miles, for example, Mode (dark or light color scheme), and the option to download maps so you don’t need an Internet connection to use them.
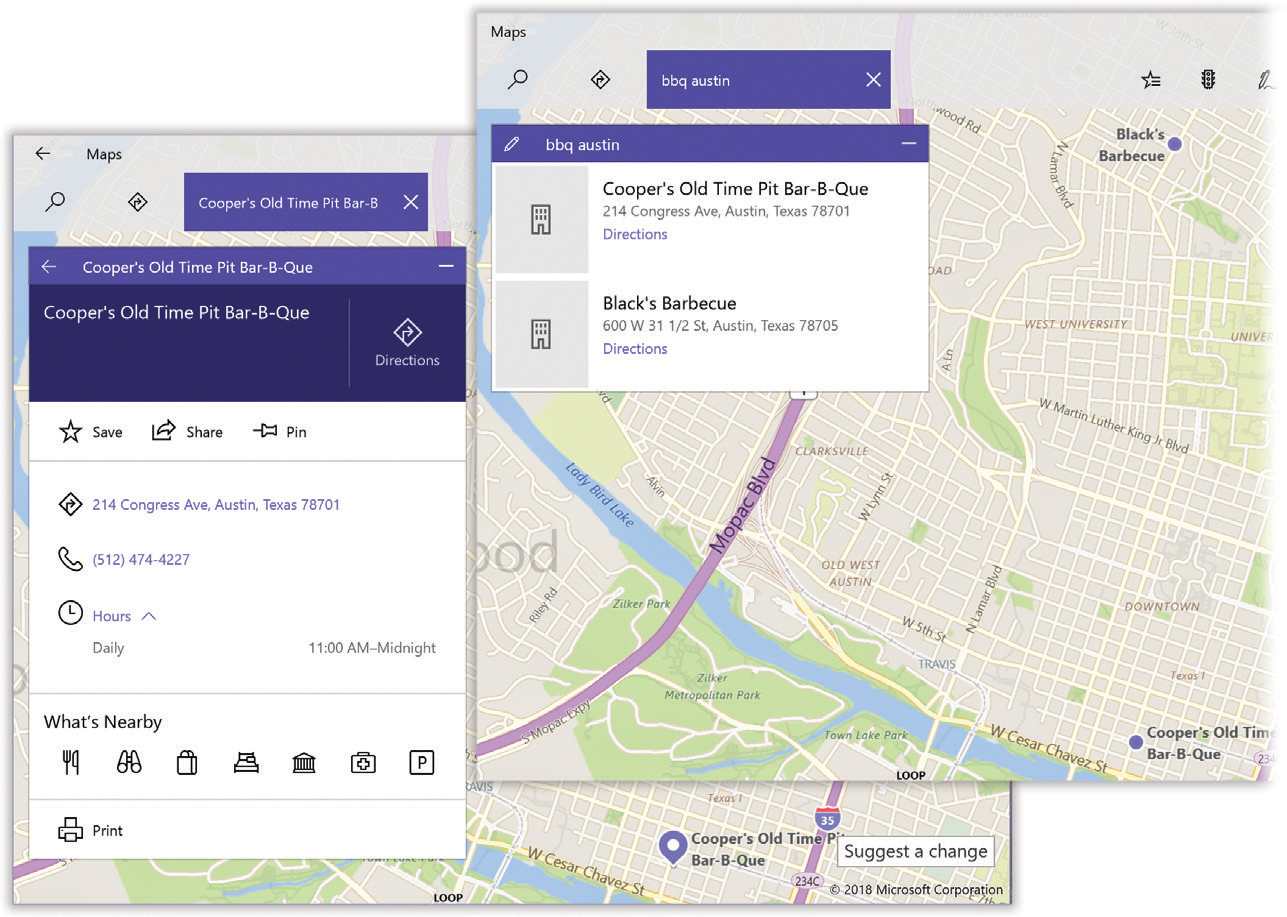
Figure 8-13. Right: When you search for something, Maps shows you the results as dots on the map.
Left: When you select a search result, Maps turns into a full-blown Yellow Pages. It shows you the name, address, phone number, ratings, and other information about the business, complete with buttons like Directions, Nearby, Website, Call, and Add to Favorites.
On the right: four awesome buttons. Here’s what they do, from top to bottom:
Rotate North to top. Click or tap to orient the map so that north is up. (Which seems like a “duh” function, until you realize that sometimes you’ll have rotated the map deliberately and need to get it back.)
Tilt. Angles the map in a sort of 3D-ish way. You might find that it better resembles those car-dashboard GPS displays this way.
Show my location. If you ever find that you’ve scrolled (or searched) away from your home location, this icon (or the Ctrl+Home keystroke) makes the map scroll and zoom until the “You are here” diamond is dead center on your screen.
Map views. This icon opens a palette of viewing options. “Aerial view” displays the map as satellite photos of the real world. Zoom in far enough, and you can find your house. (As opposed to the usual view—roads represented as lines—which Microsoft calls “Road view.”)
Turn on “Traffic” to see free, real-time traffic reporting—color-coded on major roadways, showing you the current traffic speed. Green for good traffic flow, yellow for slower traffic, and red for true traffic jams. You can even opt to see icons for Incidents (accidents and construction sites, for your stressing pleasure) or Cameras (speed-trap cameras—beware!).
If you don’t see any colored lines, it’s either because traffic is moving fine or because Microsoft doesn’t have any information for those roads. Usually you get traffic info only for highways, and only in metropolitan areas.
“Streetside” is Microsoft’s version of Google’s Street View, and is described next. And the Windows Ink toolbar (
 ) provides a palette of tools that, if you have a touchscreen and a stylus, let you draw or write notes onto the map (great for showing other people important places or directions) and measure distances.
Streetside
Streetside (Figure 8-14) is a mind-blowing way to explore maps. It lets you stand at a spot on the map and “look around.” You’re seeing actual photos of the street you seek; you can turn right or left and actually move through the still photos. It’s a great way to investigate a neighborhood before you move there, for example, or to scope out the restaurant where you’re supposed to meet someone.
(To create Streetside, Microsoft, like Google before it, has to drive specially equipped photography vans up and down every single road in the world, capturing photos and GPS data. So far, it’s done so only in the most populated areas of the U.S. and Europe, but it has big plans.)

Figure 8-14. The bluish tints on streets and towns indicate Streetside availability. In these areas, you can see, with photos, exactly what it looks like to be on the ground at a certain spot on the map. Drag to look around you. Click or tap farther down a road to jump there, or click in the navigation bar at bottom. (It may not appear if the window is too small.) Zoom with your mouse wheel, or by scrolling on the trackpad or pinching with two fingers on the touchscreen.
When you turn on Streetside (on the “Map views” palette), the map changes. If you zoom out enough, you’ll see puddles of blue shading in populated areas. These are the places where Streetside is available. Click there (or navigate there), and then proceed as shown in Figure 8-14.
Searching the Maps
You’re not always interested in finding out where you are; often, you want to see where something else is. To search Maps, hit ![]() and then type into the search box at top.
and then type into the search box at top.
Here’s what Maps can find for you:
An address. You can skip the periods (and usually the commas, too). And you can use abbreviations. Typing 710 w end ave nyc will find 710 West End Avenue, New York, New York. (In this and any of the other examples, you can type a zip code instead of a city and a state.)
An intersection. Type 57th and lexington, ny ny. Maps will find the spot where East 57th Street crosses Lexington Avenue in New York City.
A city. Type chicago il to see that city. You can zoom in from there.
A zip code or neighborhood. Type 10024 or greenwich village nyc.
A point of interest. Type washington monument or niagara falls.
A commercial establishment. You can use Maps as a glorified national Yellow Pages. If you type, for example, pharmacy 60609, blue numbered dots show you all the drugstores in that Chicago zip code. It’s a great way to find a gas station, a cash machine, or a hospital in a pinch.
Select a listing to see a full dossier about that place.
Tip:
You can tap or click either place. That is, you can tap a numbered circle to auto-scroll the info column to the corresponding description, or you can tap a description to auto-scroll the map to the corresponding numbered circle.
Directions
If you choose Directions (![]() ), you get two search bars, labeled A and B (Figure 8-15, top left). That’s right: Microsoft is literally prepared to get you from Point A to Point B.
), you get two search bars, labeled A and B (Figure 8-15, top left). That’s right: Microsoft is literally prepared to get you from Point A to Point B.
Type in two addresses, using the keyboard. After typing, press Enter or tap the ![]() .
.
Three features save you time here:
The A address may already say “My Location.”
If you’ve saved any locations as Favorites (described in a moment) or in Cortana preferences (“Setting Up Cortana”), then they appear here, too, for quick selecting.
As you type, Windows displays a tappable list of matching locations.
Once you’ve selected your A and B, hit “Get directions.” A choice of proposed routes appears on the map, showing the distance and the estimated time for your travel (Figure 8-15).
Three option icons appear above the directions summary. They let you specify how you’re planning to travel: by car, by public transportation, or on foot. Yes, that’s right: It’s turn-by-turn walking directions.
Tip:
Select ![]() to view some useful controls for things you might want to avoid—like Traffic, Toll roads, Unpaved roads, and Ferries. (Because there’s nothing like crashing into a ferry to ruin your day.)
to view some useful controls for things you might want to avoid—like Traffic, Toll roads, Unpaved roads, and Ferries. (Because there’s nothing like crashing into a ferry to ruin your day.)
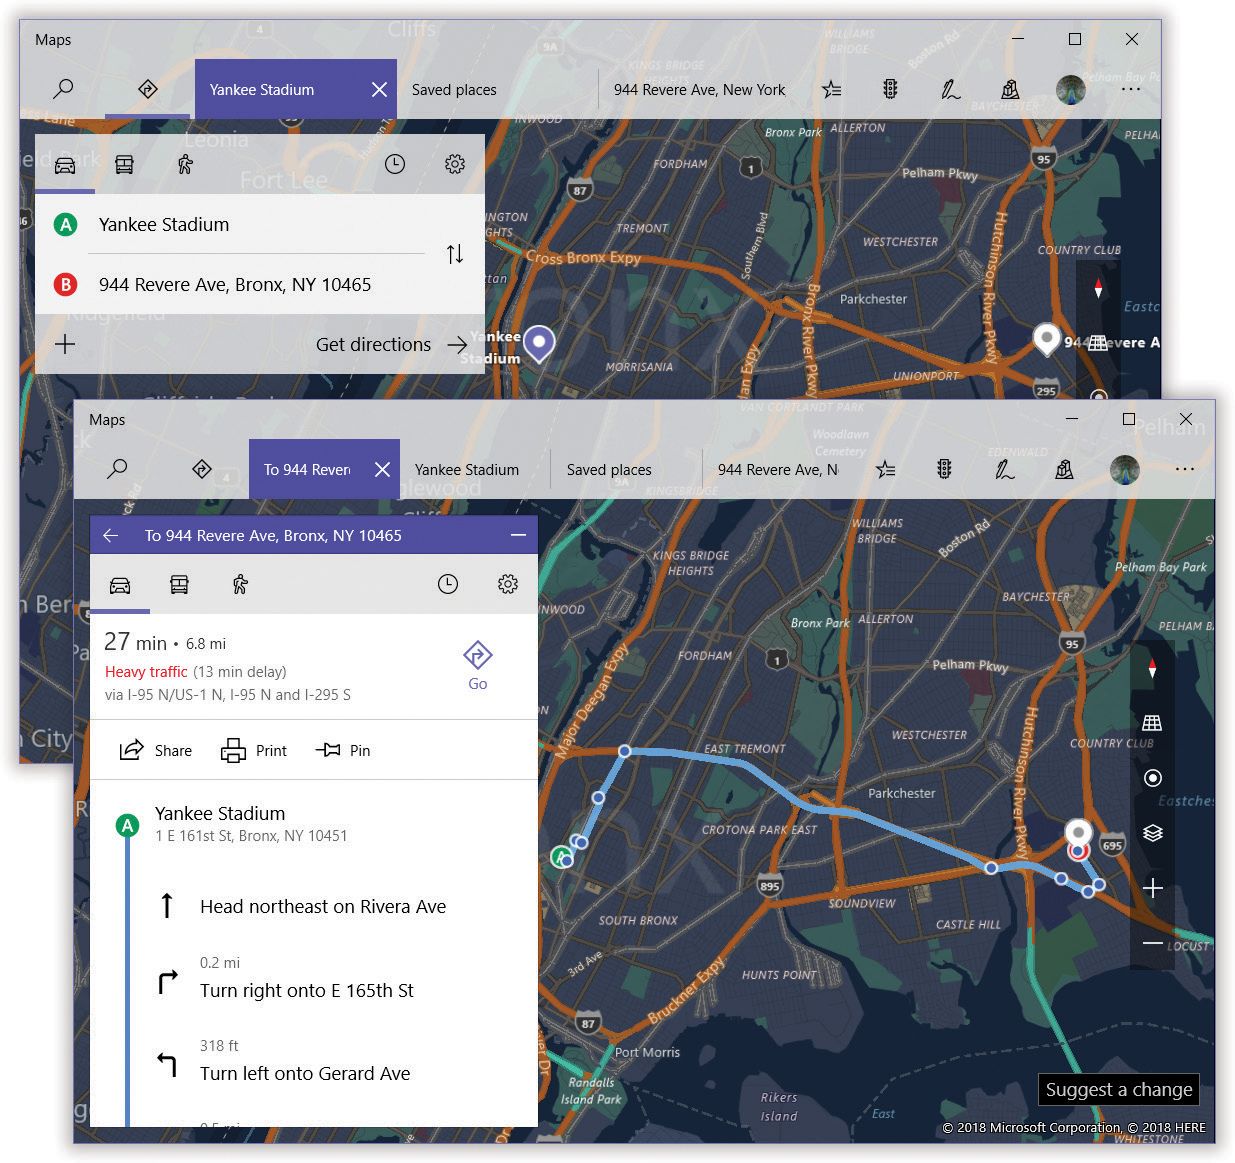
Figure 8-15. Top left: The Swap button ( ) switches the A and B locations, which is great when you want to find your way home again.
Lower right: Driving instructions include icons for accidents and construction. Tap one of those icons to open a panel describing the details and expected clearing time.
Choose the route you want. At this point, on a tablet, Maps is a full-blown GPS navigation app. It shows where you are as you drive, speaks turning instructions, and auto-scrolls the map as you drive. You can also hit the > at top right to view upcoming turns. (Hit the ![]() at top left to end the guidance.)
at top left to end the guidance.)
Favorites
If you’re like most people, you tend to live in one place. You probably have a home, and you may very well have a place of work. It’s possible you have a friend or two.
Fortunately, you don’t have to painstakingly re-enter these addresses every time you want directions someplace. You can designate any place, or even any set of directions, as a favorite; just tap the ![]() that appears on the information panel for any address or establishment. From the shortcut menu, choose Favorites, Home, or Work.
that appears on the information panel for any address or establishment. From the shortcut menu, choose Favorites, Home, or Work.
Once you’ve accumulated a few, it’s easy enough to call them up again: Tap the ![]() icon at top. Tap a Favorite place to see it on the map.
icon at top. Tap a Favorite place to see it on the map.
3D Cities
All the time Microsoft was trawling the world’s cities to create Streetside, described above, it was also assembling 3D Cities, which is closely modeled on Apple’s Flyover feature. It depicts certain cities (150 and counting) as three-dimensional models—like aerial views, except that you can peek behind buildings (Figure 8-16).

Figure 8-16. 3D Cities is a dynamic, interactive, photographic 3D model of certain major cities. It looks something like an aerial video, except that you control the virtual camera. You can pan around these scenes, looking over and around buildings to see what’s behind them.
To try it out, hit the 3D Cities icon (![]() ) on the toolbar. Choose from the list of cities. Here’s what you can try out if you have a touchscreen:
) on the toolbar. Choose from the list of cities. Here’s what you can try out if you have a touchscreen:
Move the map by dragging with one finger.
Zoom by pinching or spreading with two fingers.
Rotate the map by twisting two fingers.
Change your viewing angle by dragging up or down with two fingers.
If you have a mouse or trackpad:
Move the map by dragging.
Zoom by turning the mouse wheel (or dragging two fingers on the trackpad).
Rotate the map by pointing to the little compass needle (at the top of the vertical toolbar). A tiny rotation-arrow button appears on each side, which you can click to turn the map.
Change the viewing angle by adding the Shift key to the zooming method.
Offline Maps
Ordinarily, the Maps app gets its pictures of the world from the Internet, downloading them as you scroll. That generally works—except when you’re not online, or when you’re on an expensive cellular connection. In both cases, the solution is offline maps: Download the map images for a certain country before you go there.
To do that, go to ![]() →
→![]() →Apps→“Offline maps.” Hit “Download maps.” Choose a continent, and then a country, whose images you want to download now, while you still have an Internet connection. Windows tells you how much room each one will require. (There’s a “Delete all maps” button, too, so you can recover the space once your trip is over.)
→Apps→“Offline maps.” Hit “Download maps.” Choose a continent, and then a country, whose images you want to download now, while you still have an Internet connection. Windows tells you how much room each one will require. (There’s a “Delete all maps” button, too, so you can recover the space once your trip is over.)
You can also choose where you want the downloaded maps stored (“Storage location”), whether or not you want to download them when you’re on a cellular connection (“metered connection”), and if you want them updated as Microsoft improves the maps (“Automatically update maps”). That’s an acknowledgment that maps change all the time (roads are built, empires crumble).
Math Input Panel
This unsung little freebie (in your Windows Accessories folder) is intended for an elite group indeed: mathematicians with touchscreen computers. You’re supposed to write out math equations using your finger or a stylus and marvel as Windows translates your handwriting into a typed-out mathematical expression. (You can use this program with a mouse; it just might feel a little odd.)
Most of the time, you’ll want to use MIP when you’re writing in a word processor—preparing a math test for students, writing a white paper, whatever.
Note:
This program can insert its finished math expressions only into programs that recognize something called MathML (Mathematical Markup Language). Microsoft Word, Excel, and PowerPoint do, and so does the free OpenOffice.org.
If you have a touchscreen computer and you’re working in the Windows Journal program, you can also use MIP to analyze your previously handwritten math expressions and make them properly typeset. (Use the selection tool to highlight your handwriting, and then drag the expression into the MIP window.)
To use MIP on any other computer, write out the mathematical expression, as neatly as you can, in the writing area. In the Preview area (see Figure 8-17), you see Windows’ stab at recognizing your handwriting. If it’s all correct, tap Insert to drop the equation into your word processor. But if something needs correcting, you can show MIP what it got wrong in one of several ways:
Right-click the mistake. Or, if the mistaken transcription is more than one symbol, circle the error while pressing the right mouse button.
Tap the mistake while pressing your stylus’s button. (Or, again, circle the mistake while pressing the pen’s button.)
Click the Select and Cancel button. Now tap the erroneous symbol, or circle the larger part that’s wrong.
Tip:
It’s better to correct errors after you’ve written out the whole thing.
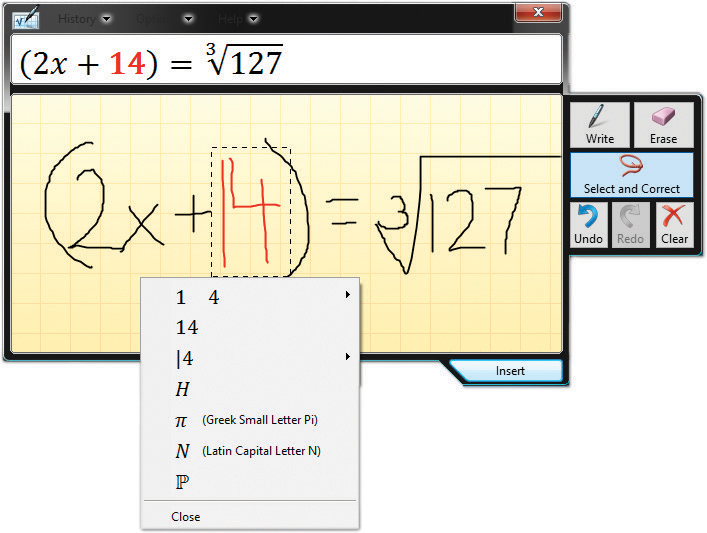
Figure 8-17. To correct an error in Math Input Panel, right-click the error. (Or use the Select and Correct tool to draw a circle around the problem.) Then, from the list of suggestions, tap the one that’s what you intended. (If none of the guesses are right, rewrite the portion you’ve selected.)
Immediately, a drop-down menu of alternative transcriptions appears. Proceed as shown in Figure 8-17. If the expression is now complete, tap Insert. If you have more to write, just keep on going. (If you got into symbol-correction mode by tapping Select and Cancel, then you have to tap Write before you continue.)
Tip:
You can tap any entry in the History menu to re-input an expression you’ve entered before. When you’re working on, for example, a proof, or a drill with many similar problems, that can save you a lot of time.
Messaging
Wouldn’t it be cool if you could send text messages from your PC to people’s phones? Yeah. But that’s not what Messaging is.
Note:
If that’s your goal, you need to download a special app from your carrier. Verizon, AT&T, T-Mobile, and Sprint each make a Windows app just for texting from your PC. (Verizon’s app is called “Message+,” for example. Its app is a mirror of what you see on your phone.)
Messaging is a very simple app for conducting text chats with other people who have Skype. (Yes, you can, and probably should, use the Skype app for that purpose; it’s not entirely clear why Microsoft decided to break Messaging out into a separate program.)
Microsoft Edge
Here’s Microsoft’s built-in browser. See Chapter 9.
Microsoft Solitaire Collection
To the shock of many, Microsoft killed off Solitaire back in Windows 8. The one, the only—for many people, the most-used app of all. But don’t panic. Windows 10 comes with a new, improved version of Solitaire—five different versions, in fact. (There are also links to download Bingo, Minesweeper, Sudoku, Mahjong, and four others, all free.)
Note:
Well, sort of free. Your game-playing experience is interrupted every now and then by 15- and 30-second video ads—including one that offers a Premium plan, where you pay $10 a year to get rid of the ads.
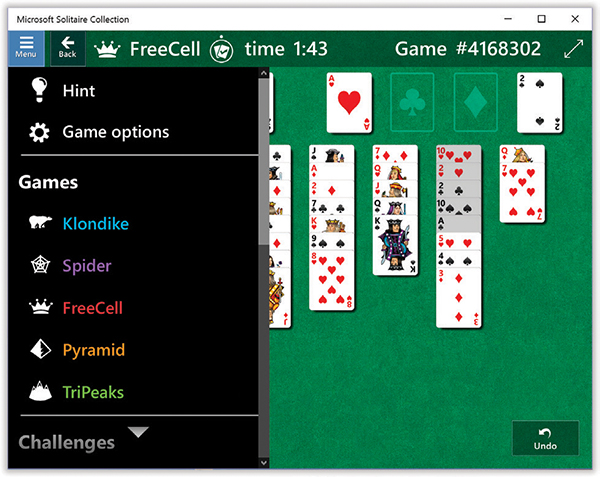
Figure 8-18. When you click the game you want to play, detailed instructions appear to help you.
Left: As always in a Microsoft Store app, the button at top left opens the main menu; in this case, it lists the five card games and gives you access to daily challenges, statistics, your Xbox account, and so on.
Improved not just because their graphics and gameplay are modernized and great, but also because they save their data as part of your online Microsoft account, so your impressive card-playing stats look similar no matter what computer (or Xbox console) you’re using.
When you fire up this app, dismiss or approve the first three administrative screens. You arrive at the game screen (Figure 8-18).
Microsoft Store
This is it: the Microsoft Store, source of many apps. Read all about it in Chapter 6.
Mixed Reality Portal
Mixed reality is Microsoft’s term for what the rest of the world calls augmented reality (AR).
In AR apps, you see graphics and information overlaid on the camera’s view of the world around you: arrows that show which way to walk to get to the nearest subway stop, for example, or info boxes that identify the prices of apartments in nearby buildings.
Microsoft is big on augmented reality. Its HoloLens headset, for example, is a pair of goggles that let you enter the mixed-reality world hands-free.
This app, the Mixed Reality Portal, is useless if you don’t own a HoloLens or another brand of Windows 10–compatible headset. It also requires some beefy hardware—very fast, very recent graphics processor, and at least 8 GB of memory .
This app is designed to be a sort of mission control: It displays, on the PC screen, whatever you’re seeing inside the headset. Using the menu, you can connect to a new headset or other controller (“Set up controllers”), turn the invisible game boundary on or off, create a new boundary (“Run setup”), or download more AR apps (“Get mixed reality apps”).
The Settings menu offers controls for uninstalling your AR hardware.
Mixed Reality Viewer
In case you missed the description above: Mixed reality is Microsoft’s term for what the rest of the world calls augmented reality (AR). This cute little app lets you dabble in AR without having to own a fancy AR headset. It’s basically a camera app that lets you add 3D objects to your camera’s feed and capture the result as a graphic. See Figure 8-19.
Begin by choosing a 3D image. The Remix 3D button lets you search Microsoft’s online catalog of 3D images, or you can import a 3D model you’ve made in Paint 3D (“Paint 3D”).
When you hit the “Mixed reality” button, your computer’s camera turns on. (As you’d guess, this app works better on a tablet than a laptop.) Click or tap to indicate where you want to place your object. You can now fiddle with the 3D object’s size and rotation in space—and, when it looks good, select the normal camera-snap button to preserve the resulting hybrid image.
Note:
You can do exactly the same thing in Paint 3D and even Photos; see “Photos”. Apparently, Microsoft really doesn’t want us to miss this feature.
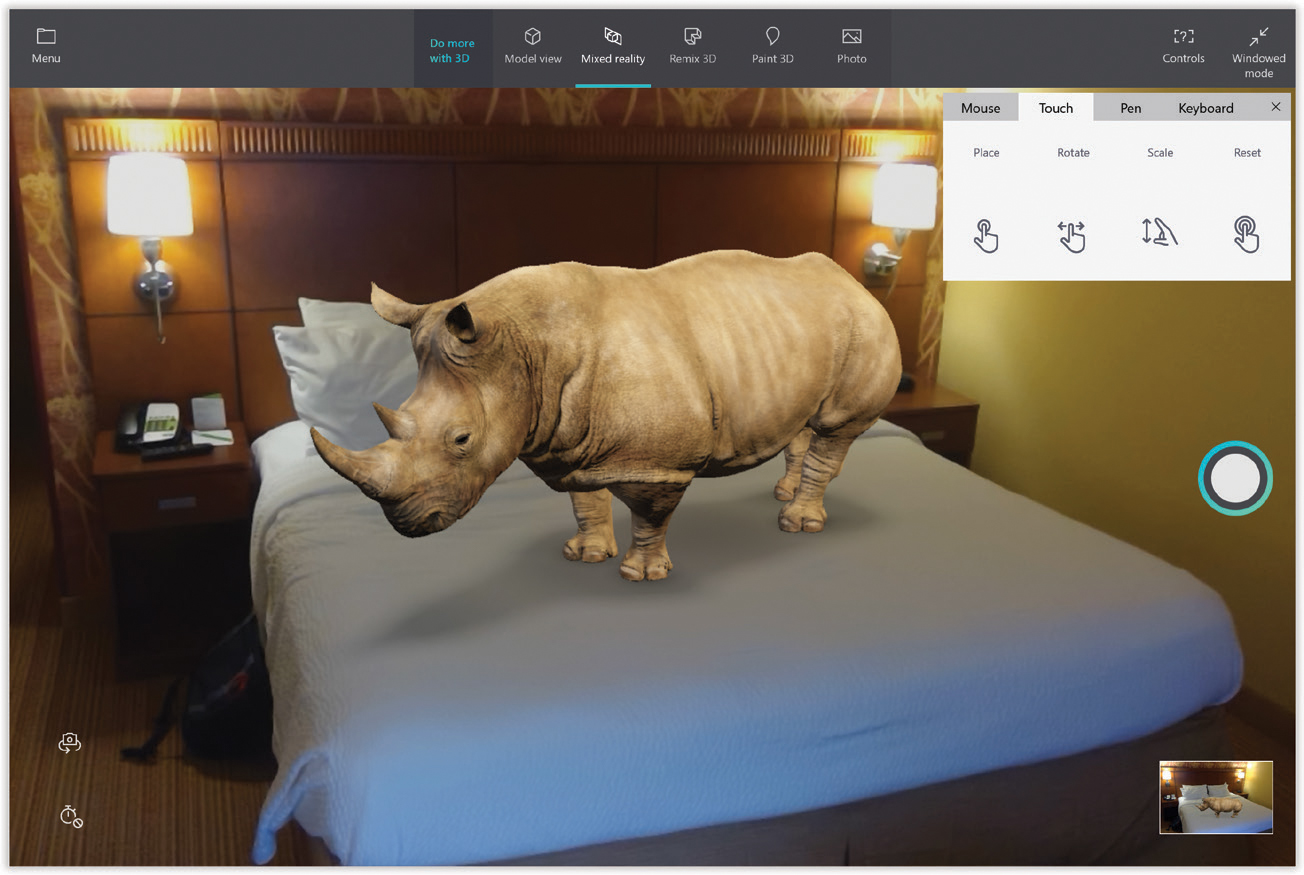
Figure 8-19. Mixed Reality Viewer might be useful, Microsoft says, for “a home decorator helping a client to visualize what a couch would look like in their living room, or a teacher demonstrating to students the size and scale of the Mars Rover.”
Mobile Plans
This weird little app exists solely to let you sign up for a cellular-data plan through the Microsoft Store. It’s useful only if you have a tablet or laptop with a cellular modem and SIM card, like the one in a phone.
Movies & TV
The Microsoft Movies & TV Store is exactly like the iTunes store, or the Amazon video store. It’s a place where you can either buy or rent movies and TV episodes—and watch them. Actually, it’s more of a sales agent for the video section of the regular Microsoft Store. In fact, if you click one of the movie-poster buttons, you’re taken out of this app and into the Microsoft Store to do your actual shopping.
At the top are three tabs: Explore (meaning “shop”); Purchased (where your rented and bought movies show up); and Personal (your own videos). When you click a video’s name, you get an info screen about it. When you click the Play triangle next to a video’s name, you open the main player screen—and the video plays. And whenever you wiggle your mouse or tap the screen, you get the playback controls shown in Figure 8-20, bottom.
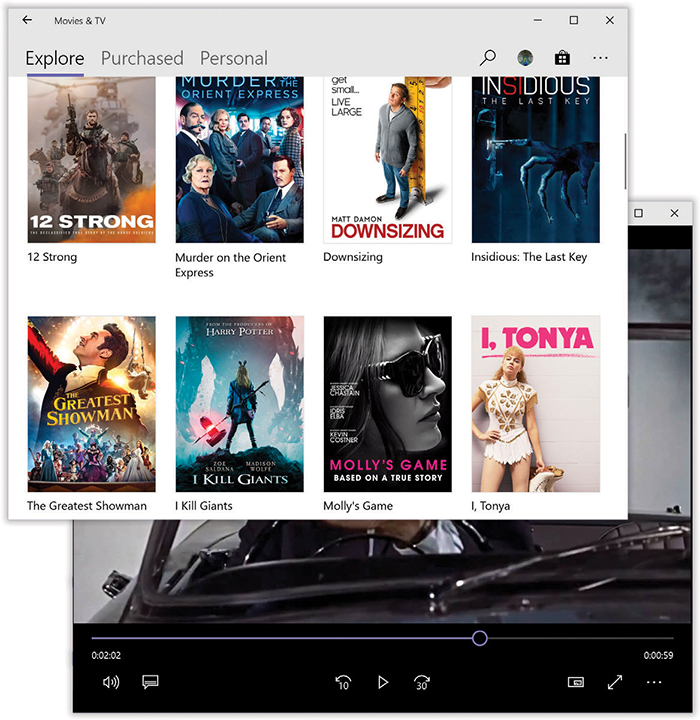
Figure 8-20. From left to right, the playback controls are Cast to Device  (sends to a TV equipped with a Miracast receiver); Aspect Ratio
  (makes the video big enough to eliminate any black bars at the edges of your screen, even if that means some of the image is now chopped off); a Play/Pause button; a Closed Captions (CC) on/off button; Volume; Full Screen; and Repeat on/off. That, obviously, is intended for families with children who watch Frozen over and over until they go to college.
Narrator
Narrator began life as a little program that could read aloud certain items on the screen, like dialog boxes and error messages. But it’s had a huge upgrade. Now it can read anything on the screen. If you’re visually impaired, you may find that Narrator comes very close to serving as a basic screen reader. It can describe every item on the screen, it can describe the layout of a web page, and it can make sounds to confirm that you’ve performed a touchscreen gesture correctly.
Even if you’re not blind, Narrator (in your Windows Ease of Access folder) is still handy. It can read your email back to you, or read web articles as you’re getting dressed in the morning.
When you open Narrator, you wind up at its Settings dialog box (Figure 8-21)—and the voice of Microsoft David (no relation) starts reading everything on the screen.
As you’ll soon discover, mastering Narrator takes a lot of time and patience; it’s something like a complete operating system in itself. But here are the basics.
Tip:
Instead of having to burrow through the Start menu to find Narrator, you can press ![]() +Ctrl+Enter at any time to start and stop it.
+Ctrl+Enter at any time to start and stop it.
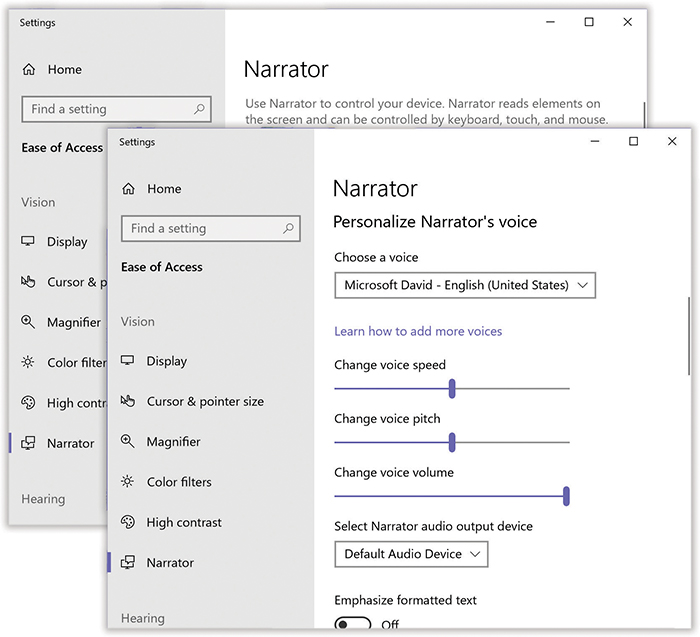
Figure 8-21. Narrator’s entire visual presence is nothing more than this Settings dialog box—and a colored rectangular frame that moves around the screen as you touch it (or arrow-key it). Whatever the frame encloses, Narrator speaks. That way, you can figure out where you are on the screen even if you can’t see it.
Touchscreen Basics
Narrator is especially important on touchscreen computers; if you’re blind, how else are you supposed to navigate the screen?
Drag your finger around the touchscreen; Narrator speaks everything you touch, so that you can get a feel for the layout of things. You can also tap to hear a single item identified; you don’t have to worry about opening something accidentally.
Of course, if touching something makes it say its name, then how are you supposed to open it? Simple: Add another tap. That is, you double-tap when a single tap usually works (or press-and-hold) and triple-tap when you’d ordinarily double-tap.
To see the master cheat sheet of touch gestures in Narrator (and to hear it read to you), tap three times with four fingers against the screen. You’ll learn essential tips like these:
| To do this… | …Use this touch command |
|---|---|
| Stop Narrator from reading | Tap once with two fingers |
| Read current window | Swipe up with three fingers |
| Click | Double-tap |
| Double-click | Triple-tap |
| Start dragging | Tap with three fingers |
| Show/hide Narrator window | Tap with four fingers |
| Move to previous/next item | Flick left/right with one finger |
| Scroll | Swipe any direction with two fingers |
| Tab forward and backward | Swipe left/right with three fingers |
There’s a lot more to Narrator. For instructions, see the free downloadable PDF appendix “Narrator” on this book’s “Missing CD” page at www.missingmanuals.com.
News
The News app is a free, daily, full-screen magazine. News grabs articles from over 300 different big-name news websites: The New York Times, The Wall Street Journal, The New Yorker, CNN, The Huffington Post, and so on. But it reformats everything into one uniform, attractive, screen-friendly layout (Figure 8-22).
Scroll down to see headlines and teaser blurbs for other articles; use the section buttons across the top to view sections—Top Stories, Technology, US, Good News, and so on. Each button takes you directly to a similar spread of photos, headlines, and blurbs just for that section.
Note:
These section buttons scroll horizontally—far enough to include all of your interests.
Customizing News
It turns out that your News app is customizable. You can ask it to bring you stories about your favorite actor, your favorite toothpaste, or even you.
When you select Interests in the menu column, you see a scrolling list of topic tiles—the same ones that appear across the top. You can tap or click to turn off the ones you don’t want cluttering up your newspaper.
You can also add topics or news sources at this point. Each of the categories before you (Featured, News, Entertainment, and so on) offers subcategories that you can turn on with just a click or tap on the + button. (Or click the tile not on the + button to get a preview of what you’ll see there.)
Or hit + at the top and type in anything you like; as you type, News shows you matching topics or sources. Click the one you want. Waterski magazine. Electric cars. Seedless watermelon. Whatever you might like your customized newspaper to show you.
You can add as many new topics as you like.
Tip:
In the Windows 10 April 2018 Update, the Health & Fitness, Money, and Sports magazine apps no longer exist. But everything in them lives on here in News. For example, on the Add Interests page, under Lifestyle, you can add everything that used to be in Sports: MLB, NFL, NBA, Soccer, and so on.
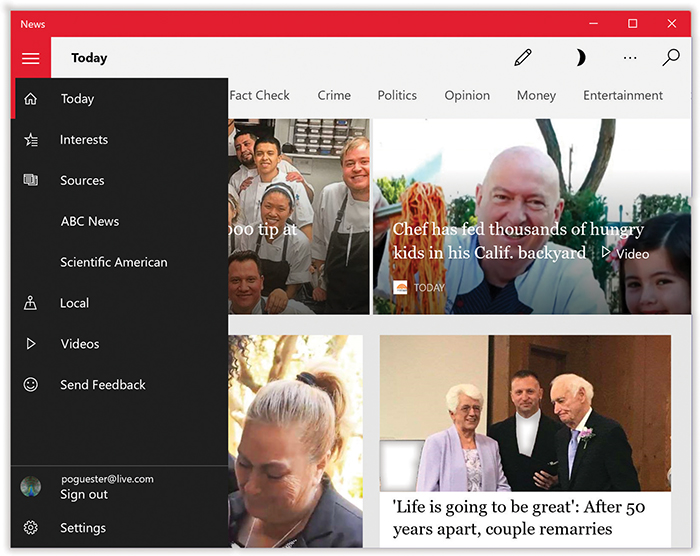
Figure 8-22. No hard-to-read color schemes or ugly fonts. No blinking ads, banners, or obnoxious animations. If the 300 publications presented here pique your interest at all, then the News app is, for sure, the way to read them.
The other icons in the menu column at left include these:
Sources. Here’s where you can view or search all 300 news sources that News can access. “Favorite” a few, and then you can jump directly to those publications in the left-side menu bar. Or see all their stuff in one place, on the My Sources tab.
Local. If you grant the app access to your location, it automatically presents articles from your local newspapers and websites—no charge.
Video. This section gives you direct access to videos from Bing’s multitude of sources. That’s something a typical printed magazine doesn’t usually offer.
Especially on a tablet, wow—News is one of the best things to come along since hyperlinks.
Notepad
Notepad (in your Windows Accessories folder) is a bargain-basement text editor, which means it lets you open, create, and edit files that contain plain, unformatted text, like the ReadMe.txt files that often accompany new programs. You can also use Notepad to write short notes or to edit text that you intend to paste into your email program after editing it.
Notepad Basics
Notepad opens automatically when you double-click text files (those with the file extension .txt). You can also find it by typing notep in the search box (“The Search Box”).
You’ll quickly discover that Notepad is the world’s most frill-free application. Its list of limitations is almost longer than its list of features. For example, the Notepad window has no toolbar and can work with only one file at a time.
Above all, Notepad is a text processor, not a word processor. That means you can’t use any formatting at all—no bold, italic, centered text, and so on. That’s not necessarily bad news, however. The beauty of text files is that any word processor on any kind of computer—Windows, Mac, Unix, whatever—can open plain text files like the ones Notepad creates.
About Word Wrap
In the old days, Notepad didn’t automatically wrap lines of text to make everything fit in its window. As a result, chunks of text often went on forever in a single line or got chopped off by the right side of the window, which could produce disastrous results when you were trying to follow, say, a soufflé recipe.
Now lines of text wrap automatically, exactly as they do in a word processor. But you’re still seeing nothing more than the effects of the Format→Word Wrap command—an option you can turn off, if you like, by choosing the command again. (You can tell when Word Wrap is on by the presence of a checkmark next to the command in the Format menu.)
On-Screen Keyboard
In the new world of touchscreen tablets, not everyone has a physical keyboard. Windows 10 offers this onscreen version (in your Windows Ease of Access folder), which is described in “The Onscreen Keyboard”.
OneDrive
This “app” is just a shortcut to opening your OneDrive folder, described in “OneDrive”.
OneNote
“OneNote” isn’t really a good name for this program, since its whole point is to create and organize lots of notes.
But never mind that; be grateful you’re getting it free—albeit in a simple, touchscreen-friendly edition. (Actually, the full version is free, too. Go get it!)
Notes can be anything (Figure 8-23). Driving directions, recipes, to-do lists, stuff you paste in from the web or email, brainstorms—anything you might want to refer to later. OneNote is a notepad and a scrapbook in one.
The beauty of it is that these notes sync via the Internet. You can refer to the same set of notes on any Windows device—phone, tablet, computer—and even Android, iPhone, or Mac. (Just download the OneNote app for each one.)
To create a new note, hit Add Page, or (if the window is too narrow to see it) you can press Ctrl+N. Type a name for this note.
The tabs across the top let you access these toolbars:
Home. Here’s formatting (bold, italic, underline, font choice), lists (like bullets, numbered lists, or checkboxes), and paragraph formatting (like Centered).
Insert. Your note can include a table, another file on your computer, a photo, or a web link.
Tip:
If you insert a picture, you can resize it by dragging the corners. You can also rotate it: Right-click it (or hold your finger down on it); from the shortcut menu, choose Rotate.

Figure 8-23. In OneNote, all kinds of data can coexist on the same note: typing, drawing, photos, to-do lists, and so on. All of this gets auto-synced to any other device that has OneNote running.
Draw. This is the “touch-enabled” part. You can draw with your finger (or, more clumsily, a mouse). The tools include an eraser, a highlighter, a pen, and a color palette. Tap one of the freehand pens, Shapes (canned geometrical shapes), or Ink to Text (write freehand, let the app straighten your lines), and then draw on the screen.
View. Here’s how you can zoom in or out, change the background color, superimpose faint blue lines like the ones in a paper notebook, and so on.
As you create your notes, they’re listed in a table of contents on the left side. Some profoundly useful options appear if you right-click one (or hold your finger down on one)—like Delete Page, Rename Page, Copy Link to Page, and Pin to Start. That one creates a tile on the right side of your Start menu—a great way to get instant access to something you refer to a lot, like your list of credit cards, things to do, or an essay in progress.
There are a few miscellaneous settings in Settings (in the … menu), the ![]() icon lets you type plain-English commands (like “add a bullet list”), and the far left column (which appears when the window is wide enough) lets you create additional notebooks. That’s right: multiple notebooks full of multiple notes. OneNote really isn’t the right name for this app.
icon lets you type plain-English commands (like “add a bullet list”), and the far left column (which appears when the window is wide enough) lets you create additional notebooks. That’s right: multiple notebooks full of multiple notes. OneNote really isn’t the right name for this app.
Paint
You can use Paint (in your Windows Accessories folder) to “paint” simple artwork or to edit graphics files from other sources. You might say Paint is something like Adobe Photoshop (well, in the same way you might say the local Cub Scout newsletter is something like The New York Times). Common tasks for this program include making quick sketches, fixing dust specks on scanned photos, and entertaining kids for hours on end.
When you first open Paint, you get a small, empty painting window. Go like this:
From the File menu, choose Properties to specify the dimensions of the graphic you want to create. Click OK.
Later in your life, you can revisit that command to adjust your graphic’s dimensions.
Click a tool on the Home tab, like the Pencil.
If you need help identifying one of these tools, tap it, or point to it without clicking. A tooltip identifies the icon by name, with a help message.
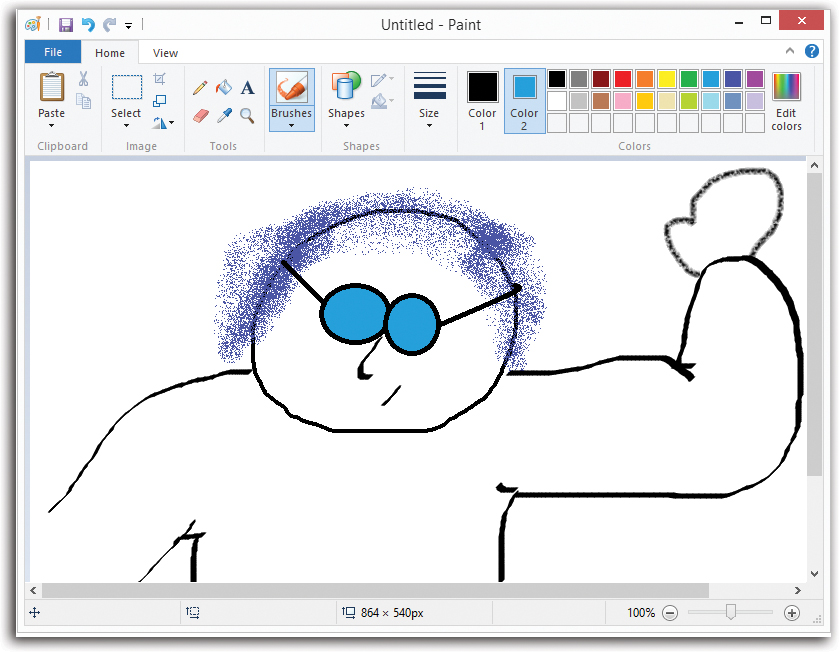
Figure 8-24. The Paint tools include shapes, pens for special uses (straight lines and curves), and coloring tools (including an airbrush). The Select tools don’t draw anything. Instead, they select portions of the image for cutting, copying, or dragging to a new location.
Click a “paint” color from the palette.
You may also want to change the “brush” by clicking the Brushes palette, where you’ll find options like the spray-paint splatter shown in Figure 8-24.
If you’ve selected one of the enclosed-shape tools, use the Fill drop-down menu to specify a texture (Watercolor, Crayon, or whatever); click Color 2, and then a color swatch, to specify the color for the inside of that shape.
Some tools produce enclosed shapes, like squares and circles. You can specify one color for the border and a second color for the fill inside.
Finally, drag your cursor in the image area (see Figure 8-24).
As you work, don’t forget that you can Undo (press Ctrl+Z), “taking back” the last painting maneuvers you made. For fine detail work, zoom in using the lower-right magnification slider (or the zoom controls on the View tab).
Paint can open and create several different file formats, including BMP, JPEG, and GIF—every file format you need to save graphics for use on a website.
Tip:
Paint also offers a nifty way to create wallpaper. After you create or edit a graphic, open the File menu. Choose “Set as desktop background.” From the submenu, choose Fill, Tile, or Center to transfer your masterpiece to your desktop.
Paint 3D
Despite its name, Paint 3D isn’t just a 3D version of Paint; it’s much more powerful. It’s one of the simplest, easiest-to-use 3D modeling apps ever written. You can use it to create creatures, buildings, designs, or scenes that are “three-dimensional,” meaning that you can turn them around in space to look at them from different angles.
Once you’ve built a 3D object, you can stamp it into a photo you already have, or into a live scene from your computer’s camera (“Microsoft Store”). If you really like what you’ve made, you can show it off on Microsoft’s Remix 3D community website. And if you really, really like it, you can print it in plastic on a 3D printer or through an online 3D-printing service.
Artistic Tools
When the app first opens, it presents a Welcome screen; hit Start to get going. Now, on the top toolbar, eight icons make up your artistic arsenal. (To identify them, point without clicking, or tap with your finger—or just hit … to make their text labels appear.) Here’s what they do:
Brushes. Lets you draw or write on any object with a marker, calligraphy pen, oil brush, watercolor, pixel pen, pencil, eraser, crayon, spray can, or paint can. Just pick a brush, a thickness, an opacity, a color, and a texture—and go to town.
2D shapes. Gives you options to make lines and curves, as well as 24 canned line shapes: squares, triangles, arrows, stars, checkmarks, and so on. Once you create a shape, you can 3D-ify it or leave it 2D, whereupon it wraps itself to whatever object is behind it.
3D shapes is the heaviest hitter, object-creation–wise. It opens a panel at right with these major components:
3D models are ready-to-use basic objects: male-ish, female-ish, dog, cat, and fish, along with a “Get more models” button.
3D objects are shapes you may recall from geometry class—cube, sphere, cylinder, cone, and so on.
3D doodle. What if you want to make your own shape? Here you get a hard-edged drawing tool and a soft, pillowy version.
In each case, the process goes like this. First, select the model, object, or doodle tool you want. Then choose a color from the palette (or use “Add color” to specify your own shade), and a material from the drop-down menu (Matte, Gloss, Dull metal, Polished metal).
To create your object, drag in the drawing area. If you’re using the model or shape tool, your drag determines the size of the object; if you’re using its Doodle tool, sketch a complete shape (for example, a cloud). Boom: A 3D object is born. You can select it, rotate it, shrink it, enlarge it, or change its color later, as described below.
Stickers. This tool wraps 2D images, as though they’re stickers, onto 3D objects (see Figure 8-25). The app starts you out with fun, cartoony ones: mouths, moustaches, noses, eyes, and so on. The next tab offers a choice of textures: rocks, tree bark, concrete, marble. These may be buried, but they’re important. They let you transform your featureless, plastic 3D blobs into realistic real-world objects. The animators at Pixar use exactly the same technique—although they use software that’s much, much, much more sophisticated.

Figure 8-25. Top: Select a sticker and then click or tap a 3D object to make it cling there. Pull the corners to change its size; drag the
 button to rotate it. To stamp the same image repeatedly, use the
  button. The
  makes it stick.
The finishes on the Textures tab act like stickers. Here a spot of wood has been enlarged to cover a generic block. (The third tab lets you rifle through your own files for images to use as stickers.)On the last tab, you can add your own sticker from any image file on your PC. You might, for example, start taking your own photos of the perfect textures, or import clip art from the pros. See Figure 8-25.
Text. This tool lets you type in 2D or 3D. Whatever you type in 2D ends up sticking itself to the canvas in the back; anything you type in the 3D tool gains a little thickness and hangs wherever you place it (visible in Figure 8-25).
Effects includes 22 lighting effect filters—including several straight from Minecraft, like medium-blue “Day,” maroon “Nether,” and the ominous-feeling “The End.” Drag the sun icon around the light wheel at the bottom of the pane to move the light source; this effect is particularly impressive if you have chosen “Gloss” or “Polished metal” finish for any of your models.
Canvas. This tool controls the 2D background—the white rectangle Microsoft calls the canvas. Using this pane, you can resize the canvas, rotate and flip it, turn it on or off, or make it transparent—like a piece of clear glass that you can still draw, stick, or write on.
Note:
The canvas in most drawing programs marks the outer limits of the working space. But in Paint 3D, the canvas is just another object. You can layer things in front of it, to the sides, behind it, or even cutting through it.
3D Library is a rabbit hole into a searchable online library containing over a million 3D objects. You’re free to drop any of them into your artwork. (You can also get here with the “Get more models” button on the 3D shapes pane.) The library is part of what Microsoft calls the Remix 3D online community; you’re welcome to upload your own objects to it, too.
To the right of these are the Paste, Undo, History, and Redo icons.
Other Tools
Underneath that bank of art-creating tools is a set of icons that let you manipulate your work and look at what you’ve made. Here’s what they do:
Select. Every object you create is automatically selected at birth—it glows teal and sprouts handles that let you rotate it and push it backward or forward (see Figure 8-26). But what if you wander away and want to select that thing again? Hit this icon and then select your object.
On the 3D selection pane at right, hit “Edit color” to change the color and texture; “Select all” to select and edit all of the objects in the file at once; Multiselect to add objects to your selection one by one (holding down Shift while selecting also does this trick); Group to join multiple objects to manipulate them simultaneously (and Ungroup when you’re done with that); and the usual cut, copy, paste, delete, and flip options.

Figure 8-26. When you select an object, it sprouts eight handles you can drag to resize it. You also get four round handles; the arrows inside indicate how it moves your shape. For example, the one on the bottom rotates the object as though it’s on a turntable; the one above rotates the object like the hands of a clock. The handle on the left pushes the object toward or away from you.
Magic select. Say you want to put your friend into your 3D world, but you don’t want the background of the photo. This tool lets you pull just what you want from any 2D image.
First, insert a picture from your PC by hitting the Menu icon at top left, and then choose Insert. Now choose “Magic select” (
 ).
).As directed by the hints in the right-side panel, start by dragging the handlebars inward to crop the photo down to, for example, the subject’s face or body. When you hit Next, Paint 3D does its best to isolate the element you were going for; see Figure 8-27.
When you hit Done, your friend pops out from the background, now transformed into a floating layer. You can move it around, rotate it, resize it, and see it from any angle, including from behind. The background, meanwhile, remains; incredibly, Paint 3D even attempts to fill in the hole your friend left behind.
Crop. This tool crops your 2D object—the canvas. Drag the handles to taste, and then hit the green checkmark.
Mixed reality. This funky tool turns on your PC’s camera and superimposes your 3D creations onto the camera’s feed—which is most likely you, looking at your computer screen.
An animated hand appears to demonstrate what’s about to happen: your objects will stick wherever you click or tap. For instance, if you tap your forehead, your objects drop onto your forehead; at that point, if you move in real life, they move with you. Click again, and they move wherever you newly clicked.
To rotate the objects, drag them. To scale them up or down, pinch and zoom with two fingers, as on a phone, or turn your mouse wheel. On the right of your screen is a big, white circle—hit it to capture the hybrid screen image. To go back to editing your work, use the Paint 3D icon (
 ) at the top.
3D view. In this very helpful view, you can turn the whole masterpiece in space—up, down, tilted, rotated, and so on. There are several ways to see your work from any angle—or as Paint 3D calls it, “to orbit”: Right-drag with your mouse, or, on a touchscreen, drag with three fingers.
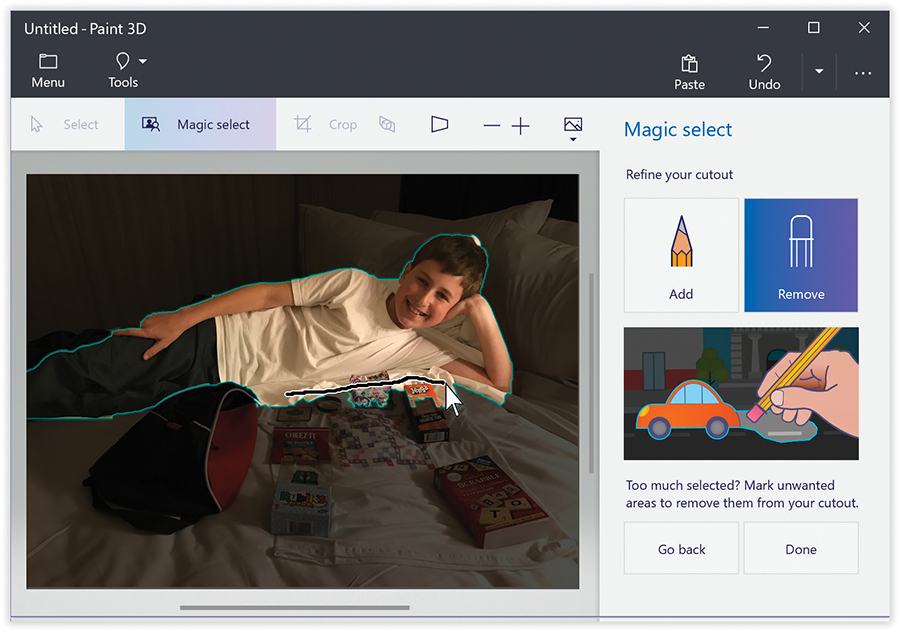
Figure 8-27. Paint 3D cuts the desired area out of its photographic background. If it missed a chunk, draw on it with the Add tool; if it included too much, draw on the excess area with the Remove tool.
You can also pan—slide your perspective up, down, left, or right without tilting or rotating. To do that, Alt-drag, or drag with two fingers (or hold down the Alt key and use one finger). To zoom in and out, use your mouse’s scroll wheel, or pinch and spread two fingers on a touchscreen. (If you’re using a digital pen—and this is a drawing program, so why not?—hold down the barrel button to orbit, or the Alt key to pan.)
Adjust the zoom. Use this slider, from – to +, to see your artwork at 10 percent all the way up to 6,400 percent. That’s very close up.
View more options. The last icon in the row,
 , offers a menu with three helpful functions: “Take screenshot,” “Reset view” (to 100 percent), and “View controls.” That last one pops up a handy window to remind you how to orbit, pan, and zoom in 3D view using your mouse, touchscreen, pen, or keyboard.
Tip:
At top right, next to the Paste icon, there’s the traditional Undo icon, ![]() , and its counterpart, Redo,
, and its counterpart, Redo, ![]() . Use these to walk through your artistic regrets one by one. If that’s not fast enough for you, the History icon nested in between the two is like a perpetual Undo. Its slider can rewind your work to any point, even all the way back to the beginning, as you watch your 3D world dismantle. You can stop sliding at any point, and start back into your work.
. Use these to walk through your artistic regrets one by one. If that’s not fast enough for you, the History icon nested in between the two is like a perpetual Undo. Its slider can rewind your work to any point, even all the way back to the beginning, as you watch your 3D world dismantle. You can stop sliding at any point, and start back into your work.
If you love your work, you can also use History to relive its glory; hit Start Recording, and then drag the slider forward or back. Then, when you hit “Export as video,” you get an .mp4 file in your Videos folder of your file coming to life. Finally, the Backspace key works to delete any selected object.
The Menu icon at top left (![]() ) lets you save your finished masterpiece as an editable Paint 3D project, a 3D model, or a 2D image. Here, you can also insert a 2D image; upload to the Remix 3D community (provided that you have created an account therein); share a screenshot; or print to a 2D or 3D printer, or to a 3D printing service online. With that last option, you choose the scale and the material—you get choices like polyamide, alumide, rubber-like, steel, and so on—and Paint 3D gives you an estimated cost. It also warns you if, say, the walls are too thin to properly print, and helps you fix the problems.
) lets you save your finished masterpiece as an editable Paint 3D project, a 3D model, or a 2D image. Here, you can also insert a 2D image; upload to the Remix 3D community (provided that you have created an account therein); share a screenshot; or print to a 2D or 3D printer, or to a 3D printing service online. With that last option, you choose the scale and the material—you get choices like polyamide, alumide, rubber-like, steel, and so on—and Paint 3D gives you an estimated cost. It also warns you if, say, the walls are too thin to properly print, and helps you fix the problems.
People
The People app is Windows’ address book. It’s a centralized database of everybody in your social circles: their email and mailing addresses, phone numbers, and so on (Figure 8-28). In fact, when you select someone’s name, the right-side panel even shows you any recent correspondence you’ve had with that person, plus any upcoming events you’re both attending.
Importing Addresses from Online Accounts
Delightfully enough, the People app can synchronize its contacts with online Rolodexes that may be very important to you: your contacts from Apple’s iCloud service, Google, Microsoft’s Outlook.com system, or your company’s corporate system.
That’s why the first thing you may see, the first time you open People, is an invitation to connect those online accounts to People. Choose the name of the network you belong to, and enter the name and password for that account.
Note:
If the People app has people listed in it the very first time you open it, then you’ve probably entered this kind of account information already, in another Windows app.
If you don’t see that invitation, or if you declined it, you can always connect your accounts later. To add an account, hit the ![]() button at lower left. There, staring you in the face, are names of the accounts you’ve set up already.
button at lower left. There, staring you in the face, are names of the accounts you’ve set up already.
To add a new one, use the “Add an account” link. Tap the kind of account you want: iCloud, Google, or whatever. Enter your account information, and boom—you’re done. The People app is now synced with your online accounts. Change information in one place and it’s also changed in the other.
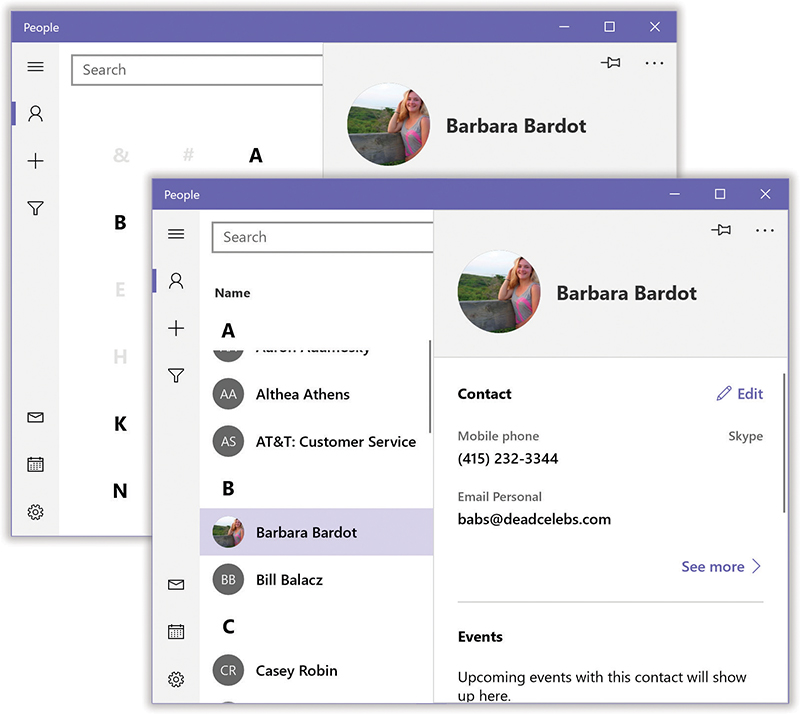
Figure 8-28. The People app screen is a dashboard for quick access to the phone numbers and email addresses of your social circle. If you click one of the letter headings, you get the alphabetical index (left); select any letter to jump to that part of the alphabet.
You can repeat the process to add more accounts; in fact, you can even have multiple accounts for certain types (like Google and Microsoft email accounts).
It’s important to understand that you’re actually linking those Internet services to your Microsoft account. You have to do that only once, and then all your Windows starter apps—Mail, Calendar, People, and so on—can use their information.
The big payoff comes when you sign into another Windows 10 machine. To your delight and amazement, you’ll see that your address book is already filled in with all your contacts and accounts. Progress!
Even after you’ve hooked up some accounts like this, you’re not stuck with wading through the addresses of a million people you don’t care about:
Hide an account. If you click
 , you get the “Filter contacts” dialog box shown in Figure 8-29. Here you can opt to hide the contacts in certain accounts (or those without phone numbers, for when you’re using People as a phone book).
Delete an account. You can unsubscribe from one of your online accounts, too. Just hit Settings (
) and then select the account you wish to forget. On the resulting dialog box, choose “Delete account,” and it is banished.
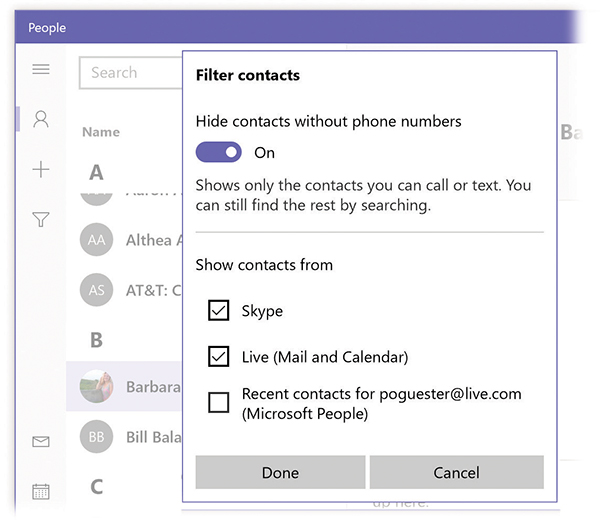
Figure 8-29. In the “Filter contacts” box, you can turn off the checkboxes of certain accounts. That way, you’re hiding their address-book contents from your People browsing and searching. You’re not deleting anything, just hiding it.
Creating Address Cards Manually
Each entry in People is like a web form, with predefined spaces to hold all the standard contact information.
To add a new person, click +. You get the “New contact” panel. Fill in the obvious stuff—name, email—plus details like these:
Add photo. Tap or click to open a mini Photos app, where you can choose a headshot for this person. It’s OK if the person’s face isn’t very big in the picture you choose; you’re offered the chance to crop down to just the head.
Save to. Which online email address book do you want this name stored in?
Tip:
If you have an Android phone, choose Gmail; if you have an iPhone, choose iCloud. Windows will thoughtfully add this person to your phone’s built-in address book automatically.
Phone number. Use the drop-down menu above the box (“Mobile phone”) to specify what kind of phone this is.
Now, the trouble with people these days is that they often have more than one phone number, more than one email address, and more than one mailing address. Fortunately, all of these boxes are infinitely expanding. Choose + to add another blank box of the same type—another phone-number field, for example.
Address. Weirdly, People doesn’t come with a mailing-address box already set up; you have to click the + Address button.
Tip:
You can also add fields for “Job title,” “Significant other,” “Website,” or “Notes.” They’re hiding in the Other button. Select its + button to see those choices.
Once you’ve added the complete dossier for this person, hit the Save button to go back to the main People screen.
Editing an Address
People move, people quit, people abandon AOL. To make changes to somebody’s card manually, select it and then hit ![]() Edit. You return to the screen where you can add, remove, and edit fields. Hit Save when you’re finished.
Edit. You return to the screen where you can add, remove, and edit fields. Hit Save when you’re finished.
Linking Contacts
If People discovers two contacts with the same name among your different accounts—say, one from Gmail and one from iCloud—it offers to combine them. Select the person’s name and scroll down on the right-side panel until you see the “Combined contacts” section. People shows you the two names it has found, indicates how it thinks they’re connected, and offers a Combine button. It automatically links the two, making it seem as though all the information appears on a single card. (There’s also a Separate button in case you change your mind.)
Pinning a Contact
Face it: Some people are more important than others. That’s why People lets you pin certain people—install their tiles—onto the right side of your Start menu. Just select the person’s name and then, on the right-side panel, hit ![]() . You can also pin your contacts to the taskbar using this icon, or using My People, as explained in the next section.
. You can also pin your contacts to the taskbar using this icon, or using My People, as explained in the next section.
The People Panel (My People)
The People app isn’t the only access you have to your contacts; there’s a People icon right on your taskbar (Figure 8-30).
Its purpose is to serve as a speed-dial list of your Very Special Friends, which Microsoft calls My People. Up to 10 very, very special people get actual icons on the taskbar; everyone else appears in the My People panel that sprouts from the taskbar. Once you’ve installed all these names, you can fire off email or Skype messages without having to open the People app.
Here’s the fun you can have:
Designate your My People. Choose the
 icon on the taskbar. (If it’s your first time, hit “Get started.”) If one of the lucky names appears in the Suggested list, select it; otherwise, hit “Find and pin contacts,” use the search box to find the person’s name, and choose it. That special someone’s icon now appears on the taskbar.
Tip:
To remove that icon from the taskbar, right-click it and choose “Unpin from taskbar.”
Repeat the process until you’ve got three people pinned to the taskbar.
Tip:
In
→→Personalization→Taskbar, you can change the number of taskbar People to any number from 0 (which means “Put everyone in overflow,” which means the People taskbar menu), to 10.If you do this “Find and pin contacts” business beyond three times (or whatever number you’ve chosen in Settings), the main People panel fills up (“overflows”) with the additional names. Keep going and the panel actually scrolls to accommodate as many My People as you like.
Note:
If someone you’ve pinned to the taskbar sends you an emoji via Skype, it pops right up on your taskbar as a giant, if somewhat mystifying, graphic (and sound). It hovers and animates for five seconds before disappearing.
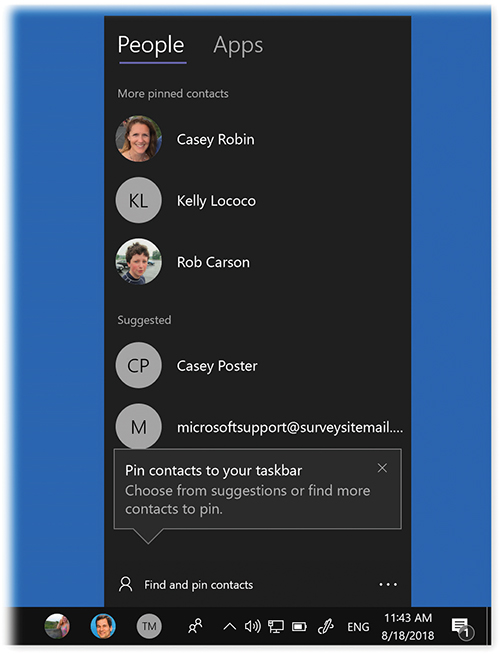
Figure 8-30. The first three pinned contacts (or whatever number you’ve chosen, up to 10) get icons on your taskbar. After that, they accumulate in the People panel itself. They’re all great for shooting out quick emails or placing quick Skype calls.
You can even drag these little round buttons around to rearrange them.Use your My People. When you want to contact one of these special people, click his icon. You get choices like Mail, Skype, and People. (The Mail and Skype commands appear here only if you have, in fact, set up Mail and/or Skype.)
If you choose People, you get access to this person’s full card—phone numbers, mailing addresses, recent conversations, and so on.
If you choose Mail, you see your recent email communication with this person; hit + to compose a new message, right there in the panel. If you choose Skype, a tiny Skype panel appears, with buttons for phoning or video-calling this person (or inviting him to be your buddy, if he’s not already).
The People panel remembers your choice—Mail or Skype—for the next time you use it.
Tip:
One of the most compelling uses for all of this is the ability to drag and drop files onto people’s heads. Want to email a Word doc to Casey? Drag its icon out of its File Explorer onto Casey’s taskbar icon. (You can even drag and drop onto the names of the secondary people you’ve installed in the People taskbar panel. Just drag a file onto the ![]() icon on the taskbar; then, without releasing your finger or the mouse button, drag up the People panel onto somebody’s name.)
icon on the taskbar; then, without releasing your finger or the mouse button, drag up the People panel onto somebody’s name.)
The People panel is a cool idea. It would be cooler, of course, if it gave you access to more communications channels than Mail and Skype. (How about text, phone, Facebook, Twitter, Snapchat…?) That seems to be the function of the Apps tab of the panel—but no other apps’ names can appear here until their software companies rewrite them, and that may never happen.
For now, let those friends know just how special they are.
Tip:
You can now add contacts right from the People panel. Just use the … button at lower right and choose “New contact.”
Photos
Microsoft changes photo programs as often as most people change socks. The Photo Gallery from Windows Vista? Dead. The Photo Viewer of Windows 7? Gone.
In Windows 10, you get yet another digital photo shoebox, this one just called Photos.
Its job is to grab photo albums from everywhere fine photos are stored—your own Pictures folder, other PCs on your network, and your OneDrive—and display them all in one place (Figure 8-31).
The Four Tabs of Photos
Photos lets you see your photo collection in four ways, represented by tabs at the top:
Collection. At top, Photos offers some ready-made assortments of photos and slideshows that may interest you. “New Orleans Last Week,” for example, or “On this day” (in past years), or “Friday in Phoenix.” Click one to open its video slideshow (see “Video Slideshows”).
Below those tiles, you’ll find your entire photographic life, labeled by date. Just below the toolbar, at right, three tiny icons let you adjust the size of the photo thumbnails. Use the vertical timeline at right to zoom through your years’ worth of pictures.
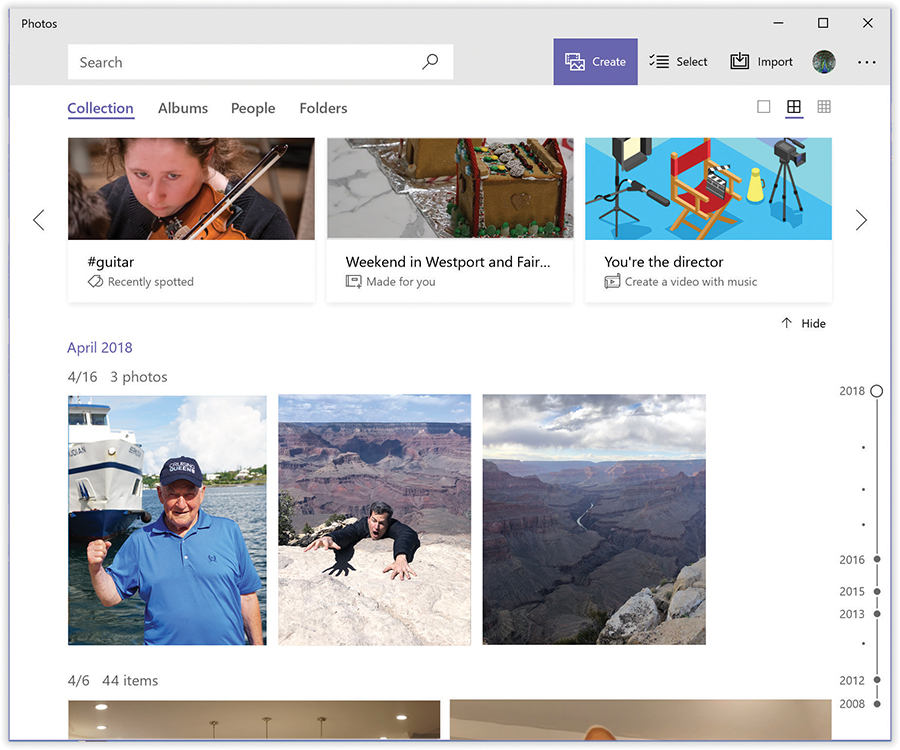
Figure 8-31. Especially if you have a touchscreen, you’ll find Photos a bare-bones but lovely way to browse your shots. You can edit them, too.
Albums. Albums are virtual containers for any old rounded-up batches of photos. You can create one of your favorites, or one for each vacation, or whatever. Hit “Create an album” to view all your photos with checkboxes, so that you can go to town clicking the ones you want in this album; then choose Create.
You wind up on a special Album page (use the
 to edit its name), featuring an animated slideshow preview at top; blue buttons for Watch (a slideshow), Edit (the slideshow), or “Create collage” (arranges some photos into a grid); sortable thumbnails of the pictures in this album; and some stats about this collection.
You haven’t actually moved any photos—they’re all still in your master collection. You can, for example, include a favorite photo in as many albums as you like.
Tip:
Photos can even build some albums for you automatically. When you click the Create→Album button at top, you see groups of photos that represent certain photo shoots. Usually, you’ll know right away what they were: “Oh, Casey’s birthday party!” “Oh, the home inspection.” “Oh, that time I woke up in Poughkeepsie.” Photos creates these groupings by studying the photos’ times and locations.
People. Photos attempts facial recognition of the people in your pictures; on this tab, you see a round thumbnail for each person it’s found, complete with the number of photos it thinks you have of that person. Click a thumbnail to see all the pictures of that person—and to let the app know who it is.
Alas, there’s no way to teach Windows to recognize faces it hasn’t already recognized, nor any way to combine separate “people” it’s found who are actually the same person.
Tip:
You can turn off Windows’ face analysis, if it creeps you out. Choose …(top right) and then ![]() to open the Settings; under “Viewing and editing,” turn off People.
to open the Settings; under “Viewing and editing,” turn off People.
Folders. This screen lists the folders whose contents Photos is including in your photo collection. Back at the desktop, you have a Pictures folder. Any photos in this folder show up in the Photos app automatically. Same for the Pictures folder on your OneDrive.
But on this screen, you can also tell Photos to display the contents of other pictures and drives. To do that, hit “Add a folder.”
Tip:
If you choose …at top right and then ![]() to open the Settings page, you can also turn on “Show my cloud-only content from OneDrive,” if you like. You don’t have to worry about duplicates; Photos is smart enough to prevent them from showing up, even if they’re different file formats.
to open the Settings page, you can also turn on “Show my cloud-only content from OneDrive,” if you like. You don’t have to worry about duplicates; Photos is smart enough to prevent them from showing up, even if they’re different file formats.
Playing with Photos
The rules of Photos are simple:
To view a photo, click or tap its photo thumbnail to open it big enough to see.
To move through the photos once you’ve opened one, swipe horizontally (touchscreen), click the < and > buttons at the edges of the screen (mouse), or press the
and keys (keyboard).Zoom in or out by spreading or pinching two fingers on the touchscreen, clicking the + and – buttons at the right edge of the horizontal scroll bar, pressing Ctrl and the + or – keys, or turning the scroll wheel while pressing the Ctrl key.
To return to the thumbnail view, hit the
button on the screen or press Alt+.The More (…) menu offers a Slideshow button (
 ) that starts a slideshow of all photos in this batch. Or press F5. Click or tap to end the show.
To send a photo to somebody by email, or to send it into another app for editing, tap the Share button on the toolbar.
A Very Smart Search Box
Photos uses artificial intelligence to figure out what’s in your pictures—you know, like “cat” or “pond” or “pizza.” You can then use the search box to find them by name.
When you click into the search box, a menu offers quick-click buttons for People (faces that Photos has identified, as described already); Places (based on the locations where you snapped the shots—usually available only on phone photos); or Things (subjects the software has found). Of course, you can also type whatever noun you want into the box.
Note:
It takes Windows a long time to analyze your photos before this search thing is ready. A tiny progress bar inches along the bottom of the actual search box to show you its progress.
Windows isn’t as good at this as, say, Google Photos. But it’s getting better all the time.
Slurping in Photos from a Camera
Photos can import photos from a camera, memory card, flash drive, or any other drive, too. Just connect the camera, card, or drive to your machine, and then hit the ![]() Import button at the top. From the drop-down menu, choose “From a folder” (if the pictures are already on your PC somewhere) or “From a USB device” (if they’re on a camera, memory card, flash drive, or USB hard drive).
Import button at the top. From the drop-down menu, choose “From a folder” (if the pictures are already on your PC somewhere) or “From a USB device” (if they’re on a camera, memory card, flash drive, or USB hard drive).
Hit Import. When it’s all over, you see the newly imported goodies nestled in their new home, in the Photos app.
Video Slideshows
Microsoft has been toying with the idea of an automatic slideshow-making module for a couple of years now. At one point, it was a separate app called Story Remix; then it was folded into Photos, but in a special window. Now it’s found a home in the Create menu, called “Automatic video with music.”
When you choose this command, you jump back to your Collection view, where you can select the photos you want in the slideshow (by clicking or tapping). Then hit Create, type a name for the video, and sit back and enjoy the results. It’s an animated slideshow, complete with an opening title, zooms and pans, and music.
At this point, you can choose:
Remix it for me. Produces a variation of the same slideshow—different slide subset, different music, different effects.
Export or share. Choose a file size for the video, and then choose “View in File Explorer” (to see the resulting file) or “Share to social media, email, or another app” to do exactly that. You’ll be offered a Share pane that features your My People (“The People Panel (My People)”), any Nearby Sharing computers (“File Sharing 1: Nearby Sharing”), plus icons for “Upload to YouTube,” Dropbox, Mail, Skype, and so on.
Edit video. You arrive at a special editing screen (Figure 8-32). At the very top are buttons like Themes (canned looks for your slideshow—Adventure, Chilled, Electric, and so on) each incorporating a piece of music, a typeface, and photo-animation effects); Music (a choice of Microsoft’s music or your own music collection, along with the on/off switch for syncing your photos’ appearance to the beat—neat); a proportions control (either 16 × 9 rectangular, 4 × 3 squarish, or “Make portrait,” a better fit for phones held upright); Add to cloud (saves to your OneDrive, so you can edit this slideshow on another PC); and “Export or share,” described on the previous page.
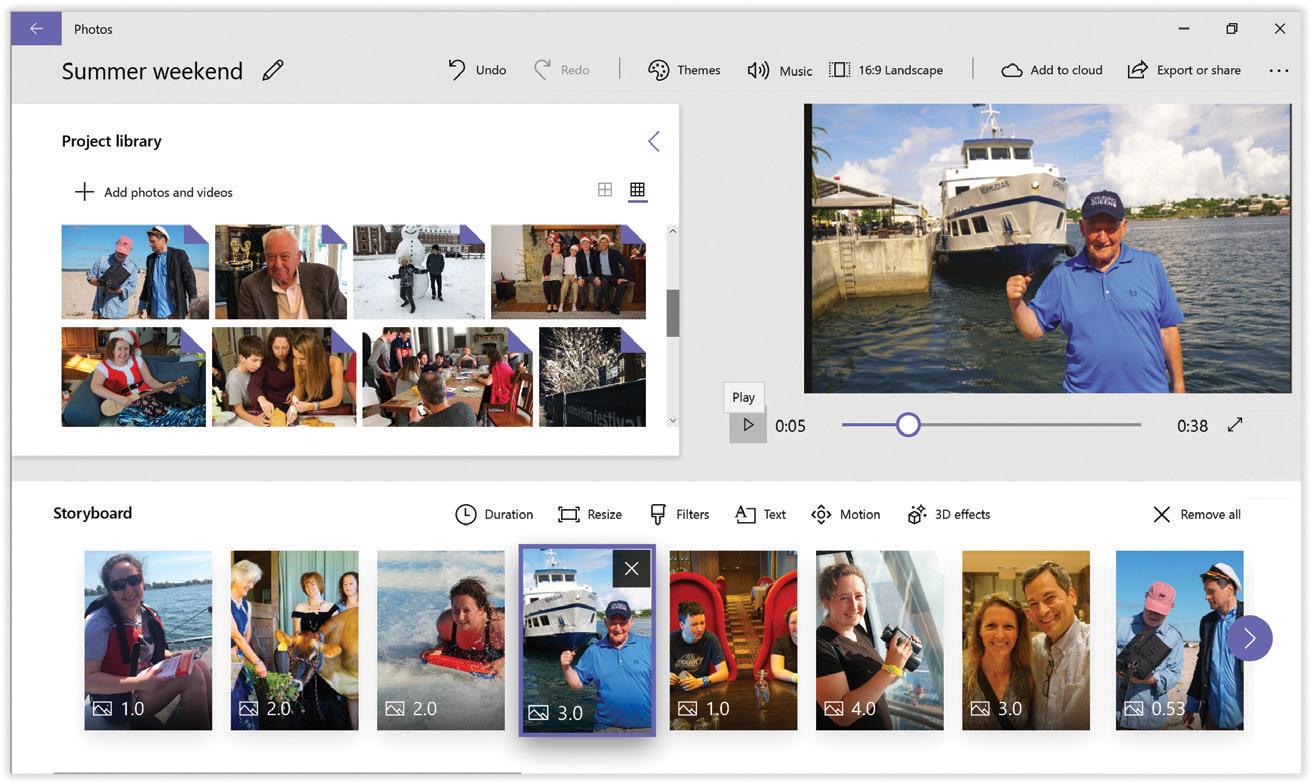
Figure 8-32. Top left: All the photos you originally chose for inclusion (and the option to add more).
Top right: a preview of the movie so far.
Bottom: The Storyboard, which is a map of the slideshow.In the Storyboard, you can delete photos (hit the
 ), rearrange them by dragging, change their timing individually (hit Duration), choose how to handle a photo whose dimensions don’t perfectly fit the frame (hit Resize, and then choose either “Remove black bars,” which also crops some of the photo, or “Shrink to fit,” which leaves black bars), apply Filters (special color tints that make photos look old-timey), overlay text (you get a choice of layouts and typefaces), or add some Motion to a photo (you get a choice of zooms, pans, and tilts).
Editing Photos: The Mini Photoshop
You might be a great photographer (although if your primary tool is a tablet or a laptop, that’s debatable).
But even pros touch up their work—and in Photos, an impressively complete suite of photo-editing tools awaits. These tools can rotate or crop; they can also fix the brightness, contrast, and color of your pictures, and even add special effects like selective blur and vignetting (where the photo corners are misty white to draw the eye to the subject).
To begin, open the photo that needs help.
Right here at the top, you’ve got your first editing option: a Rotate button. Each click (or each press of Ctrl+R) rotates your photo clockwise by 90 degrees.
But now choose Edit & Create→Edit to open the editing wonderland shown in Figure 8-33.
Ready? Keep hands and feet inside the tram at all times.
Tip:
As you work, keep in mind that you can zoom in for better detail (turn your mouse wheel, if you have one, or use Ctrl+plus and Ctrl+minus). Finally, keep in mind that the Undo command is always at your service to reverse the last editing step. It’s a safety net, and it’s Ctrl+Z.
(If you dig finding out about this sort of Photos keyboard shortcut tip, don’t miss the full list in “Photos app”.)
Enhance
This tab produces adjustment options like these:
Crop and rotate. Cropping means shaving off unnecessary outer portions of a photo. Usually you crop a photo to improve its composition—adjusting where the subject appears within the frame of the picture. Often a photo has more impact if it’s cropped tightly around the subject, especially in portraits. Or maybe you want to crop out wasted space, like big expanses of background sky. You can even chop a former romantic interest out of an otherwise perfect family portrait.
When you open the Crop window, a white rectangle appears on your photo. Drag inward on any corner. The part of the photo that Windows will eventually trim away is dimmed out. You can recenter the photo by dragging any part of the photo, inside or outside the box. (For greater precision, you can press Shift and the arrow keys to resize the cropping rectangle, or Ctrl and the arrow keys to move it.)
If you tap the “Aspect ratio” button, you get a choice of canned proportions: Square, 3 × 2, 4 × 3, and so on. They make the app limit the cropping frame to preset proportions. (The “Make portrait” choice makes the cropping rectangle tall and skinny.)
The Flip button flips your photo 180 degrees horizontally, mirror image; Rotate turns the image 90 degrees; and Reset, of course, undoes everything you’ve worked on in this window.
When everything looks good, press Enter or tap
.Enhance your photo. When you tap this magical tile (bearing the magic-wand
 icon), the app analyzes the relative brightness of all the pixels in your photo and attempts to “balance” it. After a moment, the app adjusts the brightness and contrast and intensifies dull or grayish-looking areas. Usually the pictures look richer and more vivid as a result.
You may find that this button has little effect on some photos, minimally improves others, and totally rescues a few.
Tip:
Unlike the similar feature in other apps, this one lets you adjust the degree of fixing. After applying the correction, you can drag the white vertical line across the tile to make the change more or less intense.
Choose a filter. All those Instagram fans can’t be wrong—filters must be a thing. They’re special effects that tinker with a photo’s colors so that it takes on certain looks—like an old Polaroid, or an old 1970s home photo, for example.
Undo all. Takes the photo back to its original form.
Save. Preserves your edits.
Note:
Your saved edits are permanent. There’s no Revert to Original command in Photos.
Save a copy. Duplicates what you’ve got, so that you’ve got a safety copy.
Adjust tab
This section offers options like Light (exposure), Color (saturation), Clarity (sharpness), and Vignette (lightens or darkens the photo’s corners).
Note that you can open the flippy > for Light or Color to reveal further sub-sliders (Figure 8-33). For Light, they include the following:
Contrast. If your photo looks flat, use this effect to bring out details. It makes the dark parts of your photo a little darker, and the light parts a little lighter.
Exposure. Adjusts the overall exposure of the photo, making all of it lighter or darker.
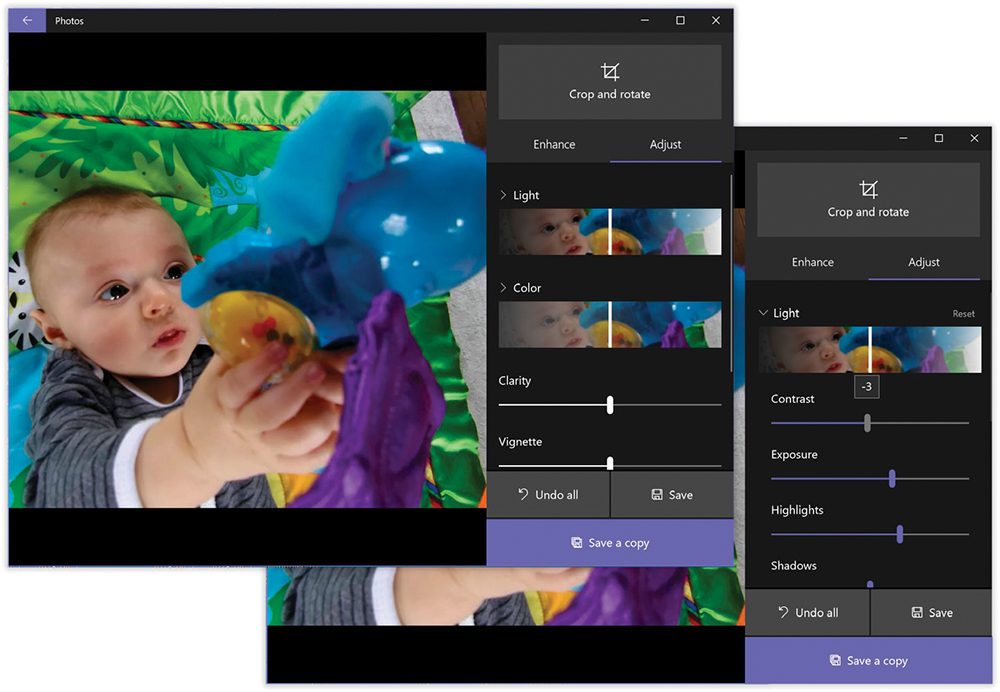
Figure 8-33. In the Adjust mode, you can adjust the Light or Color sliders for efficient large-scale tweaks (top right), or you can “open” one of the sliders with its flippy triangle to reveal hidden sliders like Contrast, Exposure, Highlights, and Shadows (lower left).
Highlights, Shadows. The Highlights and Shadows dials are designed to recover lost detail in the brightest and darkest areas of your photos, turning what once might have been unsalvageably overexposed or underexposed photos into usable shots. For example, suppose you’ve got a photo looking good, except that you don’t have any detail in murky, dark areas. Move the Shadows handle to the right, and presto! A world of detail emerges from what used to be nearly black.
For Color, you get Tint, which adjusts the photo’s overall tint along the red-green spectrum (for correcting skin tones and for compensating for difficult lighting situations, like fluorescent lighting), and Warmth (adjusts the photo along the blue-orange spectrum—a handy technique for breathing life back into subjects who have been bleached white with a flash).
This panel also offers “Red eye” (turns devil-red eyes, caused by the camera’s flash, black again) and “Spot fix” (paints away scratches, spots, hairs, and other small flaws).
Draw
That Edit & Create button (which appears when you open a photo) harbors some other delights. For example, if you have a touchscreen, the Draw option lets you doodle on your photo, using your choice of three “pens” (hold down for a choice of colors) and an eraser.
Add 3D Effects
Pretty cool: a palette of animations that you can lay on top of your photo or video, including falling leaves, rising balloons, a snowy blizzard, fluttering butterflies, and so on (Figure 8-34). A timeline scrubber lets you control when the effect appears, and for how long; handles let you adjust its size and rotation; and a “3D library” pane offers a huge assortment of 3D objects you can drop into your photos or videos: wrapped presents, aliens, dinosaurs—you name it.

Figure 8-34. When you apply one of these animated overlays to a still photo, it becomes a video, whether you like it or not. You can add multiple animated overlays or 3D models to a single photo or video. Suddenly, you’re Pixar.
Tip:
Remember, these are 3D objects; the special handles around their selection boxes let you spin them in any direction.
Animated text
The new, improved Photos can overlay fancy titles onto a photo or video clip—perfect for opening credits for your low-budget video operation.
Type the text into the box at top, choose one of the font styles, choose where to put it (using the “Choose a layout” section), and then hit the Play triangle to check it out.
Slapping a Photo onto the Lock Screen or Desktop
When you’re looking at a single photo (and not editing it), the … button at top right offers a secret shortcut menu. Its “Set as” command slaps the current photo onto any of these billboards: the Lock screen (“The Lock Screen”), the desktop background wallpaper (“Background (Wallpaper)”), or the tile for the Photos app on the Start menu’s right section (see the box below).
Tip:
Also in the … menu: “File info.” Choosing this option—or pressing Alt+Enter at any time—opens a left-side panel that tells you everything about the current photo: size, date, name, camera model, manual settings, ISO, and so on.
Selecting Photos (to Share or Delete)
Photos wouldn’t be much fun if your screen were the only place you could see them. Fortunately, the Photos app is happy to zap them away to your adoring fans electronically. Or, if they’re terrible shots, you can just zap them away.
Selecting photos
The first step is telling Photos which pictures you want to send. To do that, on the Collection screen or an Album screen, hit the ![]() icon to make their checkboxes appear. Just click or tap each photo you want to include.
icon to make their checkboxes appear. Just click or tap each photo you want to include.
Tip:
Actually, if you have a trackpad or mouse, you can save a step. Just point to each photo to see its checkbox appear—no ![]() click necessary.
click necessary.
Sharing selected photos
Once you’ve chosen the photos you want to share, the top toolbar offers several ways to go. In addition to Print, Copy, and Delete, here’s what you get:
Create lets you generate one of those musical slideshows, or an album, from the selection.
Add to puts the selected photos into a new album, a new video, or an existing video slideshow.
Share (
 ). The Share panel opens, listing all the places you can send the selected images. The options here vary. They usually include your My People (“The People Panel (My People)”), any Nearby Sharing computers (“File Sharing 1: Nearby Sharing”), and various other export options—Mail, Facebook, and Dropbox, for example. If you’ve installed a program with beefier editing tools, like Microsoft’s own Fresh Paint, its name appears here, too.
Cancel. This means “Back out of this—forget all that checking business.”
Print 3D
This little app (in your Windows Accessories folder) is intended for people who have access to a 3D printer, one of those machines that “prints” small, solid objects out of plastic. Hit Browse to load up a 3D model file (see “3D Builder”); inspect it, enlarge it, and (assuming your PC has the correct drivers and software for the 3D printer) hit Print to begin the long process of printing.
Quick Assist
You use this little app (in your Windows Accessories folder) to let some technical expert take control of your PC by remote control, so she can look around and help you troubleshoot. Or, if you’re the technical expert, you can take control of her computer. Details are in “Quick Assist”.
Remote Desktop
Remote Desktop (in your Windows Accessories folder) lets you sit at your home PC and operate your office PC by remote control. Details are in “Remote Desktop”.
Run
When you want to open something with just a few keystrokes, the little Run command line window (in the Windows System folder) is there for you. See the free downloadable appendix “Run Command” on this book’s “Missing CD” page at www.missingmanuals.com.
Settings
This, of course, is the awe-inspiring Settings app described in Chapter 7.
Skype
In 2011, Microsoft bought Skype, the popular chat, audio-chat, and video-chat program. (The price: $8.5 billion. For Microsoft, pocket change.)
In 2013, Skype officially became a standard Microsoft Store app. (Its predecessor, an app called Messenger, went to the great CompUSA in the sky.)
Skype is a game-changer. It’s the app millions of middle-aged parents use to call their kids studying abroad…new parents use to show their babies to the grandparents…and long-distance couples use to video chat. Skype finally comes preinstalled with Windows 10—you don’t have to download it anymore. And the best part: All this voice and video calling is free.
For a handy guide to setting up and using Skype, see the free downloadable PDF appendix “Skype” on this book’s “Missing CD” page at www.missingmanuals.com.
Snipping Tool
Snipping Tool (Figure 8-35), in your Windows Accessories folder, takes pictures of your PC’s screen, for use when you’re writing up instructions, illustrating a computer book, or collecting proof of some secret screen you found buried in a game. You can take pictures of the entire screen or capture only the contents of a rectangular selection. When you’re finished, Snipping Tool displays your snapshot in a new window, which you can print, close without saving, edit, or save (as a JPEG, GIF, PNG, or embedded HTML file), ready for emailing or inserting into a manuscript or page-layout program.
Now, as experienced PC enthusiasts already know, Windows has always had shortcuts for capturing screenshots: Press the Print Screen (or PrtScn or PrtScr) key to save a picture of the whole screen to a Screenshots folder in your Pictures library; add the Alt key to save a file with just that window; or press ![]() +PrtScn to copy a screenshot to your Clipboard.
+PrtScn to copy a screenshot to your Clipboard.
So why use Snipping Tool instead? Because it’s infinitely more flexible. Once you open the app, you can use the Mode menu to specify four kinds of capture:
Free-form Snip means you can drag your cursor in any crazy, jagged, freehand, nonrectangular shape. Snipping Tool outlines it with a red border; the instant you release the mouse, the captured image appears in the editing window, ready to save.
Tip:
You can change the border color in the Options dialog box. It appears when you click Options on the main Snipping palette, or when you choose Tools→Options in the editing window.

Figure 8-35. Top: The Snipping Tool program begins life as a tiny floating toolbar. Tell it what part of the screen you want to capture.
Bottom: After you capture a snip, the editing window appears, with your screen grab right in the middle of it. The Pen, Highlighter, and Eraser tools are there to help you annotate, draw attention to, or erase parts of your illustration. (The Eraser works only on pen and highlighter strokes—not the snip itself.)
Rectangular Snip lets you drag diagonally across the frozen screen image, capturing a square or rectangular area. Unfortunately, you can’t adjust the rectangle if your aim was off; the instant you release the mouse button, the program captures the image.
A Window Snip neatly captures an entire window, automatically cropping out the background. And which window does it capture? That’s up to you. As you point to each window, a red border appears around it to illustrate what Snipping Tool thinks you intend to capture. When the correct one is highlighted, click the mouse.
Tip:
A “window,” in this context, doesn’t have to be a window. It can also be the taskbar, a dialog box, and so on.
Full-screen Snip, of course, captures the entire screen.
In each case, the captured image appears in the editing window (Figure 8-35, bottom). What you do now is up to you. For example:
Paste. The edited image may be in the window in front of you, but the original, unedited image is also on your invisible Windows Clipboard. Close the editing window without saving changes, pop into your graphics, word-processing, or email program, and paste (Ctrl+V) what you’ve copied. Often that’s exactly what you want to do.
Tip:
On the other hand, Snipping Tool’s tendency to copy everything to the Clipboard can be bad if there was already something on the Clipboard you wanted to keep. (The Clipboard can hold only one thing at a time.) If that’s driving you nuts, you can turn off the copy-to-Clipboard feature in Options.
Share. The envelope button on the editing-window toolbar automatically prepares an outgoing email message with your graphic already pasted in (or, if your email program is set to send plain, unformatted text messages only, as an attachment).
Mark it up. The toolbar also harbors pen, highlighter, and eraser tools for annotating your masterpiece.
3D it. The last button on the toolbar sends the snap into Paint 3D, ready to enhance (“Paint 3D”).
Save. If your intention is to save the capture as a file, click the Save (
) icon, or choose File→Save, or press Ctrl+S. When the Save As dialog box appears, type a name for your graphic, choose a file format for it (from the “Save as type” drop-down menu), specify a folder location, and then click Save.
Tip:
If you capture the screen of a web page and save it in HTML format, Snipping Tool helpfully prints the original URL (web address) at the bottom of the image, so you’ll know where it came from. You can turn off this “subtitling” feature in the Options dialog box of Snipping Tool.
Steps Recorder
This weird little program (in your Windows Accessories folder) is designed to record exactly where you’re clicking or tapping, and to capture a screen picture each time you do so. Why? So that you can document some problem you’re having. You can send the resulting recording to someone who wants to see exactly what steps you were taking when you ran into trouble.
Of course, this is a similar scenario to the times when you might use Quick Assist, (“Quick Assist”) where the wise scholar can watch you perform the steps that are frustrating you. But because Steps Recorder lets you type a little message each time you click the mouse, it’s a better, more permanent way to record some problem you’re having.
When you’re ready to record the steps, click Start Record. Now do whatever it is, on your computer, that produces the problem: Click here, use that menu, drag that slider, whatever. As you go, you can do the following:
Pause the recording. Click Pause Record. (Click Resume Record to continue.)
Type an annotation for a particular step. (“Here’s where I double-clicked.”) Click Add Comment, highlight the part of the screen you want to comment on, type your note into the box, and then click OK.
Note:
Anything you type outside that comment box doesn’t get recorded; that’s a security precaution.
When you’re finished, click Stop Record.
The Recorded Steps window appears. It shows you each screenshot that Steps Recorder captioned, complete with its time stamp and text description (“User left-click on ‘File Explorer’ button,” for example). This is your chance to make sure you’re not about to send away personal information (or photos) that might have been on the screen while you recorded.
If everything looks good, click Save to create a compressed archive—a .zip file—that you can open to look at the report again later in your web browser or attach as an email to an expert.
Sticky Notes
Sticky Notes creates virtual Post-it notes that you can stick anywhere on your screen—a triumphant software answer to the thousands of people who stick notes on the edges of their actual monitors.
You can type quick notes and to-do items, paste in web addresses or phone numbers you need to remember, or store any other little scraps and snippets of text you come across (Figure 8-36).
Creating Notes
To create a new note, hit the + in the upper-left corner of the starter note, or press Ctrl+N. Then fill the note by typing or pasting.
Note the resize handle on the lower-right corner of each note. Drag it to make notes larger or smaller onscreen.
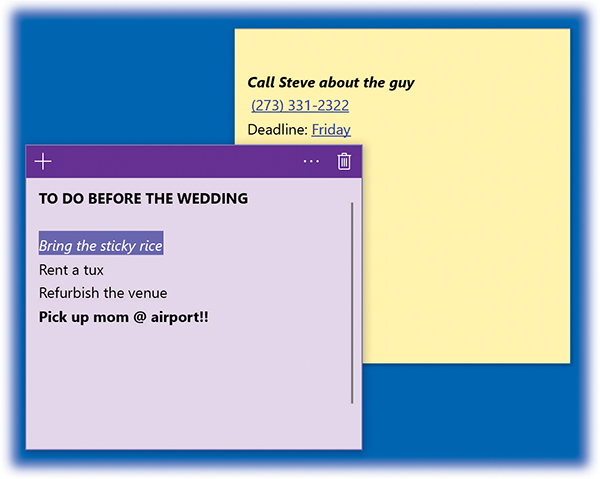
Figure 8-36. You can apply some limited formatting to your sticky notes, but only by using keyboard shortcuts, such as Ctrl+B for bold and Ctrl+U for underline.
See the automatically underlined links, dates, and phone numbers? Microsoft calls that formatting “Insights”; it means they’re clickable. Click a link, for example, to open that website.
You can turn this feature off, if you like; select a note, then …, then , and turn off “Enable insights.”
Formatting Notes
You can format the text of a note—a little bit. There are no menus, so you have to use keyboard shortcuts:
Bold, Italic, Underline. Press Ctrl+B, Ctrl+I, or Ctrl+U.
Strikethrough style. Press Ctrl+T.
Create a bulleted list. Press Ctrl+Shift+L.
You can also change the “paper” color for a note to any of five other pastel colors. To do that, click the … and choose from the shortcut menu.
Deleting Notes
To get rid of a note, click the little ![]() in the upper-right corner. When the program asks if you’re sure, click Yes.
in the upper-right corner. When the program asks if you’re sure, click Yes.
On the other hand, you can exit Sticky Notes without worrying that you’ll lose what you’ve already typed. Right-click the Sticky Notes icon on the taskbar, for example, and choose “Close window” from the shortcut menu. The program disappears, but all your notes will be there the next time you open it.
Task Manager
In the Windows System folder, this icon represents the all-purpose running-app manager described in “When Programs Die: The Task Manager”.
This PC
Don’t be fooled by this item in the Windows System folder; it’s not an app at all. It simply opens your This PC window, exactly as though you’d selected its name in any File Explorer window.
Tips
How thoughtful! Microsoft’s multimedia team has created a little scrapbook of slideshows that show you how to do things on your PC in Windows 10. There’s a “What’s new” category, a “Personalize your PC” category, a “The basics” category, and so on. It’s not exactly, you know, a Missing Manual, but it’s a start.
Voice Recorder
This audio app is ideal for recording lectures, musical performances, notes to self, and cute child utterances. You can make very long recordings with this thing. Let it run all day, if you like. Even your most long-winded friends can be immortalized.
Talk about a minimal interface! There’s nothing in this app except for a big fat microphone button. Hit it (or press Ctrl+R) to start recording. A little timer clicks away, and the Stop button (![]() ) pulses, to show that you’re rolling. You can pause or resume the recording at will (
) pulses, to show that you’re rolling. You can pause or resume the recording at will (![]() ) or, when it’s good and done, stop it by tapping the huge round Stop button. (If you switch into another app, the recording pauses automatically.)
) or, when it’s good and done, stop it by tapping the huge round Stop button. (If you switch into another app, the recording pauses automatically.)
Tip:
During recording, you can hit the little ![]() icon to mark important points in the audio you’ll want to find later. Each time, Voice Recorder creates a new time stamp, listed across the bottom of the screen. Later you’ll be able to jump to these spots for playback (see Figure 8-37).
icon to mark important points in the audio you’ll want to find later. Each time, Voice Recorder creates a new time stamp, listed across the bottom of the screen. Later you’ll be able to jump to these spots for playback (see Figure 8-37).
When you stop the recording, the screen changes; see Figure 8-37.
At this point, you can proceed like this:
Name the recording using the
button.Record another sound. Use the microphone button again. As you record more sounds, they pile up in the list at top left.
Play a recording. Select it, and then select the
 button.
Rewind, Fast-Forward. Drag the round handle in the scrubber bar to skip backward or forward in the recording. It’s a great way to skip over the boring pleasantries.
Jump to your markers. They show up with time stamps above the scrubber bar—click to jump there in the playback—and also as notches on the scrubber bar.
 . Tap to get rid of a recording (you’re asked to confirm).
Trim off the ends. You might not guess that such a tiny, self-effacing app actually offers some editing functions, but it does. You can trim off the beginning or end of your audio clip. That, of course, is where you’ll usually find “dead air” or microphone fumbling before the good stuff starts playing. (You can’t otherwise edit the sound; for example, you can’t copy or paste bits or cut a chunk out of the middle.)
To trim the bookends of your clip, use the
 button. At this point, the beginning and end of the recording are marked by big black dots; these are your trim points. Drag them inward to isolate the part of the clip you want to keep. Play the sound as necessary to guide you ().
Figure 8-37. The first time you record, there isn’t much decoration in Voice Recorder (top). But as you make more recordings, they pile up in a list at left (bottom). Unless you step in to rename them with the Rename button (
on the bottom toolbar), they’ll be called Recording, Recording (2), Recording (3), and so on.Select
if you change your mind, or the to lock in your changes. From its shortcut menu, choose either “Save a copy” (which also saves the original file) or “Update original” (which doesn’t).
Tip:
It’s a common question: Once you record these sounds, where are they? Yes, you can email them to yourself from within the app. But where on your PC are the actual recordings sitting?
Well, they’re buried, that’s for sure. Switch to the desktop. Make hidden files visible (on the View tab of an Explorer window’s ribbon, turn on “Hidden items”). Navigate to (C:) ![]() Users
Users ![]() [your name]
[your name] ![]() AppData
AppData ![]() Local
Local ![]() Packages
Packages ![]() Microsoft.WindowsSoundRecorder_8wekyb3d8bbwe
Microsoft.WindowsSoundRecorder_8wekyb3d8bbwe ![]() localstate
localstate ![]() Indexed
Indexed ![]() recordings. (Yes, there really is a folder called Microsoft.WindowsSound-Recorder_8wekyb3d8bbwe.) And there they are—the actual .m4a music files that represent your recordings. Now you can back them up, share them, copy them to a flash drive, whatever.
recordings. (Yes, there really is a folder called Microsoft.WindowsSound-Recorder_8wekyb3d8bbwe.) And there they are—the actual .m4a music files that represent your recordings. Now you can back them up, share them, copy them to a flash drive, whatever.
Weather
This app presents a lovely, colorful weather report. (The first time you use it, you have to give the app permission to use your location.)
Right off the bat, you see the current weather (as though the full-window background photo didn’t give it away). There’s the 10-day forecast (Figure 8-38). Below that, you see the hour-by-hour forecast for today, so you can see exactly what time your softball game will get rained out.
Tip:
You can view this hourly section either as a cool graph (“Summary”) or as hourly tables of data (“Details”).
But the most surprising part of the Weather app is the more complete weather station that lurks in the left-side menu column. Here’s what these icons do:
 Maps are cool visual representations of current meteorological data for the whole country: radar, regional temperature, precipitation, cloud cover, severe weather alerts, and so on.
Tip:
If you hit the Play button (![]() ), the map animates (Figure 8-38, top). It shows you the last six hours’ worth of whatever you’re looking at: cloud cover, precipitation, temperature, and so on. Zoom in or out to see a different area of the country.
), the map animates (Figure 8-38, top). It shows you the last six hours’ worth of whatever you’re looking at: cloud cover, precipitation, temperature, and so on. Zoom in or out to see a different area of the country.
 Historical Weather. This handy graph shows you a snapshot of your current location’s weather history. The big graph shows temperature, rainfall, and snowfall (depending on which of the three round icons you select above it). The little table beneath gives you stats like the average high and low for today’s date, the record high and low for today’s date, and monthly averages for rainfall, snowy days, and rainy days.
 Places. Here you can set up tiles that show you, at a glance, the weather in other cities around the world that might interest you. Hit the + button and type the city’s name.
 News. The next icon presents tiles that represent individual news articles about weather.
There are settings to explore in Weather, too. You can specify F or C for the temperature readings, and you can ask the app to auto-detect your location for weather-report purposes.

Figure 8-38. Bottom: Most people probably never bother drilling down past this screen, but there’s much more to do here. For example, the > button at right brings up the next five days’ forecast. Or you can keep scrolling down to open up even more details—wind speed, visibility, humidity, barometer, and the predicted highs and lows. You pilots know who you are.
Top: These are animated weather maps, showing the past several hours’ worth of cloud movement, precipitation, and so on. (To get there, hit the  on the left.) They’re really pretty amazing.
Windows 10 Update Assistant
Supposedly, you have this app only if you don’t have the latest edition of Windows 10. All it does is begin the installation process (from the Fall Creators Update to the April 2018 Update, for example).
And if you already have the latest version? The app tells you so and sits there quietly until you exit it. Read more about updating in Appendix A.
Windows Defender Security Center
Here’s Windows 10’s built-in antivirus software. Details are in Chapter 11.
Windows Fax and Scan
See Chapter 13 for more on sending and receiving faxes from your PC—and on scanning documents using a scanner.
Windows Media Player
In the beginning, Windows Media Player was the headquarters for music and video on your PC. It was the Grand Central Terminal for things like music CDs (you could play ’em, copy songs off ’em, and burn ’em); MP3 files and other digital songs (you could sort ’em, buy ’em online, and file ’em into playlists); pocket music players of the non-iPod variety (fill ’em up, manage their playlists); Internet radio stations; DVD movies (watch ’em); and so on.
Media Player still does all that and more. But it’s no longer clear that this is the program you’ll use for these activities. Gradually, the Media Player audience is splintering. Nowadays, people are using alternative programs like Groove Music, Apple’s iTunes, or other non-Microsoft candidates.
Still, millions continue to use Windows Media Player as their music-file database. If you’re among them, see the free downloadable PDF appendix “Windows Media Player” on this book’s “Missing CD” page at www.missingmanuals.com.
Windows PowerShell
PowerShell is a command console and scripting language. If you’re a programmer, PowerShell lets you write your own simple programs, called cmdlets (“commandlets”) that can perform all kinds of automated drudgery for you: copy or move folders, manipulate files, open or quit programs, and so on.
You harness all this power by typing up scripts in PowerShell’s command line interface (which means no mouse, no menus, no windows—all text, like in the DOS days). In short, PowerShell is not for the layperson. If you’re an ambitious layperson, however, a Google search for PowerShell tutorial unveils all kinds of websites that teach you, step by step, how to harness this very advanced tool.
Windows Speech Recognition
Windows offers a somewhat accurate speech-recognition feature, in your Windows Ease of Access folder. You can read all about it in “Speech Recognition and Dictation”.
WordPad
WordPad (in your Windows Accessories folder) is a basic word processor. Among other blessings, WordPad has a toolbar ribbon for quick access to formatting commands, and it can open and create Microsoft Word files. Yes, you can get away with not buying Microsoft Office, and none of your email business partners will ever know the difference.
And it’s not just Word files. WordPad also can open and create plain text files, Rich Text Format (RTF) documents, and OpenOffice.org files.
Using WordPad
When WordPad first opens, you see an empty sheet of electronic typing paper. Just above the ruler, the Ribbon offers menus and buttons that affect the formatting of your text. As in any word processor, you can apply these formats (like bold, italic, or color) to two kinds of text:
Text you’ve highlighted by dragging the mouse across it.
Text you’re about to type. In other words, if you click the I button, the next characters you type will be italicized. Click the I button a second time to turn off the italics.
The Font formatting buttons let you change the look of selected text: font, size, color, subscript, and so on. The Paragraph formatting buttons affect entire paragraphs.
WordPad doesn’t offer big-gun features like spell-checking, style sheets, or tables. But it does offer a surprisingly long list of core word-processing features. For example:
Find, Replace. Using the Find button (right end of the Home tab on the Ribbon), you can locate a particular word or phrase instantly, even in a long document. The Replace command takes that a step further, replacing that found phrase with another one (a great way to change the name of your main character throughout your novel, for example).
Indents and Tab stops. As shown in Figure 8-39, you click on the ruler to place tab stops there. Each time you press the Tab key, your insertion point cursor jumps in line with the next tab stop.
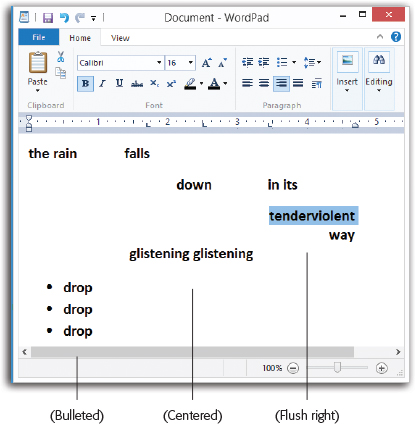
Figure 8-39. WordPad’s formatting ribbon makes it a surprisingly close relative to Microsoft Word. These buttons make paragraphs flush left, centered, flush right, or bulleted as a list. You can drag through several paragraphs before clicking these buttons, or you can click them to affect just the paragraph where your insertion point already is. The little L’s on the ruler indicate tab stops that have been clicked into place; each press of the Tab key makes the insertion point jump to the next one.
Bulleted lists. You’re reading a bulleted list right now. To apply bullets to a bunch of paragraphs, click the Bullets button (
 ). If you click the ▾ next to it, you can create a numbered or lettered list instead.
Insert object. This button lets you create or slap in a picture, graph, chart, sound, movie, spreadsheet, or other kind of data. (The “Paint drawing” button opens up a temporary Paint window so you can whip up a quick sketch that then gets dropped into your WordPad document.)
Tip:
If you click “Date and time,” you get a dialog box full of date and time formats (12/5/2018; 5-Dec-2018; Wednesday, December 5, 2018, and so on). Double-click one to insert that date into your document at the insertion point.
Drag-and-drop editing. Instead of using the three-step Copy and Paste routine for moving words and phrases around in your document, you can simply drag highlighted text from place to place on the screen.
Xbox
Steady, there. Windows 10 does not come with a free Xbox.
But if you already own Microsoft’s popular game console, you’re in for a treat. This app is one of Microsoft’s proudest Windows 10 features. It can perform a whole circus full of stunts that supplement an actual Xbox in your TV room.
For example, the Xbox app shows you all your stats, recently played games, and friends; you can message them, invite them, and chat with them.
You can also use your tablet or laptop as a remote control for the Xbox (using it to change TV channels, for example, or pause playback).
Some companies are releasing games that you can play between a PC and a real Xbox, too.
The real eye-popper, though, is real-time game streaming. That’s when you’re sitting at your laptop or tablet in one room, playing games that are physically running on the Xbox One in another. You’re seeing, hearing, and controlling the Xbox on your PC, using the PC as a second screen.
That’s a huge benefit when you’re playing a game on the Xbox in the TV room and some heartless family member comes in and demands to watch TV. Instead of being booted off your game, you can just take it anywhere else on the Wi-Fi network.
The Guided Tour
If you’ve ever played an Xbox game, much of the Xbox app should look familiar (Figure 8-40):
Top left. Here’s a list of the Xbox games you’ve been playing recently. You’ll need this list if you ever decide to try that game-streaming business, as you’ll see in a moment.
Tip:
If you click a game’s cover art here, you open the “game hub”—the game company’s own news feed.
Lower left. Featured games from the Microsoft Store—that is, games the company dearly hopes you’ll buy.
Center column. This is your activity feed, exactly as it appears on the Xbox. It shows what your friends have been doing in their games and lets you comment on or “like” their achievements.
Right column. Here’s your list of friends and clubs—all of them, whether they’re online at the moment or not. You can see what they’re doing right now on their Xboxes (“Watching TV,” “Blu-ray Player,” “Halo,” or whatever), send them messages, start a party chat, invite them to game sessions, watch their recorded game clips, and so on. (Click a friend’s name to summon the Invite and Message buttons in a toolbar at top.)
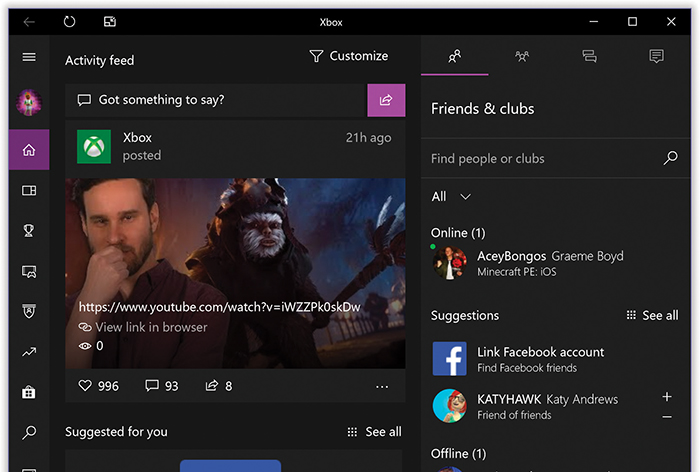
Figure 8-40. The Xbox app is a wireless global companion for your Xbox console at home—and for your universe of friends and enemies on the Xbox service. The Xbox app is a remote control for your Xbox, which also makes it possible to play games on your laptop that physically run on the Xbox elsewhere in the house.
Game Streaming
OK, here it is: The much-celebrated Xbox game streaming. Your Xbox One console is actually running the game, but you’re playing it on a Windows 10 computer elsewhere on the same Wi-Fi network. Here’s how to get it going.
First, the setup: The Xbox One and your Windows 10 machine have to be on the same network—very fast Wi-Fi or a wired network are recommended—and you have to sign in with the same Xbox account (gamertag) on both.
Set up the Xbox One for streaming.
On the Xbox itself, go to
→→Preferences. Turn on “Allow game streaming to other devices.” On the same screen, under “Enable the SmartGlass connection,” select either “From any SmartGlass device” or “Only from profiles signed in on this Xbox.”On your Windows 10 machine, open the Xbox app. Tap
(top left) to open the menu column. Hit Connection.The “Connect to Your Xbox” screen opens, and the app scans the network for Xbox One consoles.
Select your Xbox’s name.
If the fates are smiling, you’re now connected. New options appear for streaming, power, and media remotes. You now have remote control of your Xbox One!
Select Connect. Within the Xbox app, find a game you want to play. On its details screen, hit “Play from console” at upper right.
In just a moment, the game appears on your Windows 10 machine’s screen. You can plug in a USB game controller, if you like, or just use the keyboard—but either way, you can marvel at the miracle of gaming that transcends the barriers of space and time.
Well, sort of.
Tip:
If your network isn’t fast enough for smooth, crisp video, you may have to settle for smooth, less crisp video. In the Xbox app, open ![]() →
→![]() →XBox One, and try lowering the Quality level until the gameplay stops stuttering.
→XBox One, and try lowering the Quality level until the gameplay stops stuttering.
Screenshots and Game DVR
If you do something extra-cool in a game, it’s not enough just to brag about it; you’ve got to capture a picture of it (a screenshot) or record it as a video, using the Game DVR feature.
You take a screenshot of a game the way you would any other window: Alt+PrtScn (“Run”).
But in the Xbox app, life gets even sweeter, because you can also record video of your gameplay. In fact, you can record video of anything you’re doing on your computer, even if it’s not a game and has nothing to do with the Xbox. Keep that in mind next time you’re making a training video.
Note:
Two things the Xbox app can’t record are the desktop and File Explorer windows. For that, you’d need a more professional video-capture program like Camtasia.
To set this up in the Xbox app, open ![]() →
→![]() →Gaming→Game DVR. Turn on “Record in the background while I’m playing a game.” (If you can’t turn that on, then get a less wimpy PC.) Other settings here govern the quality of the recordings, maximum length, audio, storage location, and so on. Now you’re ready.
→Gaming→Game DVR. Turn on “Record in the background while I’m playing a game.” (If you can’t turn that on, then get a less wimpy PC.) Other settings here govern the quality of the recordings, maximum length, audio, storage location, and so on. Now you’re ready.
The Game Bar
Open any app on your computer. It doesn’t have to be a game. It could be Maps, or Mail, or a web browser—doesn’t matter. The Xbox app, running in the background, will be able to record its video image.
When you’re ready, press ![]() +G.
+G.
Note:
If this is the first time you’re recording from this app, Windows wants to know: “Do you want to open Game Bar?” (See Figure 8-41.) It may sound as if it’s proposing that the two of you go into the local sports-bar business. But in fact, this message is brought to you by Microsoft’s jumpy lawyers. They want you to confirm that you are, in fact, about to record a game—and, you know, not something you shouldn’t be recording.
The answer, if you hope to record video, is yes. Doesn’t matter what kind of app you’re really going to record; click “Yes, this is a game.”
Now the Game Bar appears. It has five icons: Take screenshot (saves a still image), Record that (captures the last 10 seconds of activity—yes, it’s retroactive recording, great for game highlights!), Record from now (start recording), Mic on/off, and Start broadcasting (read on). You also get mini-buttons that shut off the mic and camera while you’re broadcasting.
To start recording, hit the “Record from now” button, or press ![]() +Alt+R.
+Alt+R.
Now go about your business in whatever app you’re using. Play, zoom, scroll, click, do whatever you need to do. Behind the scenes, the Xbox app is creating a beautiful audio-and-video clip. You have an hour to fill, if necessary.
When it’s all over, press ![]() +Alt+R again. (Or if you can’t remember that, press
+Alt+R again. (Or if you can’t remember that, press ![]() +G to open the Game Bar, and then click the square Stop Recording button.)
+G to open the Game Bar, and then click the square Stop Recording button.)
How do you find your recording? Open the Xbox One app; select the Game DVR icon (the sixth icon down). Your new recording appears here, named after the app, the time, and the date.
Tip:
You can also jump to this screen by selecting the ![]() icon on the Game Bar. Or, when the notification appears (lower right of your screen) to tell you that the recording was successful, click or tap it.
icon on the Game Bar. Or, when the notification appears (lower right of your screen) to tell you that the recording was successful, click or tap it.
Here you can play it back, trim it, rename it, delete it, share it, or open the folder it’s saved in (which is your Videos→Captures folder, in case you were wondering).
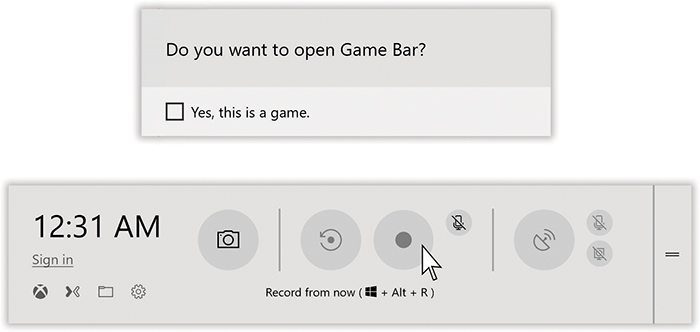
Figure 8-41. Top: Doesn’t matter if you’re recording a web browser, a map, or a spreadsheet; if you want to capture video, tell Windows it’s a game.
Bottom: The big red Record button on the Game Bar starts the recording within the current window. In this case, you’re making a thrilling fly-through of your Maps app.
Broadcasting Your Games
These days, games aren’t just fun for the person playing them. Millions of people find it just as entertaining to watch other people play games. Mostly, they do that by heading over to Twitch.com, the world headquarters for watching people play games (live and streaming, so that you can interact by typing comments), but Microsoft now offers its own, super-simple version of the same thing on a site called Mixer.com. (It’s what was called Beam when Microsoft bought it in 2016.) Not only is Mixer free and easy to use, but the tools you need to broadcast your own game-playing sessions are built right into Windows. If your streams become popular enough, you can even make money through a Mixer “partnership.” (Note, though, that Mixer is newer and much smaller than Twitch or YouTube Gaming, so there may be fewer sponsorship dollars to go around.)
Tip:
For most people, the factory settings work fine. But if you’d like to fiddle with the details of your broadcast—frame rate, audio quality, microphone volume, and so on—visit ![]() →
→![]() →Gaming→Broadcasting.
→Gaming→Broadcasting.
When it’s showtime, fire up the game you want to broadcast—any kind, any brand. Open the Game Bar by pressing ![]() +G. Then, when you’re ready, press
+G. Then, when you’re ready, press ![]() +Alt+B, or hit the
+Alt+B, or hit the ![]() button.
button.
Note:
Certain games in full-screen mode prevent the Game Bar from appearing. If that’s your situation, you can start and stop broadcasting without the Game Bar: Press ![]() +Alt+B. You can also press
+Alt+B. You can also press ![]() +Alt+W to hide or show the live camera view during your broadcast.
+Alt+W to hide or show the live camera view during your broadcast.
As shown in Figure 8-42, a setup console now appears. Double-check these parameters:
Broadcasting window. What do you want the world to see? Just the game, or the entire Windows screen (which could be useful if you intend to switch apps mid-broadcast)?
Camera Position. Which corner of the screen should hold the live camera view of your face as you play and talk?
Microphone on, Camera on. Some people don’t show their faces when they broadcast; occasionally, they don’t even wisecrack and narrate as they play.
The preview shows how your broadcast will appear to the world. If you approve, choose “Start broadcast.”
Everything you’re doing is now visible to anyone who has joined your Mixer.com channel, which Windows creates automatically. (It’s named after your Xbox Live name.) Your action also appears on your Xbox Live activity feed, so your Xbox friends can admire it using their game consoles.
Tip:
Obviously, it’s no fun to broadcast your gaming magnificence if nobody’s watching. To spread the word, send around the web address of your Mixer channel. (Select “Your channel” in the Broadcast setup window, shown in Figure 8-42.) If your Xbox gamertag (name) is Killmaster2003, for example, then your Mixer page’s address is https://mixer.com/Killmaster2003. Anyone who goes to that page can watch you play and can type-chat to fellow fans in real time.
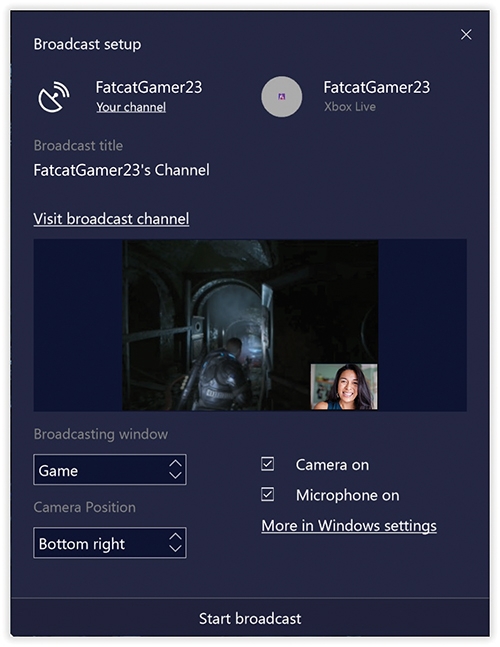
Figure 8-42. You’re getting one last look at how you’ll appear to the world of fellow gaming nerds before you go live.
A small window, showing your broadcast, appears as you play; at the top, a thin control bar offers buttons for pausing the broadcast, moving the camera’s inset, turning off the camera or microphone, switching to the chat window, and seeing how many people are watching you (and how long you’ve been broadcasting).
Tip:
Don’t use Game Mode (see the box on the previous page) while you’re broadcasting. The mere act of broadcasting already slows down the game animation slightly; Game Mode throttles the broadcasting data in the name of making the animation smoother.