Chapter 7. Settings & Control Panel
Every complex machine has a control panel. There’s the dashboard of a car, the knobs on a stove, the cockpit of an airplane. And then there’s the granddaddy of them all: the Control Panel in Windows.
Actually, in Windows 10, the Control Panel isn’t very important anymore. It’s still there—like an old typewriter you can’t bear to throw away—and you can still read about it later in this chapter.
But in Windows 10, Microsoft has extracted a few hundred of the Control Panel’s most useful options and packaged them up into a new app called Settings. It’s far cleaner, simpler, and better organized, and it’s designed to accommodate either a mouse or your finger on a touchscreen.
With every new Windows 10 update, Microsoft moves more controls out of the old Control Panel and into Settings. At this point, only the most obscure settings require a visit to the Control Panel—and the Settings app has gotten huge.
The Settings App
Most of the time, you’ll customize your system in the Settings app. Volume, screen saver, Wi-Fi setup, privacy settings, PC accounts, color schemes, and so on—it’s all here, in one place.
And where is “here”? There are plenty of avenues to the new Settings:
From the Start menu. Click, press, or tap
 ; in the left side of the Start menu, choose Settings (
 ).
).From the Action Center. Click or tap
 (or press +A); on the Quick Action tiles, hit All Settings.
From the keyboard. Press
+I. (That’s I for settIngs, of course.)
You now encounter the magnificence of the Windows 10 Settings app (Figure 7-1).

Figure 7-1. The Settings app looks like the image at right when you first open it. But what’s this? No list view available? Not to worry. If you grab the right edge and drag it inward, making the window narrower, the window redraws itself as a compact list view (left).
Direct Access to Settings Pages
The 13 broad categories of Settings are described on the following pages.
But you should know that you’re wasting your time if you click or tap your way into a settings screen. It’s almost always faster to search for settings, or to ask Cortana to open a screen for you. Say, “Open Wi-Fi settings,” for example. You’ll jump right to the page you want.
Tip:
If there’s a certain Settings page you use often, here’s an idea that may not have occurred to you: Install its tile on the Start menu!
Once the Settings app is open, you can right-click either a Settings category (like System or Devices) or an individual Settings page (like Battery Saver or Storage). From the shortcut menu, choose Pin to Start. Boom—there it is.
Handily enough, the search produces results both from Settings and from the old Control Panel.
System
At top left in the Settings app is the most important category here: System. This icon is the gateway to individual screens for power, storage, notifications, apps, and screen settings. Click it to reveal the following settings pages inside (Figure 7-2).
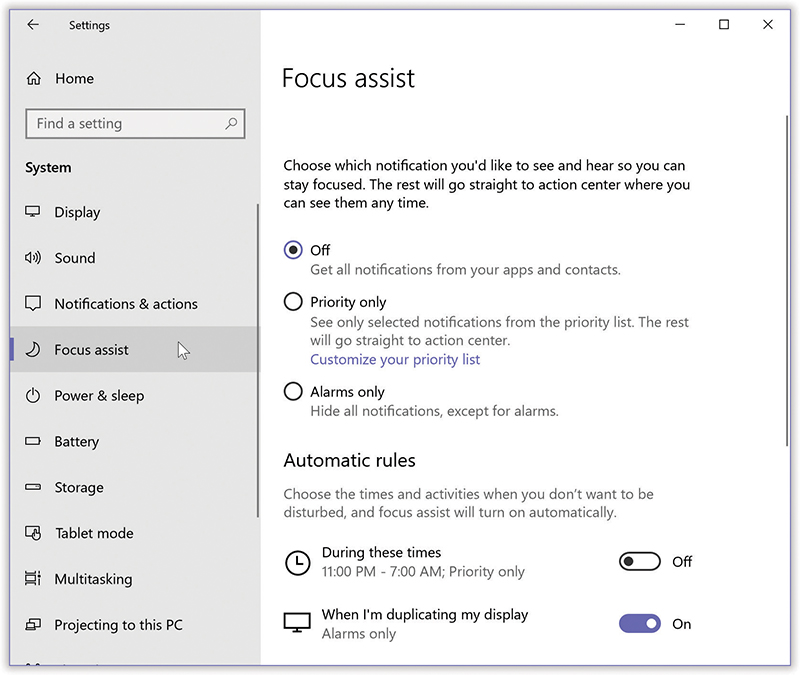
Figure 7-2. A typical Settings screen looks like this. Select a category in the column at left, and then adjust the settings at right. Of course, often, the quickest way to one of these Settings pages is to use the Search command.
Bonus tip: From any Settings screen, you can backtrack by pressing your Backspace key (as long as your cursor is not in the search box).
Display
These settings govern the size of type on your screen, serve as the dashboard for multiple-monitor setups, and control a cool (well, warm, really) new function called Night Light. “Night Light” describes it all.
Sound
This screen controls every aspect of your microphone and speakers:
Choose your output device, of course, lets you specify where your computer should play its sound: the built-in speakers? A Bluetooth wireless speaker? Headphones? Choose from this drop-down menu.
Volume. This slider is your PC’s master volume slider. (There are of course more efficient ways to adjust the volume—like using your volume keys or the volume control on your system tray.)
Troubleshoot. Opens the sound “troubleshooter,” which walks you through some steps to figure out why you’re not hearing anything.
Input. What microphone should your PC “listen to”? Of course, your machine probably has only one—but you know. Just in case.
There’s a live microphone-testing graph here, too, which dances around as it hears sound, and another Troubleshoot button.
App volume and device preferences. This new April 2018 Update feature lets you adjust volume levels and microphone/speaker setups individually for apps or devices connected to your PC. You know: headphones for Spotify, built-in speaker for error beeps. (Apps have to be specially written to hook into this feature; you may not see many listed here at first.)
Bluetooth and other devices. Opens the panel described in “Bluetooth & Other Devices”.
Sound control panel. Opens the panel described in “Editing a theme’s sound settings”.
Notifications & Actions
Here you can tame the notifications—the little bubbles that pop onto your screen to alert you about this or that—which might otherwise interrupt you to insanity.
This screen is also where you choose and arrange the tiles you want on your Quick Actions palette; see “The Quick Action Tiles”.
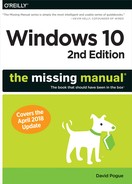
Focus Assist
This “Do not disturb” feature is described nicely in “Focus Assist: The Silence of the Toast”.
Power & Sleep
These options manage the power consumption of your computer. That’s a big deal when you’re running on battery power, of course, but it’s also important if you’d like to save money (and the environment) by cutting down on the juice consumed by your desktop PC.
The drop-down menus here govern the sleeping habits of two components: your screen and the computer itself. The sooner they sleep, the more power you save. The drop-down menus let you choose intervals from “1 minute” to “Never.”
Of course, when your PC is plugged in, you might not care so much about battery savings—so you get a second set of drop-down menus that govern sleep schedules when the machine has wall power.
Finally, “Network connection” specifies whether or not you want your laptop or tablet to remain connected to the network when it’s asleep and not plugged into power. Your choices are Never, Always, and Managed by Windows, meaning that only certain apps are allowed to stay connected to the network: Internet calling apps like Skype and apps you’ve allowed to run in the background (in ![]() →
→![]() →Privacy→“Background apps”).
→Privacy→“Background apps”).
Battery
Here, all in one handy dashboard, is everything you need to know about the battery of your tablet or laptop. It’s all covered in Chapter 12.
Storage
This screen is all about storage—of your files and apps.
Local storage shows a graph of your main drive, showing how full it is. Click the graph to see what is using up all your space, broken down by System, Apps, Pictures, and so on.
Storage sense frees up space by deleting junk files automatically. See “Storage Sense: More Gigs, Yours Free” for details.
Change where new content is saved is designed for people who have external drives connected to their PCs, so they can keep big files like pictures, music, and videos in separate, roomier places.
In the resulting dialog box: pop-up menus for documents, music, pictures, and videos. For each, you can choose your PC or an external drive’s name and letter. From now on, whenever you download or import files of those types, Windows stores them on the specified drives, for your convenience.
(Of course, whatever change you make here doesn’t affect the current locations of any files—only future ones.)
Manage Storage Spaces. See “Storage Spaces” for details on this “save everything onto two drives simultaneously” safety feature.
Tablet Mode
This mode means, “I have no keyboard or mouse. Make this tablet easier to use!” See “For Hybrid PCs Only: Tablet Mode (Continuum)” for details. You also control the suggestions you see in your Timeline, described in “Task View and Timeline: ![]() +Tab”.
+Tab”.
Multitasking
These are the options that control window snapping, and they’re described in “Windows Snap—Now with Four Panes!”.
Also tucked in here: a couple of options for the virtual-screens feature described in “Virtual Screens”. For example:
On the taskbar, show windows that are open on: The taskbar’s job is to sprout icons for all your open windows. But what if you’ve set up a couple of virtual monitors? Should the taskbar change as you switch from “monitor” to “monitor,” showing buttons only for the apps on the current desktop? Or should it always reflect all your open windows on all the desktops?
Pressing Alt+Tab shows windows that are open on: Similar question. When you press the app-switching keystroke (“The App Switcher: Alt+Tab”), should the app switcher show the window miniatures for all the windows on all your desktops? Or just the one you’re using right now?
Next, this screen offers, weirdly, a video that explains how to use Task View and window snapping. Finally, the “Multitask with multiple desktops” link opens a web page that explains virtual screens (but not as thoroughly as “Virtual Screens”).
Projecting to This PC
How’d you like to use your big computer screen as a wireless display for your phone? See “Projecting to Your PC”.
Shared Experiences
“Nearby sharing” is Microsoft’s term for what Apple calls AirDrop: a slick, simple way to shoot a file from one PC to another—without involving any setup, network settings, or user accounts; see “File Sharing 1: Nearby Sharing”.
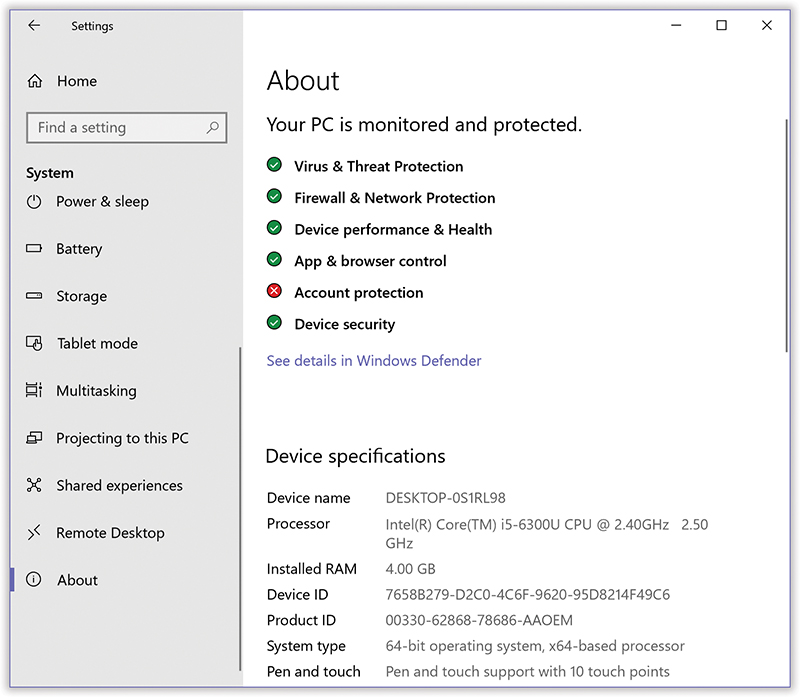
Figure 7-3. The About screen has two parts. At top, a summary of your PC’s vulnerability to various threats.
Below that, you’ll find your computer’s name, network, Windows version, memory, and processor. This screen also shows whether you have a 32-bit or 64-bit system (“UP TO SPEED A Little Bit About 64 Bits”), and lets you know whether or not you have a touchscreen, although just touching your screen is usually a faster way to figure that out.
Remote Desktop
Believe it or not, you can connect to your PC from across the Internet, rifle through its files, and control it—using any computer or phone (even an Apple or Android one) as a viewer. See “Remote Desktop”.
About
Here’s a master list of all the aspects of your computer that Windows Defender Security Center is currently protecting (“Windows Defender Security Center”), plus your computer’s birth certificate (Figure 7-3).
Devices
This second major Settings category is the grand depot for connecting other devices: printers, scanners, cameras, and so on. Its tabs go like this:
Bluetooth & Other Devices
Bluetooth is a cable-elimination technology. It’s designed to let gadgets communicate wirelessly within about 30 feet, using radio signals.
Bluetooth is built into most computers and cellphones, so you can connect them with Bluetooth speakers, earbuds, mice, keyboards, fitness bands, smartwatches, printers, and so on.
Bluetooth is pretty slow (you get transfer speeds of 30 to 150 K per second, depending on the distance). But it works no matter what the gadget—Mac, Windows, smartphone—so it’s great as a universal file-exchange translator, too.
In any case, this screen is Bluetooth Central, where you introduce your PC to wireless speakers, keyboards, mice, earbuds, and other Bluetooth gadgets. Here’s what’s on it:
Bluetooth On. Here’s the on/off switch for your computer’s ability to connect wirelessly to Bluetooth gadgets. Below it: your PC’s name, as you’ll see it listed on the Bluetooth device’s screen, if any. (There are two quicker ways to turn Bluetooth on or off, though: Use the Action Center tile or tell Cortana.)
[List of Bluetooth gadgets.] Here’s the list of Bluetooth gizmos you’ve already connected wirelessly to your PC: mouse, keyboard, speakers, and so on. If you select one, you reveal a “Remove device” button.
Add Bluetooth or other device. On the other hand, when you want to add a connection, start by putting your Bluetooth gadget in pairing mode. That’s probably the hardest part of the whole process; you may have to peer at its user guide under an electron microscope to find out what buttons you have to hold down to get pairing mode going.
Then use this button (“Add Bluetooth or other device”), and proceed as shown in Figure 7-4.
Download over metered connections. This checkbox lets you save money by preventing your PC from downloading device software (drivers and so on) while you’re on a pay-as-you-go Internet connection.

Figure 7-4. Top: You’re asked what kind of doodad you’re introducing: Bluetooth (what you want 90 percent of the time), “Wireless display or dock” (to connect wireless Bluetooth peripherals), or “Everything else” (wireless Xbox controllers, DLNA-logo products like game consoles, home theater systems, speakers, storage devices).
Bottom: Once your Bluetooth gadget in is pairing mode, it shows up on the “Add a device” screen. Select it, enter the pairing code if you see one, and enjoy your new short-range wireless connection.
Printers & Scanners
Here’s your list of printers and scanners that Windows knows about—and your opportunity to connect a new one. See Chapter 13.
Mouse
On this page, you can tweak the most essential behaviors of your pointing device:
Primary mouse button. The primary mouse button is the one you press for normal clicks (as opposed to right-clicks). If you’re left-handed, you may prefer to switch the buttons so that the right button is the primary one.
Roll the mouse wheel to scroll. If you have a mouse, and it has a scroll wheel, this drop-down menu lets you change the behavior of each “click” of that wheel. Does it scroll a few lines at a time, or a whole screenful?
If you choose “Multiple lines at a time,” you can then use the slider to specify how many lines at a time, to suit how caffeinated your style is.
Scroll inactive windows when I hover over them. The question is: When your cursor is in front of a background window—not the one you’re working in—what should happen when you turn the mouse wheel? Should that window scroll? (Usually you want this on. It’s handy.)
Additional mouse options. Boom—you wind up in the cramped, ancient Control Panel, where you can set up a few additional mouse features (“Mouse”).
Touchpad
This screen appears if you’re using a laptop; it’s got every conceivable setting for your trackpad. See “Trackpad Settings” for details.
Typing
In theory, your keyboard is something you’ll use quite a bit, whether it’s the physical one built into your laptop, a wireless one connected to your desktop, or an onscreen one you use on a tablet. Fortunately, you can tweak it to your liking.
Some of these options appear only if you have a tablet or hybrid laptop (whose keyboard comes off).
Autocorrect misspelled words. You might have noticed that, as you type, Windows quietly and instantly corrects your obvious typos. (Or maybe you haven’t noticed, which is even more awesome.)
In other words, if you type “prolbem,” for example, it changes to “problem” the instant you press the space bar at the end of the word. There’s no beep, no underline, no error message; the correction just happens.
Note:
On the other hand, these spell-checking features work only in Microsoft Store apps—Calendar, Maps, Photos, and the like—not traditional desktop apps like Notepad. So maybe you really haven’t seen them.
Anyway, here’s the on/off switch for autocorrect—handy if, for example, you’re writing a novel featuring a character with really bad spelling.
Highlight misspelled words. But what about a word like “corse”? Did you mean corset or course? Windows can’t read your mind. (Maybe someday.)
In that case, Windows doesn’t correct the error—it just flags it by displaying a wavy underline beneath the questionable word. You can turn this off, too.
Typing. These three options make your onscreen keyboard behave exactly like the one on a smartphone. For example, “Show text suggestions as I type on the software keyboard” means you’ll get a row of proposed completions of words as you type them, to save you time and typos. “Add a space after I choose a text suggestion” and “Add a period after I double-tap the Spacebar” make the onscreen keyboard work even more like your phone.
Touch keyboard. Even more time-saving features for using your onscreen keyboard! “Play key sounds as I type” helps you understand when you’ve actually triggered a letter, since the keys are just images on glass. “Capitalize the first letter of each sentence” saves you fiddling with the onscreen Shift key; “Use all uppercase letters when I double-tap Shift” lets you turn on Caps Lock when it suits you; and “Show the touch keyboard when not in tablet mode and there’s no keyboard attached” makes the onscreen keyboard appear when you’re not in Tablet mode (“For Hybrid PCs Only: Tablet Mode (Continuum)”).
Hardware keyboard. Why, look—you can summon word-completion suggestions even when you’re using an actual physical keyboard, too! You can tap or click one, if you really think that will save you time (Figure 7-5).
You get an autocorrect on/off switch for your physical keyboard here, too.
Multilingual text prediction. Suppose you’ve turned on more than one language in
→→“Time & language.” Thanks to this feature, Windows can offer three word-completion suggestions from those alternate languages, too—not just your primary language (Figure 7-5, bottom). (This feature works only in Roman languages—that is, languages whose alphabets’ characters look like English: A, B, C, and so on. So—not Chinese.)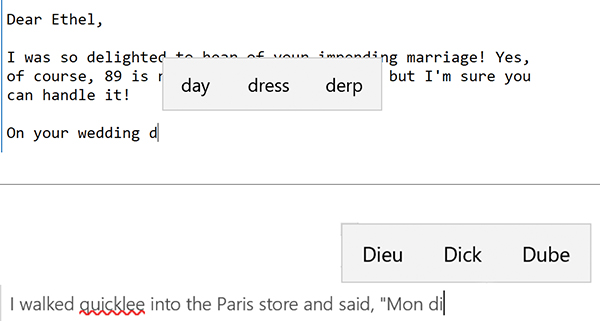
Figure 7-5. Top: You can have autocomplete suggestions even if you’re typing with a physical keyboard.
Bottom: Windows can even make suggestions in different languages.Advanced keyboard settings. On this sub-screen, you get a few settings that pertain to multiple-language setups. One of them lets you turn on the “desktop language bar,” a system tray icon that’s a drop-down menu of all the languages you’ve installed and lets you switch among them sans difficulté.
Pen & Windows Ink
These options let you fine-tune Windows’ handwriting-recognition and stylus features, as described in “Training Windows to Know Your Handwriting”.
AutoPlay
Windows wants to know what you want to happen when you insert a flash drive (“Removable drive”) or a memory card (“Memory card”). For each, you get choices like “Open folder to view files,” “Import photos and videos,” “Configure storage settings”—or “Take no action.” Or you can turn the whole feature off.
USB
“Notify me if there are issues connecting to USB devices” alerts you when Windows doesn’t properly recognize a USB gadget, like a flash drive or a mouse, that you’ve just plugged in.
Phone
Here’s where you can link your smartphone to Windows 10. Microsoft sheepishly admits that it has flopped in the smartphone biz, so it made this feature available to the winners in that market: iPhone and Android.
Start by signing in and choosing “Add a phone.” Once you enter your phone number, Microsoft texts a link to you; it takes you to the app store to download the Edge and Cortana phone apps. And now your phone is listed under “Linked phones.”
What does that mean? For now, it means three features:
Fling any web page you’re reading on your phone, in any iOS or Android browser, to your PC to keep reading on the big screen, as described in “Continue on PC”. (To do that, tap the phone’s Share button, and choose Continue on PC as the destination.) Very cool.
Dictate and create reminders on your phone in the Cortana app (iOS or Android). They’re automatically synced between the devices.
You can receive notifications from your Android phone—missed calls, incoming texts, and a few apps—on your PC. You can even respond to the texts with the luxury of a full mouse and keyboard for editing, using your phone as a cellular antenna.
To pull this off, install the Cortana app for Android on your phone. In that app, choose
→→“Cross device.” Ensure that all the notifications you want to receive (missed calls, incoming messages, low battery) are turned on.Now your Android phone’s notifications pop up in the Action Center. You can actually click or tap to reply to texts, although you can’t place calls and can’t initiate a text-message conversation. Maybe in Windows 11.
Network & Internet
The fourth major Settings page offers all the tools you need to get online. Most of them are described in Chapter 12, but here are some key panels:
Status
Voilà: The new Network Neighborhood (as Microsoft used to call it). Check your connection, fiddle with your sharing settings, dive into the troubleshooter.
Ethernet
This screen does little more than tell you whether or not you’re connected to a network with an Ethernet cable—and offer links to other networking control panels.
Dial-Up
Really? You get online with a dial-up modem?
VPN
All over the world, corporate employees on the road connect to their home offices using virtual private networking. VPN is a fancy way of saying, “Your laptop computer can become part of your company’s network over the Internet.” See “Virtual Private Networking” for details.
Airplane Mode
As you’re probably aware, you’re not allowed to make cellphone calls on U.S. airplanes. According to legend (if not science), a cellphone’s radio can interfere with a plane’s navigational equipment.
But come on. If you’re using a tablet with cellular service, are you really supposed to deprive yourself of all the music, videos, movies, and email that you could be using in flight, just because cellular gadgets are forbidden?
Nope. Just turn on airplane mode (so that this switch says On). Now the cellular, Bluetooth, and Wi-Fi features are turned off completely. You can’t make calls or get online, but you can do anything else in the computer’s bag of noncellular tricks. You can also then turn Wi-Fi and Bluetooth back on, depending on what’s available on your airplane.
Tip:
Of course, it’s much faster to hop into airplane mode using the Quick Actions panel (“The Quick Action Tiles”)—or even by telling Cortana, “Turn on airplane mode.”
Mobile Hotspot
If you’ve got a cellular-equipped tablet or laptop, it can serve as a portable Wi-Fi hotspot for other devices nearby. See “The Mobile Hotspot”.
Data Usage
This item shows how much Internet data your computer has used in the past 30 days. It’s primarily intended for tablets and laptops that have cellular service, to avoid going over your monthly allotment. But some people have Wi-Fi service with monthly data caps, so you also get a breakdown of Wi-Fi data use by hotspot.
Usage details per app. View which apps have used how much of that data.
Set limit. Click to set up a data limit—say, 5 gigabytes. When you reach that limit, Windows will warn you, so you don’t accidentally go way over and incur massive overage charges.
Background data. Choosing “Never” shuts off apps’ access to the Internet when they’re in the background (you’re not actually using them). That’s another good way to prevent nasty surprises.
Proxy
A proxy server is a security barrier between your own network and the Internet. It prevents evildoers online from getting through to your internal network. This screen is where highly paid networking professionals can set up an automatic or manual proxy server.
Personalization
Main Settings Category No. 5 is your interior-design center. Here’s where you can change the look of your desktop wallpaper (Background), desktop color scheme (Colors and Themes), the image on your Lock screen, the behavior of your Start menu, the look of your taskbar, and more. It’s all described in Chapter 4—except for the options governing what shows up in your Start menu, which are described in Chapter 1.
Apps
Windows gives you a delicious amount of control over your apps’ behavior, as you can see from these six tabs:
Apps & Features
Here’s what this screen offers:
Installing apps. Viruses and other malware have dogged Windows for decades. By creating the Microsoft Store (“Microsoft Store Apps”), Microsoft has come up with one way to shut that stuff down for good. Any app from the Store is guaranteed to be virus-free. If you really want to be safe, choose “Allow apps from the Store only.”
Of course, thousands of desktop apps aren’t available from the Microsoft Store. So this drop-down menu also offers “Allow apps from anywhere” and “Warn me before installing apps from outside the Store,” so you can choose a setting that fits your degree of conservatism.
Manage optional features. “Optional features” includes big globs of Windows code that Microsoft considers too specialized to include in the standard Windows 10 installation: Handwriting, Internet Explorer, and a lot of foreign-language fonts. Here’s where you can turn them on or off, providing you’ve got the disk space.
Manage app execution aliases. If you’re techy enough that you routinely open apps by typing their names at the Run prompt, you probably know all about aliases: alternate names for your apps—in this case, Microsoft Store apps. Some of them come pre-equipped with aliases (like spotify.exe) that resemble normal desktop apps (like winword.exe). But in the unlikely event that two of your apps have adopted the same alias, here’s where you can turn off aliases one at a time.
[List of apps.] Here’s a list of all the programs on your PC. Using the drop-down menus, you can change how they’re sorted, or limit the list to one of your drives. By clicking a program’s name, you reveal its Uninstall button, for quick deletion, and its Move button, for shoving it onto a different drive.
Default Apps
See “Choosing Your Default Apps” for details on reassigning document types to new apps.
Offline Maps
See “Offline Maps”.
Apps for Websites
Talk about edge cases!
When you click a link to play a video or music file on some web page, do you want it to play right there in the browser—or do you want it to open the Movies & TV app, or a music-playing app, on your PC? When you click an address link, do you want it to open in another web page, or in Maps? Microsoft’s original thought was that, here, you could choose. But it requires that software companies update their programs to announce which kinds of web links they can open, and very few have.
Video Playback
The settings you make here affect Microsoft’s own video programs, like Edge, Photos, and Movies & TV, and any Store apps that rely on Windows’ built-in video software, including Hulu, Netflix, and Vudu. The main things worth noticing here are “I prefer video to play at a lower resolution” (so that you don’t eat up your monthly data allowance—well, not as fast) and “Optimize for battery life,” which once again lowers the video quality, this time for the sake of your battery.
Startup
These are the programs that you (or Microsoft) has set up to open automatically every time you turn on the PC. Each has an on/off switch, for your control-freak pleasure.
And how do you designate that you want an app added to this list? Often, the app asks you when you install it: “Start BeeKeeper Pro when PC starts up?” or a similar checkbox appears in its settings. But you can also set up apps (or documents) to open at startup manually; see “Startup Items Revealed”.
Accounts
This is the seventh main category. When you sign into your computer, you’re signing into your own account. That keeps your stuff private from anyone else who uses this machine and prevents people from messing up your files and settings.
On this panel, you can set up additional accounts for signing into Windows—usually one for each person who uses the machine—or make changes to your own. And the “Sign-in options” category lets you specify a password, a four-digit number, or a picture password to unlock your account (Figure 18-5). Details on accounts are in Chapter 18.
Time & Language
This category contains a few items for you to set and forget.
Date and Time
Set time automatically, Set time zone automatically, Adjust for daylight saving time automatically. If you turn these off, you will have to set your computer’s clock, time zone, and daylight-saving settings manually.
Show additional calendars in the taskbar. As described in “The System Tray (Notification Area)”, you can click the clock on the taskbar to see a miniature calendar, complete with a list of today’s events. The options in this drop-down menu let you add Chinese subtitling to the dates of the month-view calendar.
Change time and date formats. What’s the first day of the week? Do you put the month first, American-style (7/30/18), or the date first, European-style (30/7/18)? How do you like the time written out?
Region and Language
Specify where you live and what language(s) you speak, for the purposes of tailoring the websites you see and the onscreen keyboards available to you.
Speech
Here’s where you indicate what language you speak (for the purposes of Cortana and speech recognition) and which of Windows’ voices you want it to use when speaking to you. This is also where you can set up your microphone for accurate speech interpretation; if you hit “Get started,” Windows asks you to read a sentence aloud, so it can get an idea of what you sound like.
Gaming
This panel, a relatively recent addition to Settings, offers six tabs’ worth of controls pertaining to PC gaming. Details are in “The Game Bar”.
Ease of Access
Windows offers all kinds of tools to make computing easier if you have trouble seeing or hearing.
Display
Everything you need to see better:
Make everything bigger is a duplicate of the drop-down menu described in “Magnify just the text and graphics”.
Change the size of apps and text on other displays is handy if you’ve connected a second screen or a projector. It lets you scale the text and graphics up or down on each screen independently.
Change the size and color of your cursor and mouse pointer opens the “Cursor & pointer size” described in the next section.
Change brightness automatically or use night light opens the options described in “Night Light”.
Show animations in Windows. Windows 10 spices things up by displaying animations here and there. When you hit the
button, for example, the Start menu seems to slide into place, with its tiles sliding in a microsecond later. It’s very pretty, but it also saps away precious moments of work time. This switch eliminates them, and the time they take.Show transparency in Windows. The hints of transparency (for example, in the background of the Start menu and Settings panels) is meant to make Windows look cooler, but it doesn’t actually help you get any work done, and may even make Windows slightly distracting. Here’s where you can turn them off.
Automatically hide scroll bars in Windows. A scroll bar, of course, is the traditional window-edge slider that lets you move through a document that’s too big for the window. Without being able to scroll, you’d never be able to write a letter that’s taller than your screen.
But you may never need to scroll by dragging the scroll bar; you can slide two fingers up the trackpad, or turn your mouse’s scroll wheel, or press the Page Up and Page Down keys. That’s a long-winded way of explaining why “Automatically hide scroll bars in Windows” comes turned on, so that your window gets more space for your actual document, and the scroll bar is hidden.
Even if this feature is On, you can still bring the scroll bars into view by moving the mouse to the window’s edge. The scroll bar pops right up.
Show notifications for. Notifications, the rectangular bubbles described in Chapter 2, pop in to remind you of something, or to let you know that some new message has arrived—and then they disappear. But, using this menu, you can control how long they stick around before vanishing—from five seconds to five minutes (a good setting if you’re really slow on the draw).
Show desktop background image. You know the wallpaper photo or color you set up in “Background (Wallpaper)”? With one click here, you can replace it with solid black, presumably to make life more legible for the hard-of-seeing. (Of course, you could also just choose solid black as the background color in the first place.)
Personalize your background and other colors. Takes you to the Background settings page (“Background, Colors, Themes, and Fonts”).
Cursor & Pointer Size
Here you can make the cursor easier to see when you’re typing; instead of searching around for a thin, flashing pixel-wide bar, you can thicken it all the way up to a chunky but easy-to-spot 20 pixels (see Figure 7-6).
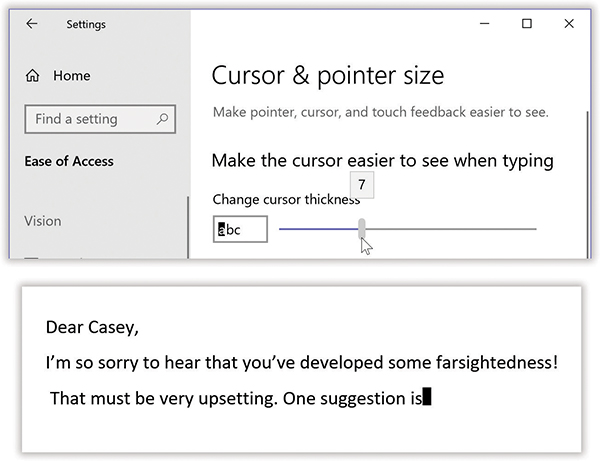
Figure 7-6. Top: Use the slider to adjust the thickness of your insertion-point cursor; as you slide, you get to see an example.
Bottom: You can make the cursor ridiculously thick, if you want.
You can also make your pointer bigger and change its color. Your three choices are the typical white arrow with a black outline, a solid black arrow, and an arrow that reverses whatever is behind it—it shows up white when it’s on a black background and vice versa.
For touchscreen owners, there’s also an option here to give visual feedback when you touch the screen—a little darkened spot follows your finger around.
Magnifier
Magnifier enlarges what’s on the screen in a special movable window; see “Magnifier”.
Color Filters
Windows has several built-in color filters to help make the screen clearer, including for people with specific types of color-blindness. Here are your choices:
Invert. This reverses all the colors: White goes to black, black goes to white, blue to orange, and so on. Some people find this scheme easier to read.
Grayscale. This converts all colors to shades of gray without changing the contrast. This is also meant for easier reading.
Grayscale inverted. This is the combination of the two previous options. All colors are gone, and the white text jumps out from the black and dark-gray screen.
Beneath these choices are three settings specific to color-blindness; they subtly shift the screen’s color values to make them more distinguishable. Choose the one that fits:
Red-green (green weak, for deuteranopia).
Red-green (red weak, for protanopia).
Blue-yellow (for tritanopia).
High Contrast
This feature reverses black for white, like in the Invert option in “Color filters.” But it goes a few steps further—all the way to an all-black background and just a few very bright colors, eliminating a lot of the visual noise. This creates a higher-contrast effect that some people find easier on the eyes. You can choose a canned color scheme, and even edit it (tap a color swatch to change it).
The High Contrast #1 color scheme recalls the first personal computer displays, heavy on the bright yellow and Army green. High Contrast #2 throws in a few Windows blues; High Contrast Black offers bright-white text; and High Contrast White flips your screen back to a white background with black text.
Narrator
Narrator is a screen reader, a digitized voice that reads everything on the screen, which is essential if you’re blind. These settings customize its voice, inflection, and talkiness. See “Narrator”.
Audio
If you have trouble hearing, you may find real value in these options:
Change device volume. Yet another place to raise your PC’s speaker volume.
Change the device or app volume. Opens the Sound panel (“System”).
Change other sound settings. Opens the Sound pane of the ancient Control Panel (“Sound”).
Turn on mono audio is intended for people with hearing loss in one ear. This way, you won’t miss any of the musical mix just because you’re listening through only one headphone.
Select how visual alerts for notifications are displayed. If you have trouble hearing, or if your roommate tends to play heavy metal at top volume when you’re trying to work, you might not hear the little beeps or chimes that Windows plays to get your attention. This drop-down menu lets you opt to add a visual cue, like a flash of the title bar, window, or the whole screen. Not a bad idea on laptops or tablets, actually, so you don’t miss beeps when you’ve got the speakers muted.
Closed Captions
This option controls the look of the closed captions (subtitles) that appear in some of the movies, TV shows, and videos you can buy, rent, or stream from Microsoft’s TV and movie store.
Tip:
In the Movies & TV Store, videos equipped with subtitles bear a small CC icon.
Using these drop-down menus, you can change an insane number of font, size, opacity, and color options, both for the type and the background it appears on.
Speech
If you have trouble typing—or just don’t like to—you may appreciate Windows’ ability to type out what you say. This pane offers links to some Cortana settings, plus reminders of the keystrokes you need to turn dictation on and off. For details on Windows 10 speech recognition, see the free PDF appendix to this chapter, “Speech Recognition.” You can download it from this book’s “Missing CD” page at www.missingmanuals.com.
Keyboard
These clever features are designed to help people who have trouble using the keyboard.
Use the On-Screen Keyboard is just another way to make the keyboard appear (“The Onscreen Keyboard”).
Use Sticky Keys lets you press multiple-key shortcuts (involving keys like Shift, Ctrl, and
) one at a time instead of all together.Use Toggle Keys plays a sound when you hit the Caps Lock, Num Lock, or Scroll Lock key. It has little to do with disabilities; it’s to save anyone from the frustration of hitting one of those keys accidentally and looking up to discover 10 minutes’ worth of gibberish typing.
Use Filter Keys doesn’t register a key press at all until you’ve held down the key for more than a second or so—a feature designed to screen out accidental key presses. It also ignores repeated keystrokes.
Note:
You can turn on each of these features with a keyboard shortcut—but you can also turn that keyboard shortcut off here, so you don’t press it accidentally and wonder why your keyboard is acting so strangely.
Underline access keys when available. Windows veterans remember when menu commands had little underlines, showing which keyboard letter (in combination with the Alt key) would trigger a command. Now that handy cheat-sheet system is back—if you turn on this switch. (It doesn’t work in all programs.)
Show a warning message/Make a sound when turning on... You’ll be shown an “Are you sure?” box, and/or hear a confirmation beep, when you turn on one of the Ease of Access features from the keyboard.
Mouse
Mouse Keys is designed to help people who can’t use the mouse—or who want more precision when working in graphics programs. It lets you click, drag, and otherwise manipulate the cursor by pressing the keys on your numeric keypad. (It’s not very useful on keyboards that don’t have separate numeric keypads, like laptops.)
When Mouse Keys is turned on, the 5 key triggers a click, and the + key acts as a double-click. (Specify a left-button click by first pressing the / key, or a right-click by pressing the - key.)
Move the cursor around the screen by pressing the eight keys that surround the 5 key. (For example, hold down the 9 key to move the cursor diagonally up and to the right.) You can even drag something on the screen; press 0 to “hold down the button” on something, and then move it using the number keys, and press the period (.) to let go.
The sliders here govern the overall acceleration and speed of the cursor movements, although you can always speed up by pressing Ctrl and slow down by pressing Shift (if you’ve turned this option on here).
Tip:
It’s kind of clunky to have to burrow all the way into PC Settings every time you want to turn on Mouse Keys. Fortunately, there’s a shortcut: the Num Lock key on your keyboard. It turns on Mouse Keys (at least if “Only use Mouse Keys when Num Lock is on” is on).
Eye Control
Whoa, cool! If you’ve bought a Tobii eye-tracking camera, you can now control the motion of your cursor just by looking at the screen. Windows translates your gaze into mouse movements—very convenient if you’re unable to use your hands. Here’s where you set up and configure your eye-tracking hardware.
Once everything is running, you get special onscreen floating palettes with buttons for “left click,” “right click,” “double-click,” and so on. You can even type by holding your gaze at one letter at a time on a floating keyboard.
To read more about all the features of eye control, see Microsoft’s help document at http://j.mp/2GB4v1g.
Cortana
Of course Cortana the voice assistant gets her own pages of settings:
Talk to Cortana. See “How to Use Cortana” for details on the different ways you can trigger Cortana.
Permissions & History. As described in “Setting Up Cortana”, these options let you limit what data Microsoft shuttles between your Windows machines across the Internet.
Cortana across my devices. Microsoft has been working hard to integrate your phone and tablet life with your PC life. Here are the on/off switches for some of those cross-platform features, like “Get phone notifications on your PC” (“Phone”), “Help me pick up where I left off on other devices” (“Pick Up Where You Left Off”), and “Get list suggestions” (“Lists”).
More details. This screen offers links to various privacy statements on Microsoft’s website.
Privacy
This panel reveals the vastness of the ocean of data that Microsoft routinely harvests from your computer and shares—with advertisers, with its own programmers, and with other apps.
Fortunately, you can shut down much of it. Chapter 11 covers what these options do, blow by blow.
Update & Security
Windows, like any software, is an eternal work in progress, as these options make clear:
Windows Update
Windows is software and can therefore be updated, debugged, and improved. (Software is handy that way.) Windows Update is Microsoft’s system for sending you patches and fixes over the Internet. See “Windows Update” for more on Windows Update.
Windows Defender
The Windows world is teeming with viruses and other nastiness—and Windows comes with a free antivirus program to block it all, called Defender. These options are described in Chapter 11.
Backup
You’ve just found the settings for Windows’ automatic backup feature, File History. It’s described in Chapter 16.
Troubleshoot
This new panel is a master list of all the Windows Troubleshooters—step-by-step interview screens that guide you through solving problems with your Internet connection, audio playback, printer, and so on. Chapter 15 has more.
Recovery
Windows offers several ways to reset itself in times of troubleshooting. Details are in Chapter 15, but here are the basics:
Reset this PC. This option refreshes your PC—resets your computer. Basic computer settings are reset to their factory states, and apps that didn’t come from the Microsoft Store are deleted. You wind up with a fresh copy of Windows, and your files and settings intact (if that’s what you want).
Go back to the previous version of Windows 10. Microsoft considers Windows 10 to be a work in progress. Upgrades and new features will trickle out all year long, automatically. If some update really messes up your machine, though, at least you have this option; it rewinds Windows to an earlier version.
Advanced startup. This option restarts your computer so you can boot up from some external drive, like a DVD or a USB flash drive, or change startup settings in the course of troubleshooting.
The screen blinks off, and then you arrive at the “Choose an option” screen, where you can restart Windows, troubleshoot (refresh or reset the PC, or use the advanced troubleshooting and configuration tools described in Chapter 15), or just turn the computer off.
Learn how to start fresh with a clean installation of Windows. Takes you directly into the Windows Defender app, where the “Fresh start” process begins, as described in “The Clean Install”.
Activation
Activation is Microsoft’s name for copy protection: You can’t run Windows without a serial number (a “product key”).
This screen lets you know if your current copy of Windows has, in fact, been activated (as opposed to running in trial mode). You can even change your Product ID by clicking “Change product key” without having to reinstall Windows itself, which can come in handy if, for example, you want to upgrade Windows versions or switch to a multiple-use product key.
Find My Device
Hey, cool! “Find my phone” has come to Windows. Here, in one place, are the controls you need to figure out where your laptop, tablet, or touchscreen pen wound up. See “Find My Device”.
For Developers
These options are for programmers who need access to unusual features—like sideloading apps (installing apps that didn’t come from Microsoft’s app store). Also hanging out here, under the File Explorer heading, are checkboxes that change File Explorer settings in ways that can make life easier for developers: revealing hidden files, turning on filename extensions, showing empty drives, and so on.
Windows Insider Program
You don’t have to be some hotshot or bigwig to be one of Microsoft’s beta testers. If you sign up for the Windows Insider program, you have access to not-quite-ready versions of Windows before the public does. You can report bugs, make suggestions, and generally feel like you’re helping Microsoft get the kinks out. On the other hand, you may also have to deal with crashes and half-finished features.
If you decide to sign up, you also have to choose what early stuff you want to get:
Just fixes, apps, and drivers. This option is for the conservative; the only software you’ll get early are these minor ancillary elements.
Active development of Windows. You’ll get early versions of Windows itself.
Skip ahead to the next Windows release. Microsoft intends to release a new Windows 10 version every six months. At any given time, the company is working on both the next version of Windows and the one after that. Is it really supposed to wait until this version is released to the public before enjoying beta-testing help on the next one from you, the brave pioneer? Nope. This option means “Skip the beta versions of the version that’s coming next—start feeding me super-buggy, super-early builds of the Windows versions after that!” (This option is available only if you’ve chosen the Fast Ring, described next.)
What pace do you want to get new builds? If you choose Fast (you’re a member of the “Fast Ring”), you get new “builds” (test versions) as soon as they’re available, every other week or even more often—but you risk greater instability. If you choose Slow (the “Slow Ring”), you’re spared the roughest builds and sent fewer, but more stable, versions of Windows.
The Control Panel
The Settings app is where you go to make most changes to your computer. It’s a cleaner, newer, nicer-looking dashboard for your PC’s settings, and it’s growing more complete with every Windows version.
But the old Control Panel, born in Windows 2 in 1987, is still around, teeming with miniature applications (or applets) that govern every component of your computer.
Many are duplicated in the Settings app. Others are so obscure that you’ll wonder what on earth inspired Microsoft to create them. The following pages cover them all.
Note:
Here and there, within the Control Panel, you’ll spot a little Windows security-shield icon. It tells you that you’re about to make an important, major change to the operating system, something that will affect everyone who uses this PC—fiddling with its network settings, for example, or changing its clock. To prove your worthiness (and to prove you’re not an evil virus attempting to make a nasty change), you’ll be asked to authenticate yourself; see “Authenticate Yourself: User Account Control” for details.
Many Roads to the Control Panel
For most people, the quickest way to the Control Panel is to click into the taskbar search box; start typing control panel until you see its name at the top of the menu. Press Enter (or tap it).
But those are only the tips of the iceberg of Ways to Open Control Panel. Consider:
Control Panel is listed in your Start menu’s “All apps” list (in the folder called Windows System).
Often, you’ll wind up popping into the Control Panel without any warning—after clicking a “More options” link in the Settings app. (Settings has a lot of links to the Control Panel like that.)
The search box is uncannily good at taking you to the control panel you really want, too. Hit
+S to open the search box; type color; when you see Color Management highlighted in the results list, press Enter to open it. (On other quests, you might type fonts, sound, battery, accounts, date, CDs, speech, or whatever.)There’s a similar search box right in the Control Panel window itself.
You can choose a certain panel’s name directly from the Start menu, as described starting in “The Taskbar Search Box”.
If you don’t mind a cluttered desktop, you can make a shortcut for the applets you access most. To do that, open the Control Panel. Right-click the icon you want; from the shortcut menu, choose “Create shortcut.” It automatically places it on the desktop for you.
You can install a certain Control Panel applet onto the Start menu (right side), too! With Control Panel open, right-click the icon you want; from the shortcut menu, choose Pin to Start.
You can even put an applet into the “Quick access” list that appears in every File Explorer window. In the open Control Panel, right-click the icon you want; from the shortcut menu, choose “Pin to Quick access.”
Control Panel Views
When it first appears, the Control Panel looks like the one shown in Figure 7-7. But that’s just the beginning.
The “View by” drop-down menu (upper right) shows that there are three ways to view the complete collection of control panels: by category or as a list of small or large icons.
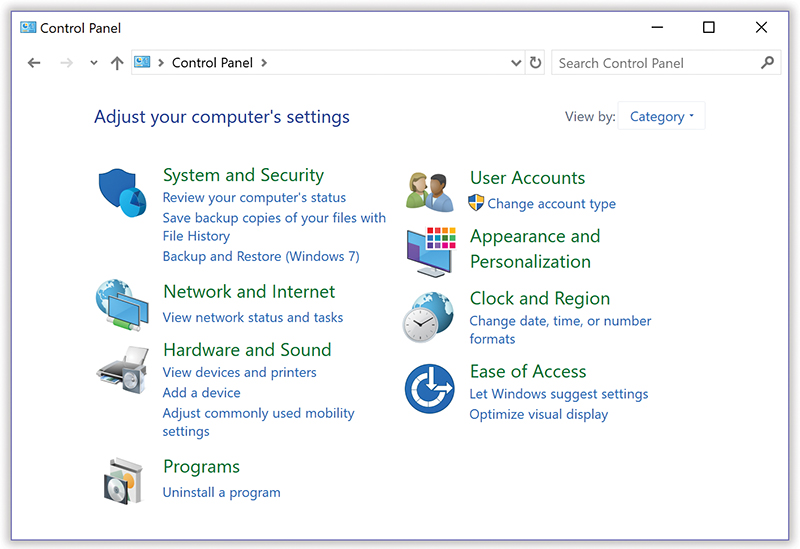
Figure 7-7. Clicking a category heading takes you to the associated list of tasks (and their applets). For your convenience, some tasks are listed under more than one category. It seems that even Microsoft couldn’t decide where each should definitively go.
Category view
If you choose Category view, you’ll find these categories:
System and Security. In this category are system and administrative tasks like backing up and restoring, setting your power options, and security options (firewall, encryption, and so on).
Network and Internet. This category contains settings related to networking, Internet options, offline files (“Offline Files and Sync Center”), and Sync Center (to manage synchronizing data between computers and network folders).
Hardware and Sound. Here you find everything for managing gadgets connected to your computer: printer settings, projector settings, laptop adjustments, and so on.
Programs. You might use this one a lot. Here’s where you uninstall programs, choose which program is your preferred one (for web browsing or opening graphics, for example), turn Windows features on and off, and manage your desktop gadgets.
User Accounts. This category contains the settings you need to manage the accounts on the computer (Chapter 18), including the limited-access accounts that parents can create for their children.
Appearance and Personalization. Here’s a big category indeed. It covers all things cosmetic, from how the desktop looks (plus taskbar and personalization settings) to folder options, and fonts.
Clock and Region. These time, language, and clock settings all have one thing in common: They differ according to where in the world you are.
Ease of Access. This category is one-stop shopping for every feature Microsoft has dreamed up to assist the disabled. It’s also the rabbit hole into Speech Recognition Options.
Large icons, Small icons
The category concept sounds OK in principle, but it’ll drive veterans nuts. You don’t want to guess what category something wound up in—you just want to open the old panel, right now.
Fortunately, the Control Panel can display its dozens of icons in alphabetical order (Figure 7-8).
Use the “View by” drop-down menu in the upper-right, and choose either “Small icons” or “Large icons.” Then double-click the icon of the applet you’d like to use.
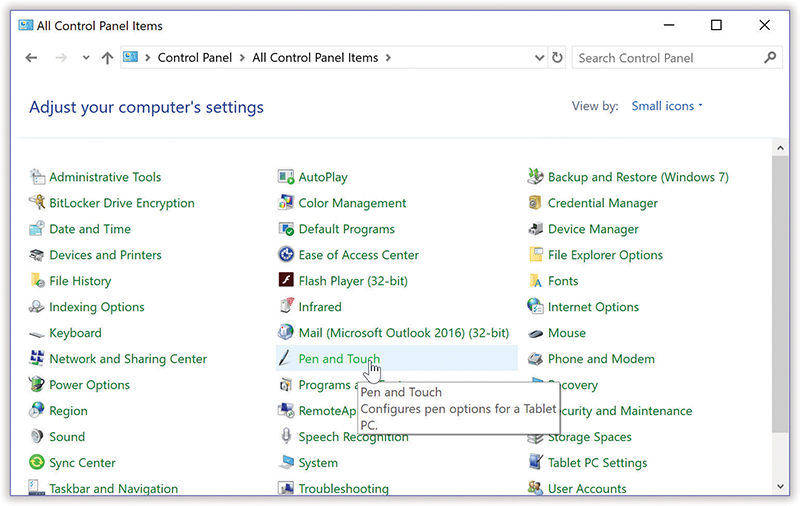
Figure 7-8. Classic view might be overwhelming for novices, because the task icons give little indication about what settings they actually contain. Here’s a hint: Remember that you can just move your mouse over a task and pause there. A tooltip pops up, giving you an idea of what’s inside.
The Control Panel, Applet by Applet
Icon view is the perfect structure for a chapter that describes each Control Panel applet, since it’s organized in alphabetical order. The rest of this chapter assumes you’re looking at the Control Panel in one of the two Icon views.
Note:
To spare you from hunting through an obsolete jungle of Control Panel options when a much cleaner Settings page will do, the following descriptions indicate which applets have been largely replaced by modern Settings screens.
Administrative Tools
This icon is actually a folder containing a suite of very technical administrative utilities. These tools, intended for serious technowizards only, aren’t covered in this book.
AutoPlay
The primary features are duplicated in the Settings app; see “AutoPlay”.
Each time you insert a disc or drive (CDs and DVDs of various types, Blu-ray, HD, cameras, flash drives, and so on), you get a dialog box asking how you want to handle it—this time, and every time you insert a similar gadget thereafter. For each kind of disc, the drop-down menu offers you obvious choices by disc type (like “Play audio CD” for music CDs), as well as standard options like “Open folder to view files (File Explorer),” “Take no action,” or “Ask me every time.”
Behind the scenes, your choices are recorded in the AutoPlay control panel, where you can change your mind or just look over the choices you’ve made so far.
If you’ve never liked AutoPlay and you don’t want Windows to do anything when you insert a disc, just turn off “Use AutoPlay for all media and devices” at the top of the window.
Backup and Restore (Windows 7)
The primary features are duplicated in the Settings app; see “Backup”.
Backup and Restore center is an obsolete method of backing up your computer. It’s included here for the benefit of people who have Windows 7 backups they might want to restore. Check out Chapter 16 for more detailed information.
BitLocker Drive Encryption
BitLocker encrypts the data on your drives to keep them from being accessed by the bad guys who might steal your laptop. For details, see Chapter 17.
Color Management
Microsoft created this applet in conjunction with Canon in an effort to make colors more consistent from screen to printer. Details are in Chapter 13.
Credential Manager
Credential Manager lets you teach Windows to memorize your corporate account names and passwords. It also memorizes your passwords for everyday websites (like banking sites). Credential Manager also stores passwords for shared network drives and corporate-intranet websites, the ones where you have to enter a name and password before you even see the home page.
Date and Time
The primary features are duplicated in the Settings app; see “Date and Time”.
Your PC’s concept of what time it is can be very important. Every file you create or save is stamped with this time, and every email you send or receive is marked with it. When you drag a document into a folder that contains a different draft of the same thing, Windows warns that you’re about to replace an older version with a newer one (or vice versa)—but only if your clock is set correctly.
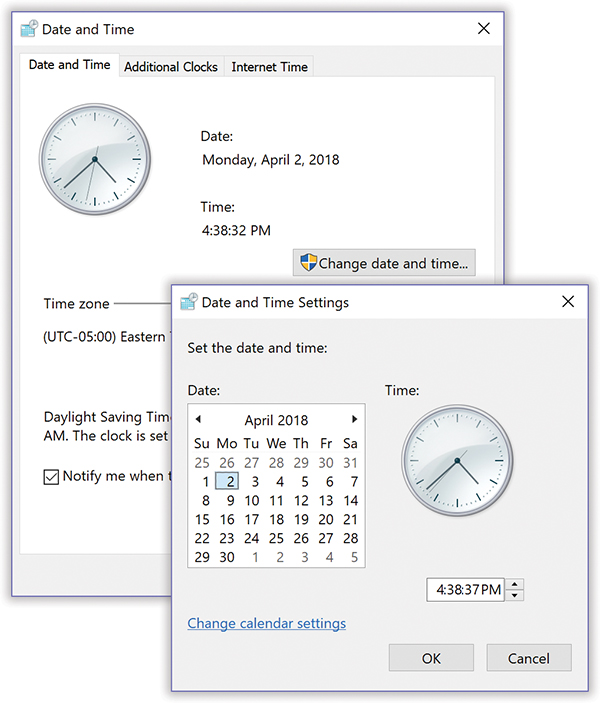
Figure 7-9. Top: The Date and Time tab has a lovely analog clock displaying the time. You can’t actually use it to set the time, but it looks nice. To make a change to the date or time of the computer, click “Change date and time.”
Bottom: At that point, select the correct date by using the calendar. Specify the correct time by typing in the hour, minute, and seconds. Yes, type it; the ▴ and ▾ next to the time field are too inefficient, except when you’re changing AM to PM or vice versa.
This program offers three tabs:
Date and Time. Here’s where you can change the time, date, and time zone for the computer (Figure 7-9)—if, that is, you’d rather not have the computer set its own clock (read on).
Tip:
In the “Time zone” section of the Date and Time tab, you can find exactly when Windows thinks daylight-saving time is going to start or end. In addition, there’s an option to remind you a week before the time change occurs, so you don’t wind up unexpectedly sleep-deprived on the day of your big TV appearance.
Additional Clocks. If you work overseas, or if you have friends, relatives, or clients in different time zones, you’ll like this one; it’s the only thing that stands between you and waking them up at three in the morning because you forgot what time it is where they live.
This feature lets you create clocks for two other time zones, so you can see what time it is in other parts of the world. (They appear when you point to the taskbar clock—or, in larger type, when you click it.)
You can give them any display name you want, like “Paris” or “Mother-in-Law Time.” Note that the additional clocks’ times are based on the PC’s own local time. So if the computer’s main clock is wrong, the other clocks will be wrong, too.
Figure 7-10 shows how to check one of your additional clocks.
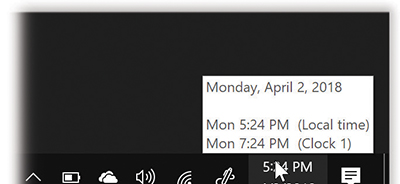
Figure 7-10. To see the time for the additional clocks, point without clicking over the time in the system tray. You get a pop-up displaying the time on the additional clock (or clocks) that you configured. (Unfortunately, it’s no longer labeled with the name of that time zone.)
Internet Time. This option has nothing to do with Swatch Internet Time, a 1998 concept of time that was designed to eliminate the complications of time zones. (Then again, it introduced complications of its own, like dividing up the 24-hour day into 1,000 parts called “beats,” each being 1 minute and 26.4 seconds long.)
Instead, this tab teaches your PC to set its own clock by consulting one of the scientific clocks on the Internet. To turn the feature on or off, or to specify which atomic clock you want to use as the master clock, click Change Settings. (No need to worry about daylight-saving time, either; the time servers take that into account).
Default Programs
The primary features are duplicated in the Settings app; see “Choosing Your Default Apps”.
In an age when Microsoft is often accused of leveraging Windows to take over other realms of software, like web browsing and graphics, the company created this command center. It’s where you choose your preferred web browser, music-playing program, email program, and so on—which may or may not be the ones provided by Microsoft.
You’re offered four links, though all but Change AutoPlay Settings take you to the ![]() →
→![]() →Apps→“Default apps” pane:
→Apps→“Default apps” pane:
Set your default programs. Here’s where you teach Windows that you want your own programs to replace the Microsoft versions. For instance, you can say that, when you double-click a music file, you want to open iTunes and not Windows Media Player.
Associate a file type or protocol with a program. This window lets you specify exactly what kind of file you want to have opened by what program. (That’s essentially what happens in the background when you set a default program.) File associations are covered in more depth in “Filename Extensions and File Associations”. From the “Default apps” pane, you can use “Choose default apps by file type,” “Choose default apps by protocol,” or “Set defaults by app” to come at these choices from all the different angles.
Change AutoPlay Settings. This option opens the AutoPlay applet described in “AutoPlay”.
Set program access and computer defaults. This just links you back to “Default apps” again.
Device Manager
The primary features are duplicated in the Settings app; see “Bluetooth & Other Devices”.
The Device Manager console shows you where all your hardware money was spent. Here you or your tech-support person can troubleshoot a flaky device, disable and enable devices, and manage device drivers. If you’re comfortable handling these more advanced tasks, then Chapter 14 is for you.
Devices and Printers
The primary features are duplicated in the Settings app; see “Printers & Scanners”.
Double-click to open the Devices and Printers window, where everything you’ve attached to your PC—webcam, printer, scanner, mouse, whatever—appears with its own picture and details screen. Chapter 13 has the details.
Ease of Access Center
The primary features are duplicated in the Settings app; see “Ease of Access”.
The Ease of Access Center is designed to make computing easier for people with disabilities, although some of the options here can benefit anyone. See “Ease of Access” for details.
File Explorer Options
This program, which is called “Folder Options” when accessed through File Explorer, offers three tabs—General, View, and Search—all of which are described in Chapter 2.
File History
The primary features are duplicated in the Settings app; see “Backup”.
Here’s the HQ for Windows’ backup feature. See Chapter 16.
Fonts
The primary features are duplicated in the Settings app; see “Fonts”.
This icon is a shortcut to a folder; it’s not an applet. It opens a window that reveals all the typefaces installed on your machine. More on fonts in “Managing Your Fonts”.
Indexing Options
The Windows search box is so fast because it doesn’t actually root through all your files. Instead, it roots only through an index of your files, an invisible, compact database file that Windows maintains in the background. To learn more about the particulars of indexing and how to use it, see Chapter 3.
Infrared
Really, Microsoft? When was the last time any PC had an infrared transceiver for sending files over the air—at about one kilobyte a year?
Anyway, if you’ve found such a PC, maybe at an antiques fair, here’s where you set up the behavior of infrared file transfers between IR-equipped machines. (Guess that means you’ll need to find two such PCs at the antiques fair.)
Internet Options
A better name for this program would have been “Web Browser Options,” since all its settings apply to web browsing—and, specifically, to Internet Explorer. As a matter of fact, this is the same dialog box that opens from the Tools→Internet Options menu command within Internet Explorer.
It’s described in the free “Internet Explorer” appendix that you can download from this book’s “Missing CD” page at www.missingmanuals.com.
Keyboard
The primary features are duplicated in the Settings app; see “Keyboard”.
You’re probably too young to remember the antique known as a typewriter. On some electric versions of that machine, you could hold down the letter X key to type a series of XXXXXXX’s—ideal for crossing out something in a contract, for example.
On a PC, every key behaves this way. Hold down any key long enough, and it starts spitting out repetitions, making it easy to type, “No WAAAAAAAAY!” (The same rule applies when you hold down the arrow keys to scroll through a text document, hold down the = key to build a separator line between paragraphs, hold down Backspace to eliminate a word, and so on.) The Speed tab of this dialog box governs the settings:
Repeat delay. This slider determines how long you must hold down the key before it starts repeating (to prevent triggering repetitions accidentally).
Repeat rate. The second slider governs how fast each key spits out letters once the spitting has begun. After making these adjustments, click the “Click here and hold down a key” test box to try out the new settings.
Cursor blink rate. The “Cursor blink rate” slider actually has nothing to do with the cursor, the little arrow that you move around with the mouse. Instead, it governs the blinking rate of the insertion point, the blinking marker that indicates where typing will begin when you’re word processing, for example. A blink rate that’s too slow makes it more difficult to find your insertion point in a window filled with data. A blink rate that’s too rapid can be distracting.
Mouse
The primary features are duplicated in the Settings app; see “Mouse”.
All the icons, buttons, and menus in Windows make the mouse a very important tool. And the Mouse dialog box is its configuration headquarters.
Buttons tab
This tab offers three useful controls: “Button configuration,” “Double-click speed,” and “ClickLock.”
Button configuration. This checkbox is for people who are left-handed and keep their mouse on the left side of the keyboard. Turning on this checkbox lets you switch the functions of the right and left mouse buttons so that your index finger naturally rests on the primary button (the one that selects and drags).
Double-click speed. Double-clicking isn’t a very natural maneuver. If you double-click too slowly, the icon you’re trying to open remains stubbornly closed. Or worse, if you accidentally double-click an icon’s name instead of its picture, Windows sees your double-click as two single clicks, which tells it that you’re trying to rename the icon.
The difference in time between a double-click and two single clicks is usually well under a second. That’s an extremely narrow window, so let Windows know what you consider to be a double-click by adjusting this slider. The left end of the slider bar represents 0.9 seconds, and the right end represents 0.1 seconds. If you need more time between clicks, move the slider to the left; by contrast, if your reflexes are highly tuned (or you drink a lot of coffee), try sliding the slider to the right.
Each time you adjust the Speed slider, remember to test your adjustment by double-clicking the little folder to the right of the slider. If the folder opens, you’ve successfully double-clicked. If not, adjust the slider again.
ClickLock. ClickLock is for people blessed with large monitors or laptop trackpads who, when dragging icons onscreen, get tired of keeping the mouse button pressed continually. Instead, you can make Windows “hold down” the button automatically, avoiding years of unpleasant finger cramps and messy litigation.
When ClickLock is turned on, you can drag objects on the screen like this: First, point to the item you want to drag, such as an icon. Press the left mouse or trackpad button for the ClickLock interval. (You can specify this interval by clicking the Settings button in this dialog box.)
When you release the mouse button, it acts as though it’s still pressed. Now you can drag the icon across the screen by moving the mouse (or stroking the trackpad) without holding any button down.
To release the button, hold it down again for your specified time interval.
Pointers tab
See “Mouse pointer settings” for details on changing the shape of your cursor.
Pointers Options tab
See “Mouse pointer settings” for a rundown of these cursor-related functions.
Wheel tab
The scroll wheel on the top of your mouse may be the greatest mouse enhancement since they got rid of the dust-collecting ball on the bottom. It lets you zoom through web pages, email lists, and documents with a twitch of your index finger.
Use these controls to specify just how much each wheel notch scrolls. (You may not see this tab at all if your mouse doesn’t have a wheel.)
Hardware tab
The Mouse program provides this tab exclusively for its Properties buttons, which take you to the Device Manager’s device properties dialog box. Useful if you have to troubleshoot a bad driver.
Network and Sharing Center
The primary features are duplicated in the Settings app; see “Network & Internet”.
This network command center offers, among other things, a handy map that shows exactly how your PC is connected to the Internet. It also contains a tidy list of all networking-related features (file sharing, printer sharing, and so on), complete with on/off switches. See Chapter 19 for details.
Pen and Touch
This item appears only if your machine has a touchscreen. It has two tabs:
Pen. On some computers, you can use a digital pen (a stylus) to write on the screen, as described in “Handwriting Recognition”. Here you can configure what the pen’s clicky button does (click, right-click, double-click, and so on).
Touch. On any touchscreen, you can tap things with your finger. Here you tell Windows what you want to happen when you double-tap the screen with your finger, or touch and hold, and whether or not you want to see a little dot appear on the screen where you tap.
Phone and Modem
If you have a dial-up modem, you’ll need to access these settings, but only once: the first time you set up to dial out.
Power Options
The primary features are duplicated in the Settings app; see “Power & Sleep”.
Power Options manages your computer’s power consumption. That’s crucial when you’re running off a laptop’s battery, but it’s also important if you’d like to save money (and the environment) by cutting down on the juice consumed by your desktop PC. The options you see depend on your PC’s particular features.
A power plan dictates things like how soon the computer goes to sleep, how bright the screen is, what speed the processor cranks at, and so on. Right up front, you get three premade power plans:
Balanced, which is meant to strike a balance between energy savings and performance. When you’re working hard, you get all the speed your PC can deliver; when you’re thinking or resting, the processor slows down to save juice.
Power saver slows down your computer but saves power—a handy choice for laptop luggers who aren’t doing anything more strenuous than word processing.
High performance (click “Show additional plans” to see it) sucks power like a black hole but grants you the highest speed possible.
Tip:
You don’t have to open the Control Panel to change among these canned plans. On a laptop, for example, you can just click the battery icon on your system tray and choose from the pop-up menu.
But creating your own power plan can be useful, not only because you gain more control, but also because you get to see exactly what a plan is made of. For step-by-step instructions, see the free downloadable appendix “Creating a Power Plan” on this book’s “Missing CD” page at www.missingmanuals.com.
Programs and Features
The primary features are duplicated in the Settings app; see “Apps”.
Programs and Features is about managing the software you have installed, managing updates, and buying software online. It replaces the old Add/Remove Programs program. This window is useful for fixing (which might simply mean reinstalling), changing, or uninstalling existing programs, and it’s the only place you can go to turn on (or off) certain obscure Windows features.
Recovery
The Recovery icon is a quick-access button for three features:
Create a recovery drive lets you build a flash drive that can start up your PC when your PC can’t start up on its own. See “The USB Recovery Drive”.
Open System Restore and Configure System Restore are described starting in “System Restore”. System Restore lets you rewind your sick PC back to an earlier, better-behaved state.
Region
The primary features are duplicated in the Settings app; see “Region and Language”.
Windows can accommodate any conceivable arrangement of date, currency, and number formats.
Formats tab
If you think that 7/4 means July 4 and that 1.000 is the number of heads you have, then skip this section.
But in some countries, 7/4 means April 7, and 1.000 means one thousand. If your PC isn’t showing numbers, times, currency symbols, or dates in a familiar way, choose your country from the top Format drop-down menu. (Or, if you’re a little weird, use the “Additional settings” button to rearrange the sequence of date elements; see Figure 7-11.)
Tip:
The Time tab of the Customize Format box (Figure 7-11) is where you can specify whether you prefer a 12-hour clock (“3:05 PM”) or a military or European-style, 24-hour clock (“15:05”).
Location tab
This tab identifies your computer’s location. The point is so when you go online to check local news and weather, you get the right local news and weather—a handy feature if you’re traveling.
Administrative tab
The “Copy settings” button applies the newly configured language settings to the following places:
The Windows Welcome screen, so that it’ll be in the right language.
New user accounts, so anyone who gets a new account on this computer will have your language, format, and keyboard settings conveniently available to them.
The “Change system locale” button on this tab lets you specify which language handles error messages and the occasional dialog box. (Just changing your input language may not do the trick.)

Figure 7-11. Top: Regional standard format templates are available from the drop-down list in the Formats tab.
Bottom: Once you choose a standard format (like U.S.), you can customize exactly how numbers, currency, time, and dates are handled. Simply click “Additional settings.”
RemoteApp and Desktop Connections
The world’s corporate system administrators can “publish” certain programs, or even entire computers, at the company headquarters—and you, using your laptop or home computer, can use them as though you were there.
But in Windows, these “published” resources behave like programs right on your PC. They’re listed right in your Start menu, for heaven’s sake (in a folder in “All apps” called, of course, “RemoteApp and Desktop Connections”), and you can search for them as you’d search for any apps.
The whole cycle begins when your company’s network nerd provides you with the URL (Internet address) of the published program. Once you’ve got that, open the RemoteApp and Desktop Connections control panel, and then choose “Access RemoteApp and desktops.”
A wizard now appears; its screens guide you through pasting in that URL and typing in your corporate network name and password.
When it’s all over, you see a confirmation screen; your new “connection” is listed in the control panel; and the folder full of “published” remote programs appears in your Start menu, ready to use.
Security and Maintenance
Open Security for a tidy dashboard of your firewall, antivirus, and other features, so you can see how they’re doing. Open Maintenance for a similar dashboard of problems and features that could be affecting your PC. (Chapter 15 has more details.)
Sound
The Sound dialog box contains four tabs that control every aspect of your microphone and speakers: Playback, Recording, Sounds, and Communications. See Figure 7-12.
Playback and Recording tabs
These tabs simply contain the icons for each attached sound device. To change a device’s settings, select it and then click Configure.
If you’re configuring an output (“playback”) device like a speaker or headset, you get a quick wizard that lets you set the speaker configuration (stereo or quadraphonic, for example). If you’re configuring a microphone (“recording”), then you’re taken to the Speech Recognition page, where you can set up your microphone.
Sounds tab
Windows comes with a tidy suite of little sound effects—beeps, musical ripples, and chords—that play when you turn on the PC, trigger an error message, empty the Recycle Bin, and so on. This tab lets you specify which sound effect plays for which situation; see “Editing a theme’s sound settings” for details.
Communications tab
This tab is designed for people who make phone calls using the PC, using a program like Skype or Google Hangouts. Here you can tell your PC to mute or soften other sounds—meaning music you’ve got playing—whenever you’re on a PC call.
Nice touch.
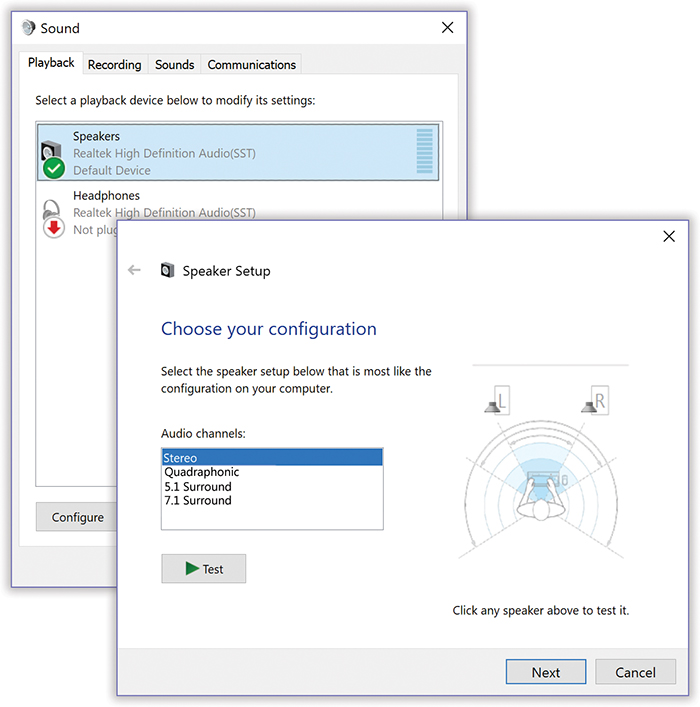
Figure 7-12. Top: The Playback and Recording tabs display the devices your computer has for playing or recording sounds. If you select the device, you can see its properties or configure it.
Bottom: Here are some of the configurations you can set from the Playback tab, from simple stereo to 7.1 surround sound. Your setup may vary.
Speech Recognition
This little program sets up all the speech-related features of Windows. See Chapter 6 for complete details.
Storage Spaces
The Storage Spaces feature can save every file onto two or more drives simultaneously, as a backup. See “Storage Spaces”.
Sync Center
The Sync Center is for syncing your files with folders elsewhere on your corporate network, so you’ll always be up to date. For details, see “Offline Files and Sync Center”.
System
The primary features are duplicated in the Settings app; see “System”.
This advanced control panel window is the same one that appears when you right-click your This PC icon and choose Properties from the shortcut menu (or press ![]() +Break key or
+Break key or ![]() +Pause key). It contains the various settings that identify every shred of circuitry and equipment inside, or attached to, your PC.
+Pause key). It contains the various settings that identify every shred of circuitry and equipment inside, or attached to, your PC.
When you open the System icon in Control Panel, you’re taken to the System window. Here you can find out:
What edition of Windows is installed on your computer. Not all editions are made equal; if you’re flailing to find some feature that you could have sworn is supposed to be in Windows 10, it’s good to check here. You might find out that the feature you want is available only on higher-priced versions.
The model name and speed of your PC’s processor (such as Intel Core 2 Duo, 2.8 GHz).
How much memory your PC has. That’s a very helpful number to know, particularly if you need to improve your computer’s speed.
Your computer’s name, domain, or workgroup, which can be modified with the “Change settings” button. Remember, your computer name and description are primarily useful on a network, since that’s how other people will identify your computer. Unless you tell it otherwise, Windows names your computer after your sign-in name, something like Casey Robbins-PC.
Whether or not your operating system is activated. For more on Activation, check Appendix A.
What the Product ID key is for your system. Every legal copy of Windows has a Product ID key—a long serial number that’s required to activate Microsoft software. For more information about Product ID keys, see Appendix A.
At the left side of the window, you find a few links:
Device Manager. This very powerful console lists every component of your PC: DVD/CD-ROM, Modem, Mouse, and so on. Double-clicking a component’s name (or hitting the
 symbol) discloses the brand and model of that component. For more on the Device Manager, see Chapter 14.
Remote settings. To read about Remote Assistance—a feature that lets someone connect to your PC (via the Internet) to help you troubleshoot—see “Remote Assistance,” on this book’s “Missing CD” page at www.missingmanuals.com.
System Protection. This link takes you to the System Protection tab in the System Properties dialog box. Here you can keep track of the automatic system restores (snapshot backups of a system), or even create a new restore point. And if your computer has begun to act like it’s possessed, you can go here to restore it to a previous restore point’s state. Check out Chapter 16 for more details.
Advanced system settings. Clicking this link opens the Advanced tab of the System Properties dialog box. This tab is nothing more than a nesting place for four buttons that open other dialog boxes—some of which aren’t “advanced” in the least.
The first button opens the Performance Options dialog box, described in “Turning Off the New Look”. The second opens the User Profile box, which is covered in “Local Users & Groups”. The third opens a Startup and Recovery window. It contains advanced options related to dual booting (“POWER USERS’ CLINIC Dual Booting”) and what happens when the system crashes.
Finally, the Environment Variables button opens a dialog box that will get only technically minded people excited. It identifies, for example, the path to your Windows folder and the number of processors your PC has. If you’re not in the computer-administration business, avoid making changes here.
Tablet PC Settings
This Control Panel item offers settings for touchscreen tablets. The Display tab lets you calibrate your touchscreen; the Other tab lets you specify whether you’re right- or left-handed (to control where menus appear relative to your pen).
Troubleshooting
These features are duplicated in the Settings app; see “Troubleshoot”.
Here’s a list of Windows’ troubleshooters—step-by-step interview screens that walk you through fixing various problems. (Insert your own joke here about Windows’ need for an entire program dedicated to troubleshooting.)
Anyway, you can find links here for running older programs in Windows 10, getting online, figuring out why your speakers aren’t working, sleuthing out why your PC is getting so slow, and even inviting a trusted friend to share your screen to help you out.
User Accounts
The primary features are duplicated in the Settings app; see “Accounts”.
This control panel is the master switch and control center for the user-accounts feature described in Chapter 18. If you’re the only one who uses your PC, you can (and should) ignore it.
Windows Defender Firewall
The primary features are duplicated in the Settings app; see “Windows Defender”.
In this age of digital technology, when most people’s computers are connected at all times to the Internet (and therefore always vulnerable to the Internet), it’s a good and reasonable idea to have a firewall protecting your computer from possible attacks and exploitation. To learn more about Windows Defender Firewall, see Chapter 11.
Windows Mobility Center
The Windows Mobility Center is a central panel for instant access to laptoppy/tablety features like screen brightness, volume, battery, and so on. The new Action Center is nearly an exact duplicate and is much easier to find. See “The Action Center” for more on Action Center; for more on Mobility Center, see “Windows Mobility Center”.
Windows To Go
This feature, for peripatetic corporate employees, lets you carry your entire work world on a flash drive. “Offline Files and Sync Center” has the details.
Work Folders
If you work for a corporation, your kindly, all-knowing network administrator may have set up Work Folders for you—folders full of your documents that physically sit on protected computers at work, but that you can access across the Internet even from your own home computer.