CHAPTER 19
Templating with Smarty
All Web development careers started at the very same place: with the posting of a simple Web page. And boy was it easy. You just added some text to a file, saved it with an .html extension, and posted it to a Web server. Soon enough, you were incorporating animated GIFs, JavaScript, and eventually a powerful scripting language such as PHP into your pages. Your site began to swell, first to 5 pages, then 15, then 50. It seemed to grow exponentially. Then came that fateful decision, the one you always knew was coming but always managed to cast aside: it was time to redesign the site.
Unfortunately, perhaps because of the euphoric emotions induced by the need to create the coolest Web site on the planet, you forgot one of programming's basic tenets: always strive to separate presentation and logic. Failing to do so not only increases the possibility that application errors are introduced simply by changing the interface, but also essentially negates the possibility that the designer could be trusted to autonomously maintain the application's "look and feel" without becoming entrenched in programming language syntax.
Sound familiar?
It's also worth noting that many who have actually attempted to implement this key programming principle often experience varying degrees of success. For no matter the application's intended platform, devising a methodology for managing a uniform presentational interface while simultaneously dealing with the often highly complex code responsible for implementing the application's feature set has long been a difficult affair. So should you simply resign yourself to a tangled mess of logic and presentation? Of course not!
Although none are perfect, numerous solutions are readily available for managing a Web site's presentational aspects almost entirely separate from its logic. These solutions are known as templating engines, and they go a long way toward eliminating the enormous difficulties otherwise imposed by lack of layer separation. This chapter introduces this topic, and in particular concentrates upon the most popular PHP-specific templating solution: Smarty.
What's a Templating Engine?
As the opening remarks imply, regardless of whether you've actually attempted it, it's likely that you're at least somewhat familiar with the advantages of separating a Web site's logic and presentational layers. Nonetheless, it would probably be useful to formally define exactly what is gained by using a templating engine.
Simply put, a templating engine aims to separate an application's business logic from its presentational logic. Doing so is beneficial for several reasons, two of the most pertinent are the following:
- You can use a single code base to generate output for numerous formats: print, Web, spreadsheets, e-mail-based reports, and others. The alternative solution would involve copying and modifying the code for each target, resulting in considerable code redundancy and greatly reducing manageability.
- The designer (the individual charged with creating and maintaining the interface) can work almost independently of the application developer because the presentational and logical aspects of the application are not inextricably intertwined. Furthermore, because the presentational logic used by most templating engines is typically more simplistic than the syntax of whatever programming language is being used for the application, the designer is not required to undergo a crash course in that language in order to perform their job.
But how exactly does a templating engine accomplish this separation? Interestingly, most implementations offer a well-defined custom language syntax for carrying out various tasks pertinent to the interface. This presentational language is embedded in a series of templates, each of which contains the presentational aspects of the application and would be used to format and output the data provided by the application's logical component. A well-defined delimiter signals the location in which the provided data and presentational logic is to be placed within the template. A generalized example of such a template is offered in Listing 19-1. This example is based on the templating engine Smarty's syntax. However, all popular templating engines follow a similar structure, so if you've already chosen another solution, chances are you'll still find this chapter useful.
Listing 19-1. A Typical Template (index.tpl)
<html>

   <head>

      <title>{$pagetitle}</title>

   </head>


<body>

   {if $name eq "Kirk"}

      <p>Welcome back Captain!</p>

   {else}

      <p>Swab the decks, mate!</p>

   {/if}

   </body>

</html>
There are some important items of note regarding this example. First, the delimiters, denoted by curly brackets ({}), serve as a signal to the template engine that the data found between the delimiters should be examined and some action potentially taken. Most commonly, this action involves inserting a particular variable value. For example, the $pagetitle variable found within the HTML title tags denotes the location where this value, passed in from the logical component, should be placed. Farther down the page, the delimiters are again used to denote the start and conclusion of an if conditional to be parsed by the engine. If the $name variable is set to "Kirk", a special message will appear; otherwise, a default message will be rendered.
Because most templating engine solutions, Smarty included, offer capabilities that go far beyond the simple insertion of variable values, a templating engine's framework must be able to perform a number of tasks that are otherwise ultimately hidden from both the designer and the developer. Not surprisingly, this is best accomplished via object-oriented programming, in which such tasks can be encapsulated. (See Chapters 6 and 7 for an introduction to PHP's object-oriented capabilities.) Listing 19-2 provides an example of how Smarty is used in conjunction with the logical layer to prepare and render the index.tpl template shown in Listing 19-1. For the moment, don't worry about where this Smarty class resides; this is covered soon enough. Instead, pay particular attention to the fact that the layers are completely separated, and try to understand how this is accomplished in the example.
Listing 19-2. Rendering a Smarty Template
<?php

    // Reference the Smarty class library.

    require("Smarty.class.php");


    // Create a new instance of the Smarty class.

    $smarty = new Smarty;

    // Assign a few page variables.

    $smarty->assign("pagetitle","Welcome to the Starship.");

    $smarty->assign("name","Kirk");


    // Render and display the template.

    $smarty->display("index.tpl");

?>
As you can see, the implementation details are hidden from both the developer and the designer, allowing both to concentrate almost exclusively on building a great application. Now that your interest has been piqued, let's move on to a more formal introduction of Smarty.
Introducing Smarty
Smarty (http://smarty.php.net/) is PHP's "unofficial official" templating engine, as you might infer from its URL. Smarty, authored by Andrei Zmievski and Monte Orte, is released under the GNU Lesser General Public License (LGPL) (http://www.gnu.org/copyleft/lesser.html), and is arguably the most popular and powerful PHP templating engine.
Smarty offers a powerful array of features, many of which are discussed in this chapter. Several of those features are highlighted here:
- Powerful presentational logic:
- Smarty offers constructs capable of both conditionally evaluating and iteratively processing data. Although it is indeed a language unto itself, its syntax is such that a designer can quickly pick up on it without prior programming knowledge.
- Template compilation:
- To eliminate costly rendering overhead, Smarty converts its templates into comparable PHP scripts by default, resulting in a much faster rendering upon subsequent calls. Smarty is also intelligent enough to recompile a template if its contents have changed.
- Caching:
- Smarty offers an optional feature for caching templates. Caching differs from compilation, in that caching prevents the respective logic from even executing instead of just rendering the cached contents. For example, you can designate a time-to-live for cached documents of, say, five minutes, and during that time you can forgo database queries pertinent to that template.
- Highly configurable and extensible:
- Smarty's object-oriented architecture allows you to modify and expand upon its default behavior. In addition, configurability has been a design goal from the start, offering users great flexibility in customizing Smarty's behavior through built-in methods and attributes.
- Secure:
- Smarty offers a number of features to shield the server and the application data from potential compromise by the designer, intended or otherwise.
Keep in mind that all popular templating solutions follow the same core set of implementation principles. Like programming languages, once you've learned one, you'll generally have an easier time becoming proficient with another. Therefore, even if you've decided that Smarty isn't for you, you're still invited to follow along. The concepts you learn in this chapter will almost certainly apply to any other similar solution. Furthermore, the intention isn't to parrot the contents of Smarty's extensive manual, but rather to highlight Smarty's key features, providing you with a jump-start of sorts regarding the solution, all the while keying in on general templating concepts.
Installing Smarty
Installing Smarty is a rather simple affair. To start, go to http://smarty.php.net/ and download the latest stable release. Then follow these instructions to get started using Smarty:
- Untar and unarchive Smarty to some location outside of your Web document root. Ideally, this location would be the same place where you've placed other PHP libraries for subsequent inclusion into a particular application. For example, on Unix this location might be the following:
/usr/local/lib/php/includes/smarty/
On Windows, this location might be the following:
C:phpincludessmarty - Because you'll need to include the Smarty class library into your application, make sure that this location is available to PHP via the
include_pathconfiguration directive. Namely, this class file isSmarty.class.php, which is found in the Smarty directorylibs/. Assuming the previous locations, on Unix you should set this directive like so:include_path = ".;/usr/local/lib/php/includes/smarty/libs"
On Windows, it would be set as so:
include_path = ".;c:phpincludessmartylibs"
You'll probably want to append this path to the other paths already assigned toinclude_pathbecause you likely are integrating various libraries into applications in the same manner. Remember that you need to restart the Web server after making any changes to PHP's configuration file. Also note that there are other ways to accomplish the ultimate goal of making sure that your application can reference Smarty's library. For example, you could simply provide the complete absolute path to the class library. Another solution involves setting a predefined constant namedSMARTY_DIRthat points to the Smarty class library directory, and then prefacing the class library name with this constant. Therefore, if your particular configuration renders it impossible for you to modify the php.ini file, keep in mind that this doesn't necessarily prevent you from using Smarty. - Complete the process by creating four directories where Smarty's templates and configuration files will be stored:
templates: Hosts all site templates. You'll learn more about the structure of these templates in the next section.configs:Hosts any special Smarty configuration files you may use for this particular Web site. The specific purpose of these files is introduced in the later section "Creating Configuration Files."templates_c:Hosts any templates compiled by Smarty.cache:Hosts any templates cached by Smarty, if this feature is enabled.
Although Smarty by default assumes that these directories reside in the same directory as the script instantiating the Smarty class, it's recommended that you place these directories somewhere outside of your Web server's document root. You can change the default behavior using Smarty's $template_dir, $compile_dir, $config_dir, and $cache_dir class members. For example, you could modify their locations like so:
<?php

    // Reference the Smarty class library.

    require("Smarty.class.php");


    // Create a new instance of the Smarty class.

    $smarty = new Smarty;

    $smarty->template_dir="/usr/local/lib/php/smarty/template_dir/";

    $smarty->compile_dir="/usr/local/lib/php/smarty/compile_dir/";

    $smarty->config_dir="/usr/local/lib/php/smarty/config_dir/";

    $smarty->cache_dir="/usr/local/lib/php/smarty/cache_dir/";


?>
With these steps complete, you're ready to begin using Smarty. To whet your appetite regarding this great templating engine, let's begin with a simple usage example, and then delve into some of the more interesting and useful features.
Using Smarty
To use Smarty, you just need to make it available to the executing script, typically by way of the require() statement:
require("Smarty.class.php");
With that complete, you can then instantiate the Smarty class:
$smarty = new Smarty;
That's all you need to do to begin taking advantage of its features. Let's begin with a simple example. Listing 19-3 presents a simple design template. Note that there are two variables found in the template: $title and $name. Both are enclosed within curly brackets, which are Smarty's default delimiters. These delimiters are a sign to Smarty that it should do something with the enclosed contents. In the case of this example, the only action is to replace the variables with the appropriate values passed in via the application logic (presented in Listing 19-4). However, as you'll soon learn, Smarty is also capable of doing a variety of other tasks, such as executing presentational logic and modifying the text format.
Listing 19-1. A Simple Smarty Design Template (templates/welcome.tpl)
<html>

    <head>

        <title>{$title}</title>

    </head>

    <body>

        <p>

            Hi, {$name}. Welcome to the wonderful world of Smarty.

        </p>

    </body>

</html>
Also note that Smarty expects this template to reside in the templates directory, unless otherwise noted by a change to $template_dir.
Listing 19-4 offers the corresponding application logic, which passes the appropriate variable values into the Smarty template.
Listing 19-4. The index.tpl Template's Application Logic
<?php

    require("Smarty.class.php");

    $smarty = new Smarty;


    // Assign two Smarty variables

    $smarty->assign("name", "Jason Gilmore");

    $smarty->assign("title", "Smarty Rocks!");


    // Retrieve and output the template

    $smarty->display("welcome.tpl");

?>
The resulting output is offered in Figure 19-1.
Figure 19-1. The output of Listing 19-4
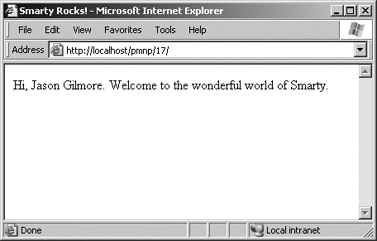
This elementary example demonstrates Smarty's ability to completely separate the logical and presentational layers of a Web application. However, this is just a smattering of Smarty's total feature set. Before moving on to other topics, it's worth mentioning the display() method used in the previous example to retrieve and render the Smarty template. The display() method is ubiquitous within Smarty-based scripts because it is responsible for the retrieval and display of the template. Its prototype looks like this:
void display(string template [, string cache_id [, string compile_id]])
The optional parameter cache_id specifies the name of the caching identifier, a topic discussed later in the section "Caching." The other optional parameter, compile_id, is used when you want to maintain multiple caches of the same page. Multiple caching is also introduced in a later section "Creating Multiple Caches per Template."
Smarty's Presentational Logic
Critics of template engines such as Smarty often complain about the incorporation of some level of logic into the engine's feature set. After all, the idea is to completely separate the presentational and logical layers, right? Although that is indeed the idea, it's not always the most practical solution. For example, without allowing for some sort of iterative logic, how would you output a MySQL result set in a particular format? You couldn't really, at least not without coming up with some rather unwieldy solution. Recognizing this dilemma, the Smarty developers incorporated some rather simplistic yet very effective application logic into the engine. This seems to present an ideal balance because Web site designers are often not programmers (and vice versa).
In this section, you'll learn about Smarty's impressive presentational features: variable modifiers, control structures, and statements. First, a brief note regarding comments is in order.
Comments
Comments are used as necessary throughout the remainder of this chapter. Therefore, it seems only practical to start by introducing Smarty's comment syntax. Comments are enclosed within the delimiter tags {* and *}, and can consist of a single line or multiple lines. A valid Smarty comment follows:
{* Some programming note *}
Variable Modifiers
As you learned in Chapter 9, PHP offers an extraordinary number of functions, capable of manipulating text in just about every which way imaginable. However, you'll really want to use many of these features from within the presentational layer—for example, to ensure that an article author's first and last names are capitalized within the article description. Recognizing this fact, the Smarty developers have incorporated many such presentation-specific capabilities into the library. This section introduces many of the more interesting features.
Before starting the overview, it's worth first introducing Smarty's somewhat nontraditional variable modifier syntax. While of course the delimiters are used to signal the requested output of a variable, any variable value requiring modification prior to output is followed by a vertical bar, followed by the modifier command, like so:
{$var|modifier}
You'll see this syntax used repeatedly throughout this section as the modifiers are introduced.
Capitalizing the First Letter
The capitalize function capitalizes the first letter of all words found in a variable. An example follows:
$smarty = new Smarty;

$smarty->assign("title", "snow expected in northeast");

$smarty->display("article.tpl");
The article.tpl template contains the following:
{$title|capitalize}
This returns the following:
Snow Expected In NortheastCounting Words
The count_words function totals up the number of words found in a variable. An example follows:
$smarty = new Smarty;

$smarty->assign("title", "Snow Expected in Northeast.");

$smarty->assign("body", "More than 12 inches of snow is expected to

accumulate overnight in New York.");

$smarty->display("countwords.tpl");
The countwords.tpl template contains the following:
<strong>{$title}</strong> ({$body|count_words} words)<br />

<p>{$body}</p>
This returns the following:
<strong>Snow Expected in Northeast</strong> (14 words)<br />

<p>More than 12 inches of snow is expected to accumulate overnight in New York.</p>
Formatting Dates
The date_format function is a wrapper to PHP's strftime() function and can convert any date/time-formatted string that is capable of being parsed by strftime() into some special format. Because the formatting flags are documented in the manual and in Chapter 12, it's not necessary to reproduce them here. Instead, let's just jump straight to a usage example:
$smarty = new Smarty;

$smarty->assign("title","Snow Expected in Northeast");

$smarty->assign("filed","1172345525");

$smarty->display("dateformat.tpl");
The dateformat.tpl template contains the following:
<strong>{$title}</strong><br />

Submitted on: {$filed|date_format:"%B %e, %Y"}
This returns the following:
<strong>Snow Expected in Northeast</strong><br />

Submitted on: June 24, 2007
Assigning a Default Value
The default function offers an easy means for designating a default value for a particular variable if the application layer does not return one:
$smarty = new Smarty;

$smarty->assign("title","Snow Expected in Northeast");

$smarty->display("default.tpl");
The default.tpl template contains the following:
<strong>{$title}</strong><br />

Author: {$author|default:"Anonymous" }
This returns the following:
<strong>Snow Expected in Northeast</strong><br />

Author: Anonymous
Removing Markup Tags
The strip_tags function removes any markup tags from a variable string:
$smarty = new Smarty;

$smarty->assign("title","Snow <strong>Expected</strong> in Northeast");

$smarty->display("striptags.tpl");
The striptags.tpl template contains the following:
<strong>{$title|strip_tags}</strong>
<strong>Snow Expected in Northeast</strong>
Truncating a String
The truncate function truncates a variable string to a designated number of characters. Although the default is 80 characters, you can change it by supplying an input parameter (demonstrated in the following example). You can optionally specify a string that will be appended to the end of the newly truncated string, such as an ellipsis (...). In addition, you can specify whether the truncation should occur immediately at the designated character limit, or whether a word boundary should be taken into account (TRUE to truncate at the exact limit, FALSE to truncate at the closest following word boundary):
$summaries = array(

   "Snow expected in the Northeast over the weekend.",

   "Sunny and warm weather expected in Hawaii.",

   "Softball-sized hail reported in Wisconsin."

   );

$smarty = new Smarty;

$smarty->assign("summaries", $summaries);

$smarty->display("truncate.tpl");
The truncate.tpl template contains the following:
{foreach from=$summaries item=summary}

   {$summary|truncate:35:"..."}<br />

{/foreach}
This returns the following:
Snow expected in the Northeast...

Sunny and warm weather expected...

Softball-sized hail reported in...
Control Structures
Smarty offers several control structures capable of conditionally and iteratively evaluating passed-in data. These structures are introduced in this section.
The if Function
Smarty's if function operates much like the identical function in the PHP language. As with PHP, a number of conditional qualifiers are available, all of which are displayed here:
|
|
A simple example follows:
{* Assume $dayofweek = 6. *}

{if $dayofweek > 5}

    <p>Gotta love the weekend!</p>


{/if}
Consider another example. Suppose you want to insert a certain message based on the month. The following example uses conditional qualifiers and elseif and else to carry out this task:
{if $month < 4}

   Summer is coming!

{elseif $month ge 4 && $month <= 9}

   It's hot out today!

{else}

   Brrr... It's cold!


{/if}
Note that enclosing the conditional statement within parentheses is optional, although it's required in standard PHP code.
The foreach Function
The foreach function operates much like the namesake in the PHP language. As you'll soon see, the syntax is quite different, however. Four parameters are available, two of which are required:
from:- This required parameter specifies the name of the target array.
item:- This required parameter determines the name of the current element.
key:- This optional parameter determines the name of the current key.
name:- This optional parameter determines the name of the section. The name is arbitrary and should be set to whatever you deem descriptive of the section's purpose.
Consider an example. Suppose you want to loop through the days of the week:
$smarty = new Smarty;

$daysofweek = array("Mon.","Tues.","Weds.","Thurs.","Fri.","Sat.","Sun.");

$smarty->assign("daysofweek", $daysofweek);

$smarty->display("daysofweek.tpl");
The daysofweek.tpl template contains the following:
{foreach from=$daysofweek item=day}

   {$day}<br />

{/foreach}
Mon.

Tues.

Weds.

Thurs.

Fri.

Sat.

Sun.
You can use the key attribute to iterate through an associative array. Consider this example:
   $smarty = new Smarty;

   $states = array("OH" => "Ohio", "CA" => "California", "NY" => "New York");

   $smarty->assign("states",$states);

   $smarty->display("states.tpl");
The states.tpl template contains the following:
{foreach key=key item=item from=$states }

   {$key}: {$item}<br />

{/foreach}
This returns the following:
OH: Ohio

CA: California

NY: New York
Although the foreach function is indeed useful, you should definitely take a moment to learn about the functionally similar yet considerably more powerful section function, introduced in this section.
The foreachelse function is used in conjunction with foreach, and operates much like the default tag does for strings, producing some alternative output if the array is empty. An example of a template using foreachelse follows:
{foreach key=key item=item from=$titles}

   {$key}: $item}<br />

{foreachelse}

    <p>No states matching your query were found.</p>


{/foreach}
Note that foreachelse does not use a closing bracket; rather, it is embedded within foreach, much like an elseif is embedded within an if function.
The section Function
The section function operates in a fashion much like an enhanced for/foreach, iterating over and outputting a data array, although the syntax differs significantly. The term enhanced refers to the fact that it offers the same looping feature as the for/foreach constructs but also has numerous additional options that allow you to exert greater control over the loop's execution. These options are enabled via function parameters. Each available option (parameter) is introduced next, concluding with a few examples.
Two parameters are required:
name:- Determines the name of the section. This is arbitrary and should be set to whatever you deem descriptive of the section's purpose.
loop:- Sets the number of times the loop will iterate. This should be set to the same name as the array variable.
Several optional parameters are also available:
start:- Determines the index position from which the iteration will begin. For example, if the array contains five values, and
startis set to3, the iteration will begin at index offset 3 of the array. If a negative number is supplied, the starting position will be determined by subtracting that number from the end of the array. step:- Determines the stepping value used to traverse the array. By default, this value is
1. For example, settingstepto3will result in iteration taking place on array indices 0, 3, 6, 9, and so on. Settingstepto a negative value will cause the iteration to begin at the end of the array and work backward. max:- Determines the maximum number of times loop iteration will occur.
show:- Determines whether this section will actually display. You might use this parameter for debugging purposes, and then set it to
FALSEupon deployment.
Consider two examples. The first involves iteration over a simple indexed array:
    $smarty = new Smarty;

    $titles = array(

       "Pro PHP",

       "Beginning Python",

       "Pro MySQL"

       );

    $smarty->assign("titles",$titles);

    $smarty->display("titles.tpl");
The titles.tpl template contains the following:
{section name=book loop=$titles}

   {$titles[book]}<br />

{/section}
This returns the following:
Pro PHP<br />

Beginning Python<br />

Pro MySQL<br />
Note the somewhat odd syntax, in that the section name must be referenced like an index value would within an array. Also note that the $titles variable name does double duty, serving as the reference for both the looping indicator and the actual variable reference.
Now consider an example using an associative array:
    $smarty = new Smarty;

    // Create the array

    $titles[] = array(

        "title" => "Pro PHP",

        "author" => "Kevin McArthur",

        "published" => "2008"

        );

    $titles[] = array(

        "title" => "Beginning Python",

        "author" => "Magnus Lie Hetland",

        "published" => "2005"

        );

    $smarty->assign("titles", $titles);

    $smarty->display("section2.tpl");
The section2.tpl template contains the following:
{section name=book loop=$titles}

   <p>Title: {$titles[book].title}<br />

   Author: {$titles[book].author}<br />

   Published: {$titles[book].published}</p>

{/section}
This returns the following:
<p>

Title: Pro PHP<br />

Author: Kevin McArthur<br />

Published: 2008

</p>

<p>

Title: Beginning Python<br />

Author: Magnus Lie Hetland<br />

Published: 2005

</p>
The sectionelse function is used in conjunction with section and operates much like the default function does for strings, producing some alternative output if the array is empty. An example of a template using sectionelse follows:
{section name=book loop=$titles}

   {$titles[book]}<br />

{sectionelse}

    <p>No entries matching your query were found.</p>

{/section}
Note that sectionelse does not use a closing bracket; rather, it is embedded within section, much like an elseif is embedded within an if function.
Statements
Smarty offers several statements to perform special tasks. This section introduces several of these statements.
The include Statement
The include statement operates much like the statement of the same name found in the PHP distribution, except that it is to be used solely for including other templates into the current template. For example, suppose you want to include two files, header.tpl and footer.tpl, into the Smarty template:
{include file="/usr/local/lib/book/19/header.tpl"}

{* Execute some other Smarty statements here. *}

{include file="/usr/local/lib/book/19/footer.tpl"}
This statement also offers two other features. First, you can pass in the optional assign attribute, which will result in the contents of the included file being assigned to a variable possessing the name provided to assign:
{include file="/usr/local/lib/book/19/header.tpl" assign="header"}
Rather than outputting the contents of header.tpl, they will be assigned to the variable $header.
A second feature allows you to pass various attributes to the included file. For example, suppose you want to pass the attribute title="My home page" to the header.tpl file:
{include file="/usr/local/lib/book/19/header.tpl" title="My home page"}
Keep in mind that any attributes passed in this fashion are only available within the scope of the included file and are not available anywhere else within the template.
Note The fetch statement accomplishes the same task as include, embedding a file into a template, with two differences. First, in addition to retrieving local files, fetch can retrieve files using the HTTP and FTP protocols. Second, fetch does not have the option of assigning attributes at file retrieval time.
The insert Statement
The insert statement operates in the same capacity as include, except that it's intended to include data that's not meant to be cached. For example, you might use this function for inserting constantly updated data, such as stock quotes, weather reports, or anything else that is likely to change over a short period of time. It also accepts several parameters, one of which is required, and three of which are optional:
name:- This required parameter determines the name of the
insertfunction. assign:- This optional parameter can be used when you'd like the output to be assigned to a variable rather than sent directly to output.
script:- This optional parameter can point to a PHP script that will execute immediately before the file is included. You might use this if the output file's contents depend specifically on a particular action performed by the script. For example, you might execute a PHP script that would return certain default stock quotes to be placed into the noncacheable output.
var:- This optional parameter is used to pass in various other parameters of use to the inserted template. You can pass along numerous parameters in this fashion.
The name parameter is special in the sense that it designates a namespace of sorts that is specific to the contents intended to be inserted by the insertion statement. When the insert tag is encountered, Smarty seeks to invoke a user-defined PHP function named insert_name(), and will pass any variables included with the insert tag via the var parameters to that function. Whatever output is returned from this function will then be output in the place of the insert tag.
Consider a template that looks like this:
<img src="/www/htdocs/ads/images/{insert name="banner" height=468 width=60}.gif"/>
Once encountered, Smarty will reference any available user-defined PHP function named insert_banner() and pass it two parameters, namely height and width.
The literal Statement
The literal statement signals to Smarty that any data embedded within its tags should be output as is, without interpretation. It's most commonly used to embed JavaScript and CSS (cascading style sheets) into the template without worrying about clashing with Smarty's assigned delimiter (curly brackets by default). Consider the following example in which some CSS markup is embedded into the template:
<html>

<head>

   <title>Welcome, {$user}</title>

   {literal}

      <style type="text/css">

         p {

            margin: 5px;

           }

      </style>

   {/literal}

</head>


...
Neglecting to enclose the CSS information within the literal brackets would result in a Smarty-generated parsing error because it would attempt to make sense of the curly brackets found within the CSS markup (assuming that the default curly-bracket delimiter hasn't been modified).
The php Statement
You can use the php statement to embed PHP code into the template. Any code found within the {php}{/php} tags will be handled by the PHP engine. An example of a template using this function follows:
Welcome to my Web site.<br />

{php}echo date("F j, Y"){/php}
Welcome to my Web site.<br />

February 23, 2008
Note Another function similar to php is include_php. You can use this function to include a separate script containing PHP code in the template, allowing for cleaner separation. Several other options are available to this function; consult the Smarty manual for additional details.
Creating Configuration Files
Developers have long used configuration files as a means for storing data that determines the behavior and operation of an application. For example, the php.ini file is responsible for determining a great deal of PHP's behavior. With Smarty, template designers can also take advantage of the power of configuration files. For example, the designer might use a configuration file for storing page titles, user messages, and just about any other item you deem worthy of storing in a centralized location.
A sample configuration file (called app.config) follows:
# Global Variables

appName = "Example.com News Service"

copyright = "Copyright 2008 Example.com News Service, Inc."


[Aggregation]

title = "Recent News"

warning = """Copyright warning. Use of this information is for

              personal use only."""


[Detail]


title = "A Closer Look..."
The items surrounded by brackets are called sections. Any items lying outside of a section are considered global. These items should be defined prior to defining any sections. The next section shows you how to use the config_load function to load in a configuration file and also explains how configuration variables are referenced within templates. Finally, note that the warning variable data is enclosed in triple quotes. This syntax must be used in case the string requires multiple lines of the file.
Note Of course, Smarty's configuration files aren't intended to take the place of CSS. Use CSS for all matters specific to the site design (background colors, fonts, etc.), and use Smarty configuration files for matters that CSS is not intended to support, such as page title designations.
config_load
Configuration files are stored within the configs directory and loaded using the Smarty function config_load. Here's how you would load in the example configuration file, app.config:
{config_load file="app.config"}
However, keep in mind that this call will load just the configuration file's global variables. If you'd like to load a specific section, you need to designate it using the section attribute. So, for example, you would use this syntax to load app.config's Aggregation section:
{config_load file="app.config" section="Aggregation"}
Two other optional attributes are also available, both of which are introduced here:
scope:- Determines the scope of the loaded configuration variables. By default, this is set to local, meaning that the variables are only available to the local template. Other possible settings include
parentandglobal. Setting the scope toparentmakes the variables available to both the local and the calling template. Setting the scope to global makes the variables available to all templates. section:- Specifies a particular section of the configuration file to load. Therefore, if you're solely interested in a particular section, consider loading just that section rather than the entire file.
Referencing Configuration Variables
Variables derived from a configuration file are referenced a bit differently than other variables. Actually, they can be referenced using several different syntax variations, all of which are introduced in this section.
You can reference a configuration variable within a Smarty template by prefacing it with a hash mark (#):
{#title}
Smarty's $smarty.config Variable
If you'd like a somewhat more formal syntax for referencing configuration variables, you can use Smarty's $smarty.config variable:
{$smarty.config.title}
The get_config_vars() Method
The get_config_vars() method returns an array consisting of all loaded configuration variable values. Its prototype follows:
array get_config_vars([string variablename])
If you're interested in just a single variable value, you can pass that variable in as variablename. For example, if you are only interested in the $title variable found in the Aggregation section of the previous app.config configuration file, you would first load that section using the config_load function:
{config_load file="app.config" section="Aggregation"}
You would then call get_config_vars() from within a PHP-enabled section of the template, like so:
$title = $smarty->get_config_vars("title");
Of course, regardless of which configuration parameter retrieval syntax you choose, don't forget to first load the configuration file using the config_load function.
Using CSS in Conjunction with Smarty
Those of you familiar with CSS may be concerned over the clash of syntax between Smarty and CSS because both depend on the use of curly brackets ({}). Simply embedding CSS tags into the head of an HTML document will result in an "unrecognized tag" error:
<html>

<head>

<title>{$title}</title>

<style type="text/css">

   p {

      margin: 2px;

   }

</style>

</head>


...
Not to worry, as there are three alternative solutions that come to mind:
- Use the
linktag to pull the style information in from another file:
<html>

<head>

   <title>{$title}</title>

   <link rel="stylesheet" type="text/css" href="default.css" />

   </head>


... - Use Smarty's
literaltag to surround the style sheet information. These tags tell Smarty to not attempt to parse anything within the tag enclosure:
       <literal>

       <style type="text/css">

          p {

             margin: 2px;

          }


</literal> - Change Smarty's default delimiters to something else. You can do this by setting the
left_delimiterandright_delimiterattributes:
         <?php

             require("Smarty.class.php");

             $smarty = new Smarty;

             $smarty->left_delimiter = '{{{';

             $smarty->right_delimiter = '{{{';

            ...

         ?>
Although all three solutions resolve the issue, the first is probably the most convenient because placing the CSS in a separate file is common practice anyway. In addition, this solution does not require you to modify one of Smarty's key defaults (the delimiter).
Caching
Data-intensive applications typically require a considerable amount of overhead, often incurred through costly data retrieval and processing operations. For Web applications, this problem is compounded by the fact that HTTP is stateless. Thus, for every page request, the same operations will be performed repeatedly, regardless of whether the data remains unchanged. This problem is further exacerbated by making the application available on the world's largest network. In an environment, it might not come as a surprise that much ado has been made regarding how to make Web applications run more efficiently. One particularly powerful solution is also one of the most logical: convert the dynamic pages into a static version, rebuilding only when the page content has changed or on a regularly recurring schedule. Smarty offers just such a feature, commonly referred to as page caching. This feature is introduced in this section, accompanied by a few examples.
Note Caching differs from compilation in two ways. First, although compilation reduces overhead by converting the templates into PHP scripts, the actions required for retrieving the data on the logical layer are always executed. Caching reduces overhead on both levels, eliminating the need to repeatedly execute commands on the logical layer as well as converting the template contents to a static version. Second, compilation is enabled by default, whereas caching must be explicitly turned on by the developer.
If you want to use caching, you need to first enable it by setting Smarty's caching attribute like this:
<?php

    require("Smarty.class.php");

    $smarty = new Smarty;

    $smarty->caching = 1;

    $smarty->display("news.tpl");

?>
Once enabled, calls to the display() and fetch()methods save the target template's contents in the template specified by the $cache_dir attribute.
Working with the Cache Lifetime
Cached pages remain valid for a lifetime (in seconds) specified by the $cache_lifetime attribute, which has a default setting of 3,600 seconds, or 1 hour. Therefore, if you want to modify this setting, you could do it like so:
<?php

    require("Smarty.class.php");

    $smarty = new Smarty;

    $smarty->caching = 1;


    // Set the cache lifetime to 30 minutes.

    $smarty->cache_lifetime = 1800;

    $smarty->display("news.tpl");

?>
Any templates subsequently called and cached during the lifetime of this object would assume that lifetime.
It's also useful to override previously set cache lifetimes, allowing you to control cache lifetimes on a per-template basis. You can do so by setting the $caching attribute to 2, like so:
<?php

    require("Smarty.class.php");

    $smarty = new Smarty;

    $smarty->caching = 2;


    // Set the cache lifetime to 20 minutes.

    $smarty->cache_lifetime = 1200;

    $smarty->display("news.tpl");

?>
In this case, the news.tpl template's age will be set to 20 minutes, overriding whatever global lifetime value was previously set.
Eliminating Processing Overhead with is_cached()
As mentioned earlier in this chapter, caching a template also eliminates processing overhead that is otherwise always incurred when caching is disabled (leaving only compilation enabled). However, this isn't enabled by default. To enable it, you need to enclose the processing instructions with an if conditional and evaluate the is_cached() method, like this:
<?php

    require("Smarty.class.php");

    $smarty = new Smarty;

    $smarty->caching = 1;


    if (!$smarty->is_cached("lottery.tpl")) {


        if (date('l') == "Tuesday") {

            $random = rand(100000,999999);

        }

    }

    $smarty->display("lottery.tpl");

?>
In this example, the lottery.tpl template will first be verified as valid. If it is, the costly database access will be skipped. Otherwise, it will be executed.
Creating Multiple Caches per Template
Any given Smarty template might be used to provide a common interface for an entire series of tutorials, news items, blog entries, and the like. Because the same template is used to render any number of distinct items, how can you go about caching multiple instances of a template? The answer is actually easier than you might think. Smarty's developers have actually resolved the problem for you by allowing you to assign a unique identifier to each instance of a cached template via the display() method. For example, suppose that you want to cache each instance of the template used to render professional boxers' biographies:
<?php

    require("Smarty.class.php");

    require("boxer.class.php");

$smarty = new Smarty;


    $smarty->caching = 1;


    try {


        // If template not already cached, retrieve the appropriate information.

        if (!is_cached("boxerbio.tpl", $_GET['boxerid'])) {

            $bx = new boxer();


            if (! $bx->retrieveBoxer($_GET['boxerid']) )

                throw new Exception("Boxer not found.");


            // Create the appropriate Smarty variables

            $smarty->assign("name", $bx->getName());

            $smarty->assign("bio", $bx->getBio());

        }


        /* Render the template, caching it and assigning it the name

        * represented by $_GET['boxerid']. If already cached, then

        * retrieve that cached template

        */

        $smarty->display("boxerbio.tpl", $_GET['boxerid']);


    } catch (Exception $e) {

        echo $e->getMessage();

    }

?>
In particular, take note of this line:
$smarty->display("boxerbio.tpl", $_GET['boxerid']);
This line serves double duty for the script, both retrieving the cached version of boxerbio.tpl named $_GET["boxerid"], and caching that particular template rendering under that name if it doesn't already exist. Working in this fashion, you can easily cache any number of versions of a given template.
Some Final Words About Caching
Template caching will indeed greatly improve your application's performance and should seriously be considered if you've decided to incorporate Smarty into your project. However, because most powerful Web applications derive their power from their dynamic nature, you'll need to balance these performance gains with the cached page's relevance as time progresses. In this section, you learned how to manage cache lifetimes on a per-page basis and execute parts of the logical layer based on a particular cache's validity. Be sure to take these features under consideration for each template.
Summary
Smarty is a powerful solution to a nagging problem that developers face on a regular basis. Even if you don't choose it as your templating engine, hopefully the concepts set forth in this chapter at least convince you that some templating solution is necessary.
In the next chapter, the fun continues, as we turn our attention to PHP's abilities as applied to one of the newer forces to hit the IT industry in recent years: Web Services. You'll learn about several interesting Web Services features, some built into PHP and others made available via third-party extensions.