

Andrew Tingle
PROJECTS
Cyberpunk Spikes
3D-print these soft, flexible spikes and light them up with full-color programmable LEDs
Written by Becky Stern and Phillip Burgess

BECKY STERN
Time Required:
A Few Hours
Cost:
$70–$85
» NeoPixel RGB LED strip, 60 per meter, individually addressable Adafruit Industries part #1138, adafruit.com
» NinjaFlex flexible 3D printing filament, Snow White Adafruit #1691
» Adafruit Gemma microcontroller Maker Shed item #MKAD71, makershed.com, or Adafruit #1222
» Slide switch, SPDT, 0.1" pin spacing Adafruit #805
» Battery, LiPo, 500mAh Adafruit #1578
» Battery extension cable, JST male-female Adafruit #1131
» Rare earth magnets (6) Adafruit #9
» Safety pins or needle and thread
» Silicone adhesive, Permatex 66B
» Heat-shrink tubing
» Tape, nonconductive
» 3D printer, fused-filament type
» Computer running Arduino IDE software free download from arduino.cc/en/main/software
» Soldering iron
» Solder, rosin core, 60/40
» Scissors
» Wire cutters/strippers
MAKE YOUR OWN FLEXIBLE, SPIKY, GLOWING ACCESSORY USING NEOPIXEL LED STRIP lights diffused by NinjaFlex flexible 3D printing filament! Magnets let you attach the spikes to anything in your wardrobe. The soft flexible enclosure holds Gemma, the tiny microcontroller that animates the LEDs, and a rechargeable lithium polymer battery.
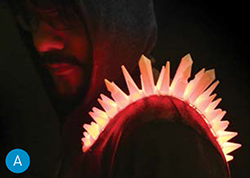
We designed 2 styles of spike strip — one with regular round spikes and one crystal-inspired statement piece (Figure A). Whichever you choose, it’ll get you noticed!
1. 3D-PRINT THE SPIKES AND ENCLOSURE
Download whichever spikes you like from thingiverse.com/thing:262494 and print them in NinjaFlex filament at 225°F with a nonheated build plate (Figure B). For more tips on working with NinjaFlex, check out the guide by the Ruiz Brothers at learn.adafruit.com/3d-printing-with-ninjaflex.

Becky Stern
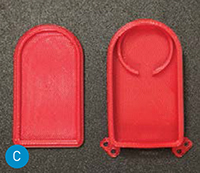
Also download and print the 2 pieces of the flexible enclosure for the Gemma microcontroller and battery, from thingiverse.com/thing:262522. Since it’s printed in NinjaFlex, the enclosure is soft and flexible, yet firm enough to protect your components (Figure C). The enclosure shape includes tabs for pinning or sewing to your garment.
2. PREPARE THE NEOPIXEL STRIP
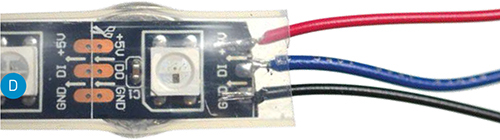
Prepare the input end of your NeoPixel strip by tinning the pads with solder. The strip won’t work if you solder wires to the wrong end, so be sure the arrows on the PCB point away from the end you’re wiring.
Solder 3 stranded wires, about 8" long, to the tinned pads of the NeoPixel strip. To prevent the solder joints from being too cramped, solder the center pad’s wire on the reverse side of the PCB as shown: 2 on top, one on bottom (Figure D).
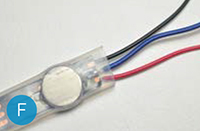
Wrap 3 rare-earth magnets in tape to prevent short circuits (Figure E), and slide them into the NeoPixel strip sheathing on the underside of the PCB (Figure F). Our spike strip is 16 pixels long, and we used 3 magnets evenly spaced (one at each end and one in the center).

Prepare a protected work surface in an area with good ventilation.
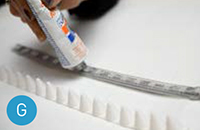
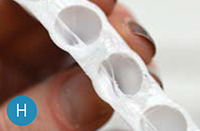
Use Permatex 66B silicone adhesive to affix the 3D-printed spikes to the NeoPixel strip (Figure G). Apply adhesive to both the strip’s silicone sheathing and the NinjaFlex strip of spikes, using a toothpick to spread it around if necessary (Figure H).

Squish a bit of silicone adhesive into the ends of the NeoPixel strip sheathing to provide water resistance and strain relief (Figure I). Allow adhesive to dry overnight.
3. ASSEMBLE THE CIRCUIT
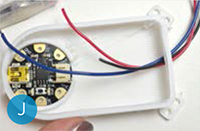
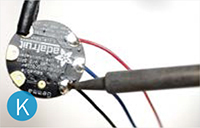
Route your NeoPixel strip’s wires through the hole at the top of the enclosure (Figure J, following page), and solder them up to Gemma as follows: NeoPixel GND to Gemma GND; NeoPixel + to Gemma Vout; and NeoPixel signal to Gemma D1 (Figure K, following page).
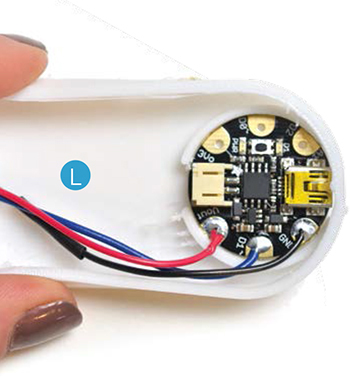
Seat Gemma into the round outline inside the enclosure, with the USB port facing its opening at the bottom end of the enclosure (Figure L, following page).
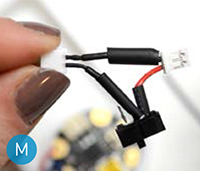
Use a JST extension and slide switch to make this tiny adapter (Figure M, following page). Solder the connections as shown, and insulate with heat-shrink tubing.
The slide switch fits into the opening in the enclosure (Figure N). Now you can easily power up your circuit while still making it easy to disconnect the battery for recharging.

Connect the battery, fit everything neatly in the enclosure (Figure O), and press on the lid.

4. LOAD THE CODE
Download the NeoPixel library from github.com/adafruit/Adafruit_NeoPixel. Rename the folder (containing the Adafruit_NeoPixel.h and .cpp files) to Adafruit_NeoPixel (with the underscore and everything), and place it alongside your other Arduino libraries, typically in your [home folder]/Documents/Arduino/Libraries folder.
Now open the strandtest.ino sketch from the Examples sub-folder, and upload it to the Gemma using the Arduino IDE.
Did that sound like gibberish to you? It’s easy — if it’s your first time, just read the “Introducing Gemma” and “NeoPixel” guides at learn.adafruit.com before you start.
The code is well commented to guide you through each part of the sketch and what it does. Let’s have a look:
DECLARING AN OBJECT
All NeoPixel sketches begin by including the header file:
#include <Adafruit_NeoPixel.h>
The next line of code assigns a number to the symbol PIN for later reference. (This isn’t necessary, it just makes it easier if you want to change the microcontroller pin where the NeoPixels are connected without digging deeper into the code.) Your strip is connected to Gemma’s pin 1:
#define PIN 1
The next line declares a NeoPixel object:
Adafruit_NeoPixel strip = Adafruit_NeoPixel(16, PIN, NEO_GRB + NEO_KHZ800);
We’ll refer to this by name later to control the strip of pixels. There are 3 parameters or arguments in parentheses:
» The number of sequential NeoPixels in the strip, in our case 16. (Yours might be longer.)
» The pin to which the NeoPixel strip is connected. Normally this would be a pin number, but we previously declared the symbol PIN to refer to it by name here.
» A value indicating the type of NeoPixels that are connected. (You can leave this off; it’s mainly needed for older NeoPixels.)
DEFINING COLORS AND BRIGHTNESS
The next block of code lets you define favorite colors, which the NeoPixel will call upon later:
// Here is where you can put in your
favorite colors that will appear!
// Just add new {nnn, nnn, nnn}, lines.
They will be picked out randomly
//
R G B
uint8_t myColors[][3] = {{232, 100, 255},
// purple
{200, 200, 20},
// yellow
{30, 200, 200},
// blue
};
There are 2 ways to set the color of any pixel. The first is:
strip.setPixelColor(n, red, green, blue);
The first argument — n in this example — is the pixel number along the strip, starting from 0 closest to the Arduino. If you have a strip of 30 pixels, they’re numbered 0 through 29. It’s a computer thing. (You’ll see various places in the code using a for loop, passing the loop counter variable as the pixel number to this function, to set the values of multiple pixels.)
The next 3 arguments are the pixel color, expressed as numerical brightness levels for red, green, and blue, where 0 is dimmest (off) and 255 is maximum brightness.
IMPORTANT:
setPixelColor() does not have an immediate effect on the LEDs. To “push” the color data to the strip, call show():
strip.show();
This updates the whole strip at once, and despite the extra step is actually a good thing. If every call to setPixelColor() had an immediate effect, animation would appear jumpy rather than buttery smooth.
An alternate syntax has just 2 arguments:
strip.setPixelColor(n, color);
Here, color is a 32-bit type that merges the red, green, and blue values into a single number. This is sometimes easier or faster for programs to work with; you’ll see the strandtest code uses both syntaxes in different places.
You can also convert separate red, green, and blue values into a single 32-bit type for later use:
uint32_t magenta = strip.Color(255, 0, 255);
Then later you can just pass magenta as an argument to setPixelColor rather than the separate red, green, and blue numbers each time.
The overall brightness of all the LEDs can be adjusted using setBrightness(). This takes a single argument, a number in the range 0 (off) to 255 (max brightness). For example, to set a strip to ¼ brightness, use:
strip.setBrightness(64);
ANIMATED EFFECTS
In the strandtest example, loop() doesn’t set any pixel colors on its own — it calls other functions that create animated effects. So ignore it for now and look ahead, inside the individual functions, to see how the strip is controlled.
You’ll see code blocks with parameters you can tweak to:
» change the rate of twinkling
» change the number of pixels to light at one time
» transition colors gradually through the whole spectrum
» display rainbow colors, static or animated
» flash or fade random pixels.
NOTE:
Since you sealed up the LED strip with adhesive, this accessory is fairly water-resistant. But turn it off and remove the battery if you get stuck in a torrential downpour!
5. WEAR IT!
You can stitch or pin the 3D-printed enclosure to your garment wherever you’d like, using the mounting tabs. For permanent use, stitch a pocket for this enclosure inside your garment and route the wires inside (Figure P).

» Use a fluffy bun-maker hair accessory and tuck the enclosure under it to wear these spikes around your head (Figure Q)!

» Epaulets, two styles (Figure R and S).

» Around the collar (see page 126).
» Cyber dragon, anyone? Try the crystal-inspired spikes (Figure A, page 127).
How will you wear it? We’d love to see your variations!![]()
See more photos, and share your spike builds and costume ideas at makezine.com/projects/cyberpunk-spikes. This tutorial originally appeared on the Adafruit Learning System at learn.adafruit.com/cyberpunk-spikes.