4
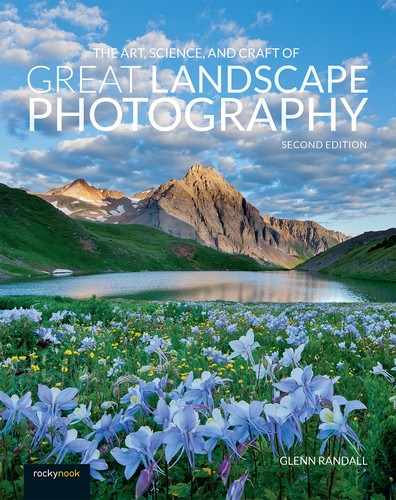
Visualization
When I’m helping a student set up a shot, I always ask three questions: Have you refined your composition (chapter 6)? What is your exposure strategy (chapter 7)? And, perhaps most important of all, how could you make the best possible rendition of the subject you have chosen to photograph?
With that third question, I’m not asking what more the student could do at that moment. The first two questions largely address that task. I’m asking the student to visualize possibilities that don’t exist at that instant. What if the student came back at sunset? What parts of the subject would be lit? Would the sun be in the frame? What if the student returned the next morning at sunrise? What if the student came back at the right time in the lunar cycle, and stayed till the galactic center, the most photogenic part of the Milky Way, rose into a jet-black sky? What if the student came back at an entirely different time of year, when the angle of sunrise and sunset will be radically different? Does the sun ever rise or set at a low point along the horizon, which would allow warm light to flood the foreground? Could the full moon ever play a prominent role in the image? Is there a possibility of wildflowers, foliage in fall colors, or a winter wonderland?
Great landscape photographs often begin with visualization: imagining the best possible image an interesting subject could offer. Sometimes the process begins at home with visualizing a compelling image, then going out in search of a place where that image could happen. Sometimes the process begins by studying maps to identify promising locations. And sometimes the process begins in the field with the discovery of a great subject, then continues by applying your knowledge of geography, atmospheric optics, local weather patterns, and seasonal changes to envision the best possible image.
In truth, these methods are interrelated. The first leads to the second, then the third, and back to the first. However the process for an individual image starts, it ends with multiple visits to a great location until you capture the light and atmospherics that match your vision. With that photo in hand, the process repeats, as each shoot sparks fresh ideas for compelling images.
Using Maps to Help Visualize Photographs
Most often, I start my search for a great landscape photograph by studying a map, either on paper or on my computer screen. The USGS 7.5-minute quadrangles are the most detailed paper topographic maps available, but must usually be ordered online. They typically have a scale of ⅝ inches per mile. The Trails Illustrated series of maps have a smaller scale (typically 1 or 1½ inches per mile) but are readily available in most well-stocked outdoor stores.
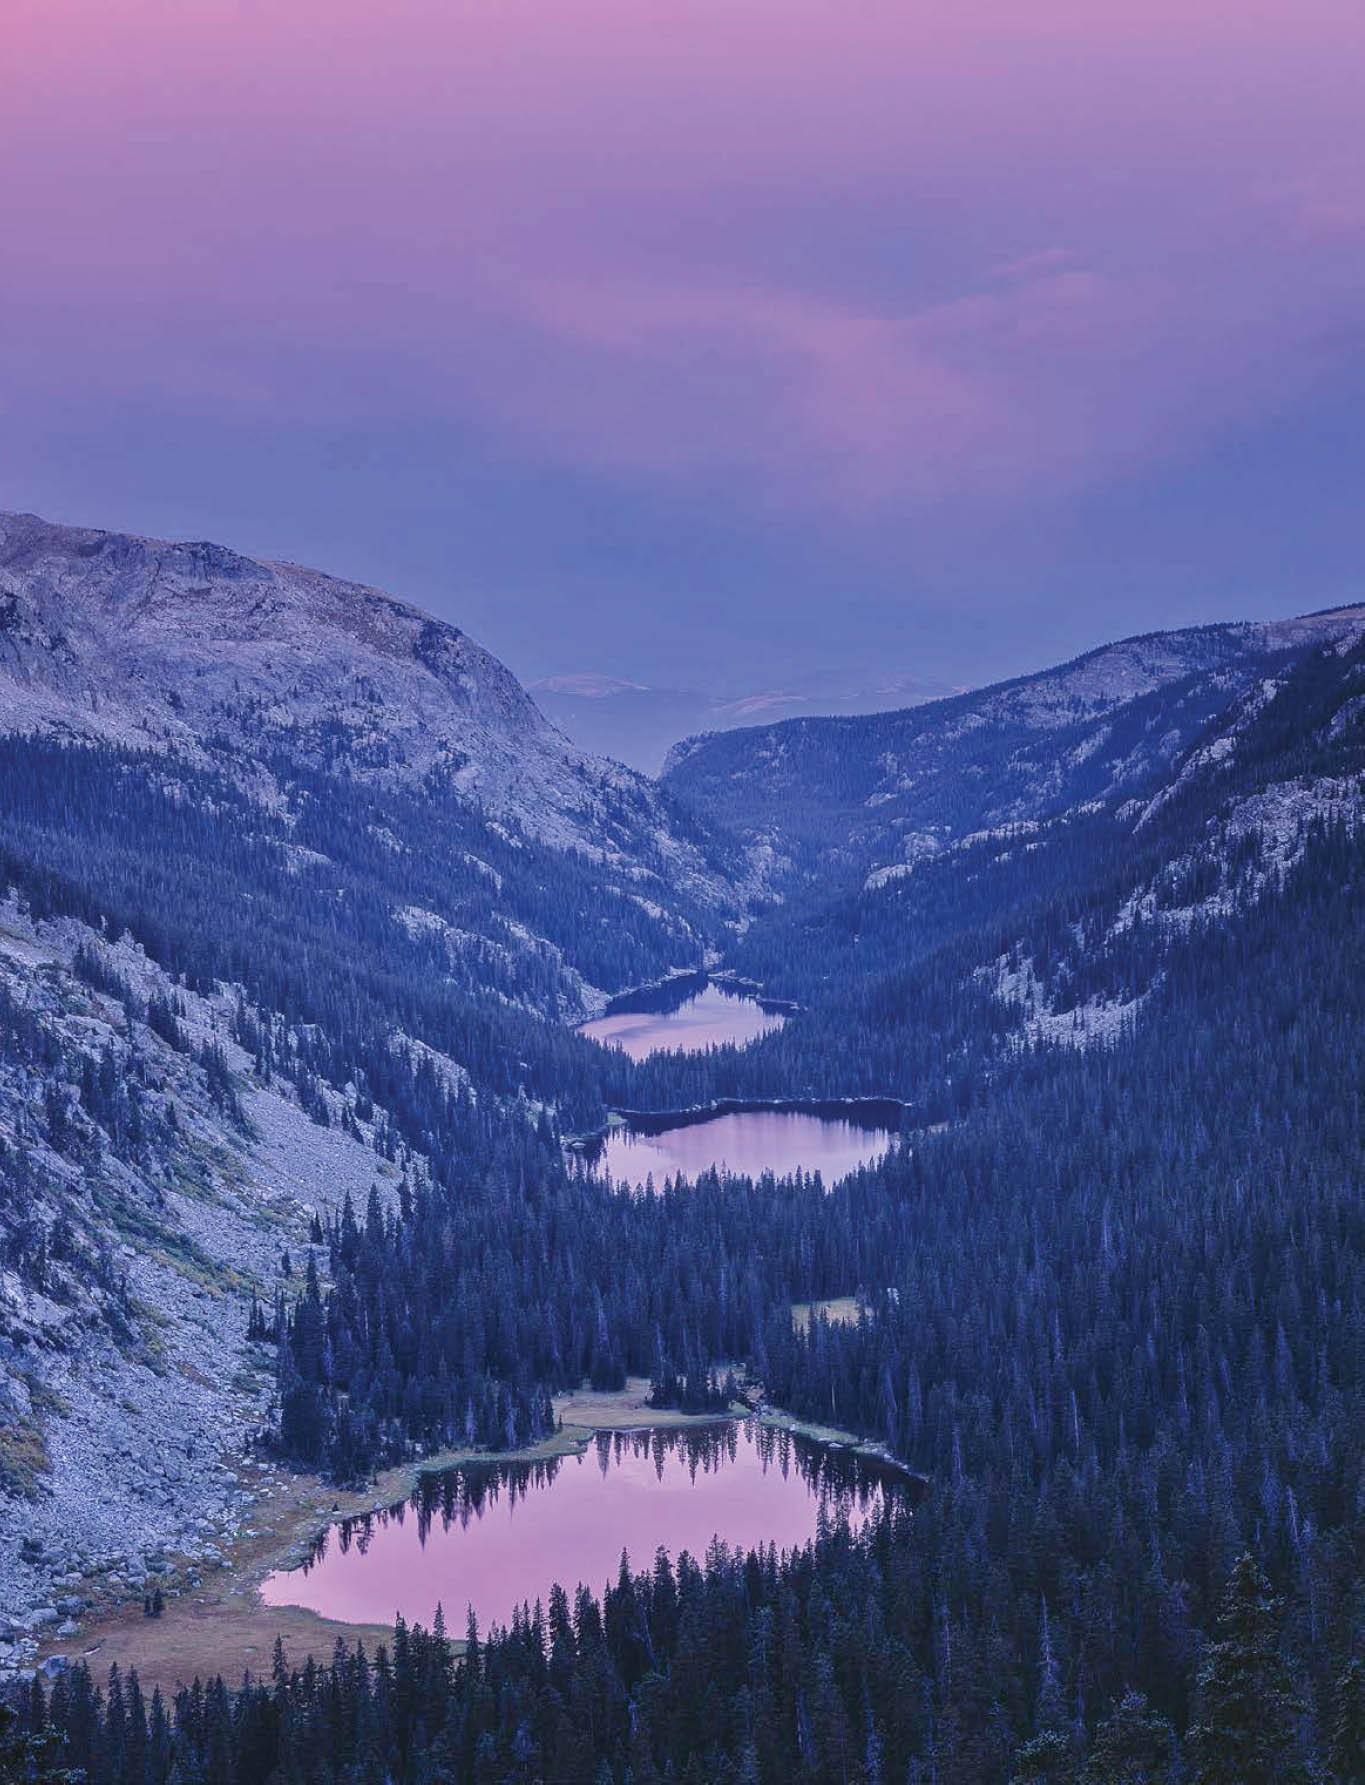
FIGURE 4-2 Fourth Lake, Spirit Lake and Lake Verna at sunrise, Rocky Mountain National Park, Colorado. I envisioned a shot where each lake would reflect a different part of the sky, which would be filled with colorful clouds at sunrise. After multiple tries, I came up with this image, which came close to fulfilling my vision. Someday, I hope to return so I can try to make something even better. Zone VI 4×5 field camera, Fujichrome film. Lens and exposure unrecorded.
The Photographer’s Ephemeris (TPE) is currently the best mapping application for photographers that will run on a desktop or laptop. There are many excellent mapping apps for mobile devices as well, but the map size is limited by the size of the screen. Maps are most useful when large, which is why I like viewing them on my 27-inch monitor.
TPE comes in three versions: iOS, Android, and desktop. The iOS and Android versions, which are available at modest cost, have the most features. Currently, the desktop version (app.photoephemeris.com) is a free web app that doesn’t require creating an account or logging in. All TPE screenshots come from the desktop version.
The heart of TPE is a topographic map (figure 4-3). The maps are downloaded on the fly from various map sources, which means you need an internet connection to make the program work. When the program opens, it displays a red primary marker on the map. Four thick, color-coded lines radiate from the primary marker, indicating the direction to sunrise (yellow), sunset (orange), moonrise (light blue), and moonset (dark blue) on the day you choose. If the sun is above the horizon at the time you’ve chosen, a thin yellow line appears indicating the direction from the primary marker to the sun at that moment. If the moon is above the horizon, a thin blue line will appear indicating the direction from the primary marker to the moon. TPE also provides information on the time and azimuth of sunrise, sunset, moonrise, and moonset, as well as data on the position of the sun and moon at any time of day or night. That information will help you visualize which parts of your subject will get sunrise or sunset light, from which direction (frontlight, sidelight, or backlight), and when.
Visualizing a compelling photograph always involves more than finding a suitable subject because the search for a great subject is inextricably intertwined with the search for spectacular light. The best light for a landscape photograph is usually found near sunrise or sunset, when the warm rays of the sun enliven the colors and when the low sun altitude creates the long shadows that give the subject a three-dimensional feel when it is reduced to a two-dimensional image. Subjects that appear boring at midday can come alive as the sun sinks toward the horizon. But it’s not enough to know that the best light usually occurs at the beginning and end of the day. You must also know if your subject ever gets interesting light.
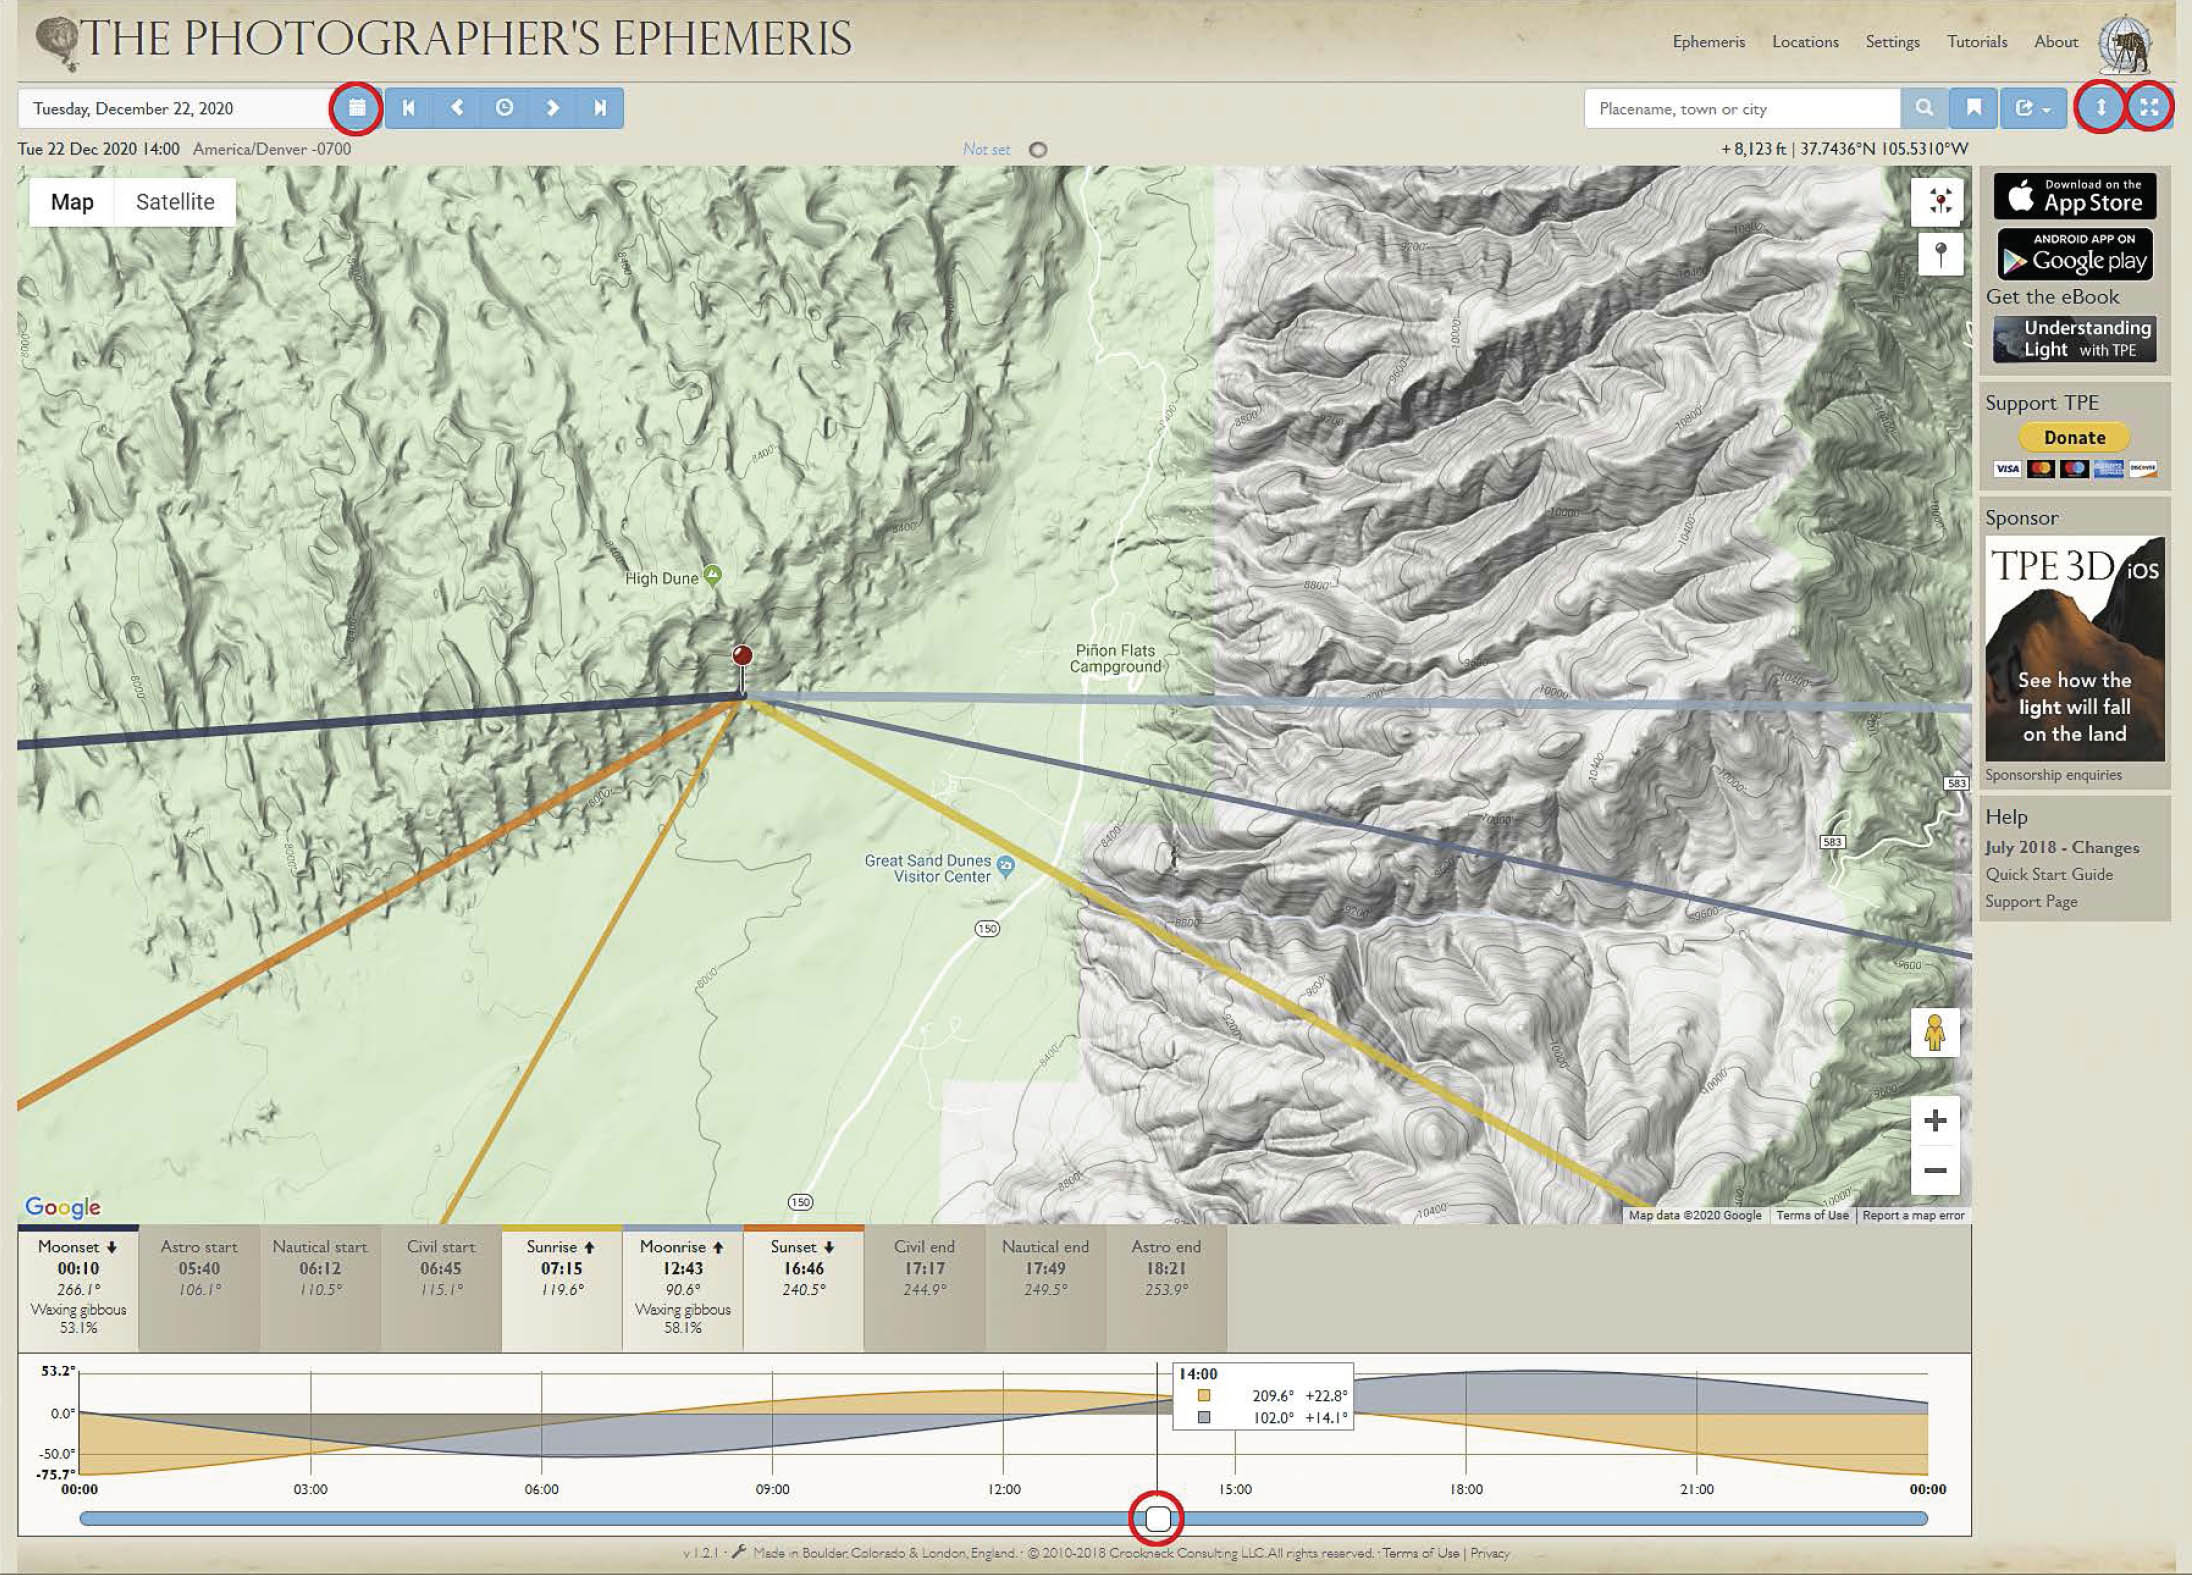
FIGURE 4-3 This screenshot from TPE shows Great Sand Dunes National Park on December 22, 2020, at 2 p.m. Four thick, color-coded lines radiate from the primary marker, indicating the direction to sunrise (yellow), sunset (orange), moonrise (light blue), and moonset (dark blue) on the day you choose. If the sun is above the horizon at the time you’ve chosen, a thin yellow line appears indicating the direction from the primary marker to the sun at that moment. If the moon is above the horizon, a thin blue line will appear indicating the direction from the primary marker to the moon. Adjust the time by dragging the time slider (circled at the bottom-center of the screen). Set the date by clicking on the calendar icon (circled at the top-left of the screen). The double-headed arrow (circled top-right) toggles the events timeline (the icons for sunset, sunrise, etc.) on and off. The four-headed arrow (circled top-right) toggles full screen on and off. Notice how in late December the line indicating sunset runs almost parallel to the southeast face of the dunes, showing how direct sunlight will rake across the dunes, revealing texture and form, until nearly sunset (figure 4-4).
In mountainous country, one fruitful place to search is a valley whose mouth faces either the rising or setting sun. For example, a valley running northeast at an angle of 60 or 70 degrees from the peaks at its head toward the valley below, roughly the angle of a midsummer sunrise in the mid-latitudes, can work well in summer. On clear mornings, peaks and foreground subjects at the head of the valley can get beautiful sunrise light. However, that same valley might present very few opportunities in the dead of winter when the sun is rising at an angle of roughly 120 degrees, leaving everything in deep blue shadow until hours after the sun has come up. Midday light on a clear day is typically harsh and colorless.
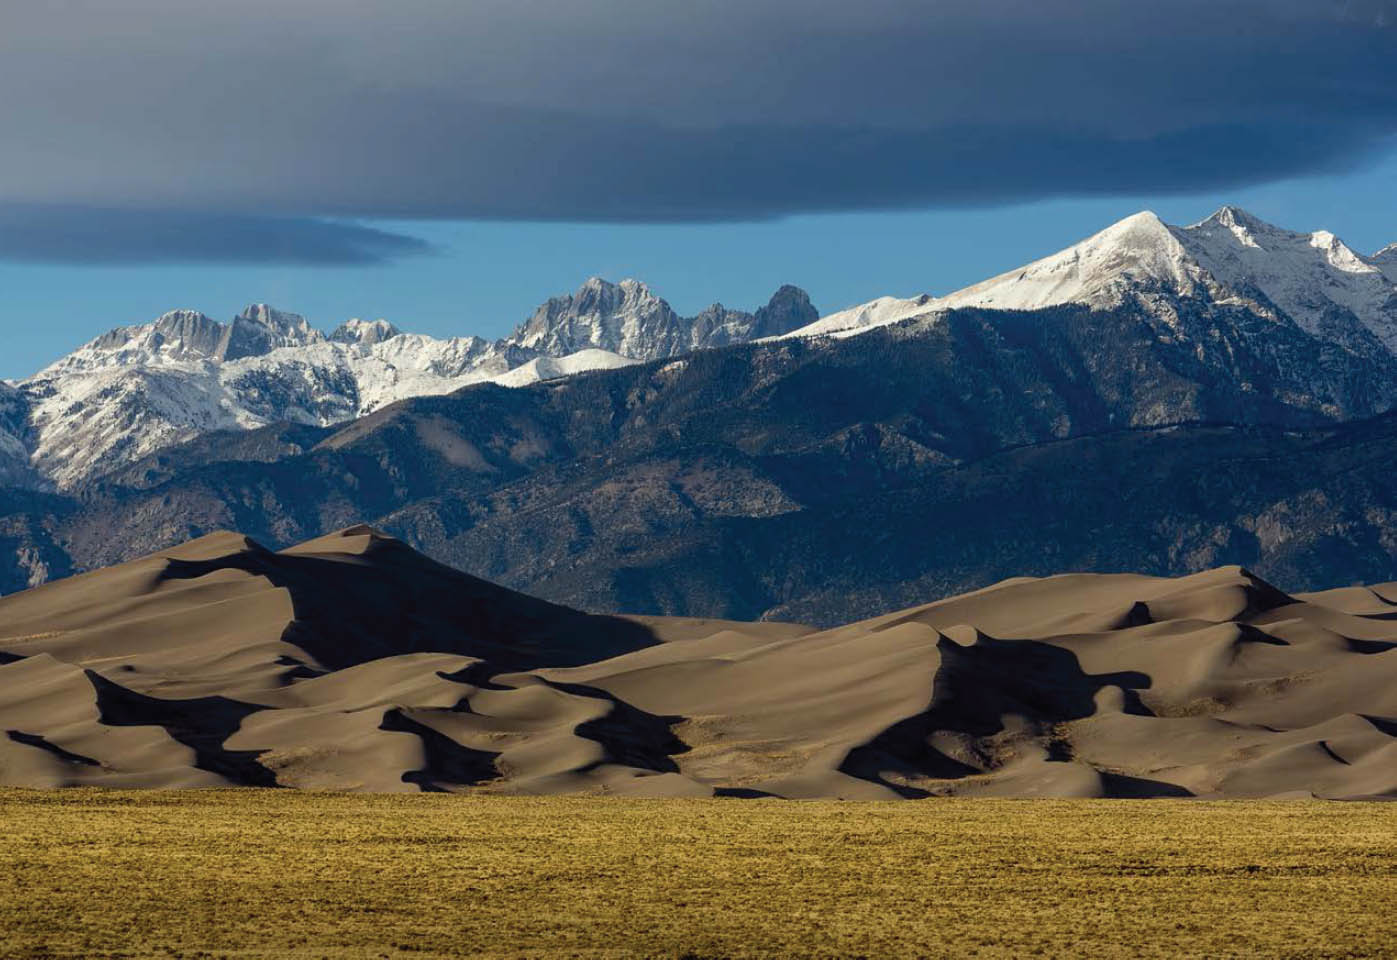
FIGURE 4-4 Sand dunes and the Sangre de Cristo Range, Great Sand Dunes National Park, Colorado. The low sun angle in late afternoon in late December sharply delineates every ridge in these dunes. Without such texturing light, the peaks and valleys of the dunes, which are all the same color, would tend to merge in the photograph. In December, the face of these dunes gets direct sunlight until almost sunset (figure 4-3); in mid-summer, they go into shade by mid-afternoon. Canon EOS 5D Mark III, Canon EF 70-200mm f/4L IS USM at 200mm, 1/200th, f/11, ISO 100.
Here’s a concrete example of how TPE can help you visualize possible images. Glacier Gorge is a deep, glacier-carved valley in Rocky Mountain National Park that is ringed by many of the park’s most spectacular peaks. The most arresting view of the gorge is looking due south, straight up the valley, from Mills Lake. The mountain that dominates that view is called Chiefs Head Peak. Let’s use TPE to answer this question: does the northern flank of Chiefs Head Peak, the side visible as you look south from Mills Lake, get moment-of-sunrise light in late August?
Start by searching for Chiefs Head Peak. The map will reload, centered on Chiefs Head Peak, with the red primary marker positioned atop the summit. Turn on the gray secondary marker by clicking or tapping on its icon. Notice that a new panel, called the geodetics panel, has appeared. This panel gives you information on the relationship between the primary and secondary markers: the distance between the two, the azimuth from the primary to the secondary marker, the difference in elevation, expressed in feet, and, most importantly for our purposes now, the altitude, in degrees, of the secondary marker as seen from the primary marker.
Set the date to August 21, 2020. Drag the secondary marker to the closest ridge or peak that lies in the direction of sunrise as shown by the broad yellow line radiating out from the primary marker (figure 4-5). In this example, that’s Longs Peak. A negative altitude means you are looking down to the top of that obstacle. The shadow of that obstacle will fall below the summit of the peak you’re shooting, so the summit itself will get sunrise light. A positive altitude means you are looking up to the top of that obstacle. The sun must rise over the top of that ridge before its light can shine directly on the summit of your target peak. If the altitude is only a degree or two, the light may still be warm, but it won’t be the intense red or orange you might be hoping for.
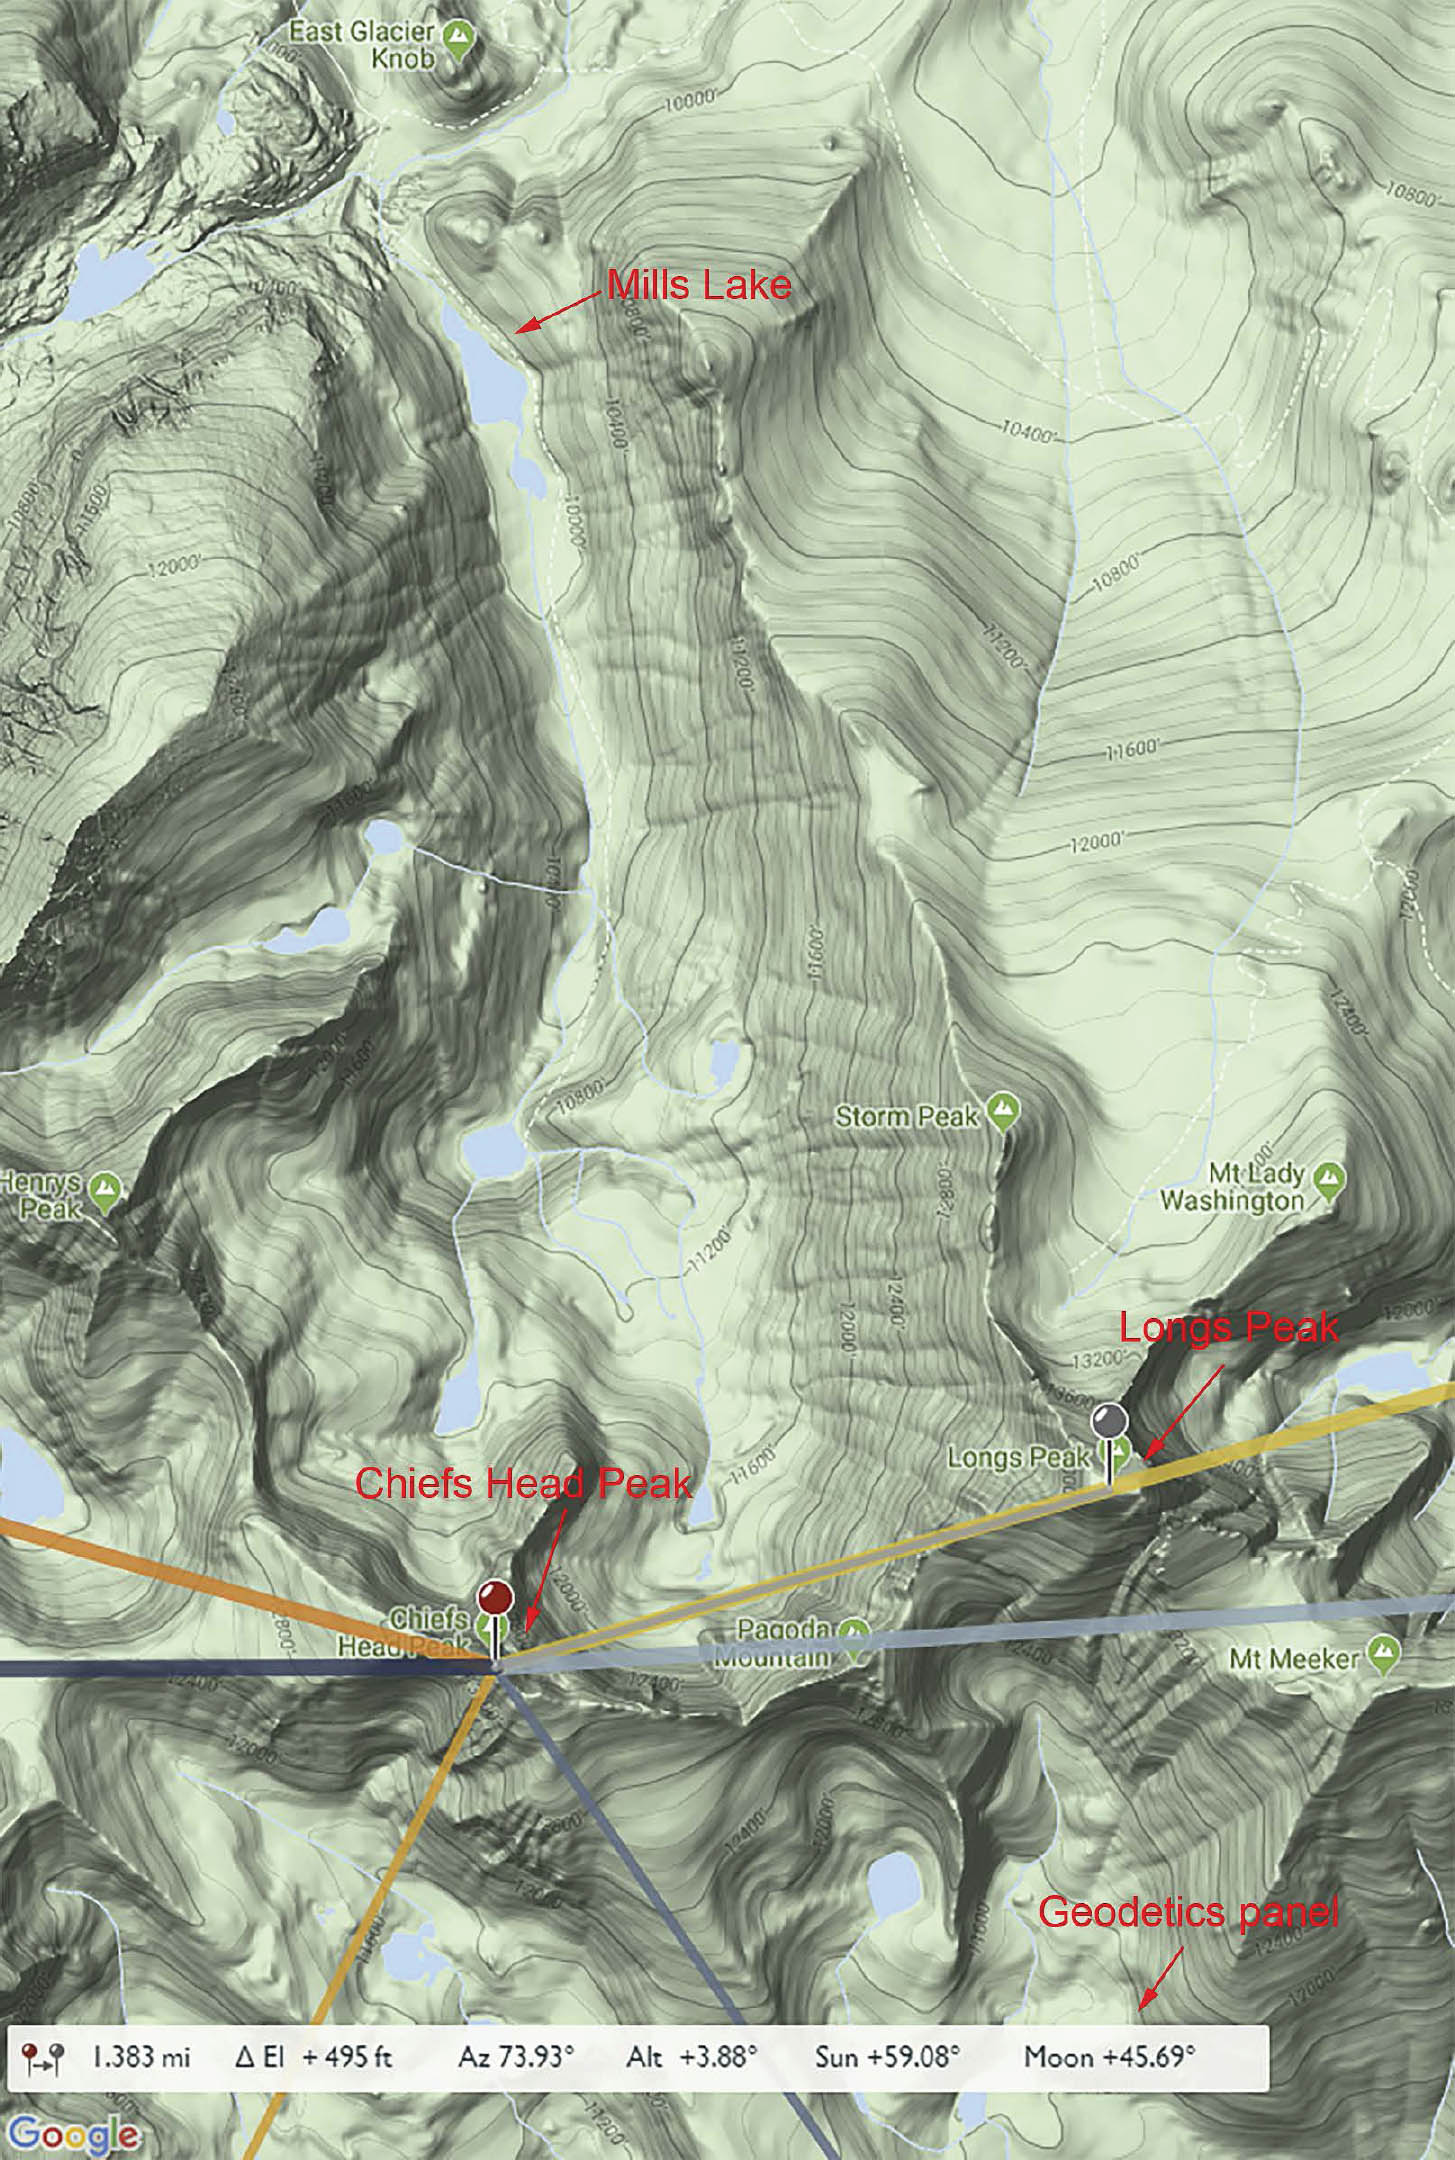
FIGURE 4-5 This TPE screenshot shows the red primary marker atop Chiefs Head Peak and the secondary marker atop Longs Peak. The date is set to August 21, 2020 (not shown). Notice in the geodetics panel that the altitude of Longs Peak is 3.88 degrees as measured from the summit of Chiefs Head Peak, which means Chiefs Head Peak will be in the shadow of Longs Peak at the moment of sunrise.
You’ve just learned that in late August, Longs Peak shadows its lower neighbors to the west at sunrise. Further investigation with TPE reveals that McHenrys Peak shadows most of the peaks to the east at sunset.
Would a different time of year be better? Change the date to winter solstice, around December 21. Immediately it becomes obvious that in winter, when the sun rises to the south of east and sets to the south of west, all the peaks of Glacier Gorge are backlit at both sunrise and sunset when seen from Mills Lake. The sides of the peaks that face toward your shooting location will be shadowed at both ends of the day.
At no time of year does the dramatic north face of Chiefs Head Peak get sunrise or sunset light from bottom to top. Mills Lake is still a beautiful place to shoot, but you shouldn’t rely on dramatic light on Chiefs Head Peak itself to carry the shot. Your best bet is to hope for clouds lighting up at either sunrise or sunset.
You can use this same idea to determine how much of a peak will get light at the moment of sunrise or sunset. Let’s assume that the obstacle to sunrise light is lower than the summit of your target peak. Position the secondary marker atop the obstacle. Use trial and error to reposition the primary marker lower on the peak, moving it in the direction of sunrise, until the altitude of the secondary marker as shown in the geodetics panel is zero. Everything above the primary marker will get sunrise light. For example, in late March sunrise light comes barreling up the valley of Tyndall Creek and bathes the northeast face of 12,713-foot Hallett Peak and the nearby Mosquito Crags in a warm glow (figure 4-6). The unnamed peak that is the obstacle to the east that the sun must clear to illuminate the head of the valley is only 10,134 feet high, which means that the upper 2,600 feet of Hallett Peak could theoretically get moment-of-sunrise light. As a practical matter, only Tyndall Glacier, the snowfield at the very end of the valley, gets light from the very bottom of the valley upwards. Still, the effect can be stunning, as you can see in Dream Lake in Winter (figure 4-7).
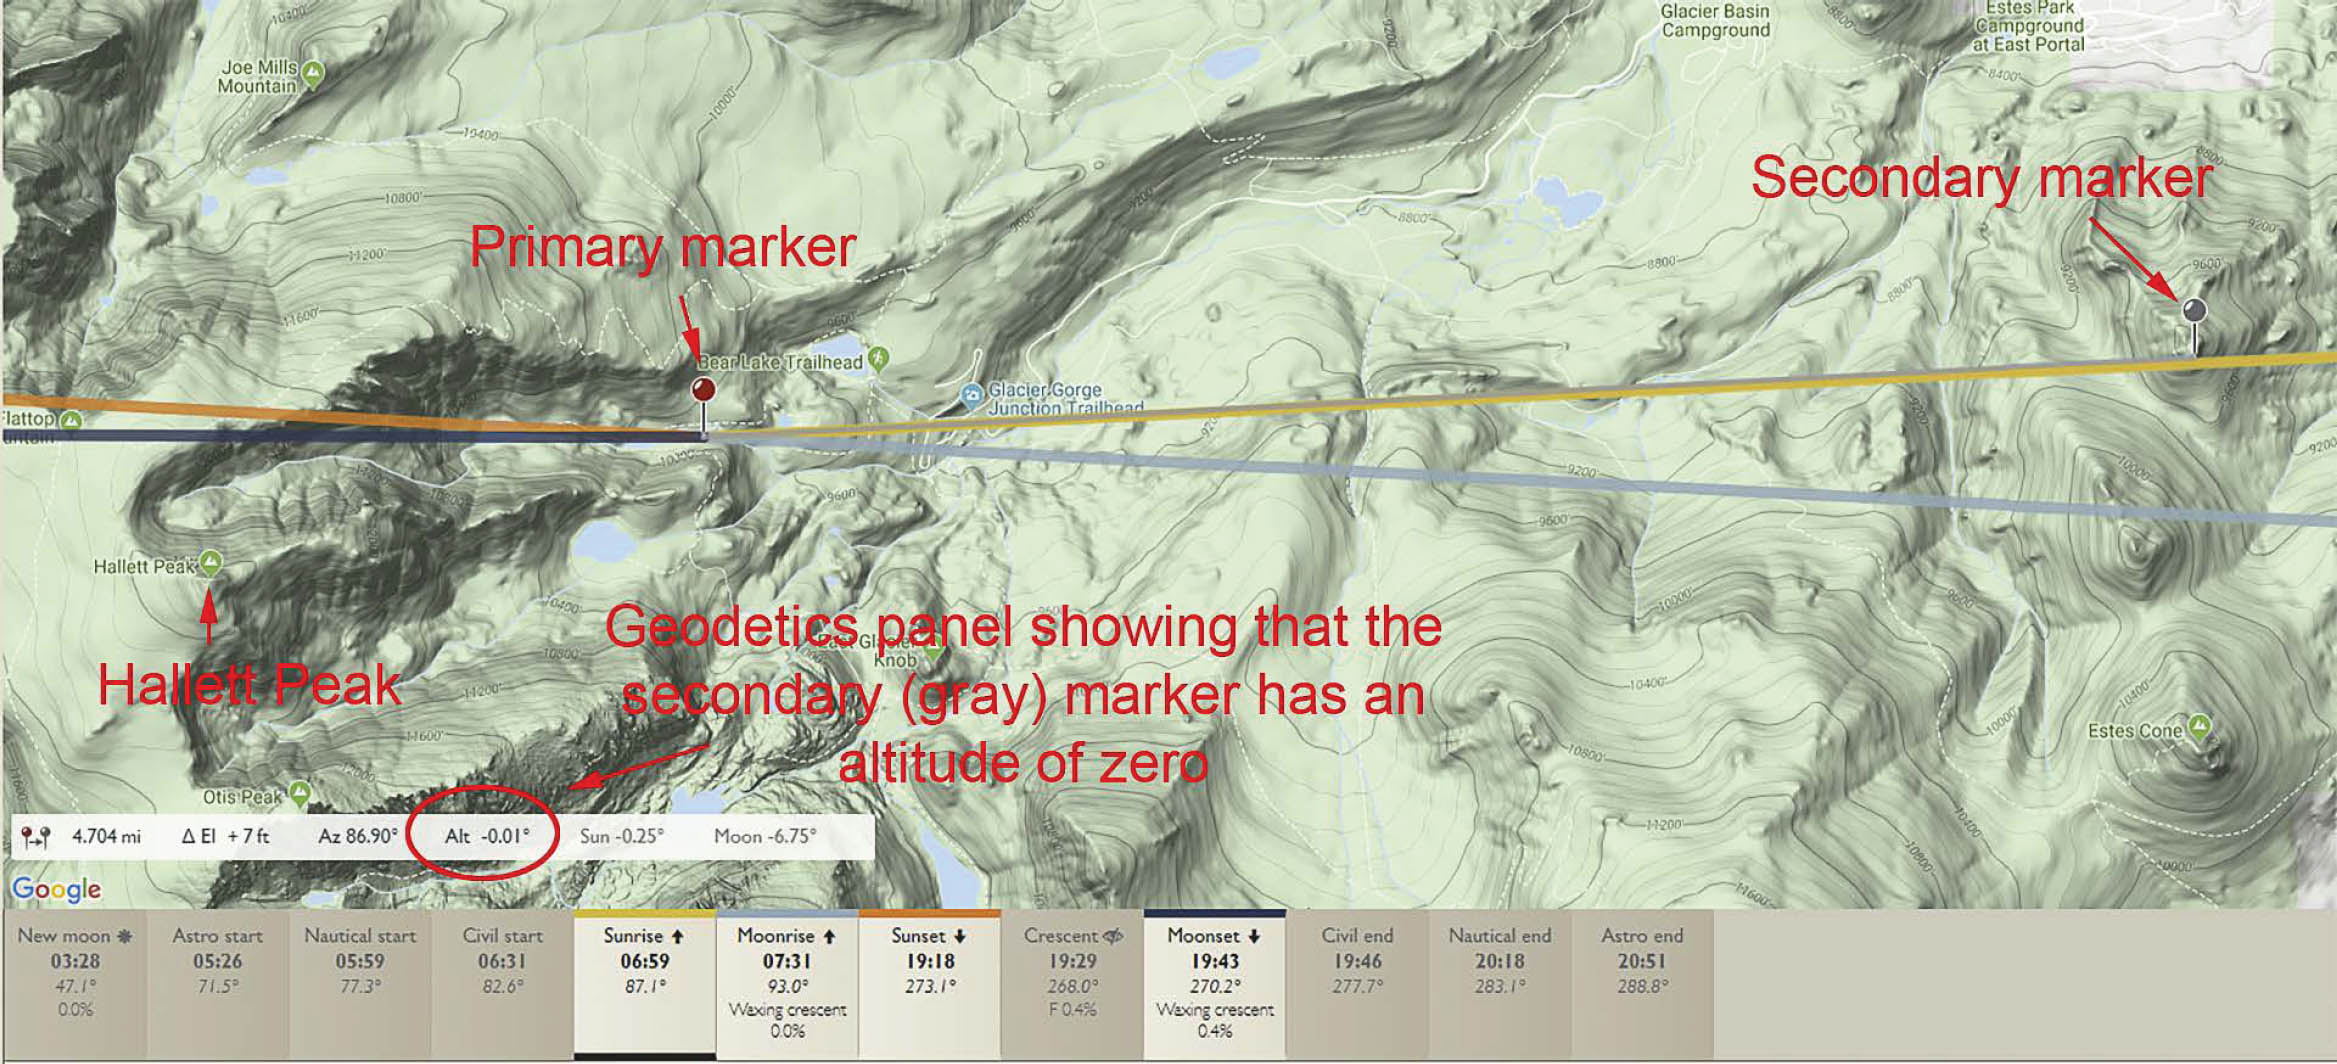
FIGURE 4-6 In this screenshot from TPE, the primary (red) marker is on the shore of Dream Lake and the secondary (gray) marker is on the highest point in the direction of the rising sun in late March. The geodetics panel shows that the obstacle is at the same elevation as Dream Lake, which allows warm sunrise light to flood up the valley of Tyndall Creek, as shown in figure 4-7.
It’s rare that one location will work equally well at both sunrise and sunset. A valley that gets interesting light at sunrise will probably have peaks blocking the light of sunset. On the Pacific Coast, sunsets are usually more interesting than sunrises (if the coastline at that point is running north-south). On the East Coast, the opposite is usually true. In the wintertime, in the Northern Hemisphere, a peak or sandstone tower that’s interesting when viewed from the south could be interesting at both ends of the day since the south face could get both sunrise and sunset light if there are no obstructions. In winter, the sun rises well to the south of east and sets well to the south of west. Conversely, in summer, the sun rises north of east and sets north of west, which means the north face of a peak can get light at both sunrise and sunset.
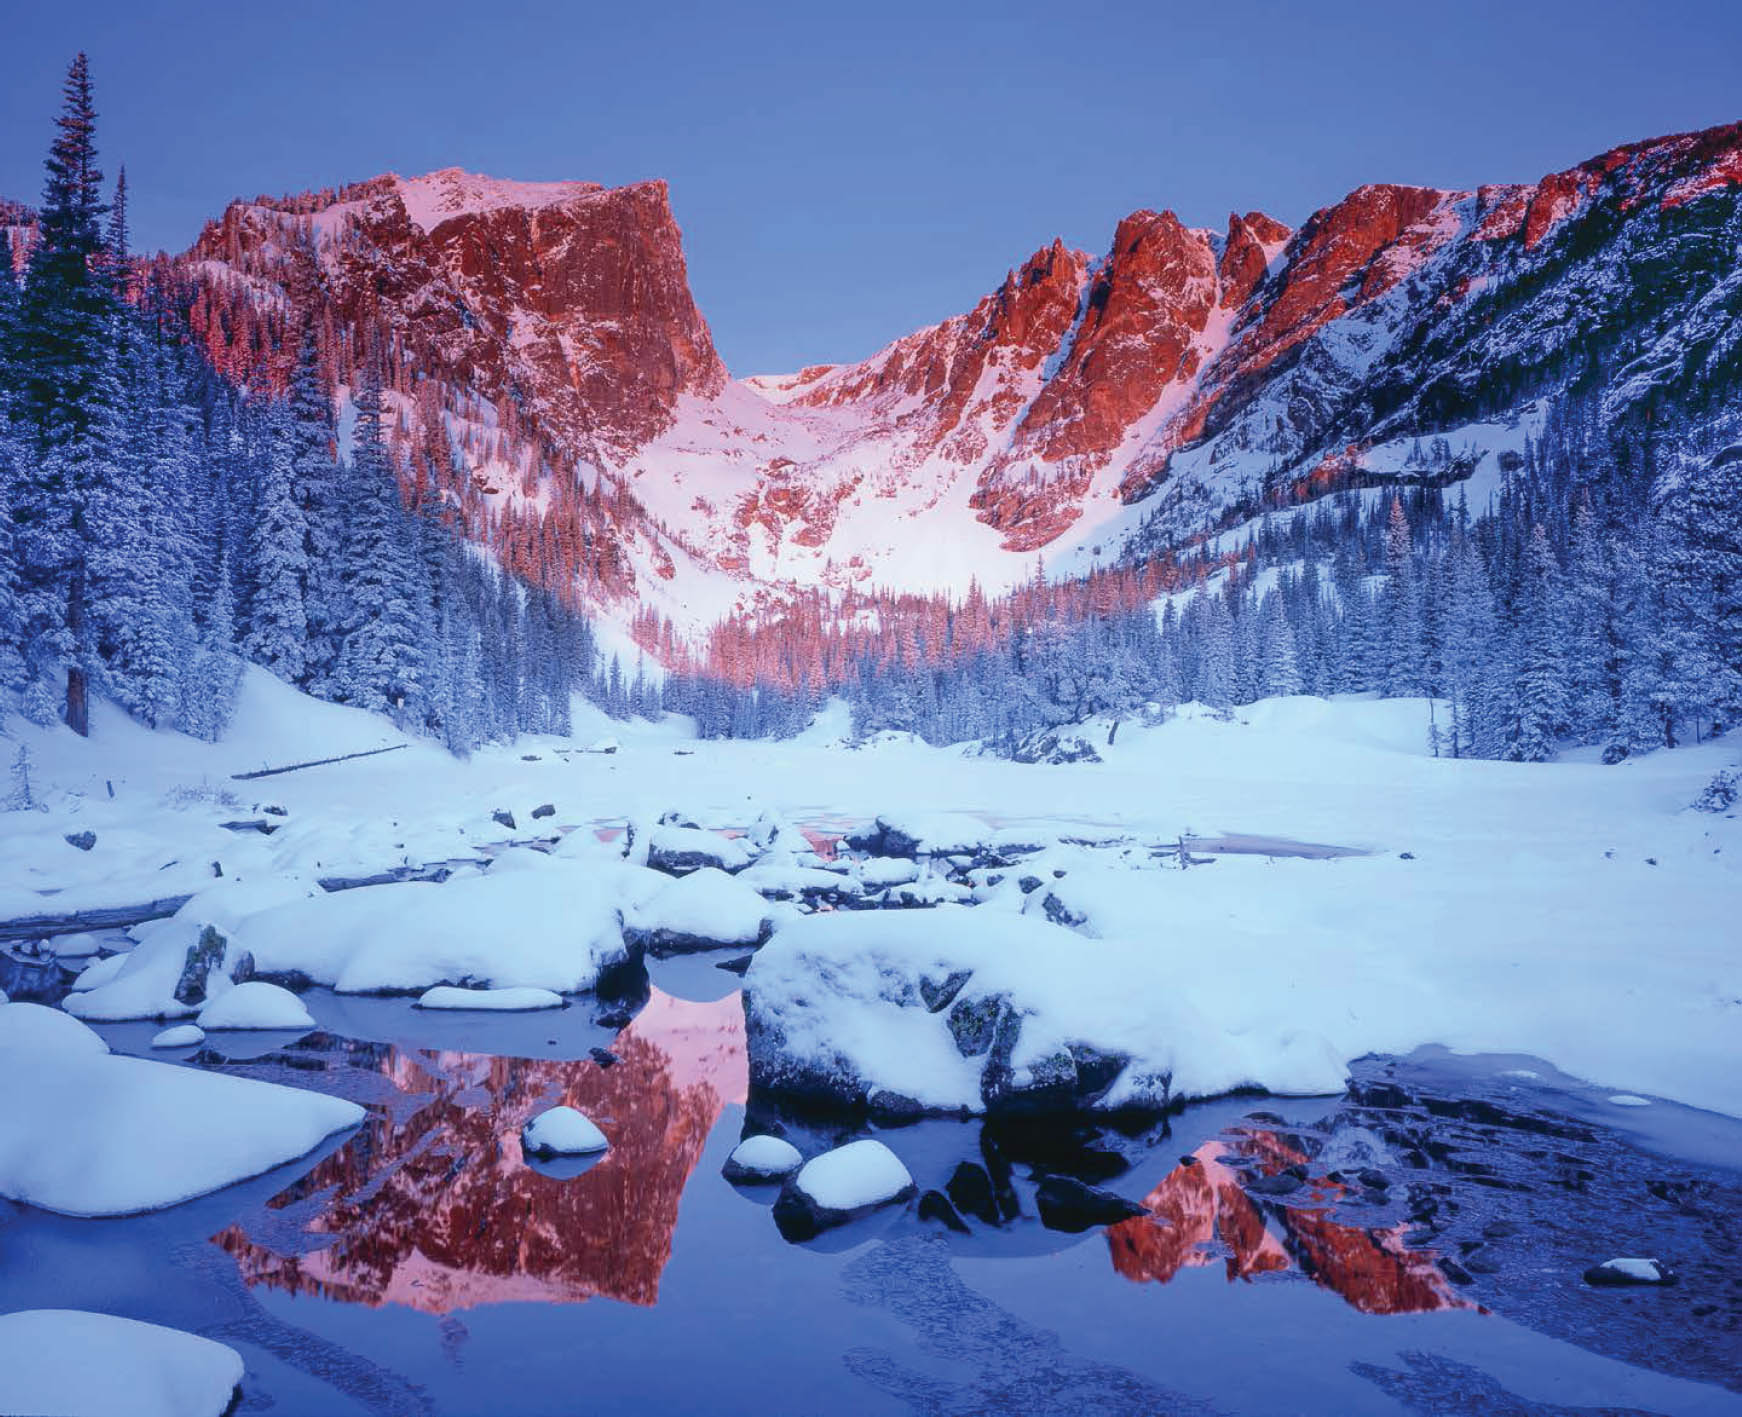
FIGURE 4-7 Hallett Peak reflected in Dream Lake at sunrise in late March, Rocky Mountain National Park, Colorado. Ebony SW-45 field camera, Fujichrome film. Lens and exposure unrecorded.
Imagine that the sun is drawing a line through the sky as it rises and sets. At the mid-latitudes, for the first hour after sunrise and the last hour before sunset, that line forms an angle to the horizon that’s roughly 45 degrees. To be precise, if you’re at 40 degrees north latitude, the latitude of Boulder, Colorado, the sun’s path on the fall equinox makes an angle of 48 degrees to the horizon, leaning to the south, for the first hour after sunrise. The angle is about 2 degrees less at the summer equinox; the angle in winter is lower still, at 38 degrees. In the tropics, near latitude zero (the equator), the sun’s path is nearly perpendicular to the horizon near the beginning and end of the day, which means that the periods of good light at sunrise and sunset are brief. In the arctic, by contrast, the sun’s path at sunrise and sunset is almost parallel to the horizon, and the good light can seem to last forever. For example, in Fairbanks, Alaska, 65 degrees north latitude, on the summer solstice, the sun’s path makes an angle of 7 degrees with the horizon for the first hour after sunrise.
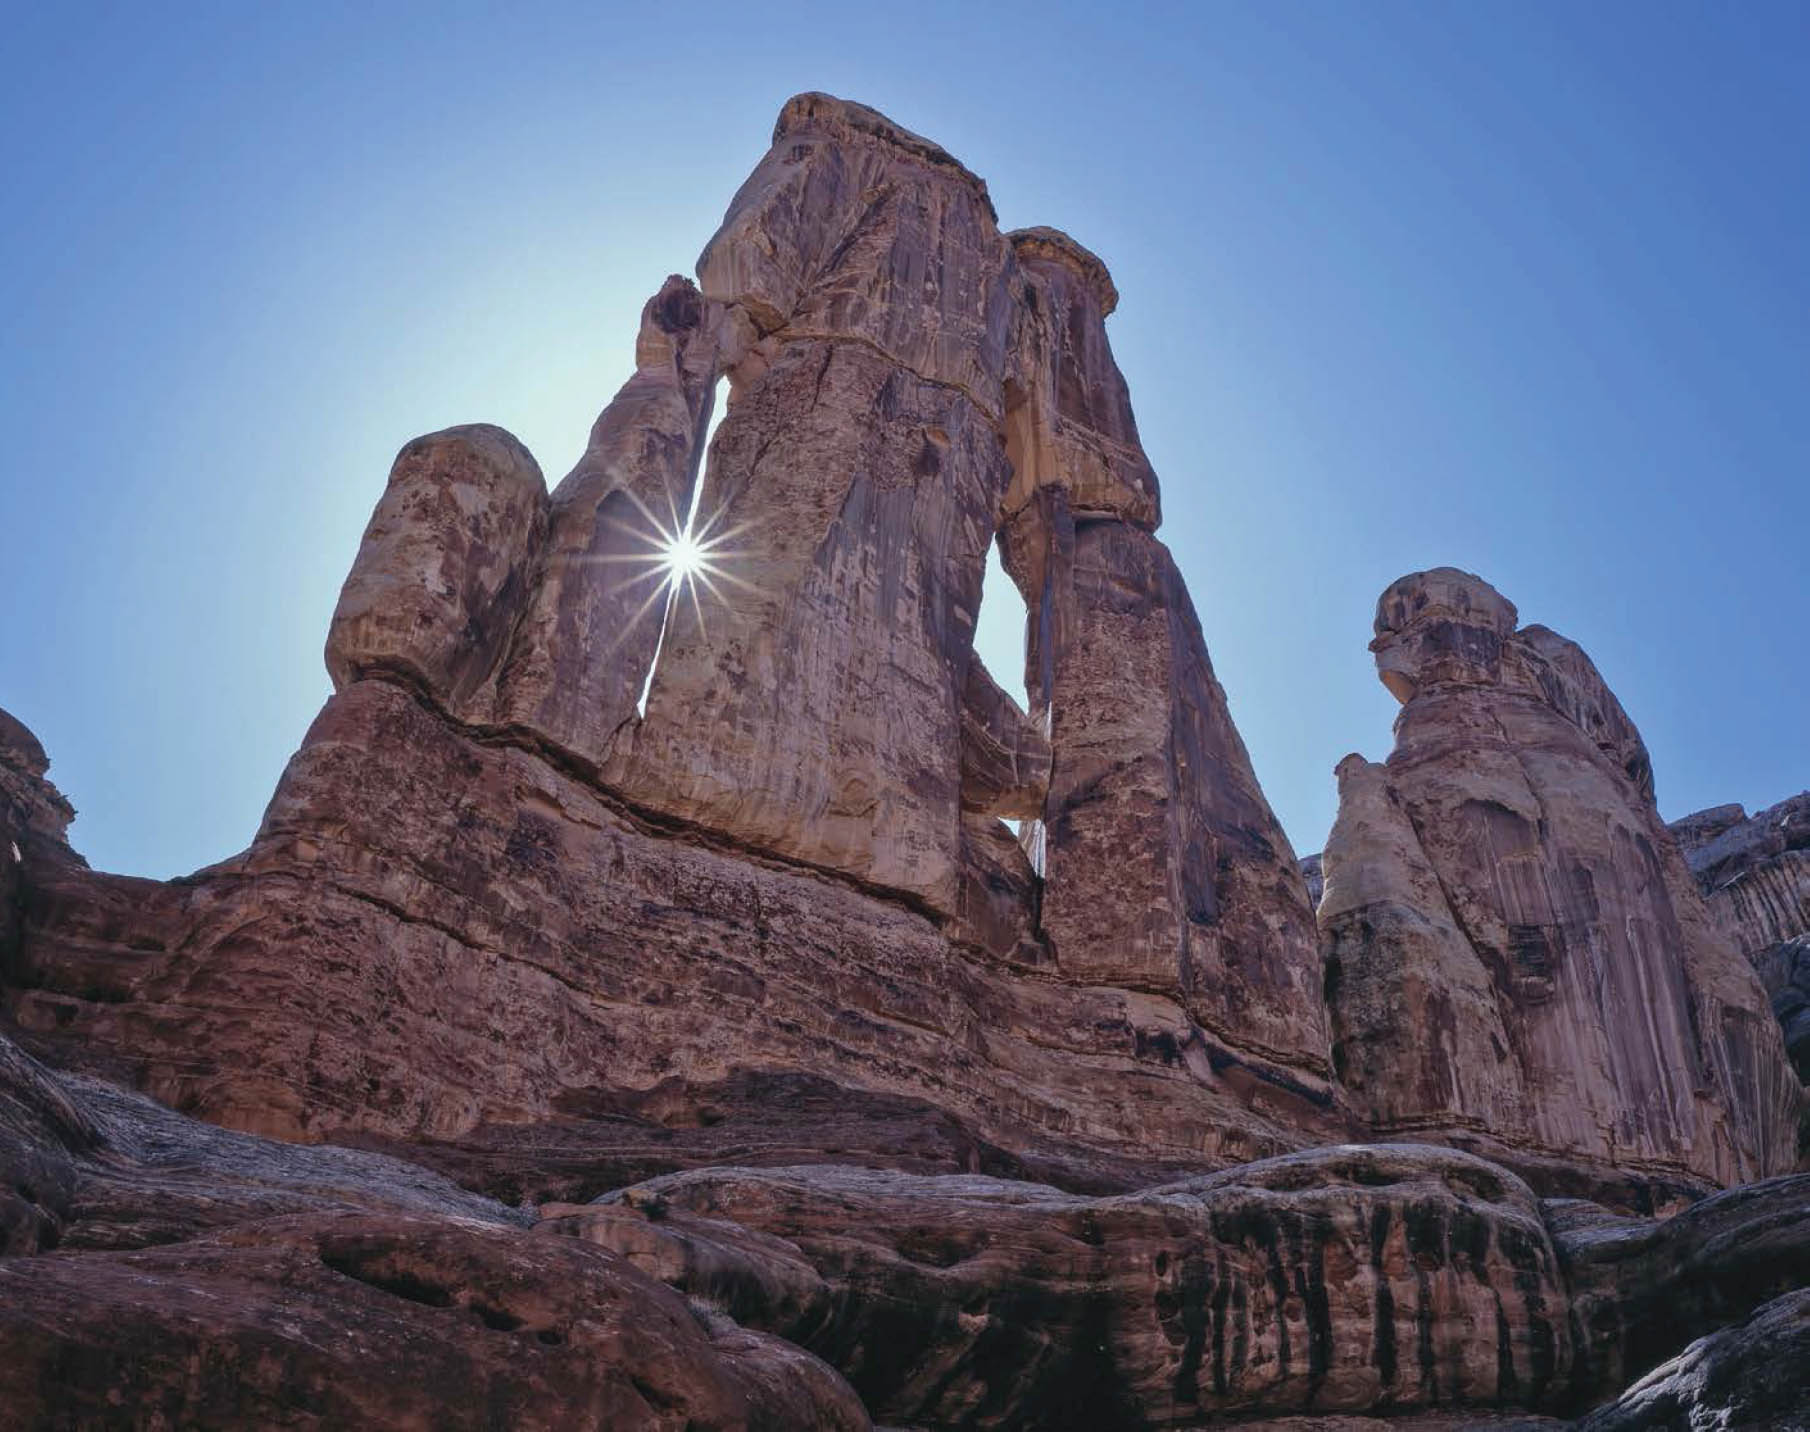
FIGURE 4-8 Sunstar and Druid Arch, Needles District, Canyonlands National Park, Utah. I had photographed early light from the opposite side of the arch, then realized that the path of the sun through the sky was such that if I hurried around to the other side of the arch, I might be able to shoot the sun through the left-hand opening in the arch. Ebony SW-45 field camera, Fujichrome film. Lens and exposure unrecorded.
Knowing the sun’s path through the sky can prevent aggravating failures, like the time I tried to photograph sunrise above a frozen lake. Instead of rising over the end of the lake and bathing the rippled ice with warm, texturing light at the moment of sunrise as I expected, the sun followed a path that ran parallel to—and just barely below—a diagonally sloping ridge crest that began right at the end of the lake. It took 45 frustrating minutes for the sun to finally emerge from below the ridge. Needless to say, I had already given up on my original idea for the photograph.
Topographic maps from the U.S. Geologic Survey in the 7.5-minute series are the gold standard for detail and accuracy, but even they can lead you astray on rare occasions. In September one year, as I was studying maps of the area near Silver Jack Reservoir in the San Juan Mountains, I noticed a small lake I’d never visited. Coyote Lake, as it was called, was only about three miles from the road. I envisioned a great shot of yellow aspen and dramatic peaks reflected in clear blue water. On a beautiful fall day I packed up for a sunset shoot and headed in. After hiking hard for over an hour, my GPS receiver told me the lake was just a hundred yards away up a steep embankment. Soon I crested the embankment, did a double-take, and stopped.
There was a small problem with my grand plan. Cows were grazing in the middle of Coyote Lake. No, these cows had not learned to walk on water. Coyote Lake was a meadow.
I checked the publication date on my map. It hadn’t been field-checked in nearly 50 years. Coyote Lake had long ago filled up with silt and sprouted grass.
That fiasco taught me to add another tool to my visualization arsenal: the satellite images available through TPE, various smartphone apps, and Google Earth. When I got home, I compared satellite images from Google Earth to my topographic maps. Not only could I see that Coyote “Lake” was a meadow, I could also see that another nearby “lake” that looked promising but required an even longer approach had also become a cow pasture. No need to waste a precious sunset shooting at that location!
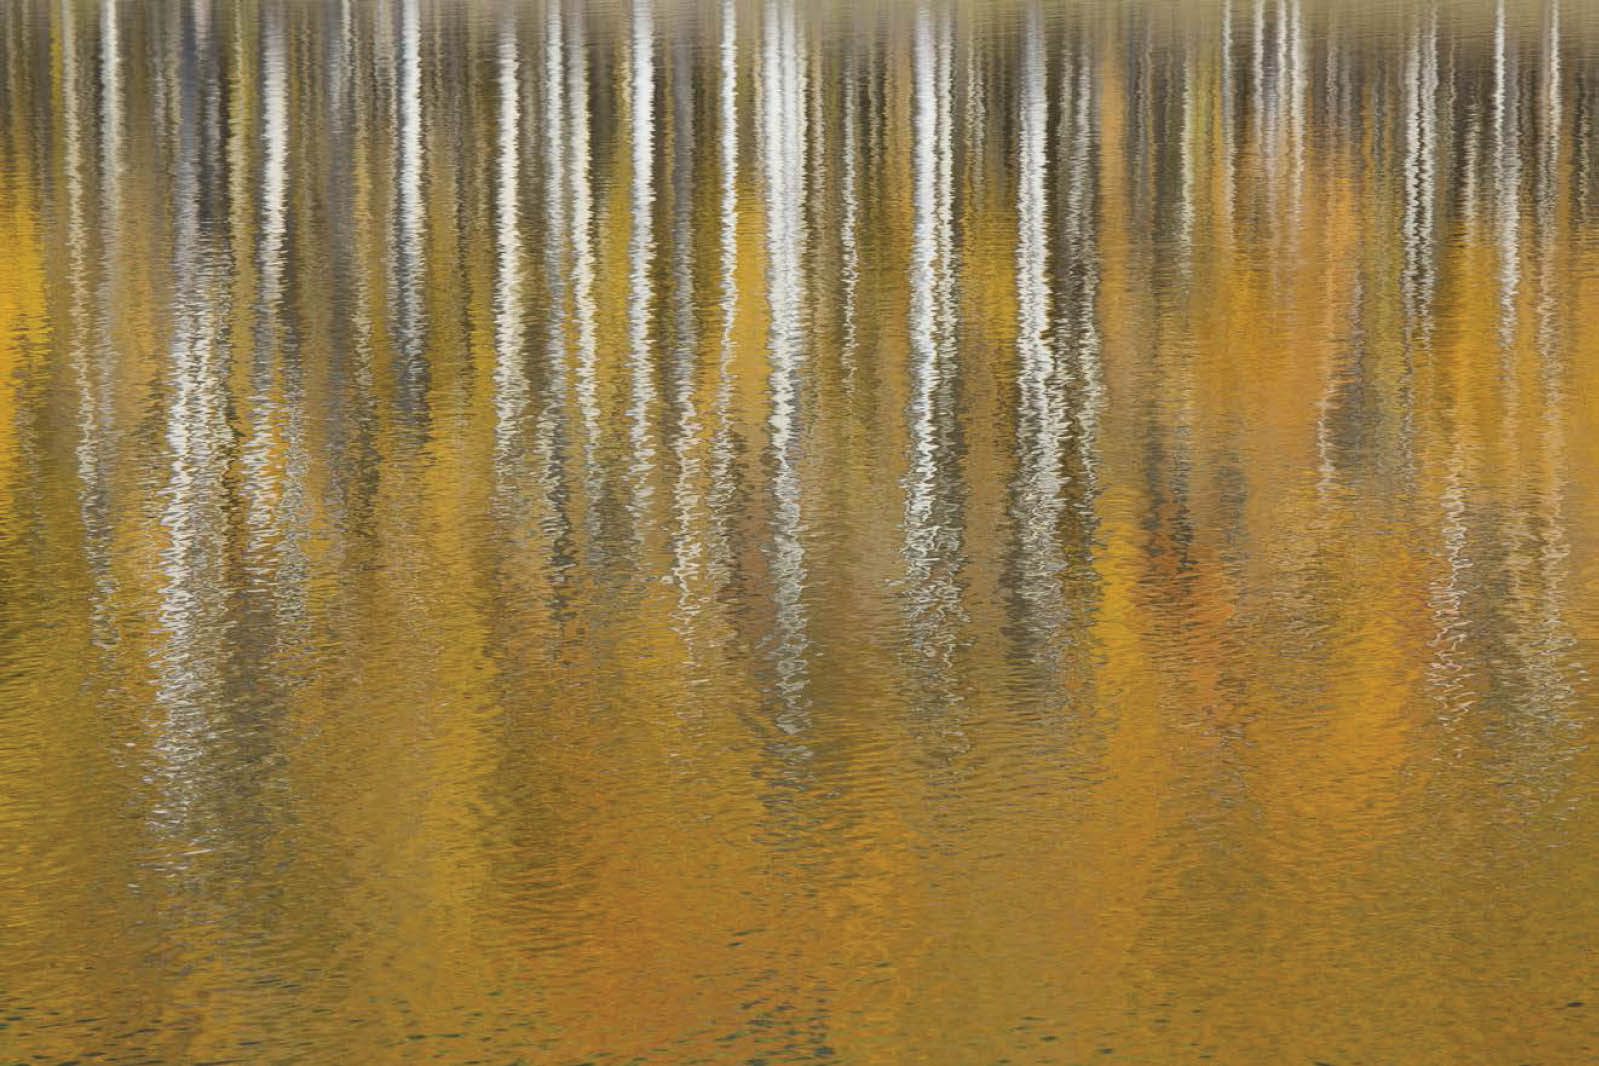
FIGURE 4-9 Reflections in Clear Lake, near Silver Jack Reservoir, San Juan Mountains, Colorado. Fortunately, unlike Coyote Lake, not all the ponds near Silver Jack Reservoir have silted up and grown grass.
Searching for the Position of the Sun, Moon, and Galactic Center
Some landscape images only work if the sun, moon, or galactic center appear in a precise location during a narrow window of time. For example, in Arches National Park, there is a narrow ledge 20 feet off the ground that lets you see South Window through Turret Arch. You might want to know if and when the rising sun will be visible through those sandstone windows. Or you might want to know the best day to photograph the full moon setting over Longs Peak as seen from the summit of Twin Sisters in Rocky Mountain National Park (figure 4-1). Or you might want to know when the galactic center will appear in the notch to the right of Lone Eagle Peak as seen from Mirror Lake in Colorado’s Indian Peaks Wilderness (figure 4-10).
Today several smartphone and web apps can help you solve these problems. At this time, the best position-search app for the sun, moon, and galactic center is Sun Surveyor (iOS and Android—no desktop version). Let’s use Sun Surveyor’s position-search utility, combined with the large maps you can display on your laptop or desktop monitor using TPE, to determine the best day in 2020 to shoot the full moon setting over Longs Peak from Twin Sisters at sunrise.

FIGURE 4-10 Milky Way over Lone Eagle Peak and Mirror Lake, Indian Peaks Wilderness, Colorado. I used Sun Surveyor to determine when the galactic center would appear in the notch to the right of Lone Eagle Peak. Canon EOS 5D Mark IV, Canon EF 35mm f/1.4L II USM. Stitched panorama. Land: two rows, four camera positions per row, 40 seconds, f/1.4, ISO 6400. Sky: one row, four camera positions per row, 10 seconds, f/1.4, ISO 6400.
Images of the full moon rising or setting over some photogenic subject require careful planning because the moon is quite small in an angular sense, subtending an angle of only 0.5 degrees. In other words, the angle between a line leading from your eye to the top of the moon’s disc and another line leading from your eye to the bottom of the moon’s disc is only 0.5 degrees. To put that in perspective, the angle of view of a 50mm lens on a full-frame camera (measured on the long dimension) is about 40 degrees. Take a picture of the moon with a 50mm lens, and the moon will occupy only one-eightieth of the width of the frame. That means you need to use a long lens to magnify the moon and render it large enough in the frame to play a significant role in the composition. And if you’re going to use a long lens, then the moon must be low in the sky, close to the subject, to include both the moon and the subject in the frame.
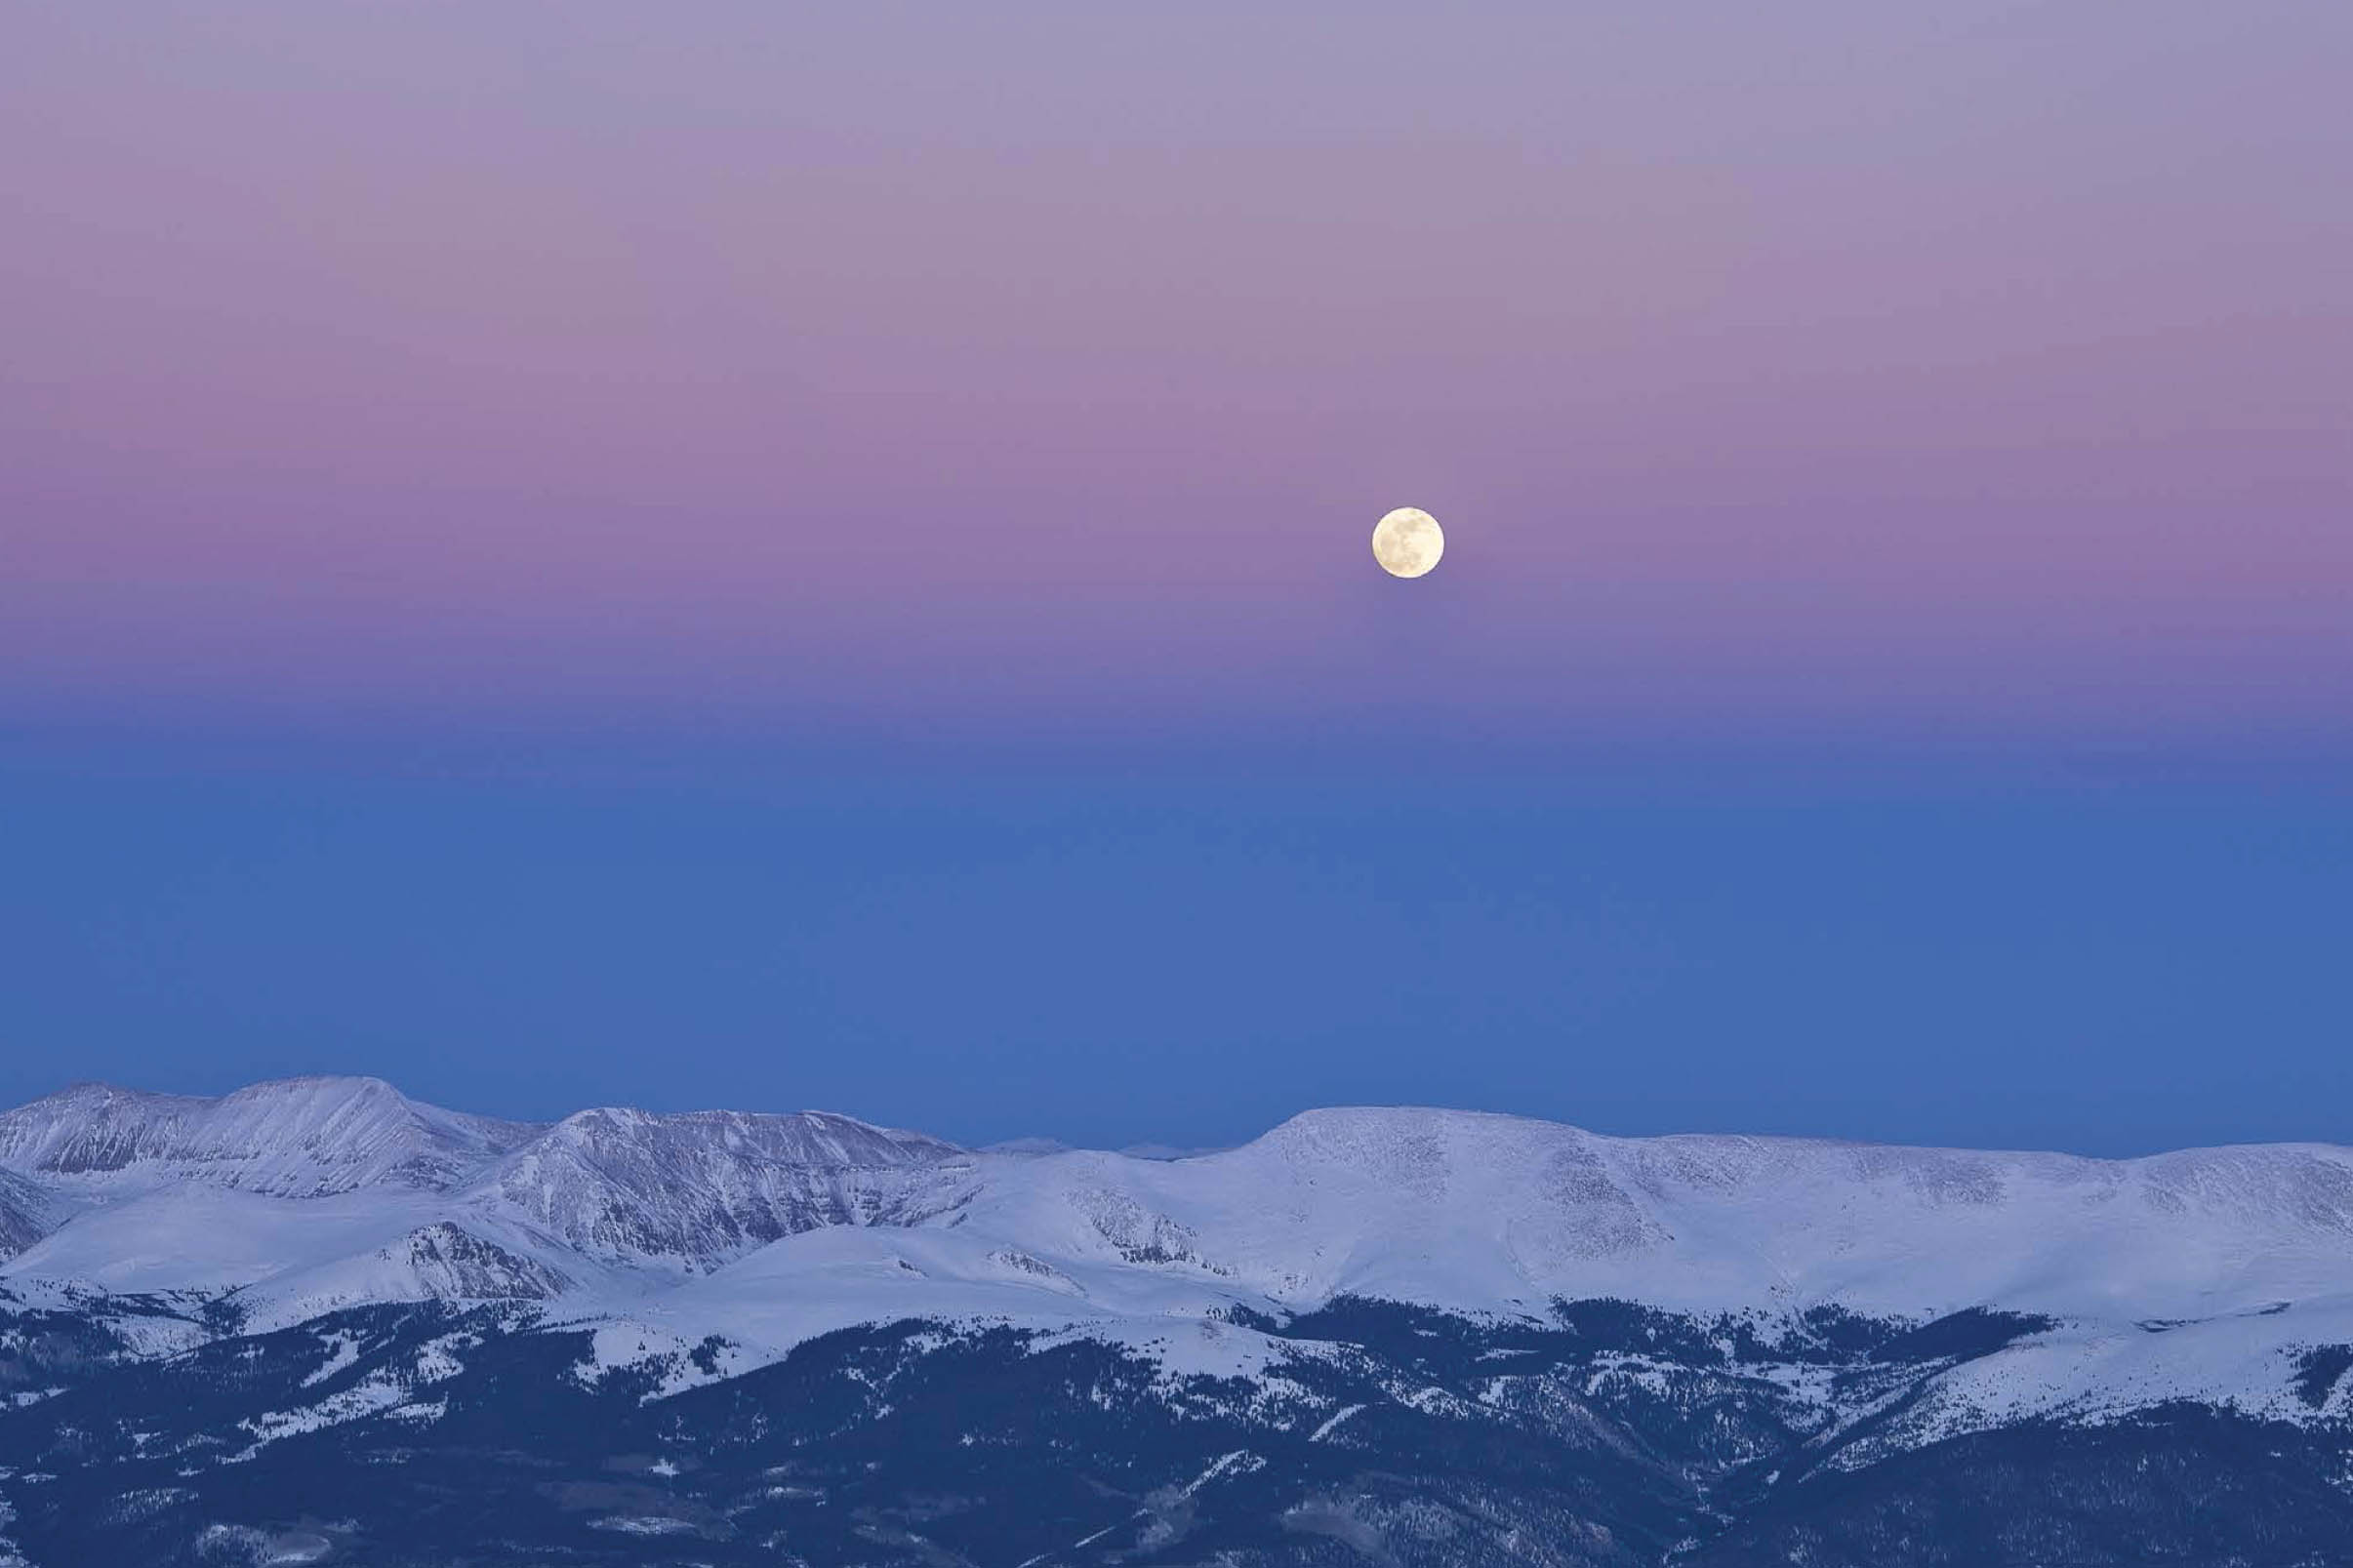
FIGURE 4-11 Full moon rising over the Mosquito Range, seen from the summit of 14,433-foot Mt. Elbert in January, San Isabel National Forest, Colorado. Canon EOS 5D Mark III, Canon EF 70-200mm f/4L IS USM at 106mm, 1/5th, f/11, ISO 100.
Knowing this can help you visualize your shot. If the moon is 20 degrees—40 moon diameters—above the actual horizon at sunrise, you’re going to have a lot of sky between your subject and the moon. The moon itself will look very small when you use the normal-to-wide lens you’ll need to include all that sky, plus the subject. Unless that sky is filled with colorful clouds, the shot probably won’t be very interesting. On the other hand, if the moon is only a degree or two—two to four moon diameters—above the actual horizon, then you can use a long lens and fill the frame with the subject and a narrow strip of sky enlivened by the presence of the moon.
The earth rotates 360 degrees every 24 hours, which means that the moon (and the sun) move 1 degree across the sky every 4 minutes, or about one moon diameter in 2 minutes. If the moon is only one moon diameter above the actual horizon at the moment of sunrise, you’ve only got a couple of minutes until it’s gone for good. Knowing your lenses’ fields of view (in degrees) will help you visualize the final shot. That information is readily available on the internet or in various smartphone apps.
Planning an Image of the Full Moon Over Longs Peak
With that as preamble, let’s figure out the best day in 2020 to shoot the full moon setting over Longs Peak, at the moment of sunrise, from the summit of Twin Sisters. Start by opening TPE and searching for Longs Peak (Twin Sisters is not in the TPE database as of this writing). Drag the primary marker across the map to the northeast and drop it precisely on the summit of Twin Sisters. Right now, the date doesn’t matter. Activate the secondary marker, and drop it on the summit of Longs Peak, as shown in figure 4-12. Jot down the azimuth shown in the geodetics panel—the compass bearing from Twin Sisters to Longs Peak. Rounded, I got 245 degrees. You’ll want the moon, at sunrise, to have a similar bearing. The moon doesn’t have to be precisely over the summit of Longs to get a good photo, however; there’s actually a range of acceptable angles. Drag the secondary marker a bit left of Longs and note the azimuth. Drag it a bit right and do the same. Let’s say the acceptable azimuth range is 235 to 250 degrees.
Twin Sisters is about 2,800 feet lower than Longs Peak, so you have to look up slightly to see Longs’ summit. That angle, the altitude, is also shown in the geodetics panel. Rounded, I get 5 degrees. The moon must be higher than that angle for you to see it; any lower, and it would be hidden behind Longs Peak. Again, however, there is an acceptable range of values. Let’s say the acceptable altitude range is 6 to 10 degrees.
We have two final considerations: the percentage of the surface of the moon that will be illuminated, and when the moon will appear within the acceptable range of azimuths and altitudes. We’re looking for a full moon, so a percentage illumination of 95 to 100 percent is appropriate. And we want beautiful light, so the range of acceptable times is from about 10 minutes before sunrise, when the twilight wedge usually peaks, until about 10 minutes afterward, when the warmth of the sunrise light will have largely faded. If you were shooting the full moon rising at sunset, you’d want a similar time range around sunset.

FIGURE 4-12 Screenshot from TPE showing Longs Peak and Twin Sisters for 5:52 a.m. on May 8, 2020, one of the two best days in 2020 to shoot the moon setting over Longs Peak from Twin Sisters. The red primary marker is set atop Twin Sisters; the gray secondary marker is atop Longs Peak. As shown in the geodetics panel (circled), the azimuth of Longs Peak as seen from the summit of Twin Sisters is 245 degrees; the altitude is 5 degrees.
The beauty of Sun Surveyor is that it allows you to enter each of these search parameters as a range: azimuth, altitude, percentage of moon illuminated, and time in relation to sunrise or sunset.
Open Sun Surveyor on your tablet or phone. Tap the menu icon in the top-left corner of the screen (the “cheeseburger” icon that looks like three horizontal bars). On the main menu, tap Settings. On the Settings screen, shown in figure 4-13, turn on: address lookups, elevation lookups, North is true north. Turn off Quick Location Fix. Use the left-facing arrow or Done button to exit this screen. Please note: all Sun Surveyor screenshots are from the iOS version running on an iPad.
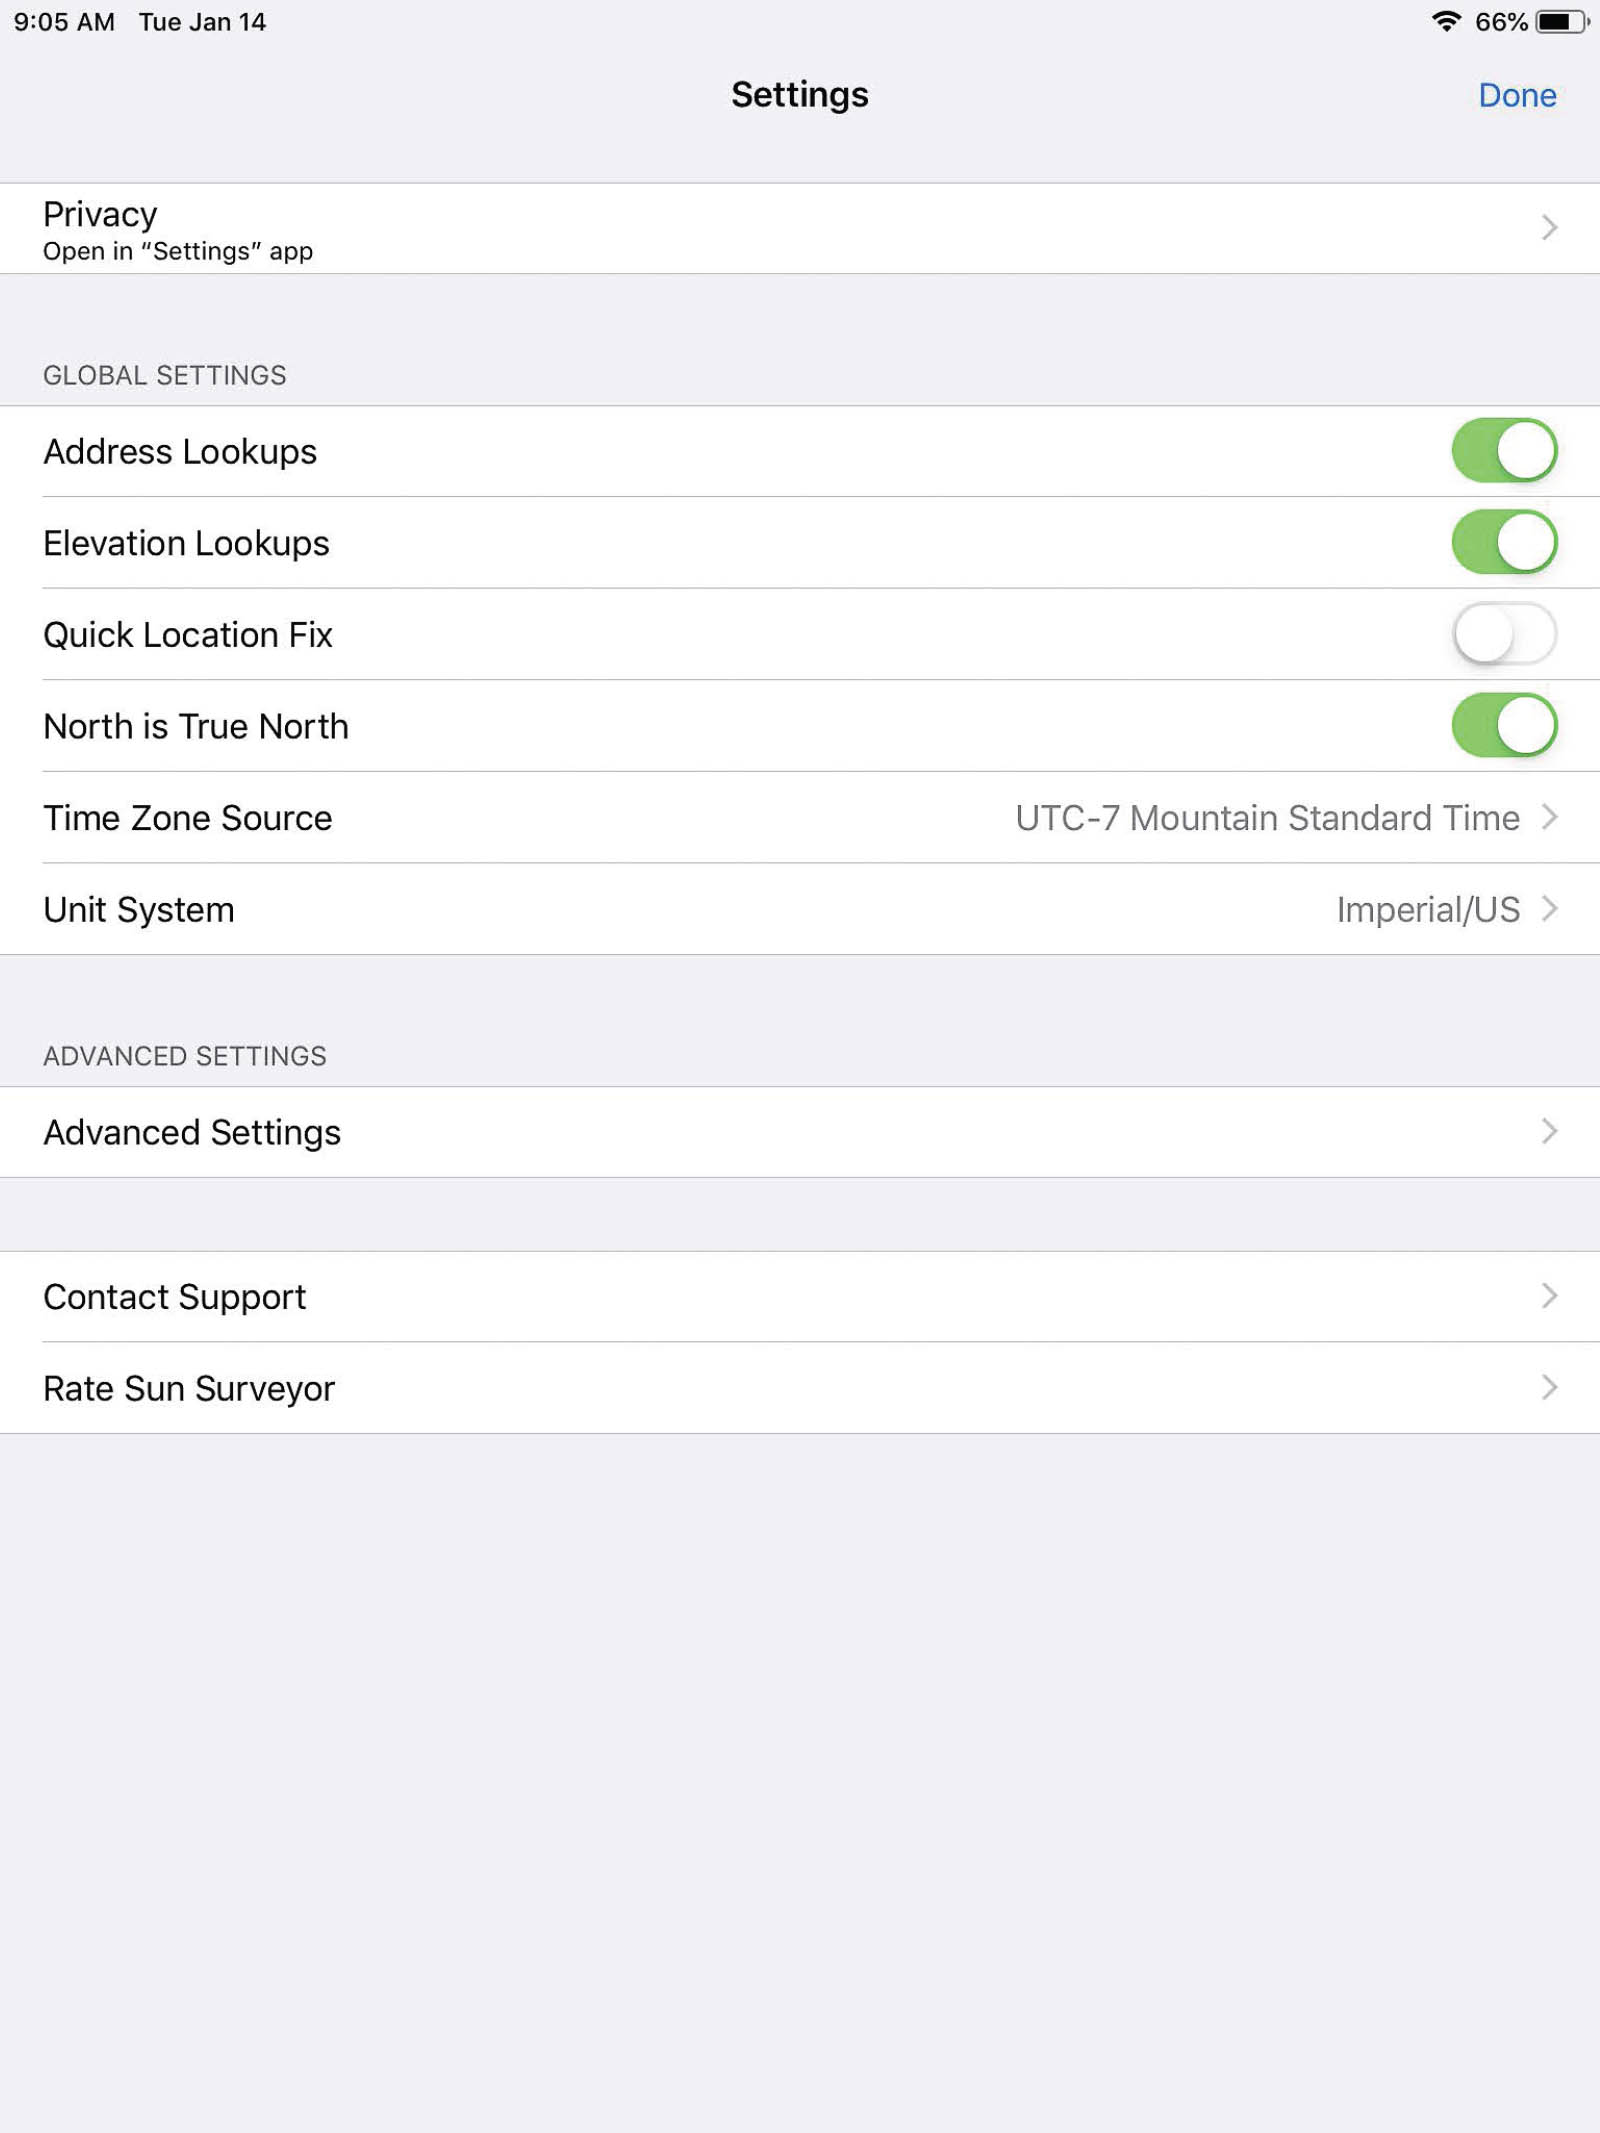
FIGURE 4-13 Settings screen from Sun Surveyor showing the preferred settings.
Now tap the menu icon again and choose Map. Tap the Location icon in the top-right corner of the screen (its appearance will vary depending on the device you’re using). Turn off Continuously Track My Location if it’s enabled, tap the search icon, then search for Twin Sisters Peaks. Tap Twin Sisters Peaks, Colorado, USA, in the search results to set your location and return to the Map module. Below the map you’ll find the Info Carousel. Swipe left or right across the carousel until it shows Position Search and tap the Position Search icon, as shown in figure 4-14.
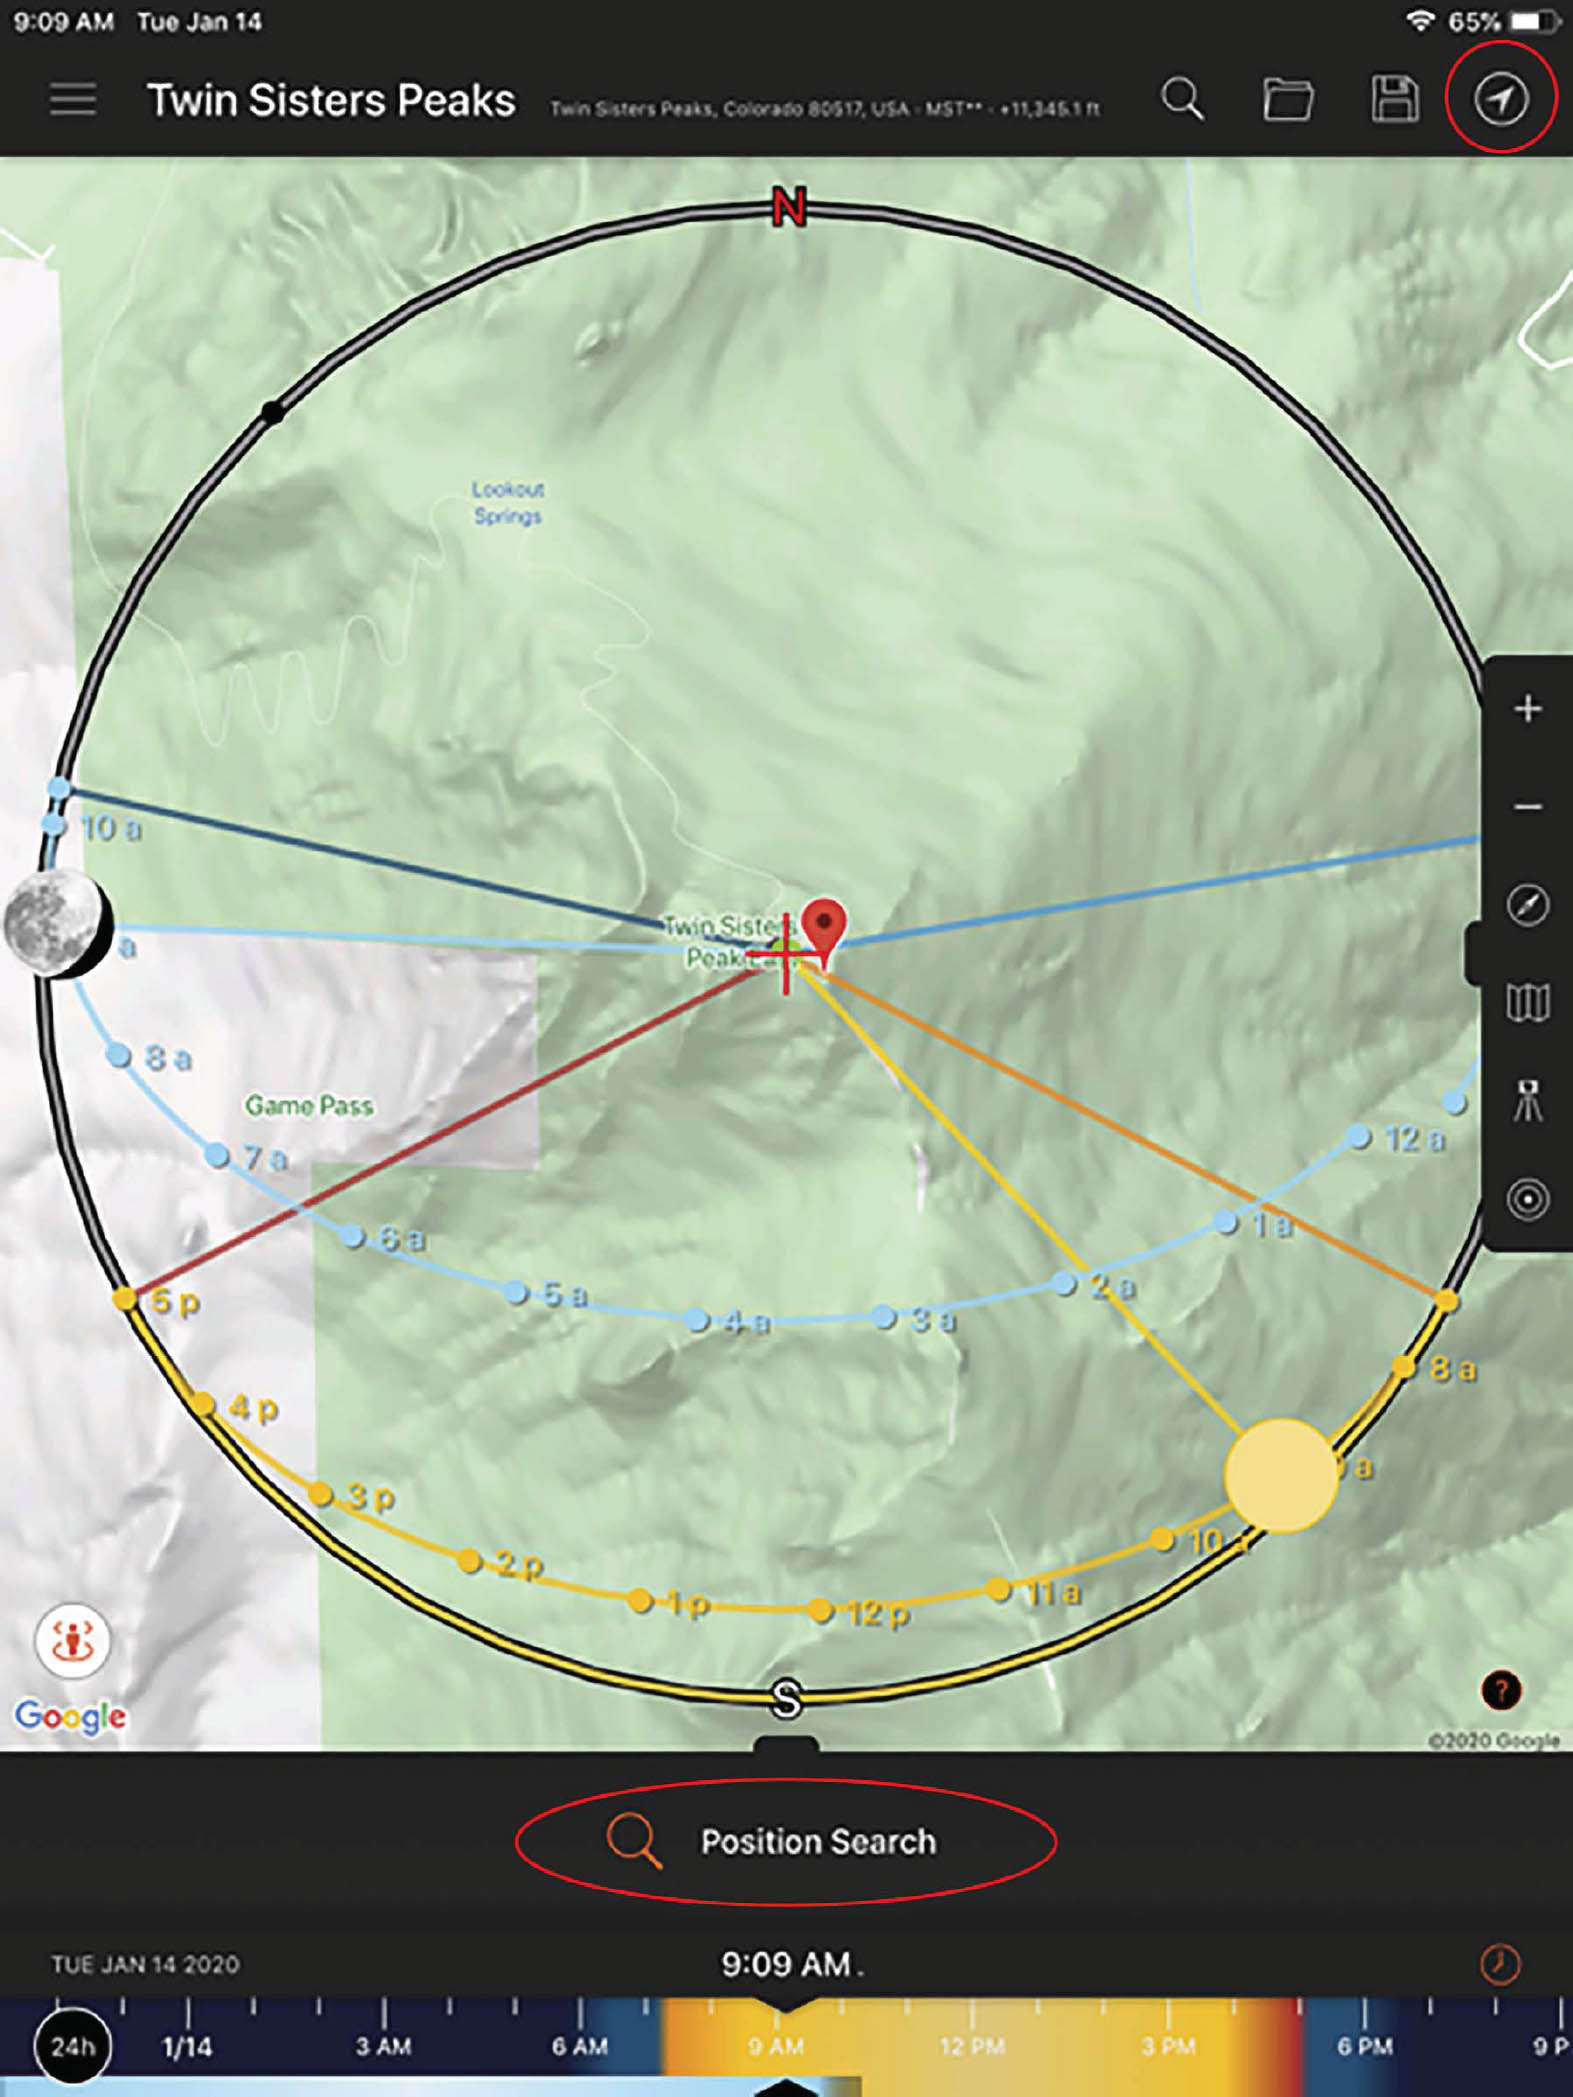
FIGURE 4-14 Screenshot from Sun Surveyor showing the map module with Twin Sisters set as the location. The Location icon and Position Search icon are circled.

FIGURE 4-15 Sun Surveyor screenshot showing choice of sun, moon, or Milky Way center visibility for a position search.
Tap Moon on the screen shown in figure 4-15.
On the search parameters screen, shown in figure 4-16, choose a start date and time period to search. For the purposes of this demonstration, I chose January 14, 2020, as the start date and one year as the length of time to search. Then I entered the other parameters we calculated above: 95-100 percent for illumination, 6-10 degrees for altitude, 235-250 degrees for azimuth, and 10 minutes before sunrise to 10 minutes after sunrise. Sunset times (not shown) are irrelevant for the moment.
Tap Search (top-right corner) to see the results shown in figure 4-17.
If you’ve entered your search parameters correctly, then every day in the search results will work, but you can use TPE to double-check and pick the very best day. Try the first date, May 8, 2020, at 5:52 a.m. Note that for each day in the search results, Sun Surveyor returns the first time when the moon’s position matches all search criteria. Enter that date in TPE’s date panel at the top of the interface, shown in figure 4-3. Drag the time slider on the chart to 5:52 a.m. (If the chart isn’t visible, click the full-screen icon in the top-right corner of the interface. It looks like a four-headed arrow.) A thin, dark blue line now extends from the Primary Marker—your position atop Twin Sisters—toward the moon at that moment (figure 4-12).
Bingo! At 5:52 a.m, which happens to be 1 minute before sunrise, the moon will be just to the left of Mt. Meeker, a dramatic peak near Longs Peak that is easily included in the composition, and about 4 degrees (eight moon diameters) higher than the summit of Longs Peak, close enough to the horizon that you can use a telephoto lens to magnify the moon. As sunrise and moonset progress, the moon will move down and right as viewed from Twin Sisters, giving you additional options. Checking the other date in the search result shows that August 4, 2020, could also work well.
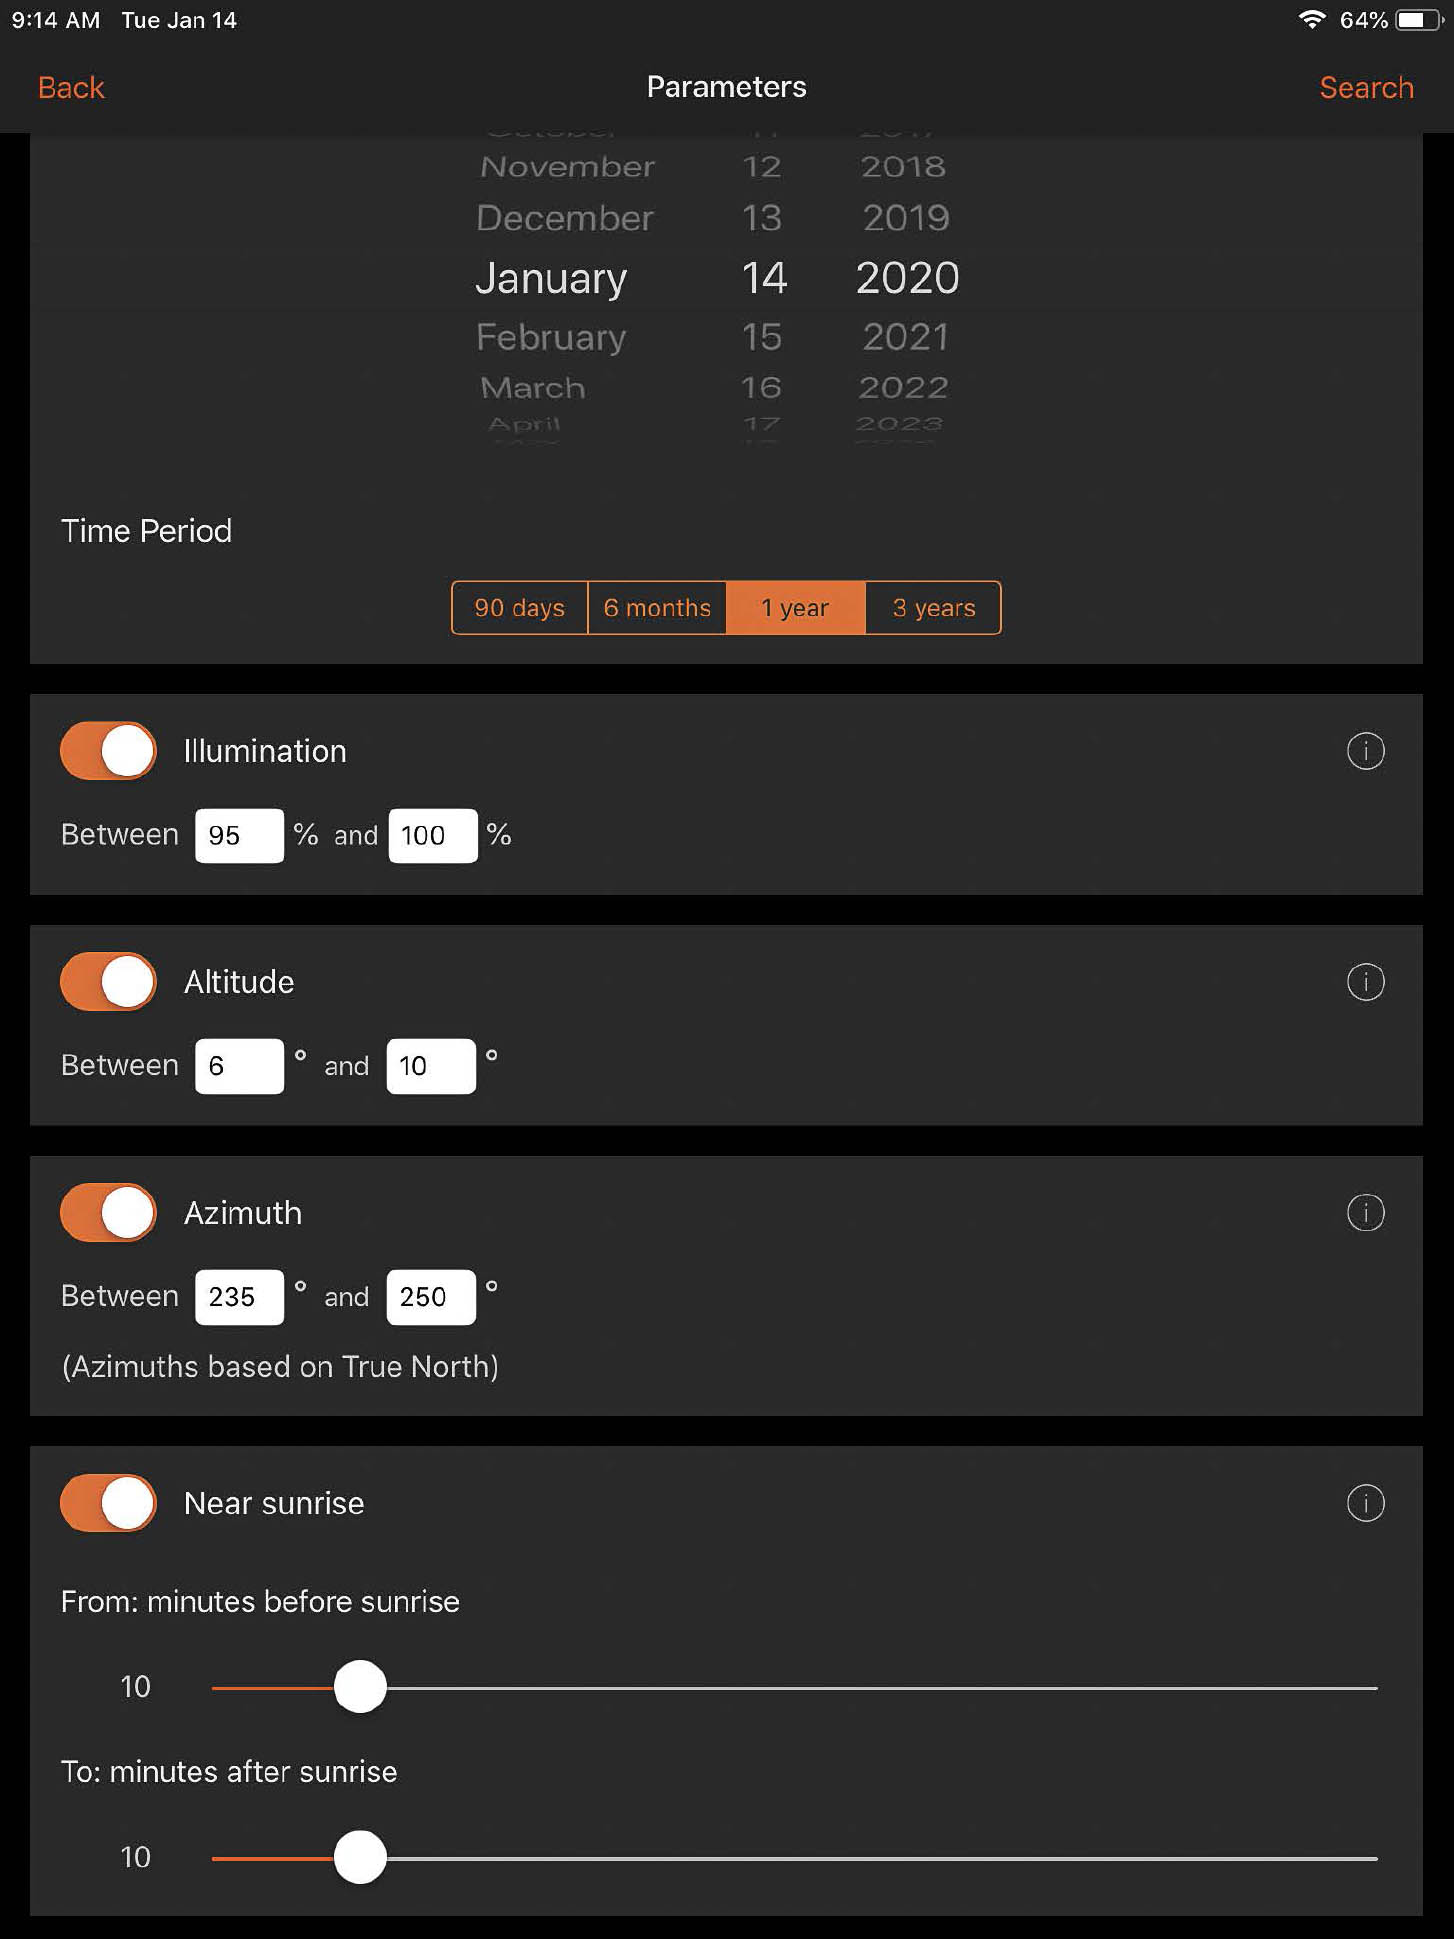
FIGURE 4-16 Sun Surveyor screenshot showing search parameters screen.
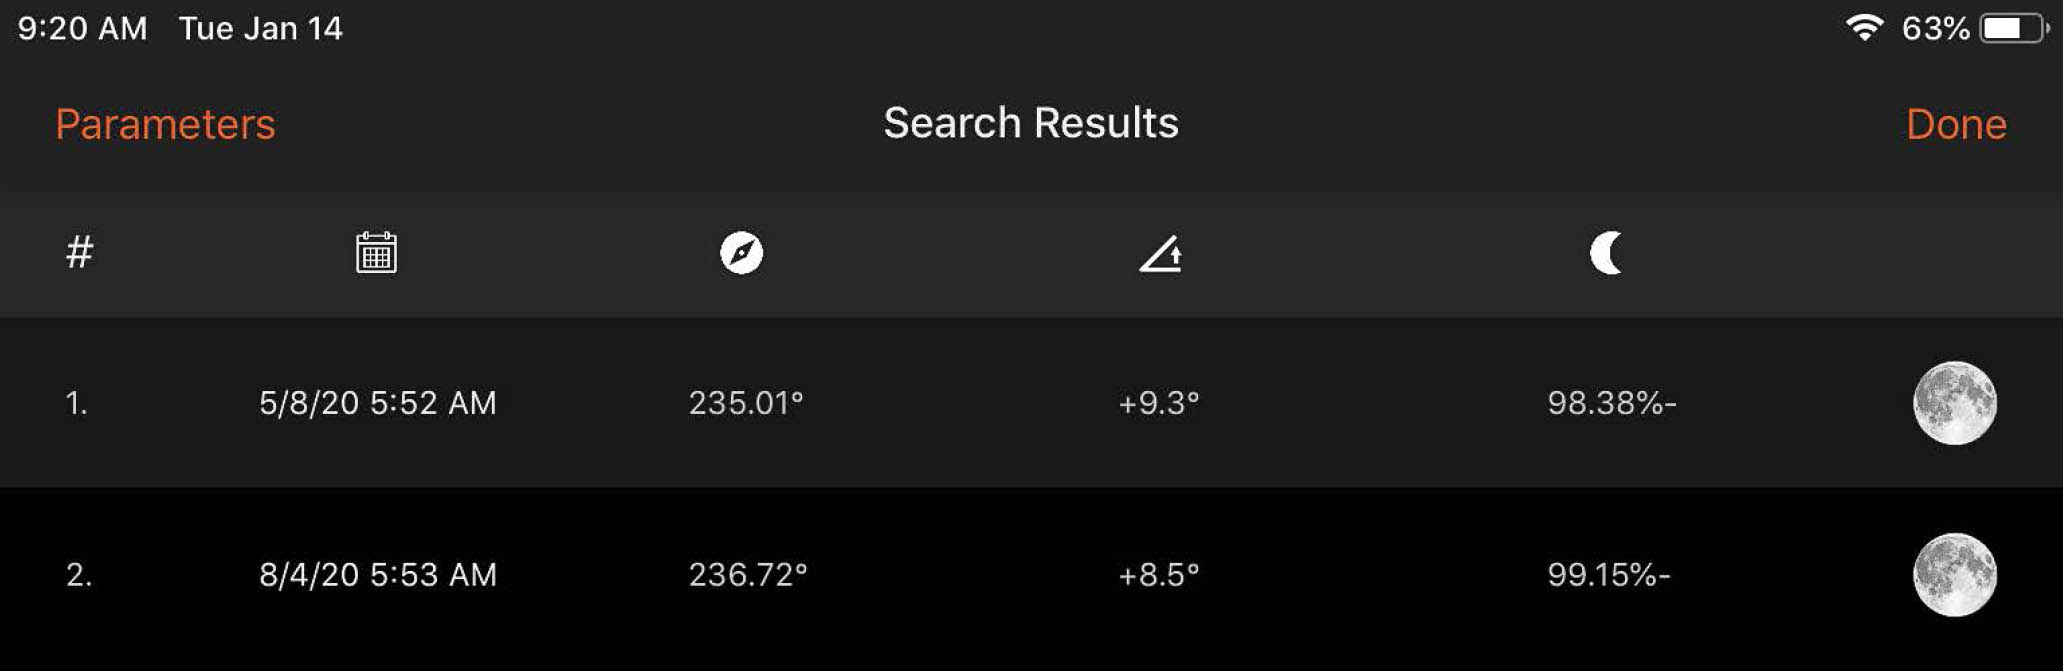
FIGURE 4-17 Sun Surveyor search results screen.
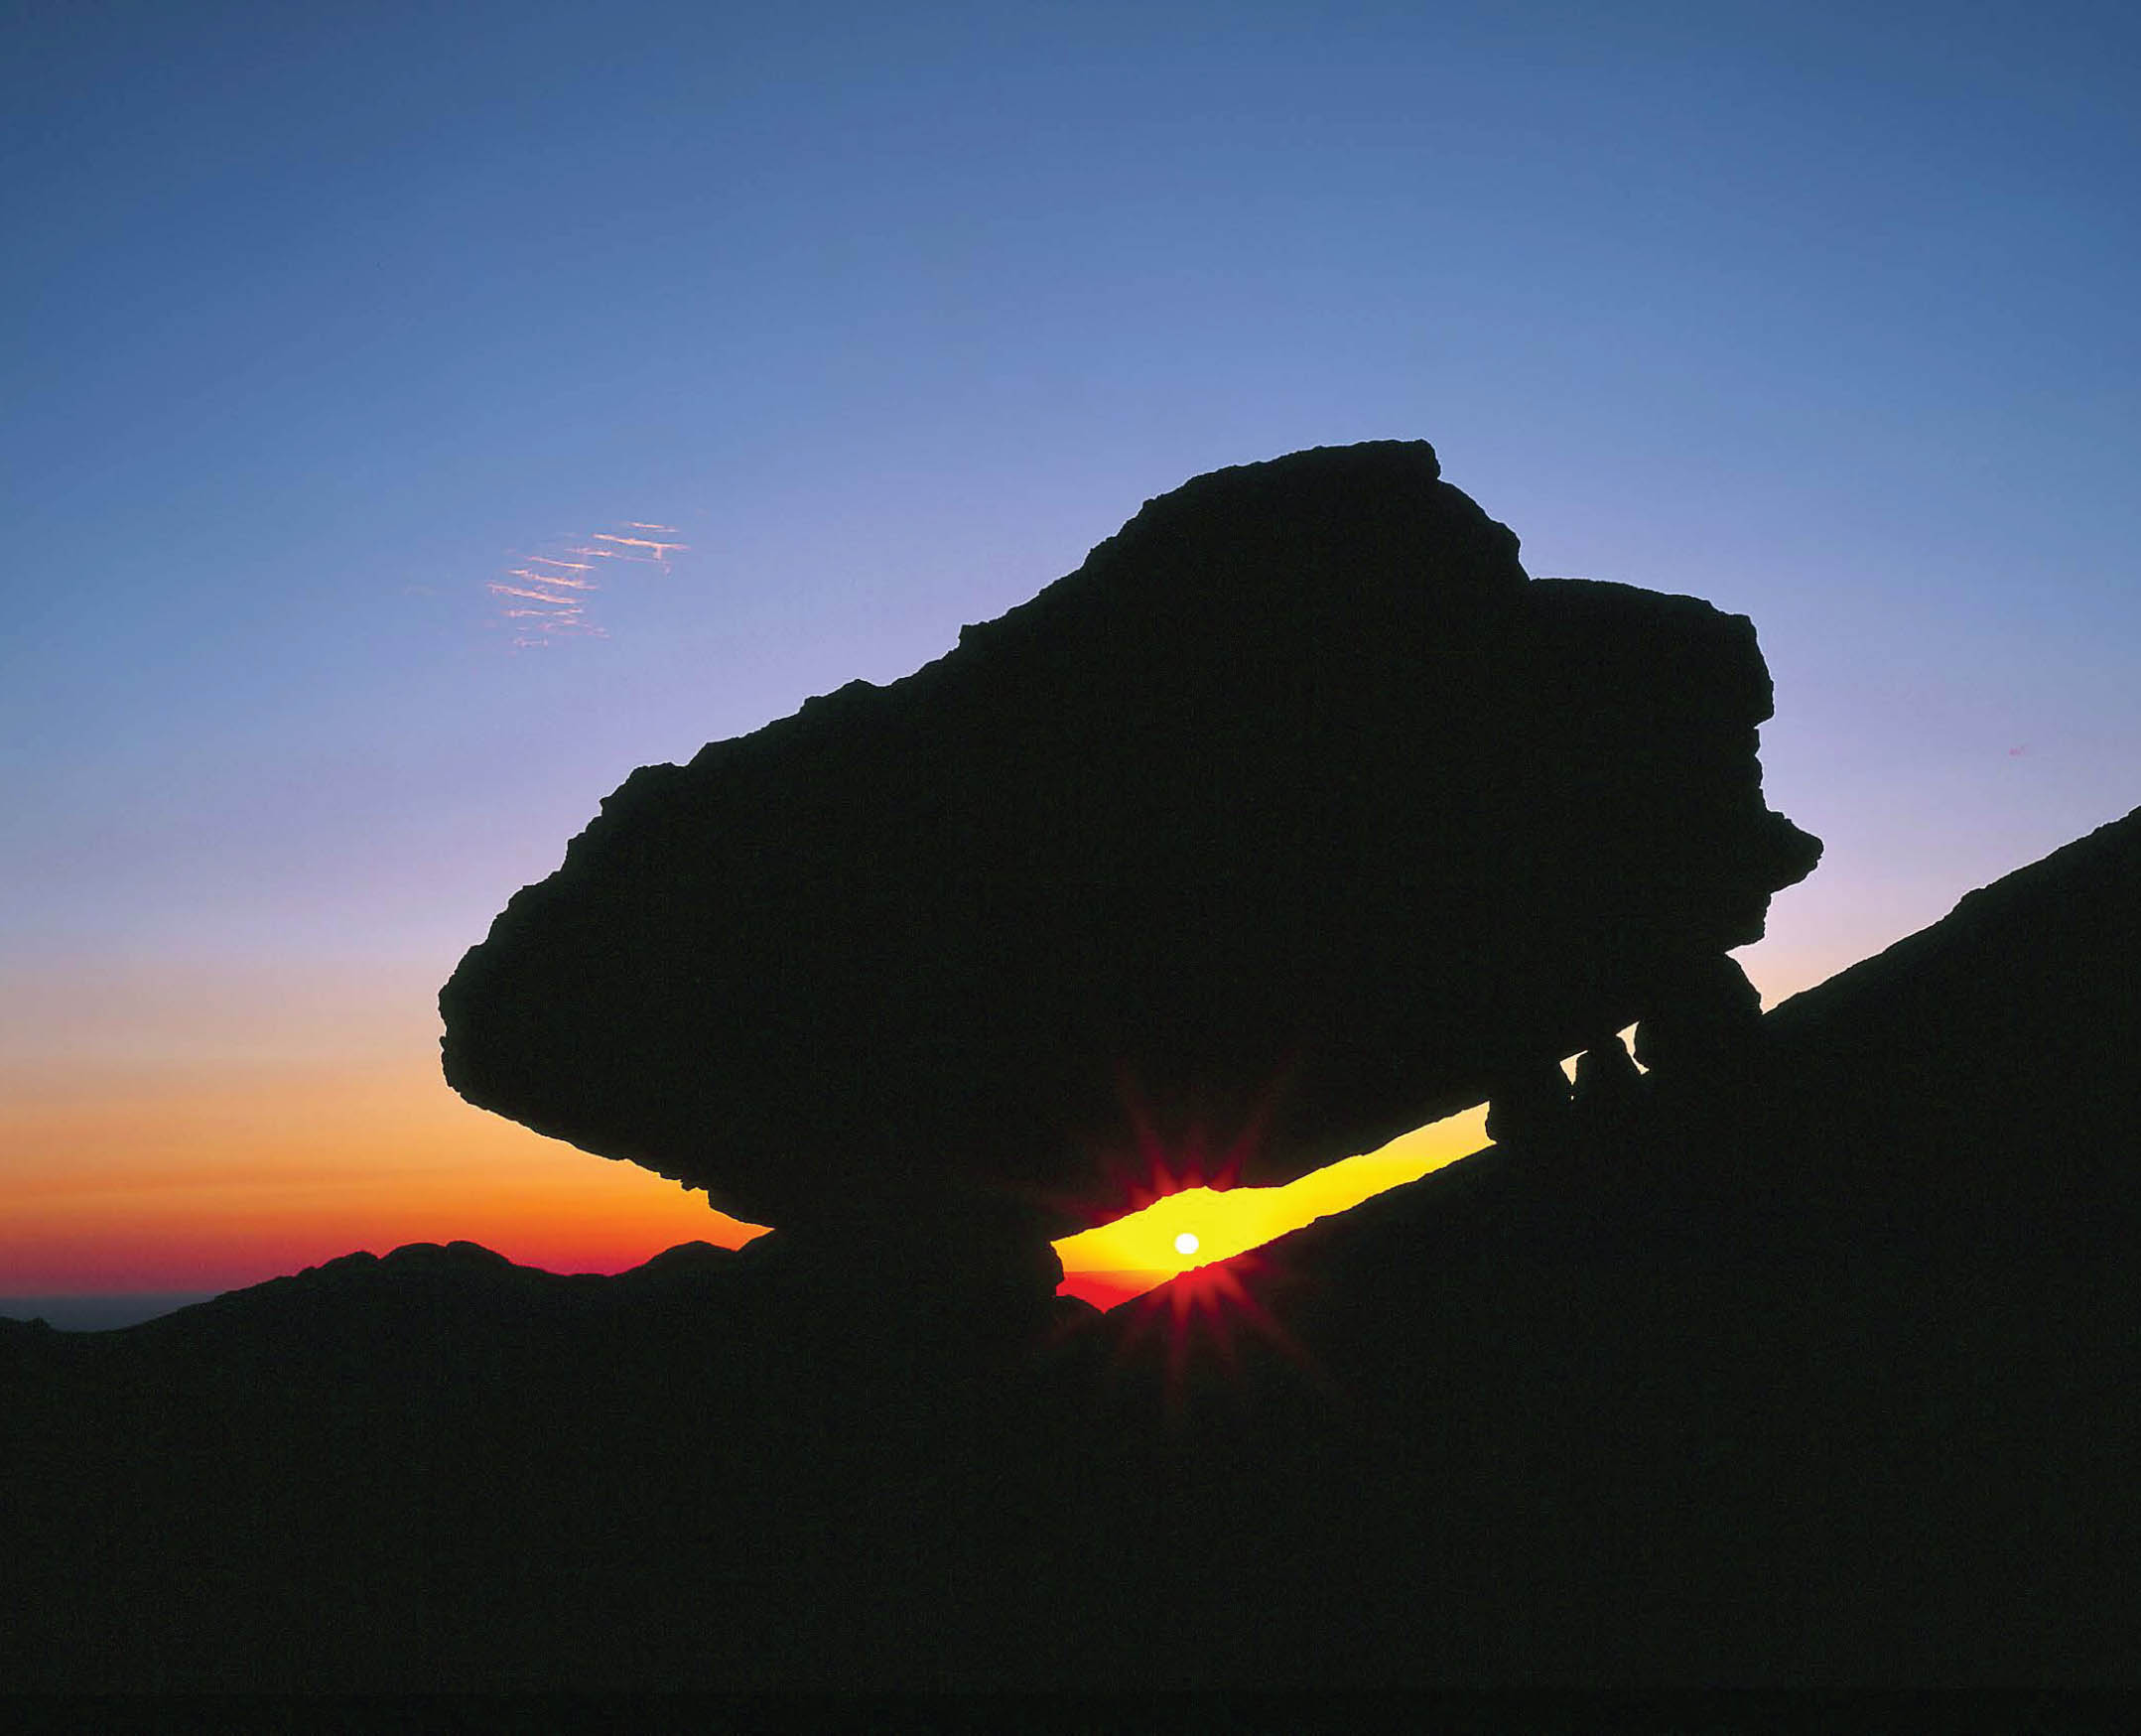
FIGURE 4-18 Glacial erratic near Columbine Falls, Rocky Mountain National Park, Colorado. The precarious perch of this boulder atop small stones on a sloping granite slab intrigued me, so I shot a compass bearing under the boulder and wrote the bearing down in a notebook. A couple of years later I calculated when the sun would be visible under the boulder at sunrise and returned to make this image. Zone VI 4×5 field camera, Fujichrome film. Lens and exposure unrecorded.
Sun Surveyor also lets you search for specific positions of the sun by entering an appropriate range for altitude and azimuth. And you can search for specific positions of the galactic center by entering a range for altitude and azimuth and specifying that the results only include periods between astronomical dusk and dawn with no visible moon.
No photographer can afford to be in the field 365 days a year. Thoughtful use of TPE and Sun Surveyor will help you choose the most promising days to get out and shoot. Using the Photographer’s Ephemeris and Sun Surveyor together makes it much easier to be in the right place at the right time.
This brief introduction to TPE and Sun Surveyor is surely not enough to teach you every facet of the software. I find both programs invaluable when planning my shoots. Both programs have been around for years and are likely to still be available at the time you read this book. If not, it will be well worth your time to search for alternatives that offer similar features.
Not every shot has to be visualized or even scouted. On rare occasions I’ve stumbled across an exquisite subject just as the right light and atmospherics came together, then created a successful image of that scene. Far more often, however, my best images came about because I imagined them first and then found a way to put my vision onto my sensor. To me, visualization is one of the most exciting and enjoyable parts of landscape photography. Imagination is infinite: let yours run wild, then follow where it leads.