3
In Search of Extraordinary Landscapes
Before I became a landscape photographer, I was often astonished at the beauty of the images exhibited in calendars and magazine articles. How on earth could these photographers be so lucky as to stumble across such gorgeous scenes? Then I realized that the answer wasn’t luck. It was scouting.
There’s no shortage of information about the world’s iconic landscape locations. There are printed and online guidebooks, magazine articles, smartphone apps, blog posts, and more. Sooner or later, however, you’re going to get bored following the herd to the Maroon Bells, Delicate Arch, and the Wawona Tunnel view of Yosemite Valley. You’re going to want to make images that are uniquely your own. To do that, you need to scout.
Great landscape photography is often 1 percent inspiration and 99 percent perspiration. It’s rarely productive to throw a dart at a map and head out in the middle of the day in hopes of making a great photograph the instant you find a beautiful scene. For the majority of my best images, I found the location while scouting during the midday hours, then returned at the right time of day or night, and the right time of year, to make the image I envisioned. I spend much more time scouting than I do clicking the shutter.
Some people like shooting intimate landscapes: close-ups of flowers, beautiful little waterfalls and cascades, or interesting weathered trees. Intimate landscapes can be beautiful, and I shoot them when I find them, but I am most interested in the grand landscape—the sweeping vista across miles of wilderness. When I’m scouting, I’m usually looking for a compelling foreground that integrates seamlessly with a strong midground and background. I also pay close attention to the potential for great light. This chapter will teach you how to search for a striking subject, which is always your first task. Finding that subject, however, is only the beginning of creating an evocative image.
Of course, if your subject is a long way from your campsite or car, you need to be prepared for serious nighttime hiking and route-finding. I carry a map, compass, altimeter, and GPS receiver, as well as a powerful LED headamp with extra batteries. Since I’m frequently shooting alone, I also carry a small backup headlamp, complete with its own spare batteries. For safety’s sake, I also carry a Garmin two-way satellite communicator that will allow me to send an SOS anywhere in the world, no cellular service required. A complete discussion of wilderness travel is beyond the scope of this book. For detailed treatises on backpacking and backcountry navigation, please see my books Outward Bound Backpacker’s Handbook and Outward Bound Map & Compass Handbook, both published by Globe Pequot Press.

FIGURE 3-2 Aspen below Mt. Jackson, the east fork of the Cimarron River and Uncompahgre Peak, San Juan Mountains, Colorado. I first saw this grove with binoculars from the road near Silver Jack Reservoir, 2,000 feet below. A map check revealed that the grove would get near moment-of-sunset light and that it should offer a great view of Uncompahgre Peak to the south. I backpacked to a dry camp nearby and shot this photo at sunset. Canon EOS 5D Mark III, Canon EF 16-35mm f/2.8L II USM at 35mm, 1/15, f/16, ISO 400.
Here are my 12 principles of scouting.
1. Have an Image in Mind Before Leaving Home
The search for great landscape images begins at home, with research into the area you plan to visit. Popular destinations usually have websites dedicated to them that can offer a wealth of information on the area’s scenic climaxes. These or other websites can also provide information on the weather you can expect during different seasons. An online search for pictures of your destination can also help you visualize possible images. In addition to consulting these resources, I always obtain topographic maps of my destination, which I study obsessively. I’m looking for dramatic terrain: steep mountains, deep gorges, desert towers, sandstone arches, and rugged coastlines. In particular, I’m looking for terrain with the potential for great light. For example, I might spot a lake nestled beneath the eastern flank of a precipitous peak. On a clear morning, the east face of the peak will be bathed by warm, moment-of-sunrise light—if there are no higher peaks to the east that will block that light. There are many online and mobile apps that can help you visualize how the light will play out at sunrise and sunset. I’ll discuss them in detail in the next chapter. The more you know about your destination, the more productive your trip is likely to be.
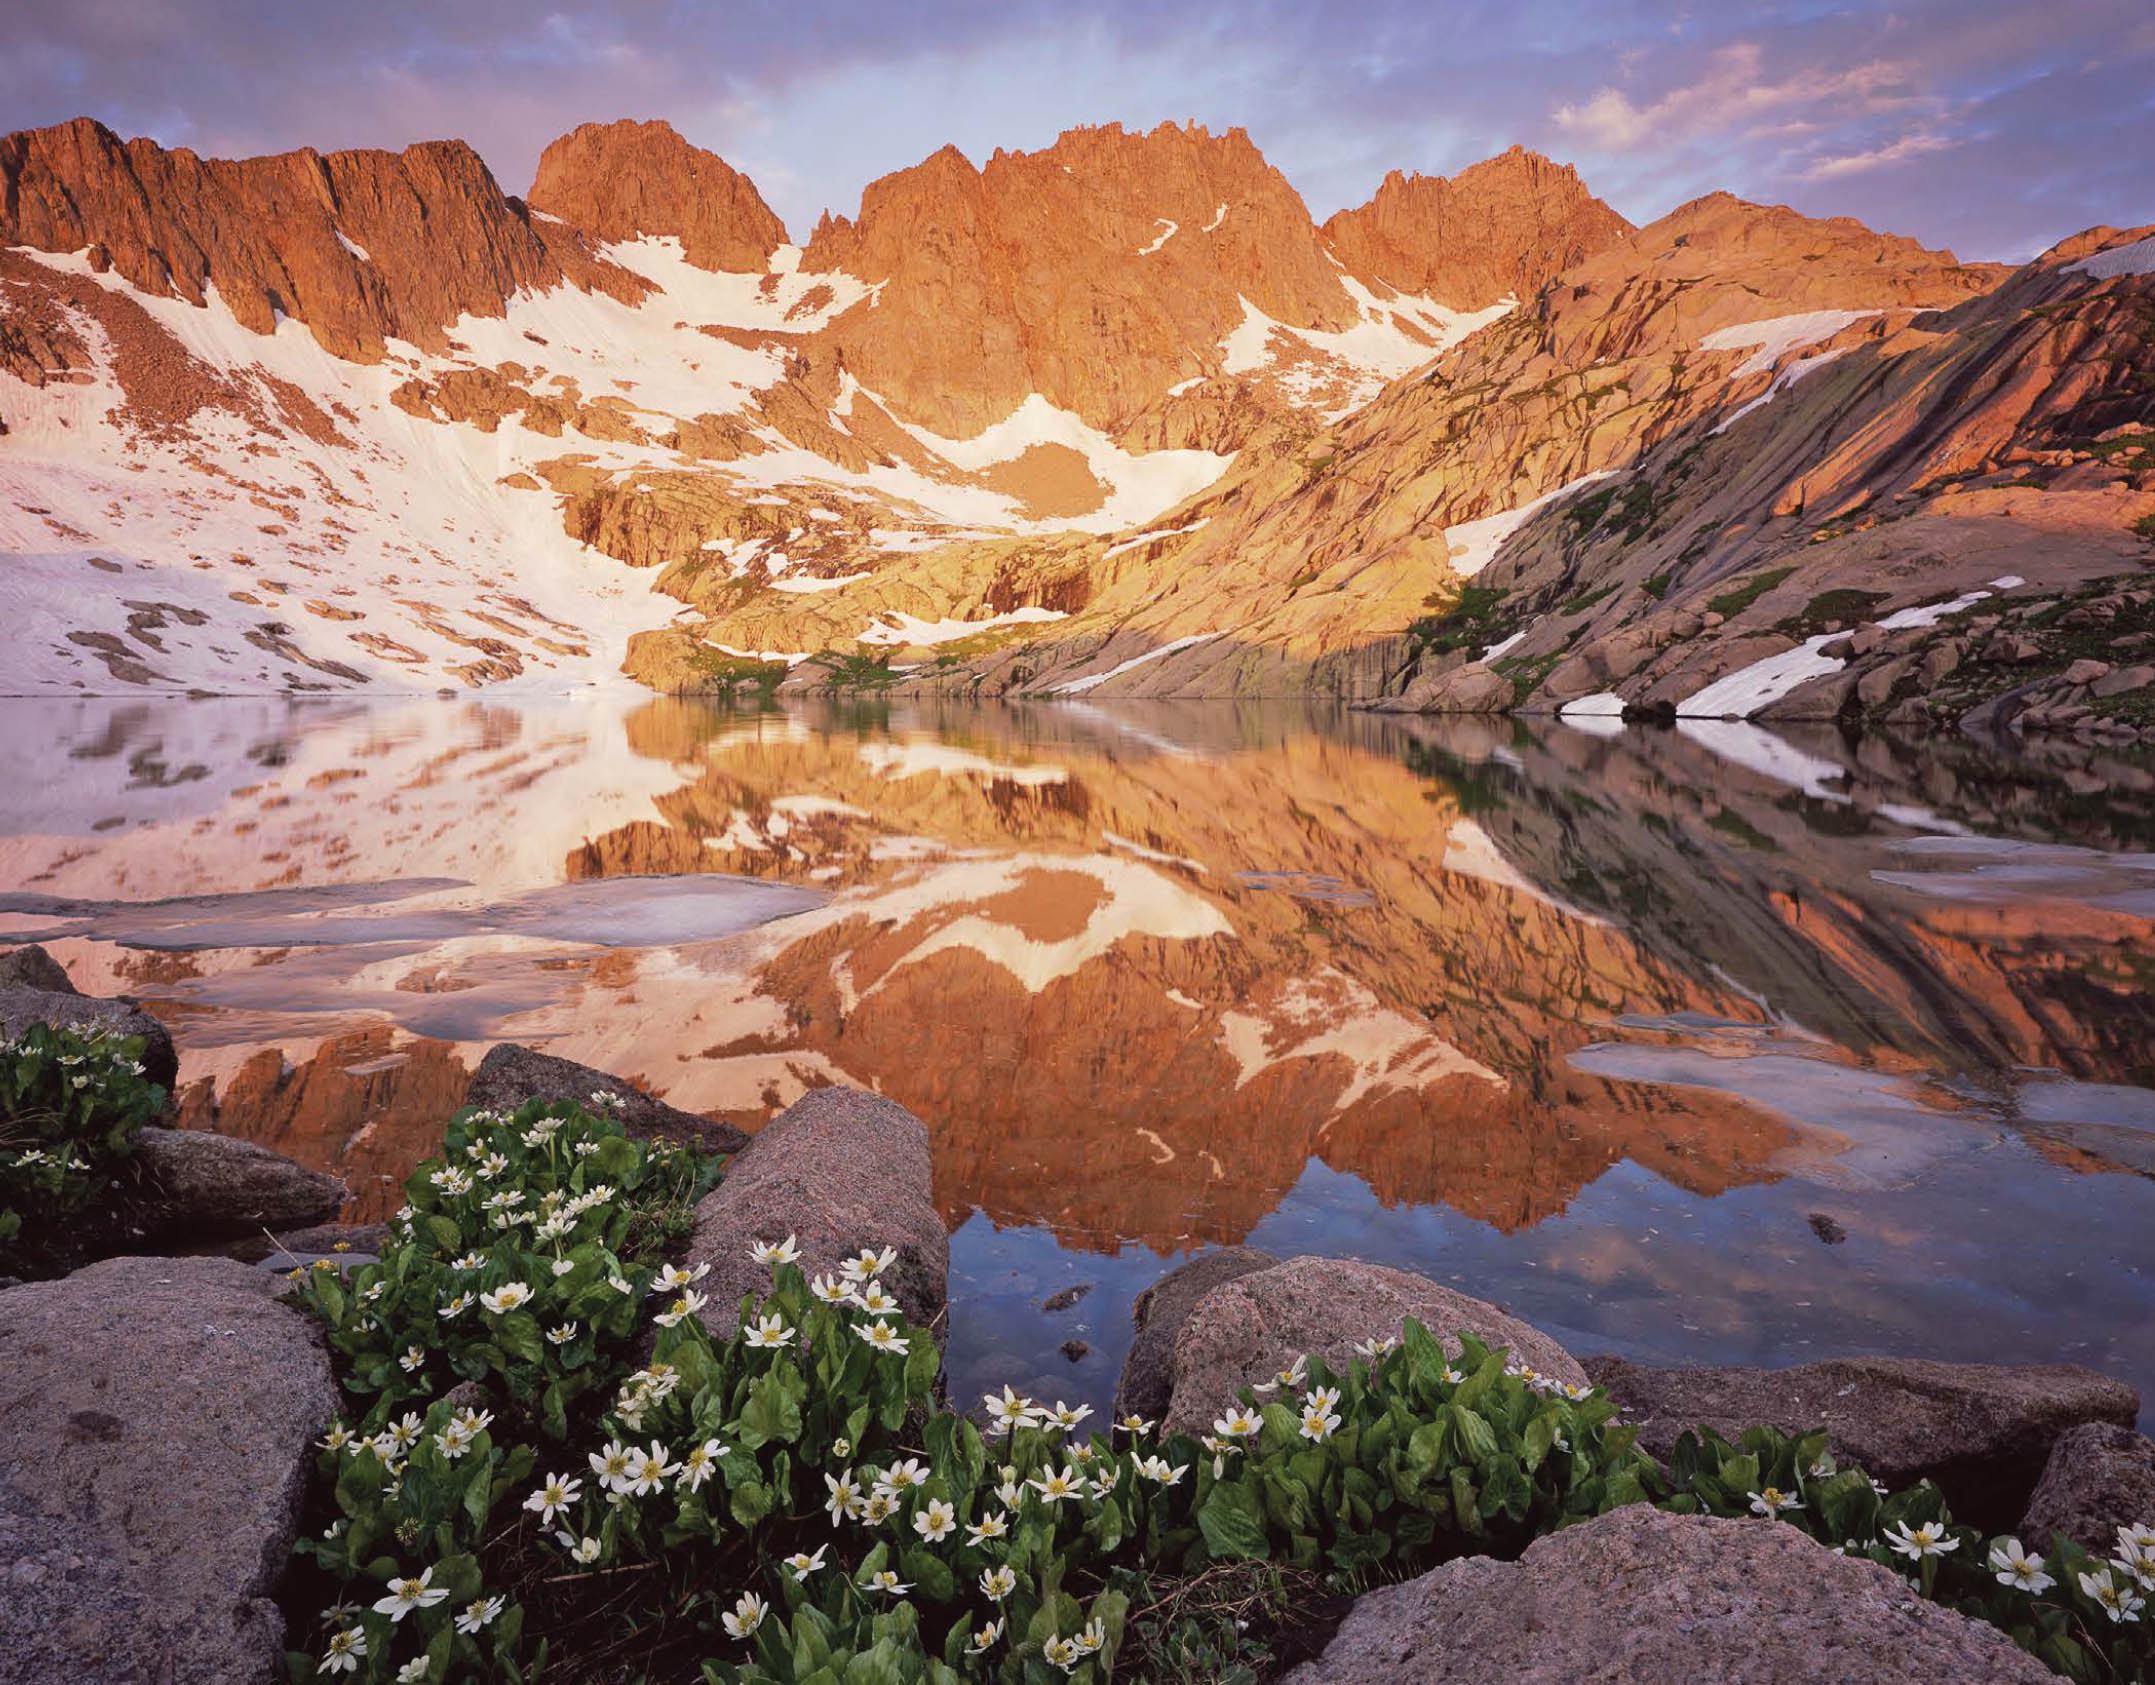
FIGURE 3-3 Windom Peak, Sunlight Spire, and Sunlight Peak from South Sunlight Lake at sunrise, Weminuche Wilderness, Colorado. With two rugged peaks rising above 14,000 feet and a third reaching 13,995 feet, it didn’t take much map study to realize that South Sunlight Lake had to be a spectacular place to shoot photographs. Another minute’s examination of the map showed that the highest ridge to the northeast, where the sun would rise in midsummer, was only 12,600 feet, meaning that on a clear morning the entire east face of these dramatic peaks would light up orange at the moment of sunrise. Ebony SW-45 field camera, Fujichrome film. Lens and exposure unrecorded.
2. Time in an Area Is the Greatest Luxury
It’s much better to have three nights in one promising location than one night each at three different locations. There’s nothing more frustrating than painstakingly scouting an area, finally locating the perfect patch of wildflowers, then getting skunked by clouds or rain during the only evening you have to shoot in that area.
Getting to know an area also entails studying its weather patterns. A subject that is mundane under clear blue skies can be magical with the right atmospherics: the interplay of mist, fog, cloud, and landscape. In summer along the California coast, for example, fog develops almost every night and burns off again by noon. That transition, as the fog banks break up and the sun begins to spotlight the ground through holes in the clouds, can be a spectacular time to shoot. Almost everyone has felt their spirits lift as a gray day gives way to sunshine. A photograph that captures that feeling can be compelling. In the deserts of southern Utah, day after day of blue skies can result in images that all look the same. Landscape photographer Tom Till, who lives in Moab, the heart of red-rock country, told me his solution: “I wait for storms and go shoot when storms come.” In winter that may mean the rare significant snowfall; in summer that may mean waiting for the arrival of the summer monsoon, the annual influx of moist air that produces spectacular late-afternoon thunderstorms.
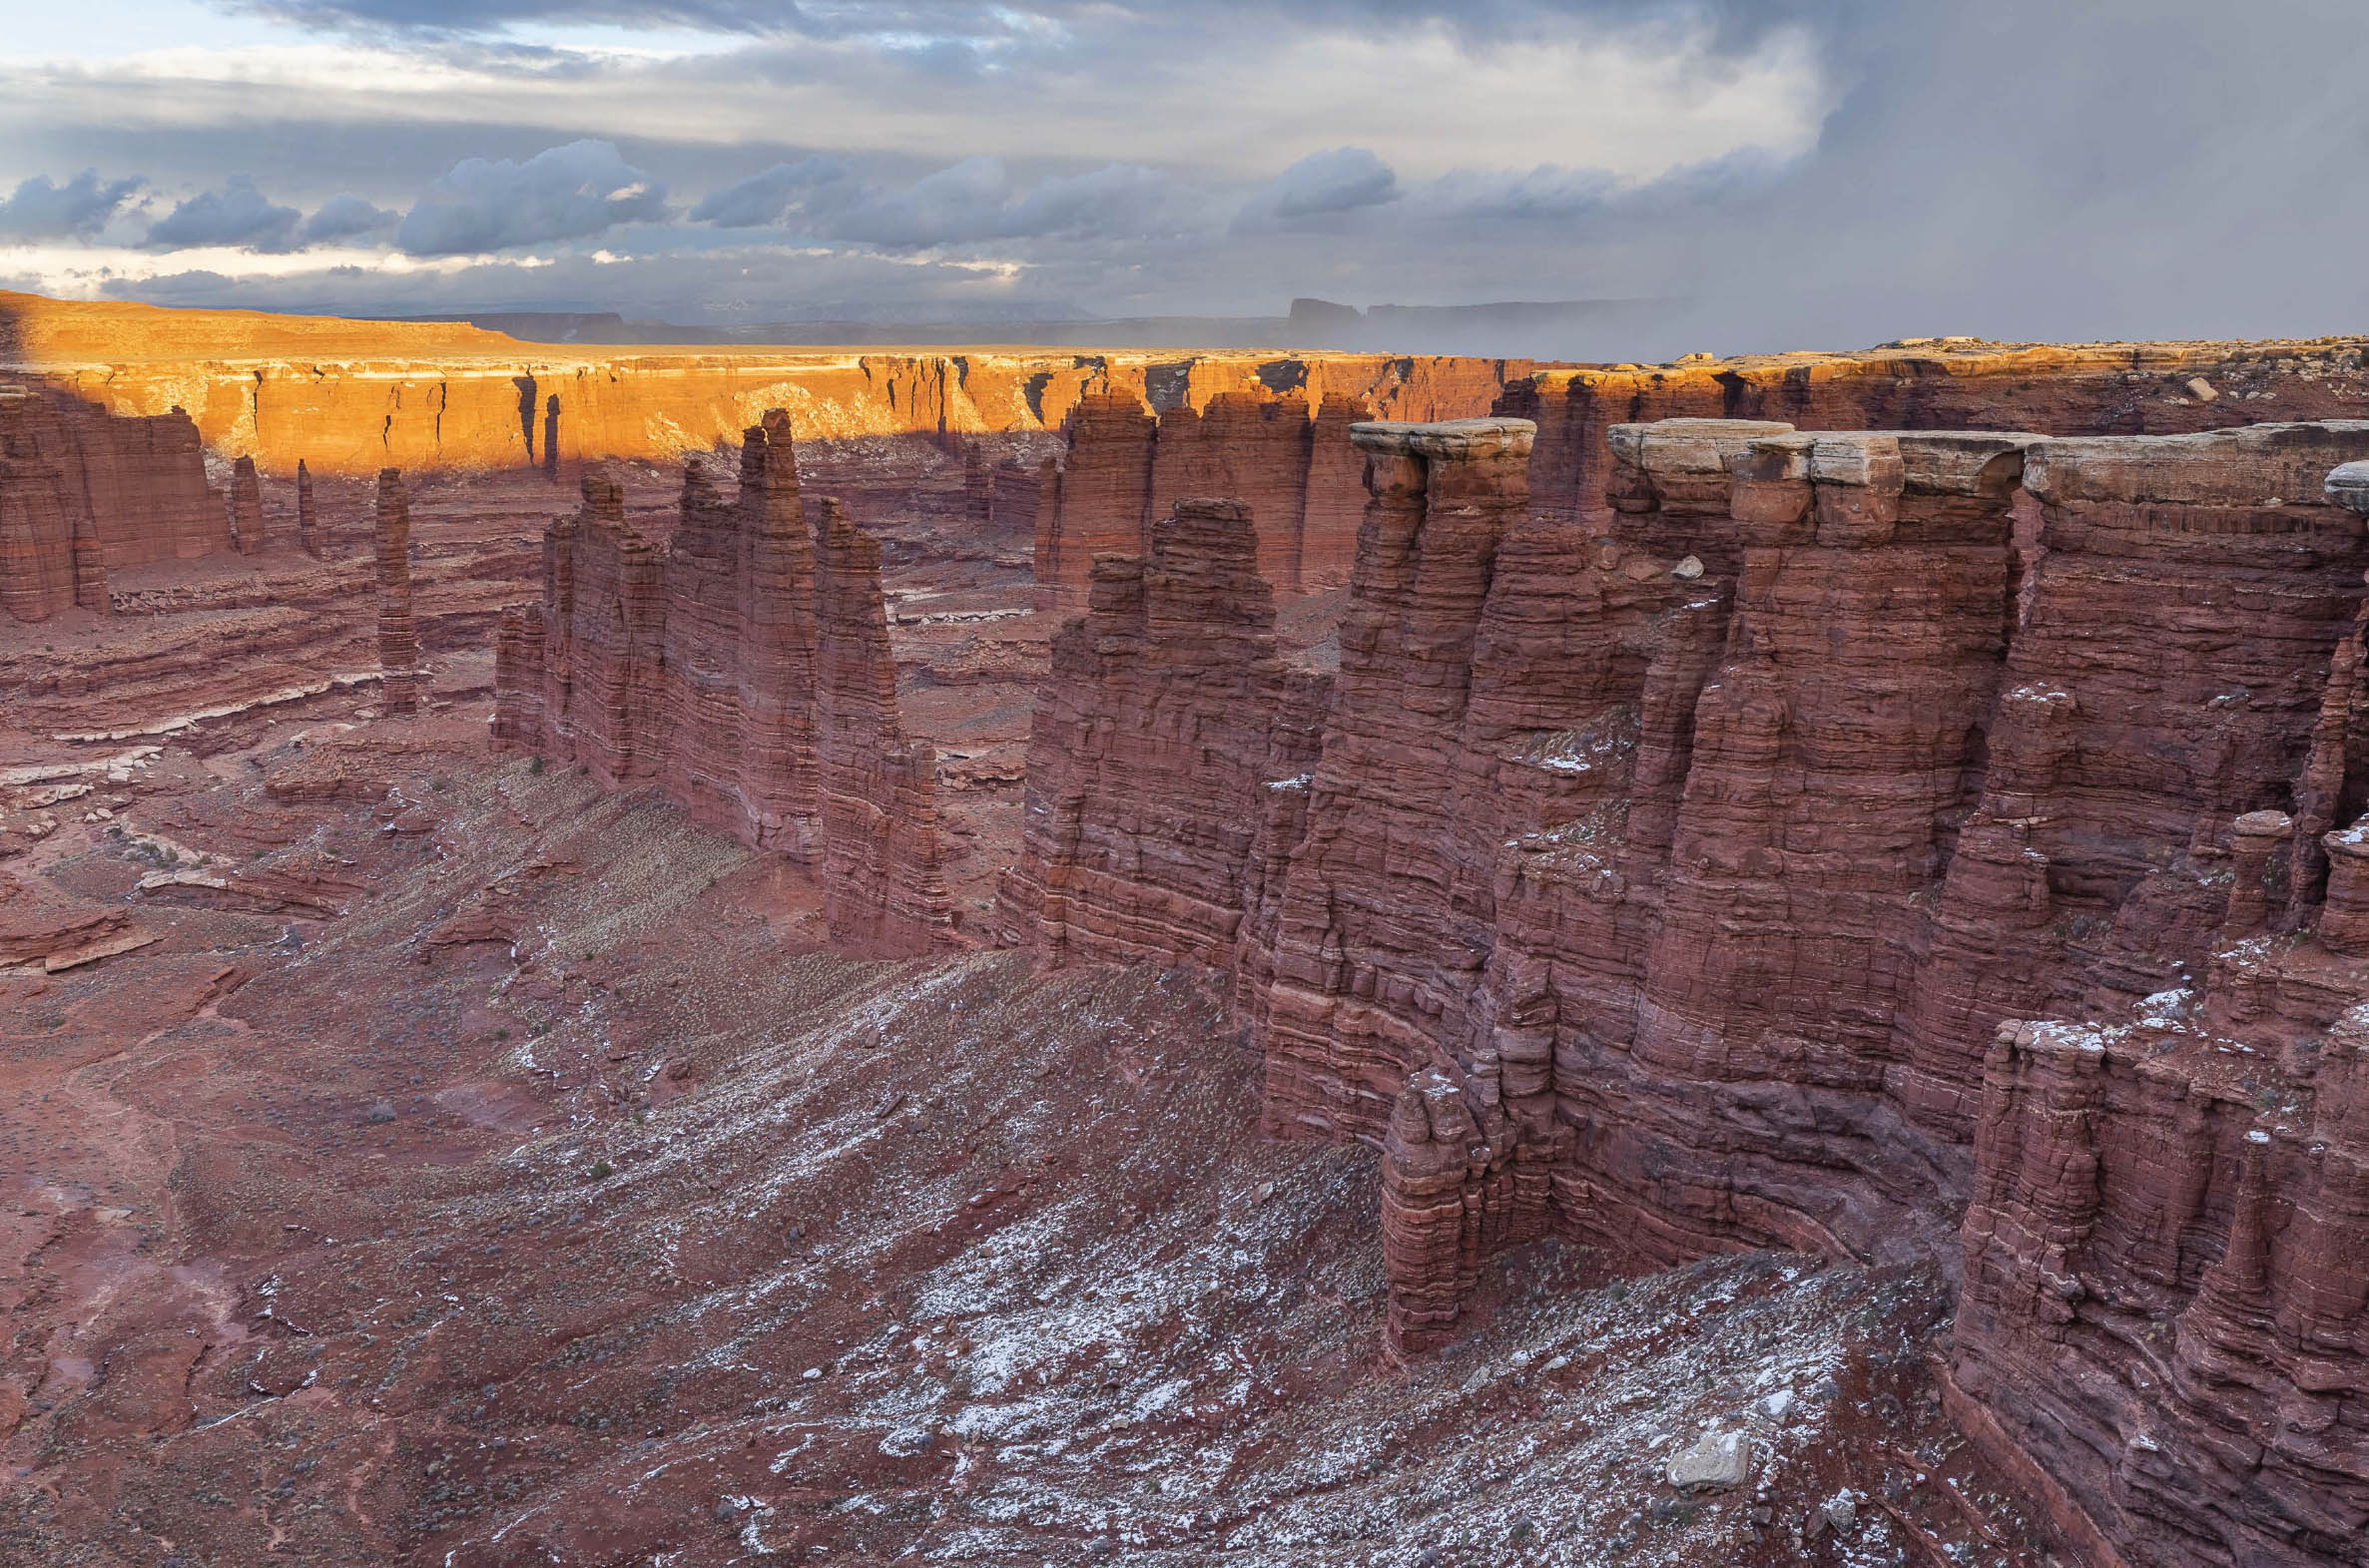
FIGURE 3-4 A December snow squall pulls away from Monument Basin at sunset, Canyonlands National Park, Utah. I had spent two days scouting along the rim of Monument Basin 10 years earlier, shooting study frames and recording GPS waypoints at the most promising vantage points. I returned in December 2018 to my favorite overlook and made this image, which combines sunset light, a dramatic landscape, and turbulent weather. Canon EOS 5D Mark IV, Canon EF 16-35mm f/2.8L III USM at 30mm, three-frame bracket set, two-stop bracket interval at ISO 100, images merged using Lightroom Classic’s Photo Merge>HDR utility.
The transition from one weather system to another can produce unique images in mountain areas as well. In Colorado, most major storms track from west to east, following the prevailing winds. All winter long, these storms hammer the Continental Divide, particularly the Front Range, which includes the Indian Peaks Wilderness and Rocky Mountain National Park. The high winds scour the snow from the peaks and trees, leaving behind a stark landscape that’s more harsh than beautiful. Occasionally, however, particularly in March and early April, these storms reverse course. Moist air pours in from the east, hits the foothills of the Rockies, rises and cools. These upslope storms sometimes dump as much as 20 or 30 inches of snow on the eastern side of the Continental Divide. Often these storms have light winds, so the snow plasters every peak and loads every tree, transforming the landscape overnight into a winter wonderland. I’ve learned to wait patiently for those days when upslope storms clear out, then do whatever it takes to be in the right place early in the morning so I can shoot the scene before the sun melts the snow from the trees and the prevailing westerly winds reestablish themselves and begin scouring the peaks once more.
No matter where you’re shooting, remember that in many ways bad weather can be good weather—particularly when you can combine it with good light. I’ll explain why the day right after a storm can produce spectacular light in chapter 5.
SIDEBAR: MAP AND COMPASS FUNDAMENTALS
A basic understanding of map and compass principles is important for a landscape photographer. Here are some key concepts.
All maps are drawn so true north is at the top of the map. Compass needles, however, point to magnetic north, which usually lies in a slightly different direction than true north. That difference is called the declination. “Set-and-forget” compasses allow users to correct for that difference without having to do any confusing calculations.
In this book, I’ll use the term elevation to refer to the number of feet above mean sea level. I’ll use the term altitude the way an astronomer would, to refer to an object’s distance, in degrees, above a level horizon. For example, the altitude of the moon 30 minutes before sunset might be 10 degrees. In other words, the angle between a line from the observer to the moon, and another line from the observer to the horizon, is 10 degrees.
Topographic maps use contour lines—lines of equal elevation—to show peaks and valleys. If you were to walk along a contour line in the real world, you would neither gain nor lose elevation. Closely spaced contours indicate steep terrain (large vertical change over a short horizontal distance); widely spaced contours indicate gentle terrain (small vertical change over a large horizontal distance).

FIGURE 3-5 Tombstone Mountain at sunset, Tombstone Territorial Park, Yukon Territory, Canada. In March 2015 a friend and I chartered a helicopter and flew from Dawson City to Talus Lake in Tombstone Territorial Park. As we were planning the trip, I noticed that the valley of the Tombstone River ran east to west, almost perfectly aligned with the setting sun. As we were scouting a knoll rising above our campsite, I used a compass to confirm that the setting sun would drop directly into the notch at the west end of the valley. The final step was selecting some interesting wind-sculpted snow to use as a foreground. Canon EOS 5D Mark III, Canon EF 16-35mm f/2.8L II USM at 29mm, focus-stacked, five-frame bracket set, one-stop bracket interval at each focus position, ISO 100. HDR images created using Photomatix, focus-stacked images blended using Helicon Focus.
In the wilderness, directions are specified in degrees: north is zero degrees; east is 90 degrees; south is 180 degrees; west is 270 degrees. An azimuth is an angle, measured in degrees starting at true north, proceeding clockwise around the compass dial. For example, the azimuth of the sun at sunrise on the autumnal equinox, around September 22 or 23, is 90 degrees—due east.
To “shoot a bearing” to an object or a particular point on the horizon means to use a compass to measure the horizontal angle between true north and that object with the observer at the vertex (the point) of that angle. For example, I might want to know the azimuth of a notch between two sandstone towers. Using a compass, I can measure that angle. I can then consult a smartn of map and compass work, please phone app to see when, if ever, the sun will rise or set into that gap. Alternatively, if I know that the azimuth of the sun at sunrise the next day will be 90 degrees, I can set that azimuth (also called a bearing) on my compass, sight along the edge of the compass’s baseplate, and see where along a level horizon the sun will first appear.
This cursory introduction should be enough to help you understand references to azimuths, altitudes, and bearings in this book. For a thorough discussion of map and compass work, please see my book Outward Bound Map and Compass Handbook, published by Globe Pequot.
3. Always Carry a Compass and a Smartphone with a Sunrise/Sunset App
If you’re unfamiliar with the basics of map and compass use, please read the sidebar on those topics before continuing.
A compass is not only an essential navigational tool; it’s an essential tool for landscape photography. (No, your smartphone compass is not an adequate substitute.) The first thing I do when I find a promising location is to pull out my smartphone, open my favorite sunrise/sunset app to check the azimuth of sunrise and sunset, then set those bearings on my compass so I know exactly where the sun will come up and go down. That information tells me if my subject will be frontlit, backlit or sidelit at each end of the day. By comparing the elevation of the point on the horizon where the sun will rise or set to my elevation, I know if my foreground will get moment-of-sunrise or sunset light. If so, then the subject is likely to have potential. If, as is more likely, the foreground will be shadowed when there’s sunrise or sunset light on the background, then at least I know what level of contrast I’ll be dealing with and can prepare accordingly, using the exposure strategies I detail in chapter 7.
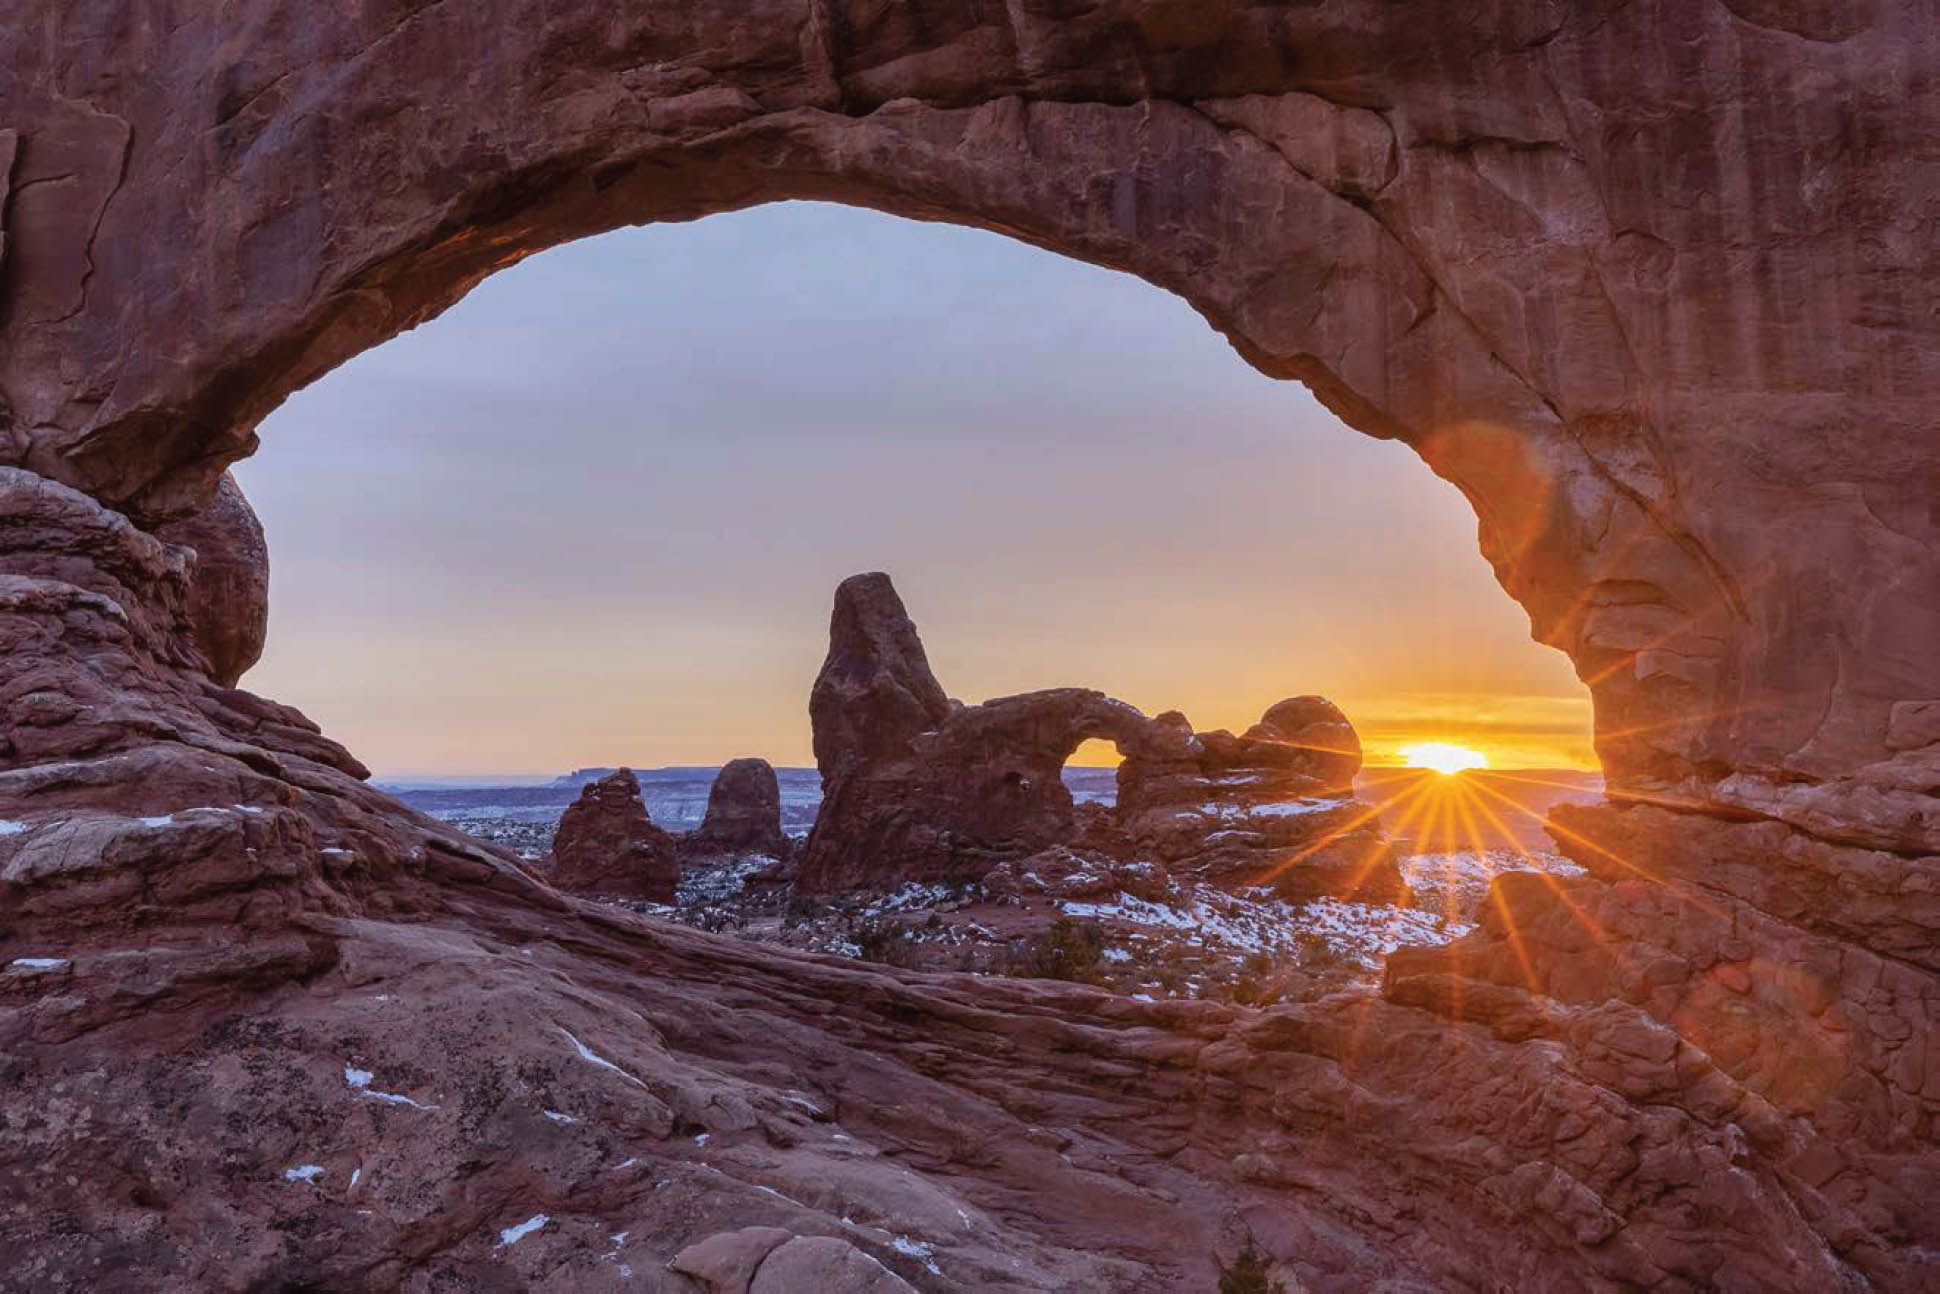
FIGURE 3-6 Turret Arch through North Window at sunset in mid-December, Arches National Park, Utah. The classic view of Turret Arch through North Window is shot at sunrise, when both arches can get warm light. In an effort to shoot something different, I visited this location at sunset on December 14, when the sun is setting almost as far to the south of west as it will for the entire year. I arrived an hour before sunset, pulled out my compass and smart-phone and immediately realized, to my surprise and delight, that the sun at the moment of sunset would be visible to the right of Turret Arch but within the opening of North Window. Canon EOS 5D Mark IV, Canon EF 16-35mm f/2.8L III USM at 35mm, five-frame bracket set, two-stop bracket interval at ISO 100, images merged using Lightroom Classic’s Photo Merge>HDR utility.
4. Keep Other Seasons in Mind as You Scout
A shot that doesn’t work well when you discover it may be superb with a different lighting angle at a different time of year. At the latitude of my home in Boulder (40 degrees north), the azimuth of sunrise (and sunset) varies by more than 60 degrees from summer solstice, usually June 21, to winter solstice, usually December 21. To be precise, the sunrise azimuth varies from 58 degrees (summer solstice) to 121 degrees (winter solstice); the sunset azimuth varies from 302 degrees (summer solstice) to 240 degrees (winter solstice). That’s a huge difference in the angle of light on your subject.
Here’s an example of how I used this information to plan the best time of year to shoot the classic view of Delicate Arch and the La Sal Mountains, as well as make a unique image of Delicate Arch that I hadn’t realized was possible. The classic shot of Delicate Arch, which has approximately the same latitude as Boulder, is taken looking southeast at sunset with the La Sals in the background and an immense sandstone bowl in the foreground. My first task as I was scouting was to determine the best time of year to shoot this iconic image. During a midday visit, I took a compass bearing along the face of the arch. The plane of the arch runs from 80 to 260 degrees, or nearly east-west. Immediately I realized that the face of the arch would be shadowed at sunset angles less than 260 degrees. In other words, late fall and early winter weren’t the ideal time because most of the face of the arch would be shadowed at sunset.

FIGURE 3-7 Delicate Arch and the La Sal Mountains at sunset, Arches National Park, Utah, taken around April 1st. Zone VI 4×5 field camera, Fujichrome film. Lens and exposure unrecorded.
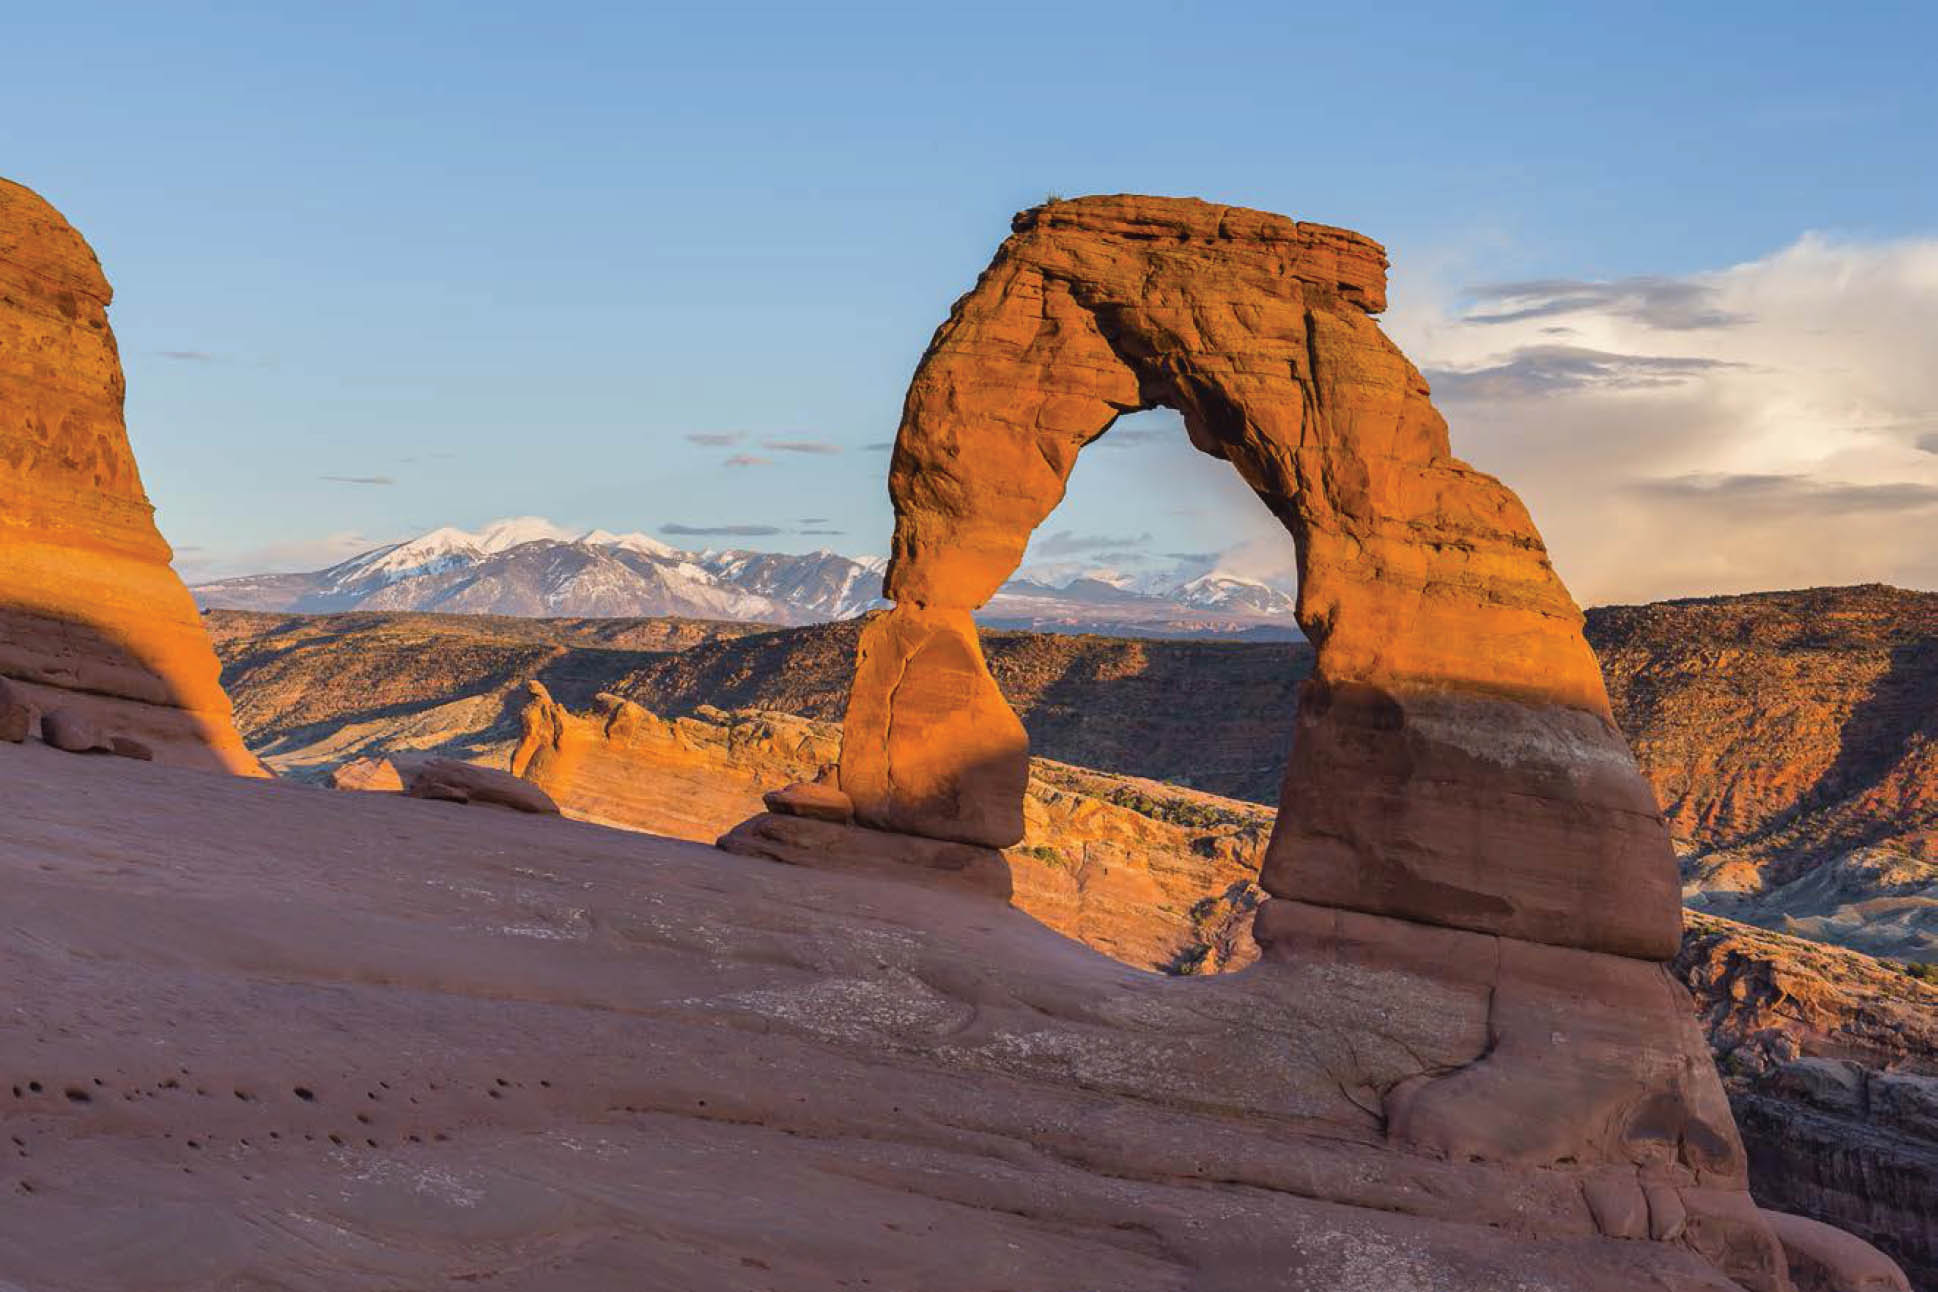
FIGURE 3-8 Delicate Arch and the La Sal Mountains at sunset, Arches National Park, Utah. By early May, two sandstone towers shadow the sandstone bowl and the lower half of the arch at sunset. Canon EOS 5D Mark III, Canon EF 50mm f/1.4 USM, 1/25th, f/11, ISO 100.
Further compass work showed that at sunset angles greater than 284 degrees, the sun would set behind a sandstone tower, which meant that the entire sandstone bowl beneath the arch, as well as the bottom half of the arch, would be shadowed, greatly reducing the area of the subject that would be lit by wonderful sunset light. Consulting a smartphone app that gave me sunrise and sunset azimuths for different times of year for that location and allowing for a margin of error showed me that August 30 to September 22 works well for the classic shot, as does March 19 to April 11. During those periods the sun sets at an azimuth between 270 and 280 degrees. In the early spring period there would be more snow on the La Sals, which would add an appealing contrast between icy peaks and warm golden sandstone. I now knew that early spring was when I needed to return to make the classic image. (I’ll have more to say about smartphone mapping apps in the next chapter.)
My scouting also revealed something surprising: at winter solstice, the setting sun is visible through Delicate Arch. I’d seen dozens of renditions of the classic view of Delicate Arch and the La Sal Mountains, but never seen a photograph showing the sun setting through the arch. I’ve now traveled to Arches National Park twice during the two-week period centered on winter solstice when this shot is possible, and come up with two satisfying images.
5. Shoot Study Frames and Take Notes So You Can Relocate Favorite Subjects
I always carry a notebook and pen to record notes on how I got to a location and how long it took to get there. I also turn on the GPS receiver built into my current DSLR, so I record the location of each shot automatically. If reaching a location required difficult route-finding, perhaps because the location is off-trail, I’ll use a handheld GPS receiver to record GPS waypoints along the hike in, then construct a GPS route so I can navigate to the location in the dark if I return before sunrise, or navigate back out again after sunset. In 2008, for example, I did a five-day trip along the White Rim 4wd road in Canyonlands National Park. During the trip I scouted and photographed a number of awe-inspiring locations along the rim of Monument Basin that were some distance from the road. I recorded GPS waypoints at the most promising locations, then marked those locations on my USGS 7.5-minute topo of the area. At the time, night photography with an ordinary DSLR was still just a gleam in a camera engineer’s eyes. Ten years later, however, it was a reality. As I was planning a shot of the Geminid meteor shower, I suddenly realized that one ideal location for such an image was the exact same overlook along the rim of Monument Basin where I’d shot moonrise over the La Sal Mountains 10 years earlier. I returned to the same location and made Geminid Meteor Shower over Monument Basin (figure 3-9).
6. The Diligent Local Photographer Should Always Have the Best Photos of Nearby Areas
A dedicated photographer who lives near a beautiful area should always have better photos of that location than one who has to travel a long distance to visit. It’s exciting and fun to go to new and far-flung locations on every trip, but repeat visits to a promising nearby site in every season often reveal new possibilities and result in better images. Many of my best images have been made in areas with which I’m intimately familiar.
Working close to home makes it easy to return again and again to a special location until you capture the image that matches your vision. For example, I’ve always enjoyed the view of 14,259-foot Longs Peak from Many Parks Curve, a pullout along Trail Ridge Road in Rocky Mountain National Park. Unfortunately, the view from the road had no interesting foreground. Then one day I noticed a rocky outcrop flanked by trees just a hundred yards below the road. By themselves, the outcrop and trees were uninteresting. But what if they were covered with newly fallen snow? And what if that white, reflective snow was lit by warm sunrise light?
I snowshoed down to the knoll, shot a compass bearing to the horizon at the point where the sun would rise on winter solstice, then checked the map. The foothills along the horizon were lower than Many Parks Curve, which meant that my foreground would get light at the moment of sunrise, when the light was warmest. If the foothills had been higher, the sun would have had to rise over those obstacles and the light reaching my foreground would have been white. As I envisioned it, the left side of the frame would show the sun rising behind snow-laden trees, while Longs Peak would dominate the right side of the frame. I’d need a wet snow near winter solstice and light winds so the snow wouldn’t be blown out of the trees. Ideally the storm would end at night, leaving a clear dawn. If the storm cleared midday, the sun could easily melt the snow out of the trees before sunrise the next day. It took several years and several failures before all the elements came together, but when they finally did, I was able to make a satisfying image. Years later the combination of elements occurred again, and I returned to shoot the same scene, this time as a stitched panorama (figure 3-10).
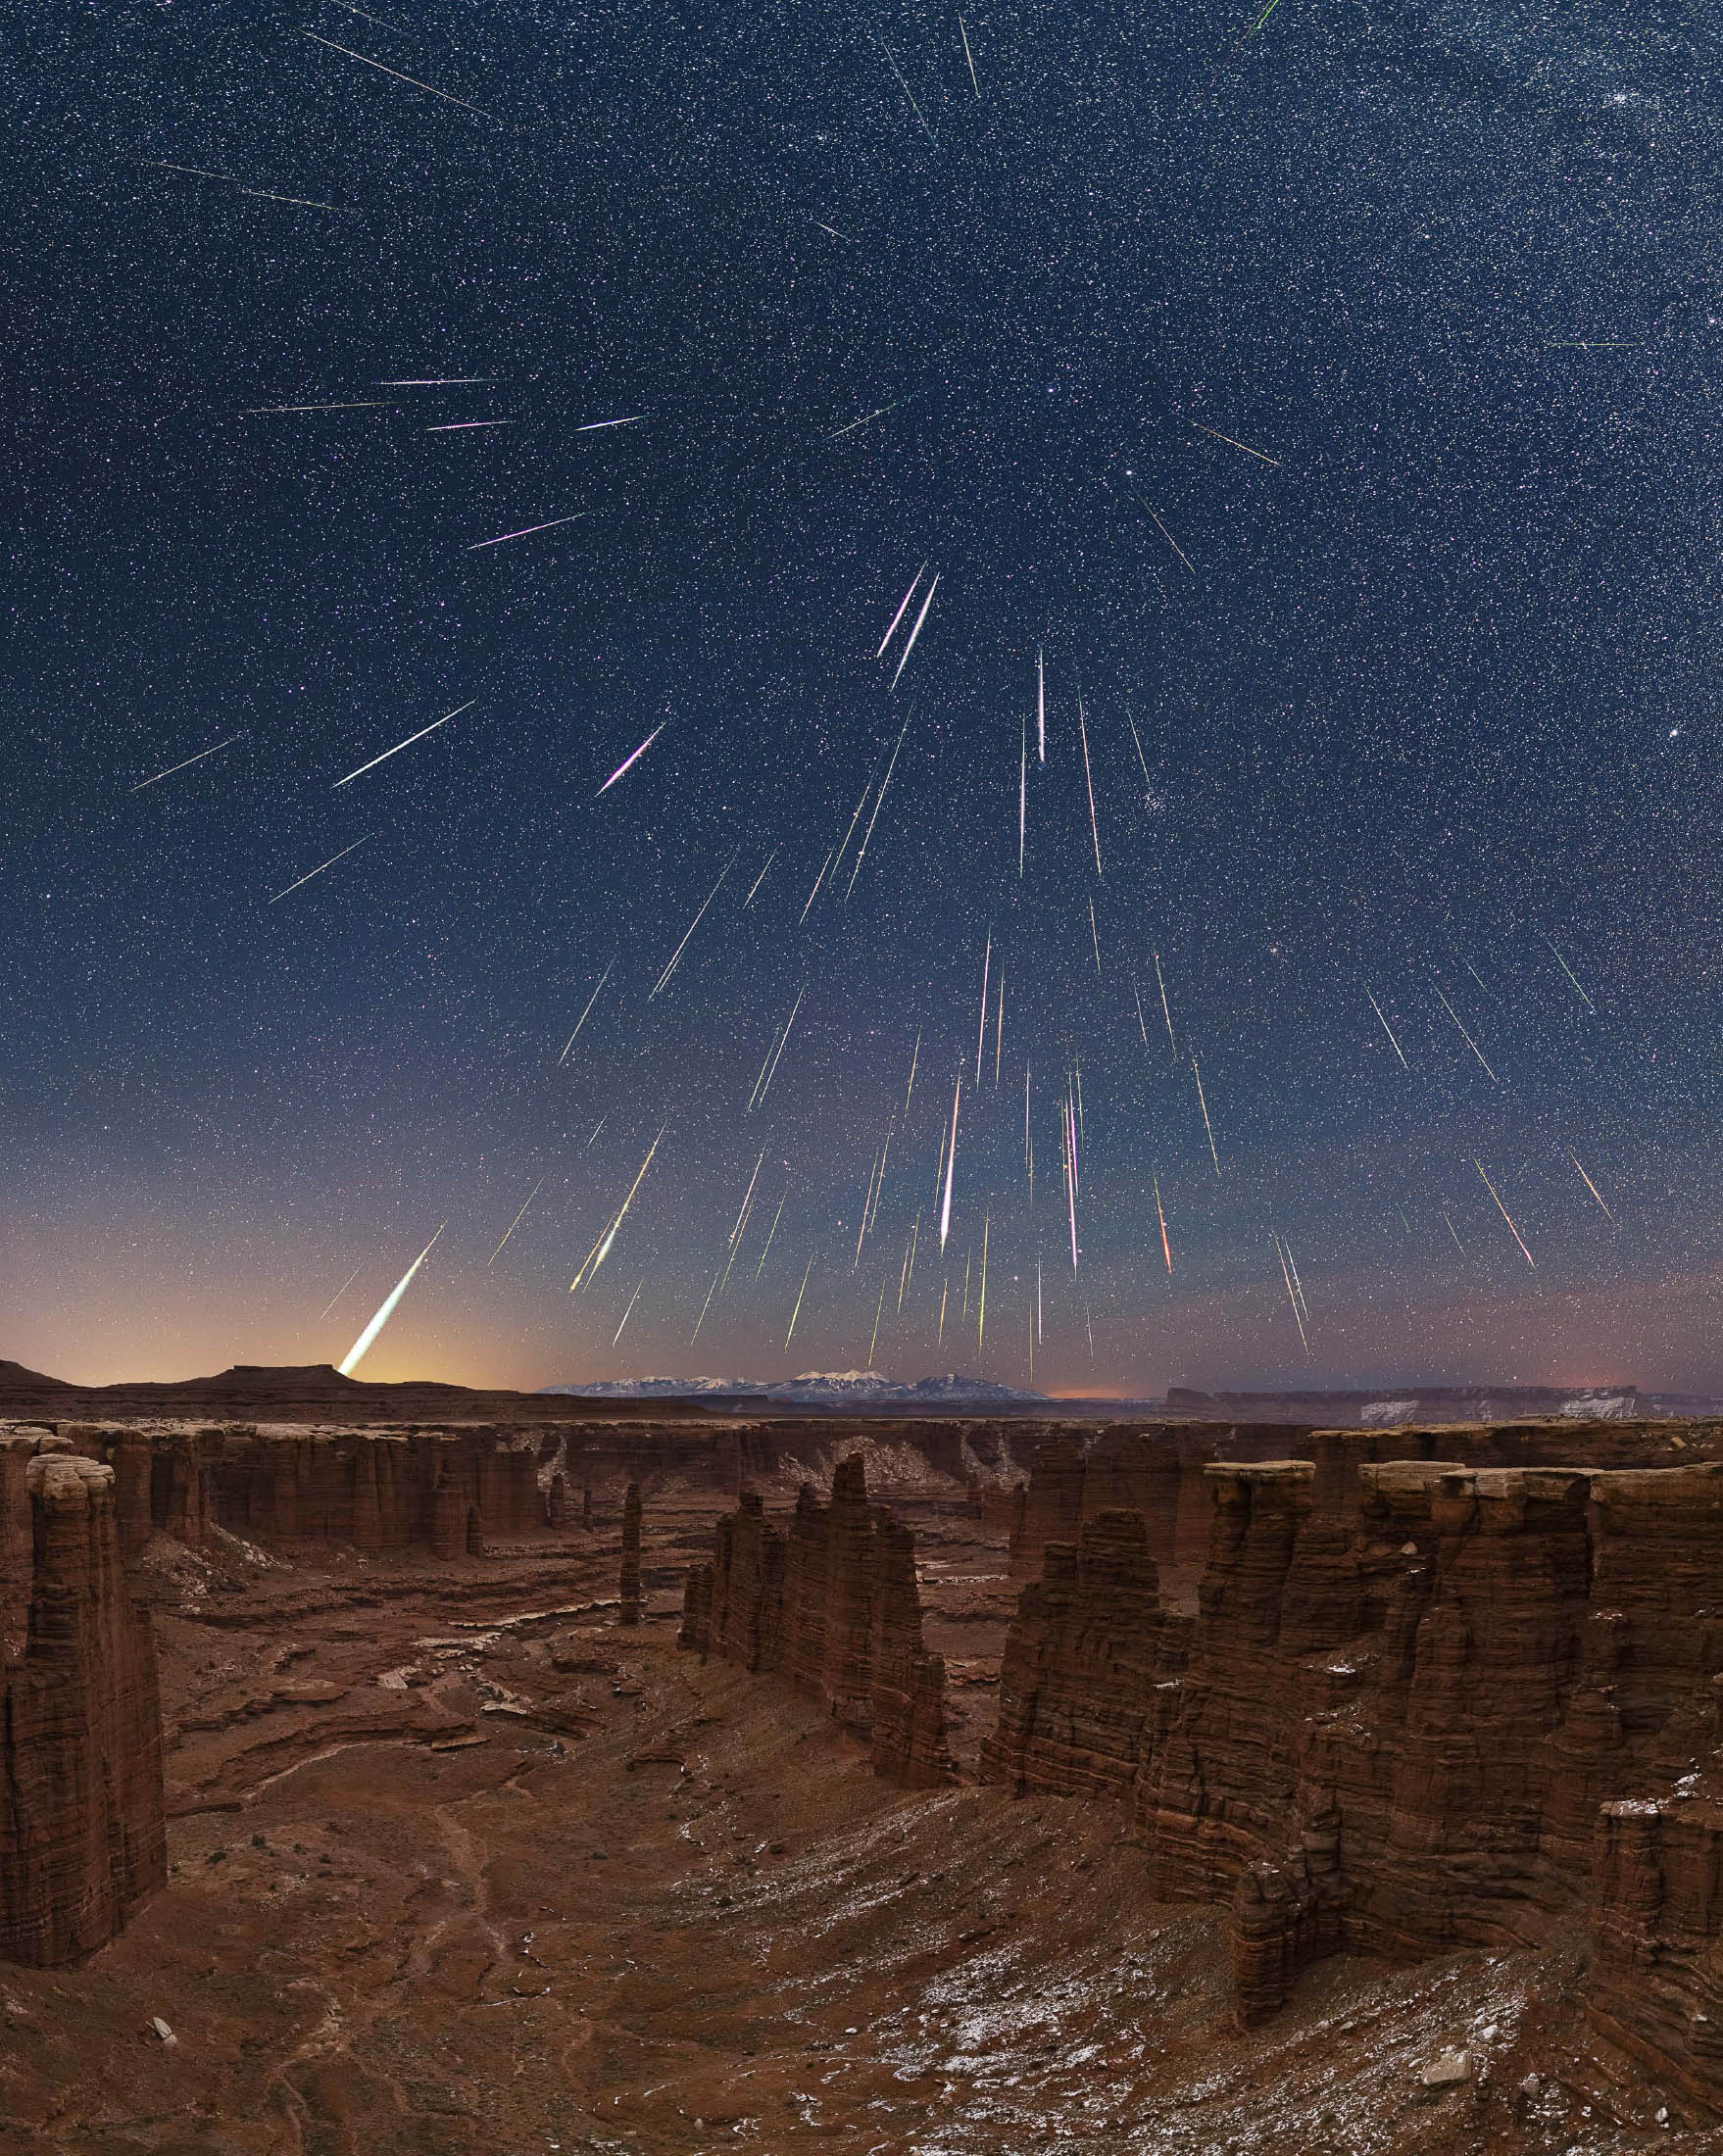
FIGURE 3-9 Geminid meteor shower over Monument Basin, Canyonlands National Park, Utah, December 13-14, 2018. This composite image shows 86 meteors captured over a period of 9 hours 15 minutes. Land: Canon EOS 5D Mark IV, Canon EF 35mm f/1.4L II USM, one row, four camera positions, four frames per camera position, noise reduced with Photoshop>Stack Mode>Median, 40 seconds, f/1.4, ISO 6400. Sky: Canon EOS 5D Mark IV, Canon EF 35mm f/1.4L II USM, two rows, four camera positions per row, four frames per camera position, stars aligned and noise reduced with RegiStar, 10 seconds, f/1.4, ISO 6400. Meteors: 2,702 frames exposed, total, with a Canon EOS 5D Mark IV and a Canon EOS 5D Mark III set side by side, both with Canon EF 24mm f/1.4L II USM lenses, 20 seconds, f/1.4, ISO 3200.
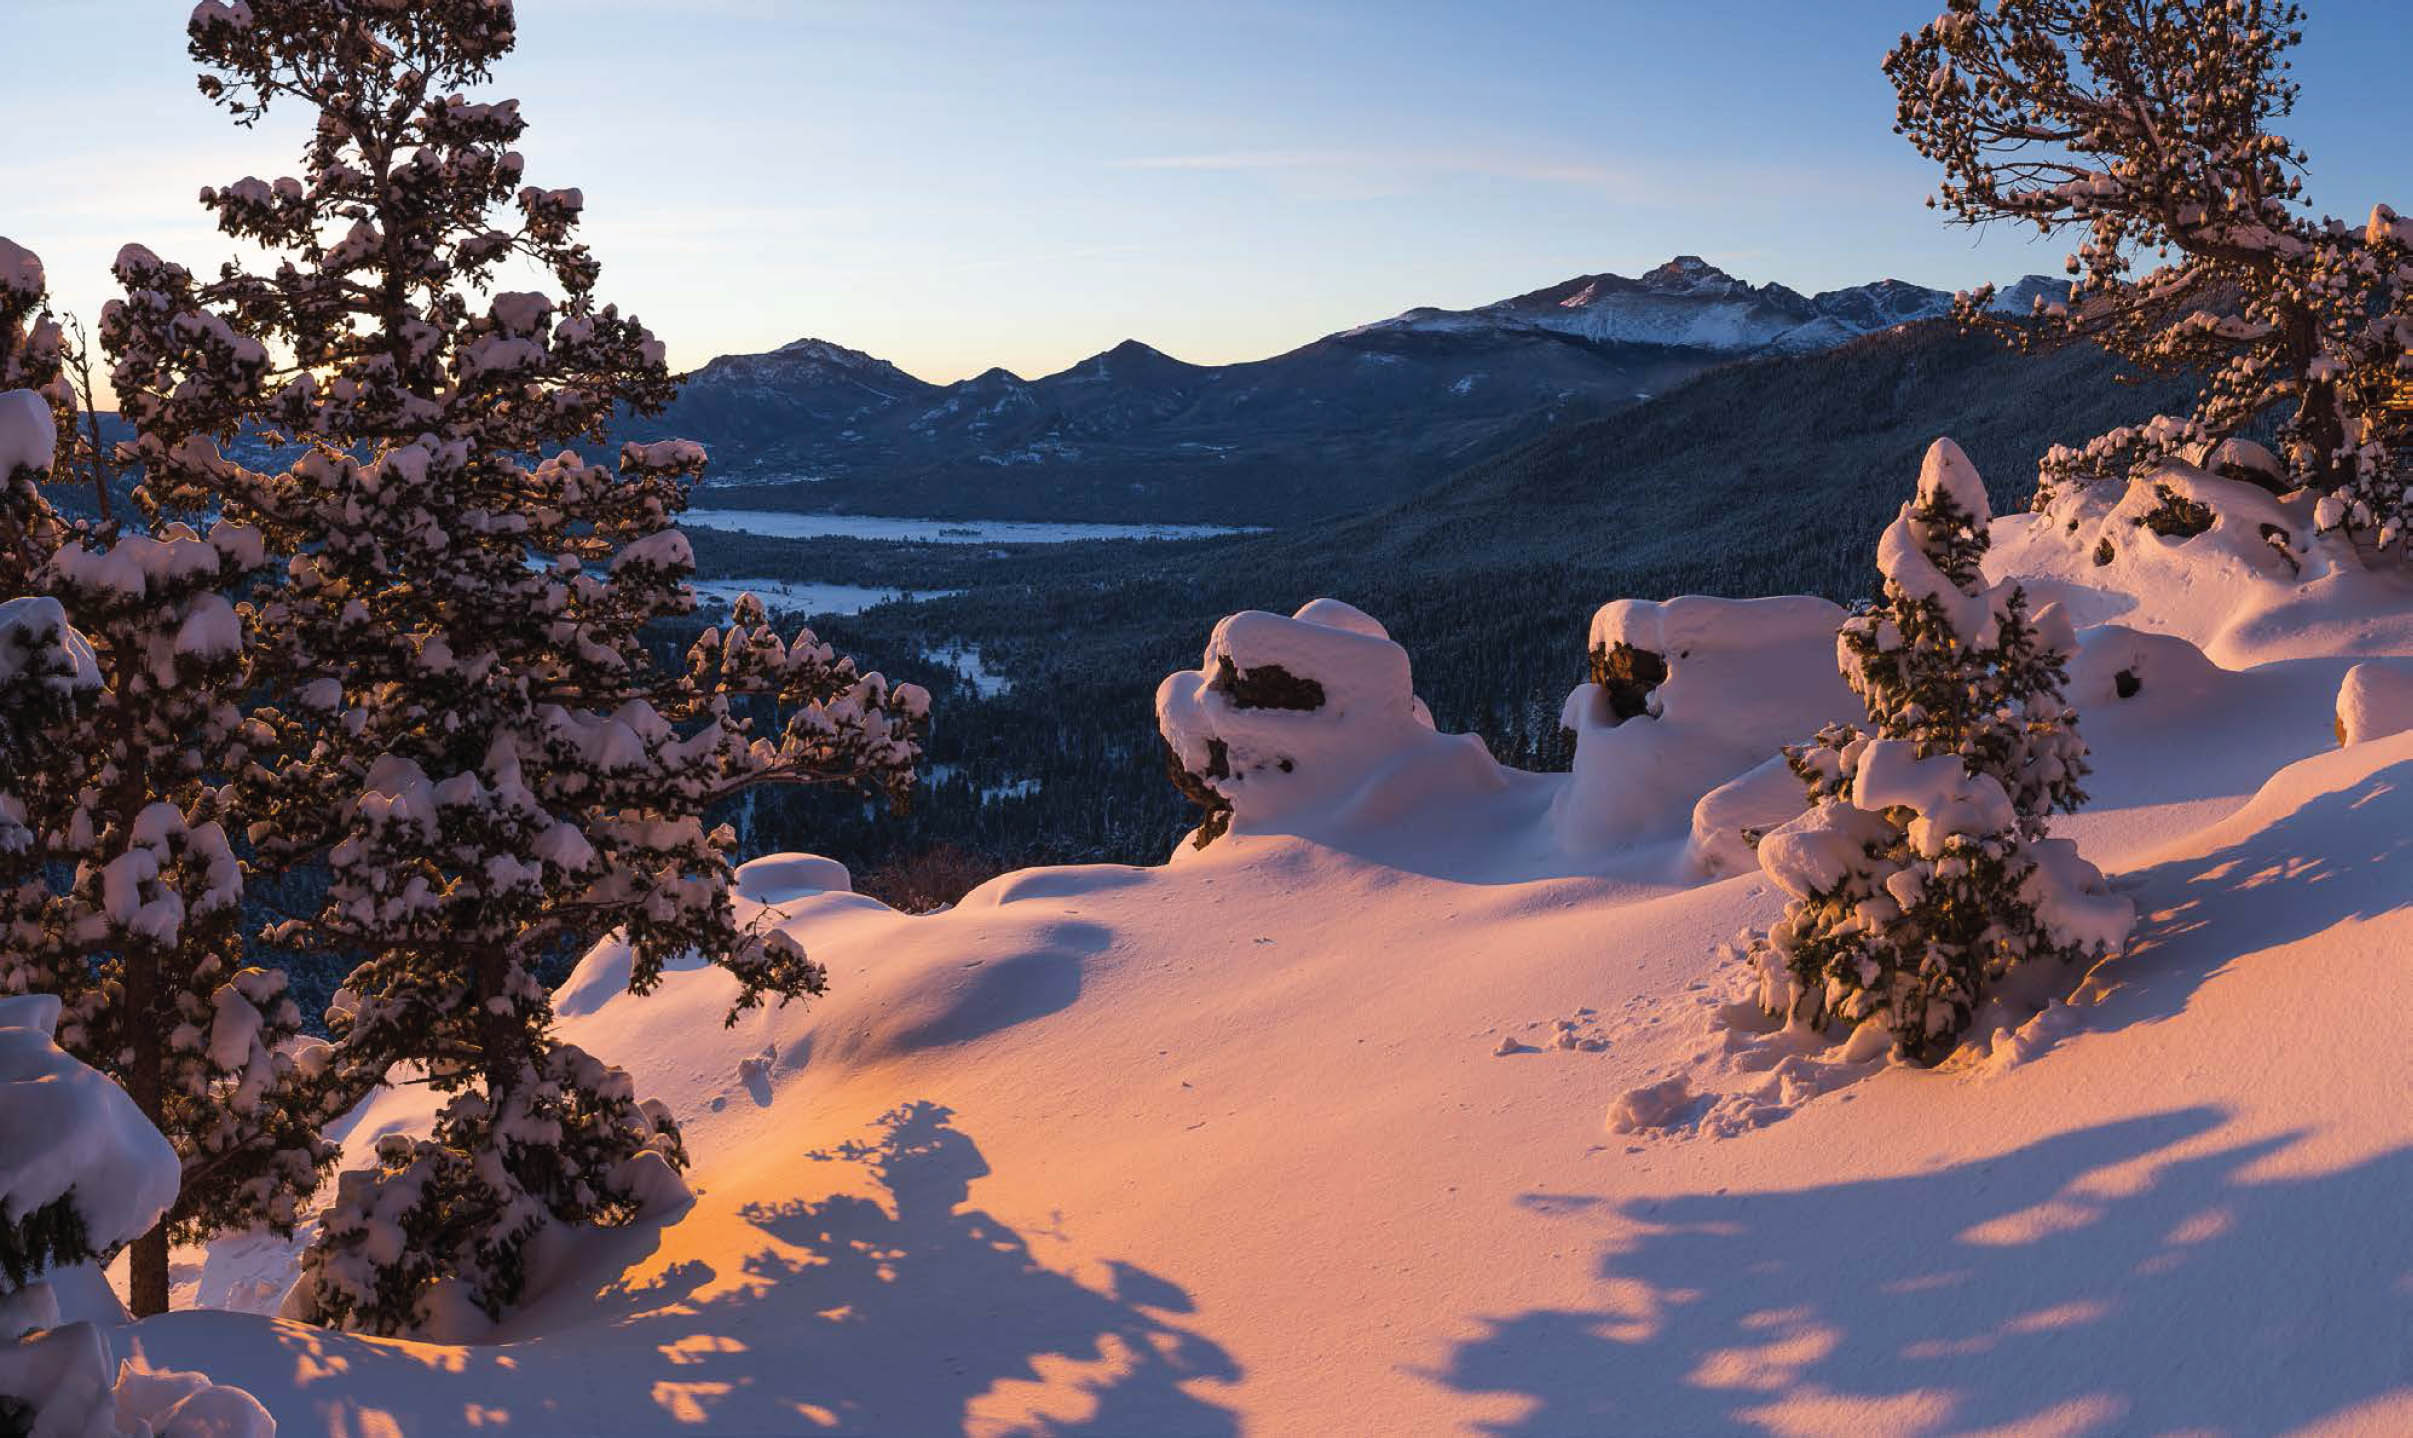
FIGURE 3-10 Longs Peak from Many Parks Curve at sunrise, Rocky Mountain National Park, Colorado. Canon EOS 5D Mark III, Canon EF 16-35mm f/2.8L III USM at 35mm. Stitched panorama, five camera positions, three-frame bracket set, two-stop bracket interval at ISO 100, images merged using Lightroom Classic’s Photo Merge>HDR Panorama utility.
A good landscape photographer is also a good naturalist. That means understanding the seasonal changes in the area where you’re shooting. In the Colorado Rockies, for example, the first tundra flowers appear in early June, but the most showy tundra flowers, the alpine sunflowers, don’t appear until late June or early July. The columbine, Indian paintbrush, and heartleaf arnica usually peak in mid- to late July. A heavy snow year can delay the cycle by weeks. Not all flowers bloom every year. An exceptional year for alpine sunflowers, for example, is followed by several years when you’re lucky to find even a handful of them. Shooting in areas close to your home helps you track the progression of the seasons and time your shoots to capture the peak of the bloom or the height of the fall color.
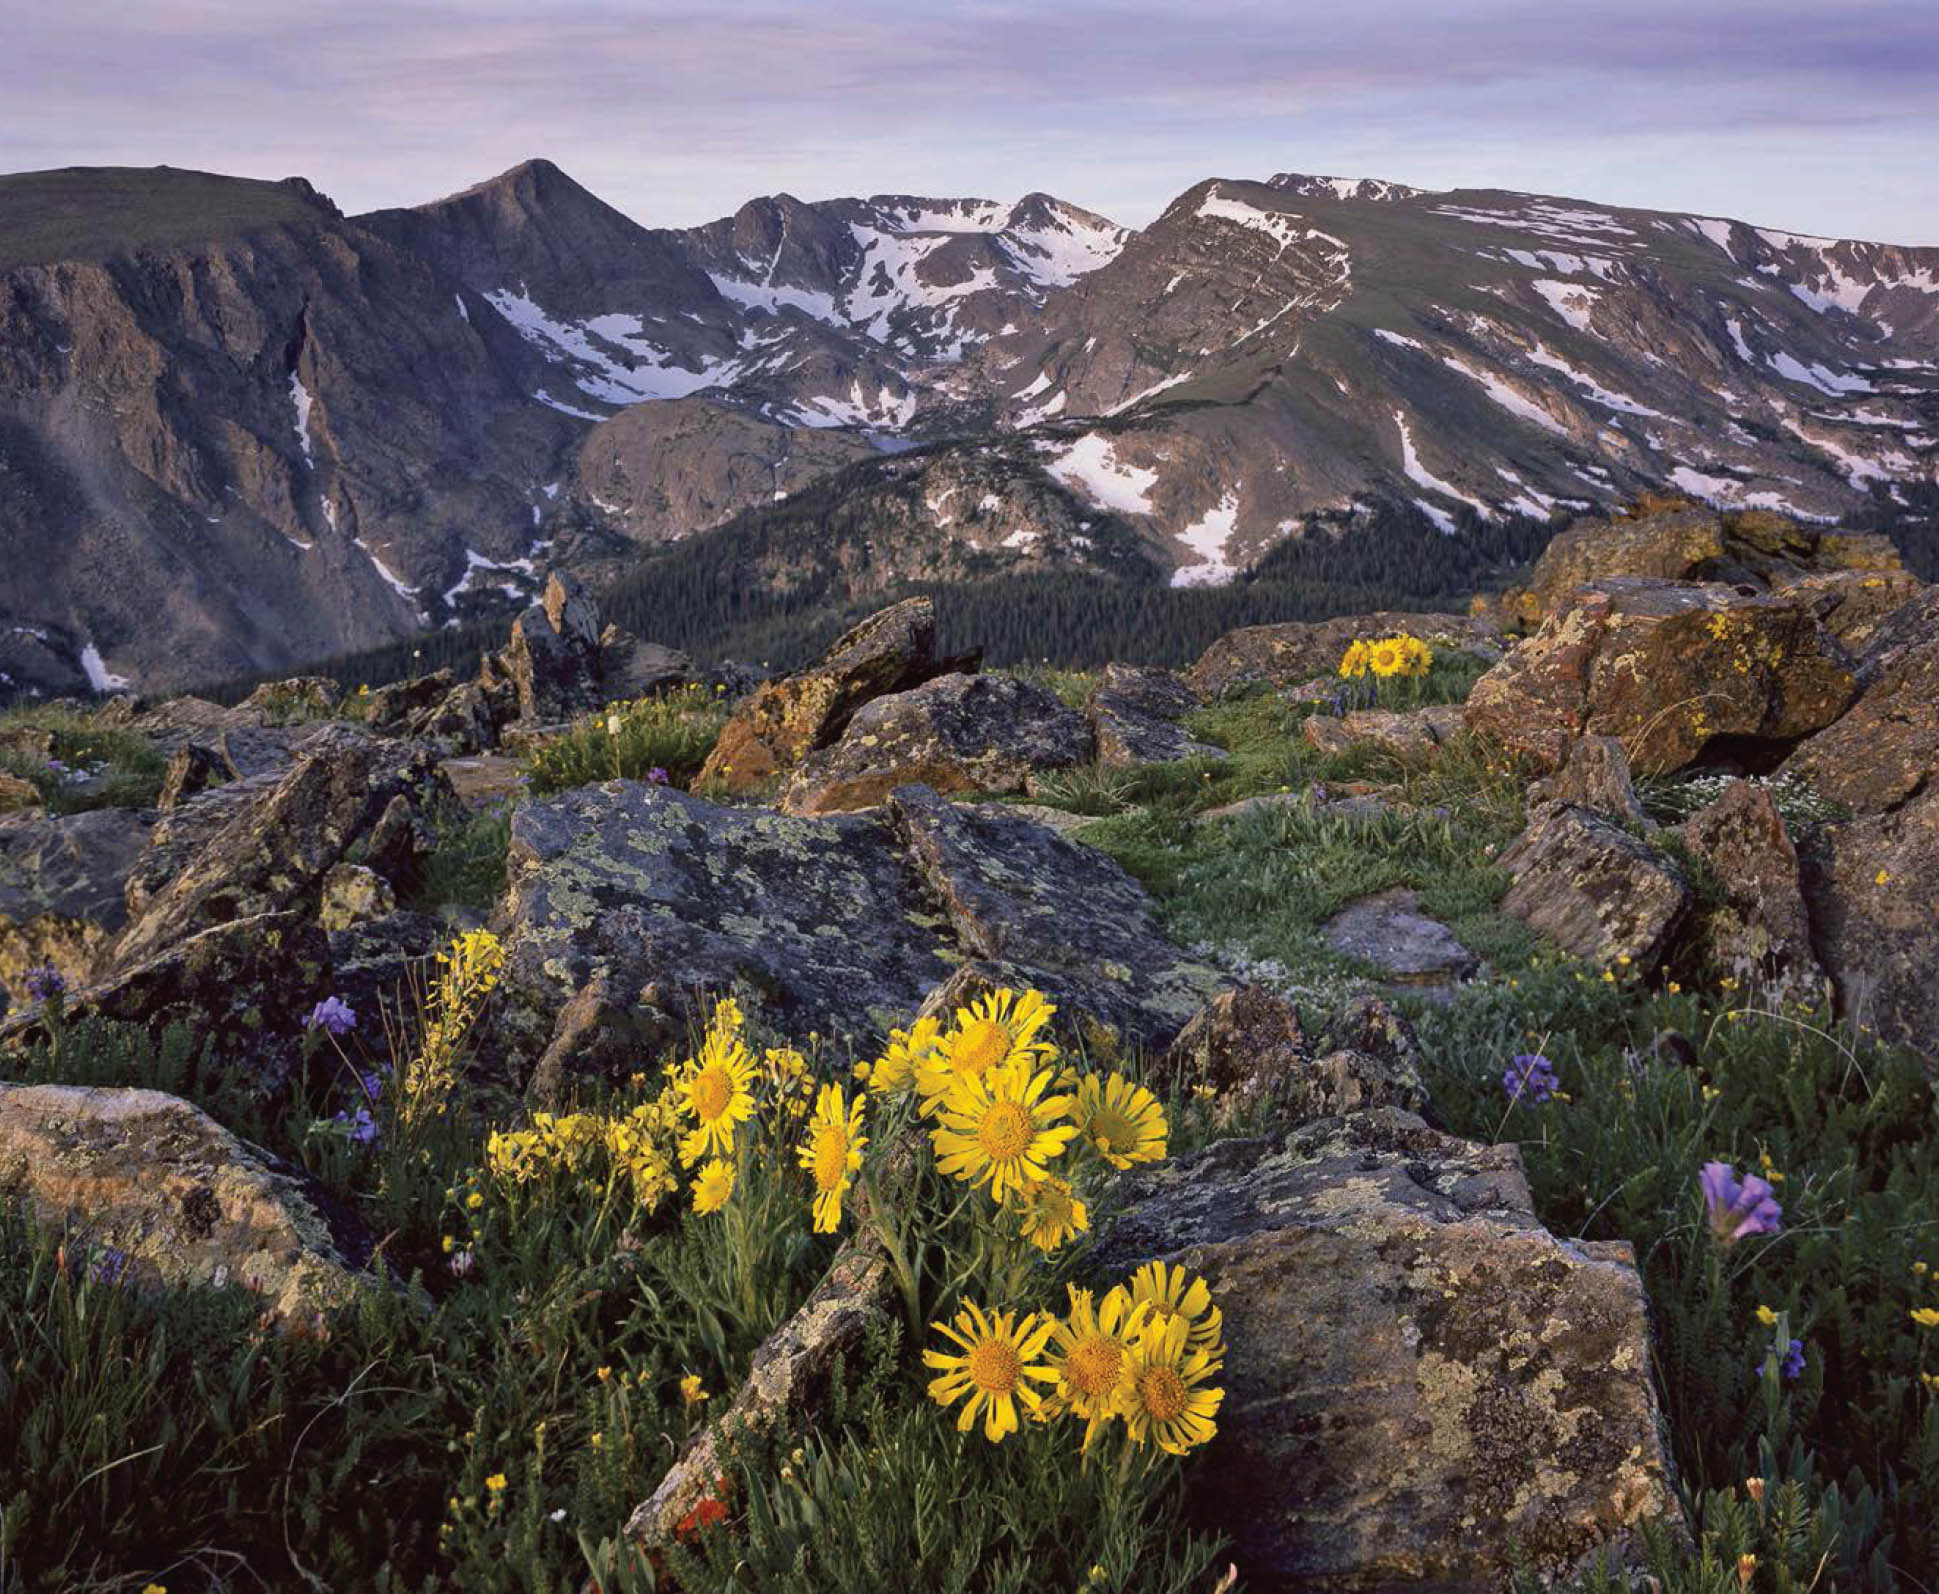
FIGURE 3-11 Alpine sunflowers, Chief Cheley Peak, and the Gorge Lakes from Trail Ridge Road, Rocky Mountain National Park, Colorado. I have driven past this location many times at the right time of year, but only once did I see these alpine sunflowers in bloom. Zone VI 4×5 field camera, Fujichrome film. Lens and exposure unrecorded.
Reflections of a scene in a lake or pond are another subject where it’s helpful to shoot close to home, since it may take many visits to find a day of complete calm, when the reflection is most mirror-like. Often the wind is calmest right at sunrise, before the sun has a chance to warm the earth and start the wind’s turbulent daily dance. The smaller the body of water, the better the chance of a perfect reflection. If the main body of water is too rippled, look for coves along the shore that may be calmer. Outlets and inlets, where the water flows gently, freeze up last in the fall and open up first in the spring. They often provide additional opportunities for reflections.
7. Whenever Possible, Scout Sunrises the Day Before
Most good landscape photographs are made early or late in the day. The local geography determines whether the shot will work better at sunrise or sunset. The eastern slope of the Rockies, for example, tends to be a sunrise location because the most interesting sides of the peaks face east, toward the rising sun; at sunset they’re in deep shade. Scouting sunrise shots is harder than scouting sunset ones. In the morning, you’ve got just a few minutes between the time when it’s light enough to see and the time when you need to start setting up your camera. If an area is too big to scout in a few minutes, you can’t really scout a sunrise and shoot it effectively on the same day. You need to scout in advance, during the midday hours when the light is typically less interesting, then return at sunrise. Sunset shots are easier since you can conceivably scout and shoot on the same day—and you don’t need to get up insanely early.
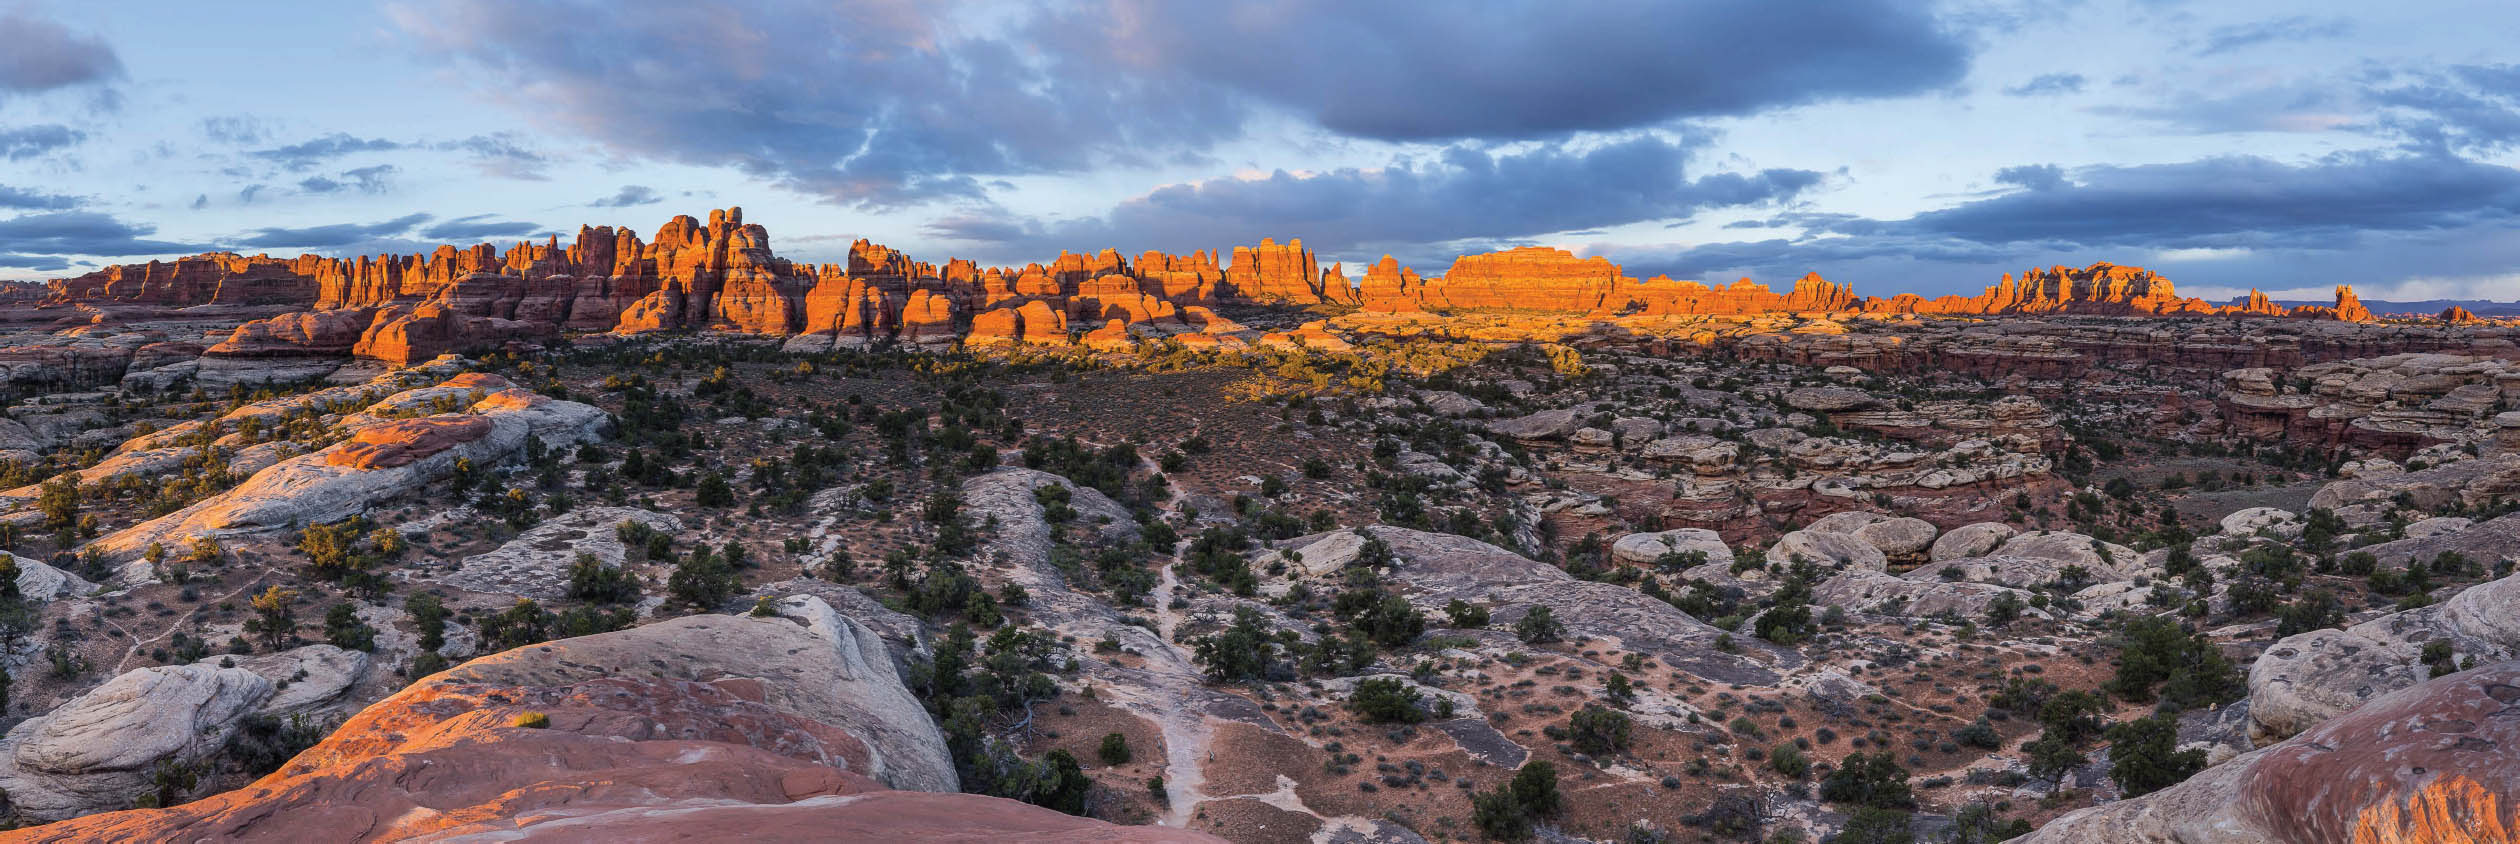
FIGURE 3-12 Panorama of towers above Elephant Canyon at sunrise, Needles District, Canyonlands National Park, Utah. The Needles District yields its secrets slowly, and only to those willing to flex boot leather. I discovered that it was possible to scramble up to the top of the sandstone tower where I shot this image while exploring the trail leading south from Elephant Hill in 2016. My effort that year to shoot this scene was disappointing, so I returned twice more in 2017 and finally made this image. Canon EOS 5D Mark III, Canon EF 16-35mm f/2.8L III USM at 35mm. Stitched panorama, five camera positions, three-frame bracket set, two-stop bracket interval at ISO 100, images merged using Lightroom Classic’s Photo Merge>HDR Panorama utility.
8. When Scouting for Flowers, Density Trumps Breadth
A dense group of flowers that measures 3 feet on a side is more photogenic than a less dense patch measuring 10 feet on a side (see figure 3-13). The best strategy is usually to select the densest patch you can find, put on your wide-angle lens, and get down on your knees. Position the camera so the lens is only a foot or two from the nearest blooms, and fill as much of the frame as possible with colorful petals. I often carry large garbage bags so I can kneel on wet ground without getting soaked. Putting on your rain paints is another option. Some photographers like wearing kneepads to protect their vulnerable joints.

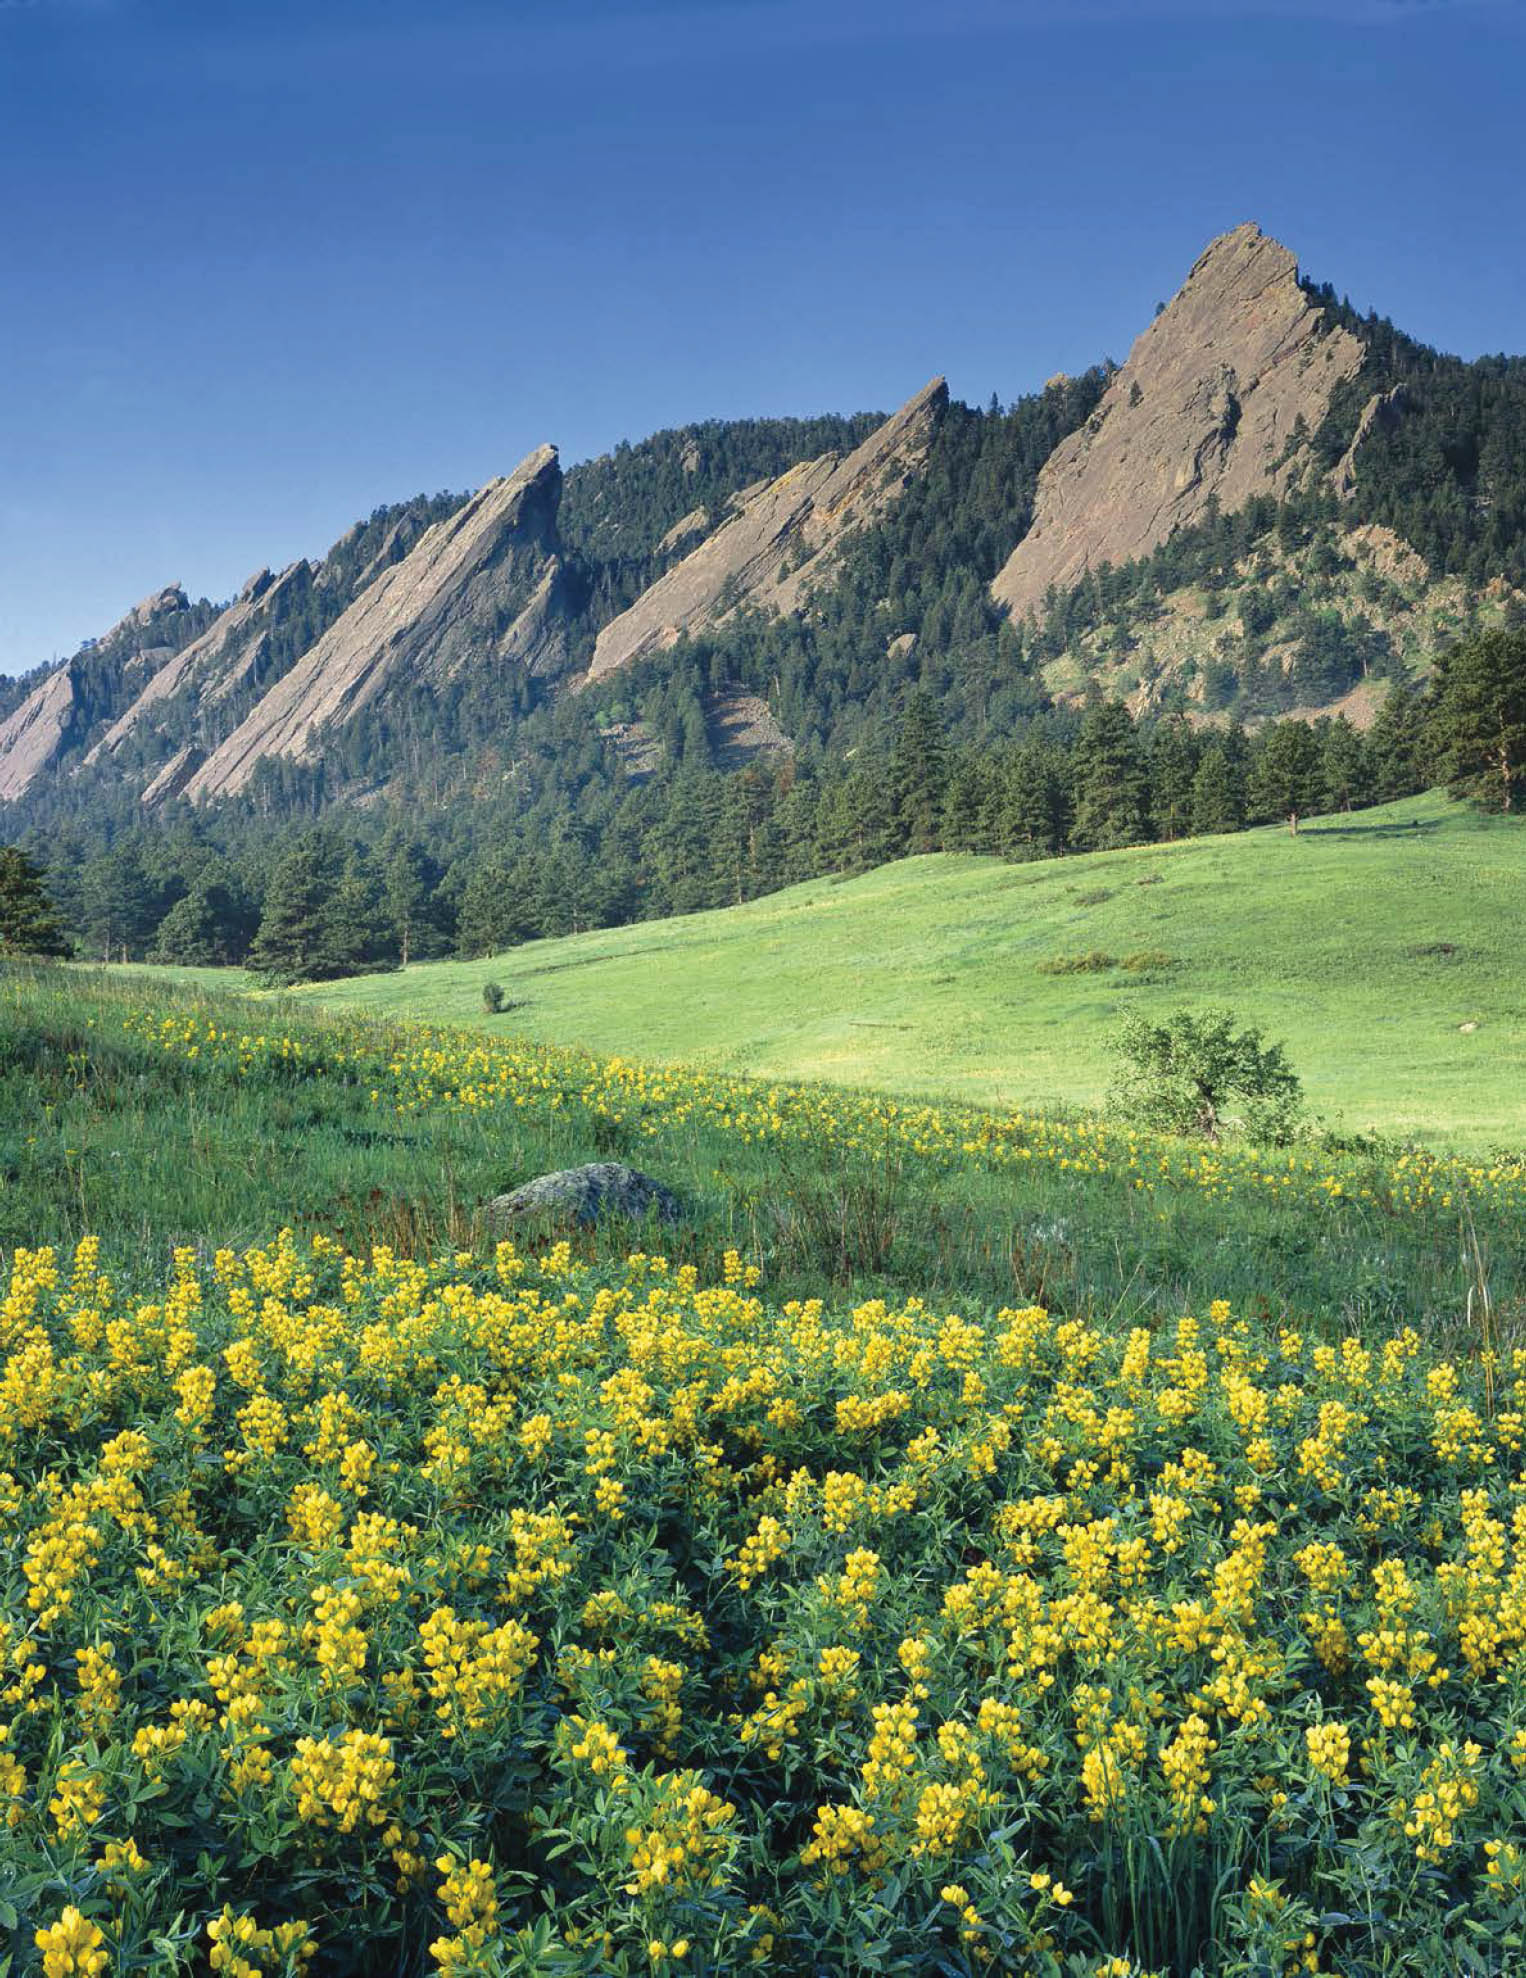
FIGURE 3-13 Golden pea and the Flatirons from Chautauqua, Boulder Mountain Parks, Colorado. The field of golden banner in the image on the left is broad but relatively sparse; the field on the right is smaller but denser and is therefore, in my view, more photogenic. Zone VI 4×5 field camera, Fujichrome film. Lens and exposure unrecorded.
9. Steep Slopes Are Problematic
No matter how dense the cluster of flowers, composing a grand landscape that includes the background is challenging if they are growing on a steep slope. If you try to shoot from a position uphill from the flowers, looking straight down the slope, you have to place the tripod extremely low to the ground and use a very wide-angle lens to include both flowers and distant peaks (see figure 3-14). Usually the result of using such a wide angle is that the distant peaks shrink into insignificance and the (often-boring) midground valley looms too large. If you shoot from below, looking straight up the slope, you lose the sense of perspective. Often the hillside looks flat, with very foreshortened peaks or crags at the top. Every picture element seems to lie in one plane, which reduces visual interest (figure 3-15). Shooting across a steep slope is usually the best bet. The key to a successful composition in that case is finding something to fill the bottom corner of the frame closest to the slope. In Trinity Peaks at Sunset (figure 3-16), I was able to fill the bottom-left corner of the frame with Parry’s clover.
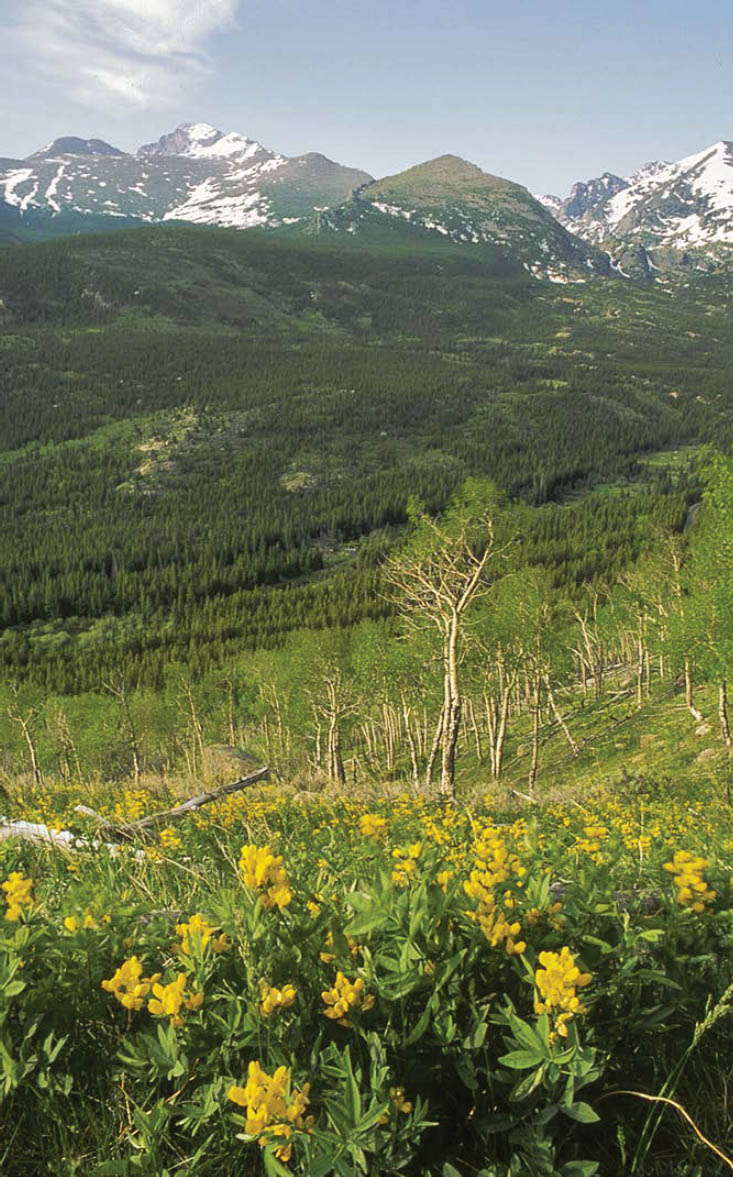
FIGURE 3-14 Longs Peak and golden banner from the Bierstadt Lake Trail, Rocky Mountain National Park, Colorado. This mediocre photograph is the best example I have of the difficulty of composing a pleasing photograph of wildflowers when looking straight down a very steep slope. Nikon F4, Fujichrome film. Lens and exposure data unrecorded.
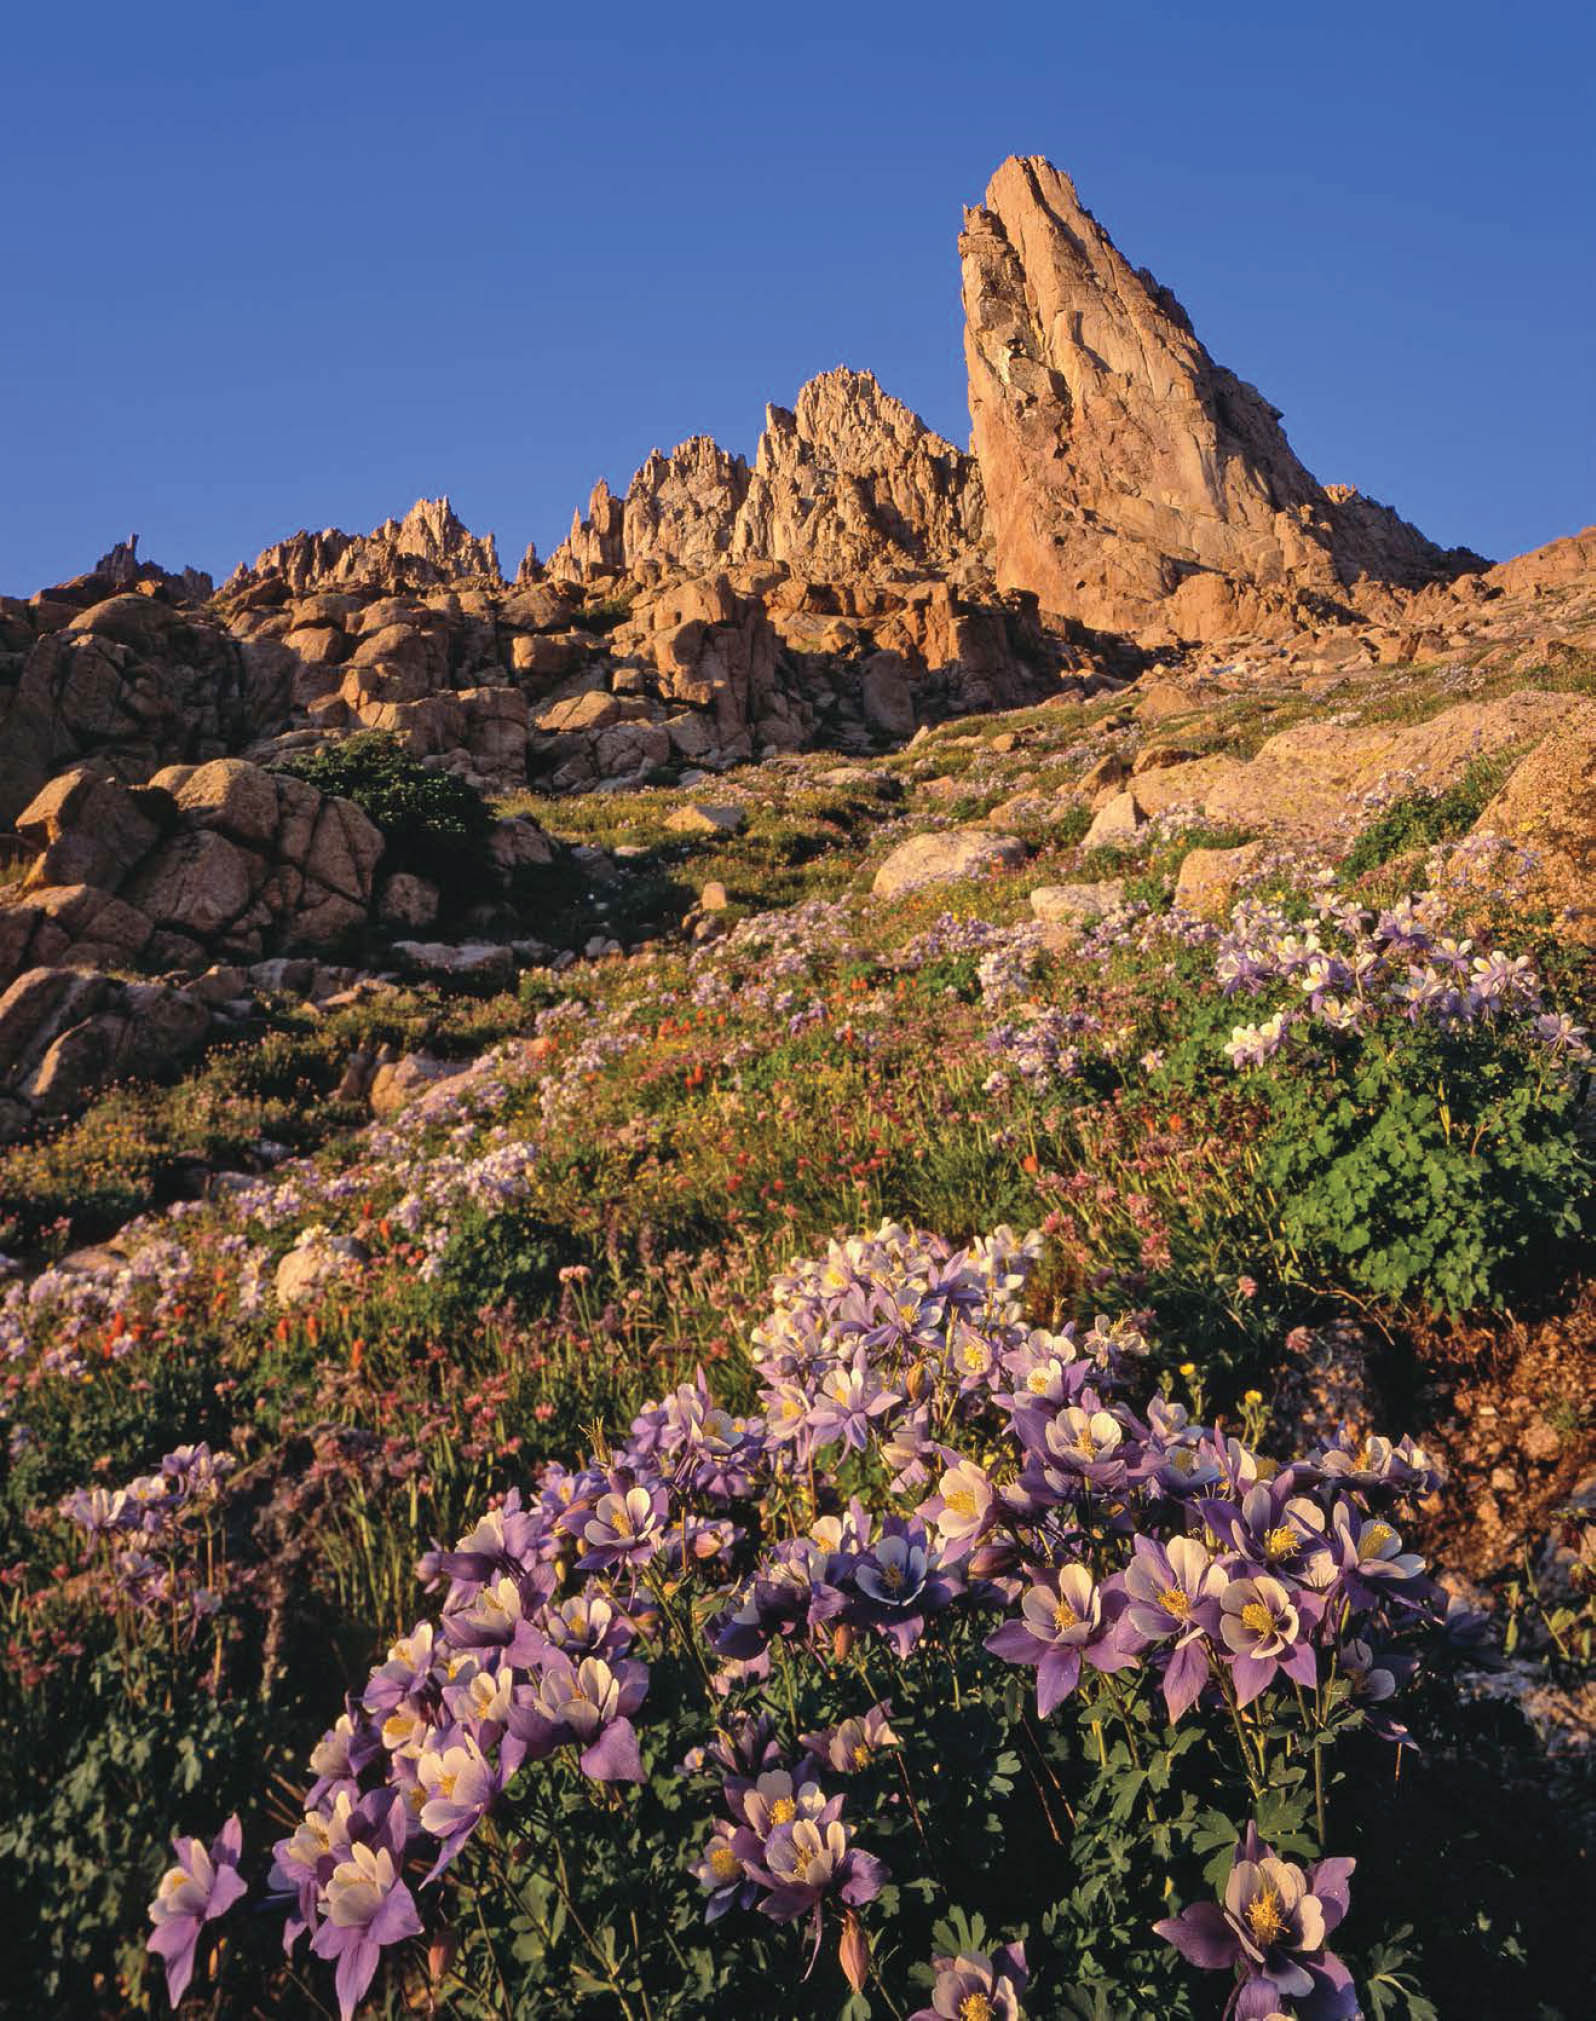
FIGURE 3-15 Columbine and Animas Mountain at sunset, Ruby Basin, Weminuche Wilderness, Colorado. Images taken looking straight up a steep slope look flat and show foreshortened peaks. Ebony SW-45 field camera, Fujichrome film. Lens and exposure unrecorded.
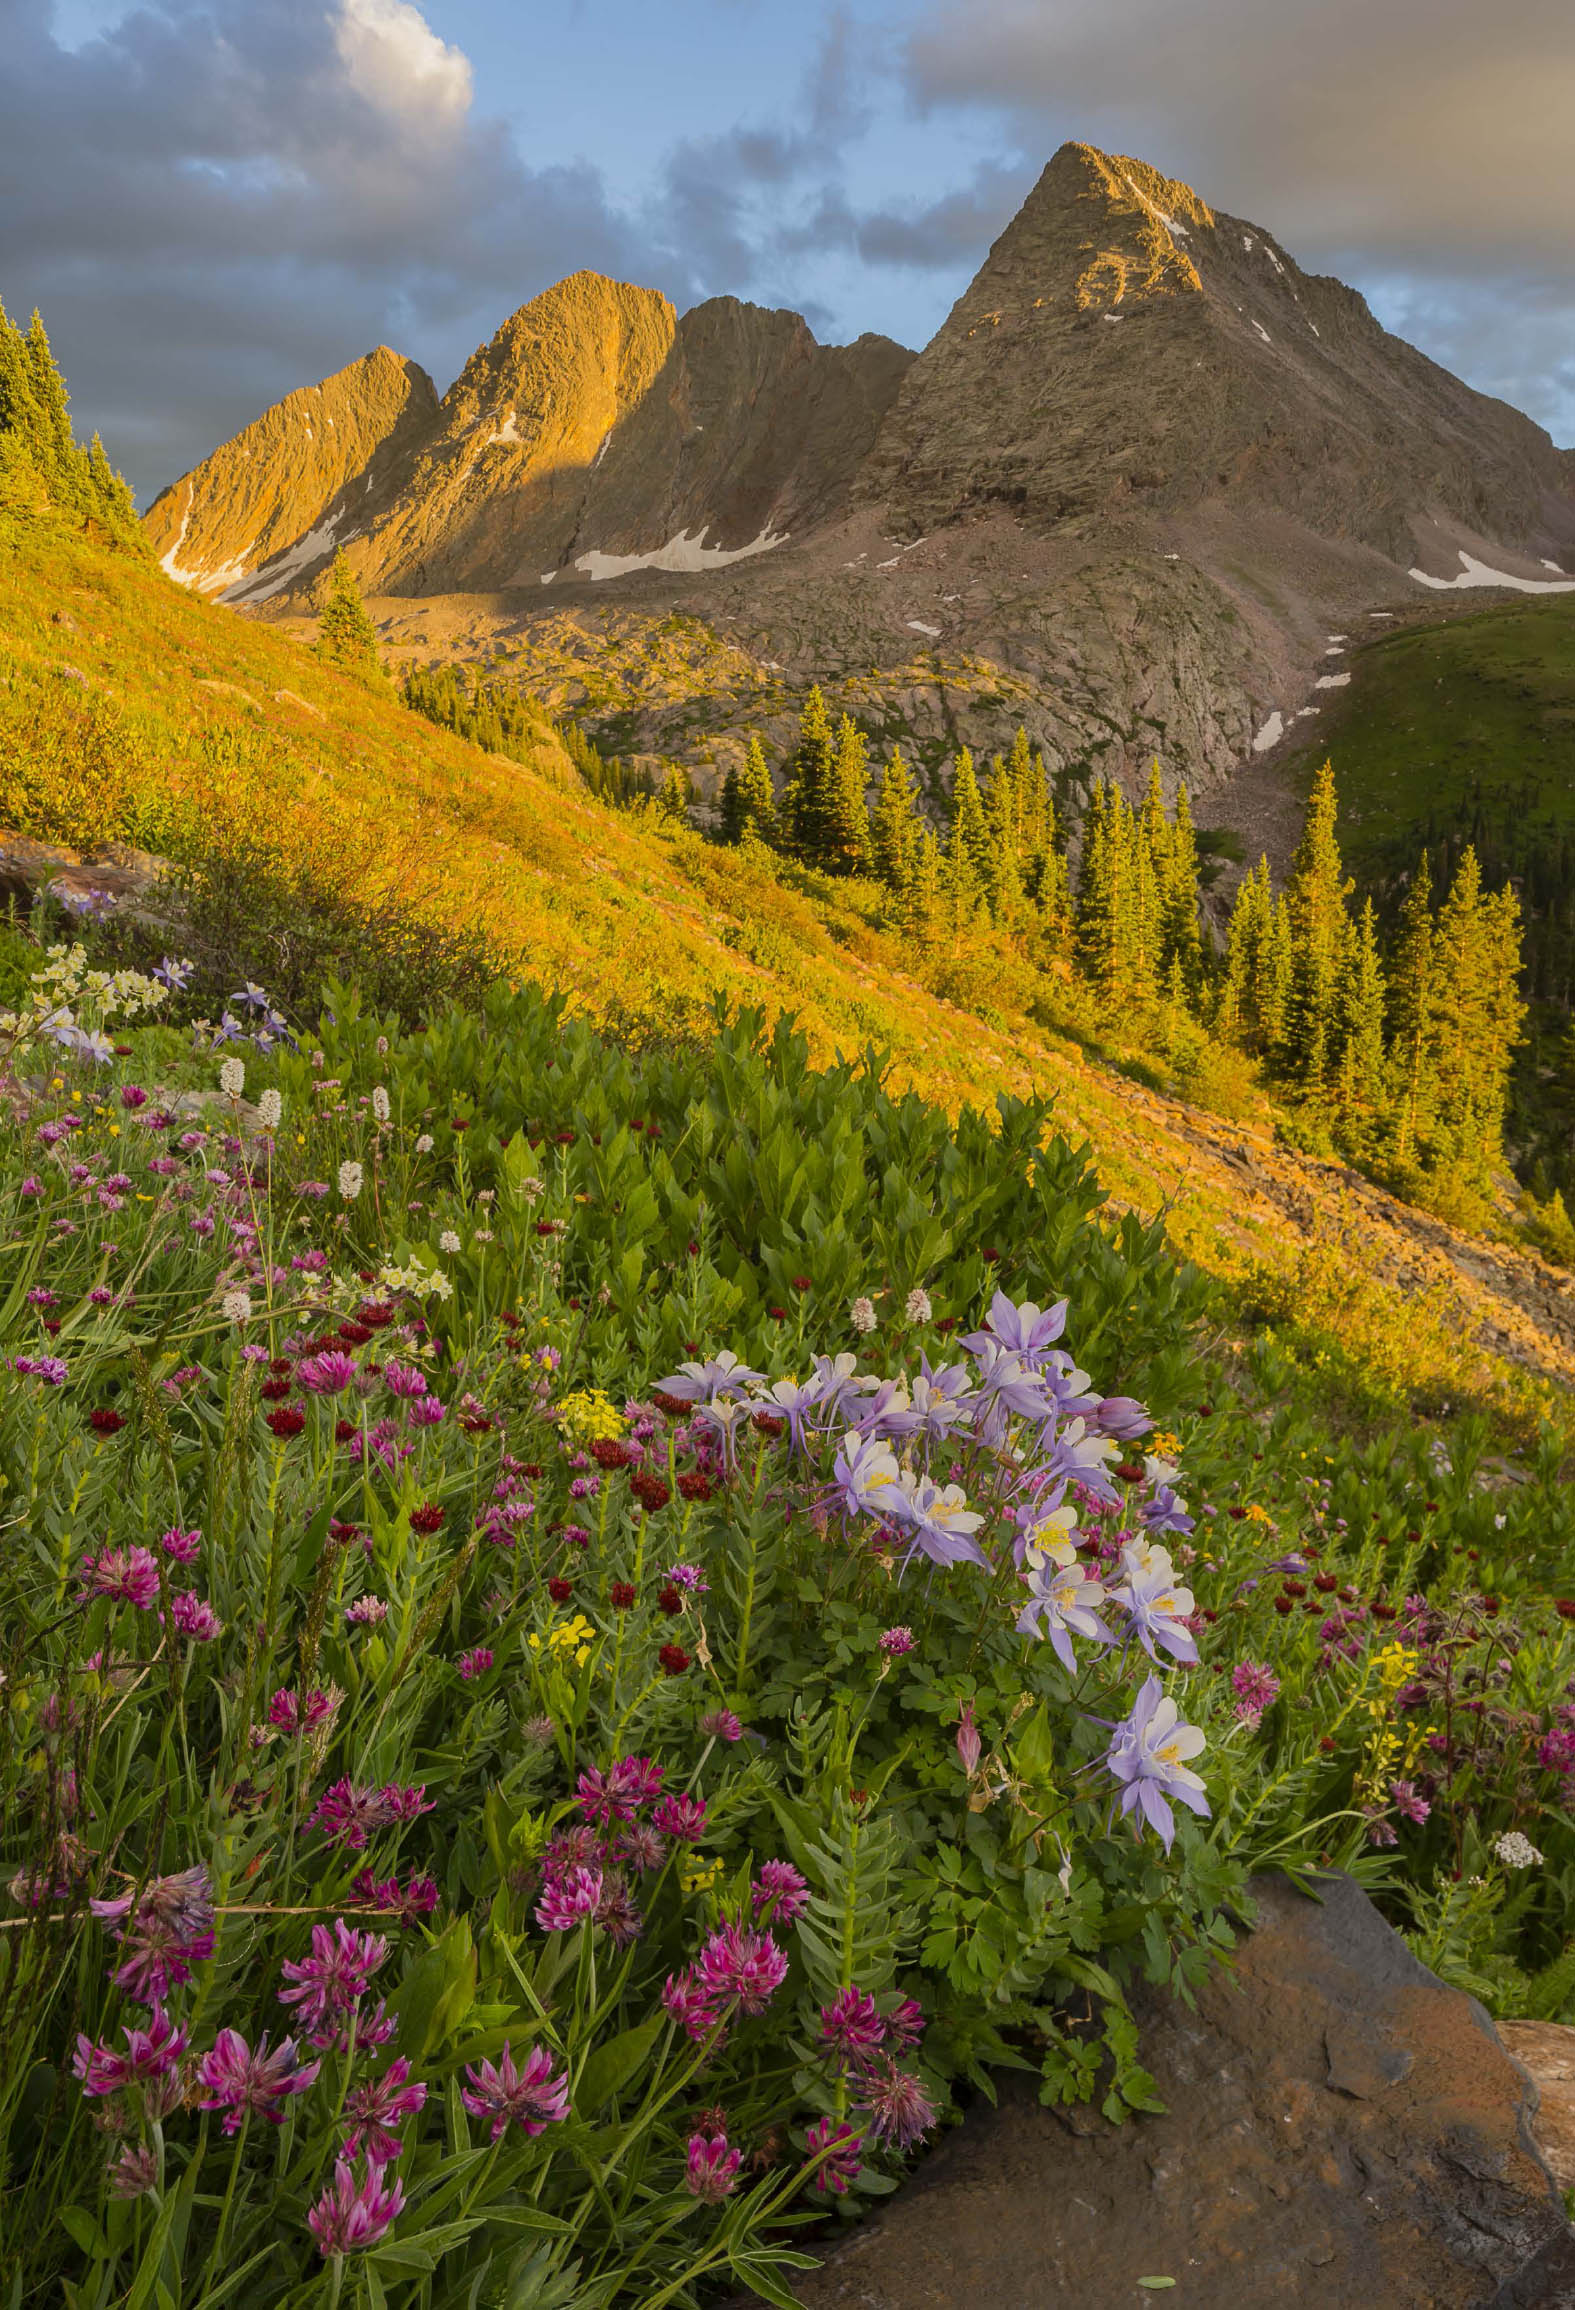
FIGURE 3-16 Columbine, Parry’s clover, and the Trinity Peaks at sunset, Weminuche Wilderness, Colorado. By shooting across the slope I was able to give the viewer a better sense of the terrain. Parry’s clover fills the lower-left corner of the frame, creating visual interest in the closest part of the composition. Canon EOS 5D Mark III, Canon TS-E 24mm f/3.5L II tilt-shift lens, 1/6th, f/16, ISO 200.
10. Sometimes the Best Possible Shot Is an ERNI: An Exceptional Rendition of a Natural Icon
Sometimes all your scouting will be for naught, and the best shot will turn out to be the one that’s been staring you in the face all along. That’s the case with the famous view of the Maroon Bells reflected in Maroon Lake. I once spent an entire day scouring the valley of Maroon Creek, hiking off-trail to the tops of obscure knolls, looking for that secret location that no one else had discovered. If it exists, I didn’t find it. The best shot of the Maroon Bells is from Maroon Lake. So how do you create a fresh image of one of the most heavily photographed locations in Colorado? Shoot an ERNI: an exceptional rendition of a natural icon. Unless you’re a lot luckier than I am, sometimes the only way to make something exceptional is to go back again and again until something interesting happens with the light, the clouds, and the atmospherics: a gathering or clearing storm, fresh snow, mist rising off the lake—something to lift the image from cliché to extraordinary.

FIGURE 3-17 Maroon Bells at sunrise, Maroon Bells-Snowmass Wilderness, Colorado. It took many fruitless visits to Maroon Lake before I came up with this image. Zone VI 4×5 field camera, Fujichrome film. Lens and exposure unrecorded.
11. Sit Tight, Don’t Gun and Run—Usually
I shot 4×5 film for 15 years before switching to digital capture in 2008. Fifteen years of shooting with such a slow-moving camera and such expensive film taught me to search hard for the best composition with the best potential for interesting light; compose it perfectly; then sit tight and wait until the light peaked. If the sky behind me suddenly lit up while the clouds in my field of view remained stubbornly gray, well, so be it. I learned the hard way that if I made a last-minute decision to change my composition to try to take advantage of changing light, I would usually be too late. The best light in the new shot would fizzle before I could find a composition as good as my original one. To add to my frustration, I would sometimes find the sky in my original composition suddenly lighting up as I was trying to dial in the new one. Before I could re-set up my original shot, the light would fade in that direction as well. I would miss both shots and come up completely empty-handed.

FIGURE 3-18 Twilight wedge over Mount of the Holy Cross, Indian paintbrush and lupine, Shrine Ridge, near Vail Pass, White River National Forest, Colorado. I had decided the day before that this patch of Indian paintbrush was the best available, so I knew where to go in the pre-dawn twilight. It took several minutes to perfectly position my 24mm tilt-shift lens and find the right combination of focus position and degree of tilt. Once I had the composition dialed in, I waited for the light and took the shot. Canon EOS 5D Mark III, Canon TS-E 24mm f/3.5L II tilt-shift lens, two-frame bracket set, 2-stop bracket interval at ISO 400, images merged using Lightroom Classic’s Photo Merge>HDR utility.
At first, switching to digital capture seemed to change the equation. After all, I now had auto-exposure and auto-bracketing (no more handheld spot meter!) and could zone-focus for depth of field without painstakingly examining the 4×5’s ground glass with a 4× loupe. Then I added a 24mm tilt-shift lens to my Canon kit. This added significant quality when shooting images that require extreme depth of field, such as fields of wildflowers, but it also slowed me down.
So which approach is best, sit tight or gun and run? I still find that the most productive strategy is usually to scout in advance, find the best foreground, dial in the composition, and wait. This is particularly true for any composition that requires precise tripod placement, which generally means compositions with foreground elements such as wildflowers that are very close to the lens. The rougher the ground, the longer it takes to position a tripod. It can easily take several minutes to precisely position a tripod on a talus slope, for example. Setting up stitched panoramas is also time-consuming. Once I have that shot, however, I’m now much more willing to experiment. After all, pixels are “free” while 4×5 film costs $6 per sheet. On rare occasions I will have two equally good compositions in mind that are close to one another. Sometimes it’s smart to make a last-minute decision on the best composition depending on where the clouds are lighting up. And if I’m shooting long-lens landscapes from the summit of a Fourteener, for example, where I can compose a variety of shots without moving the tripod, then I shoot freely and follow the light wherever it goes.
12. As You’re Scouting, Look for Other Possible Vantage Points
Your primary task when scouting is to locate great foregrounds that integrate with superb backgrounds, but you should also keep a lookout for new vantage points, whether they are a hundred yards away or across the valley.
Here’s an example. Almost every year for 20 years, I have made a pilgrimage to Colorado’s San Juan Mountains in late September to photograph fall colors. Inevitably, that pilgrimage includes several trips up and down Owl Creek Pass, just outside Ridgway. One year, for the first time, a splash of yellow-orange in the distant hills below Courthouse Mountain caught my eye as I started up the dusty gravel road. I stopped, dug out the map and compass and shot a bearing. The colorful aspen turned out to be a grove on the summit of Stealey Mountain. The map showed a trail leading to within a quarter-mile of the summit. It also showed that the aspen should get moment-of-sunset light. Put warm light on a warm-toned subject, and you’re bound to get spectacular color. On a whim, I decided to gamble a precious sunset shoot on finding a good composition on Stealey Mountain. I knew I would need some kind of clearing or outcropping in exactly the right place to make it all work. The map showed nothing promising, but the only way to really know was to hike in and see for myself.
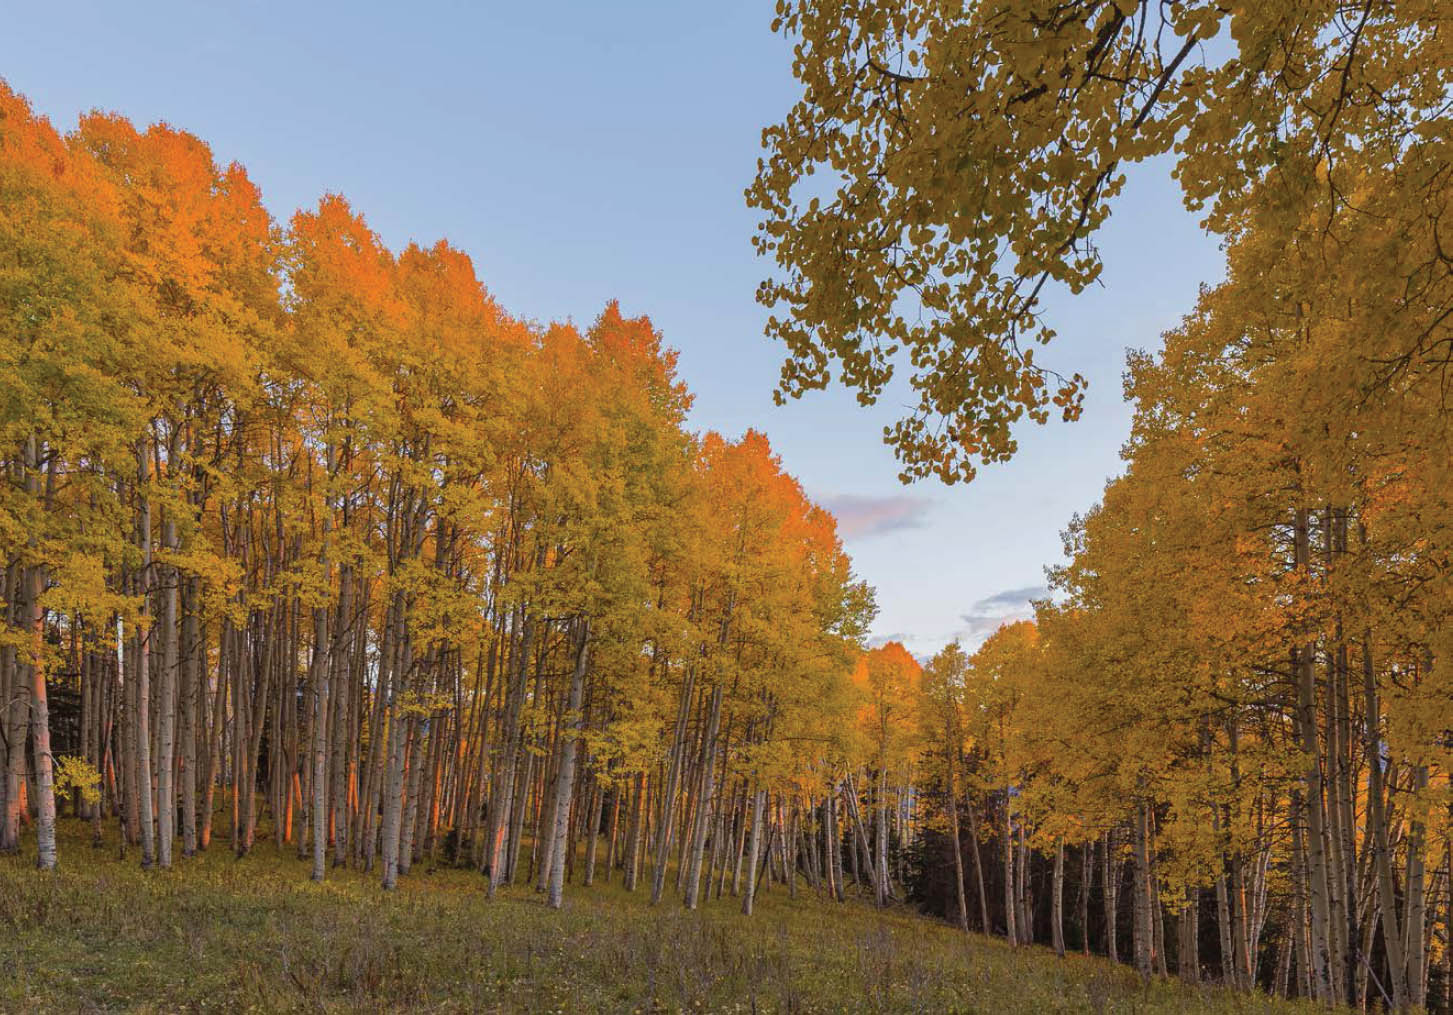
FIGURE 3-19 Aspen grove on top of Stealey Mountain at sunset, near Owl Creek Pass, San Juan Mountains, Colorado. Canon EOS 5D Mark III, Canon TS-E 24mm f/3.5L II tilt-shift lens, 1/8, f/11, ISO 400.
As I was hiking to the summit, I came across a clearing with a view back across a valley to Cimarron Ridge. As I examined the ridge with the 8× monocular I always carry, I noted a grove of aspen right on the ridge crest with a steep, rocky clearing just uphill from the grove. Without even checking the map, I could tell that the grove would get moment-of-sunset light. I could also tell that the view from the clearing looking south over the aspen grove should be spectacular, with Courthouse Mountain and Chimney Rock as the focal points. No trail led to the grove. The easiest approach looked to be an hour-long bushwhack from the parking lot atop Owl Creek Pass. I thought I had just discovered a place where no one had ever shot before.
I didn’t have time to explore that location on that trip, so I filed away the idea for the future and continued on to the top of Stealey Mountain. After some exploring, I found a clearing that would allow sunset light to filter into the grove, igniting the white trunks and aspen leaves. Fortunately, the sky at the horizon remained clear, and I was able to make Stealey Mountain Sunset (figure 3-19). My gamble had paid off, which made the two-hour hike out in the dark seem worthwhile.
Later that fall, to my chagrin, I saw two published photographs that must have been taken from my “secret” spot. I should have known better; in the internet age, there are no secret spots. I visited the grove for the first time the following year, then came back twice a year after that and finally made the image I call Courthouse Mountain from Cimarron Ridge (figure 3-20).
This chapter has focused on the process of scouting broad areas that you’ve identified as promising. That’s certainly a sound approach, but in some cases you can create photographs that are even more powerful by visualizing a specific image, going out in search of the perfect location, then planning the exact time of day or night when everything will come together and you can create an image that matches your vision. That’s the subject of the next chapter.
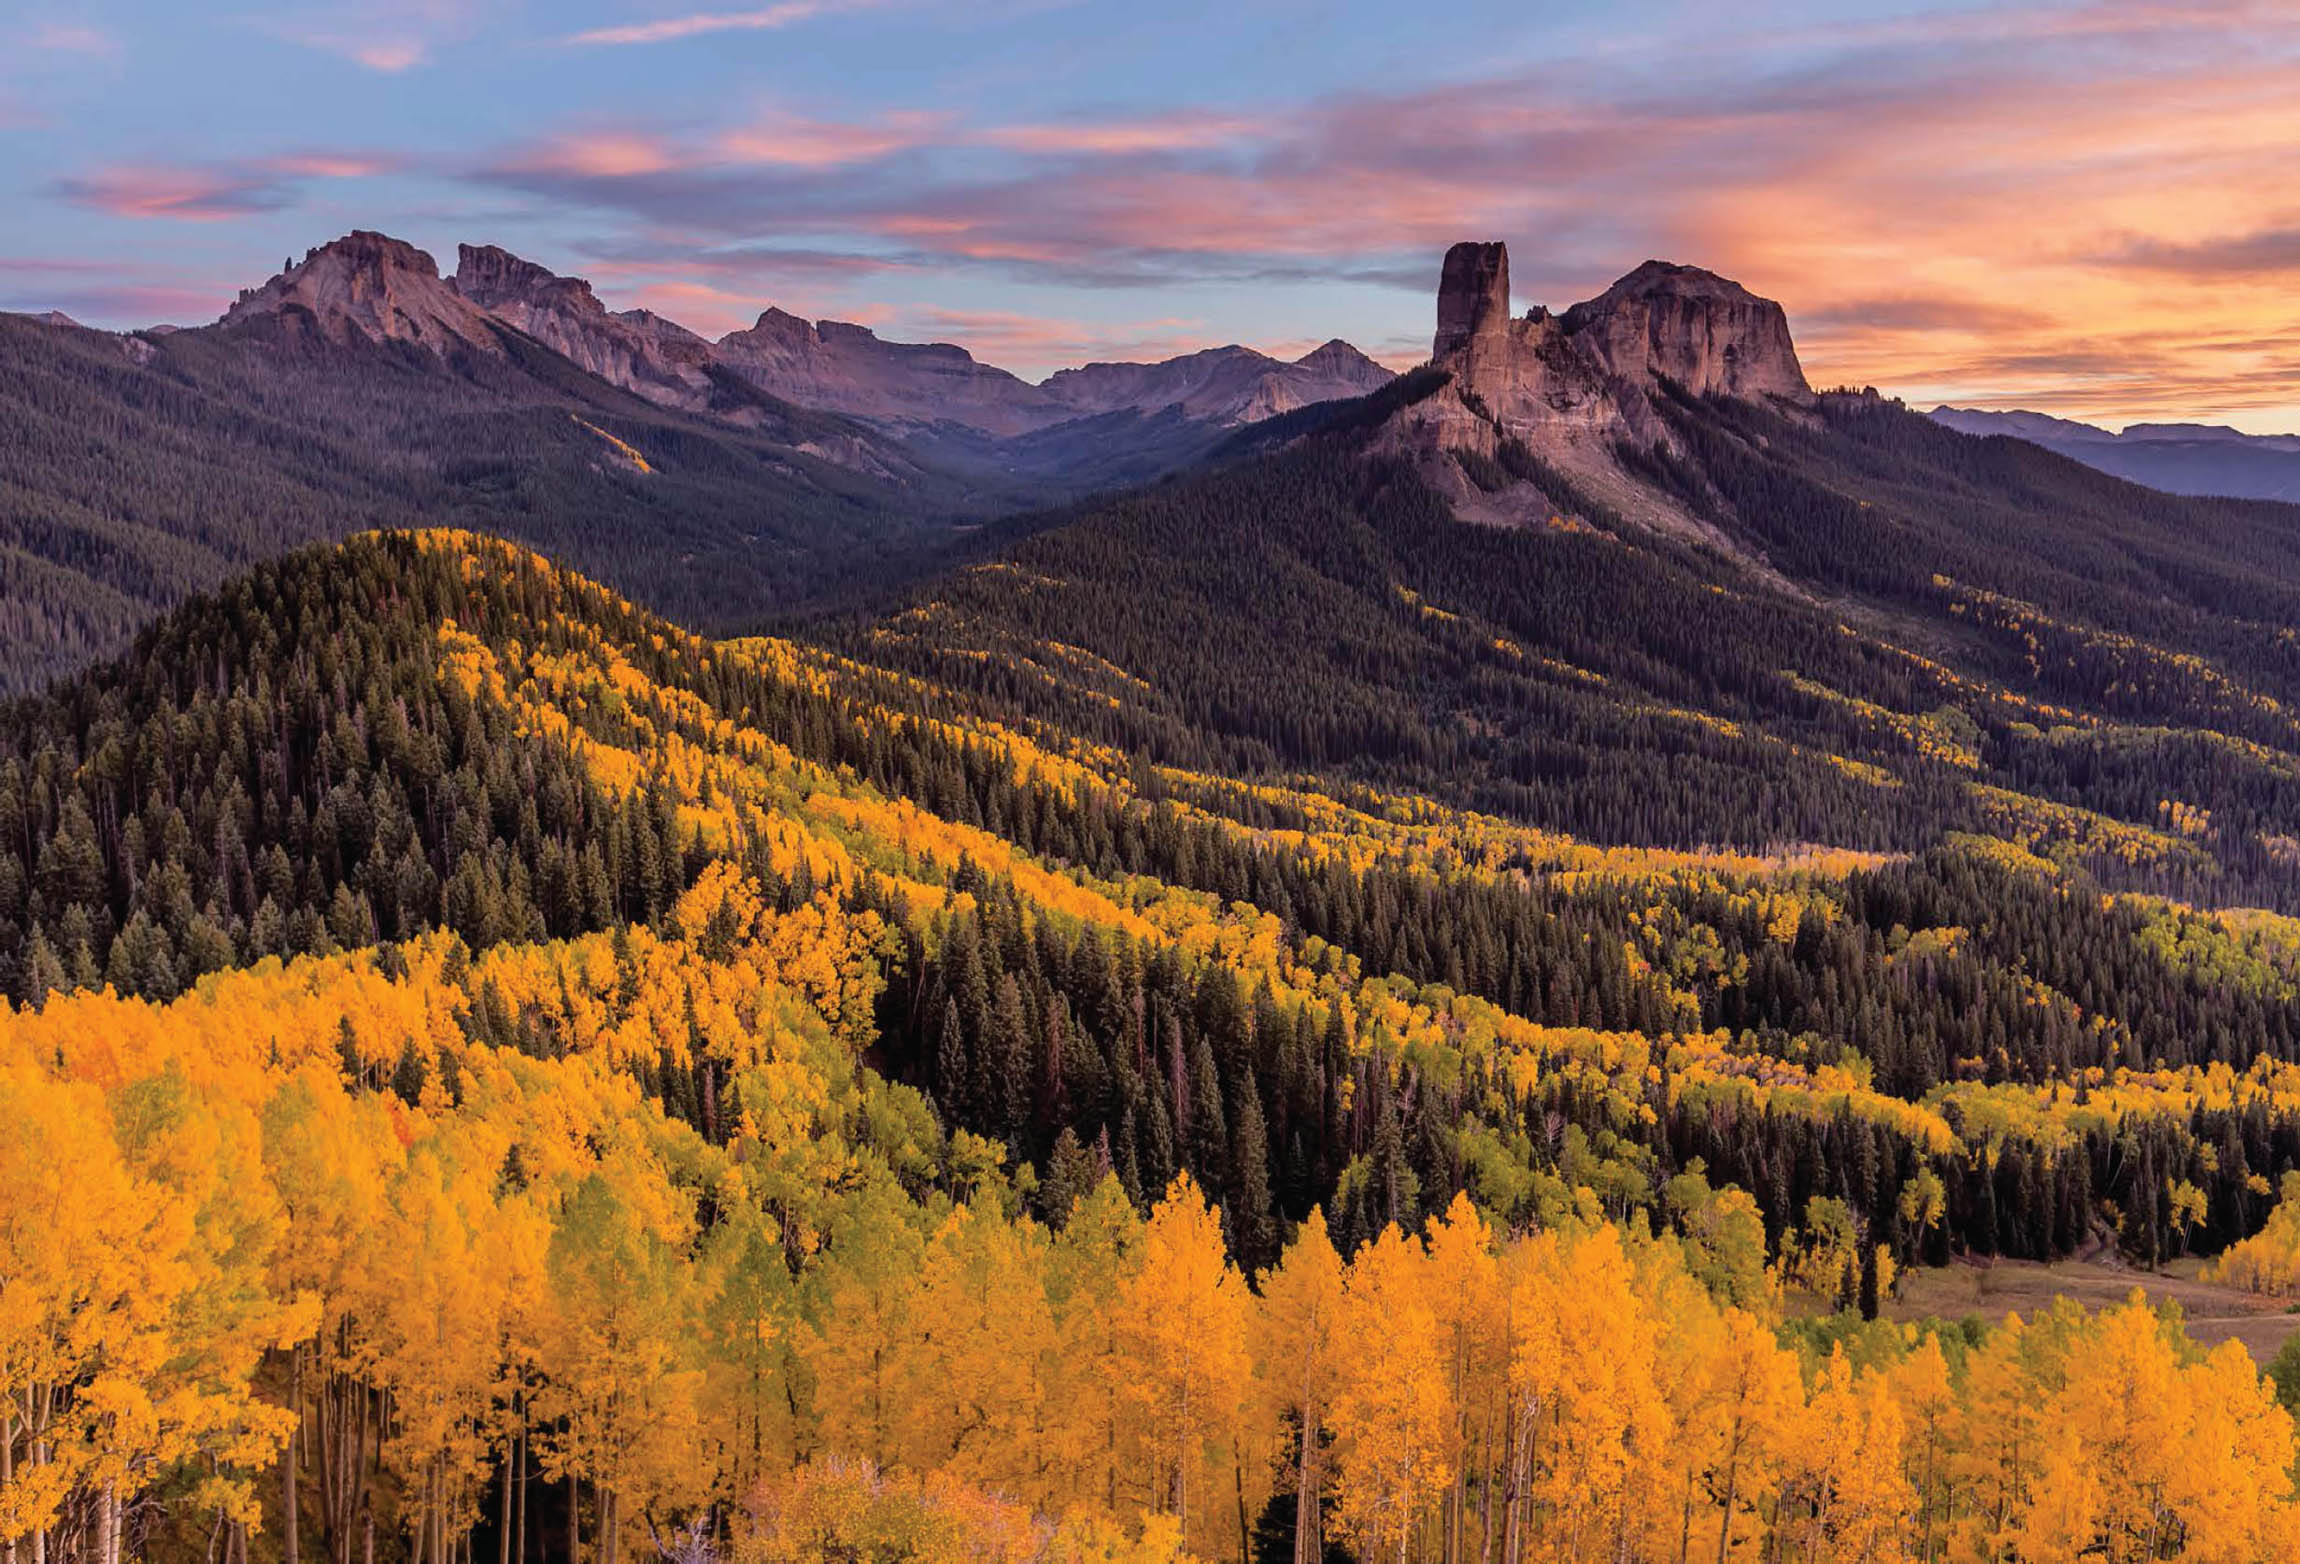
FIGURE 3-20 Dunsinane Mountain, Precipice Peak, Redcliff, Coxcomb Peak, Chimney Rock, and Courthouse Mountain from Cimarron Ridge at sunset, San Juan Mountains, Colorado. Canon EOS 5D Mark III, Canon EF 16-35mm f/2.8L II USM at 28mm, five-frame bracket set, one-stop bracket interval at ISO 100, images merged using Lightroom Classic’s Photo Merge>HDR utility.