5
The Art and Science of Light
Many years ago, when my ambitions as a photographer greatly exceeded my skills, a friend and I went on a climbing trip to Arches National Park, a marvelous preserve in southeast Utah that has the greatest density of natural arches in the world. Unfortunately, my friend injured his shoulder on the first day. With our climbing plans abruptly canceled, I spent the next three days driving around to scenic overlooks and making photographs of various arches, quite convinced I was adding publishable images to my growing collection. I shot at 10 a.m., noon, 2 p.m.—it didn’t seem to matter, since I was framing up such extraordinary stone formations in my viewfinder. I was awed by what I saw; surely the photographs I took would generate that same awe in those who viewed them.
Later, when my understanding of landscape photography had deepened considerably, I went back through my collection of Arches photographs and threw every single one away. What went wrong? Quite simply, the light was boring. I had paid no attention to the direction of the light, its color, or whether it was bold and direct or soft and subtle. Not even the most unique natural arches in the country could retain much interest as photographs when handled that way. I had also ignored “photo-graphics,” to borrow a term from nature photographer John Shaw. I had failed to see my subjects as they would appear on film: as lines, shapes, and colors on a two-dimensional surface. Composition—the art of arranging subject elements within the frame—is the topic of the next chapter.
We are constantly deluged with images of all kinds, including landscape images. Every nature lover in this country has seen dozens of pictures of the Maroon Bells and Delicate Arch. You may not know their names, but their distinctive forms would nonetheless be recognizable. We live in an image-saturated culture.
Humanity has not always lived this way. In the Middle Ages, “illuminated” (illustrated) books were rare and precious objects, hand-copied by monks. The daguerreotype, the first really popular form of photography, was invented in 1839, but the process generated only one-of-a-kind originals that could not be reproduced. In fact, prior to the invention of the half-tone printing process in 1877, images could only be reproduced in quantity by laboriously hand-engraving the image on a wooden block, which was then used for printing. Newspapers began using photographs regularly late in the 1800s, and the image explosion really began. Our landscape images today must compete with the hundreds of thousands of images our viewers have already seen. My first Arches photographs would have stunned a European monk in the Middle Ages, who had never even seen a photograph, much less a photograph of Delicate Arch. They certainly wouldn’t have interested a modern photo editor.

FIGURE 5-2 Capitol Peak from the Ditch Trail at sunset in autumn, Maroon Bells-Snowmass Wilderness, Colorado. Rayleigh scattering caused the blue light from the setting sun to scatter out of the beam, leaving the reddish light to come straight through the atmosphere and paint the clouds and peak orange. Canon EOS 1Ds Mark III, Canon Compact-Macro EF 50mm f/2.5, 0.6 seconds, f/11, ISO 100.
One way to make your images fresh and exciting is to seek out different views of old subjects, or to find new subjects altogether, as described in the previous two chapters. Another way is to seek out unique light, which can reveal a familiar subject in a new way or make an unfamiliar subject into something extraordinary.
Lighting Fundamentals
The basics of photographic lighting may already be familiar to you. Front-lighting, with the light coming from behind you as you look at the scene, tends to make the subject look flat. The part of our visual system that sees depth and identifies where objects are located in space is actually color-blind. It works on luminance values; in other words, it’s a black-and-white system, which is why images need shadows to reveal shape and texture. Frontlighting generally only works if the color of the light itself is unusual.
Sidelighting, with the light coming from the side of the subject, reveals the contours of the land with the interplay of light and shadow. Images shot in sidelight usually create a strong illusion of form and volume, which can make for powerful photographs. Sidelight is most effective when the sun is low in the sky because the shadows are long. When the sun is high in the sky, the shadows shorten, and the effect is much like frontlight.
Backlight, with the light coming from behind the subject, can add tremendous drama by rimlighting your subject or by creating a stained-glass effect as the light shines through flower petals or colorful autumn leaves. Backlight can also create a range in light intensities from deepest shadows to brightest highlights that exceeds the range your sensor can capture, making it one of the most difficult lighting situations to handle successfully. I’ll describe how to meet this challenge in chapters 7 and 8.
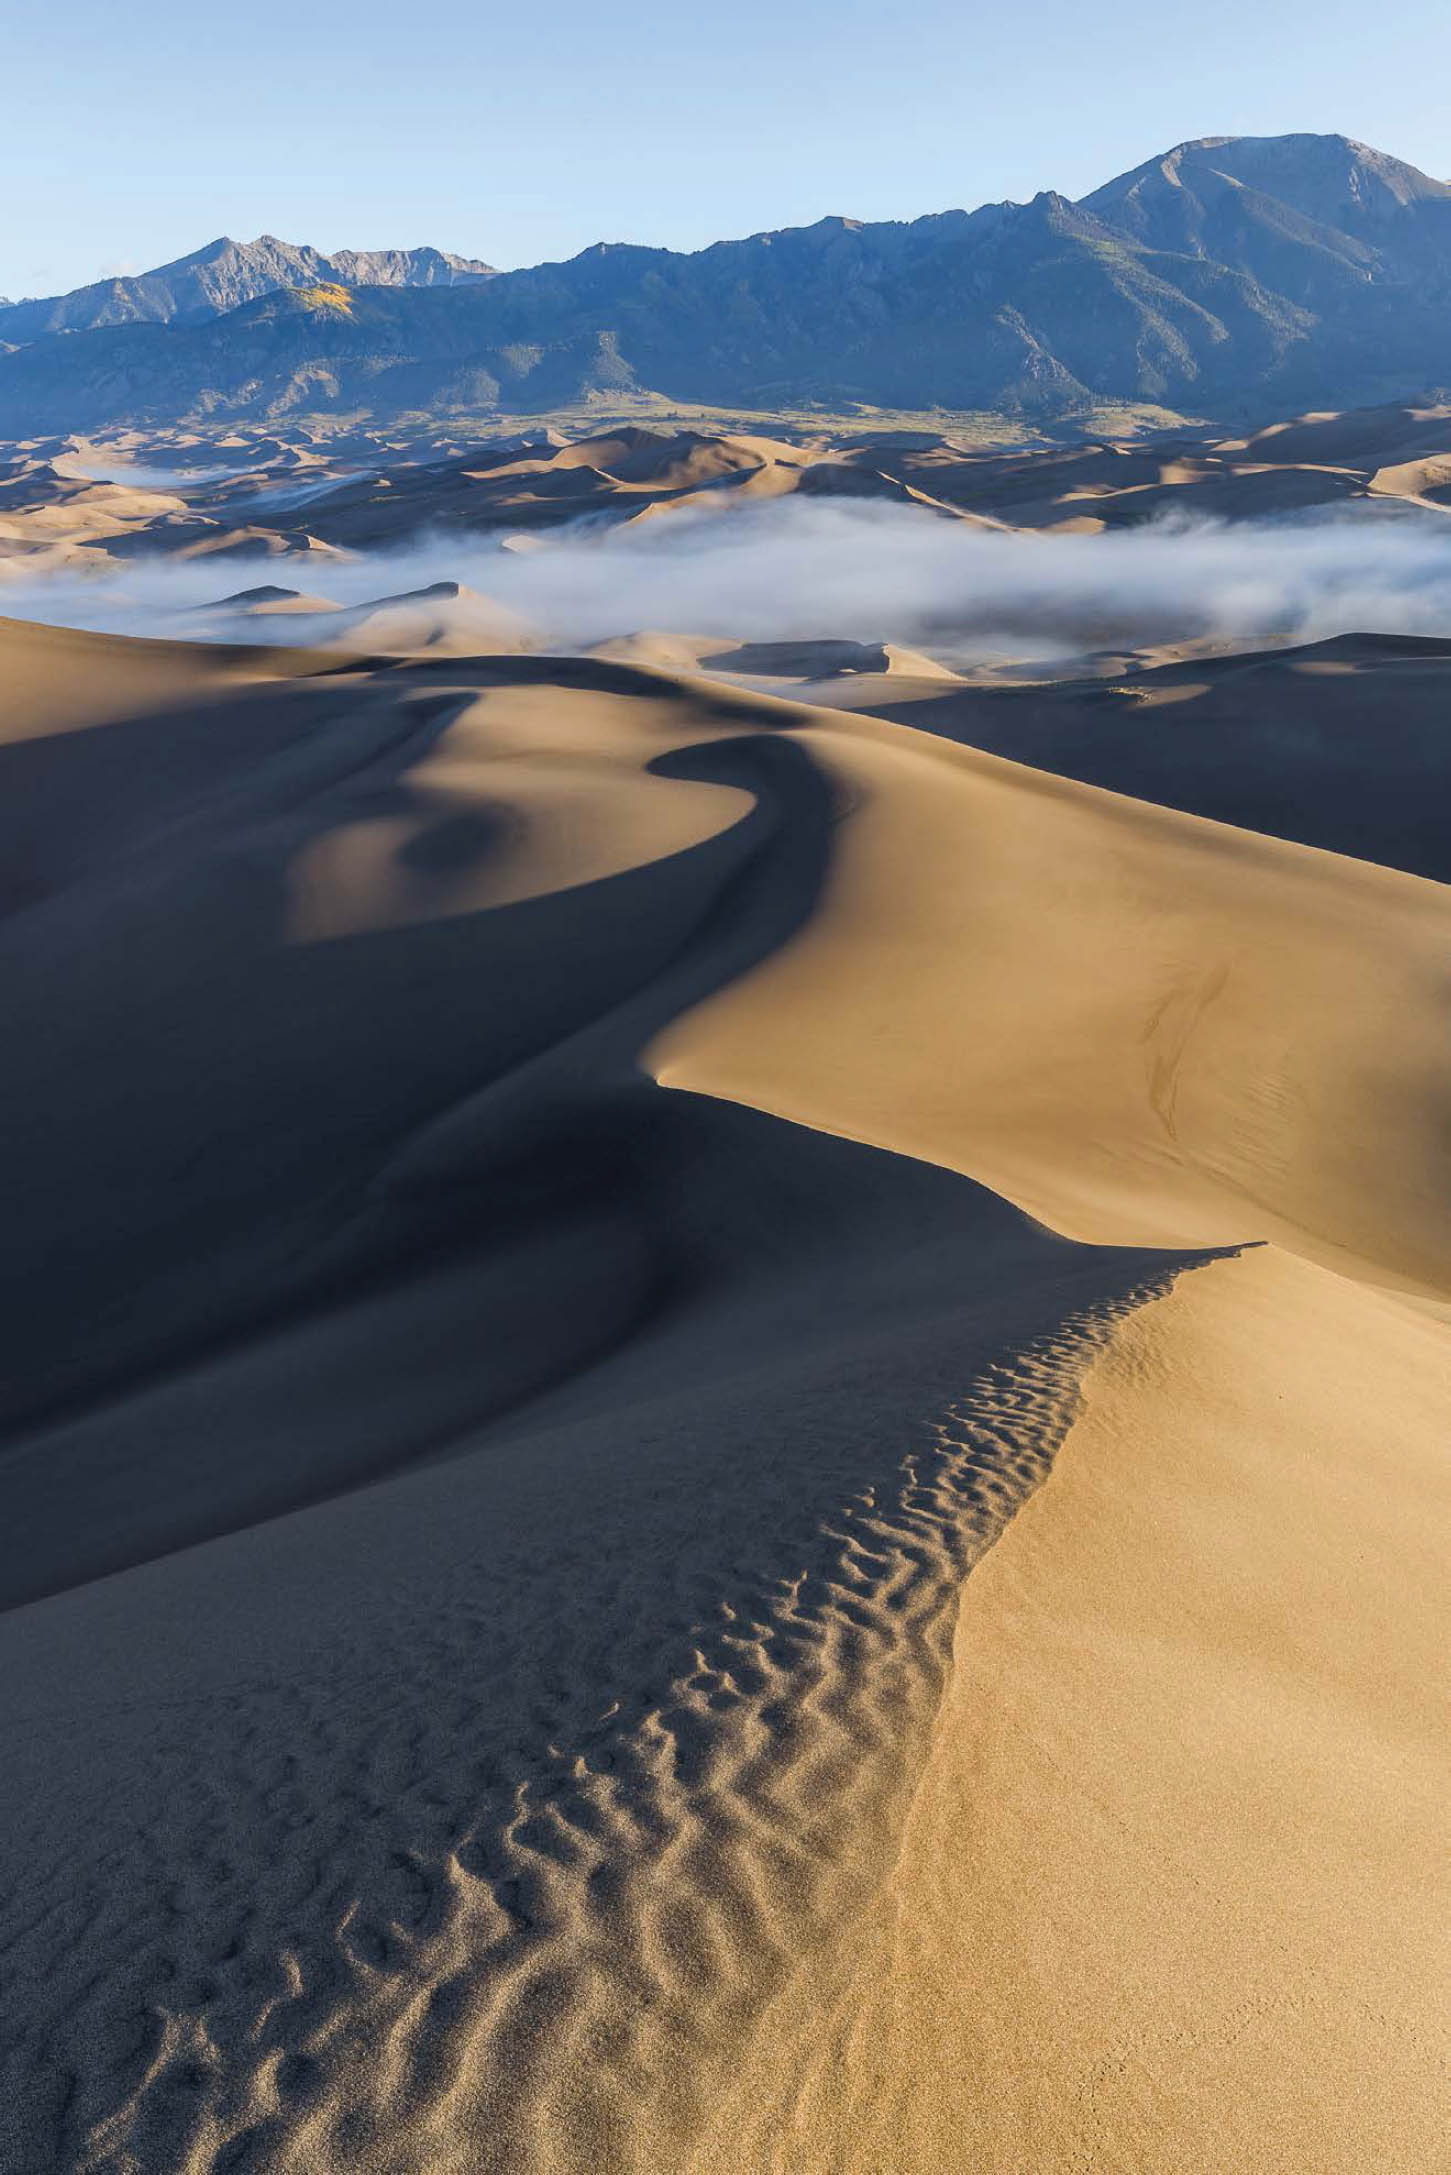
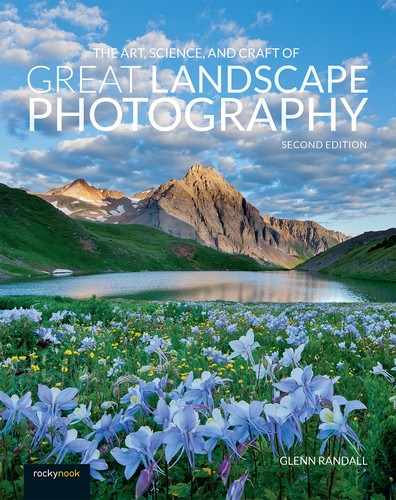
FIGURE 5-3 Sunrise from the summit of High Dune, Great Sand Dunes National Park, Colorado. Strong sidelighting reveals every ripple and strongly defines each dune crest. Canon EOS 5D Mark III, Canon EF 16-35mm f/2.8L III USM at 34mm, 1/20th, f/16, ISO 100, focus-stacked.
The size of the light source also greatly affects your photograph’s appearance. On a clear day the sun is a point source that casts strong, dark, hard-edged shadows. Such light works well for distant landscapes if the sun is fairly low in the sky and at 90 degrees to the subject. On a cloudy day your light source is the clouds themselves, which are lit from above by the sun. The light source is broad, so the lighting is even, with little difference between the soft-edged shadows and highlights. On an overcast day with thick clouds, the light is bluish in tone, which gives a photograph an overall cool, blue appearance. If the clouds are thin, however, the light is not only even, but white. Such lighting is effective for close-ups of flowers and the like, since there are no harsh, distracting shadows, but it is neutral at best for broad landscapes, since it adds no interesting light to your subject. Grand landscapes can work in soft light if the foreground is very strong and colorful, the background features are rendered small in the frame, and the sky, which tends to record as blank white, is kept to an absolute minimum. I much prefer, however, to try to find grand landscapes where the background can get interesting light in its own right.

FIGURE 5-4 Kings crown and purple fringe high on the flanks of Mt. Shavano, San Isabel National Forest, Colorado. The soft light created by cloudy skies was ideal for this close-up of wildflowers. Canon EOS 5D Mark III, Canon Compact-Macro EF 50mm f/2.5, 1/50th, f/16, ISO 1600.
Blue Skies and Red Sunsets
Recognizing the direction and size of the light source is the first step, but there’s far more to understanding natural light than that. How can it be, for example, that there’s nothing blue in a blue sky, nor is there anything white in a white cloud? Why is it that the sky near the horizon opposite the sun can turn pink just before sunrise or after sunset, but only on exceptionally clear days when you are at the same elevation as your horizon? Why do rainbows never appear in level country if the shadow of your head is less than 6 feet away from your boots? The answers to these questions will tell you a lot about atmospheric optics, and understanding atmospheric optics will help you in your search for beautiful light.
If the earth had no atmosphere, there would be no colorful sunrises or sunsets. The sky would be black both day and night. Everyday objects would still be visible when the sun was above the horizon, but shadows would be lit only by sunlight bouncing off nearby surfaces. When the sun set, complete darkness would occur almost instantly. There would be no twilight. Light in a vacuum travels in a straight line, so without the atmosphere to deflect sunlight from its straight-line path, no light could reach any objects once the sun dipped below the horizon because the earth would block the direct rays of the sun.

FIGURE 5-5 Sumac in fall colors and the Flatirons at sunrise, Boulder Mountain Parks, Colorado. Sunrise light ignited these lenticular clouds, which in turn bounced warm light down onto the sumac in the foreground. Zone VI 4×5 field camera, Fujichrome film. Lens and exposure unrecorded.
Fortunately for the landscape photographer (and for every living thing), the earth does have an atmosphere full of molecules of nitrogen, oxygen, and water (in vapor form), as well as dust and water droplets of all sizes. Let’s divide these particles into three categories: those much smaller than the wavelength of visible light, such as molecules of nitrogen and oxygen; those that are roughly equal in size to the wavelength of light, such as some smoke particles; and those that are much larger, such as dust particles. Light’s behavior when it strikes a particle depends on whether that particle is smaller or larger than the light’s wavelength.
Before entering the earth’s atmosphere, sunlight is composed of all the wavelengths of visible light. Different wavelengths correspond to different colors. We perceive the longest wavelengths of visible light, around 700 nanometers, as red; the shortest wavelengths, around 400 nanometers, we see as blue or violet. Mix together blue light, red light, and all the colors in between, and we see the mixture as white light.
As light travels through the atmosphere, it collides with various particles. If the particle is much smaller than the wavelength of light, such as a molecule of nitrogen or oxygen, the light is scattered in all directions: forward, backward, and, to a lesser extent, at right angles to the original direction of travel. In this type of scattering, called Rayleigh scattering, blue light is scattered much more effectively than red light. Some of the red light, in fact, passes straight through the atmosphere without being deflected from its original path. Particles about the size of the wavelength of light also scatter blue light more effectively than red light, but the effect is much less pronounced than it is for air molecules. Particles much larger than the wavelength of light, such as dust and water droplets, scatter all wavelengths equally, primarily in the forward direction, with most of the scattered light continuing in roughly the original direction of travel.
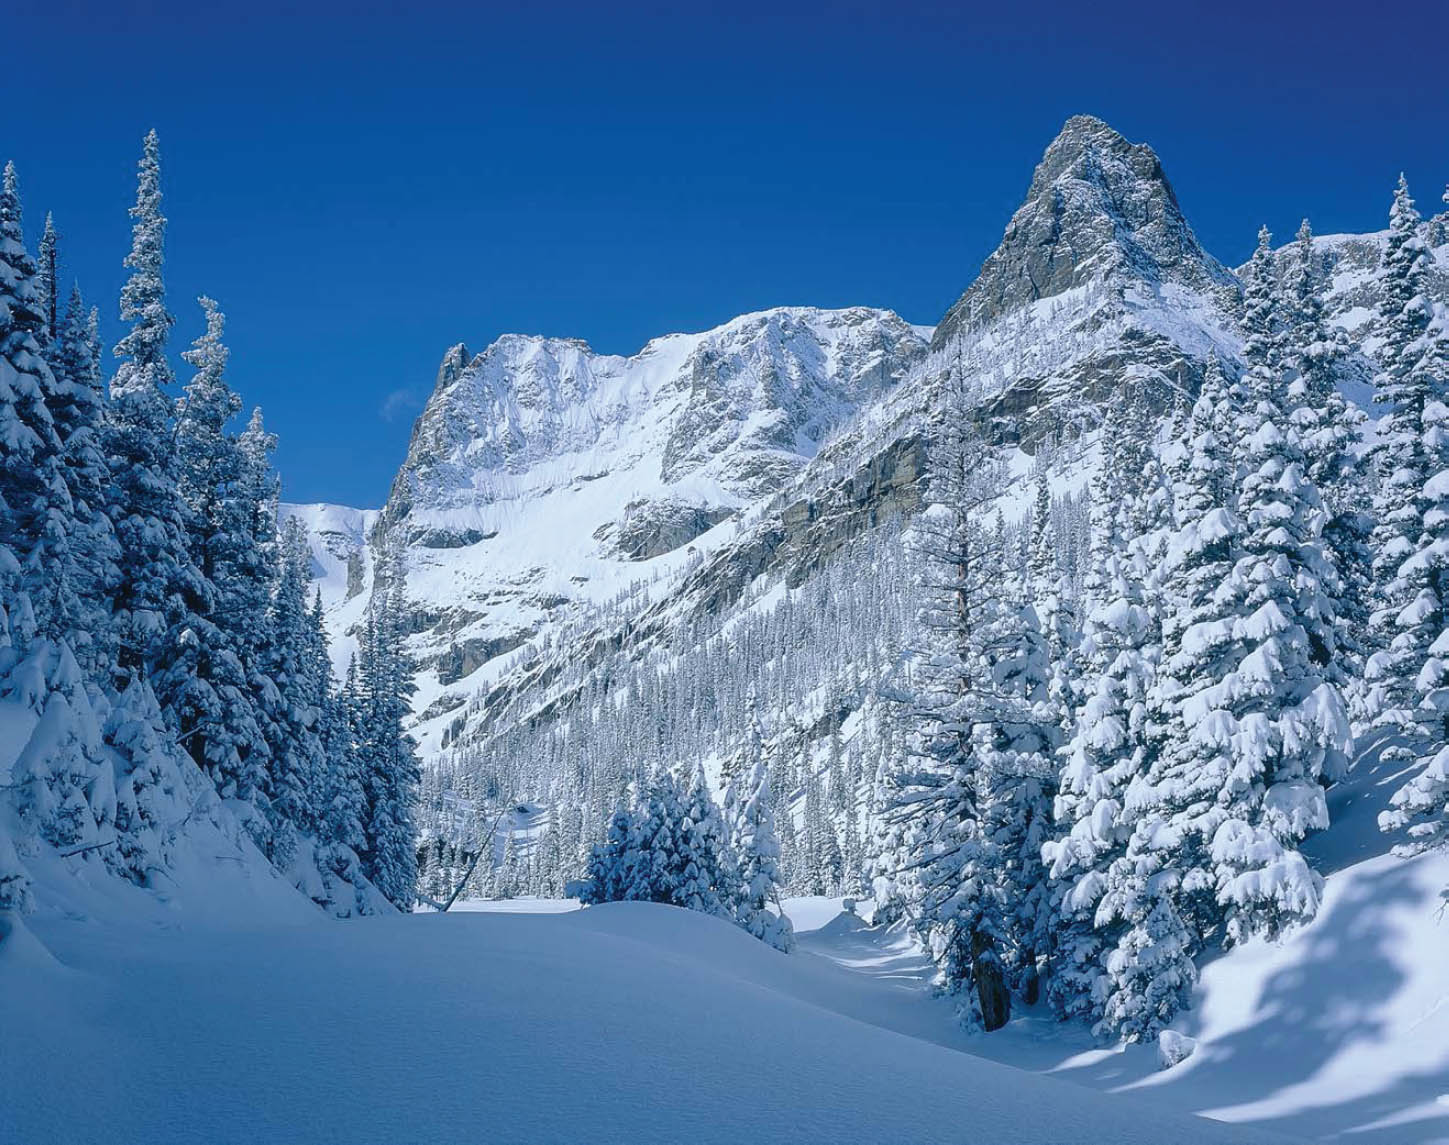
FIGURE 5-6 Notchtop Mountain under fresh snow, Rocky Mountain National Park, Colorado. Snowflakes, as well as raindrops, form around condensation nuclei—dust particles. When it snows or rains, it literally washes the air clean, which is one reason the sky can be such a rich blue right after a storm. Ebony SW-45 field camera, Fujichrome film. Lens and exposure unrecorded.

FIGURE 5-7 Twilight wedge over the Yampa Valley just before sunrise from the west side of Buffalo Pass, near Steamboat Springs, Colorado. Although a band of pink light fills most of the sky visible in this image, the huge region of sky not included in the image was entirely blue, which meant that the light illuminating this autumn scene was blue, producing beautiful but pastel colors. The aspen and sumac would have looked much more saturated in direct sunlight. Zone VI 4×5 field camera, Fujichrome film. Lens and exposure unrecorded.
When you see a blue sky, you’re actually seeing the blue component of the white sunlight that’s been deflected from its original path by small particles in the atmosphere and has traveled down to your eye. There’s actually nothing blue in the sky in the sense that a blue sweater is blue. We see a blue sweater as blue because the sweater absorbs all the other colors of light and reflects the blue light to our eyes. The blue sky doesn’t absorb the other colors; it simply doesn’t scatter them down to our eyes as effectively.
You may have noticed that when you take pictures of yellow flowers or autumn leaves in the shade on a clear day, the vibrant colors your eye perceived look dull and perhaps even have a greenish tint in the photograph. This is due to the color of the light illuminating the shade. The light doesn’t come directly from the sun; your subject is in the shadows. Nor does it reflect off nearby objects, as many of my students guess. Instead, it comes from the sky, which is blue on a clear day. Rayleigh scattering causes the shadows on sunny days to be cooler in tone than areas illuminated directly by the sun; the light reaching the shadows comes primarily from the blue sky and has a pronounced blue tint. Put blue light on a yellow subject and you get a dull greenish-yellow hue.
Shadows on snow on a sunny day are particularly bluish in tone because the white snow adds no color of its own. Rayleigh scattering is also responsible for the blue tint you see as you look at distant mountains. The Blue Ridge Mountains, which are part of the Appalachians, were named for this effect. Viewed close-up, these mountains appear in their normal, midday colors. When viewed from far away, however, the light reaching your eye contains a mixture of light rays bouncing off the peaks and blue rays scattered toward you by the air between you and the mountains. The tendency of distant objects to look increasingly blue the farther away they are is called aerial perspective. Aerial perspective is one of the ways we judge distance.
Now you know why the sky on a clear day is blue. So why are sunsets red? And why don’t we see red clouds at noon?
The amount of Rayleigh scattering that occurs is dependent on the distance the light travels through the atmosphere. For the sake of argument, I’ll use the troposphere, the dense layer next to the earth, as a proxy for the atmosphere as a whole, since most scattering effects occur there.
At noon, the distance the light must travel through the troposphere is relatively short, roughly seven miles on average in the mid-latitudes, varying with the season (figure 5-8). Enough blue light scatters out of the beam to make the sky blue, but the remaining light is still a mixture of wavelengths that we perceive as white. At sunrise and sunset, however, sunlight takes a much longer path through the atmosphere because the light is traveling obliquely along a tangent to the earth’s surface rather than along a path nearly perpendicular to the earth’s surface. For example, if you are photographing an old barn on the flat plains of eastern Colorado at sunrise, the path length through the troposphere is roughly 235 miles—34 times longer than at noon. At sunrise or sunset on a clear day, most of the blue light scatters out of the beam. The reddish light passes straight through the atmosphere, providing warm light on your subject. Snow and light-colored rock show the true color of the light much more clearly than dark objects because they add little or no color of their own.
Rayleigh scattering causes the brilliant red alpenglow sometimes seen on high peaks. The effect is particularly strong when tall mountains rise abruptly above the plains because the sun’s rays take an exceptionally long path through the troposphere, first grazing the lowlands many miles from the peaks themselves, then slanting back up through the atmosphere to caress the highest summits with fiery light. Let’s say you’re photographing wind-sculpted snow on the summit of 14,259-foot Longs Peak, which rises abruptly above the plains 9,000 feet below. The path the light travels through the atmosphere will be even longer than it is for the eastern Colorado barn because sunlight has to enter the troposphere, skim the earth’s surface somewhere near that barn, then continue through the atmosphere to the summit of Longs Peak—a total of roughly 380 miles, half again as long as the path to the barn alone. The exact numbers are not important, but the principle is: tall mountains that tower over nearby plains can get amazing light, as you can see in my image Winter Sunrise on Longs Peak (figure 5-9).
The same principles also explain why the sky near the zenith (the point directly above you) is usually darker at sunrise and sunset than the sky at the horizon, which is often distressingly bright. The sky at the zenith is darker because Rayleigh scattering causes most of the scattered light to continue in its original direction of travel or be scattered straight backwards; only a relatively small amount of scattered light travels at a 90-degree angle to its original direction of travel. The sky at the zenith is also dark because you’re looking through the thinnest possible layer of atmosphere at the blackness of space. Fewer molecules between you and the top of the atmosphere mean less light is scattered to your eyes overall, so you perceive the sky directly above you as darker than the sky viewed in any other direction.

FIGURE 5-8 Rayleigh scattering explains why the sky on a clear day is blue and why sunrise and sunset light is sometimes red. The amount of scattering that occurs is dependent on the length of the path sunlight takes through the atmosphere.
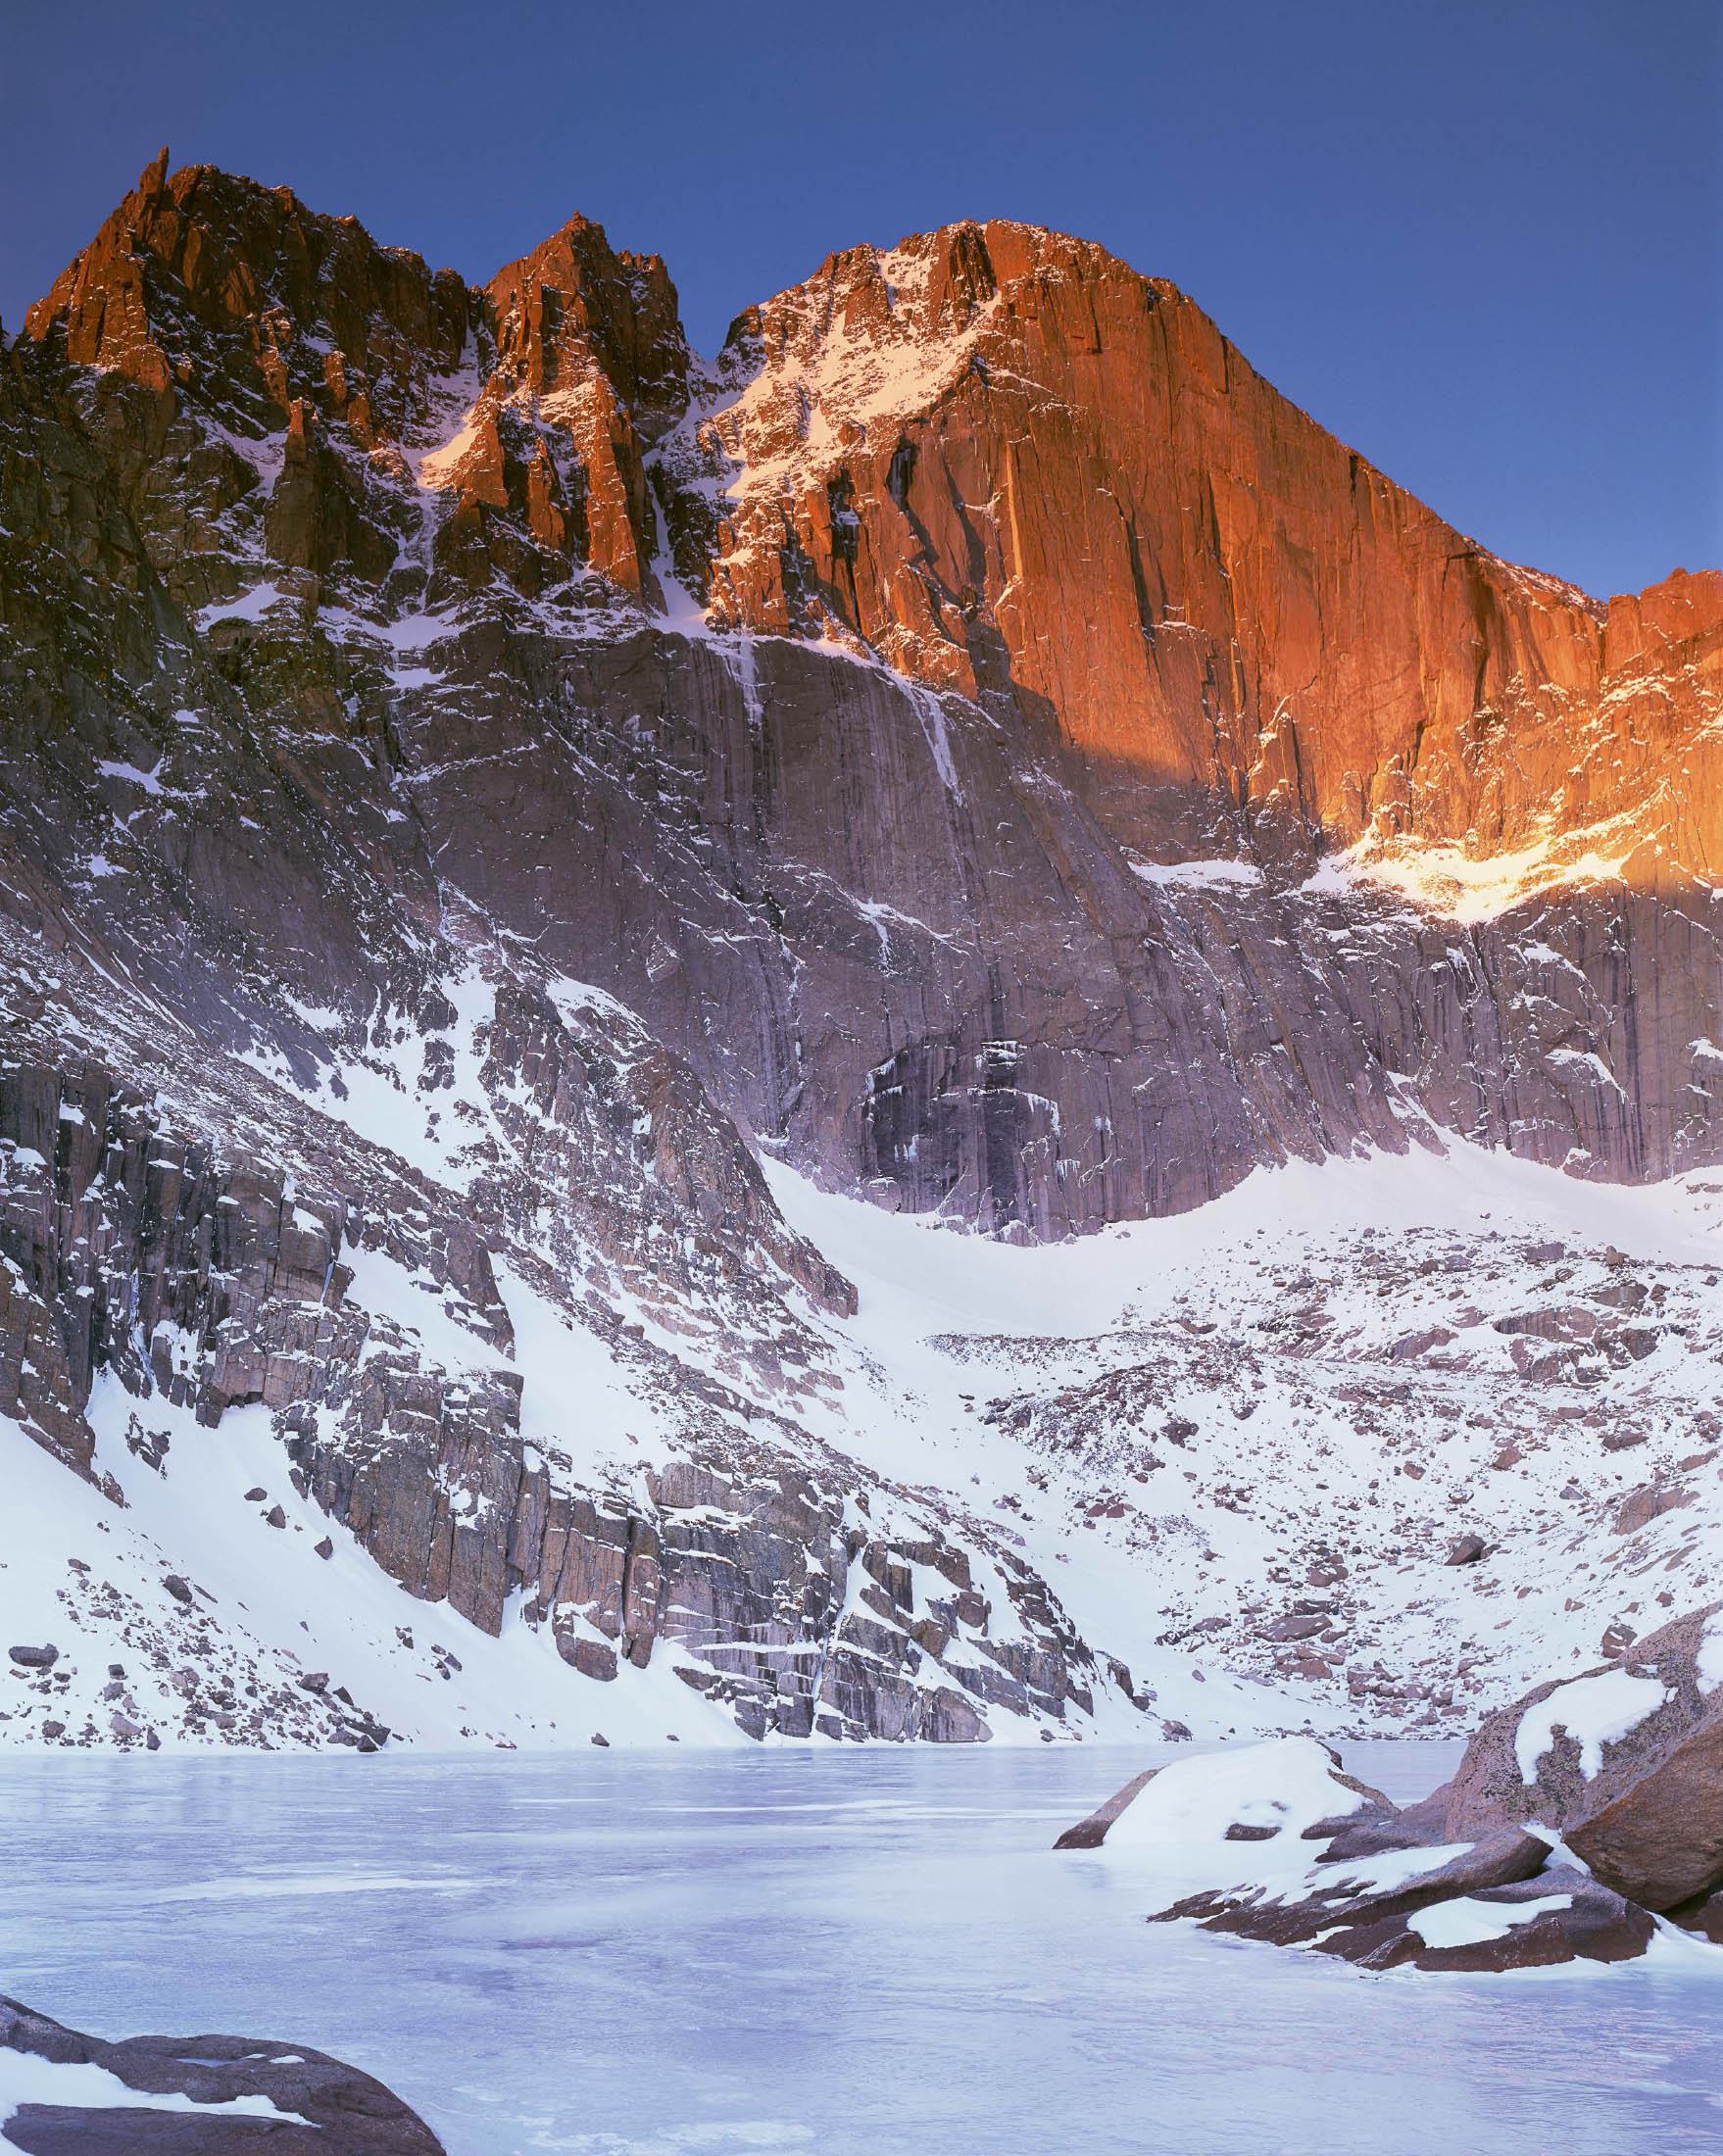
FIGURE 5-9 Winter Sunrise on Longs Peak from Chasm Lake, Rocky Mountain National Park, Colorado. Longs Peak towers 9,000 feet above the plains of eastern Colorado. The exceptionally long path sunlight took as it traveled through the atmosphere to reach Longs Peak at sunrise caused all the blue light to scatter out of the beam. The remaining red light traveled straight ahead to strike the peak. The sky was exceptionally blue because I was looking up steeply. Zone VI 4×5 field camera, Fujichrome film. Lens and exposure unrecorded.
That explains why the sky near the horizon is bright compared to the sky straight above, but why is it often whiter in tone? The color we see as we look at the horizon is a mixture of blue light scattered to our eyes from nearby air and warm-toned light reaching our eyes from distant air. The length of the path the light follows from the most distant air near the horizon is so long that much of the blue light scatters out of the beam. The combined effect of the bluish light from nearby air and redder light from distant air registers as pale blue or white. This effect is stronger at sunrise and sunset than it is at midday. In fact, the sky near the horizon at sunrise and sunset can be so white and so bright that white clouds can actually appear darker by comparison—a reversal of the situation at midday, when white clouds are always brighter than the blue sky surrounding them.
By now you should know enough about atmospheric optics to understand why the sky is such a rich blue in Winter Sunrise on Longs Peak and so pale in Garden of Eden Overlook and the La Sal Mountains (figure 5-10), which I shot at sunset. In Winter Sunrise, I was looking up steeply at the darker sky well above the horizon, so the sky behind Longs Peak is dark blue. The blue sky contrasts vividly with the orange light on Longs Peak, and the photo jumps off the page. In Garden of Eden Overlook and the La Sal Mountains, I was looking up only slightly at the bright sky near the horizon, so the sky is much paler. White skies in a landscape photograph are very distracting. In my view, this photo is less punchy than Winter Sunrise because the bald sky draws your attention away from the dramatic towers and snowy peaks. Understanding how sky color varies with time of day and the sun’s angle above the horizon will help you scout locations to photograph because you will be better able to visualize the images each possible place can offer.
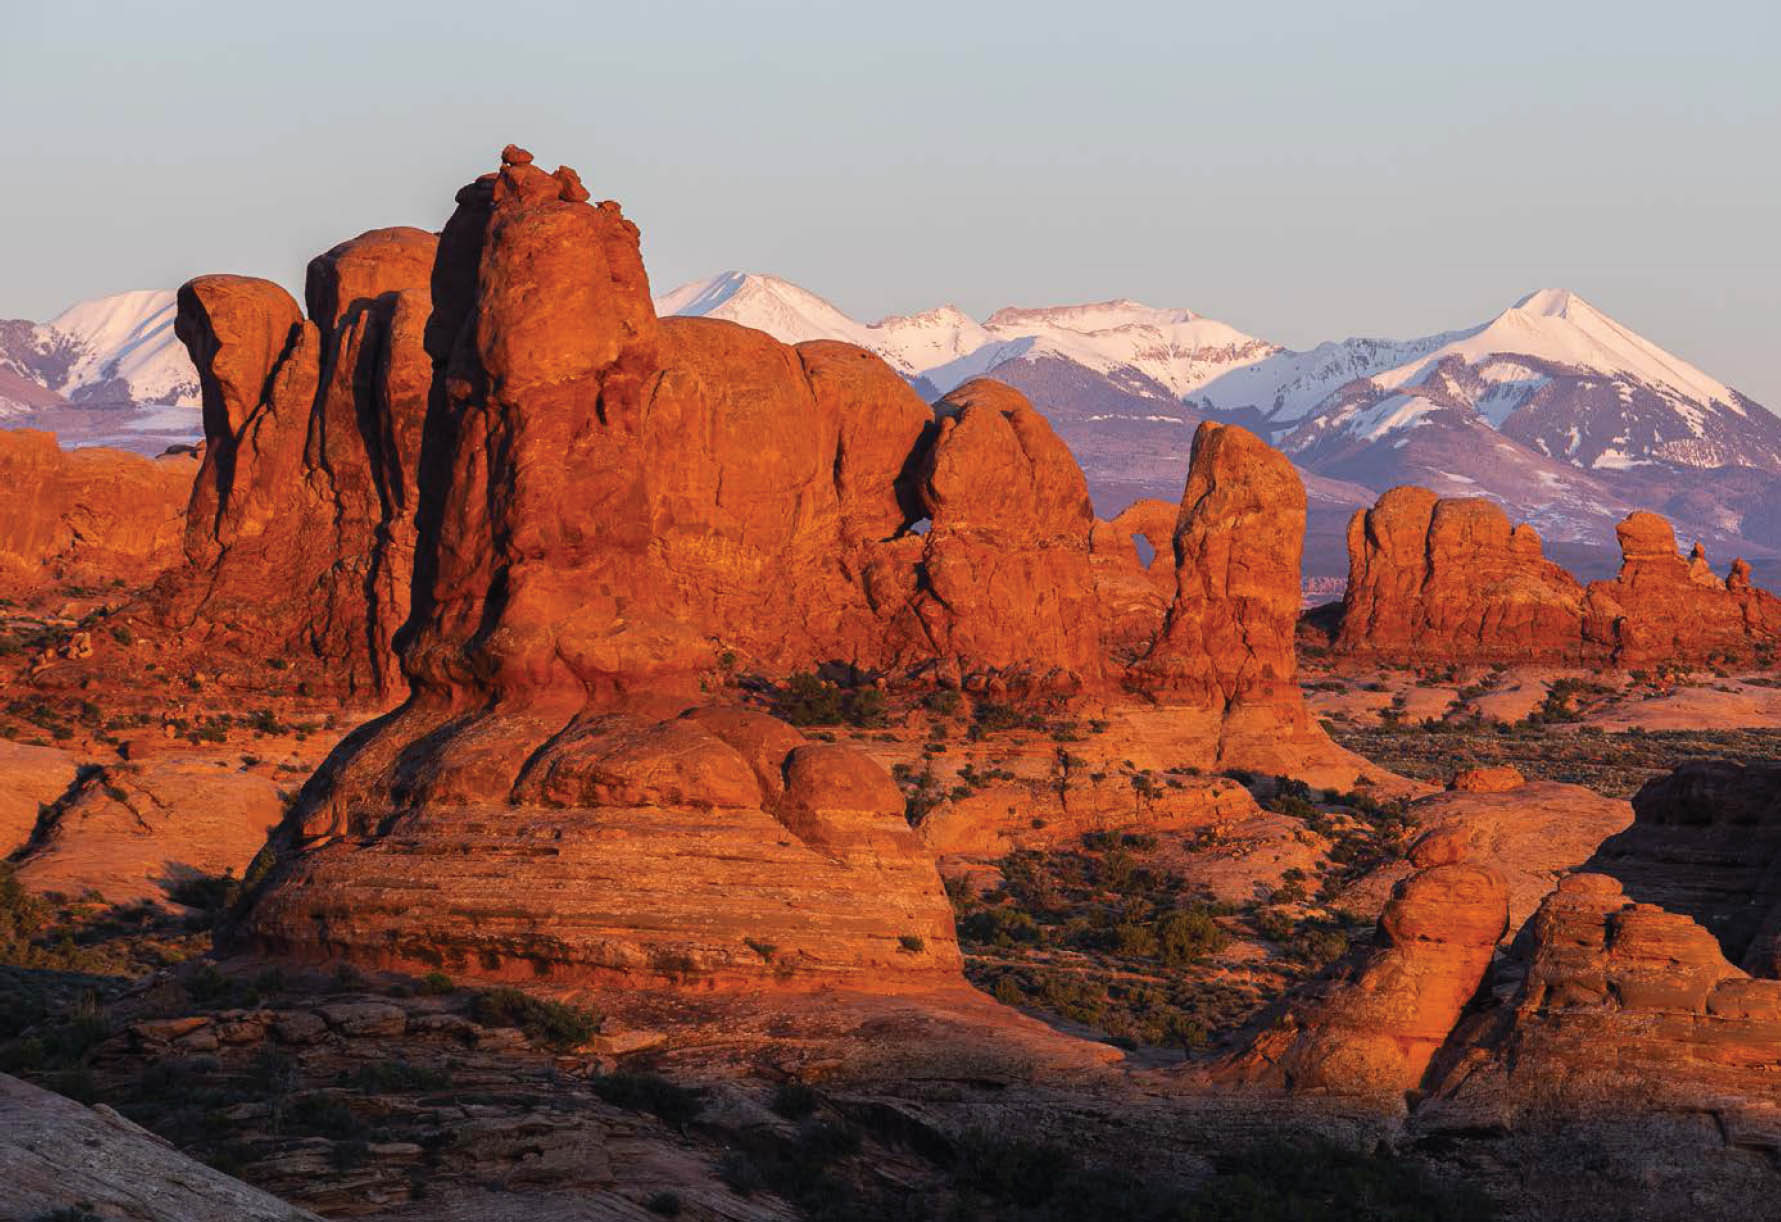
FIGURE 5-10 The La Sal Mountains and Windows area from the Garden of Eden Overlook at sunset, Arches National Park, Utah. The sky was pale because my line of sight was nearly horizontal. Canon EOS 5D Mark IV, Canon EF 70-200mm f/4L IS USM at 176mm, 1/10th, f/11, ISO 100.
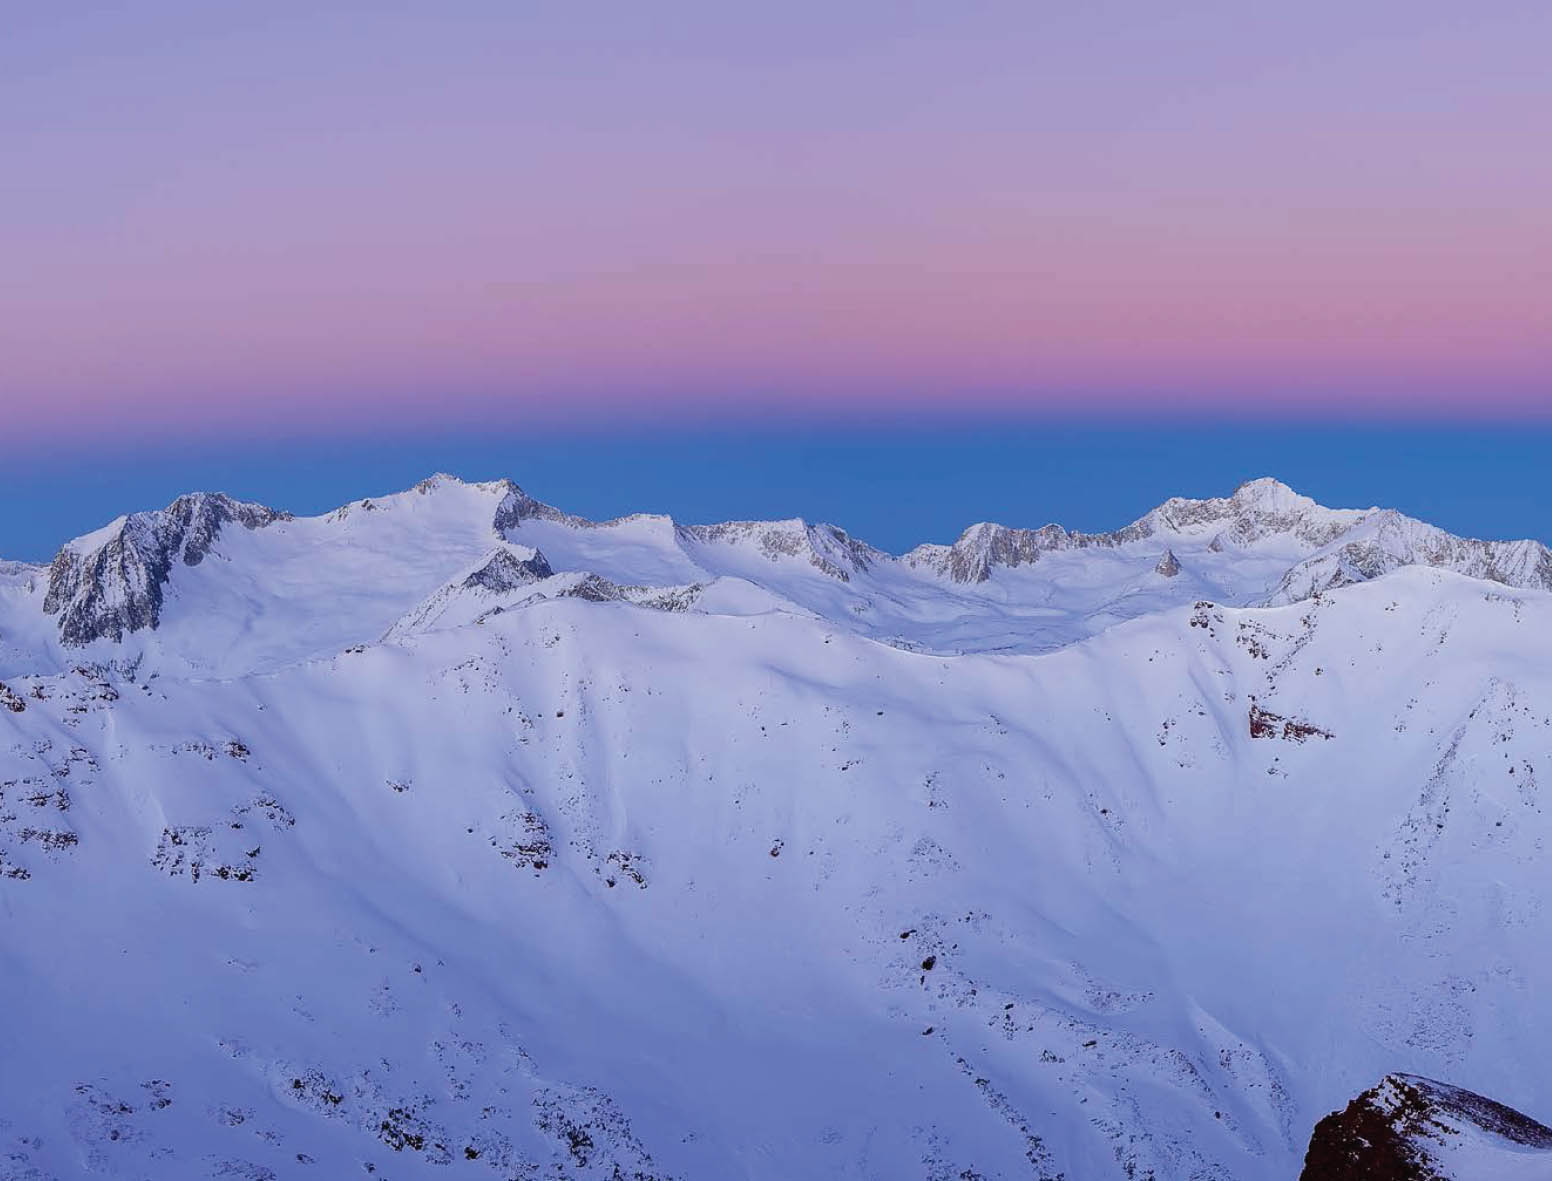
FIGURE 5-11 Twilight wedge over Snowmass Mountain and Capitol Peak from Peak 13,244, Maroon Bells-Snowmass Wilderness, Colorado. The dividing line between pink and blue air was sharp because I was at nearly the same elevation as the distant peaks. Canon EOS 5D Mark III, Canon EF 16-35mm f/2.8L II USM at 35mm, 1/4th, f/11, ISO 100.
The red light from the sun at sunrise and sunset can light up more than clouds and peaks. It can also light up the air itself, causing the phenomenon known as the twilight wedge (figure 5-11). It begins a few minutes before sunrise when a band of pink light appears just above the horizon directly opposite the rising sun. The band of blue sky between the pink band and the horizon is actually the earth’s shadow. As the sun rises, the band of pink light sinks toward the opposite horizon. The boundary between pink and blue sharpens and the pink color intensifies as it descends toward the earth. The pink light is usually at its strongest and most photogenic just before the last blue vanishes. A minute or two later, the sun strikes the tops of the highest peaks and the sky at the horizon often becomes almost white. As the sun continues to rise, the light on the peaks fades from red to orange to yellow to white, and the sky at the horizon becomes pale blue. At sunset, the sequence plays out in reverse.
The twilight wedge is most photogenic on exceptionally clear mornings and evenings at high elevations. When you’re high in the mountains, your eyes are at nearly the same level as the plane that divides the shadowed blue air and pink sunlit air, so the boundary between the two seems sharp and the colors seem more pure. When viewed from the lowlands, however, particularly when the pink band is significantly above the horizon, your line of sight leads through the blue shadowed air first, then into the pink air. The boundary between the two colors seems blurred, and the pink tone is diluted.

FIGURE 5-12 The twilight wedge is most vivid at high elevations.
White Clouds and White Haze
Now let’s turn our attention to large-particle scattering. As I mentioned earlier, particles much larger than the wavelength of light scatter all wavelengths equally. The small water droplets that make up clouds are examples of these larger particles. That’s why we see sunlit clouds at midday as white. There’s nothing white in a white cloud; if you could examine a bit of cloud with a microscope, you would see only innumerable tiny, transparent water droplets.
Larger particles are also responsible for the white haze that can obscure the view of distant subjects (figure 5-13). We see haze most clearly when looking in the direction of the sun, since large particles mostly scatter light forward in approximately the ray’s original direction of travel. Photographing distant subjects when they’re backlit on a hazy day is often futile. The visible side of a backlit subject is always in shadow. By definition, shadows are low contrast because there’s little or no variation in the intensity of the light illuminating the shadowed region. If the atmosphere is hazy, contrast is reduced still further. Dark regions appear lighter than they should because some of the light coming from those areas is actually white light scattered by the haze between you and the subject. In severe cases, only the strongest possible contrasts (white snow against black rock, for instance) can still be seen. Ordinary subjects may appear completely monotone and devoid of detail. To make matters worse, the sky in the direction of the sun on a hazy day is glaringly bright, which means the sky is nearly certain to be rendered as blank white in your image.
The darkness of a blue sky is a good barometer of the cleanliness of the atmosphere and the probability of warm light at sunrise or sunset. On exceptionally clear days Rayleigh scattering is dominant, and the sky is a rich, deep blue. A light blue sky means larger particles are scattering white light to your eye, and the deep blue tint is diluted. The presence of larger particles also means the warm colors of sunset will be diluted by blue light scattering forward (rather than out of the beam), then bouncing back to your eye from your subject.

FIGURE 5-13 Ridges recede into the haze as seen from the summit of 14,267-foot Torreys Peak, near Georgetown, Colorado. Canon EOS 5D Mark III, Canon EF 70-200mm f/4L IS USM at 97mm, 1/160th, f/11, ISO 100.
Color is not the only clue to the cleanliness of the atmosphere. Here’s another rough-and-ready test: close one eye, then position your thumb over the sun with your arm outstretched so your thumb blocks direct light from the sun. (Never look directly at the sun! You can damage your eyesight.) On an exceptionally clear day, the sky adjacent to the sun will be almost the same shade of blue as the sky a hand-span farther away. On a slightly hazy day, the sky adjacent to the sun will be much whiter (and brighter) than the sky a hand-span farther away. On a really hazy day, the sky adjacent to the sun will be so blindingly bright you can’t look at it.
If thick haze is shutting down your search for the grand landscape, do a rain dance. Water droplets often form around dust particles, which serve as condensation nuclei. A hard rain temporarily washes the air clean of these dust particles, which is why the air seems so clear after a shower. That’s one reason why bad weather can be good weather for a landscape photographer. The combination of a clearing storm and clean air can produce dramatic clouds ignited by richly colored light at sunrise or sunset.
Scattering from larger particles isn’t all bad. It’s responsible for crepuscular rays, more often known as god beams (figure 5-14). In the language of folklore, these columns of light in the sky are described as “the sun drawing water.” We see crepuscular rays most commonly when light passes through a window into a dusty, darkened building. The beam of light is only visible because the dusty air scatters some of the light out of the beam and toward our eyes. Clear holes in dense clouds can also serve as “windows” producing the same effect. Sunlight passing through notches in serrated peaks when the sun is low can also create god beams. These beams appear to converge at the sun, which seems odd at first because the sun is so far from the earth that its rays are essentially parallel to each other. Crepuscular rays appear to converge for the same reason that parallel railroad tracks seem to converge at the horizon when we stand between the two rails. Anti-crepuscular rays (anti-god beams? atheist beams?) are really just the continuation of crepuscular rays across the sky. They seem to converge at the anti-solar point, the point directly opposite the sun.
Rainbows
The anti-solar point plays a prominent role in an even more spectacular optical phenomenon: the rainbow. When I first began photographing seriously, I knew only that rainbows appeared when direct sunlight struck falling raindrops. That left me guessing where a rainbow might appear, or if one was even possible. A little study soon taught me that rainbows are in fact quite predictable. To predict them yourself, you need to understand how rainbows form.
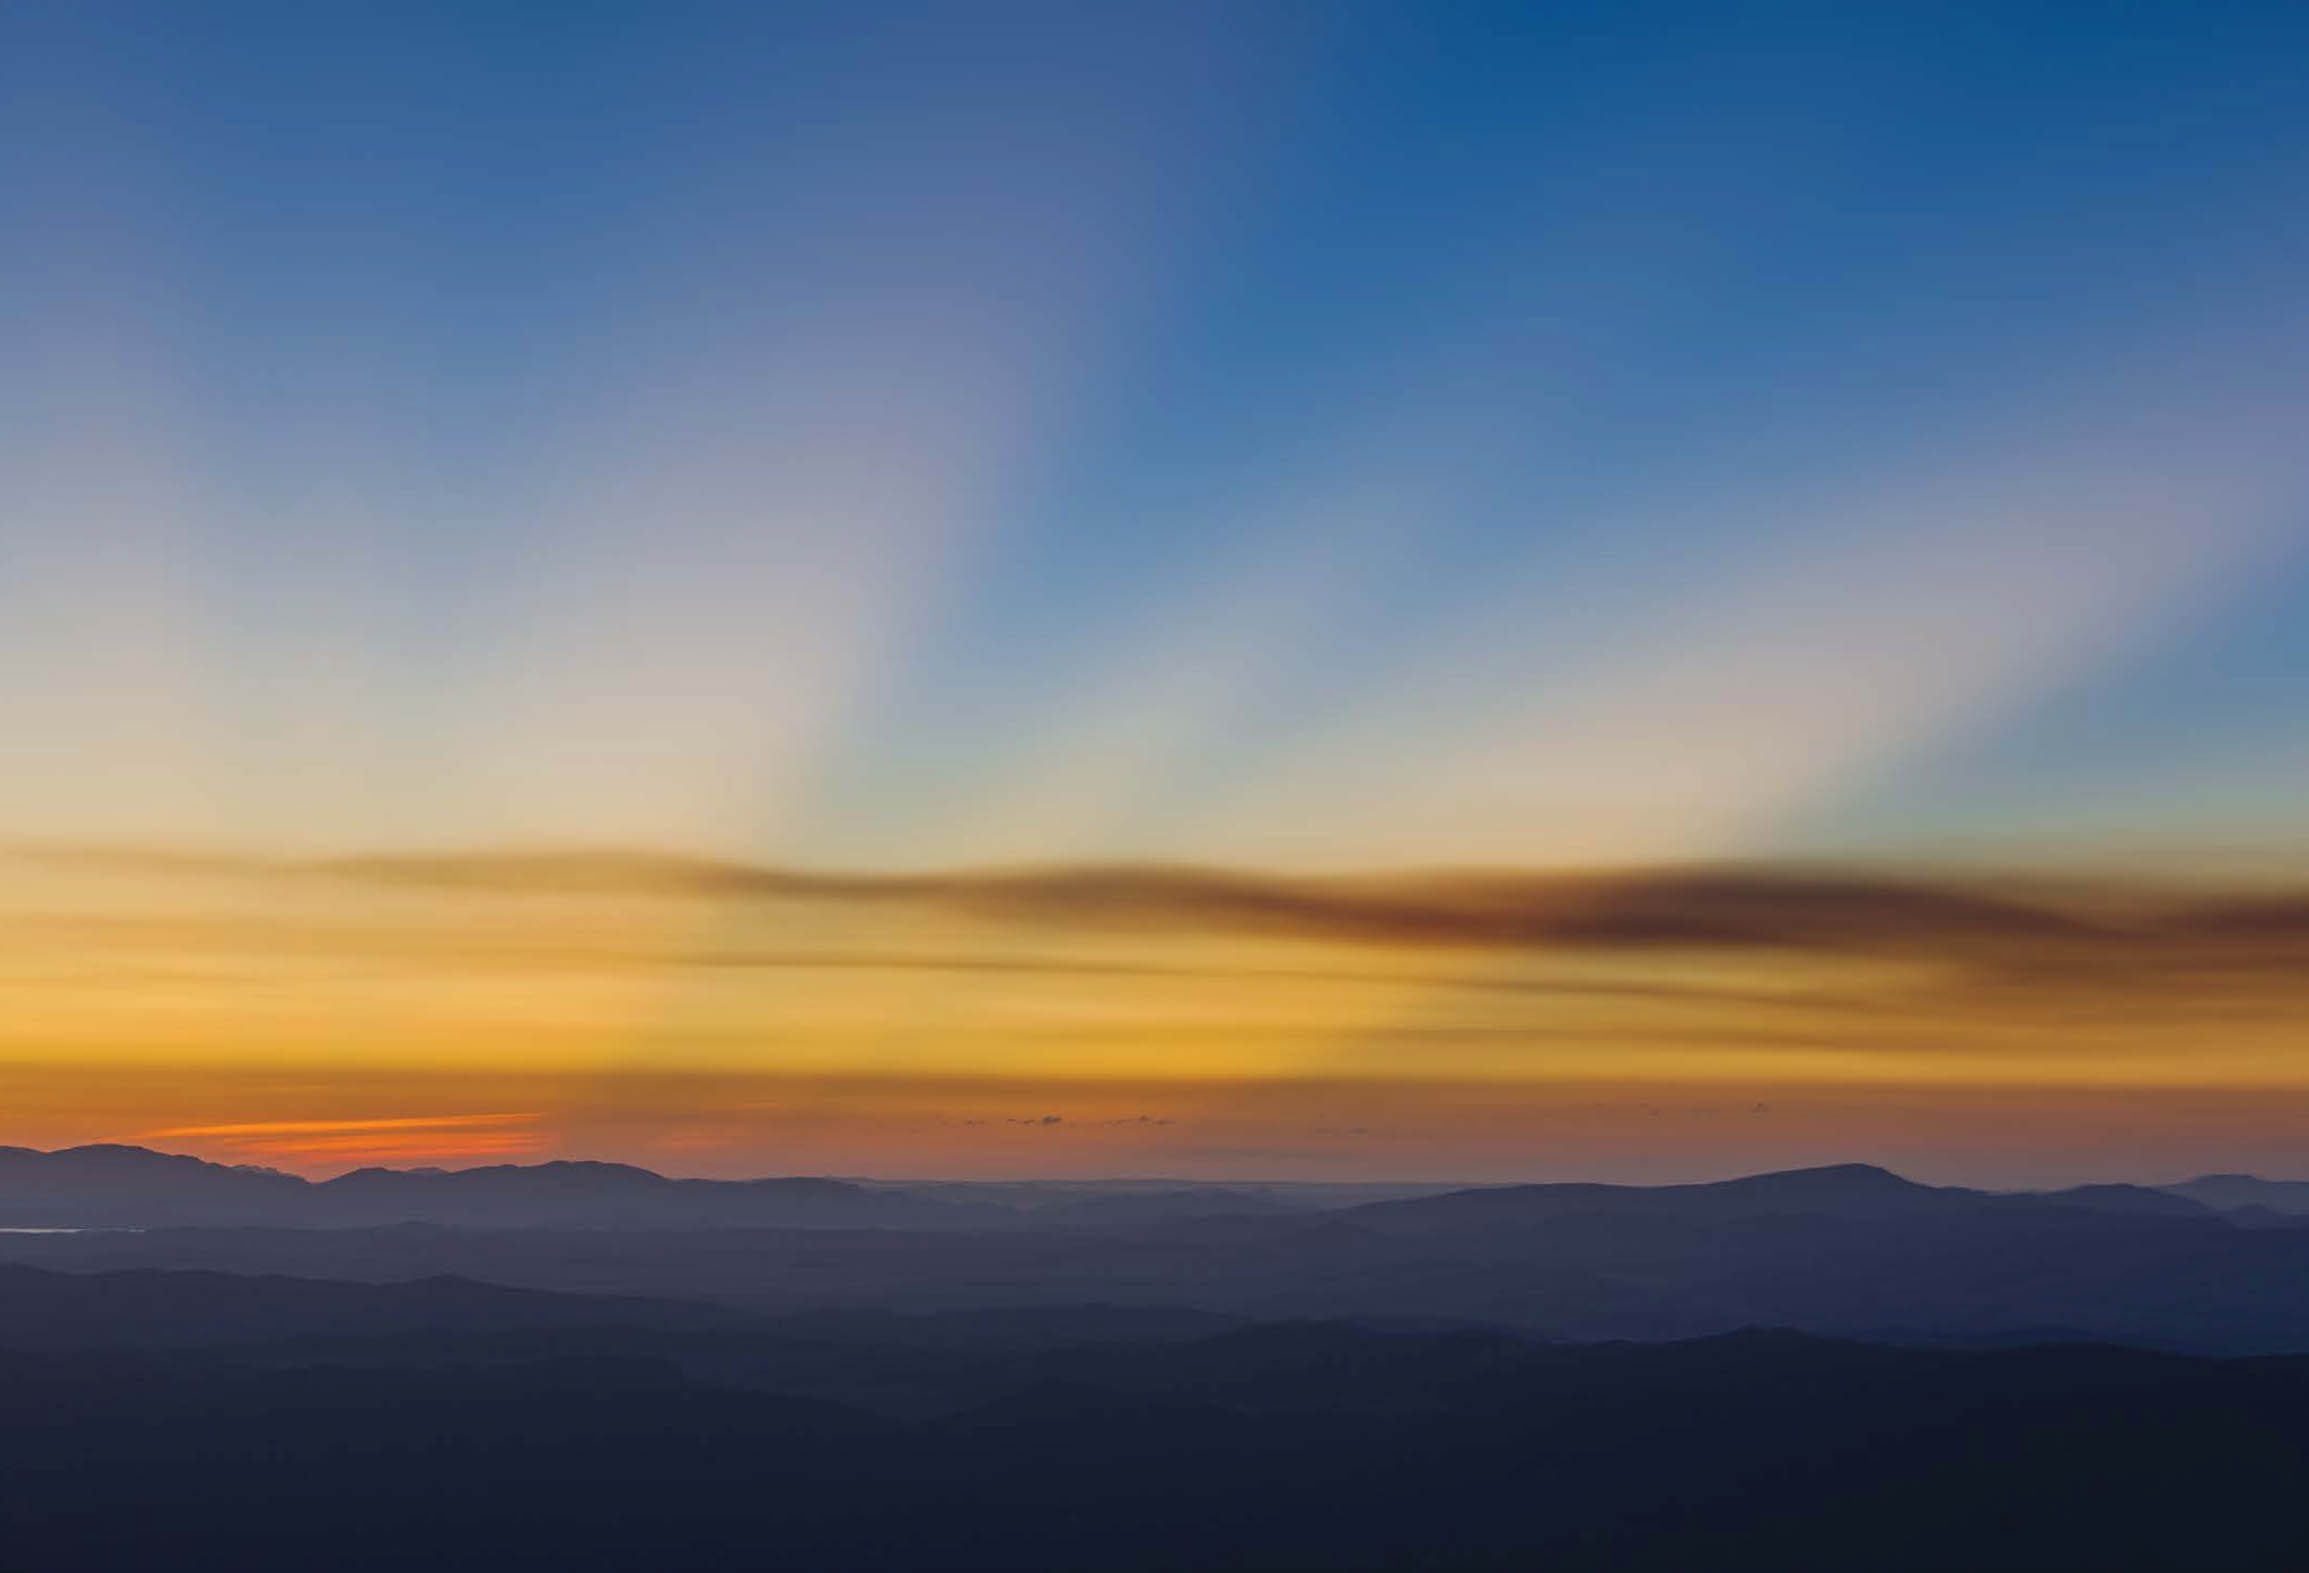
FIGURE 5-14 God beams (crepuscular rays) from the summit of Mt. Shavano at sunrise, San Isabel National Forest, Colorado. The warm rays occurred when sunrise light passed through holes in the clouds and illuminated the dusty air. The regions between the rays were blue because that air was in the shadow of a distant cloud. Canon EOS 5D Mark III, Canon EF 70-200mm f/4L IS USM at 97mm, 1 second, f/8, ISO 100.
A falling raindrop is essentially spherical. When a ray of sunlight enters a drop, it bends slightly as it passes from air to water (a process called refraction), then reflects off the inside surface of the drop, and is refracted again as it exits the drop. Rays can exit the drop at many angles, but the geometry of the sphere forces a large fraction of the rays to exit at nearly the same angle, around 42 degrees. This concentration of light reaching your eye from one direction forms the rainbow.
What then causes the beautiful colors? Each color of light corresponds to a different wavelength. The angle of refraction—the amount the ray bends as it enters and leaves the drop—varies depending on the wavelength. Red is bent the least; violet, at the other end of the visible spectrum, is bent the most. The result is that the arc of light reaching your eyes is separated into all the colors of the spectrum, just like what happens when sunlight is refracted through a prism.

FIGURE 5-15 Rainbow over Pawnee Buttes, Pawnee National Grassland, Colorado. Nikon F4, Nikon AF Zoom-Nikkor 80-200mm f/2.8D ED lens, Fujichrome film, polarizer. Focal length and exposure unrecorded.
The geometry of refraction and reflection dictate that a rainbow can only appear as a circle, centered on the anti-solar point, with an angular radius of 42 degrees. Let’s take that sentence apart and make sense of it one step at a time.
The rainbows we see most often are portions of a circle, with half or more of the arc cut off by the ground. If you saw a rainbow from an airplane, however, it could form a complete circle. That circle is centered on the anti-solar point, which is the point directly opposite the sun. Imagine a line that starts at the sun and passes through your head. That line leads to the anti-solar point. It’s easy to identify the position of the anti-solar point if the line intersects the ground: Its position is marked by the shadow of your head.
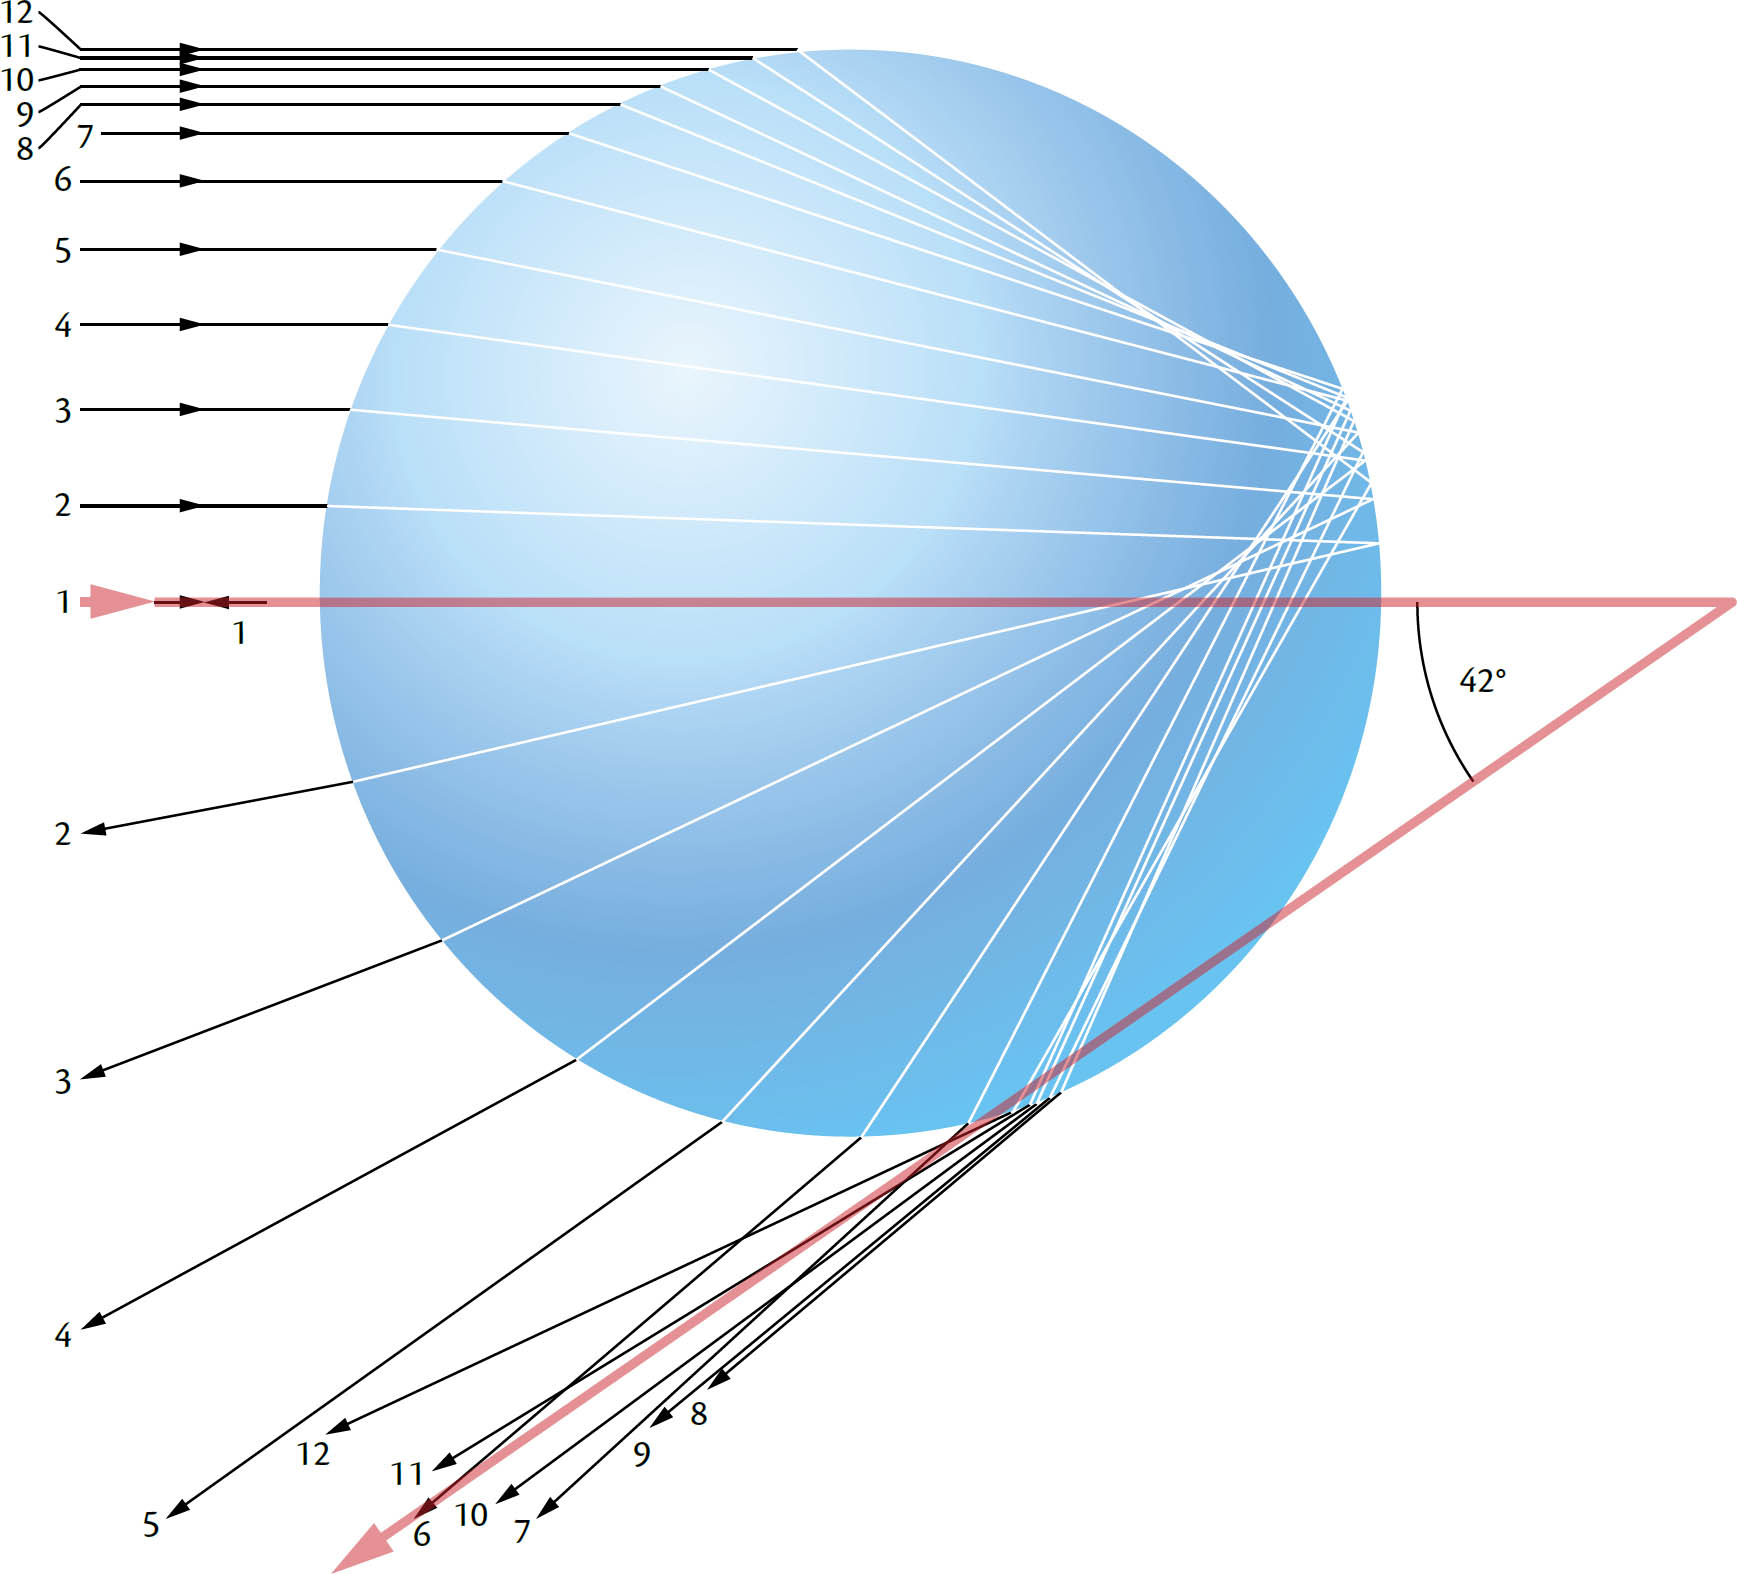
FIGURE 5-16 Light rays enter the raindrop at many angles, but most of those light rays exit the drop at an angle of 42 degrees to the incoming rays. This concentration of rays forms the rainbow.
Now comes the tricky part. Imagine a line from your eye to the anti-solar point, and a second line from your eye to the rainbow. The angle between those two lines must always be 42 degrees. That’s true whether you’re measuring to where the rainbow intersects the horizon or measuring to the highest point on the rainbow’s arc.
All this geometry leads to our first practical conclusion: rainbows can only appear when the sun’s altitude is less than 42 degrees. Remember that the anti-solar point is directly opposite the sun. If the sun is more than 42 degrees above the horizon, then the anti-solar point must be more than 42 degrees below the horizon, which means the top of the rainbow would also be below the horizon. If the shadow of your head is less than 5 or 6 feet from your boots, then the sun must be higher than 42 degrees in the sky, and no rainbow can appear. Realistically, most rainbows worth photographing occur when the sun has an altitude of 25 degrees or less.

FIGURE 5-17 Rainbows form in a circle, centered on the anti-solar point, with an angular radius of 42 degrees.
You can predict where a rainbow will appear with this simple trick. First, face your shadow. Stretch both arms in front of you with your fingers and thumbs spread as wide as possible and the tips of your thumbs touching, as shown in figure 5-18. Close one eye, sight past the tip of your left little finger, and align your fingertip with the shadow of your head. Now, while keeping the tip of your left little finger anchored on your head’s shadow, sight past the tip of your right little finger and scribe an imaginary arc in the air with the tip of your finger. For most people, that arc has an angular radius of roughly 42 degrees. If a rainbow appears, it will occupy part or all of that arc. In level country, if the arc you scribe in the air lies below the horizon, then no rainbow can appear because the sun must be higher than 42 degrees. If the arc appears above the horizon, you can predict not only where the rainbow will intersect the horizon, but also how high the top of the arc will be above the horizon. In the mountains, of course, or in an airplane, rain can fall below you, and a rainbow can appear when the sun is at a higher angle. In a similar way, you can sometimes see a rainbow in the mist kicked up by a big waterfall if you’re looking down on the falls from atop a nearby cliff.
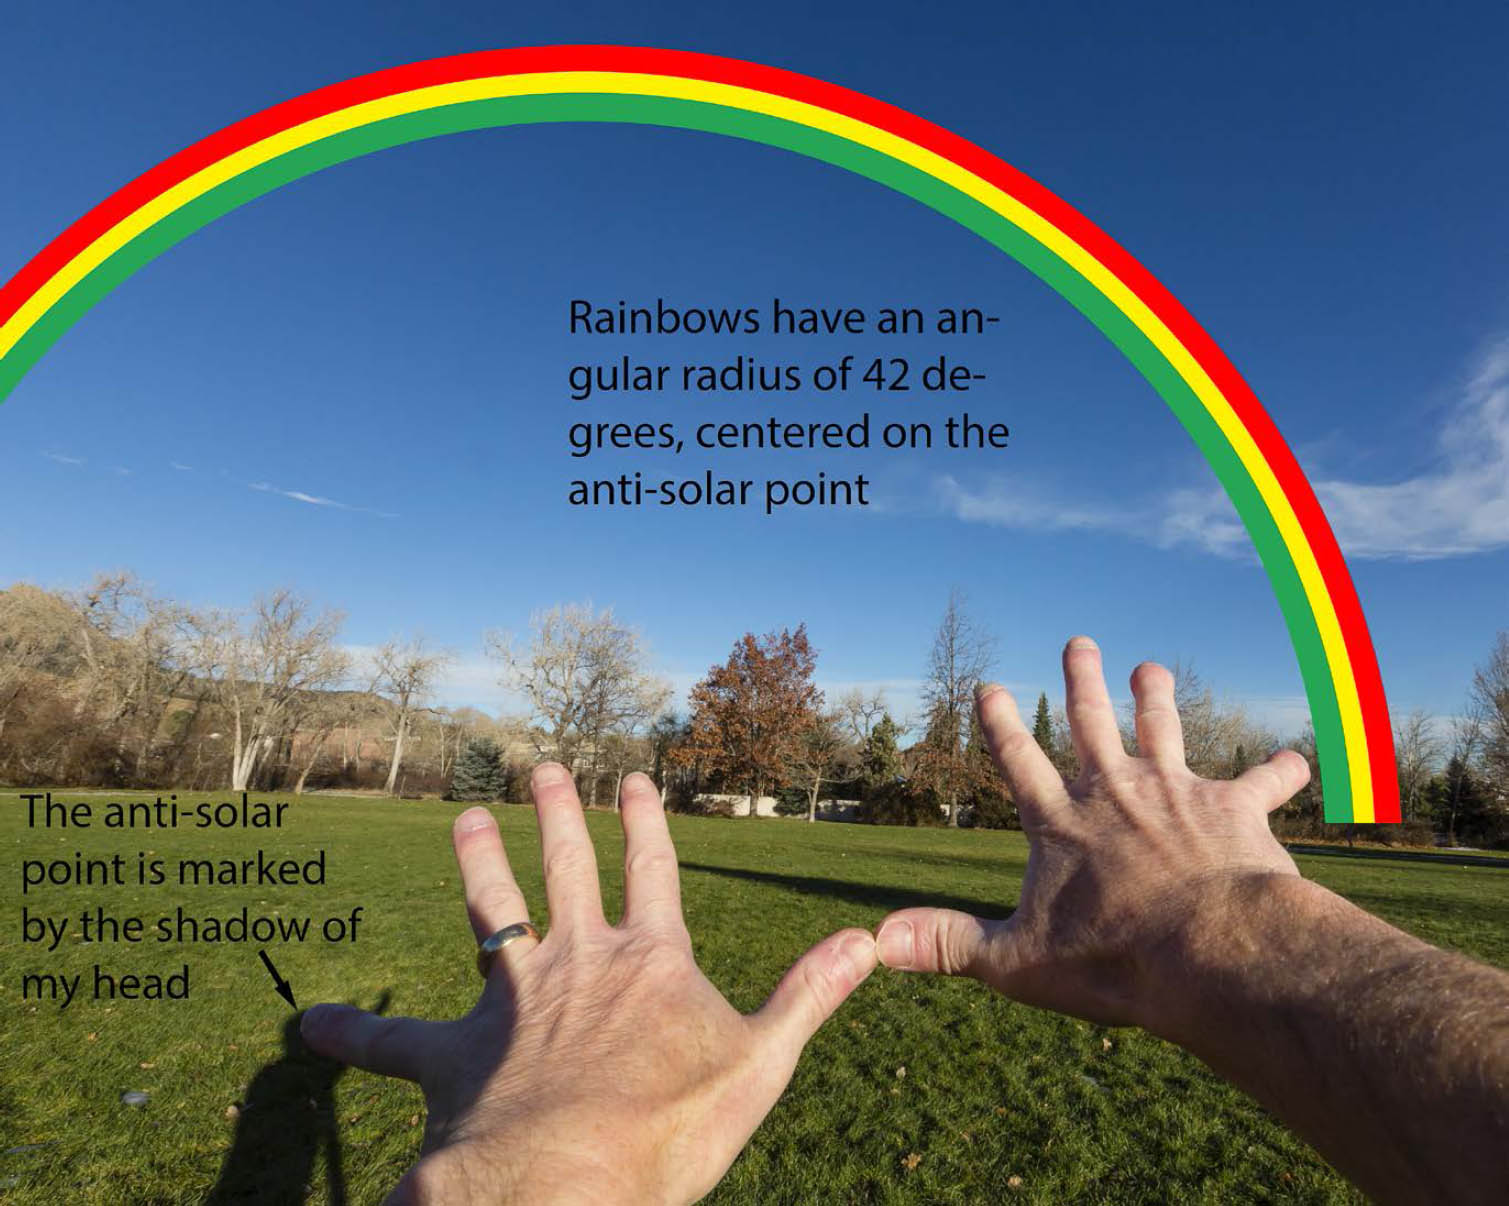
FIGURE 5-18 This simple trick lets you predict if a rainbow is possible, and, if possible, where it will appear.
When the sunlight is strong and the curtain of rain is dense, a second, larger rainbow with an angular radius of 51 degrees can appear outside the primary bow. This secondary bow is caused by rays that enter the raindrops and are reflected twice before exiting. Rainbows can also be accompanied by interference or supernumerary bows, which appear most often just inside the primary arc. These thin, pale bows, most often alternating between light green and violet, are a consequence of the wave nature of light. Sometimes two waves enter the drop at different places but exit traveling in exactly the same direction toward the viewer’s eye. If the crests of the waves coincide, the height of the wave—its intensity—is doubled. If a crest coincides with a trough, then the wave is annihilated, and less light reaches our eyes. Pairs of waves that enhance each other emerge from the drop at a different angle than pairs of waves that cancel each other. The result can be the appearance of one or several bows inside the primary bow. The spacing between interference bows is dependent on the size of the droplets. If the curtain of rain is composed of many different sizes of drops, the interference bows all tend to overlap each other, making it impossible to distinguish one from another.
Whenever I encounter rainbow weather—sun near the horizon, clearing skies near the sun, a curtain of rain in the opposite direction—I use my hand-and-arm trick to trace out where a rainbow would appear, then start envisioning the best possible image I could make if the rainbow did materialize. Where would I stand? What would be the foreground? Rainbows, like the sun and moon, appear to move with you. Let’s say the end of a rainbow terminates to the left of an old gold-miner’s cabin. You want the rainbow to appear as if it were emanating from the cabin, so you move to the right. That causes the end of the rainbow to also move to the right until it is centered on the cabin.
Calculating Rainbow Positions
Sometimes, of course, clouds prevent you from seeing the shadow of your head, so the hand-trick I described won’t work. Sometimes the best location for a rainbow photograph may be miles away, and you need to position yourself there well before the rainbow appears. In those cases, you can use a compass, a topographic map, a smartphone app with sun positions, such as the Photographer’s Ephemeris, Sun Surveyor, or others, and the chart on page 114 to predict the best places to chase rainbows.
Let’s start with a bit more background information. A rainbow is a big subject, at least in an angular sense. If the rainbow’s arc is a full half-circle, then the width of the rainbow is 84 degrees (twice the angular radius of 42 degrees). That means you need a very wide lens—at least 20mm on a full-frame camera—to include the full arc. Although it’s very exciting to see such a huge rainbow, all too often the result of photographing the entire arc is an image with a very thin half-circle of color and a whole lot of boring gray sky underneath that arc. The angular distance from the inner to the outer edge of the rainbow is only about 2 degrees—a small fraction of the frame if the angle of view of your lens is 84 degrees or more. Many of the best rainbow images are shot with a telephoto lens and include only a portion of the arc, usually either the right or left limb where it intersects the horizon. To chase rainbows successfully, you need to know how to calculate where that intersection will be.
Here’s a simplified example: Assume the sun is due west and about to set. Its bearing is 270 degrees. The anti-solar point is directly opposite, or due east. Its bearing is 90 degrees. In level country, the right side of the rainbow will intersect the horizon at 132 degrees, 42 degrees to the right of the anti-solar point (90 + 42 = 132). The left side of the rainbow will intersect the horizon at 48 degrees (90 – 42 = 48).
Armed with this information, you can now grab your map and start looking for interesting subjects. Once you’ve located a promising subject, you can hike or drive to a place where the bearing to the subject is either 132 degrees or 42 degrees. If a rainbow appears near sunset while you’re at that location, the left limb will land on your subject if it’s at a bearing of 42 degrees; the right limb will land on your subject if it’s at a bearing of 132 degrees. In most cases, you’ll want the rainbow arcing up and over the subject, curving into the frame, rather than curving out of it.
FIGURE 5-19 Rainbow over aspen grove near the Telluride Mountain Village, San Juan Mountains, Colorado. Canon EOS 5D Mark III, Canon EF 70-200mm f/4L IS USM at 165mm, polarizer, 1/100th, f/8, ISO 100.

FIGURE 5-20 Rainbow over Brimhall Point and Junction Butte, Maze District, Canyonlands National Park, Utah. Canon EOS 5D Mark III, Canon EF 70-200mm f/4L IS USM at 70mm, polarizer, three-frame bracket set, two-stop bracket interval at ISO 100, images merged using Lightroom Classic’s Photo Merge>HDR utility.
As I mentioned earlier, at a latitude of 40 degrees the angle of sunrise (and sunset) varies by 60 degrees from winter solstice to summer solstice. Rainbow weather most often occurs in summer in late afternoon, when the sun is setting well to the north of west. To calculate where the limbs of a rainbow will intersect the horizon at sunset when the sun is not setting straight west, find the angle of sunset for that date and location in a phone app. Subtract 180 degrees from that angle to get the direction to the anti-solar point. Add 42 degrees to the result to get the bearing to the right limb; subtract 42 degrees to get the bearing to the left limb. For example, if the sun is setting at an angle of 300 degrees, the anti-solar point is at 120 degrees. The right limb will intersect the horizon at 162 degrees; the left limb will intersect the horizon at 78 degrees.
The situation is more complicated when the sun is well above the horizon but below the 42-degree angular limit above which no rainbow can be seen in level country. The chart on page 114 shows the angular distance from a point on the horizon directly opposite the sun to the intersection of a rainbow and the horizon for different sun elevations. To use the chart, first find the compass bearing to the sun in your app for the correct location and time of day. Subtract 180 degrees from that number to find the direction of the anti-solar point. The anti-solar point is actually below the horizon, but let’s assume for the moment that it’s right on the horizon. Find the altitude of the sun for the correct time of day and find the correct row in the table below for that altitude. Add the number in the second column to the bearing (direction) of the anti-solar point to determine the point where the right limb of the rainbow will intersect the horizon. Subtract the number in the second column from the bearing (direction) of the anti-solar point to determine the point where the left limb of the rainbow will intersect the horizon. This assumes a level horizon, meaning one that has the same elevation as your location. The third column shows the altitude of the highest point of the rainbow above a level horizon.
FIGURE 5-21 Rainbow over lupine and Indian paintbrush, Shrine Ridge, near Vail Pass, White River National Forest, Colorado. Canon EOS 5D Mark III, Canon EF 70-200mm f/4L IS USM at 100mm, polarizer, 1/5th, f/22, ISO 100.
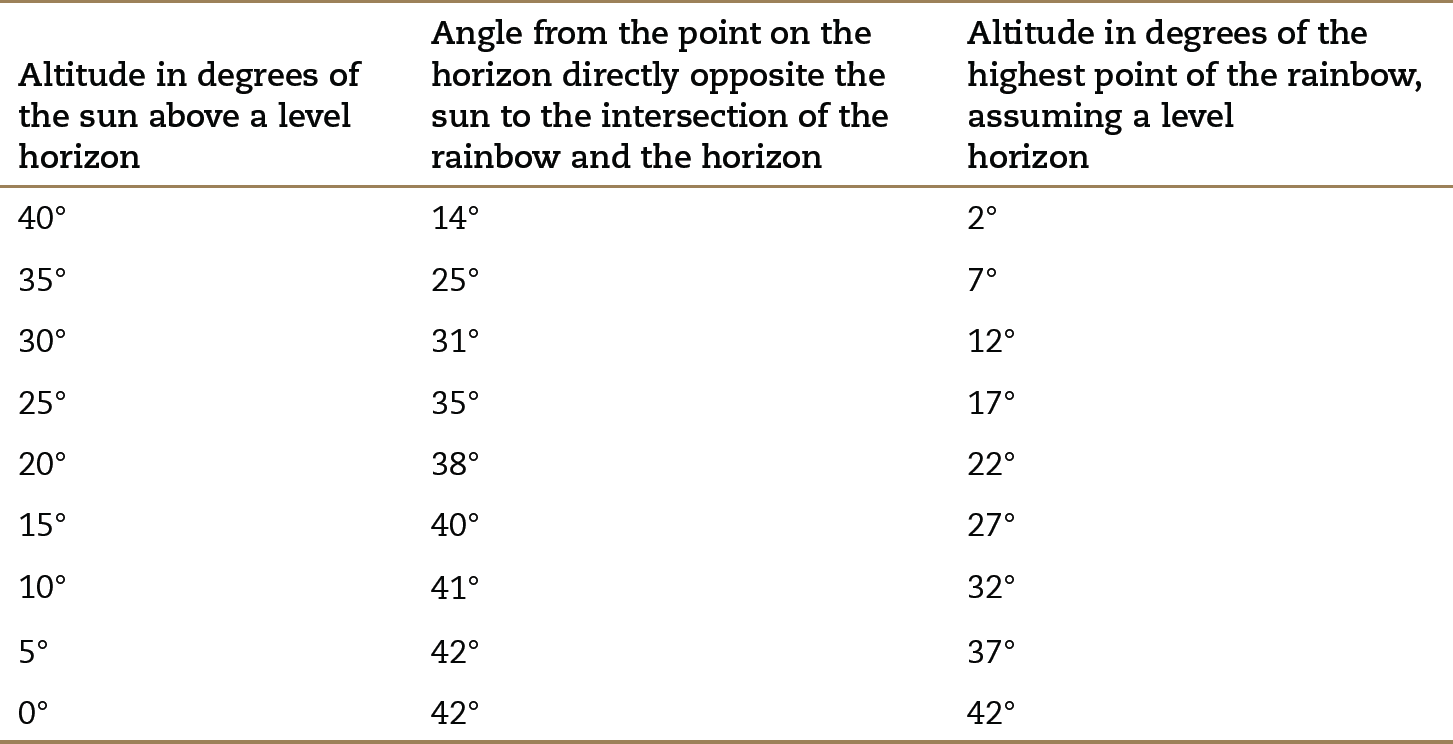
Here’s an example. Assume once again that the sun is due west, at a bearing of 270 degrees, but this time its altitude is 25 degrees. The anti-solar point is actually 25 degrees below the horizon, but we will assume it’s at the horizon. The bearing to this horizon anti-solar point is 90 degrees. Consulting the table above, you can see that the rainbow will intersect the horizon 35 degrees left and right of the horizon anti-solar point, or at 125 and 55 degrees, respectively.
Rainbows and Polarizers
Rainbows are rare and fleeting, and their appearance is often startling. In psychological terms, they have salience, which means they often appear brighter and more vivid than they actually are. Salience is meaningless to a camera, of course, which is why photographs of rainbows sometimes disappoint. To make photographs of rainbows that capture the impact of what you saw, consider using a polarizing filter on an 80mm or longer lens. To understand why that filter and that focal length, you first need to know a bit more about polarizers and polarized light in general.
Light can behave like both a particle and a wave. As a wave, light oscillates or vibrates in a certain plane, called the plane of polarization. Ordinary sunlight is a mixture of light with many different planes of polarization—horizontal, vertical, and everything in between. A polarizing filter can be thought of as a picket fence with gaps between the fence slats. Orient the polarizer vertically, and it allows vertically polarized light to pass through the gaps. Orient it horizontally, and it blocks vertically polarized light. Light from the sky when the sun is near the horizon and you are looking at a 90-degree angle to the sun is vertically polarized. For example, if the sun is near the horizon and due east, the light from the sky that is due south and due north will be polarized. Orient your polarizer horizontally, and that blue sky will darken, both as seen through the viewfinder and in your image.
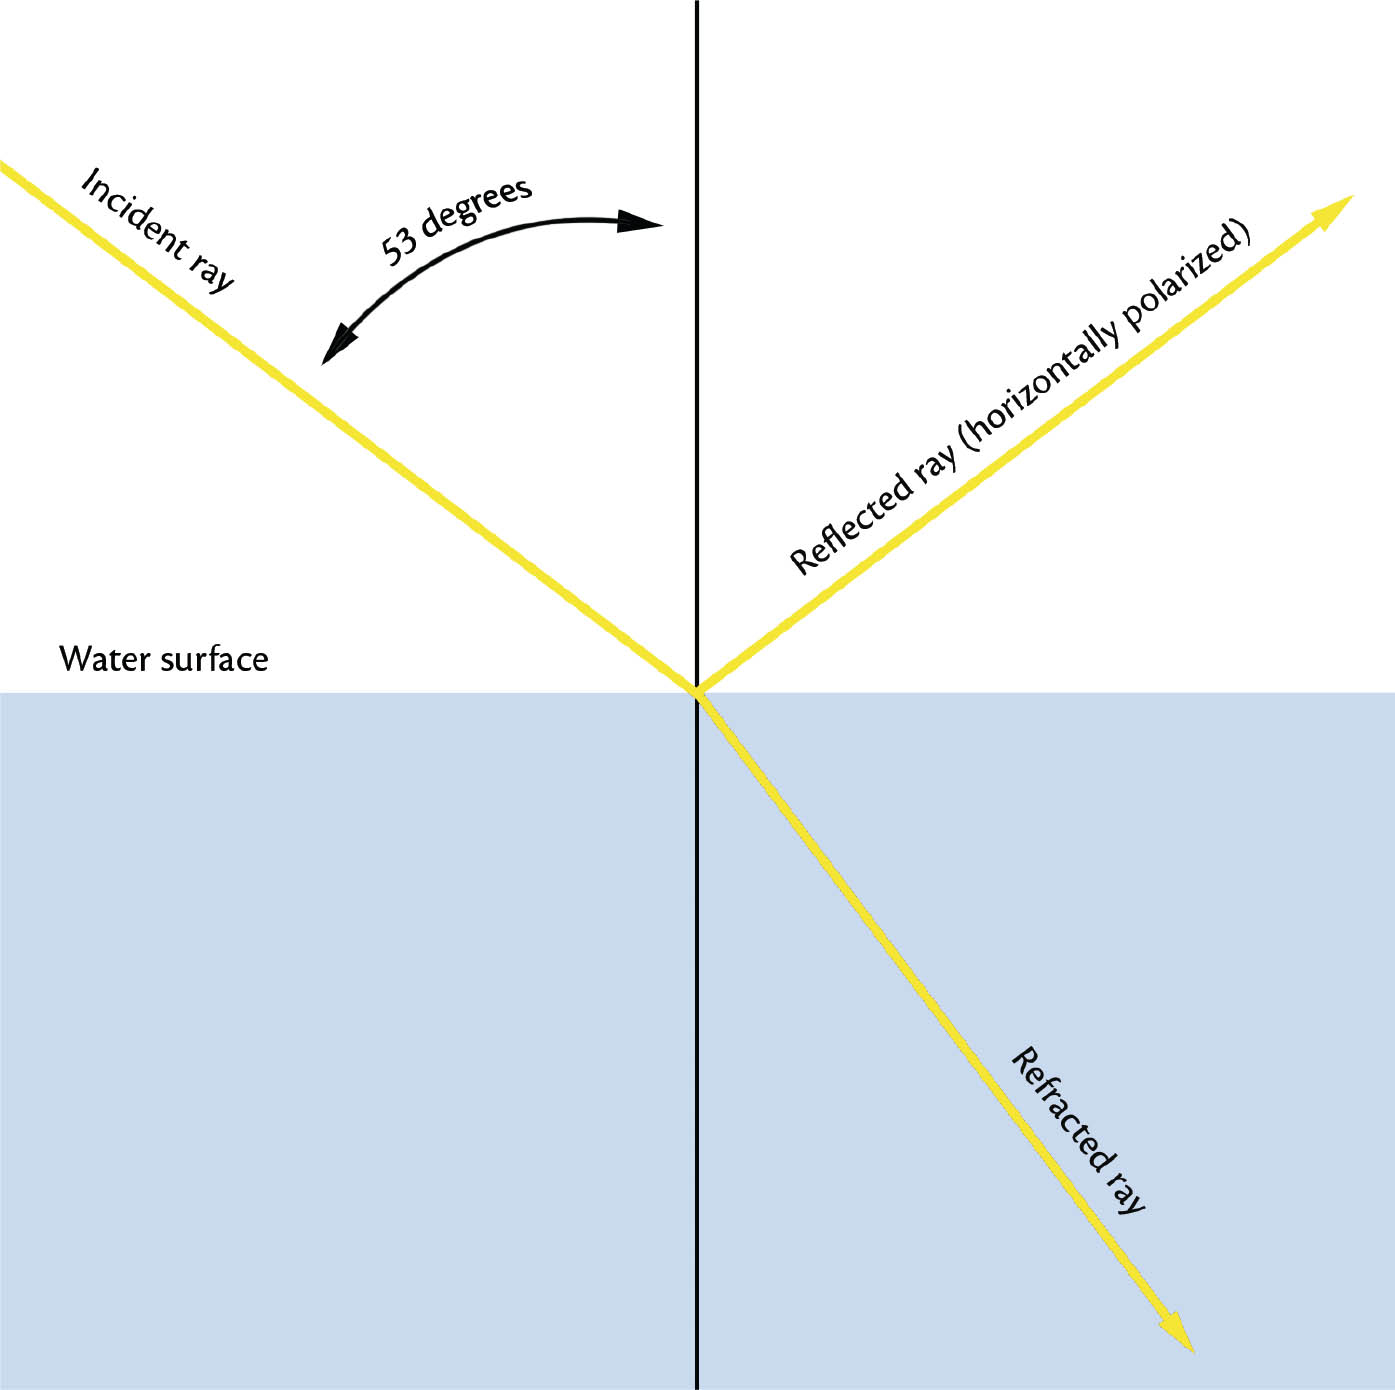
FIGURE 5-22 All light reflected from a water surface at the Brewster angle (53 degrees measured from a line perpendicular to the water’s surface) is horizontally polarized.
When light reflects from a water surface at a particular angle (called the Brewster angle), all horizontally polarized light is reflected. The remaining light is transmitted into the water. The situation is easiest to understand when considering reflections on the surface of a lake or pond. The Brewster angle for an air-water boundary is 53 degrees when measured from a line perpendicular to the water’s surface, as shown in figure 5-22. If you are looking down at a steep angle to the surface of a pond, much of the light you see is horizontally polarized because it is reflected at an angle close to the Brewster angle. This explains why fishermen wear polarizing sunglasses with vertically oriented lenses that block the horizontally polarized reflected light. They want to eliminate reflections on the surface of the water so they can spot the fish below. Photographers can use polarizers for similar purposes, such as when shooting tide pool creatures living below the surface.
On the other hand, if your line of sight forms a small angle with the surface of the water, then the reflection off the water doesn’t change the light’s polarization. A polarizer will not remove reflections if the light is merely grazing the surface. As I mentioned earlier, light from the sky, when you are looking at 90 degrees to the sun, is vertically polarized. If the vertically polarized light from the sky is reflected at a shallow angle to the water’s surface, it retains its original vertical polarization. A polarizer oriented horizontally will darken both the blue sky and the reflection of the blue sky in your image, as you can see in figure 5-23.
How does all this apply to rainbows? It turns out that the angle of reflection of light from the inside of a raindrop is close to the Brewster angle. That means that light from a rainbow is polarized. Light from the sky around the rainbow, however, has many different angles of polarization. Put a polarizer on your lens, orient it to permit the polarized rainbow light to come through, and you’ll block the component of background light that has the opposite angle of polarization. By darkening the background, the rainbow appears brighter.

FIGURE 5-23 Quail Mountain, Hope Pass, and Mt. Hope reflected in a beaver pond near the South Mt. Elbert trailhead in late September, San Isabel National Forest, Colorado. When I used a polarizer to darken both the blue sky and the sky’s reflection in this image, the effect seemed too strong, so I rotated the polarizer slightly to a partially effective setting. Canon EOS 5D Mark III, Canon EF 70-200mm f/4L IS USM at 70mm, 1/8th, f/11, ISO 100.
So far, so good, but there’s a catch. The angle of polarization of rainbow light is dependent on which segment of the rainbow you’re photographing. Rainbow light is tangentially polarized, which means that the angle of polarization is along a line that is tangent to the arc of the rainbow (figure 5-24). Because a rainbow is curved, the angle of polarization varies. Put a polarizer on a wide-angle lens and you’ll enhance one part of the rainbow while extinguishing another part. Rotate the polarizer and the situation will reverse, with the formerly brightened segment vanishing and the extinguished part reappearing. Put a polarizer on a short telephoto, however, perhaps an 80mm or so, and the situation is different. The telephoto has a much narrower angle of view than a wide-angle. The angle of polarization of the rainbow over that narrow angle of view is near constant. The polarizer, oriented properly, will enhance the entire segment of rainbow visible in your image. The result can be an image with the impact of the original experience.
The Rarest Light of All
During my 26-year career as a landscape photographer, I’ve been privileged to witness many beautiful scenes, but on only a few occasions each year have I been fortunate enough to photograph the rarest light of all. In my experience, truly extraordinary light can occur in three ways.
In the first, which I call gap light, the sun finds a narrow gap between dense clouds and the horizon precisely at the moment of sunrise or sunset. For just a minute—maybe only seconds—a beam of intense red or orange light blasts through the gap and ignites the subject with the most colorful natural light you’ll ever see. The effect is strongest when the horizon is at your elevation or lower; if it’s higher, the effect is weakened or absent.
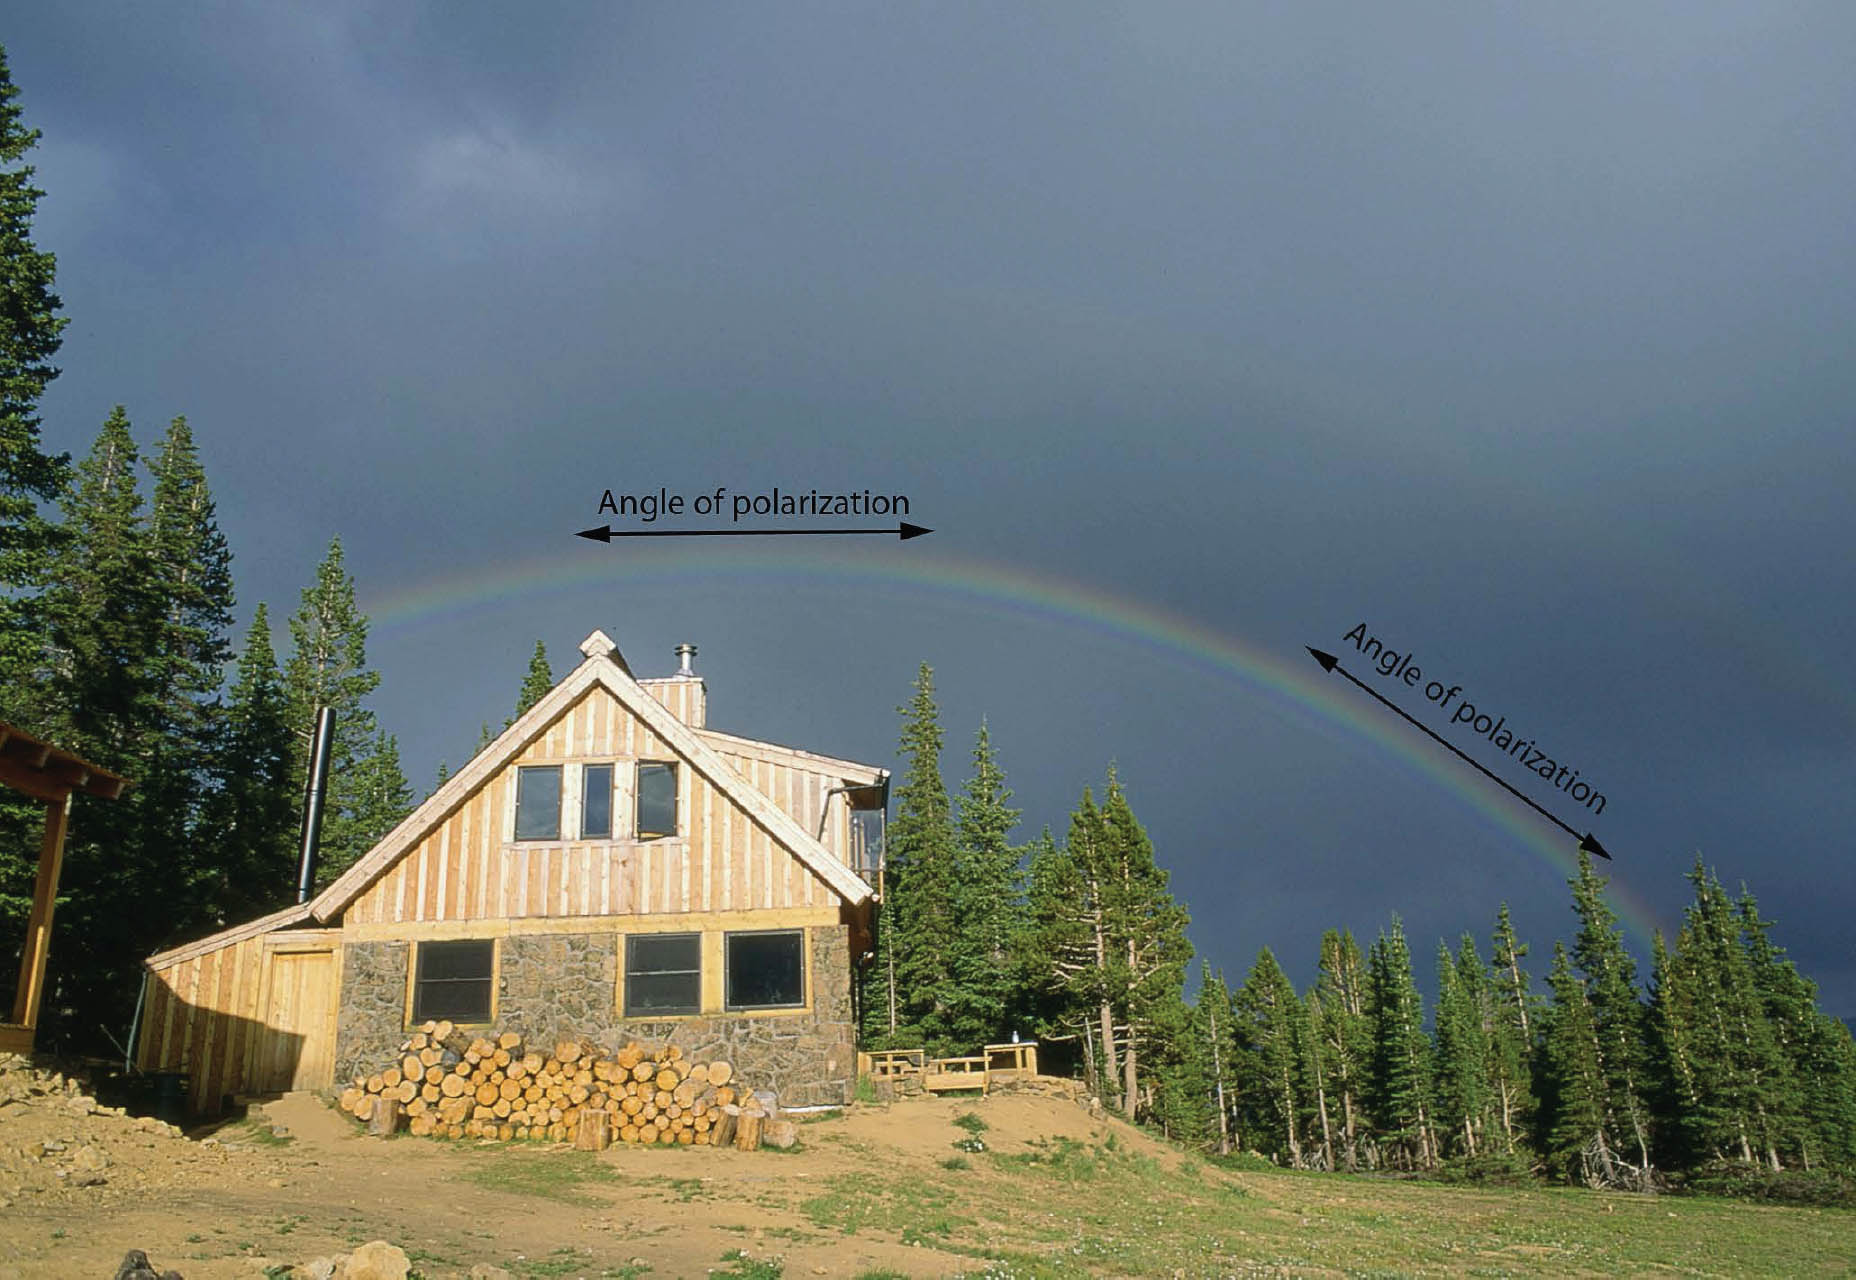
FIGURE 5-24 The light from a rainbow is tangentially polarized.
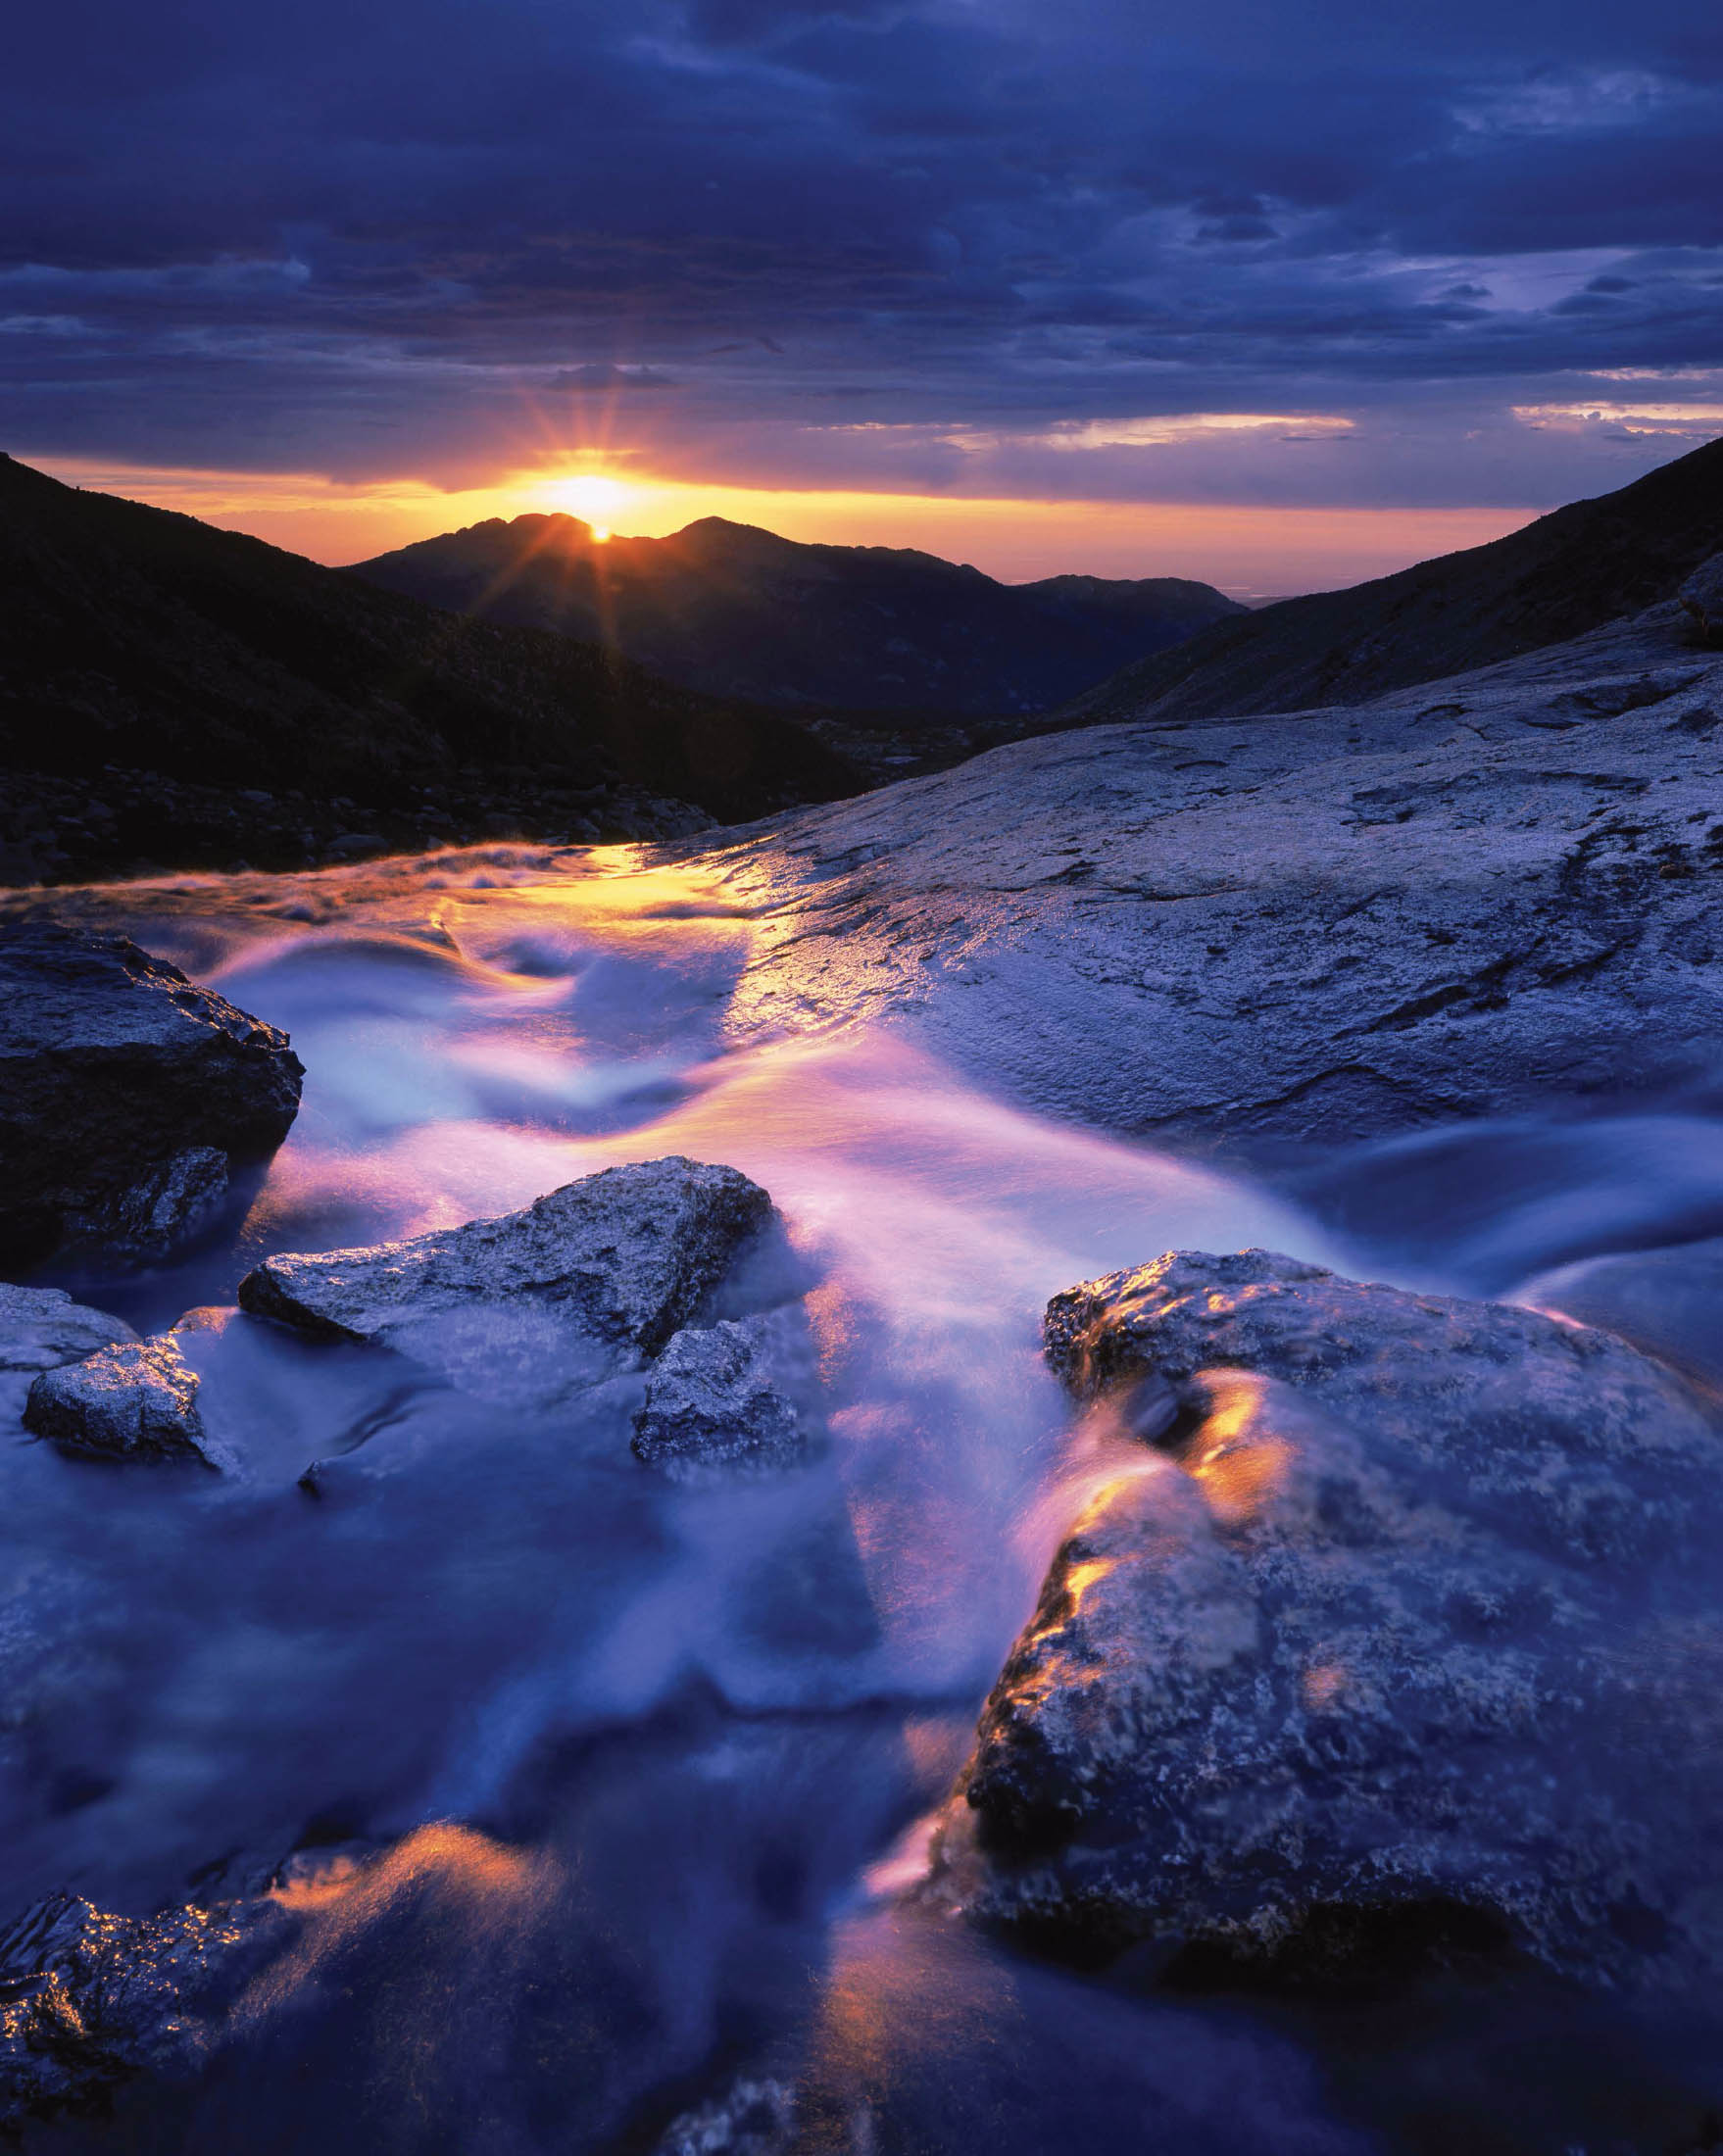
FIGURE 5-25 Sunrise at Columbine Falls, Rocky Mountain National Park, Colorado. Compare this example of gap light to the light during a clear sunrise (figure 5-26). Zone VI 4×5 field camera, Fujichrome film. Lens and exposure unrecorded.
To understand gap light, first consider what happens during a cloudless sunrise. When the sky is clear, the reddish light coming directly from the rising sun is diluted by the bright, white light from the sky around the sun. It’s like pouring white paint into red paint—the result is usually a pastel pink or pale orange that is pleasing but not extraordinary. If, however, the sun finds a gap between dense clouds and the horizon, the clouds block that bright, white light from the sky around the sun and the result can be truly spectacular light.
In the second situation, which I call cloudy-sky glow light, the sun, while still below the horizon, paints a broad bank of clouds with strongly colored warm light. These clouds, which can be inside the frame or out, now become the dominant light source. While glowing clouds are beautiful, of course, it is the light those clouds bounce down onto the landscape below that is truly remarkable. Like a giant studio photographer’s soft box in the sky, the colorful clouds illuminate the landscape with a warm, soft, yet still directional light. Such images seem to be suffused with an ethereal radiance. On a completely clear morning, by contrast, the blue sky is actually the dominant light source when the sun is just below the horizon. Photographs taken under this lighting usually have a somber, cool cast.
Cloudy-sky glow photos can occur almost anywhere. I’ve even seen a perceptible mauve glow in the depths of Colorado’s aptly named Black Canyon of the Gunnison. All that’s required is a sufficiently large bank of clouds lighting up brightly enough to overpower the light from the blue sky and any blue-gray clouds that remain in shadow. The glowing clouds then become the dominant light source. Figure 5-1, the photo which opens this chapter, is a great example. Figures 5-27 and 5-28 show the same scene, one illuminated by cloudy-sky glow light 10 minutes before sunrise, the other by direct sun half an hour later.
FIGURE 5-26 Sunrise at Columbine Falls on a clear morning, Rocky Mountain National Park, Colorado. Compare this example of the light during a clear sunrise to the gap light in figure 5-25. Zone VI 4×5 field camera, Fujichrome film. Lens and exposure unrecorded.
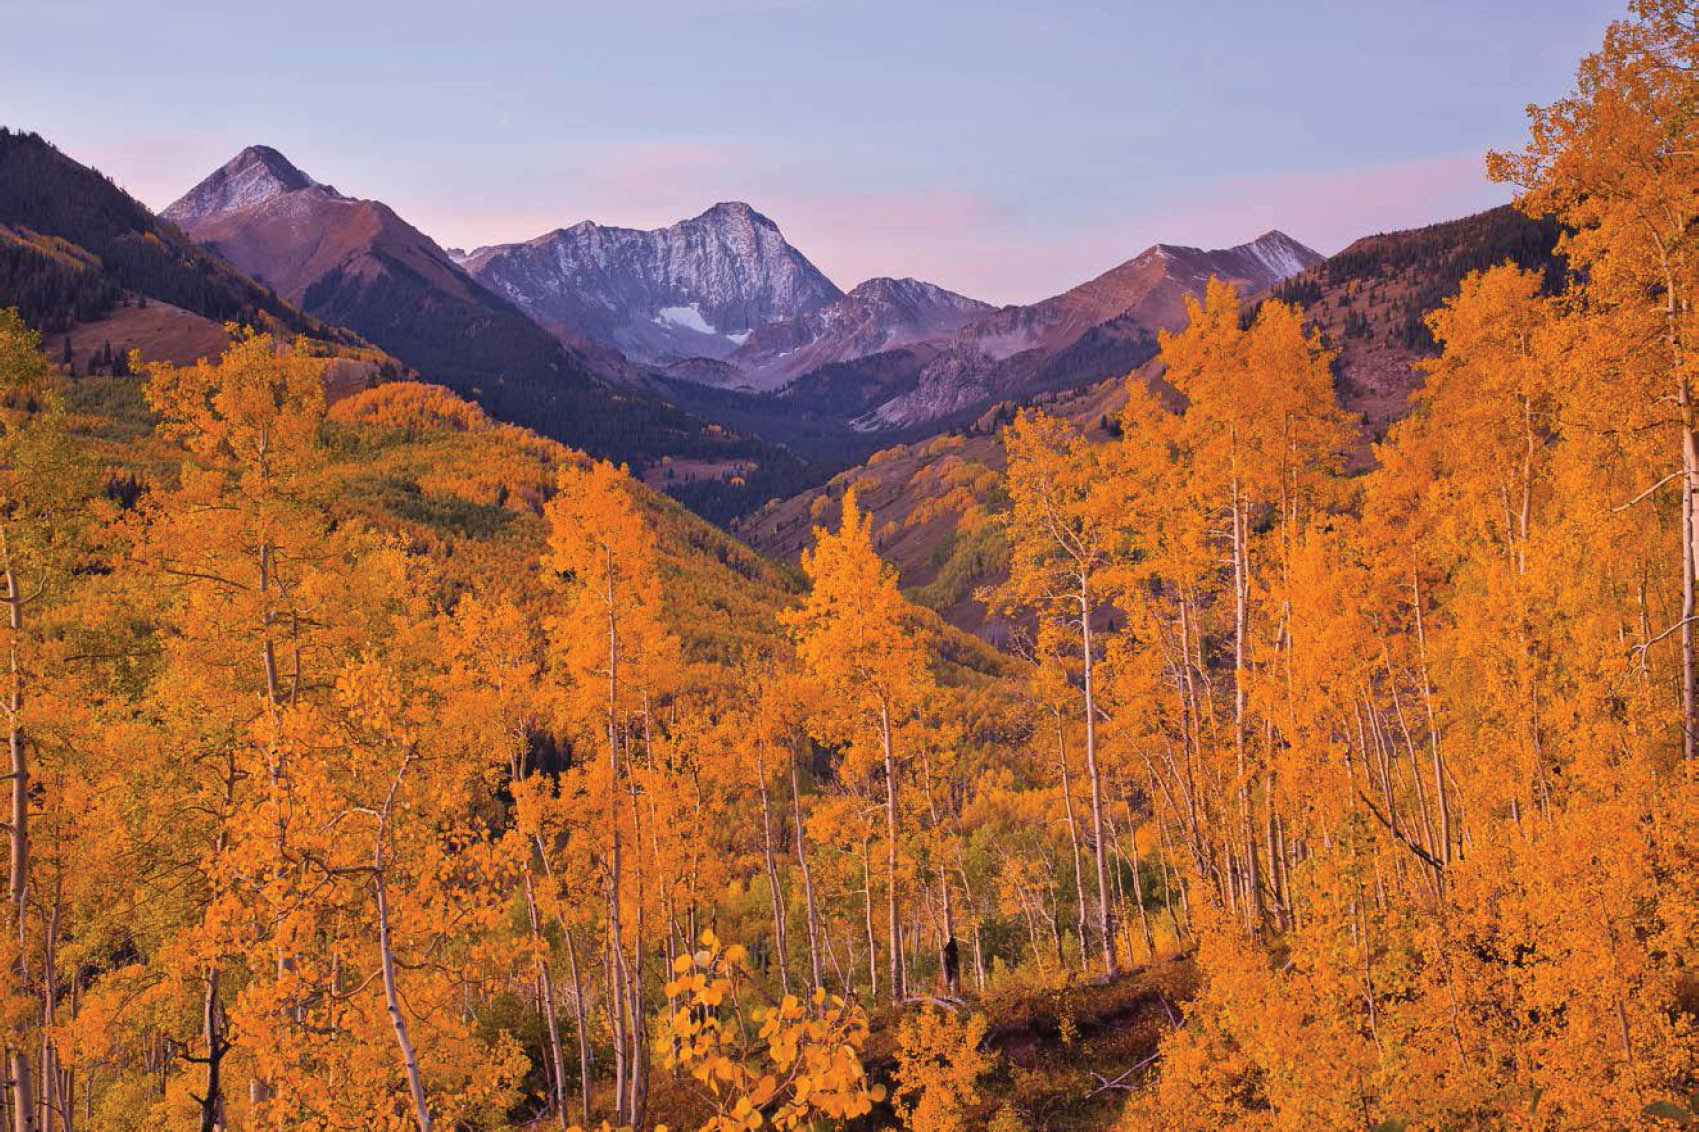
FIGURE 5-27 Twilight glow over Capitol Peak from the Ditch Trail about 10 minutes before sunrise, Maroon Bells-Snowmass Wilderness, Colorado. The light source was a large bank of pink clouds out of the frame to the left. Canon EOS 5D Mark III, Canon Compact-Macro EF 50mm f/2.5, 2.5 seconds, f/11, ISO 100.
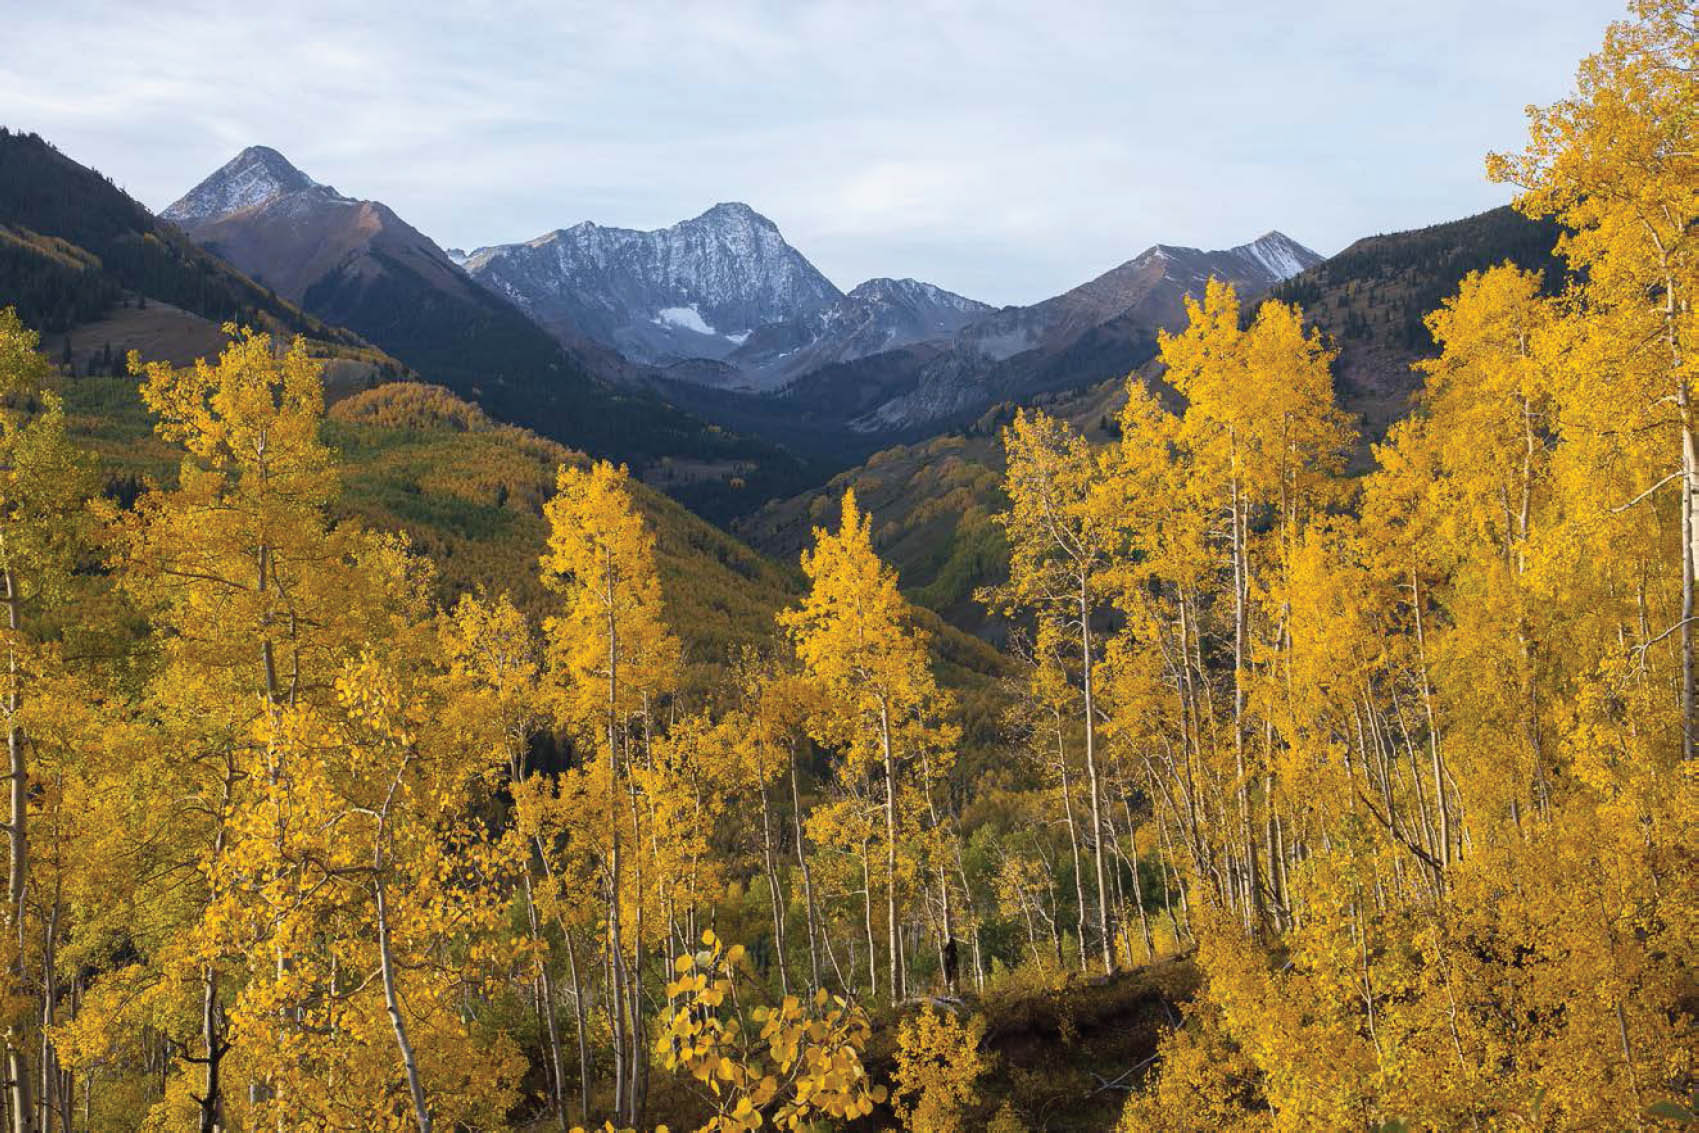
FIGURE 5-28 Capitol Peak from the Ditch Trail about 20 minutes after sunrise, Maroon Bells-Snowmass Wilderness, Colorado. Canon EOS 5D Mark III, Canon Compact-Macro EF 50mm f/2.5, 1/15th, f/11, ISO 100.
In the third situation, which I call clear-sky glow light, the sun is again below the horizon, but the sky is clear. With the right atmospheric conditions, the sky along the horizon in the direction of the rising or setting sun can develop an intense orange glow that in the mid-latitudes usually peaks around 20 minutes before sunrise or after sunset. If the glow is strong enough, it can illuminate the landscape with a diffuse golden light that can even reach deep into canyons that would never receive direct moment-of-sunrise or sunset light.
Let’s look more closely at the sequence of events around sunrise. In the mid-latitudes, the glow typically peaks about 20 minutes before sunrise when the sun is about 4 degrees below the horizon. As the sun gets closer to the horizon, the orange glow fades to yellow, then to white. Photos taken a couple of minutes before sunrise have an unappetizing blue cast because the dominant source of light on the land is the blue sky straight overhead. Finally the sun pops over the horizon and bathes the scene in strong reddish or orange light so long as the elevation of the horizon is the same as or lower than your subject. The sequence repeats in reverse at sunset.
Shooting at the moment of sunrise or sunset is often an effective way to shoot mountains, particularly those that rise abruptly above the plains. Direct sunrise or sunset light is usually more vivid than the relatively weak light produced by the twilight glow, and it’s usually possible to fill the frame with warm-toned peaks. Direct sunrise or sunset light doesn’t work as well for canyons, however. Typically only the rim of the canyon gets moment-of-sunrise light, leaving the rest of canyon in deep shadow, lit only by the blue sky. The lighting is usually harsh, and only a small part of the frame gets colorful light. During a cloudy-sky or clear-sky glow-light morning or evening, however, the entire canyon can be filled with a marvelous glow. When it happens, such images are often my favorite of the entire sunrise or sunset sequence.
Figure 5-29 shows a superb example of clear-sky glow light; figure 5-30 shows how the light in the depths of the canyon has become blue a few minutes before sunrise; figure 5-31 shows golden light on the rim of the canyon, with the rest of the canyon in deep blue shadow.
The conditions that produce a superb clear-sky glow shot are rare. Most importantly, the air at the tangent point—the point where the sun’s rays just graze the earth—must be clear. Consider a sunset scenario. If you are in the middle of a flat plain, such as the wheat fields of Kansas, and the sun is just about to set, then you are standing at the tangent point. As the sun dips below the horizon, the tangent point moves west rapidly. The best twilight glows occur when the air at the tangent point some 15 to 25 minutes after sunset is very clear. By that time, the tangent point will be hundreds of miles to the west.
The second condition that must be met is that there is a dense layer of aerosols—tiny liquid particles suspended in the air—high in the atmosphere that can bounce that warm light back down to Earth, where it can illuminate even the depths of a canyon. These aerosols are volcanic in origin. When a big volcano erupts, it pushes sulfur dioxide gas all the way up to the stratosphere. Through a series of chemical reactions, that sulfur dioxide gas is eventually converted into tiny droplets of sulfuric acid and water. Over time, some of these aerosols combine with each other and become heavy enough to fall out of the stratosphere. Some 60 volcanoes erupt every year, however, so the aerosol layer is continually renewed with a fresh supply of sulfur dioxide.
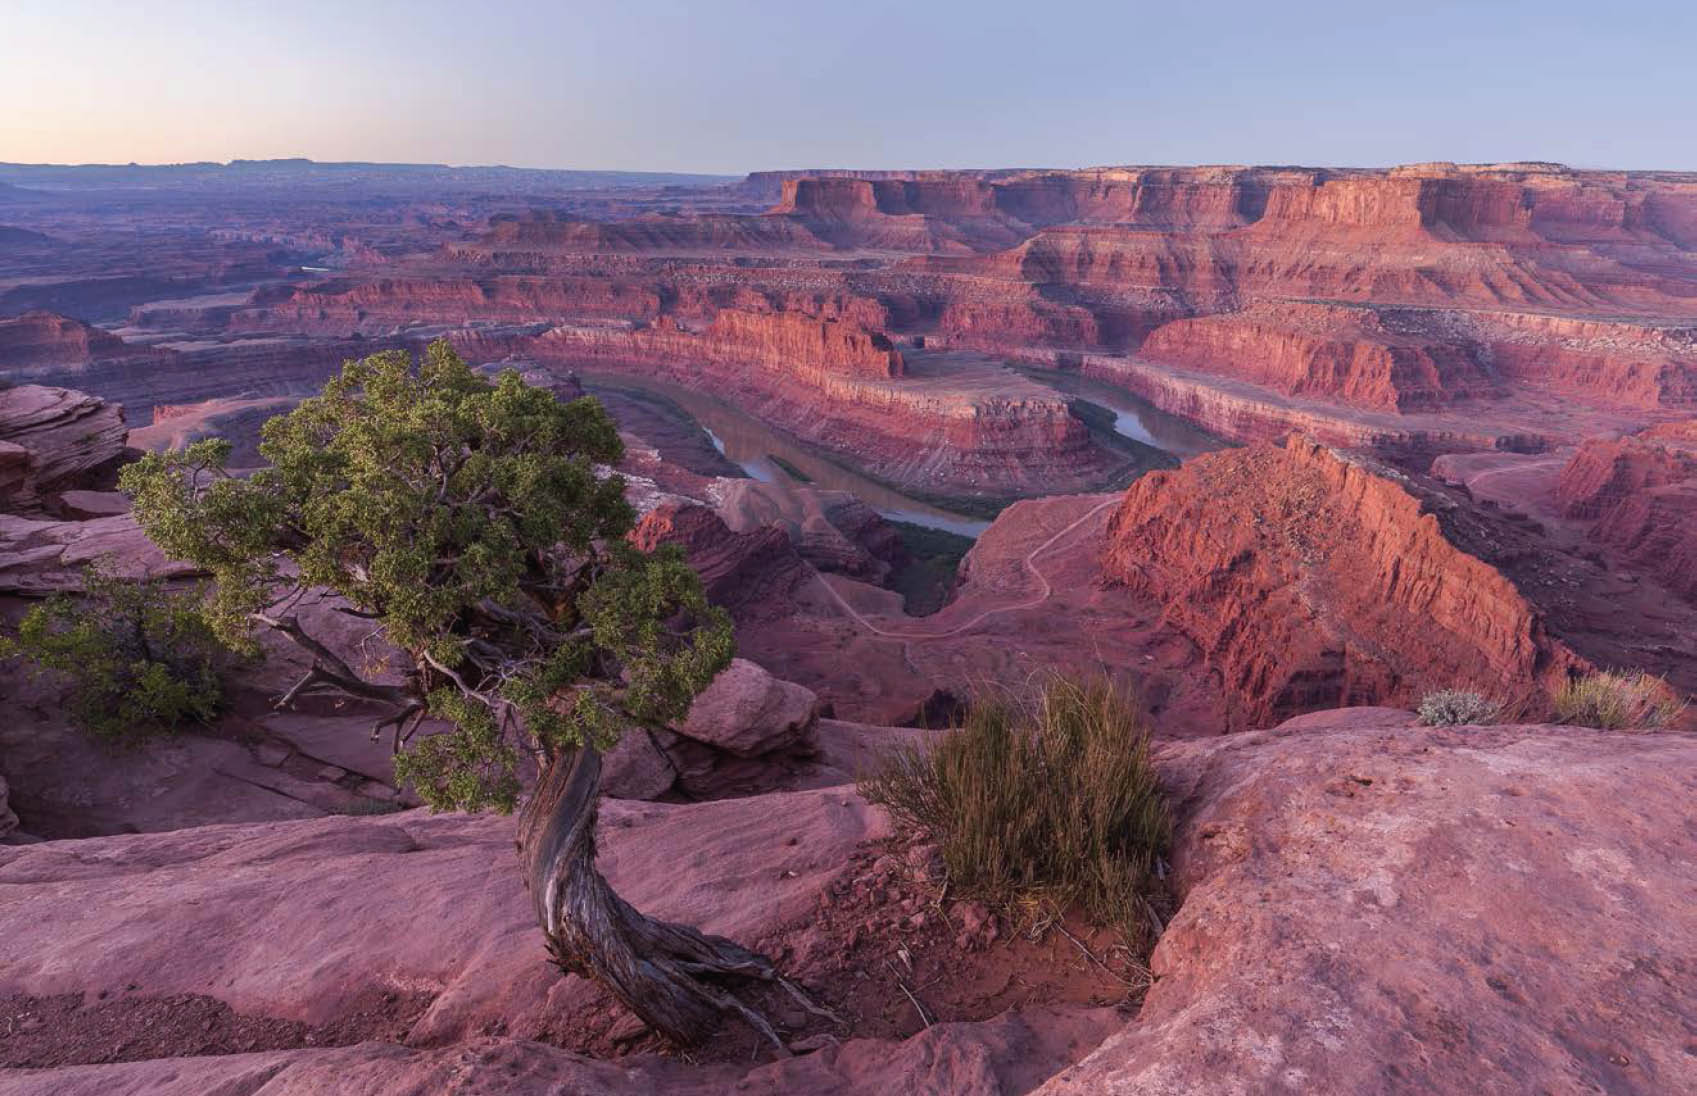
FIGURE 5-29 Dawn glow at Dead Horse Point, taken about 20 minutes before sunrise when the sun was 4.5 degrees below the horizon, Dead Horse Point State Park, Utah. Of the three versions of this image presented here (figures 5-29, 5-30, and 5-31), this is my favorite. Canon EOS 5D Mark III, Canon EF 16-35mm f/2.8L III USM at 20mm, 6 seconds, f/11, ISO 100.

FIGURE 5-30 Two minutes before the almanac time of sunrise at Dead Horse Point, Dead Horse Point State Park, Utah. The land in this image is lit primarily by the blue sky, so it has a distinct bluish cast. Canon EOS 5D Mark III, Canon EF 16-35mm f/2.8L III USM at 20mm, 1 second, f/16, ISO 100.
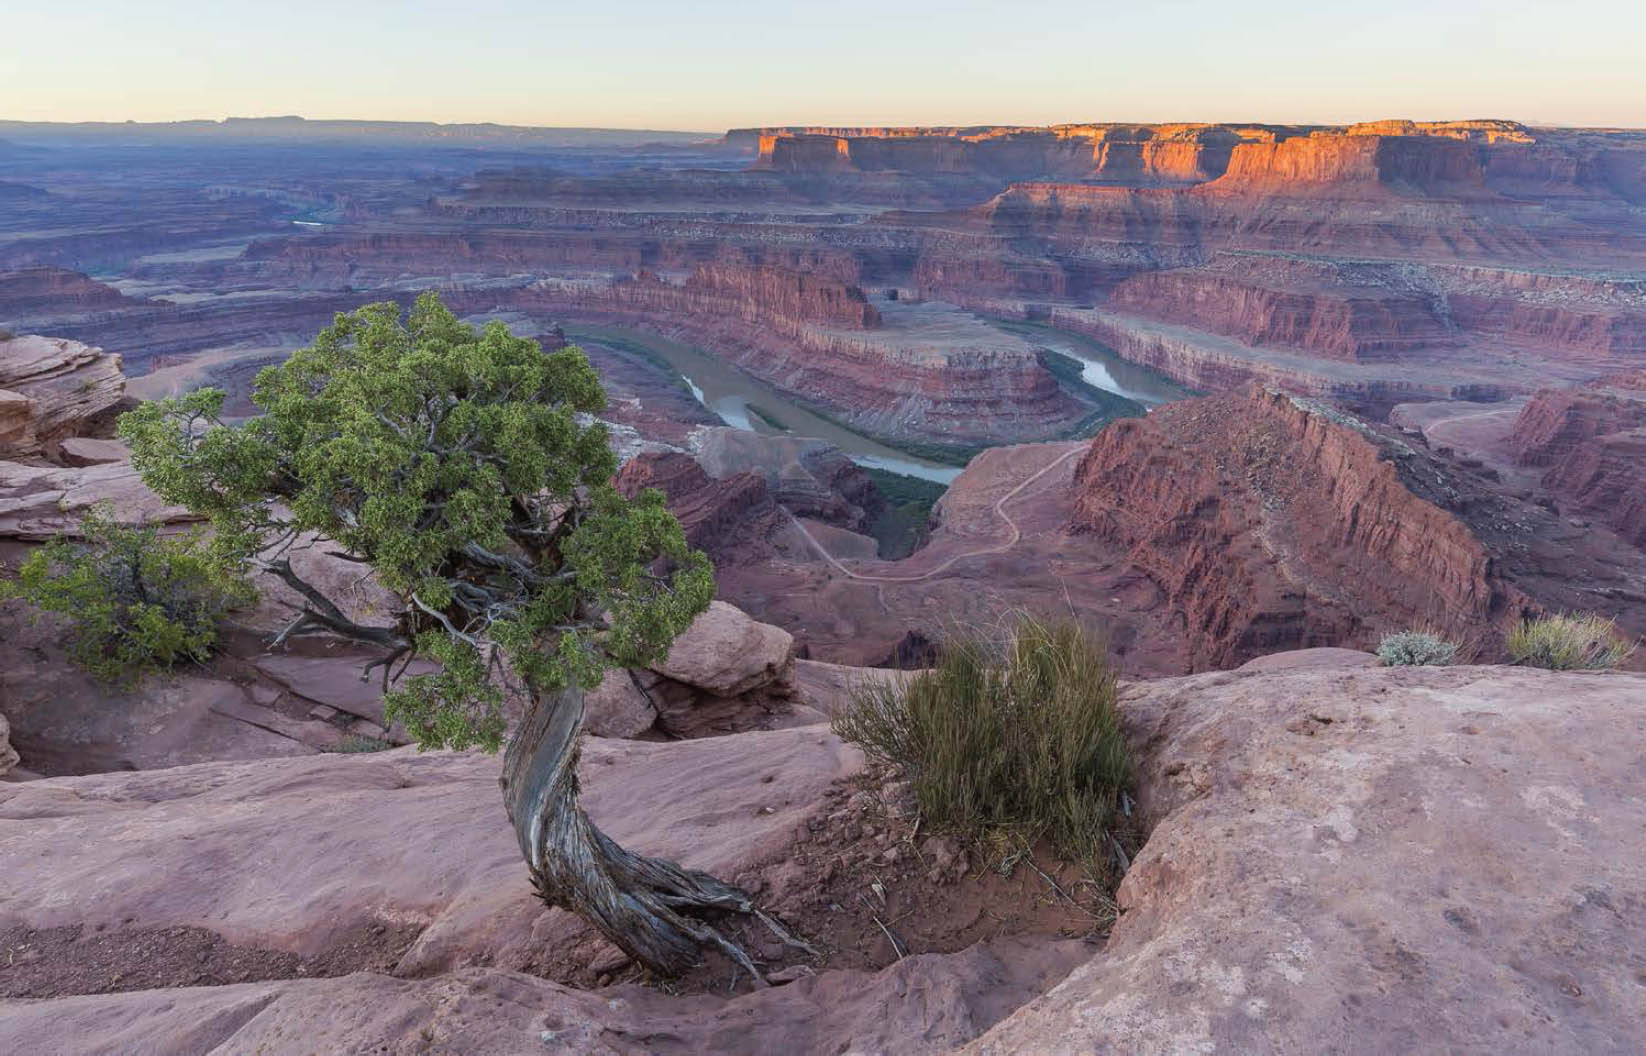
FIGURE 5-31 Sunrise at Dead Horse Point, taken 7 minutes after the almanac time of sunrise when direct sun first hit the canyon rim, Dead Horse Point State Park, Utah. The golden light on the canyon rim is lovely, but it only fills a tiny fraction of the frame. Canon EOS 5D Mark III, Canon EF 16-35mm f/2.8L III USM at 20mm, three-frame bracket set, one-stop bracket interval at ISO 100, images merged using Lightroom Classic’s Photo Merge>HDR utility.
The aerosol layer is always present, although its density varies. Aerosols are much bigger than the wavelength of light, so they scatter all wavelengths equally. When the sun is the right number of degrees below the horizon (figure 5-32), much of the light reaching the aerosol layer has been reddened by Rayleigh scattering. Aerosols then bounce that reddened light back down to the observer, forming a golden glow along the horizon.
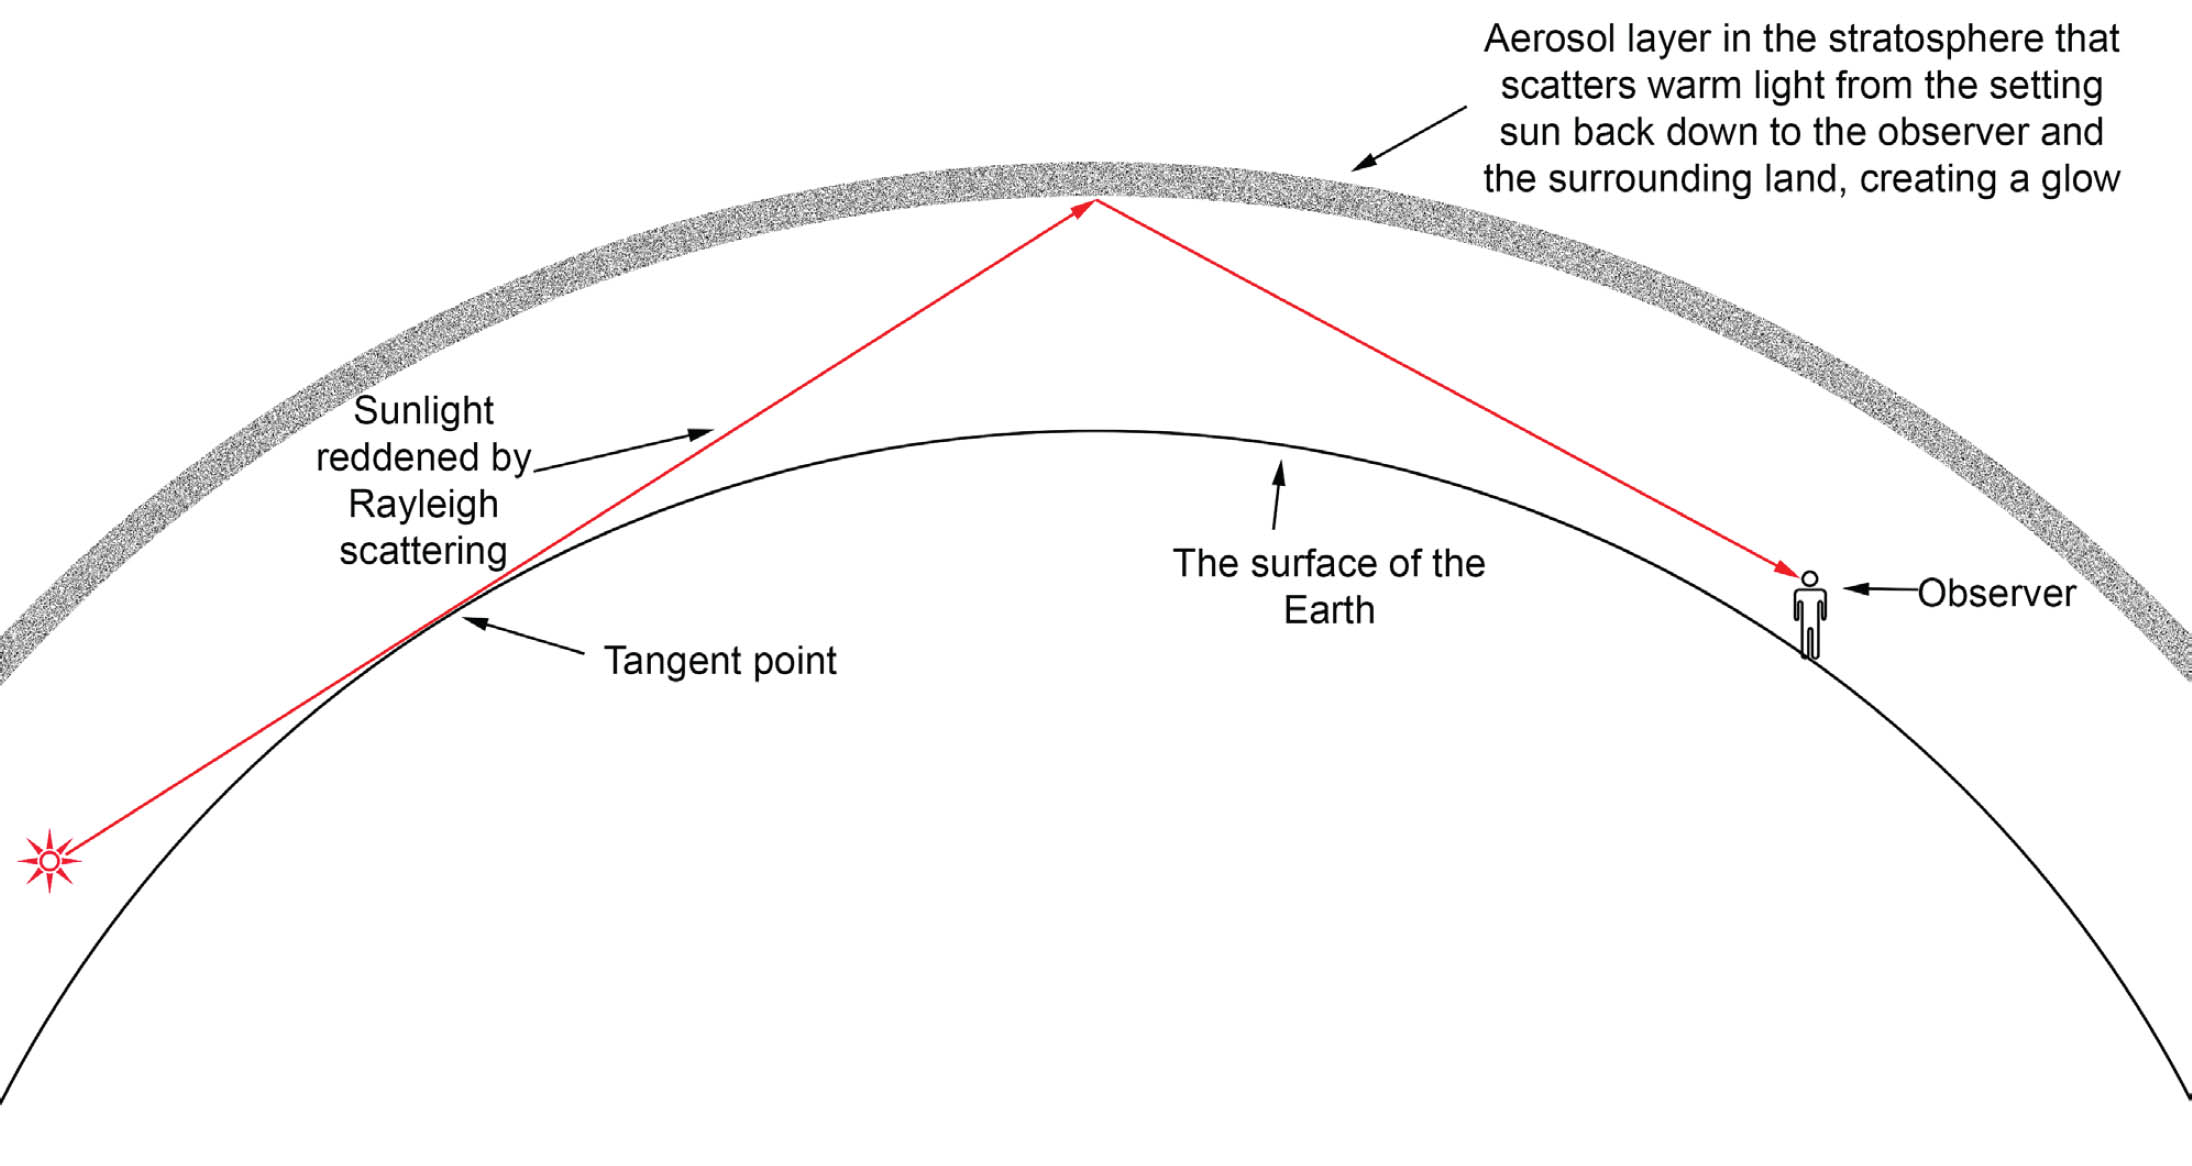
FIGURE 5-32 If the air is clear at the tangent point, a strong golden glow can develop along the horizon about 20 minutes before sunrise or after sunset.
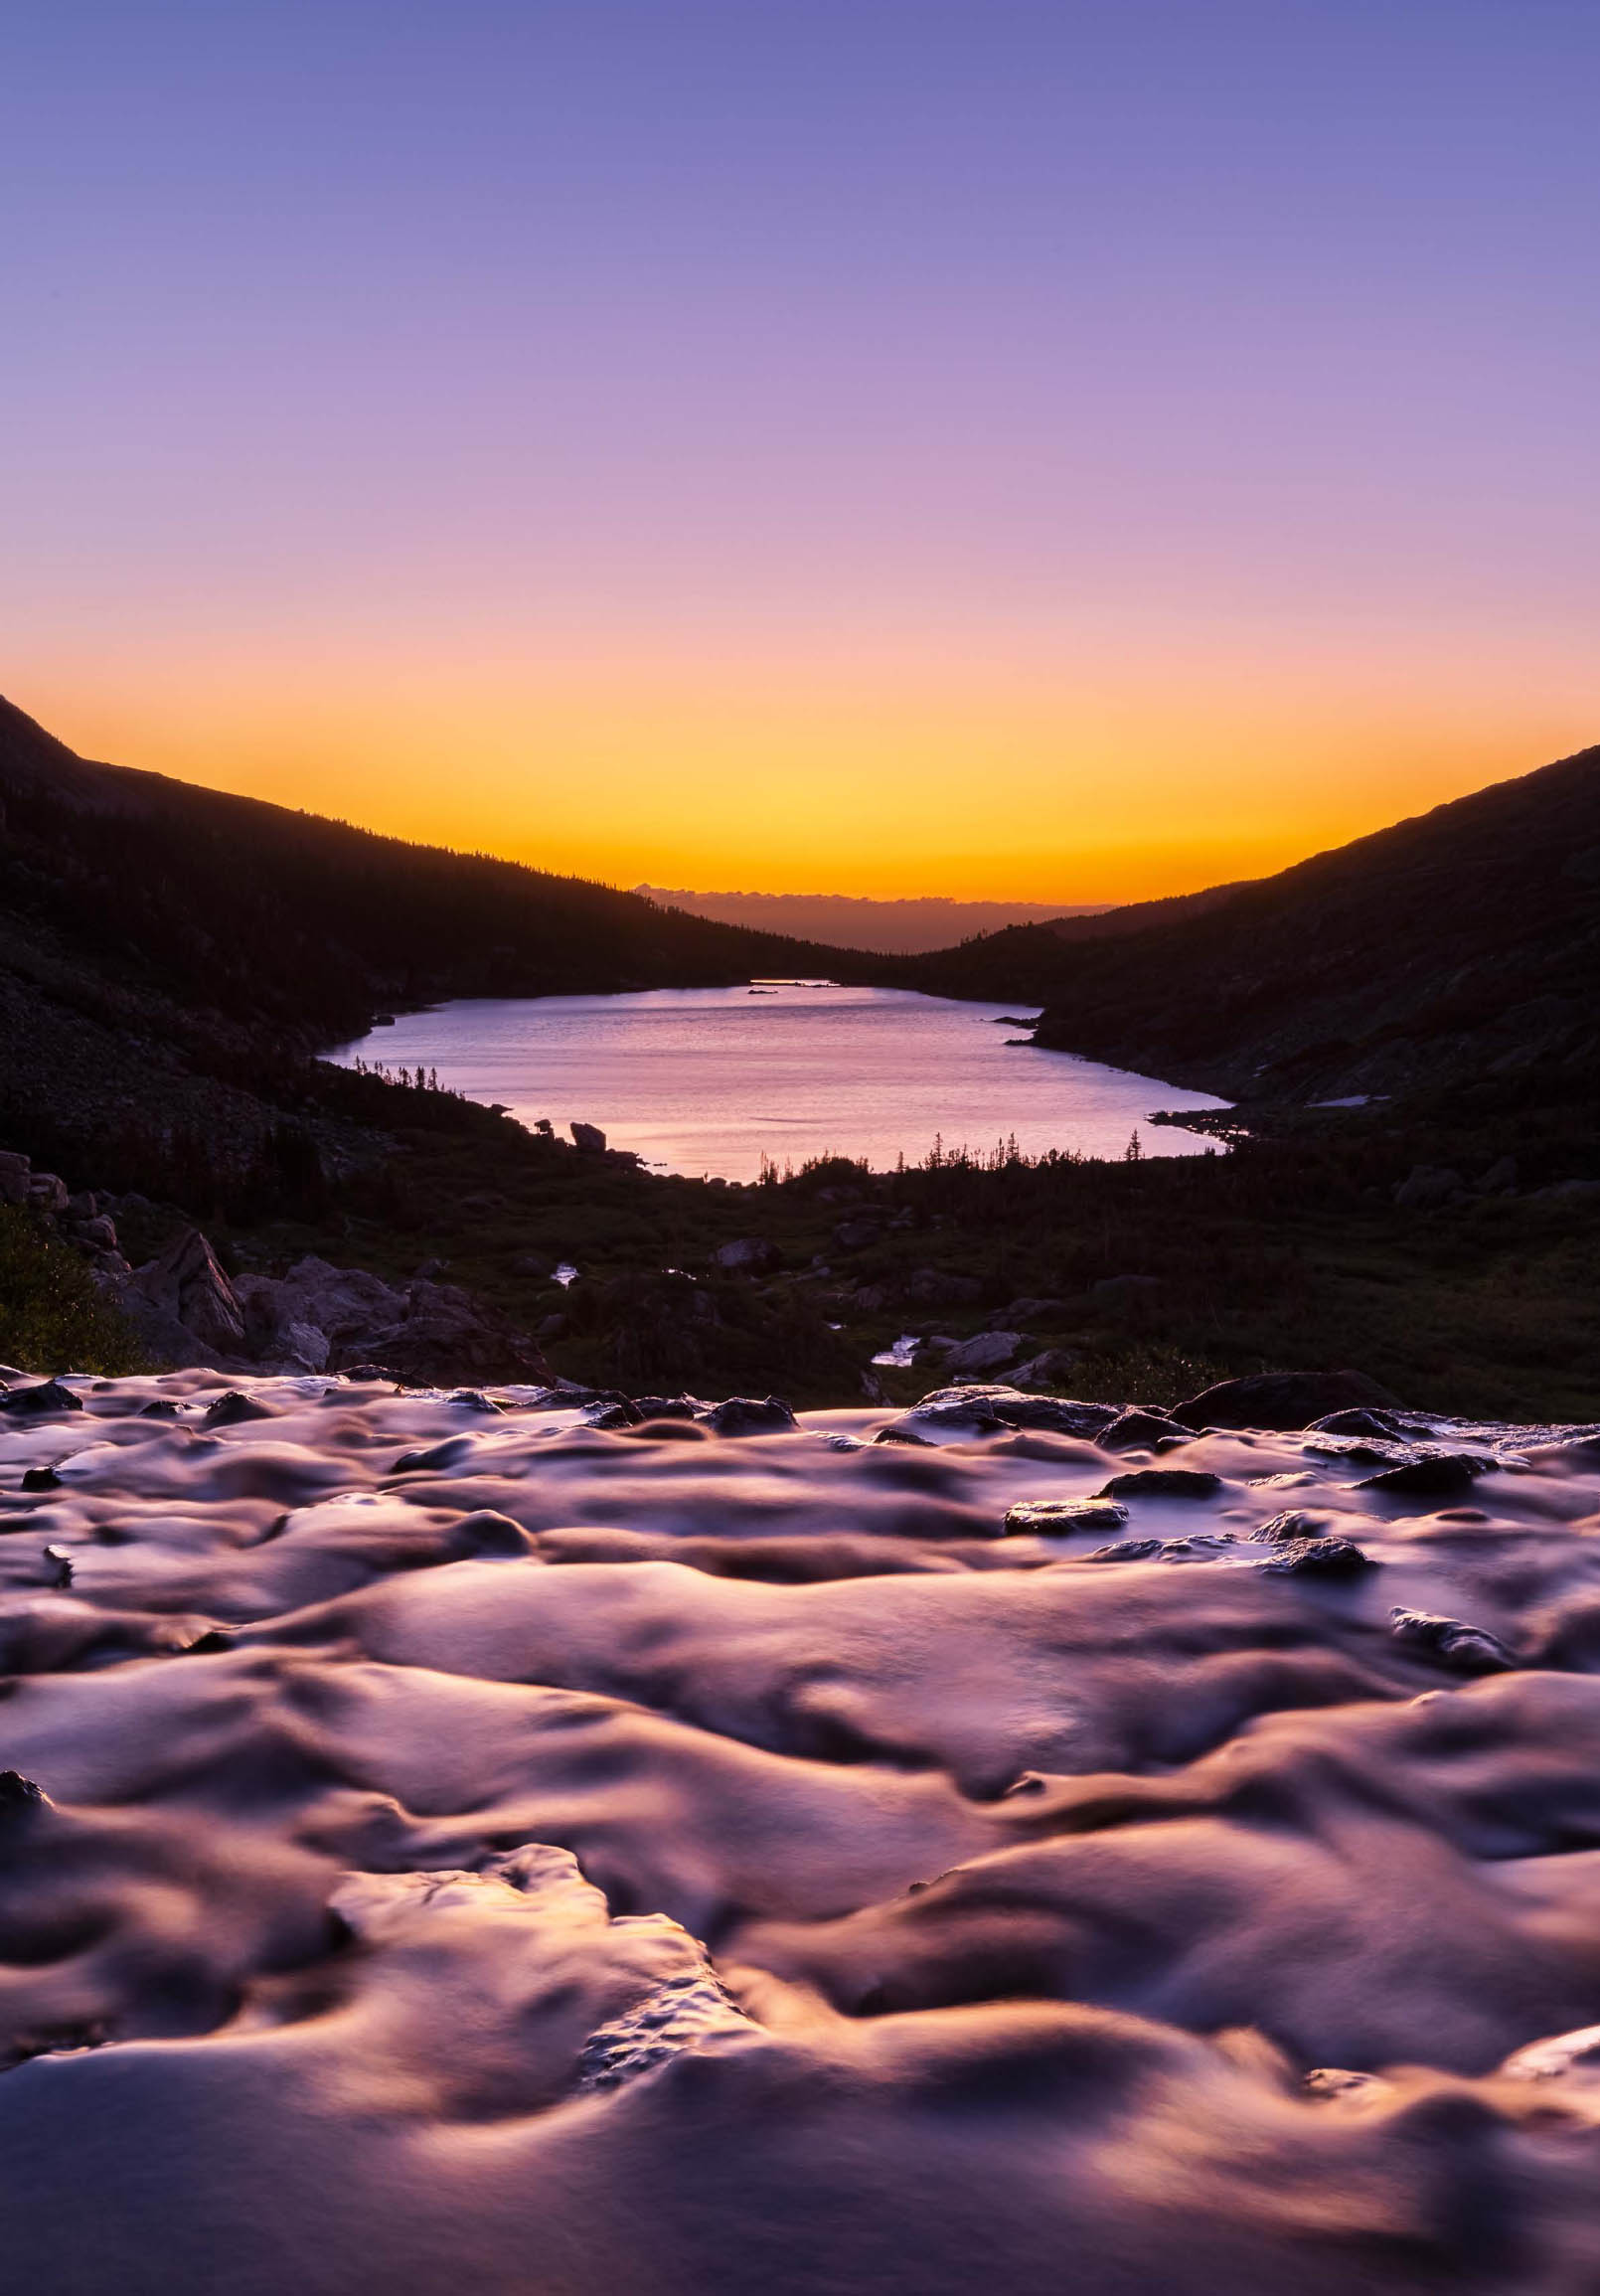
FIGURE 5-33 Dawn glow on cascade above Lake Isabelle, Indian Peaks Wilderness, Colorado. Recent volcanic eruptions halfway around the world had caused the aerosol layer to become denser, giving the sky above the golden glow a purple tint. Canon EOS 5D Mark IV, Canon EF 16-35mm f/2.8L III USM at 35mm, seven-frame bracket set, one-stop bracket interval at ISO 100, images merged using Lightroom Classic’s Photo Merge>HDR utility.
Powerful recent eruptions enhance the likelihood of witnessing clear-sky glow light 15 to 25 minutes before sunrise or after sunset. They also increase the chances that the sky above the orange glow will turn faintly purple (figure 5-33). We see purple when blue and red light enter our eyes simultaneously. The red component comes, as before, from sunlight reddened by Rayleigh scattering as it passes through the troposphere, skims the tangent point, then scatters off the aerosol layer and back down toward the sky above the golden glow. The blue component has several sources. The sunlight striking the upper part of the atmosphere directly, without first passing through the lower troposphere, has taken a shorter path through less dense air, so less blue light has scattered out of the beam. Some of the red light in this beam is absorbed by ozone in the stratosphere. The now-bluish light scatters off the aerosol layer and comes down to our eyes. Additional blue light comes from the region of the troposphere that is in the shadow of the Earth. The bluish light then mingles with the reddish light that is scattered by the aerosol layer. We see the combination of those two colors as a faint purple glow in the sky 15-25 degrees above the horizon (figure 5-34).
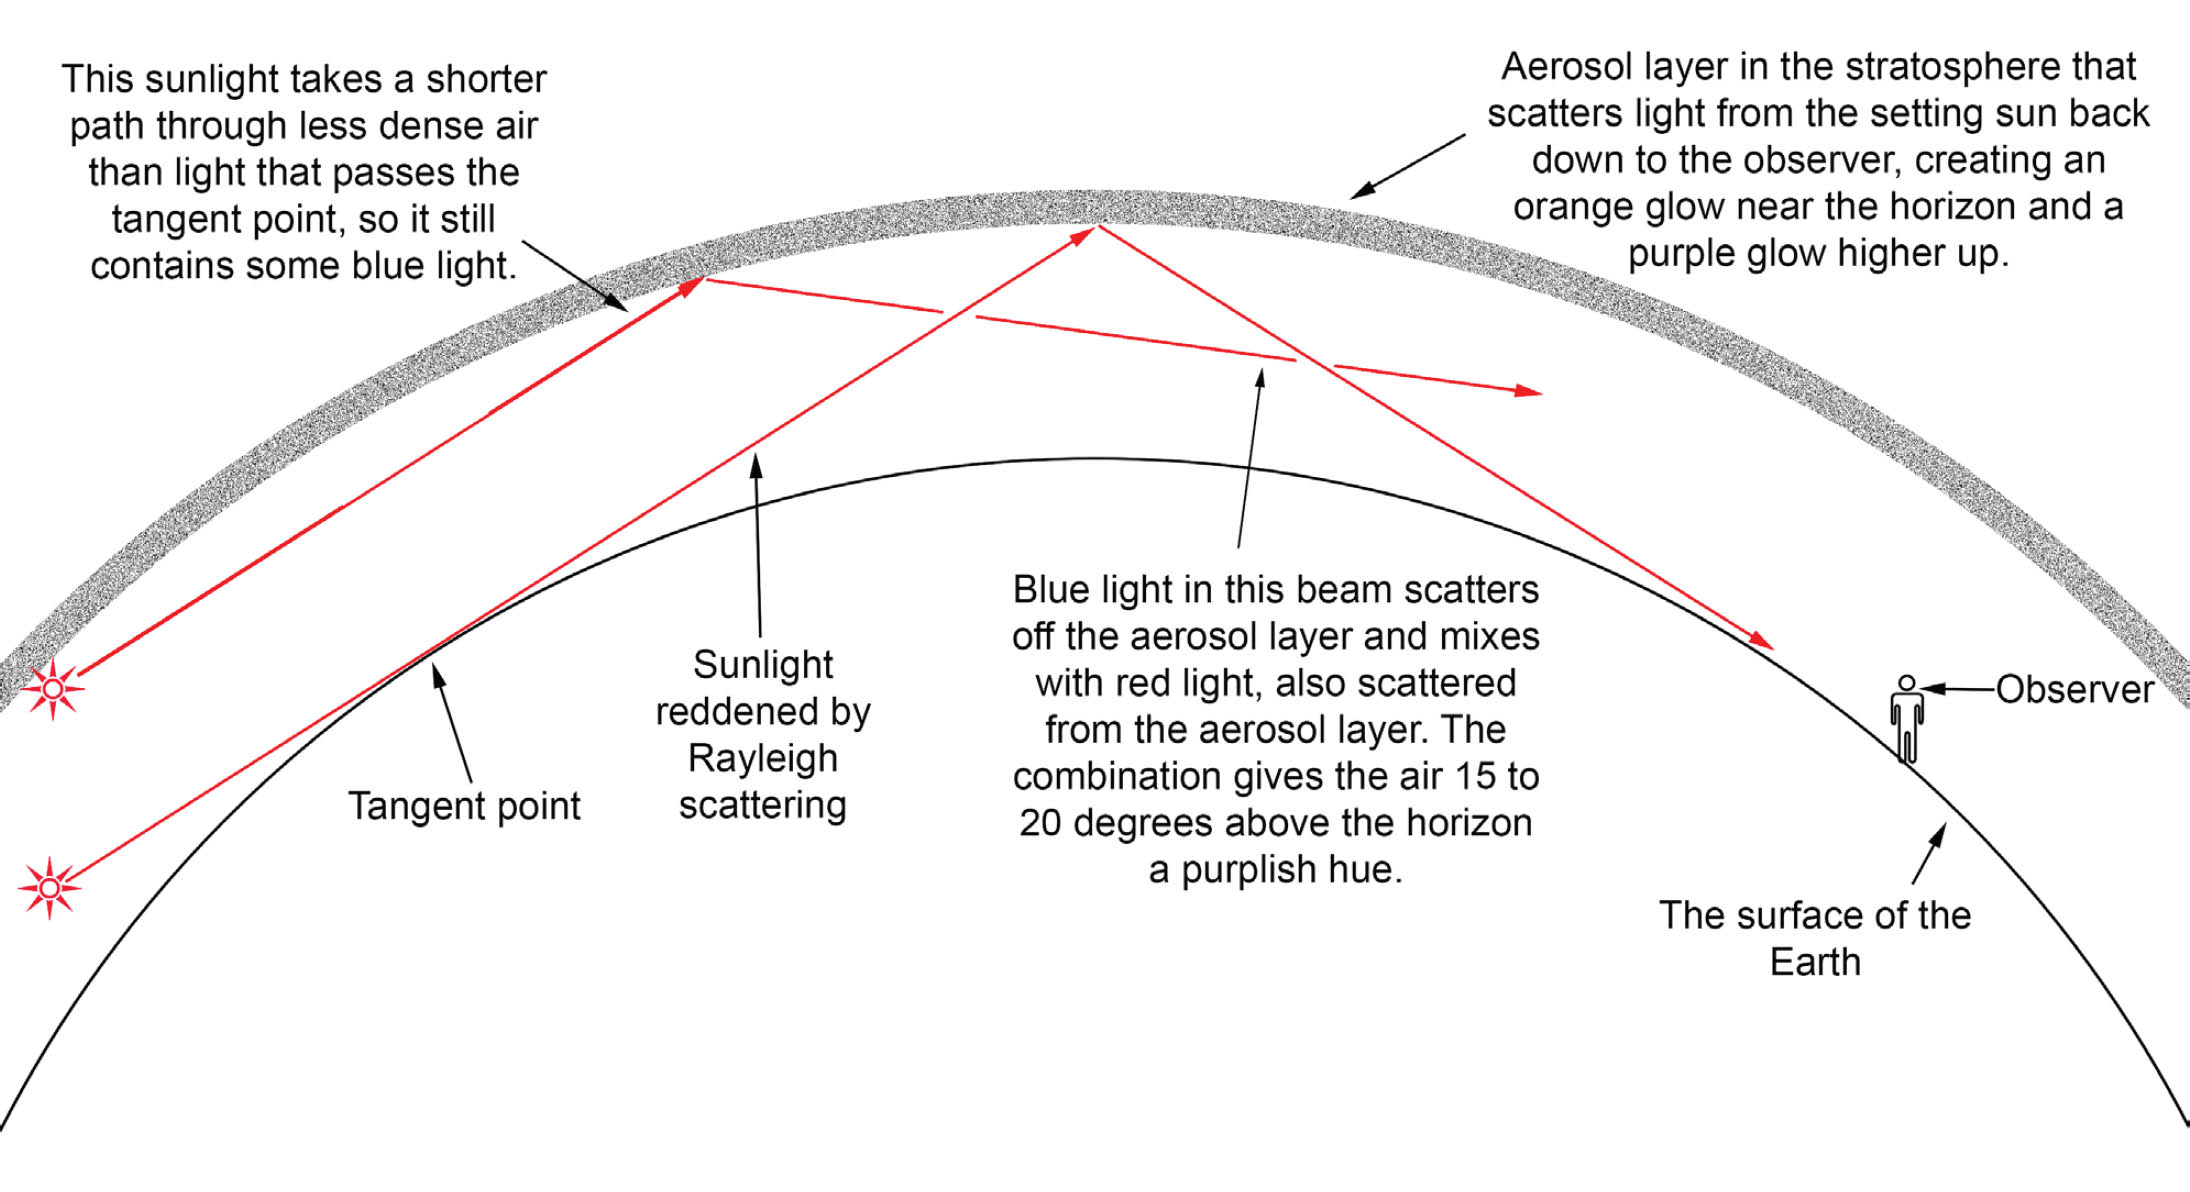
FIGURE 5-34 If the air is clear at the tangent point and recent volcanic eruptions have caused the aerosol layer to become denser, a purple glow can develop 15 to 25 degrees above the horizon roughly 20 minutes before sunrise or after sunset.
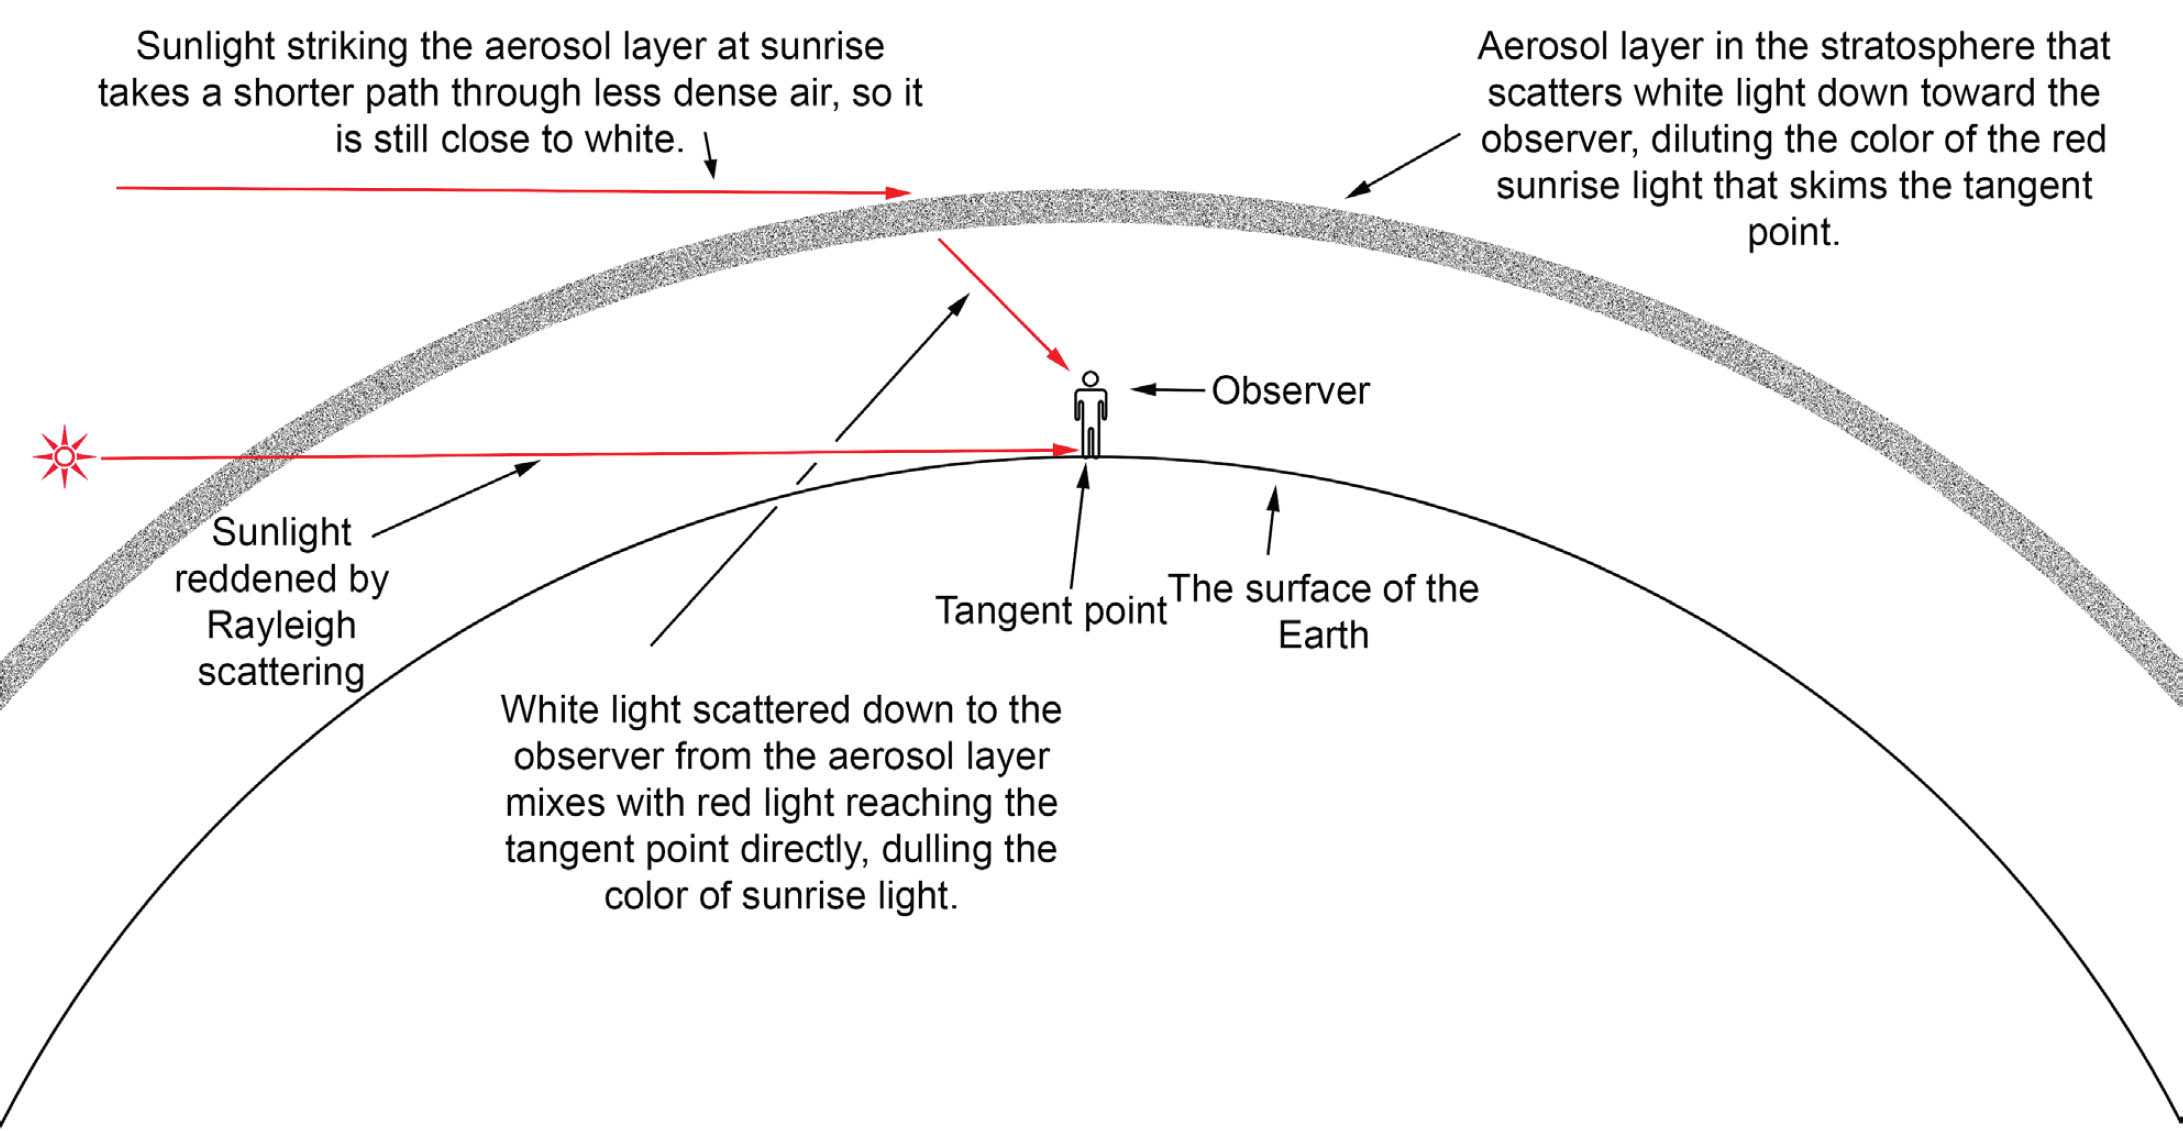
FIGURE 5-35 Recent volcanic eruptions can dull the color of the light at sunrise and sunset.
Ironically, recent eruptions can also diminish the saturation of moment-of-sunrise and sunset light. When the aerosol layer is dense right after a big eruption, the sky at the zenith is noticeably brighter at the moment of sunrise and sunset than it is when there have been no big recent eruptions and the aerosol layer is less dense. A dense aerosol layer not only bounces more light down onto landforms; that light is close to white because the path length of sunlight through the atmosphere to reach the aerosol layer in the stratosphere at sunrise and sunset is relatively short, so little blue light scatters out of the beam. This whitish light from the stratosphere dilutes the red light from beams passing through the troposphere and reaching the observer, who is standing at the tangent point. The result is that while glow light can be strengthened by eruptions, moment-of-sunrise and sunset light is often less vivid (figure 5-35).
Predicting when a clear-sky glow shot will occur requires knowing both the extent of cloud cover and haze hundreds of miles away, below your horizon, and the characteristics of the aerosol layer in the stratosphere—a difficult if not impossible task for a landscape photographer. Fortunately, there’s an easy solution: arrive long enough before sunrise that you can set up and be ready to shoot 30 minutes before sunrise, and stay comparably late after sunset. You won’t always be rewarded, but the images you’ll produce when fortune smiles will make all the waiting worthwhile.
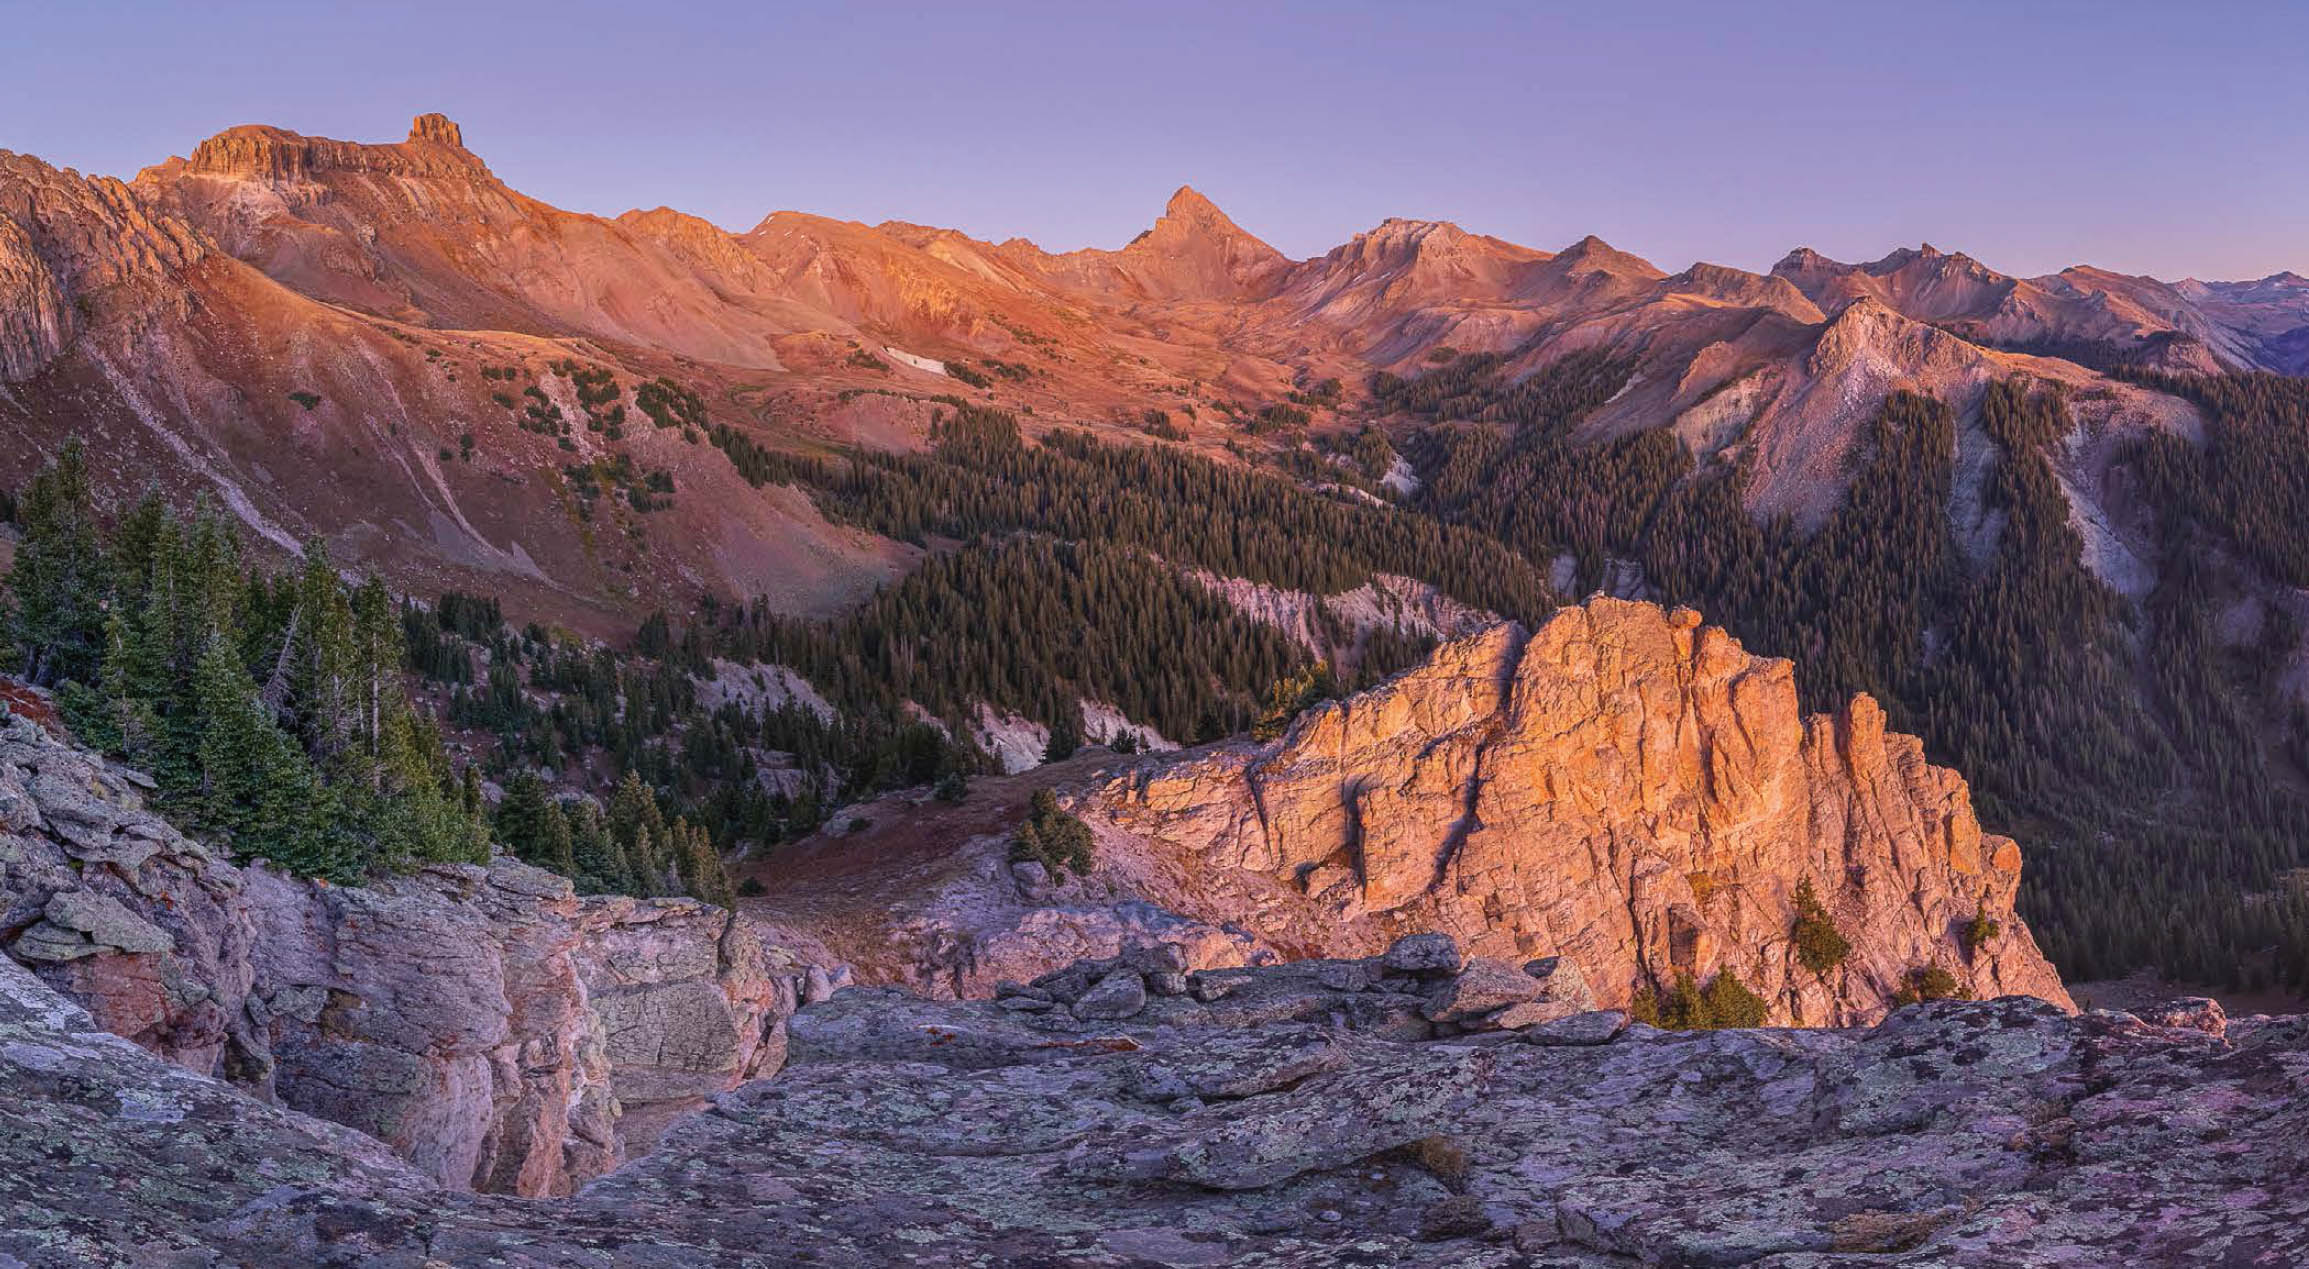
FIGURE 5-36 Twilight glow over Coxcomb Peak (left) and Wetterhorn Peak (center) from the Wetterhorn Basin Overlook about 30 minutes after sunset, Uncompahgre Wilderness, Colorado. Canon EOS 5D Mark IV, Canon EF 16-35mm f/2.8L III USM at 20mm. One row, four camera positions, three-frame bracket set, two-stop bracket interval at ISO 640, images merged using Lightroom Classic’s Photo Merge>HDR utility.
All of us tend to be blind to phenomena that we don’t understand or don’t even know exist. The more deeply I understand the science of light in the sky, the more clearly I see the sky’s awesome beauty. That sense of amazement and wonder was expressed well by John Muir, who wrote, “I used to envy the father of our race, dwelling as he did in the new-made plants and flowers of Eden. But I do so no longer. For I have discovered that I too live in creation’s dawn. The morning stars still sing together and the earth, not yet half-made, grows more beautiful every day.”
It is this sense of wonder that makes landscape photography so captivating. Wonder is crucial to the success of my work—and, I might add, one of the keys to my happiness. Naturalist Sigurd Olson said it well when he wrote, “When you lose the power of wonderment, you become old, no matter how old you are. If you have the power of wonderment, you are forever young. The whole world is pristine and new and exciting. That, I think, is the secret to any artistic endeavor—as long as you can be excited, as long as you can wonder about the magnificence of the world and the whole universe, you’ll stay forever young.”

FIGURE 5-37 The golden glow along the western horizon about 37 minutes after sunset provided the light illuminating Coxcomb and Wetterhorn Peaks in figure 5-36.