10
The Landscape at Night
Today’s high-end DSLRs and mirrorless cameras can make landscape photographs at night that were simply impossible in the film era. Film lacked the sensitivity to record the night sky as we see it, with apparently stationary stars. Exposures on even the fastest (most sensitive) film were usually so long that the stars made visible streaks as the earth rotated, rather than being rendered as points of light. True, some photographers used tracking devices to counteract the earth’s rotation, but these were specialized tools not widely used by most shooters. The sensors in today’s best digital cameras, by contrast, are so sensitive at high ISOs that photographers can capture the night sky using exposures short enough to record the stars as pinpricks of light. In brief, we can now use readily available equipment to make photographs that capture some of that sense of wonder we all felt as children gazing up at the star-filled night sky.
Mastering night photography will let you tackle six major nocturnal subjects: the Milky Way, star trails, the aurora, landscapes lit by the full moon, meteor showers, and lunar eclipses. I’ll provide an introduction to shooting the first four in this book. For an in-depth discussion of how to photograph all of these subjects, please see my book Dusk to Dawn: A Guide to Landscape Photography at Night, also published by Rocky Nook.
Equipment for Night Photography
Recent cameras perform better at night than older ones. Your camera should offer ISOs up to at least 6,400. Although you probably won’t shoot at ISOs higher than that, a camera that offers still-higher ISOs will probably be better at 6,400 than one whose top ISO is 6,400.
Two basic categories of lenses work well for night photography: ultra-wide-angle, moderately fast lenses, such as a 14mm or 16mm f/2.8 (or zooms with these specs at the wide end of the range), and ultra-fast, moderately wide lenses, such as a 35mm f/1.4. Ultra-wide-angle lenses are your best bet when just starting out. They’re versatile, meaning you’ll find them useful both day and night; they include a wide area of the sky, which is often essential when shooting the Milky Way, star trails, meteor showers, and the aurora; they provide good depth of field, even when wide open; and they offer long exposures before the stars begin to streak due to the earth’s rotation. Their disadvantage, however, is low light-gathering power. A 35mm f/1.4 lens, for example, gathers 19 times as much light per second of exposure as a 16mm f/2.8 lens. More light-gathering power translates to much lower noise. True, you can’t use as long an exposure with a 35mm f/1.4 as you can with a 16mm f/2.8 if you want to avoid visible star streaks, but the gain in light-gathering power is still huge. The disadvantages of a 35mm f/1.4 are lack of versatility, which makes their high cost even more daunting; shallow depth of field; and a much narrower angle of view, which often necessitates shooting single or multi-row panoramas to include all of the subject. That, in turn, greatly increases the complexity of both shooting and processing.
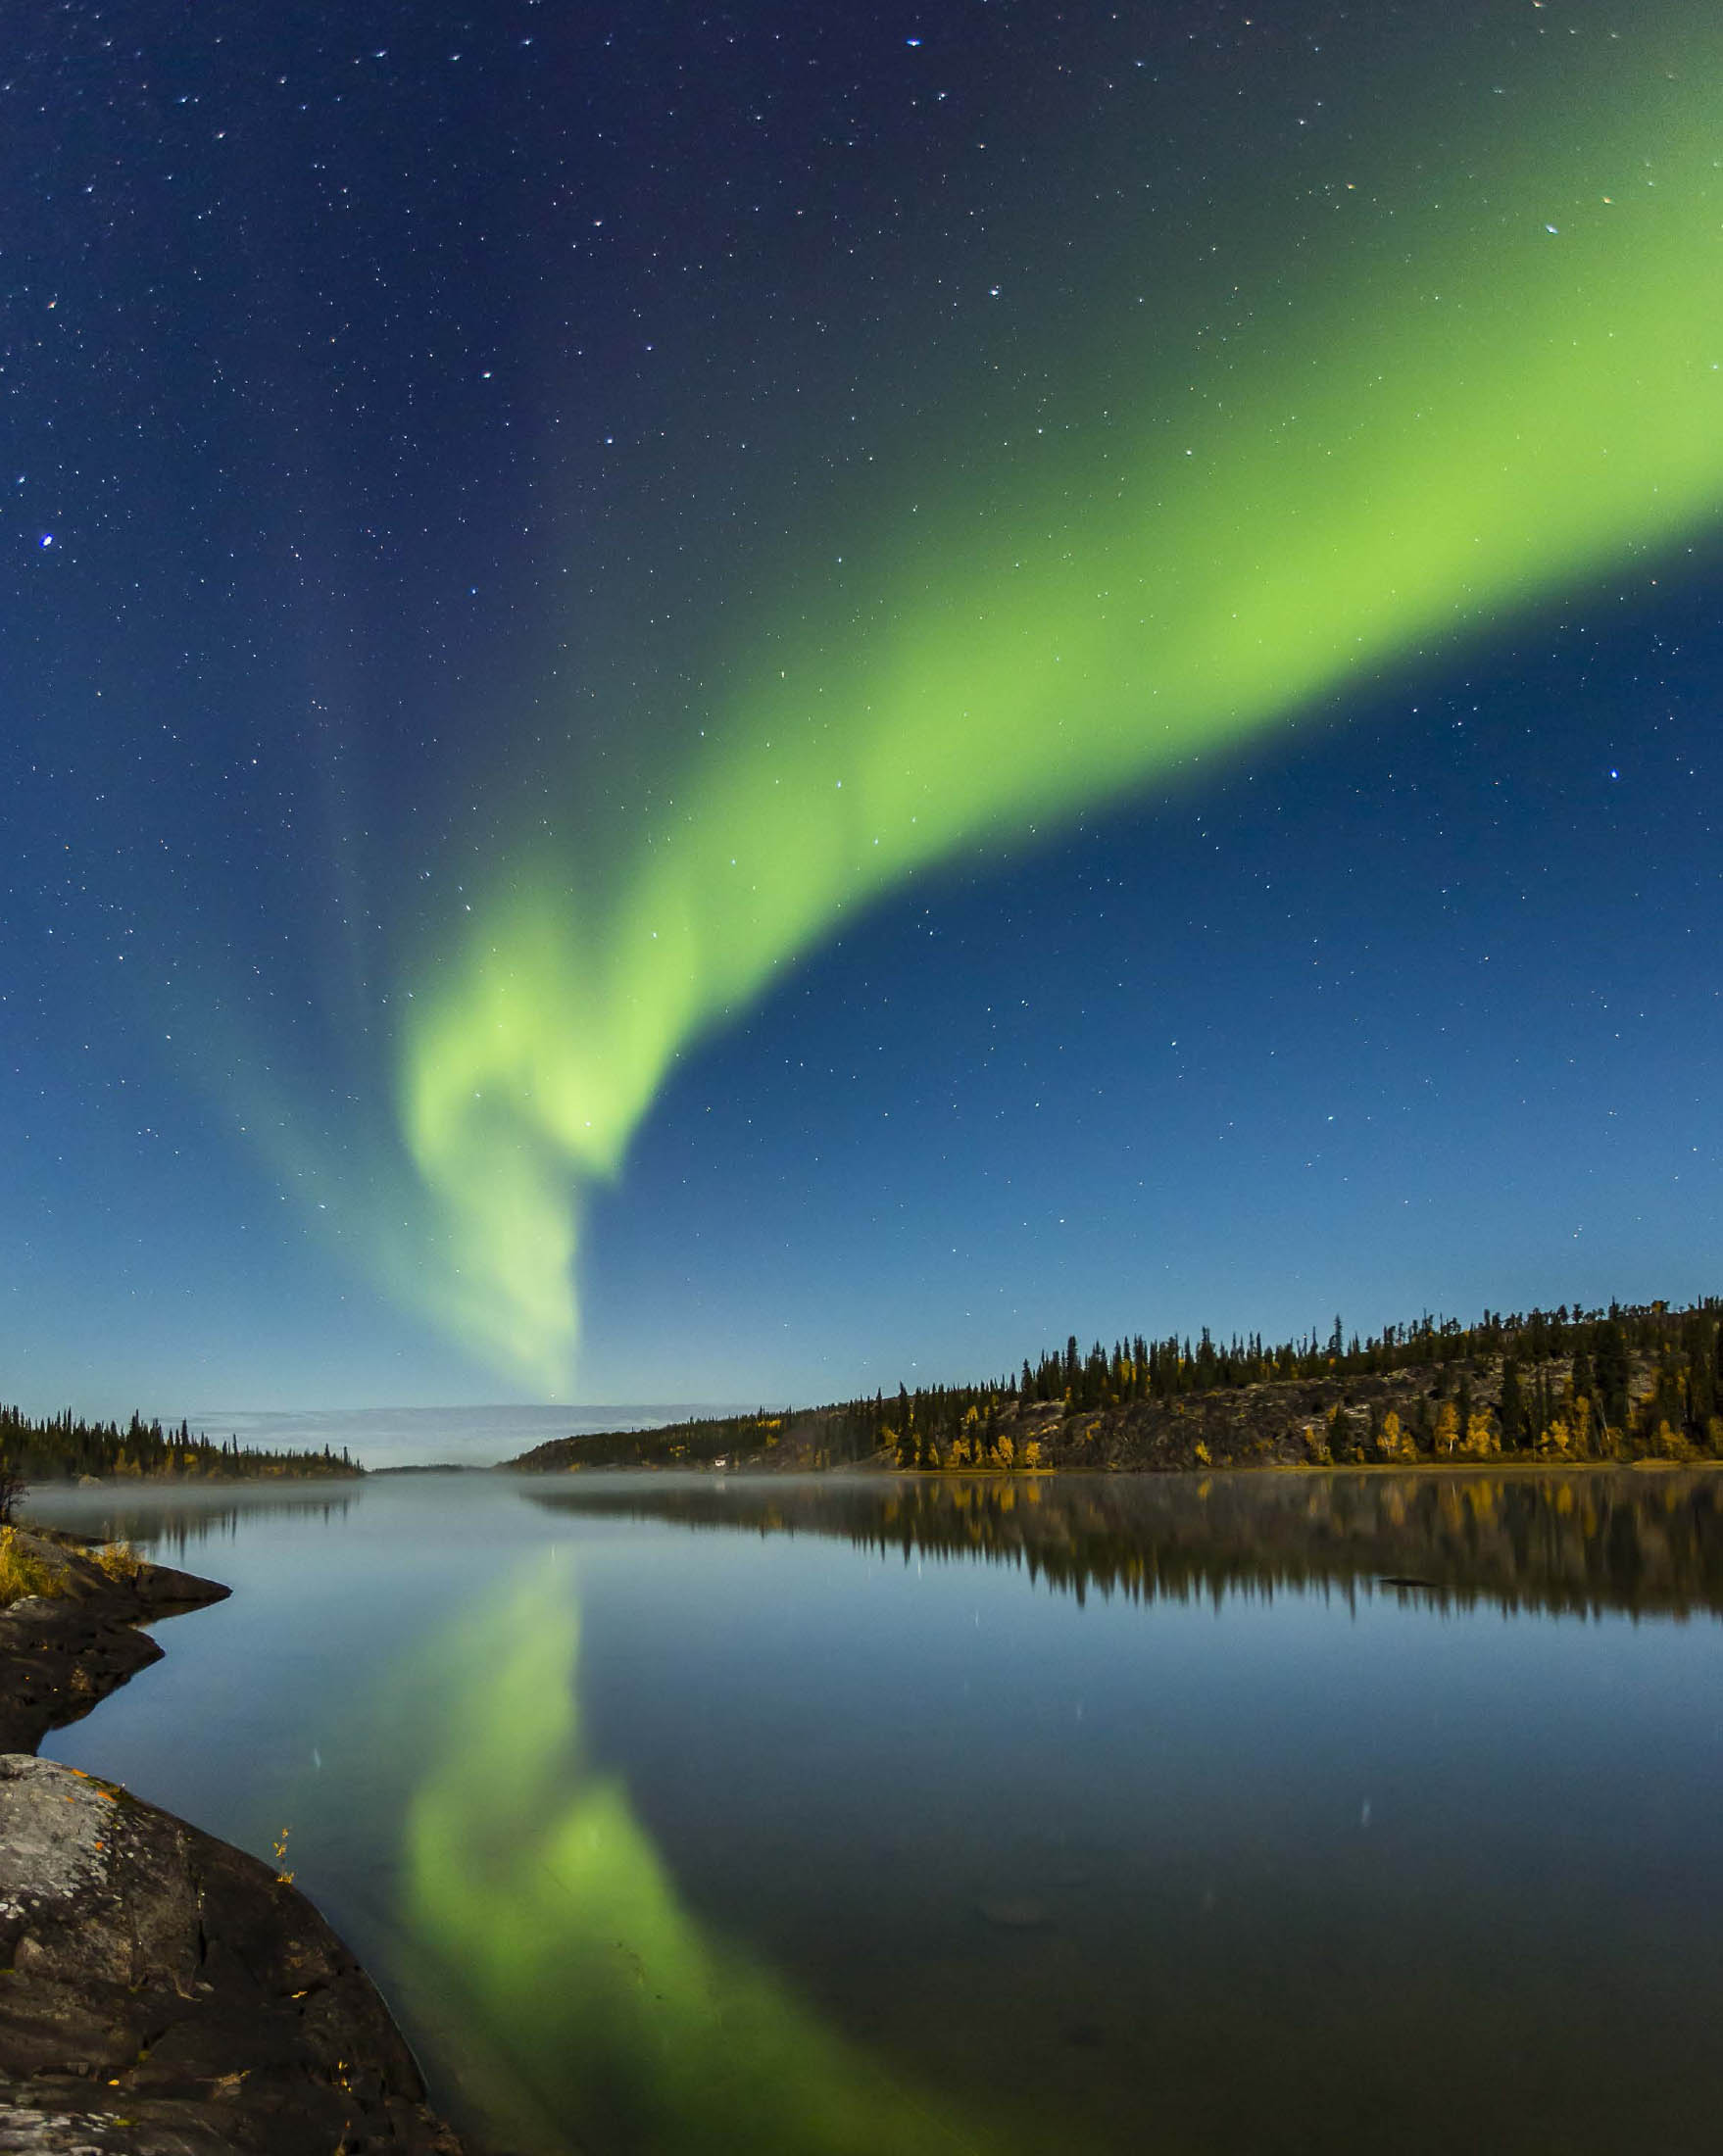
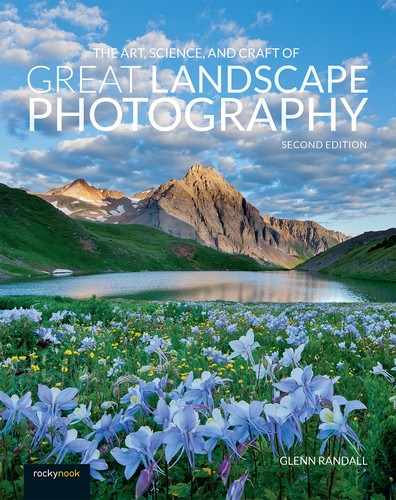
FIGURE 10-2 Aurora at Powder Point, an arm of Prelude Lake, Hidden Lake Territorial Park, along the Ingraham Trail near Yellowknife, Northwest Territories, Canada. Fast, ultra-wide lenses are essential for aurora photography. Canon EOS 5D Mark III, Canon EF 16-35mm f/2.8L II USM at 20mm, 10 seconds, f/2.8, ISO 3200.
The final consideration when choosing a lens for night photography is control of stellar aberrations. Some lenses, even very expensive ones, will create images of stars in the corner of the frame that have grown “bat wings.” These aberrations, which are frequently but erroneously called coma, are an annoyance in single-frame images and a major headache when stitching together panoramas. There are now many night-photography websites that have made it their business to test lenses for this problem. A bit of research before buying a new lens will prevent buyer’s remorse.
Some additional equipment is essential. A solid tripod is a necessity. A headlamp, unlike a flashlight, lets you use both hands when working at night. Models that offer a red LED in addition to the standard white LED will help preserve your night vision. A cable release lets you trigger the shutter without touching the camera and makes it possible to use bulb mode for exposures longer than 30 seconds. An intervalometer is basically a fancy cable release that lets you set four parameters: length of exposure, including exposures longer than 30 seconds; number of frames; interval between frames; and delay until the first frame is taken. Although not essential for your first foray into the night, an intervalometer will be invaluable as you dive deeper into night photography.
Focusing and Composing at Night
Focusing at night is challenging. Whenever possible, focus the lens at infinity during the day, then tape the lens with gaffer tape or blue masking tape to preserve correct focus.
Sometimes, of course, you must focus at night. Auto-focus is useless; turn it off completely so you don’t accidentally trigger it. Nor can you simply set the index mark on the lens to the infinity mark. That’s usually not sharp enough either. Nor can you just turn the lens barrel until it reaches its physical limit. Most modern lenses rotate past the infinity mark to allow you to focus at infinity even in extremely hot or cold conditions. Instead, point the camera toward a bright star, set the lens to infinity to get close to proper focus, engage Live View, magnify the view to 10×, and focus manually on the star. You may need to disable exposure simulation in your Live View menu to actually see a star. Check focus by shooting a test frame at the widest aperture your lens allows. Include a bit of the skyline in your test frame. A slightly out-of-focus star just looks like a bigger star, but an out-of-focus skyline will be obviously blurry. Tape the lens to preserve correct focus, then test again.
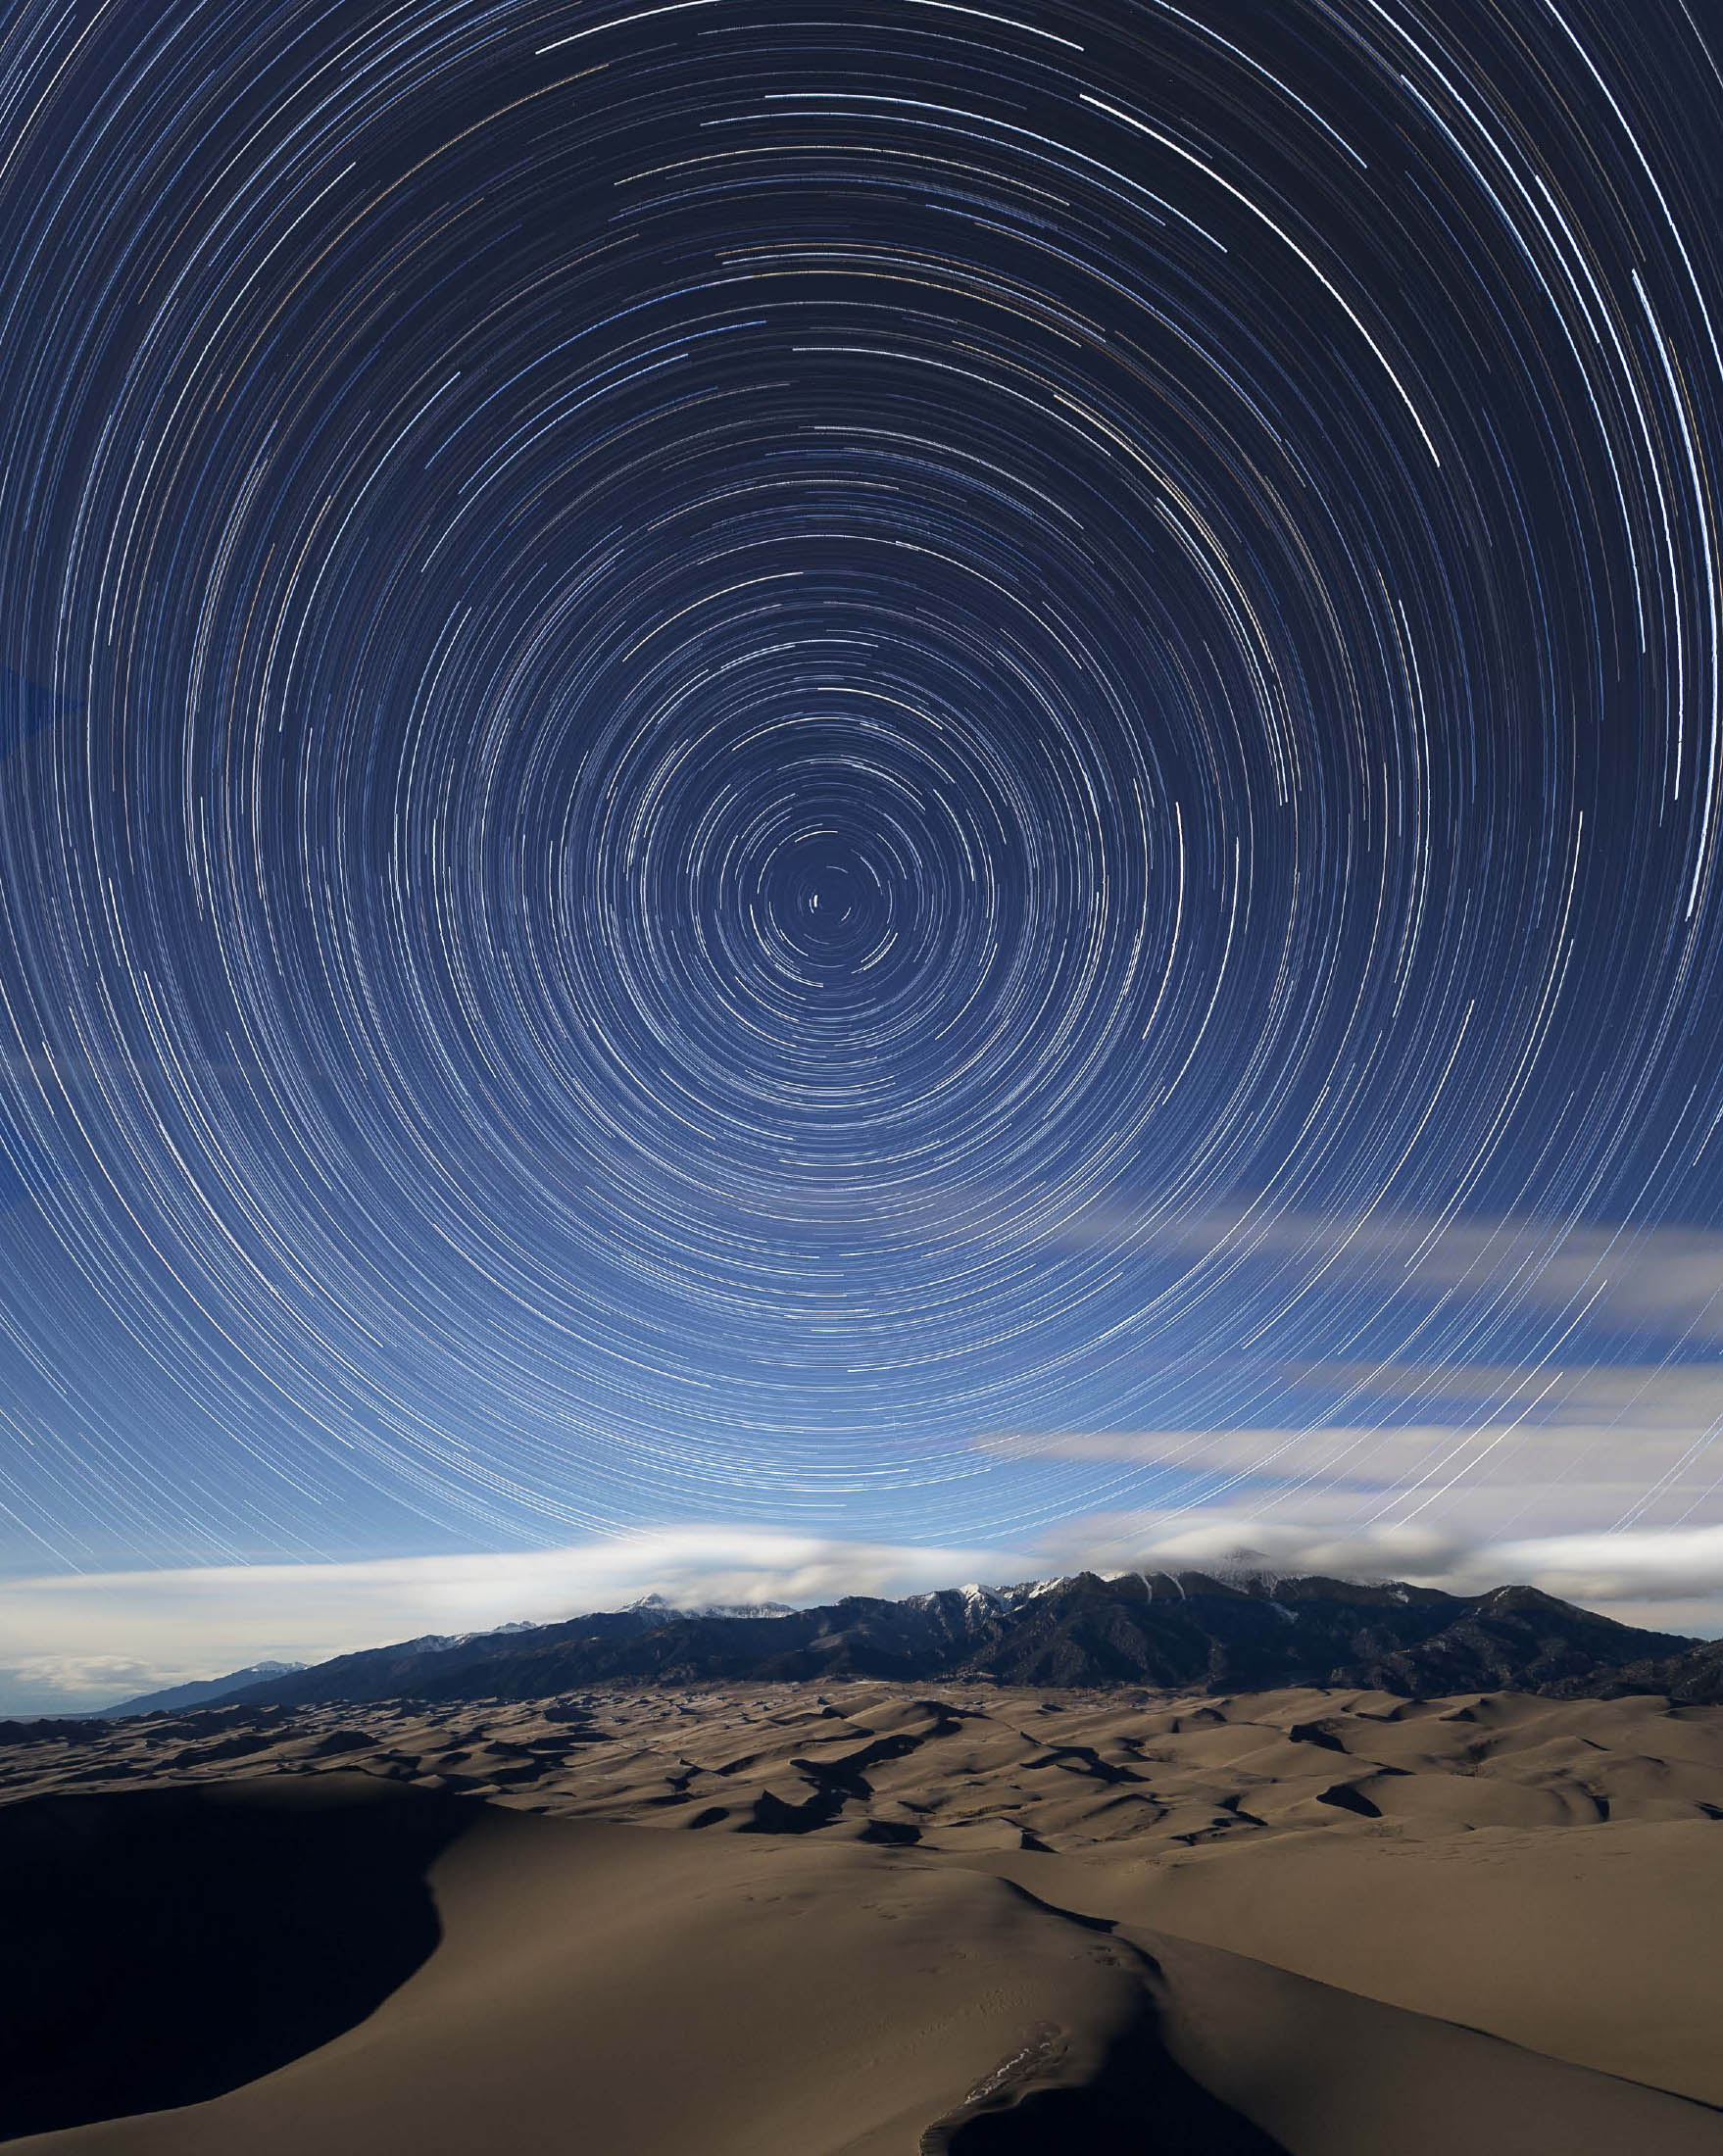
FIGURE 10-3 Star trails over the Sangre de Cristo Range from High Dune, Great Sand Dunes National Park, Colorado. A full moon (100 percent illuminated) provided light on the dunes and mountains. Canon EOS 5D Mark III, Canon EF 16-35mm f/2.8L III USM at 16mm, 290 frames exposed at 30 seconds, f/2.8, ISO 400.
Once you’re confident you’re focused at infinity, you can compose your shot. It’s easier to compose if you first let your eyes adapt to the dark. I use the red LEDs on my headlamp and turn the brightness way down to preserve my night vision as much as possible. Even better is to learn how to find the appropriate buttons on your camera by touch and use no light at all. Composition is largely a matter of guess-and-check, since you probably won’t be able to see the subject clearly through the viewfinder, although you may be able to distinguish horizon from sky. Level the camera left-to-right with a hot- shoe level or your in-camera level, point it in approximately the right direction, and shoot a test frame. Adjust as needed and try again.
Exposure at Night
Exposure at night is a matter of (educated) guess-and-check. Your meter will be useless; use manual exposure mode and ignore the meter. Your histogram, however, will still work perfectly. Trust it, rather than the image on the LCD, when judging exposure. For most night images, you’ll want to keep the stars reasonably round, which means your shutter speed must be short enough to prevent the stars from becoming streaks due to the rotation of the earth. One convenient way to calculate the maximum shutter speed is the 500 rule: divide 500 by the focal length of the lens to get the maximum shutter speed. For example, if you are using a 20mm lens, you would divide 500 by 20 and get 25 seconds—the maximum shutter speed to keep stars reasonably round. Note that this rule is a compromise between two goals: keeping stars round and keeping noise under control. If you enlarge the image to 100 percent, you will see that the stars have made short streaks. You can use a tighter standard for star roundness (for example, use 200 instead of 500 when dividing by the focal length) and compensate for the shorter shutter speed by using a higher ISO, but the price will be more noise.
The shorter the focal length, the longer the exposure you can use before the stars move noticeably. Refer to the maximum shutter speed chart on page 245 to determine the longest non-streaking exposure you can use with different focal-length lenses.

FIGURE 10-4 Double Arch by moonlight, Arches National Park, Utah. The moon was 77 percent illuminated. Canon EOS 5D Mark III, Canon EF 16-35mm f/2.8L II USM at 16mm, 20 seconds, f/2.8, ISO 1600.
Maximum Shutter Speed Chart
This chart lists the longest shutter speed you can use with different focal-length lenses before the stars make noticeable streaks. The chart assumes you are using a full-frame camera with a sensor the size of a 35mm slide. If you are using a camera with a “sub-full-frame” or APS-C sensor, multiply the focal length printed on the lens by the appropriate crop factor or multiplication factor, then use the result as the focal length for the purpose of this chart. For example, if you are using a 16mm lens on a camera with a 1.5 crop factor, multiply 16 by 1.5 to get 24. The longest exposure you can make with that lens without visible star motion is 21 seconds. Note that this chart assumes you are viewing a print made at normal resolution for high-quality output (file resolution of 240 to 300 ppi). If you zoom in to 100 percent on your monitor, you will see some very short star trails.

Photographing the Milky Way
Learning to photograph the Milky Way begins with a quick refresher on your college astronomy class. We live in the Milky Way Galaxy, which is shaped like a plate, not a sphere. Our solar system lies part-way between the center and the rim. The Milky Way is the band of light formed by hundreds of billions of very distant stars that you see as you look along the galactic plane. You can see the Milky Way every clear, moonless night of the year, but it’s not equally bright in all directions. If you look away from the center of the galaxy, you are looking through a region with relatively few stars. If you look toward the center of the galaxy, however, your line of sight leads past many more stars, plus clouds of interstellar gas and dust, so the Milky Way is much brighter and has more interesting structure.
Like any celestial object, the galactic center appears to rise and set as the earth rotates. The galactic center always rises at an azimuth of 129 degrees and sets at an azimuth of 231 degrees at 40 degrees north latitude, the latitude of my home in Boulder, but the time of rising and setting varies throughout the year. The galactic center is most prominent in late winter, spring, summer, and early fall (roughly March 1 to October 1 in Boulder) and is not visible during most of the fall and winter because it is only above the horizon during the day. The Milky Way season gets longer as you go south, and shorter as you go north.
FIGURE 10-5 An artist’s conception of the Milky Way Galaxy viewed from above. Image courtesy of NASA.
Even the brightest part of the Milky Way is relatively dim. Get as far away from city lights as possible, and shoot on a clear, moonless night when the sky is as dark as it will get. That means shooting during the interval between astronomical dusk and astronomical dawn, when the sun is more than 18 degrees below the horizon. There are many websites and smartphone apps that provide moonrise and moonset times and the times of astronomical dusk and dawn.
The sky is always brightest near the horizon. It gets darker as you look higher into the sky. That’s true at night as well as during the day. To make the best part of the Milky Way stand out against a dark sky, shoot when the galactic center is at least 10 degrees above the horizon. The galactic center reaches its maximum altitude (21 degrees as seen from Boulder) when it transits, which occurs when it is due south. As with any landscape, the best Milky Way photographs include more than sky. When planning your shoot, think about compositions in which you are looking roughly south at something interesting. Arches, sandstone towers, and dramatic peaks make good land elements. You don’t need to worry much about foregrounds; the depth of field is so shallow at the wide-open aperture you’ll be using that you won’t want anything in the frame closer than about 15 feet, even with a 16mm lens. See the chart for the depth of field of selected lenses focused at infinity.
Depth of Field for Selected Lenses Focused at Infinity (CoC .02mm)

Depth of field for certain lenses mounted on full-frame cameras and focused at infinity. The circle of confusion is 0.02 mm. This is a slightly more stringent standard for sharpness on the sensor than is used by many depth of field calculators.
In the spring, at the midlatitudes, the galactic center rises to the southeast just before astronomical dawn. You can only shoot looking southeast, and only in the wee hours. In midsummer your shooting window is much longer. You can shoot looking southeast starting at astronomical dusk, shoot looking south around midnight, and shoot looking southwest just before astronomical dawn. In the fall you can only shoot looking southwest right after astronomical dusk, and the shooting window is once again short.

FIGURE 10-6 The Milky Way over Longs Peak from the Emerald Lake Trail after an April snowstorm, Rocky Mountain National Park, Colorado. Canon 5D Mark III, Canon EF 16-35mm f/2.8L II USM at 16mm. This panorama spans approximately 145 degrees left to right and 85 degrees vertically. Stitched panorama, two rows, six camera positions per row, 20 seconds, f/2.8, ISO 6400.
Smartphone apps such as PhotoPills, the Photographer’s Ephemeris, and Sun Surveyor (my current favorite) can tell you the precise azimuth and altitude of the galactic center at any time, anywhere in the world. They can also show you the angle the Milky Way band makes with the horizon, which varies depending on the time of night and the season of the year. For example, in the Northern Hemisphere, the Milky Way arcs up and left when the galactic center rises, gradually becomes more vertical as the night progresses, then arcs slightly up and right as it sets. During most of the night, you’ll generally want to position your most important land element—the mountain, tower, or arch—in the bottom-left part of the frame so that the Milky Way arcs up and over it.
Holding Detail in the Land
A good starting-point exposure for the Milky Way on a moonless night far from any city lights is 30 seconds, f/2.8, ISO 6400. While correct for the sky, that exposure will render the land very dark. Creating a compelling photograph of the Milky Way with detail in the land (rather than letting the land fall into black silhouette) is challenging. At high ISOs, even with today’s best cameras, it’s very difficult to open up deep shadows without generating unacceptable noise and peculiar color shifts. If there’s lots of snow on the ground, you can get minimal detail in the land from starlight. To obtain more detail, shoot as long as 20 minutes before astronomical dusk or 20 minutes after astronomical dawn. The full moon will provide great detail in the land but it will wash out the Milky Way. A good compromise is to shoot when the moon is 15 to 30 percent illuminated and lighting the scene from the side. Avoid backlighting. Shooting by moonlight and shooting before astronomical dusk and after astronomical dawn create a trade-off: brighter land means a dimmer Milky Way and vice versa. You can try to get better land detail by shooting at ISOs above 6400 if your camera offers them, but the noise may be intolerable, and you may wash out the sky so much you can’t retrieve good color and detail. The image on your LCD will probably give you a false impression of how much land detail you’ve actually captured. Go into your menus and turn down the LCD’s brightness, and be sure to check your histogram.
The best way to create an image with excellent detail throughout the frame is to make two exposures, one for the sky, and one for the land, then combine them in Photoshop. The sky in the good-sky exposure will show sharp stars, while the land will be very dark. The land in the good-land exposure will be properly exposed, while the stars in the overexposed sky will make long streaks. Unfortunately, the standard version of the Rembrandt Solution allows star streaks from the good-land image to bleed through the sharp stars in the good-sky image. In a moment I’ll describe a simple way to combine the two images in Photoshop using a modified version of the Rembrandt Solution. Before combining the images, however, you’ll need to process them separately in Lightroom. Here’s how.
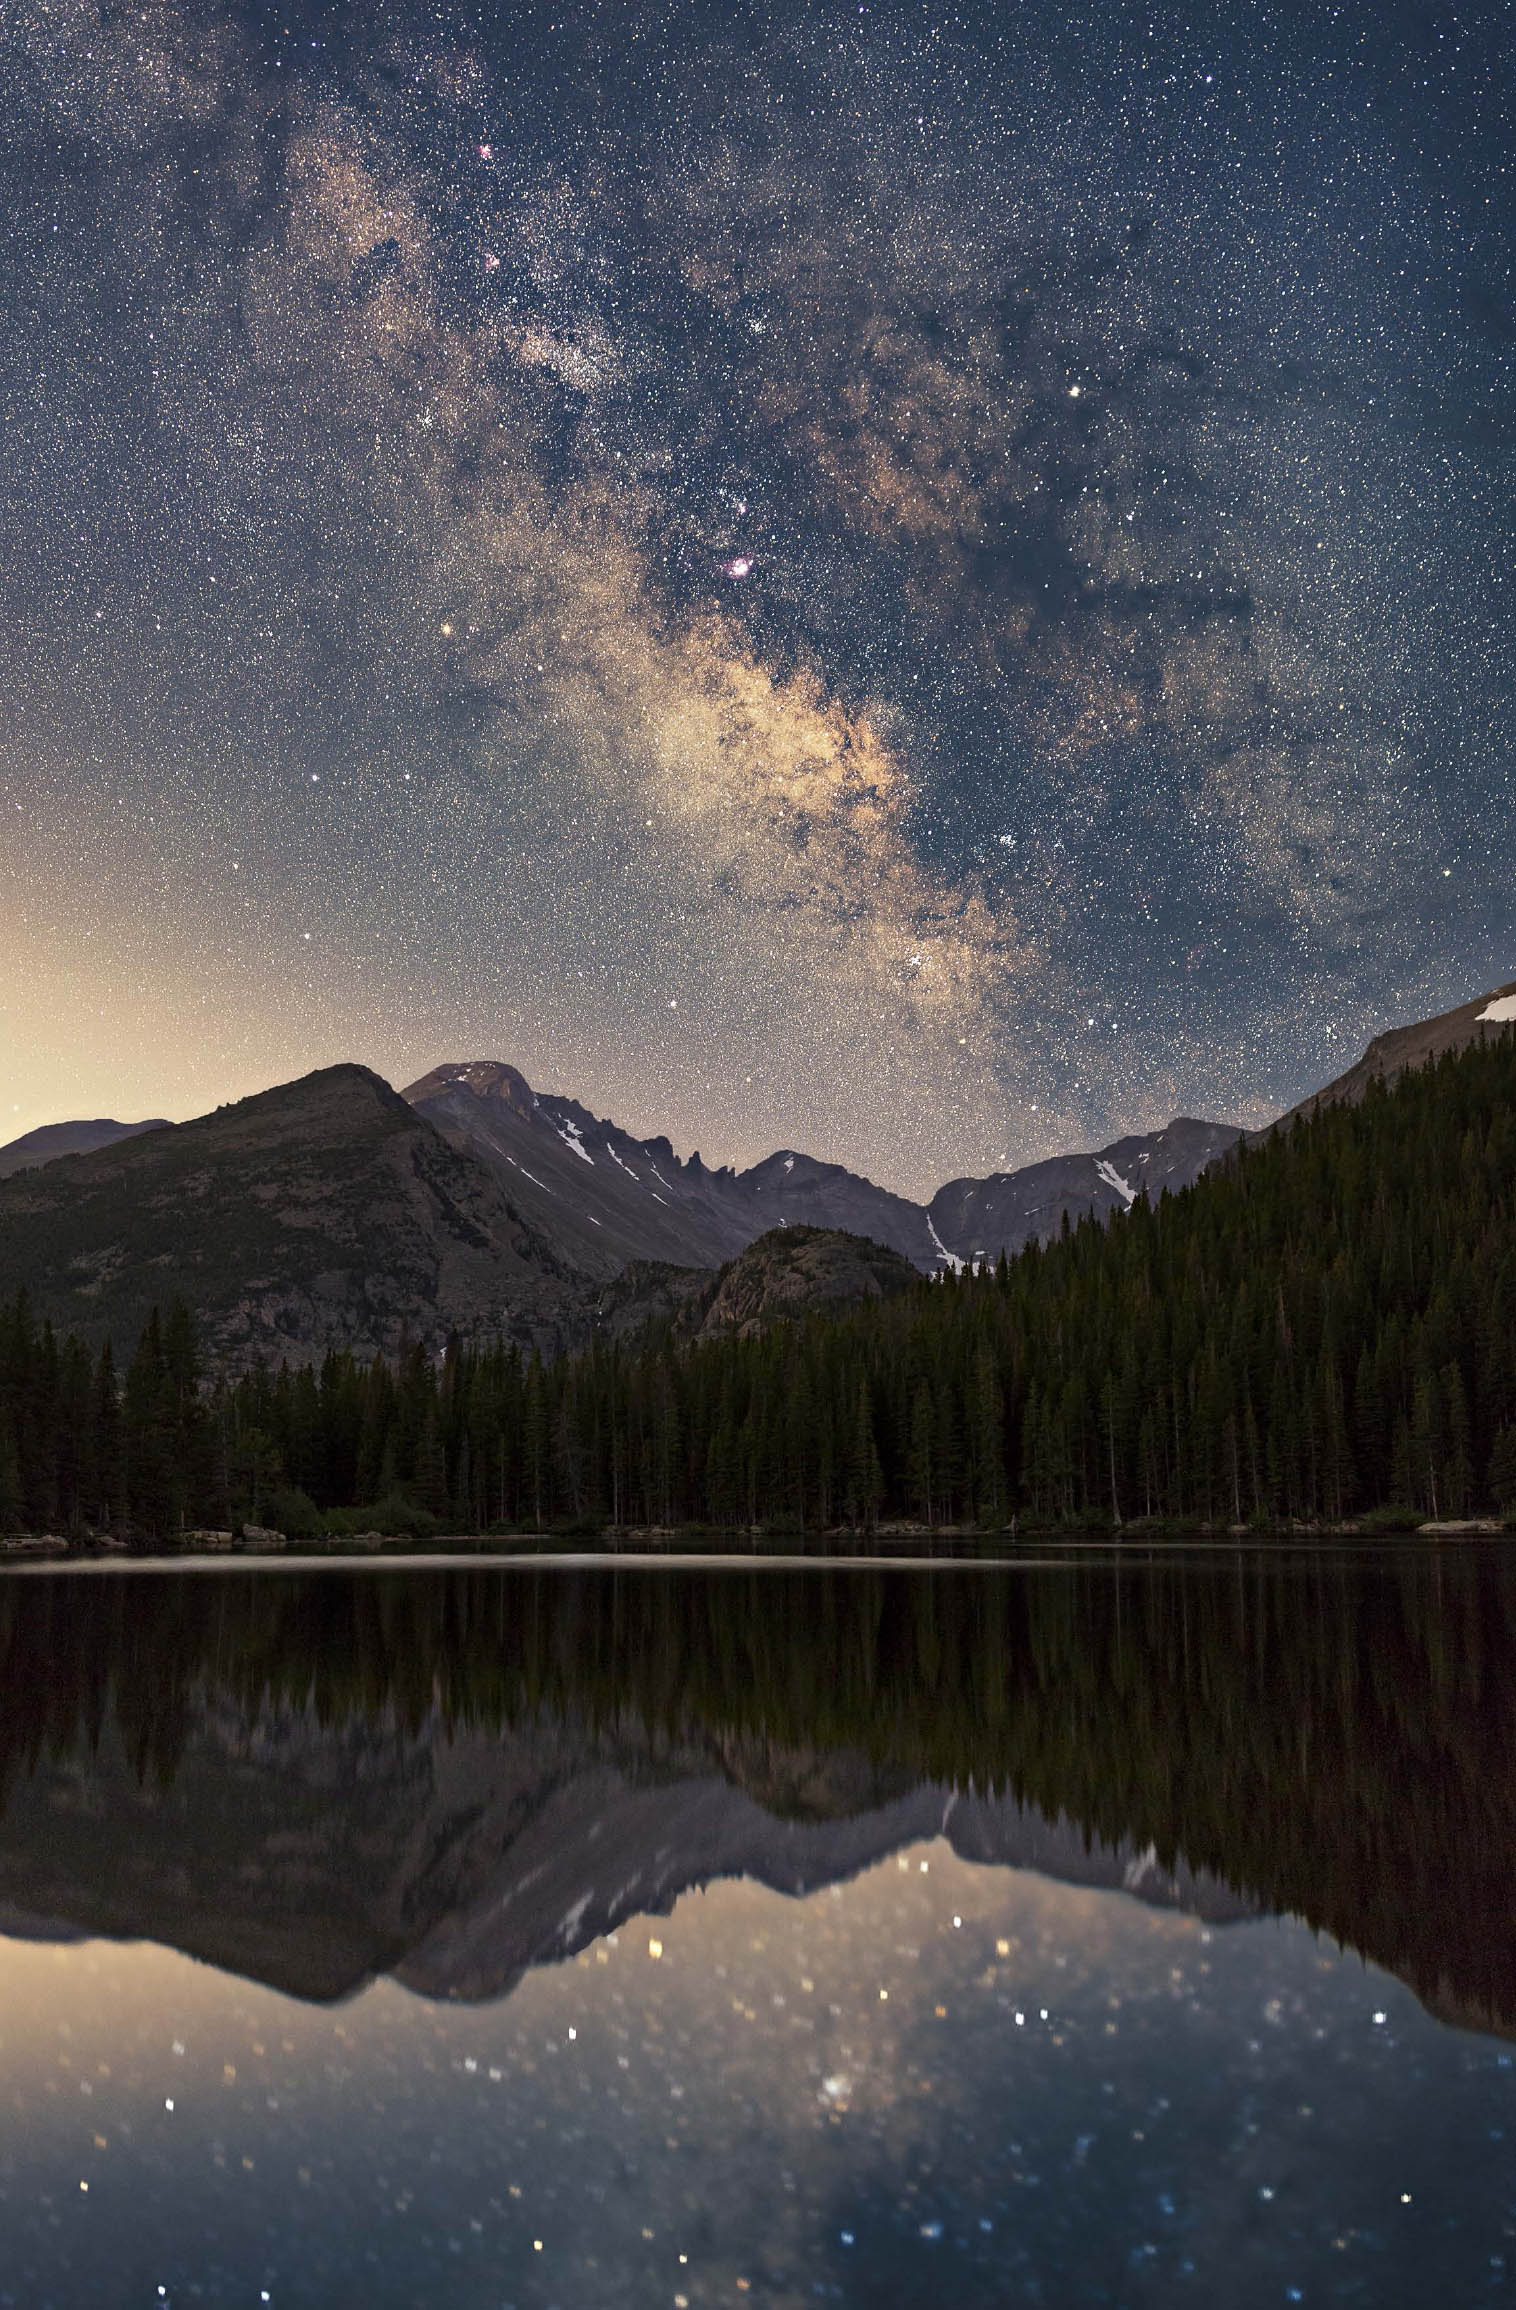
FIGURE 10-7 The Milky Way over Bear Lake and Longs Peak, Rocky Mountain National Park, Colorado. Canon 5D Mark III, Canon EF 35mm f/1.4L II USM. The explosion of interest in night photography has led to the invention of small, moderately priced star-tracking devices like the iOptron SkyTracker Pro I used for this image. Land: five frames, images stacked in Photoshop, noise reduced with Stack Mode>Median, 40 seconds, f/1.4, ISO 6400. Sky: five frames, camera mounted on iOptron SkyTracker Pro equatorial mount, images aligned and noise reduced in RegiStar, 80 seconds, f/1.4, ISO 800.
Processing Milky Way Images
If you are shooting with a daylight white balance, which I recommend, you may be startled by the green color of the sky in your Milky Way shots. Even on the darkest night, the sky is never completely black. Instead, it exhibits a faint greenish glow called airglow caused by a variety of processes high in the atmosphere. We don’t see the night sky as green, of course; in fact, we don’t really see color at night at all unless we’re looking at an object bright enough to excite the cones in our retinas. Certain bright stars, such as Arcturus, Aldebaran, Antares, and Betelgeuse, have a distinctive reddish hue. Mars, of course, is famously the red planet. Other bright stars, such as Sirius and Rigel, have a bluish cast. A few photographers show the night sky as their cameras record it when set to a daylight white balance. While scientifically accurate, such an approach, for me, fails to capture the experience of being outside under a magnificent starry sky. We have a lifelong association between the sky and the color blue. Accordingly, my preference is to preserve the colors of the bright stars and planets and shift the sky itself toward the blue we imagine the night sky to be. (See the section titled Can Night Photographs be Authentic? at the end of this chapter for a more thorough discussion of these issues.)
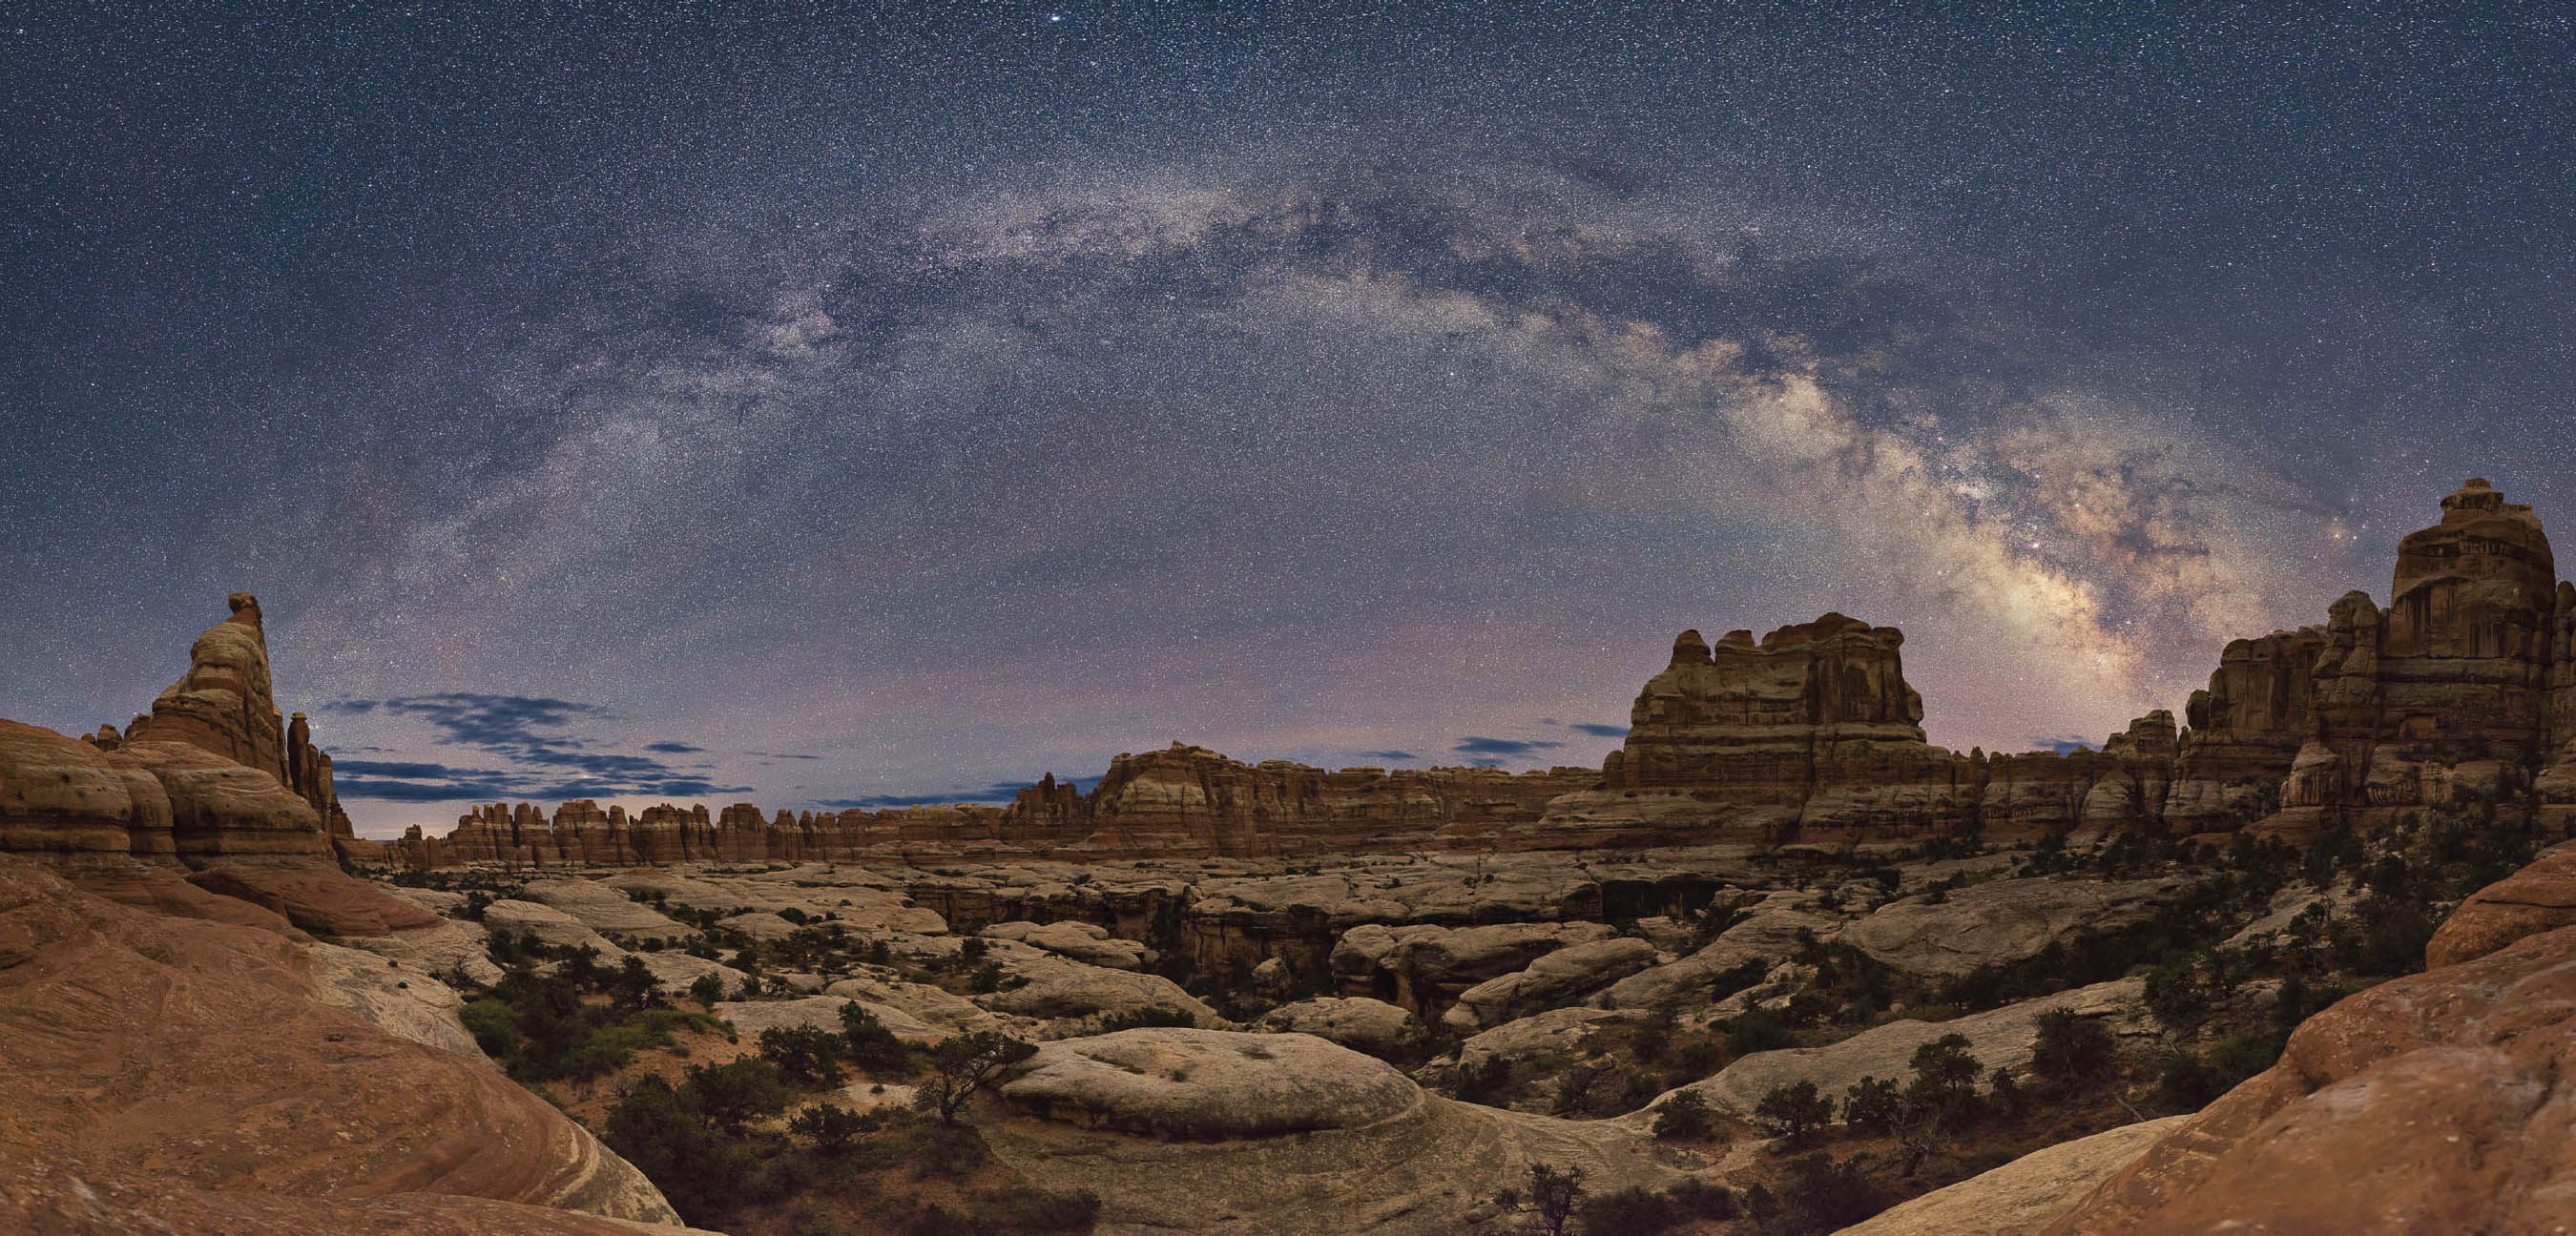
FIGURE 10-8 Milky Way panorama over Elephant Canyon, Needles District, Canyonlands National Park, Utah. Canon 5D Mark III, Canon EF 35mm f/1.4L II USM. This image can be printed 7 feet wide with low noise and high resolution. Land: two rows, nine camera positions per row, four frames per camera position, images stacked in Photoshop, noise reduced with Stack Mode>Median, 40 seconds, f/1.4, ISO 6400. Sky: two rows, nine camera positions per row, four frames per camera position, images aligned and noise reduced in RegiStar, 10 seconds, f/1.4, ISO 6400.
Here are the basic steps I follow when editing a photograph of the night sky in Lightroom. Please note that all keyboard shortcuts I mention assume you’re using a PC.

FIGURE 10-9 This is the good-highlight image, correctly exposed for the sky, straight out of the camera. Canon EOS 5D Mark III, Canon EF 16-35mm f/2.8L II USM at 16mm, 30 seconds, f/2.8, ISO 6400.
- 1. In Lightroom, in the Develop module, in the Lens Corrections panel, Profile tab, check Enable Profile Corrections and Remove Chromatic Aberrations (figure 10-10). Double-check that Lightroom has recognized your lens. If not, find the closest equivalent in the drop-down list. Checking Enable Profile Corrections eliminates most of the vignetting found in images taken with wide-angle lenses, particularly when shot wide open. Chromatic aberrations are thin, colored fringes that can appear where dark objects are silhouetted against bright backgrounds. Checking Remove Chromatic Aberrations usually has little effect when shooting with high-quality lenses and cameras but does no harm and may help with images from lower-quality equipment.
- 2. In the Noise Reduction section of Lightroom’s Detail panel, adjust the Luminance slider while examining the image at 100 percent magnification. The goal is to minimize noise while still retaining as much fine detail as possible. The exact value will vary depending on your camera and the ISO value you set. Use the lowest value that reduces noise to an acceptable level. Our visual system has less ability to resolve fine detail at night than it does during the day, so the slight loss of detail that inevitably accompanies noise reduction is usually acceptable. The default setting for the Color noise-reduction slider usually works well.
- 3. Next, use the Tone Curve panel in Lightroom to shift the sky color toward blue by manipulating the individual red, green, and blue channels. Note that the Tone Curve panel has two modes. If you see the word Region underneath the graph, with four sliders below that, click the small icon in the bottom-right corner of the dialog box to switch to the Edit Point Curve mode.
- 4. Set the Point Curve preset to Linear. Next, click the disclosure triangle next to Channel: RGB and choose the red channel. Click to place a point on the curve about two-thirds of the way up, but don’t move the point in any direction. This point serves to anchor the top part of the red curve, preserving the color of the highlights (the stars and Milky Way) as captured in the original file. Next, click to place a point about one-quarter of the way up the curve and drag downward a bit. Switch to the green channel and place the same two points. Again, drag the lower point down a bit. Finally, switch to the blue channel, place the same two points, but this time drag the lower point upward a bit. Figure 10-11 shows screenshots of the three channels.
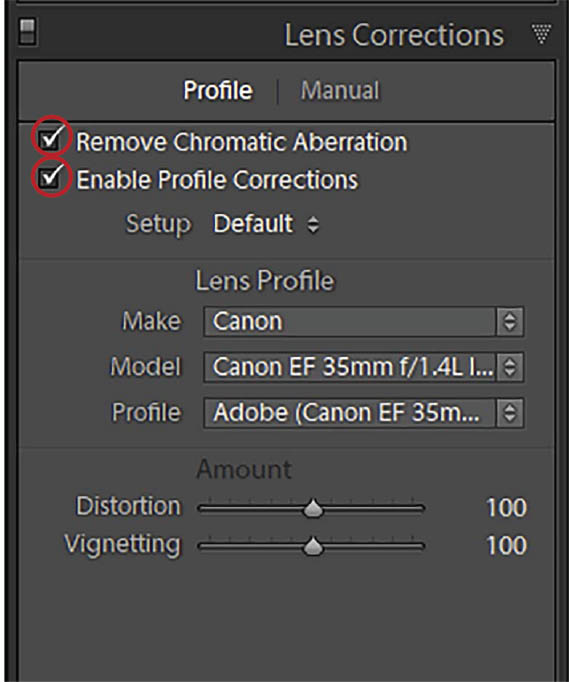
FIGURE 10-10 Screenshot of the Lens Corrections panel in Lightroom Classic’s Develop module with Remove Chromatic Aberration and Enable Profile Corrections enabled.
- 5. If you find that it’s hard to make small, precise adjustments to the curve, hold down the Alt key while you drag the point. The point will now move a smaller distance for a given mouse movement, giving you better control. The goal is to shift the color of the sky to a pleasing blue while preserving the original colors of the stars and the Milky Way. It can take a lot of trial and error to get this right. Once you have a group of settings you like, click the disclosure triangle next to Point Curve: Custom and click Save to create a preset. You’ll probably find you need different settings for different images, so you may want to create a series of presets you can click through to see which one gets you closest. You can then perfect your settings if necessary. On nights when the airglow is particularly strong, you may find it impossible to completely eliminate the green cast without shifting some portions of the sky toward purple. Your best compromise may be to shift the upper regions of the sky blue while allowing the sky near the horizon to retain its greenish hue.
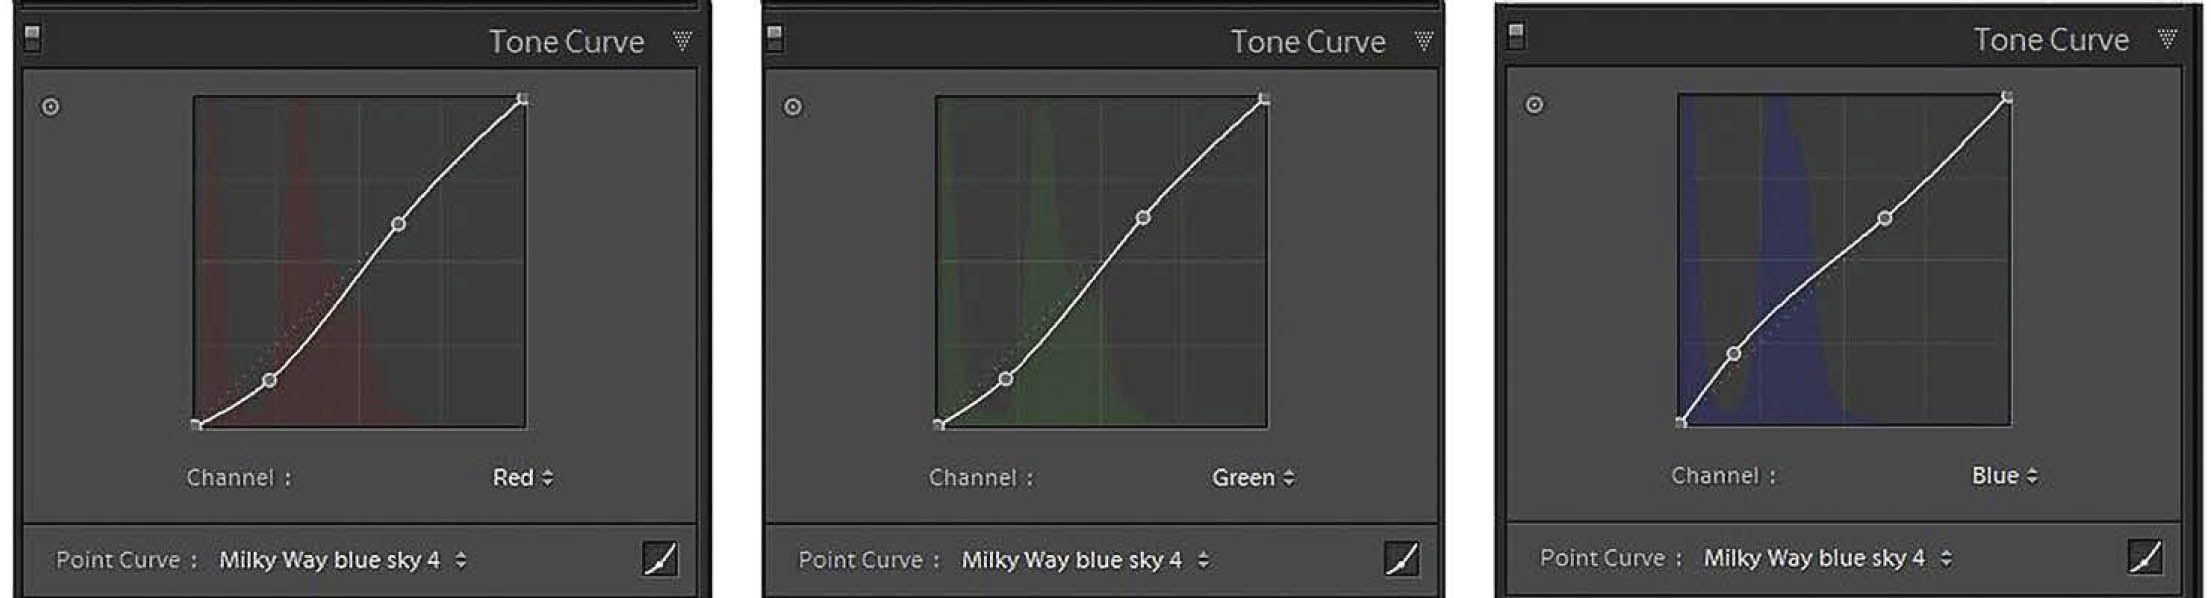
FIGURE 10-11 Three views of the Tone Curve panel in Lightroom Classic’s Develop module showing settings for the three channels that will shift the sky color toward blue.
- 6. The next step is to increase contrast in the sky to make the Milky Way stand out a bit more. Don’t increase contrast globally; that just makes the dark land even darker. Instead, paint additional contrast onto the sky using Lightroom’s Adjustment Brush. Choose the Adjustment Brush from the toolbox just above the Basic panel (figure 10-12). As a starting point, set Contrast to 30. Choose an appropriate brush size. It will be easiest to hide the transition between areas where you paint and unaffected areas if you choose a soft-edged brush, so set Feather to 100. Flow controls how much of the effect is laid down in one stroke over an area. A setting of 100 percent means you will apply the full effect in a single stroke. Reduce the Flow setting to build up the effect with multiple brush strokes over an area, even with the mouse button held down continuously. With enough strokes you will eventually apply the full effect. Density controls what percentage of the effect will be laid down regardless of how many passes you make over an area with the mouse button held down or how many additional strokes you apply after releasing the mouse button. I normally leave this set to 100. Leave Auto Mask unchecked. Once you’ve painted the effect into the image, you can adjust the Contrast setting (and any of the other sliders) to taste.
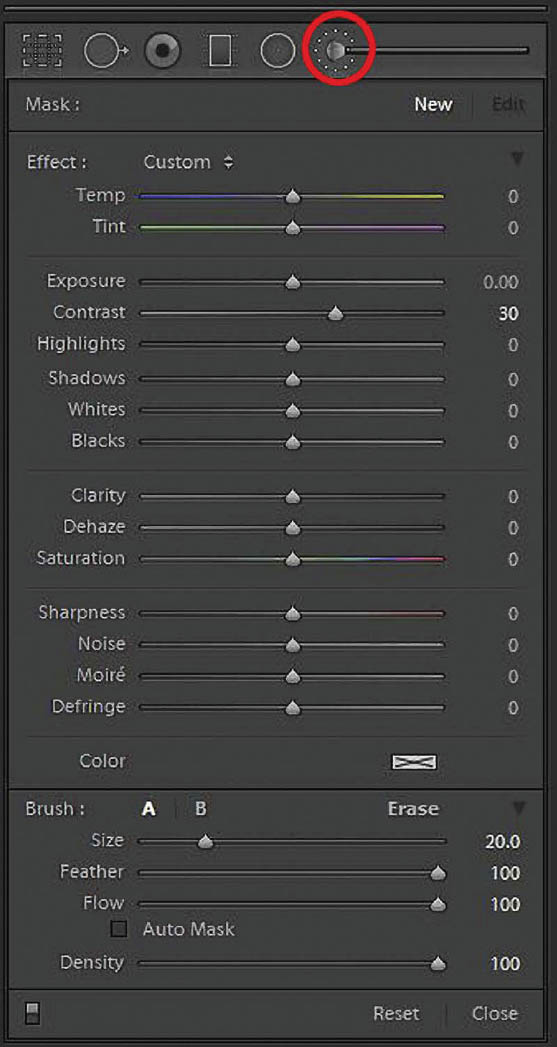
FIGURE 10-12 The Adjustment Brush dialog box in Lightroom Classic’s Develop module with the Adjustment brush circled. The Contrast slider is set to 30.
- 7. Adding a bit of Clarity, either globally in the Basic panel, or locally with the Adjustment Brush, can make the stars pop and add interest to the land. Figure 10-13 shows the final result.
- 8. Now turn your attention to the good-land image (figure 10-14). First, follow the instructions in steps 1 and 2 to remove chromatic aberrations, enable profile corrections, and reduce noise. Next, cool the image slightly by setting the Temp slider in the Basic panel to a value between 4,200 and 4,600 (figure 10-15). Our visual system gives us the impression (which is actually erroneous) that moonlit scenes are bluish. Even though you presumably shot your Milky Way image on a moonless night, you can still give the land a nighttime look by shifting the tones toward blue. I typically use values at the lower end of the range for snow scenes and higher values for desert scenes. Figure 10-16 shows the final result.
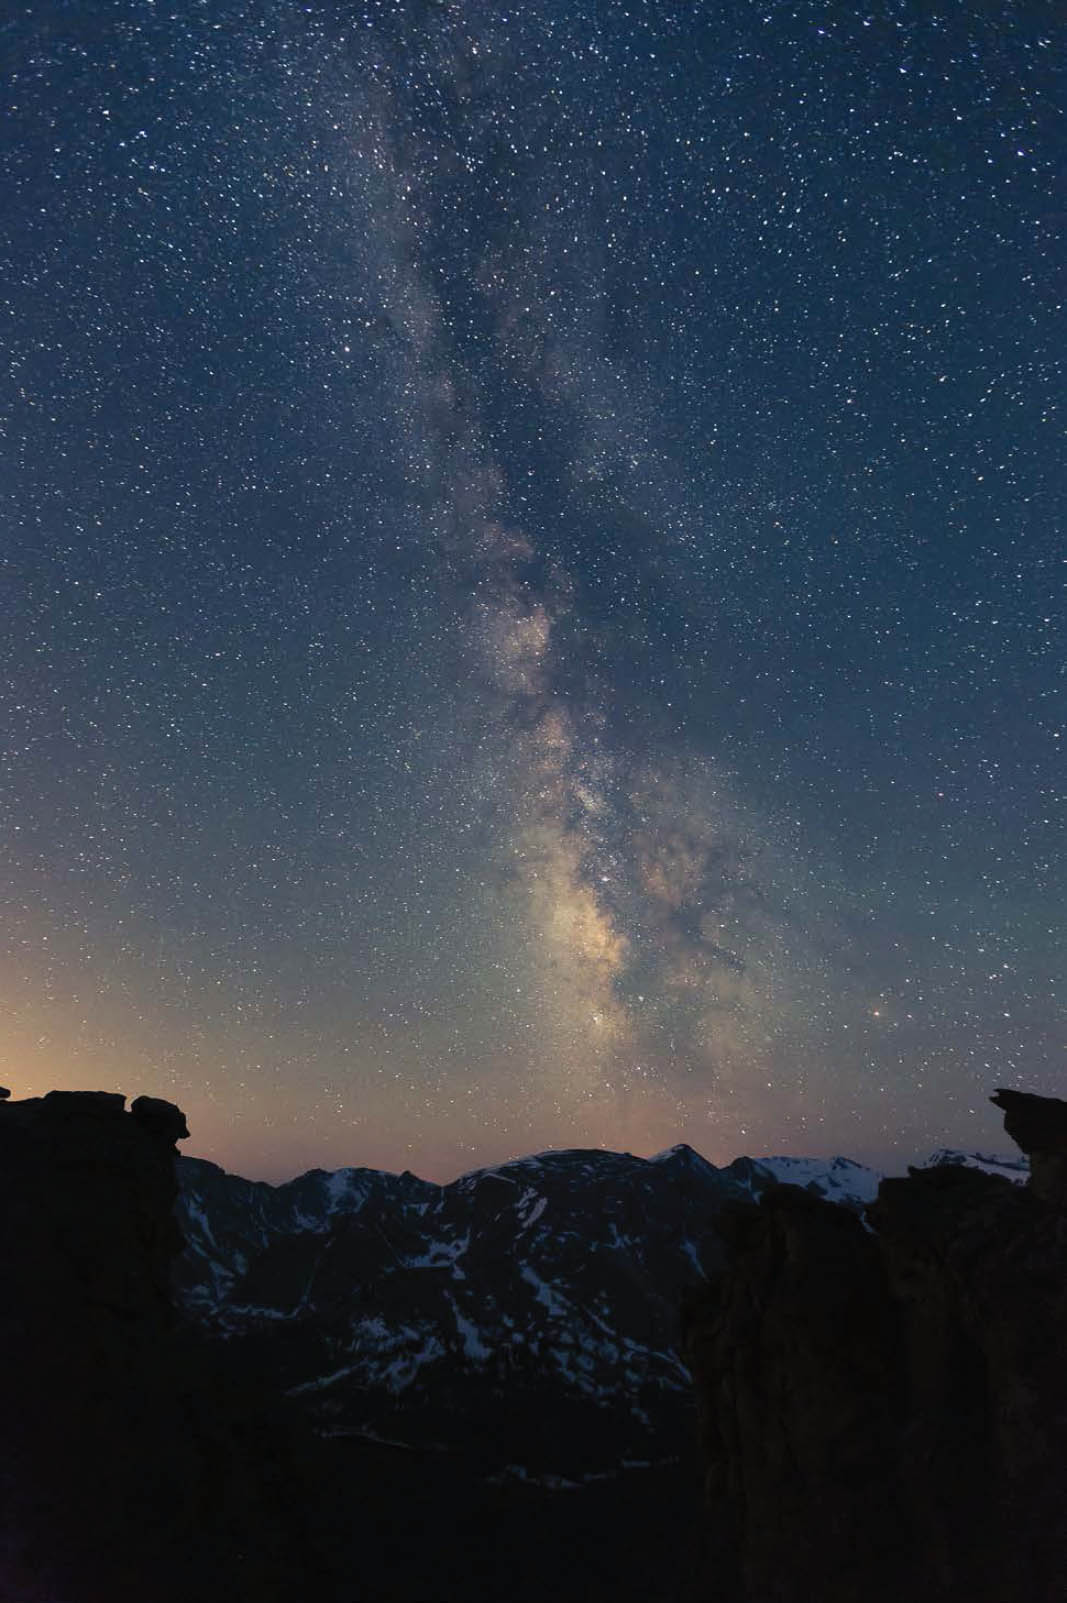
FIGURE 10-13 The good-highlights image, correctly exposed for sky, after following steps 1-7. This image is ready to be brought into Photoshop to be combined with the good-shadows exposure. Canon EOS 5D Mark III, Canon EF 16-35mm f/2.8L II USM at 16mm, 30 seconds, f/2.8, ISO 6400.

FIGURE 10-14 The good-shadows image, correctly exposed for the land, straight out of the camera. Canon EOS 5D Mark III, Canon EF 16-35mm f/2.8L II USM at 16mm, two minutes, f/2.8, ISO 6400.
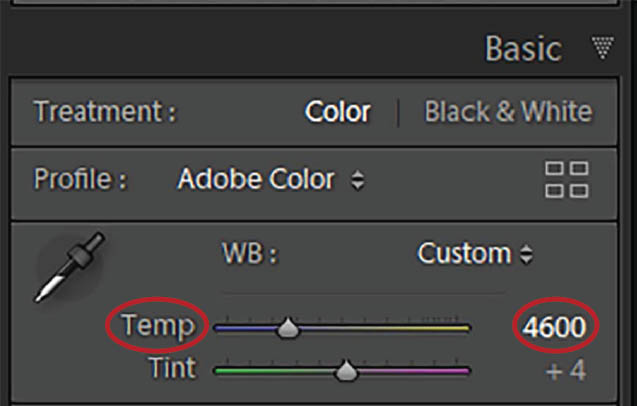
FIGURE 10-15 A screenshot of the Temp slider in the Basic panel of Lightroom Classic’s Develop module set to 4,600.
The Modified Rembrandt Solution
Combining these two frames requires Photoshop, since Lightroom doesn’t support layers. Start the same way you do for the regular Rembrandt Solution, by stacking the two images as layers in Photoshop. One more time, here’s the drill: if you have Lightroom, select both images in the Library module, then choose Photo>Edit In>Open as Layers in Photoshop. If you don’t use Lightroom, start from Bridge (which ships with Photoshop). Select both images, then choose Tools>Photoshop>Load Files into Photoshop Layers. If you don’t use Bridge, start from Photoshop itself. Choose File>Scripts>Load Files into Stack and navigate to the appropriate files. Whichever method you use, the next task is to drag the dark (good-sky) layer to the top of the layer stack if it’s not already there.
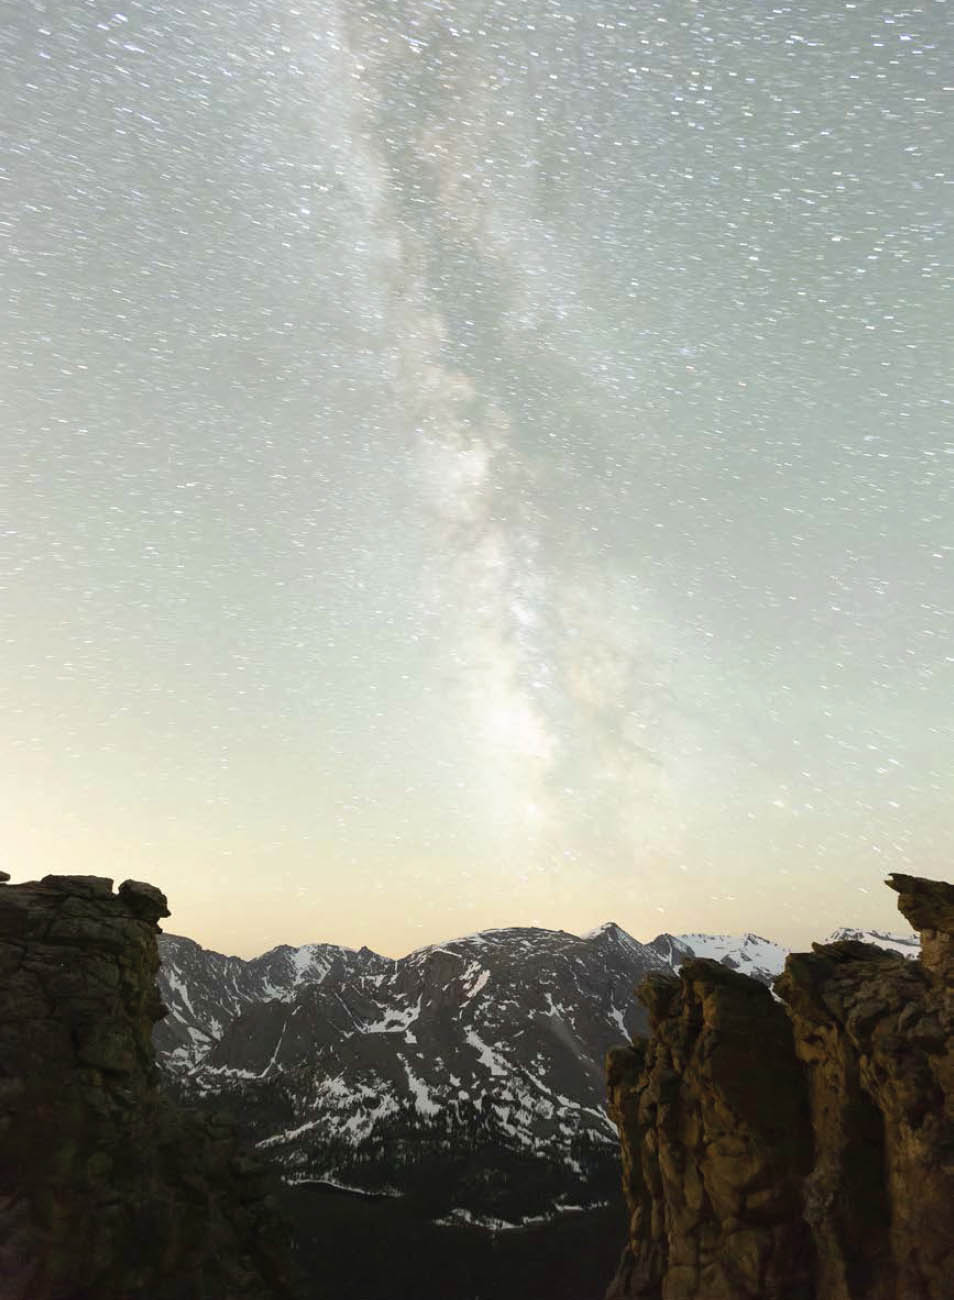
FIGURE 10-16 The good-shadows image, correctly exposed for the land, after following step 8. This image is ready to be brought into Photoshop to be combined with the good-highlights image. Canon EOS 5D Mark III, Canon EF 16-35mm f/2.8L II USM at 16mm, two minutes, f/2.8, ISO 6400.
Here’s where the procedure for the modified Rembrandt Solution diverges from the standard version. Choose the Quick Selection tool and select the sky by clicking, holding, and dragging the cursor across the sky. Photoshop will attempt to select everything with the same color and density, in this case, the sky. You don’t need to get too fussy about making a perfect selection. Next, expand the selection by choosing Select>Modify>Expand. I usually expand the selection by 300 to 500 pixels when working with files from my 30-megapixel 5D Mark IV, but you may need to experiment to see what value works best for your particular image and for the resolution of your camera.
With the top layer (the good-sky layer) active, add a layer mask by clicking the third icon from the left at the bottom of the Layers panel (the one shaped like a square with a circle inside). The image will look awful (figure 10-17).
With the new mask targeted, go to the Properties panel and feather the mask by the same amount you expanded the selection. That should blend the good-sky and good-land images in a believable way. You may be able to slightly improve your results by feathering the mask by 100-200 pixels more than you expanded the selection. This will make the transition from sky to land slightly more pleasing, at the risk of letting the long star streaks from the good-shadows exposure start to show through, giving all the stars near the horizon obvious tails. Be sure to inspect your handiwork carefully at 100 percent to be sure you haven’t turned your stars into comets.
The advantage of using this approach to feathering the mask is that you can reopen the image later and adjust the feathering if need be. The disadvantage is that you can’t effectively refine the mask by painting on it. The same feathering value you’ve applied to the mask will also apply to the brush you choose to paint on the mask. If you choose a 30-pixel brush, for example, it will have a 300- to 500-pixel feather applied to it. That makes the edge of the brush so soft it’s useless.
If you decide you need to refine the mask by painting on it, you’ll need to take a slightly different approach. Instead of feathering the mask in the Properties panel, choose Filter>Blur>Gaussian Blur. Set a radius equal to the value you used to expand the selection. Now you can paint on the mask with predictable results. The only disadvantage of this approach (a minor one) is that once you save and close the image, the mask can only be modified by further painting and/or blurring.

FIGURE 10-17 The image after expanding the selection and adding a layer mask.

FIGURE 10-18 The result of using the modified Rembrandt Solution. I expanded the selection by 500 pixels and feathered the mask by 700 pixels.
This simple approach to blending the two images will give reasonably good results, particularly if the land in your composition occupies a third or more of your frame. For a more difficult but more sophisticated approach that will give still better results, see my book Dusk to Dawn: A Guide to Landscape Photography at Night, also published by Rocky Nook.
Shooting Milky Way Panoramas
Single-frame photographs of the Milky Way are beautiful, but the Milky Way offers other photographic possibilities as well. Look closely with dark-adapted eyes, and you’ll see that the Milky Way forms a gigantic arch in the sky that extends from horizon to horizon. This arch is far too large, in an angular sense, to be captured in a single frame, even with the widest recti-linear (non-fisheye) lens. The best way to shoot it is as a stitched panorama with a multi-row panorama head.
Shooting a Milky Way panorama is easiest during new moon periods in April, May, and June. Start shooting when the galactic center, which will be rising, reaches an altitude of 10 degrees. At that time of year and night, the Milky Way arch is relatively compact. The high point of the arch will be just north of east and considerably lower in the sky when the sky is fully dark and the galactic center is in the right position than it will be later in the summer. For example, the top of the arch is roughly 40 degrees above the eastern horizon on April 1 at the ideal time of night but close to 90 degrees on September 1st.
I discussed the tripod hardware and procedures needed for multi-row panoramas in chapter 9. My go-to lens for Milky Way panoramas is my 35mm f/1.4.
The problem of holding adequate detail in the land is exacerbated when you’re trying to stitch together a panorama. One solution is to use the modified Rembrandt Solution I described previously, being certain to use the exact same settings for expanding the selection and feathering the selection edge for each pair of good-shadow and good-highlight images.
I only need to do this for component images that contain the skyline—in other words, images where I want to blend properly exposed sky with properly exposed land. For component images that only contain land, I use only the good-land exposure in the stitched panorama. For component images that only contain sky, I use only the good-sky exposure. I usually only have all-land or all-sky images if I’m using the 35mm lens, which has a relatively narrow angle of view. Once I’ve prepared all the Rembrandt Solution images, I flatten them and save them as TIFFs under a new name in a new folder along with all the land-only or sky-only images (if any), also saved as TIFFs. Then I point my favorite stitching program at the folder full of images and let ’er rip.

FIGURE 10-19 Milky Way panorama at Goblin Valley State Park, Utah. I used Sun Surveyor (iOS and Android) to determine the azimuth of the galactic center and the highest point of the Milky Way arch when the galactic center reached the ideal altitude of 10 degrees, then scouted until I located the right group of hoodoos to position underneath the arch. Canon 5D Mark III, Canon EF 16-35mm f/2.8L II USM at 16mm. Land: 2.5 minutes, f/2.8, ISO 6400. Sky: 30 seconds, f/2.8, ISO 6400. Land and sky: one row, four camera positions.
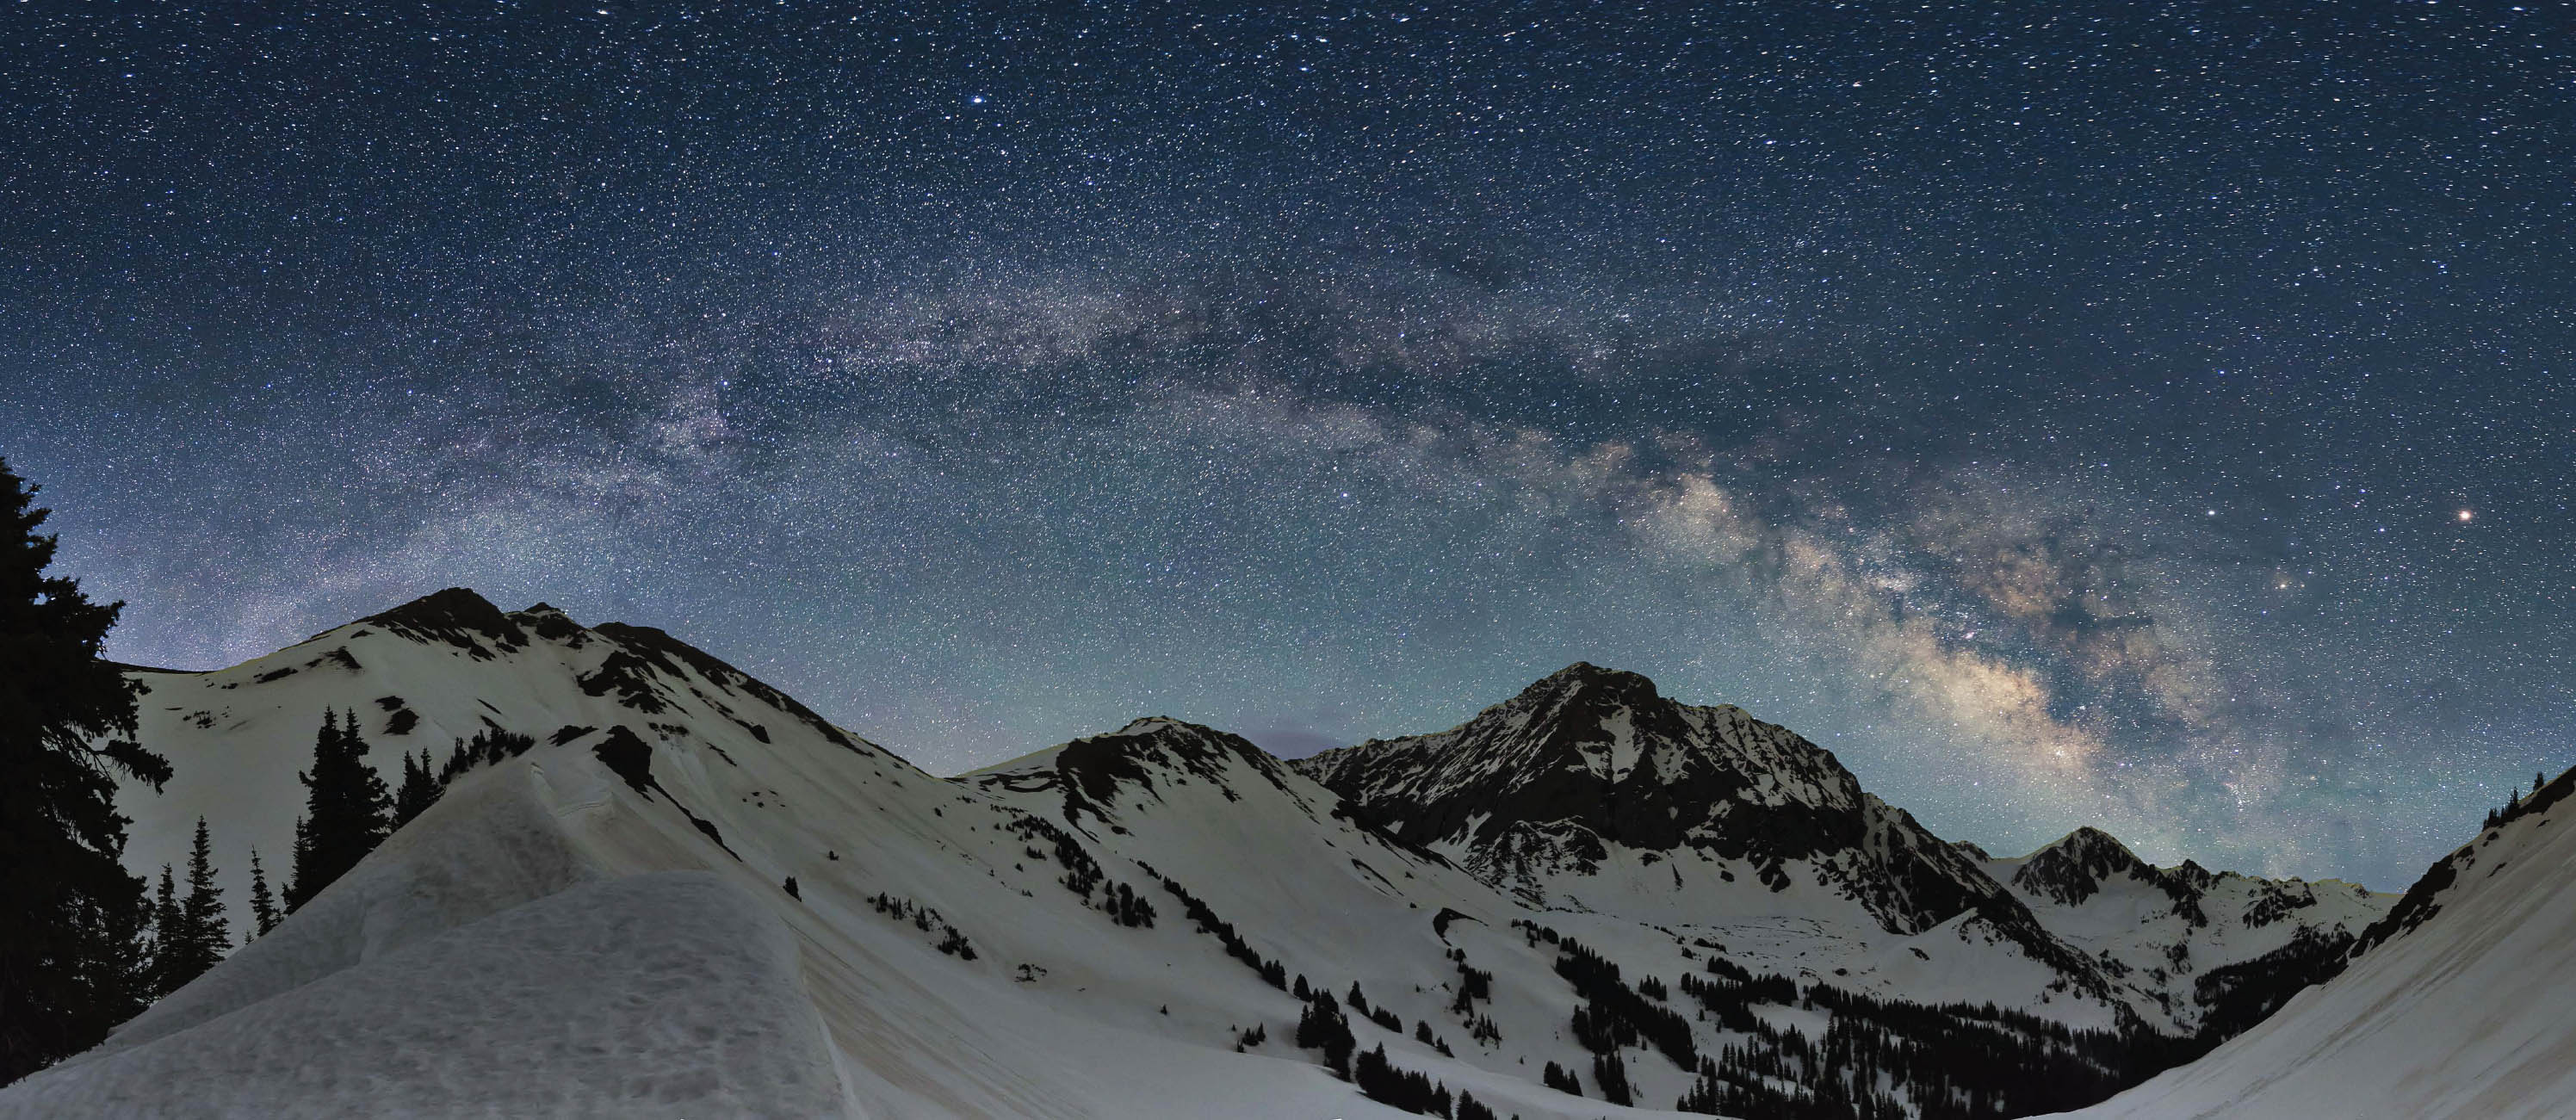
FIGURE 10-20 Milky Way panorama over Capitol Peak, Maroon Bells-Snowmass Wilderness, Colorado. I shot this in early June after a very snowy winter. It was the first time I’d ever snowshoed in June, and the first time I’d ever snowshoed in shorts. Canon 5D Mark III, Canon EF 16-35mm f/2.8L II USM. Land: 2 minutes, f/2.8, ISO 6400. Sky: 30 seconds, f/2.8, ISO 6400. Land and sky: one row, four camera positions.
As with single-camera-position images of the Milky Way, the modified Rembrandt Solution can produce a good result when shooting Milky Way panoramas. A better solution begins with shooting a complete panorama of the sky and a narrow strip of land using the correct exposure for the sky. Next, shoot a complete panorama of the land and a narrow strip of sky using the correct exposure for the land. Stitch together the good-sky frames, then stitch the good-land frames. You now have two separate panoramas. Load the two panoramas into Photoshop as layers in a single file. The procedure required to make the two layers match up, then to blend them into a believable whole is complex and beyond the scope of this book. For a complete description, please see Dusk to Dawn: A Guide to Landscape Photography at Night.
Here’s one additional tip for assembling a multi-row panorama. As I mentioned above, I always check Enable Profile Corrections in the Basic tab of the Lens Correction panel in Lightroom. This will correct some, but not all, of the light falloff in the corners of a wide-angle lens shot wide-open. Areas of your panorama that have uniform tone, such as the sky or an evenly lit snowfield, can show odd, repetitive variations in brightness because the corners of the component frames are darker than the centers. To fix this, add some additional vignette correction by going to the Profile tab of the Lens Correction panel and moving the Vignetting slider toward higher values. You’ll need to experiment to see what is required for your lenses. Beware of opening up the corners so much that you create unacceptable noise and color shifts.
Don’t let the technical details of a complex Milky Way shoot overwhelm the experience of being there. Take a moment during the shoot to turn off your headlamp and soak in the beauty of the night sky. It’s the best way I know to truly appreciate the immensity of our universe.
Photographing Star Trails
Back in the film era, the standard approach to capturing the night sky without employing a tracking mount was to open the shutter and leave it open for a very long time. During that long exposure, which could extend for hours, the stars would make graceful streaks across the film as the earth rotated. Although recent DSLRs can now capture the night sky as we see it, with stationary stars, it’s still lots of fun to create photos of star trails.
The direction you point the camera controls the shape of your star trails. Point your camera due north and include Polaris, the North Star, and your star trails will form concentric circles. Point your camera due south and include the celestial equator, the projection of earth’s equator onto the imaginary celestial sphere, and you’ll get a very different pattern. Stars right on the celestial equator will form trails that are nearly straight. Stars above and below the celestial equator will form trails that bend away from that line. Point your camera east or west and the stars will form trails leaning to the south (up and right as you face east; up and left as you face west).
Most subjects are easier to capture digitally than on film, but star trails are an exception. The easiest way to shoot star trails is still with an old film camera and color slide film. Pick a clear, moonless night, mount the camera on a solid tripod, open the shutter at astronomical dusk and close it at again at astronomical dawn. An aperture of f/2.8 or f/4 usually works well. This approach will create beautiful star trails, but probably capture no detail in the land. To get detail in the land, try opening the shutter a little before astronomical dusk or leave it open after astronomical dawn. You’ll have to experiment with your favorite film to determine exactly when to open and close the shutter to provide detail in the land without washing out the sky.
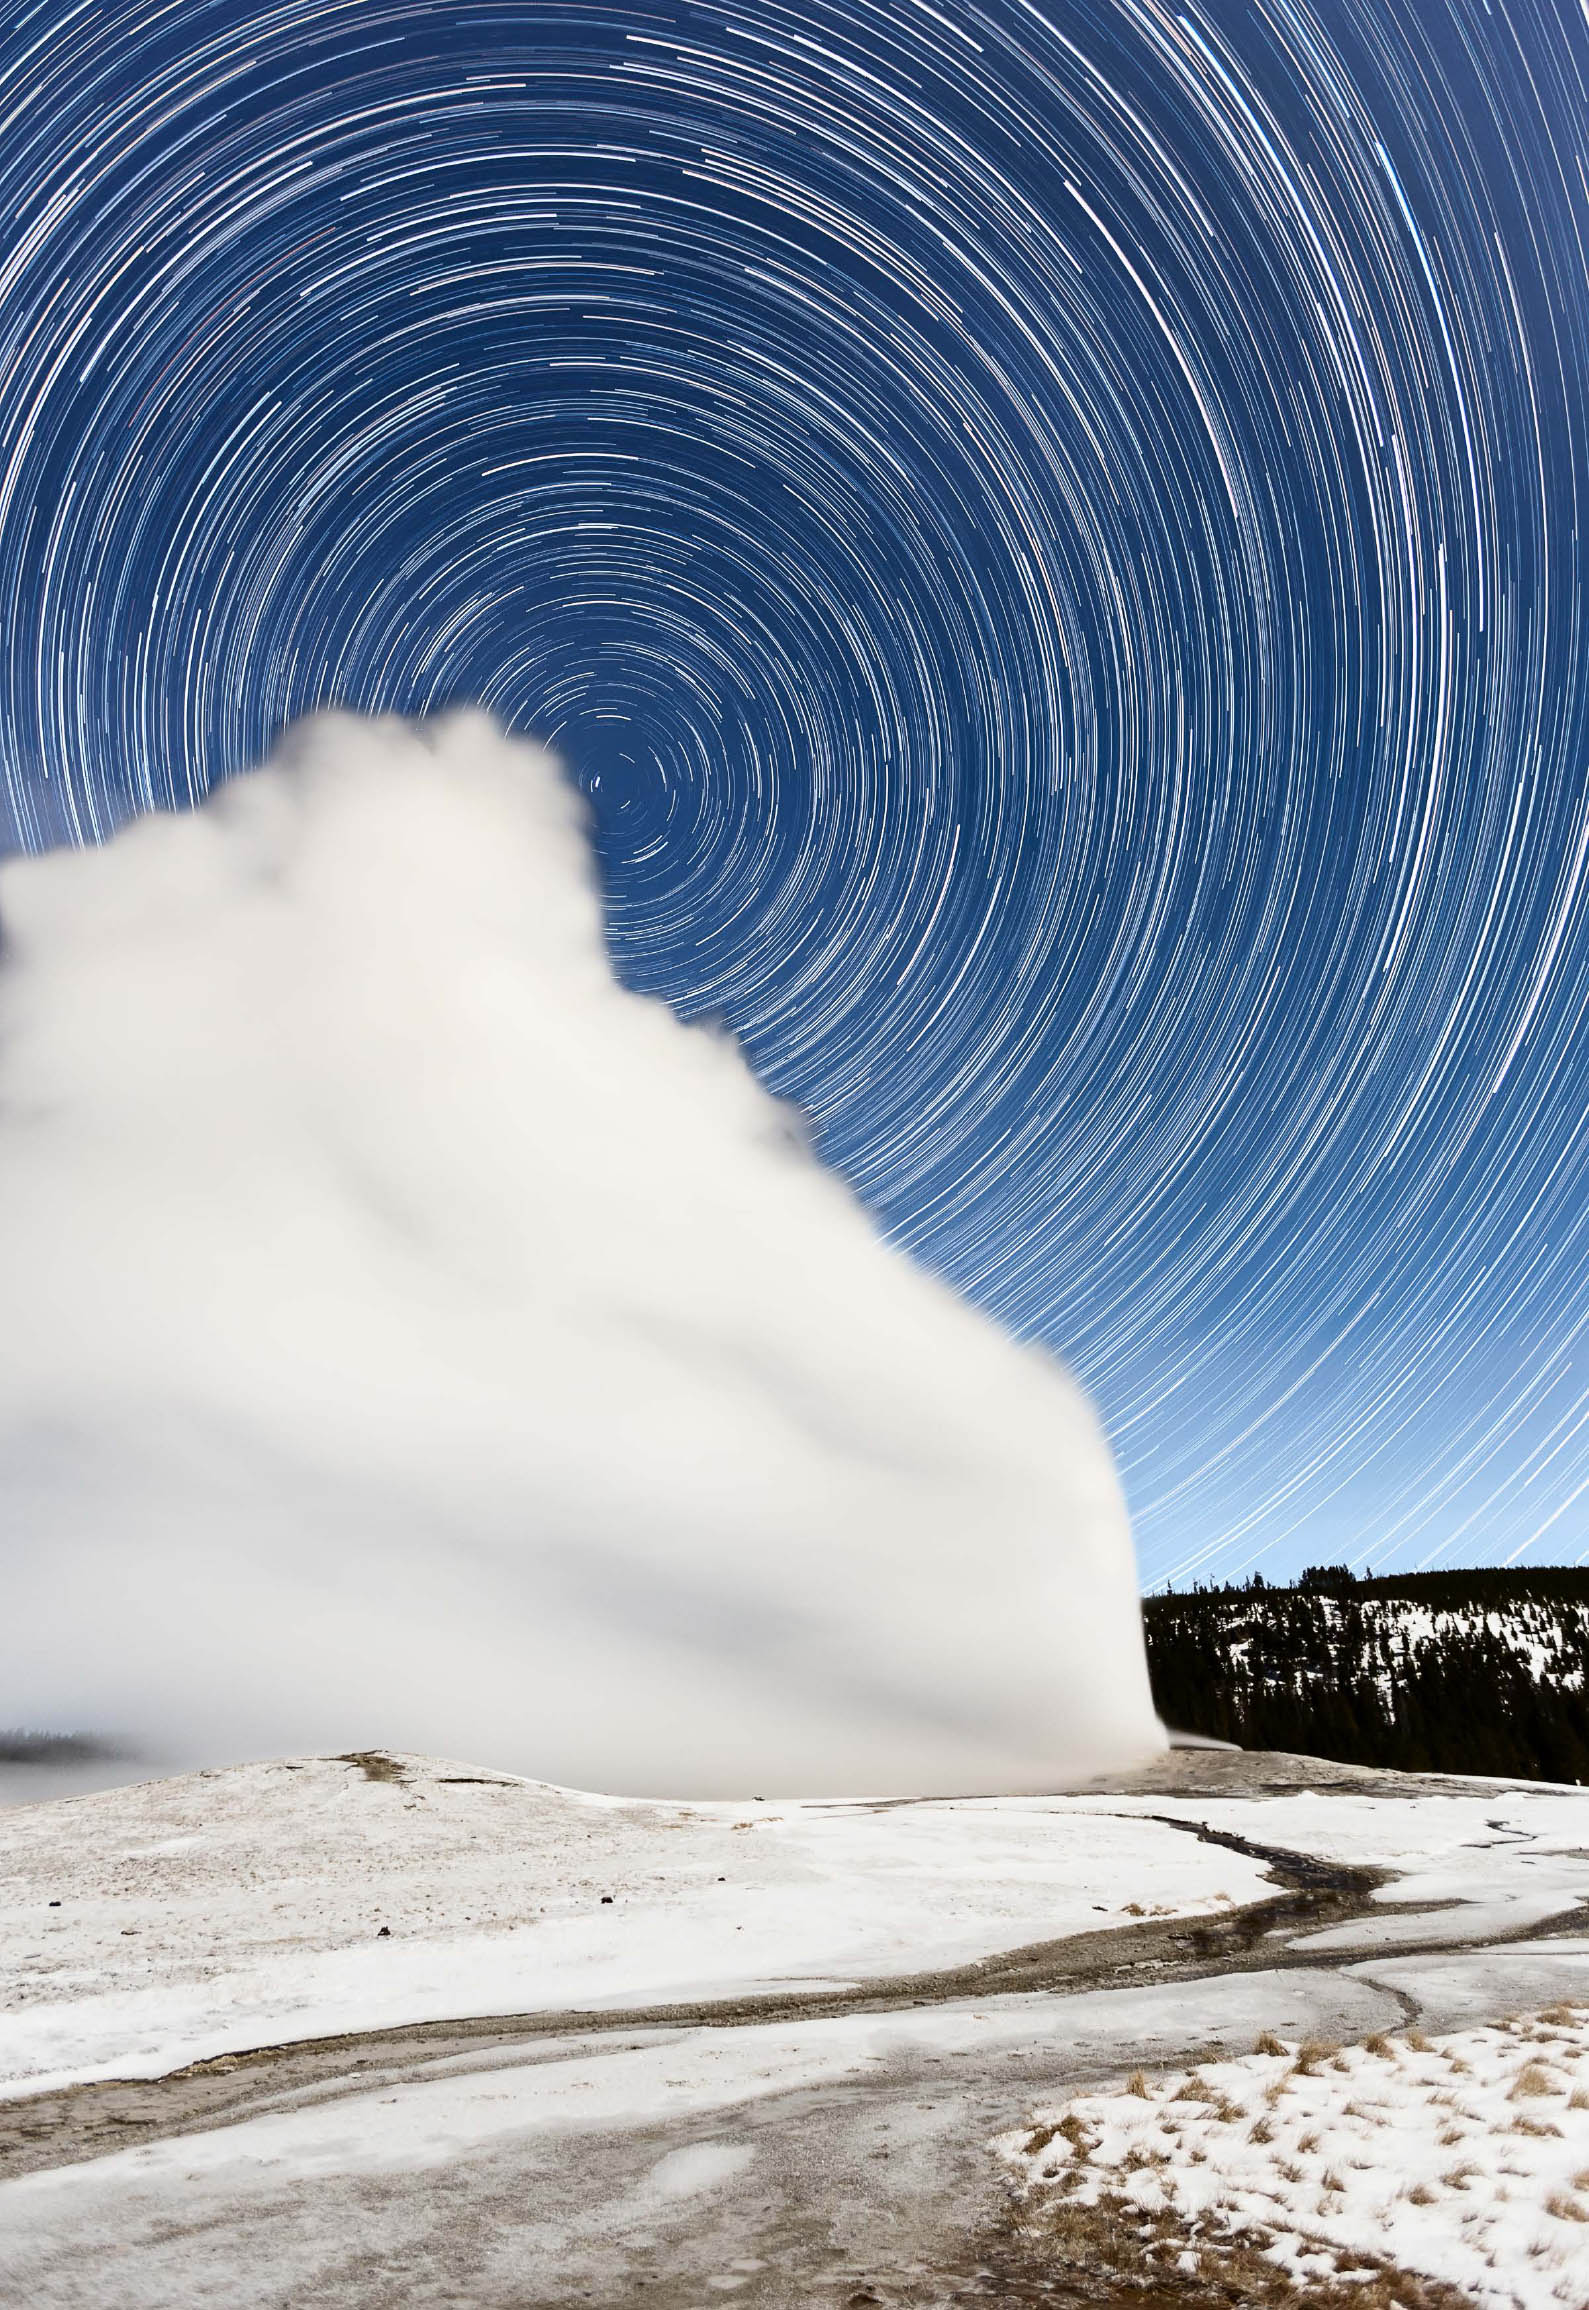
FIGURE 10-21 The full moon illuminates an eruption of Old Faithful as the stars circle Polaris, Yellowstone National Park, Wyoming. The scariest part of making this image was keeping a wary eye on the bison hunkered down in the snow nearby. Canon 5D Mark III, Canon EF 16-35mm f/2.8L II USM at 18mm, 615 frames, 10 seconds, f/2.8, ISO 1250.
Alas, this simple technique generates unmanageable noise if you try it with a digital camera. The standard digital approach is to make many long exposures with the shortest possible gap in between, then blend them together so the star trails show through.
You’ll simplify your life if you use the longest exposures your camera will tolerate without generating unacceptable noise. Test your gear to determine the longest usable exposure. On a moonless night, use exposures in the 2- to 4-minute range. Your exposures will need to be shorter on nights when the moon is bright (50 percent or more illuminated). On nights with a moon, shorter exposures reveal more stars. On nights with a full moon, use exposures of 15 to 30 seconds. Limit exposures to 1 or 2 minutes when the moon is 50 percent illuminated.
As for the other exposure parameters, try f/2.8 to f/4, ISO 200 – 400, depending on how many stars you want to capture. Higher ISOs and wider apertures will create more closely spaced star trails. Shooting at f/2.8, ISO 1600 will generate so many star trails you’ll practically have more stars than sky. It’s an effect you may consider cool, or it may strike you as over the top.
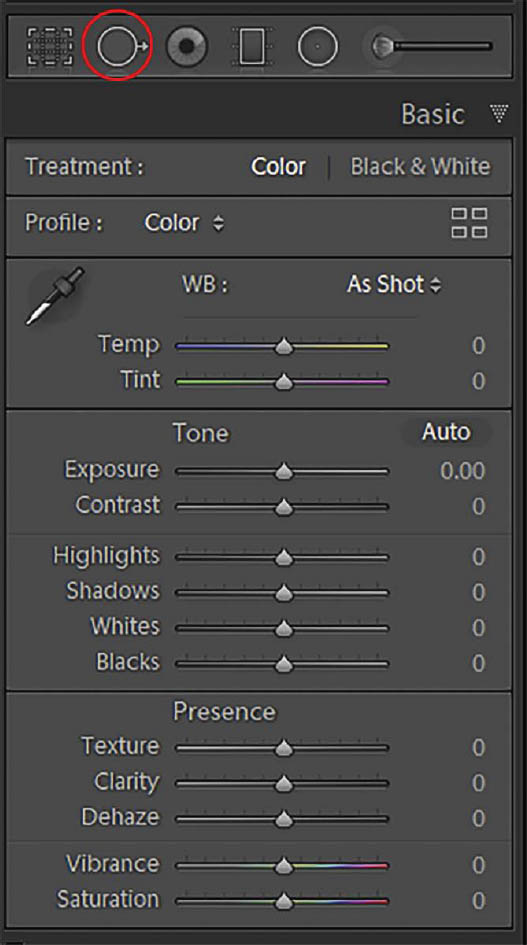
FIGURE 10-23 The Spot Removal tool (circled) is found in the Tool Strip, which is just above the Basic Panel in Lightroom Classic’s Develop module.
An intervalometer will allow you to program the exposure length, number of exposures, and interval between exposures, which should be 1 second. Start your star-trails sequence around nautical dusk, before the sky is totally dark, if you want a frame with some detail in the land.
The night sky is busier than you might think. During a 2-hour star-trails sequence, you’re guaranteed to have the lights of passing jets make long, continuous streaks through many of the component images. You should remove these streaks from each component image before blending the component images into the final composition. You can sometimes remove these streaks in Lightroom using the Spot Removal tool (second icon from the left in the row of tools just above the Basic panel (figure 10-23)). Click once at the beginning of the streak, then hold down Shift and click again at the end of the streak. Be sure you haven’t removed some star trails you want to keep. You can use the same click/shift-click technique, usually with better results, using the Spot Healing Brush in Photoshop. The Clone Stamp tool is another option, of course, but that’s tedious and can result in a blotchy look. If the streak is curved, try using the Spot Healing click/shift-click technique on short sections of the jet streak.

FIGURE 10-22 Star trails over Hallett Peak and Bear Lake, Rocky Mountain National Park, Colorado. A waning gibbous moon (56 percent illuminated) provided the light on the land. I took this image looking west, so the stars made streaks leading down and right. Canon 5D Mark III, Canon EF 24mm f/1.4L II USM. Land: 60 seconds, f/2.0, ISO 3200. Sky: 158 frames, 59 seconds, f/2.8, ISO 400.
Processing Star Trails Images
After downloading all your exposures to your computer, your next task is to blend them so the short star trails in the individual images form long, continuous trails. Photoshop provides one easy solution if you don’t have too many frames and don’t plan to make large prints. In Lightroom, choose all the component images, then choose Photo>Edit In>Open as Layers in Photoshop.
Select all the layers (click the top layer, then shift-click the bottom layer) and change the blend mode to Lighten. The Lighten blend mode compares the pixel in the target layer to the pixel directly underneath. If the pixel underneath is lighter, Photoshop allows that pixel to shine through. This will make all the star trails appear.
You can paint directly on your component images with black to remove unwanted elements in the land portion of the image, such as hikers who pass through your shot with their headlamps. There’s no need to be fussy when painting, since everything black will be ignored by the Lighten blend mode. Identify the files with issues in Lightroom, then return to your layered file in Photoshop and locate the offending files. Turn off the eye icon for all layers but the target layer. You can usually alt-click on the target layer’s eye icon to turn off all other layers with one click. Alt-click again to turn them on again. If that doesn’t work, right-click on the eye icon and choose Show/Hide All Other Layers. Choose the Brush tool from the Tool Bar, change the foreground color to black (press D for default colors of black and white), then paint on the image.

FIGURE 10-25 Using the Lighten blend-mode method in Photoshop creates gaps between the star trails that are visible on close inspection.
Closing the Gaps in Star Trails Images
The simple approach of using the Lighten blend mode to reveal star trails has one disadvantage. Every star trail will show a tiny gap in between exposures. These gaps are not noticeable on the web or in a small print but are rather annoying in a large print.
You might think that these gaps are inevitable; after all, there is a 1-second interval between each exposure. However, nature photographer Floris Van Breugel has pointed out that these gaps will disappear if you use the Screen blend mode instead of Lighten. He has developed a slick technique for eliminating the gaps. The instructions below assume you’re using a PC; Mac users can generally substitute the Command key for the Control key.
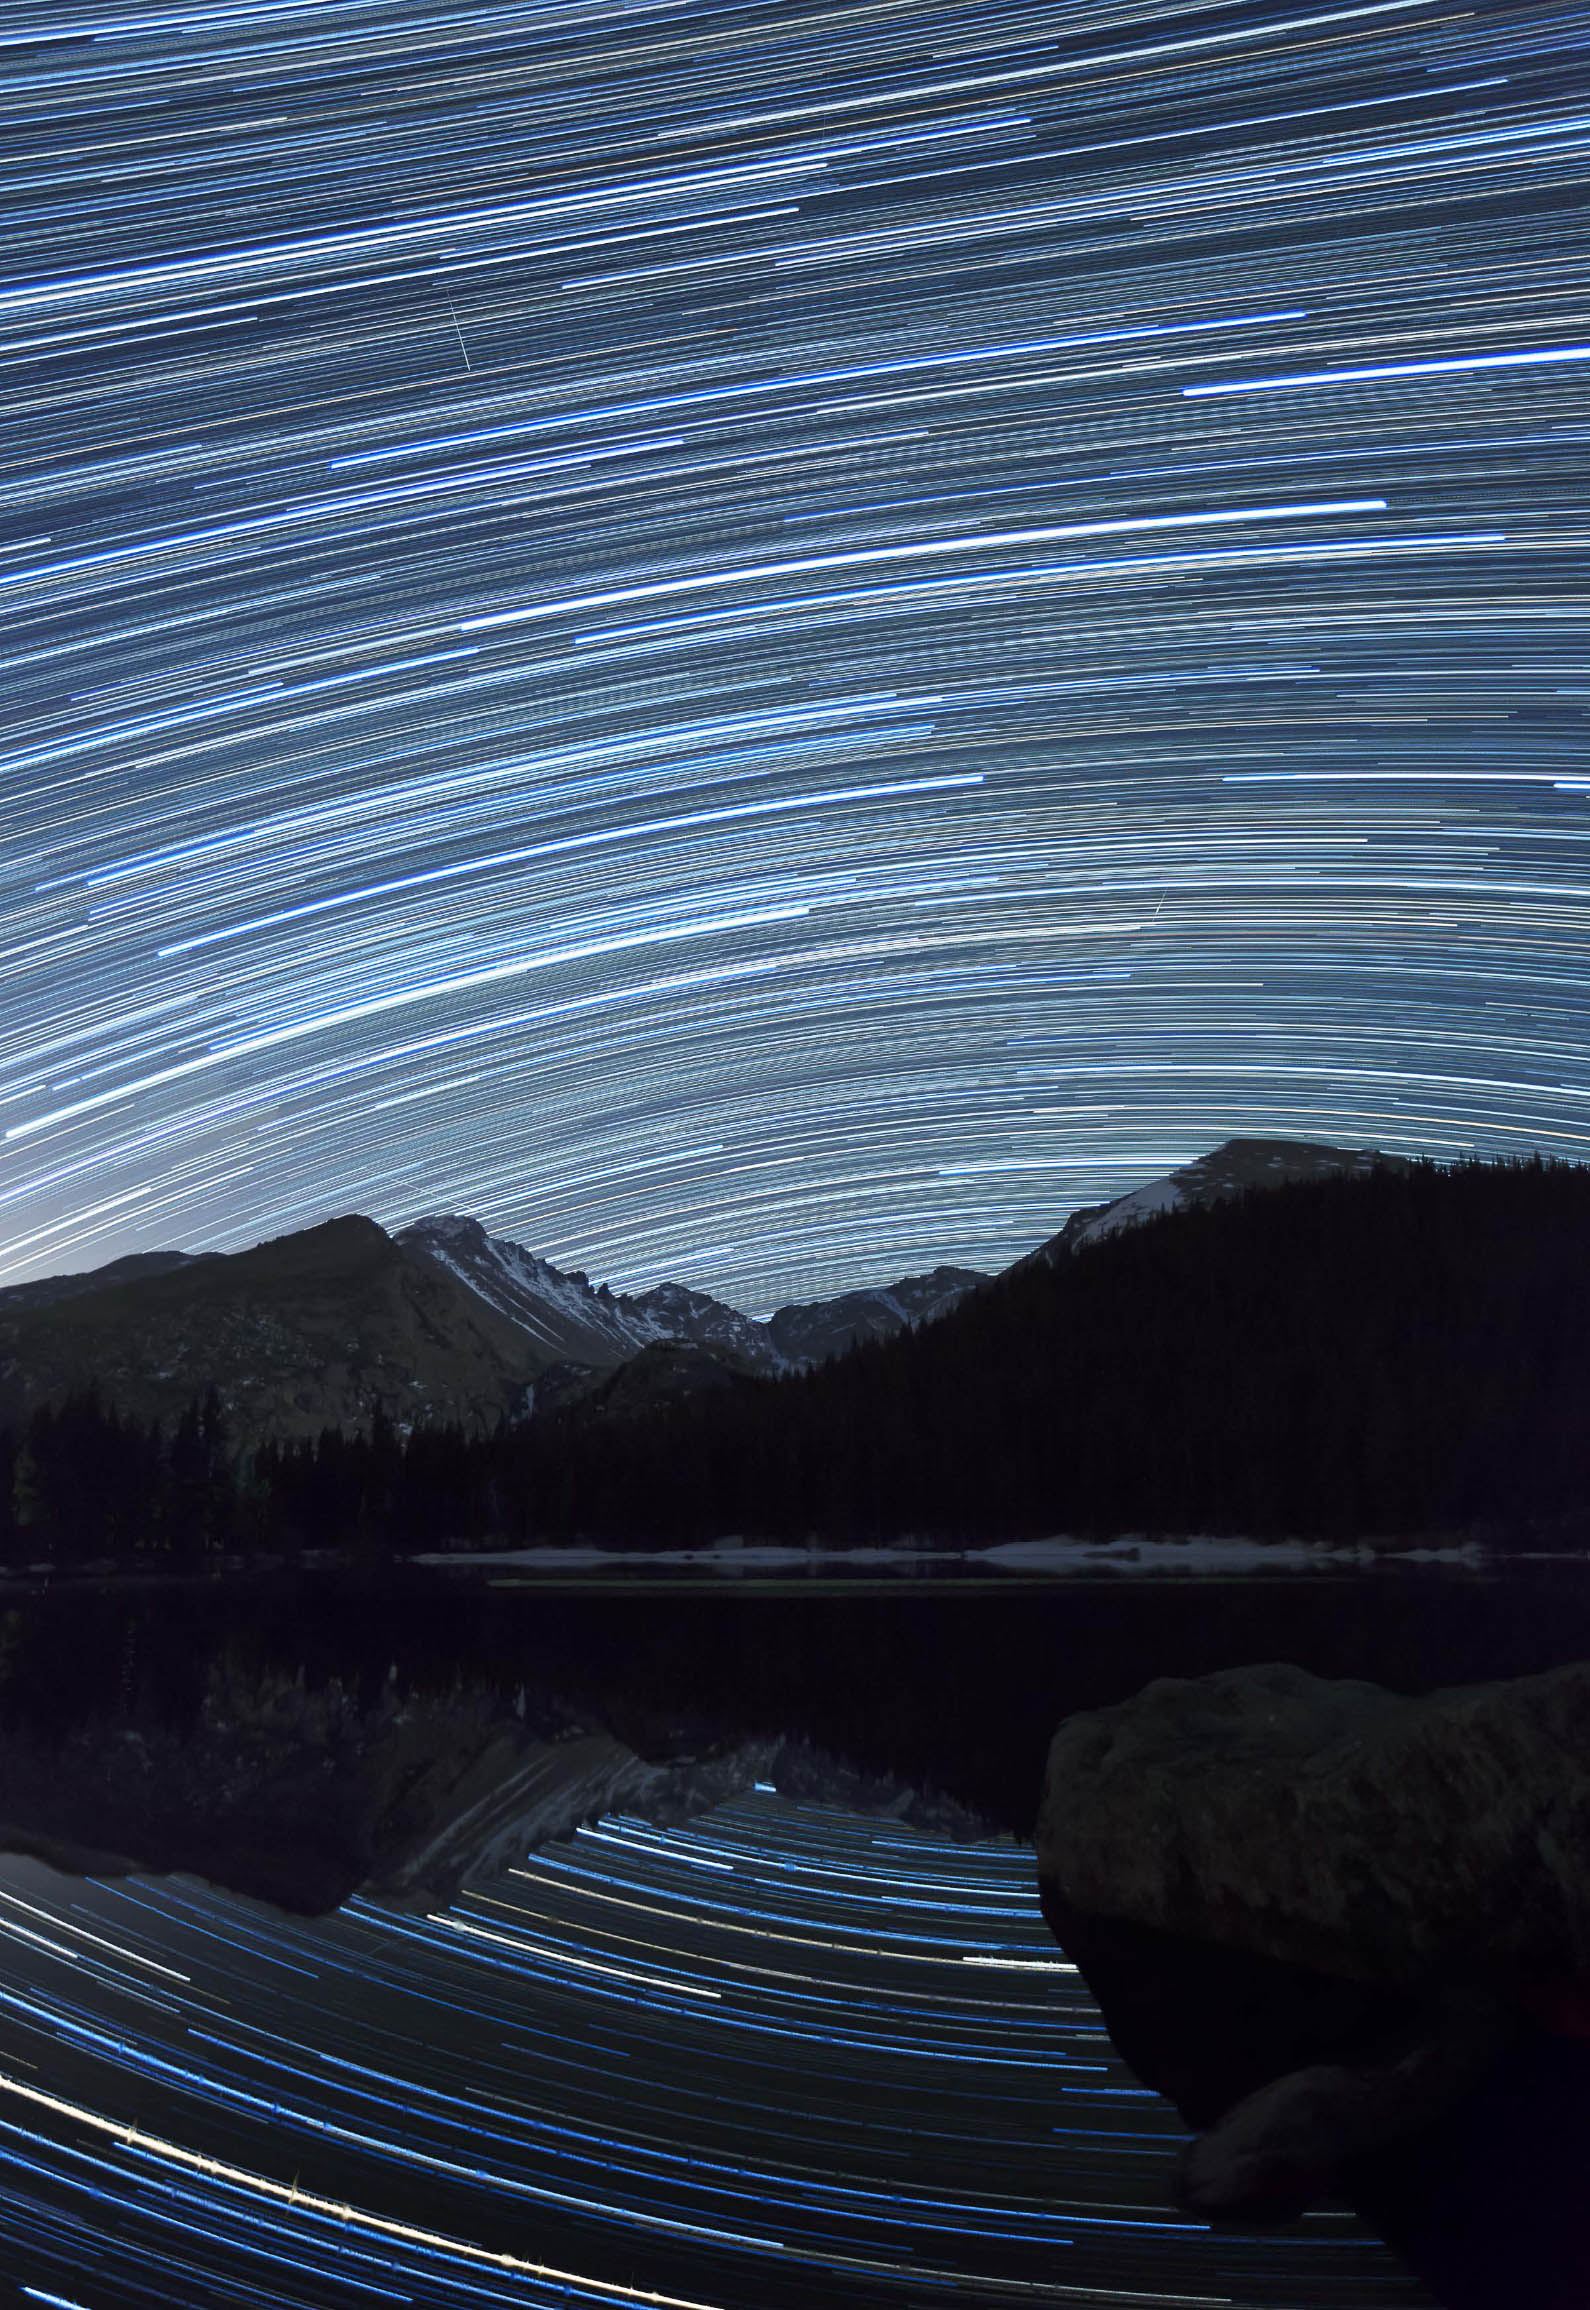
FIGURE 10-24 Star trails over Longs Peak reflected in Bear Lake, Rocky Mountain National Park, Colorado. A waxing crescent moon provided the light on the land. This image was taken looking south. The nearly straight star streak marks the position of the celestial equator; star trails on either side of the celestial equator curve gently away from it. Canon 5D Mark III, Canon EF 16-35mm f/2.8L II USM at 24mm, 243 images, 30 seconds, f/2.8, ISO 1600.
- 1. First, set all your RAW files to neutral settings, with all settings in the Basic panel set to 0 (no change in Exposure, Contrast, Highlights, Shadows, etc.). Set the Tone Curve to linear. Yes, the images will look bad. We’ll fix that later.
- 2. Now select all the images and choose Photo>Edit In>Open as Layers in Photoshop.
- 3. Make the first layer above the bottom layer of the stack active. Press Control-J to make a copy. Choose the next layer above the new copy layer and make a copy of it. Make a copy of every other layer in the stack except the top layer. Do not make a copy of the top and bottom layers.
- 4. Now target the top layer in the stack and change the blend mode to Screen (figure 10-26). You should see the star trails lengthen and the image get lighter.
- 5. Hold down shift and click the next layer below to highlight both the top and next-to-top layers simultaneously. Press Control E to merge the two layers. Change the blend mode of the new merged layer to Lighten.
- 6. Target the next layer below and change the blend mode to Screen. Again the star trails should lengthen.
- 7. Hold down shift and click the next layer below so you have two layers selected simultaneously. Press Control E to merge the two layers. Change the blend mode of the new merged layer to Lighten.
- 8. Repeat this procedure all the way down the stack. Each time you change the blend mode to Screen at the start of another repetition of this procedure, the star trails should lengthen. If they don’t, you’ve done something wrong. Back up in the History panel until you know you’re above where you made the mistake and try again.
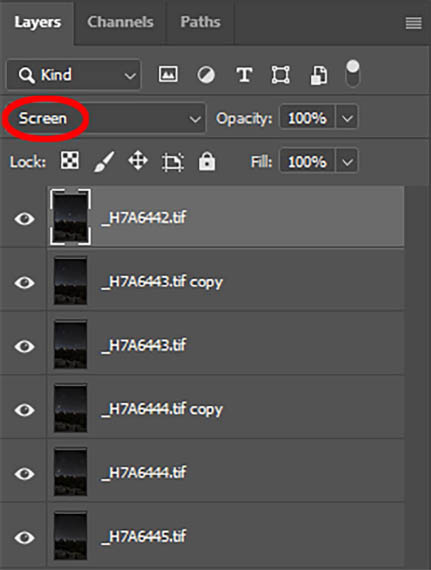
FIGURE 10-26 This screenshot from Photoshop CC shows the Layers panel after loading the component images as layers and duplicating all layers except the top and bottom layers. For this simplified example, I used just four images. The Blend Mode (circled) is set to Screen.
- 9. The photo at the end of the procedure will look flat and dull since you used a linear conversion of the RAW data. Increase contrast and adjust color and density to taste.
Stacking dozens or hundreds of high-resolution files in Photoshop can create impossibly large files. Fortunately, at this writing Floris van Breugel is offering a free Photoshop scripton his website, www.artinnaturephotography.com/page/startrailstacker, to perform this procedure without crashing your computer. If that script is no longer available, search the web for star-trails software. There’s lots of free or low-cost software out there that will blend star-trails images together without overwhelming your computer’s memory.
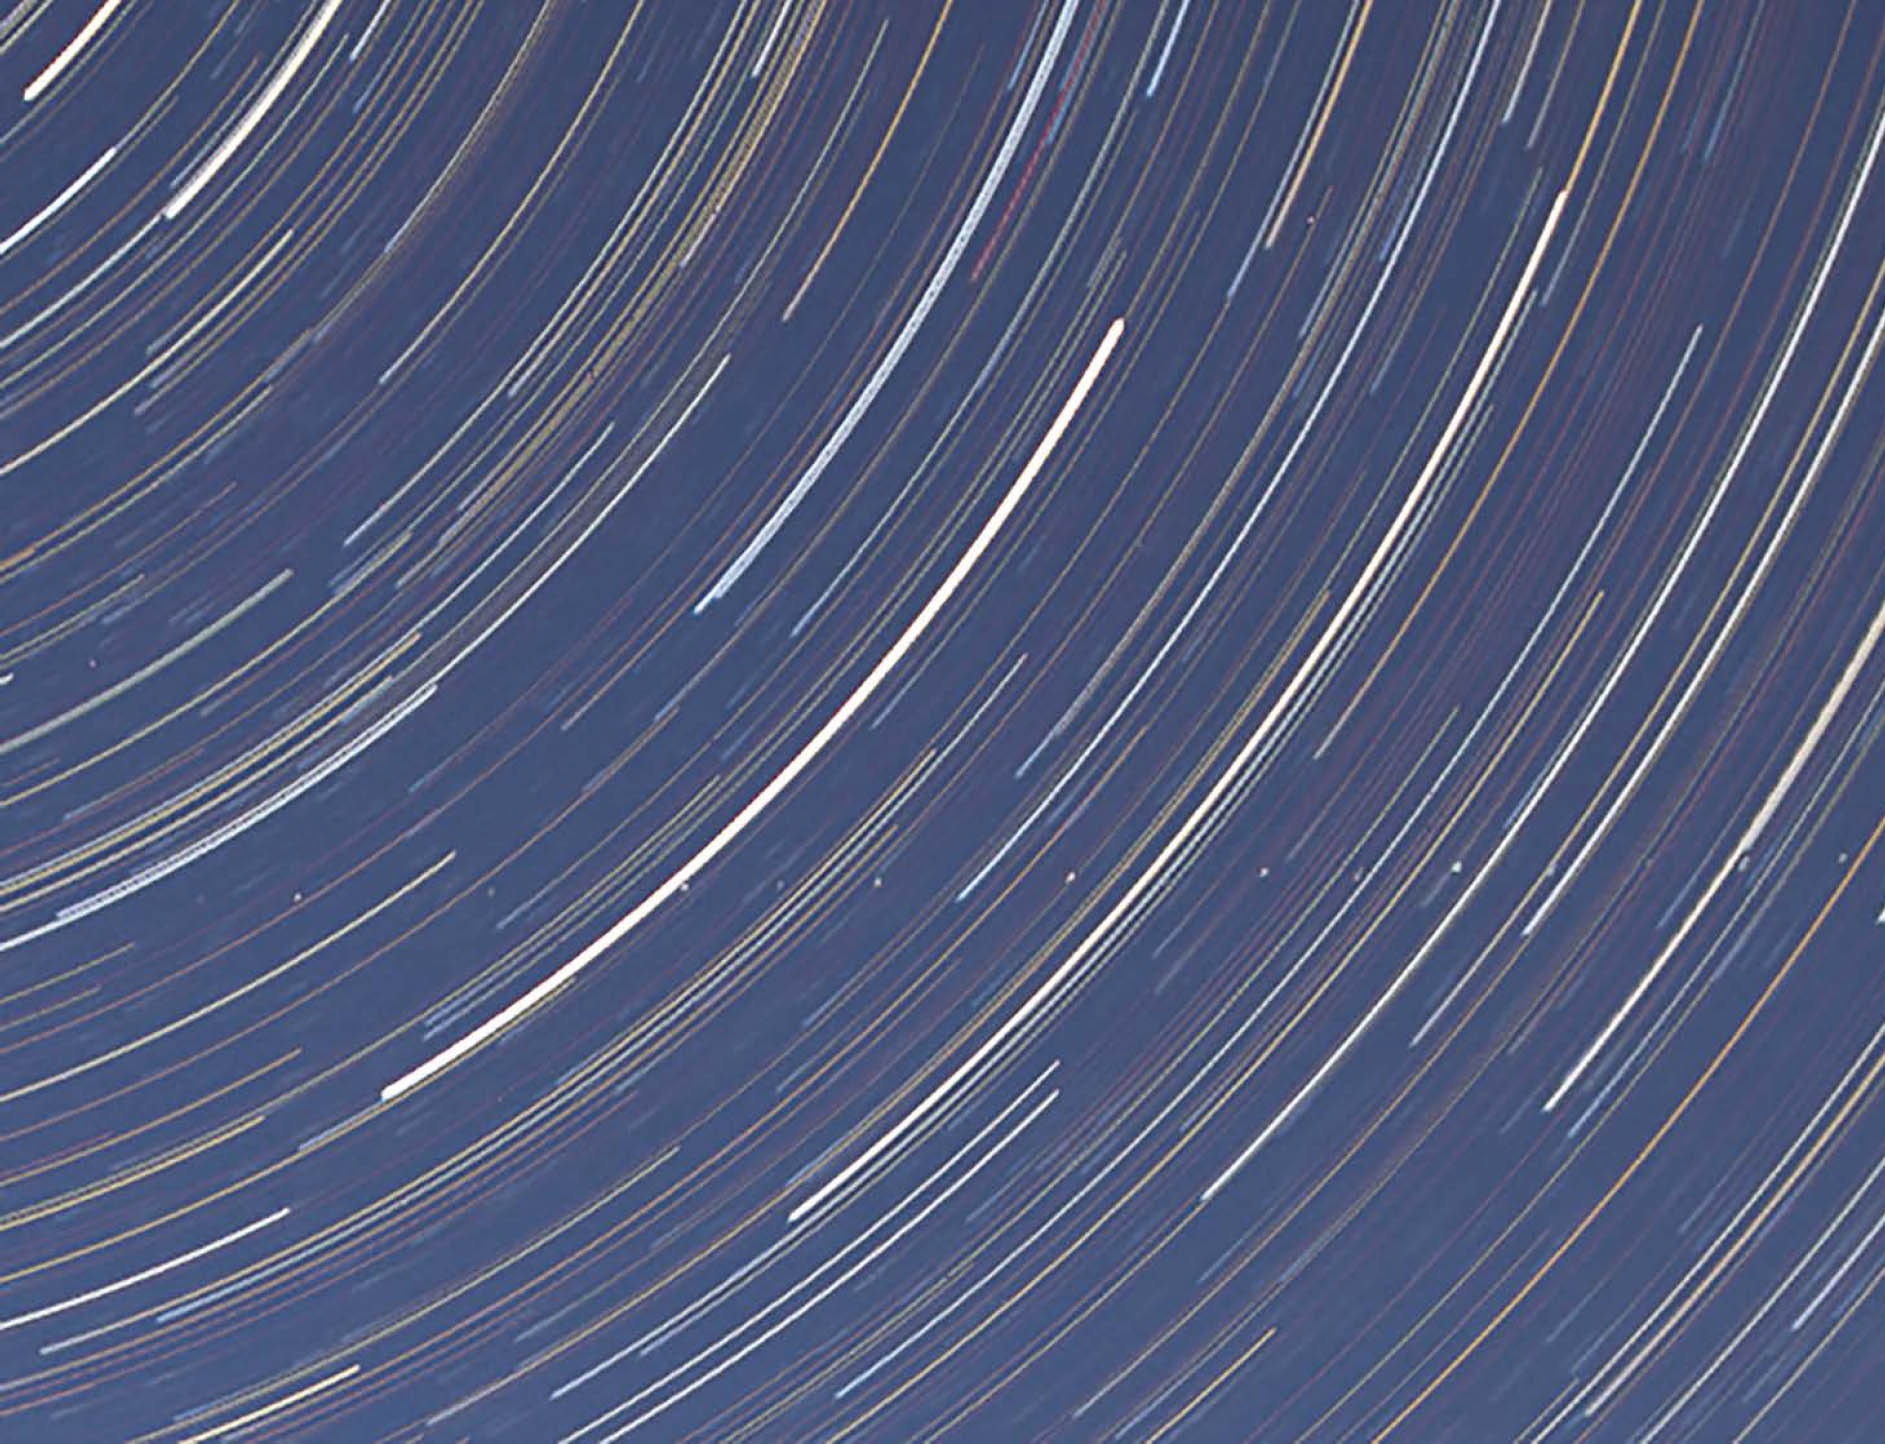
FIGURE 10-27 Close-up showing how the gaps have been closed by Floris Van Breugel’s star-trails stacking script.
Photographing the Aurora
Words cannot truly convey the awesome experience of watching the aurora swirl across the sky. The aurora can be seen most frequently in the auroral zones, doughnut-shaped regions centered on the magnetic poles, so unfortunately for photographers based outside the arctic, it’s an experience reserved for those willing to travel. Both the southern and northern auroral zones offer an excellent chance to see the aurora, but the northern zone is far more accessible to photographers in North America. Two recommended destinations with relatively easy logistics are Yellowknife, in Canada’s Northwest Territories, and Fairbanks, Alaska. Iceland is another popular aurora destination, but the weather is notoriously bad.
To see the aurora most vividly, the sky must be dark, which precludes arctic destinations in the summer months. Auroral activity tends to peak around the fall and spring equinoxes, which means late September and late March are good times for a trip. The most vivid displays often erupt in the hours around midnight, but they can occur at any time of night.
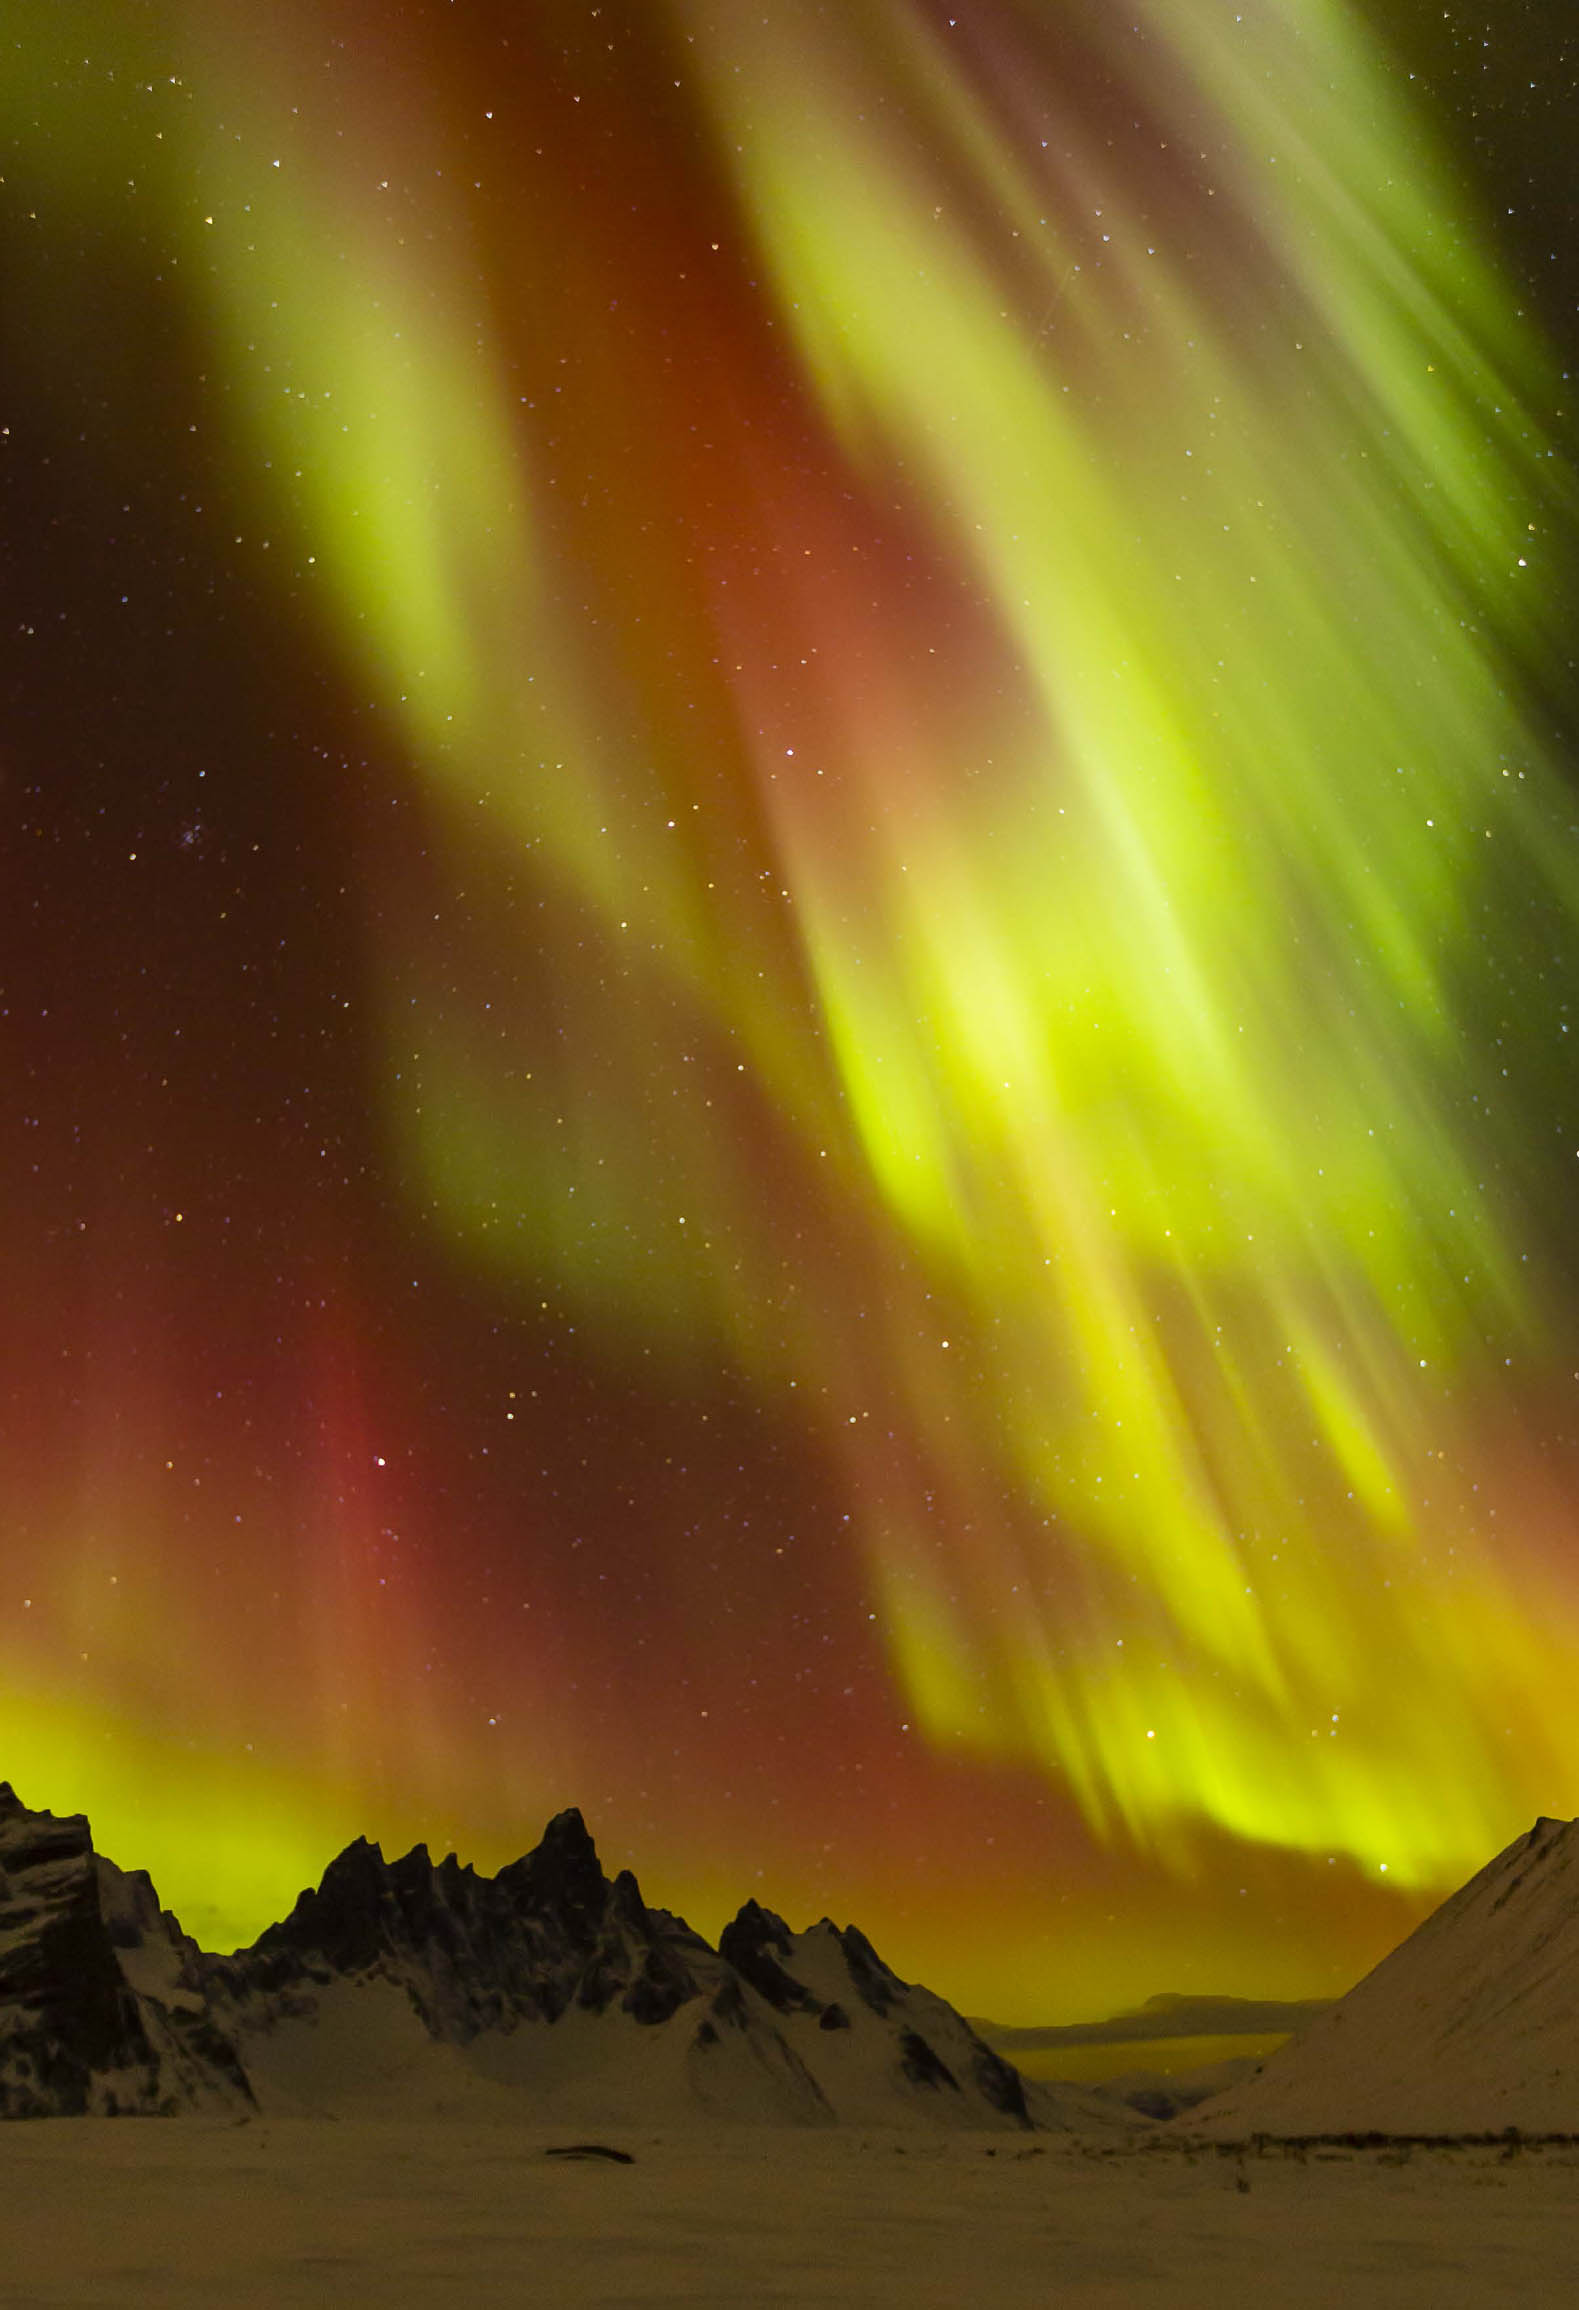
FIGURE 10-28 Aurora over Tombstone Mountain, Tombstone Territorial Park, Yukon Territory, Canada. I shot this on St. Patrick’s Day in 2015 during the biggest geomagnetic storm in 11 years. Canon EOS 5D Mark III, Canon EF 16-35mm f/2.8L II USM at 16mm, 8 seconds, f/2.8, ISO 3200.
In Canada and Alaska the aurora most commonly appears in an arc of sky from northwest to southeast (moving clockwise around the compass). The ideal shooting location allows you to photograph in any direction within that 180-degree arc.
Unlike the Milky Way, which moves slowly, the aurora is in constant motion. Use the shortest shutter speed you can, consistent with good overall exposure, to keep the fine structure in the aurora from becoming smeared in your image. With an aurora of average brightness, a good starting-point exposure is about 10 seconds, f/2.8, ISO 3200. The correct exposure can vary by several stops in either direction from that starting point. Check your histogram to be sure you are capturing adequate detail without blowing out the highlights (which is surprisingly easy to do). Engage the blinking highlight warning to double-check that you aren’t clipping the highlights. Turn your LCD brightness down to avoid getting a false impression about how much detail you’ve actually recorded. As always, your histogram is your best guide to correct exposure, not the image on your LCD.
The aurora’s constant motion means you’ll need to compose each shot separately while looking through the lens. You can’t just point the camera in the general direction of the aurora and leave it set to that position. In order to see through the lens, your eyes must be as dark-adapted as possible, which means you should use a very dim headlamp with red LEDs just as you should when shooting the Milky Way. Be sure to turn it off before making the exposure. At high ISOs, the light of even the dimmest headlamp will turn your foreground bright red. Be sure to remove any filters from your lens. Filter coatings can generate interference patterns in your image that are difficult or impossible to remove.
FIGURE 10-29 Aurora over the Cloudy Range, Tombstone Territorial Park, Yukon Territory, Canada. The auroras were still astonishing two nights after the St. Patrick’s Day geomagnetic storm captured in figure 10-28. Canon EOS 5D Mark III, Canon EF 16-35mm f/2.8L II USM at 18mm, 2.5 seconds, f/2.8, ISO 3200.
You’ll want to focus carefully at infinity using the procedure I described for shooting the Milky Way. Once you’ve achieved critical focus, shoot a test frame, check that it’s sharp, then tape the focus ring on the lens to prevent accidentally changing the focus. Then double-check the focus with another test frame. While you’ve got the tape out, put a couple of squares over the LED that lights up when your camera is writing data to the card. You should also tape the “active” light on your intervalometer, if yours is so equipped. When you’re fully dark-adapted, those lights are an annoyance. I’ve even seen the intervalometer’s blinking “active” light cast a perceptible red tint over the foreground.
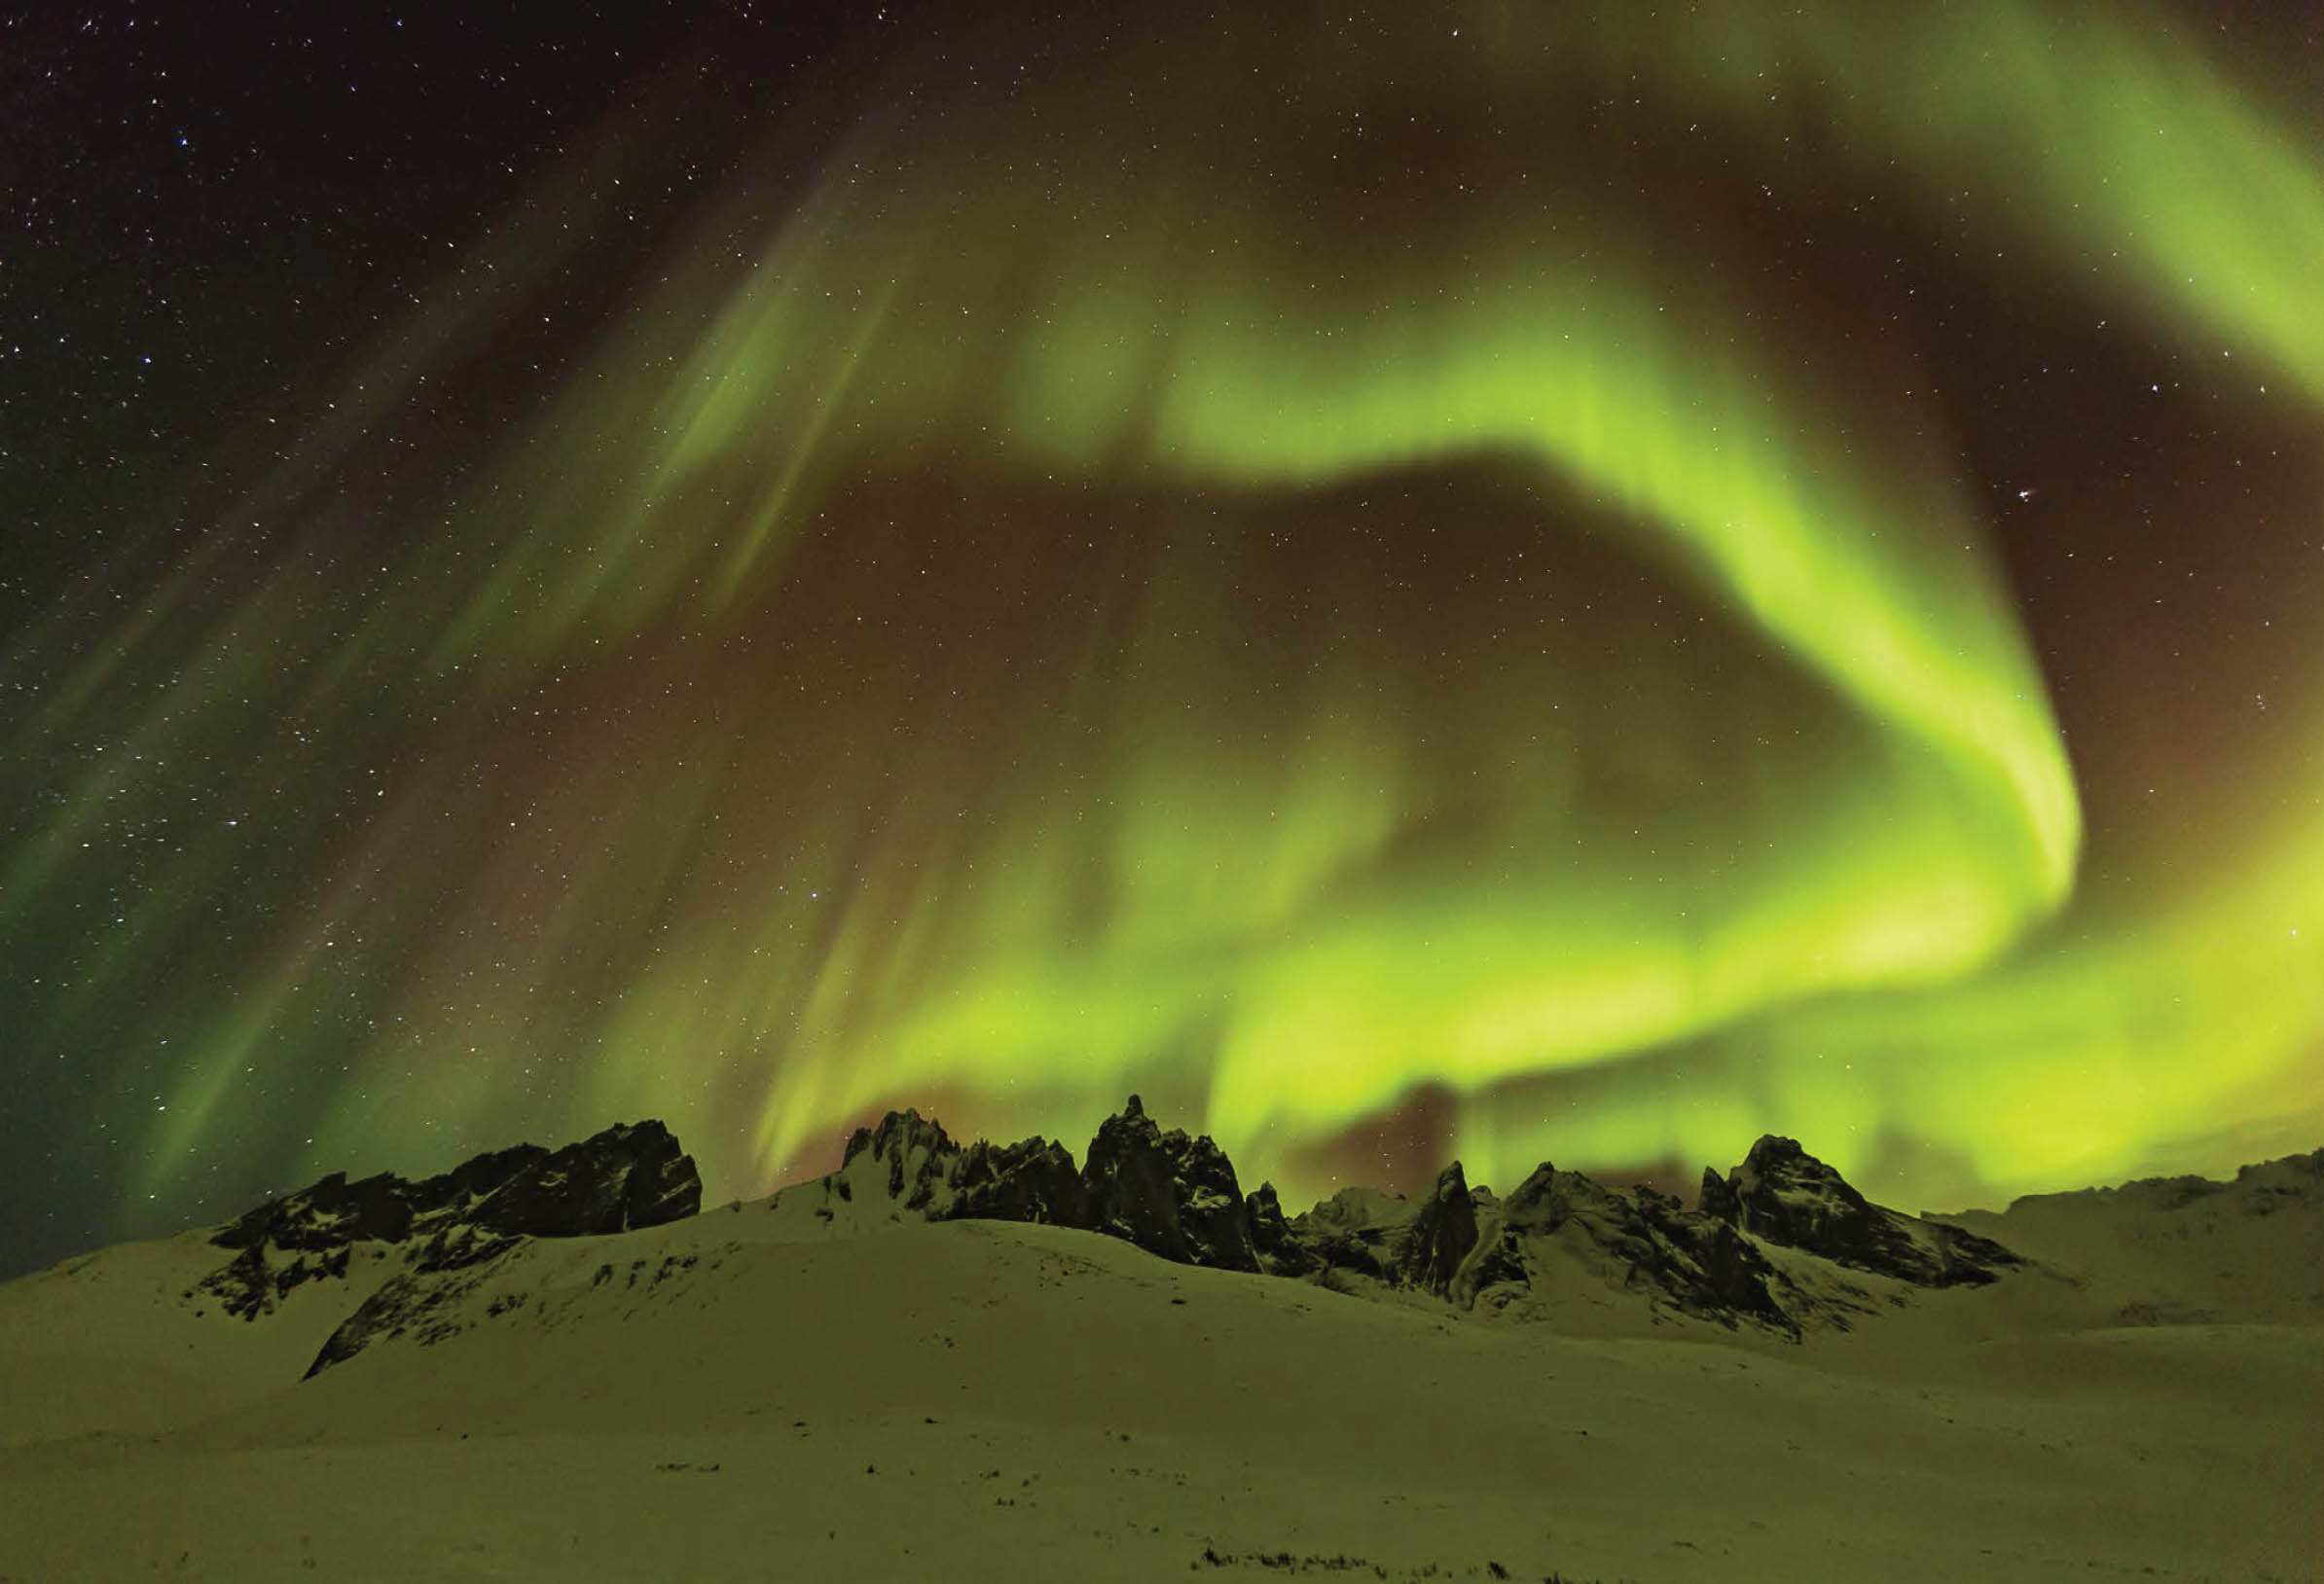
FIGURE 10-30 Aurora over Mt. Monolith, Tombstone Territorial Park, Yukon Territory, Canada. This was another magnificent auroral display during the 2015 St. Patrick’s Day geomagnetic storm. Canon EOS 5D Mark III, Canon EF 16-35mm f/2.8L II USM at 16mm, 6 seconds, f/2.8, ISO 3200.
When the aurora is good, it’s big (in an angular sense). I used my Canon 16-35mm f/2.8 lens exclusively when shooting the aurora during a recent trip to Yellowknife. I made about two-thirds of my aurora photos at 16mm.
Some modern cameras are so sensitive at high ISOs that they can actually give you a fairly accurate meter reading from a bright aurora. I typically use manual exposure mode, but bias the exposure toward the plus side by one stop or occasionally more. For my Canon 5D Mark III, I discovered that the light of the full moon shining directly into the eyepiece, or even bouncing off my cheek and into the eyepiece, could alter the exposure. For that reason, I always set the exposure in manual mode while looking through the camera, and used my black-gloved hand to prevent stray moonlight from entering the eyepiece while metering.
One final tip: in cold weather, avoid breathing on either the viewfinder or the front element of your lens, and check both frequently for frost or condensation.
Photographing Moonlit Landscapes
Exploring the wilderness by the light of the full moon can be a magical experience. Making an image that captures that experience starts with planning. The Photographer’s Ephemeris, PhotoPills, and Sun Surveyor all provide information on the time and azimuth of moonrise and moonset as well as the percentage of the moon’s surface that will be illuminated. Even today’s best cameras struggle to capture good detail in the dark shadows of moonlit shots if the highlights are properly exposed. Plan to visit locations where the moon will be roughly 30 to 60 degrees right or left of a straight-behind-you position as you shoot the most interesting subjects. Avoid situations where the moon will be directly behind you; frontlight is just as flat and boring when shooting by moonlight as when shooting by the light of the sun. Also avoid backlight, which will produce images where too much of the scene is in shadow, and avoid compositions with the moon in the frame. The moon is much brighter than the land; flare and overexposure will cause it to blow out to a blank, irregular blob. Try to find compositions that require you to look up steeply. The darker sky well above the horizon will reveal more stars.
Moonlight varies in brightness depending on the phase of the moon and the moon’s altitude. For a landscape lit by a full moon high in the sky, start with 30 seconds, f/2.8, ISO 400 and adjust as needed. The brightness of moonlight drops off rapidly as the moon wanes. You might think that a moon that is 50 percent illuminated would be half as bright as the full moon (100 percent illuminated), and that you would therefore only need to open up one stop. In fact, you’ll need to open up three stops or more.
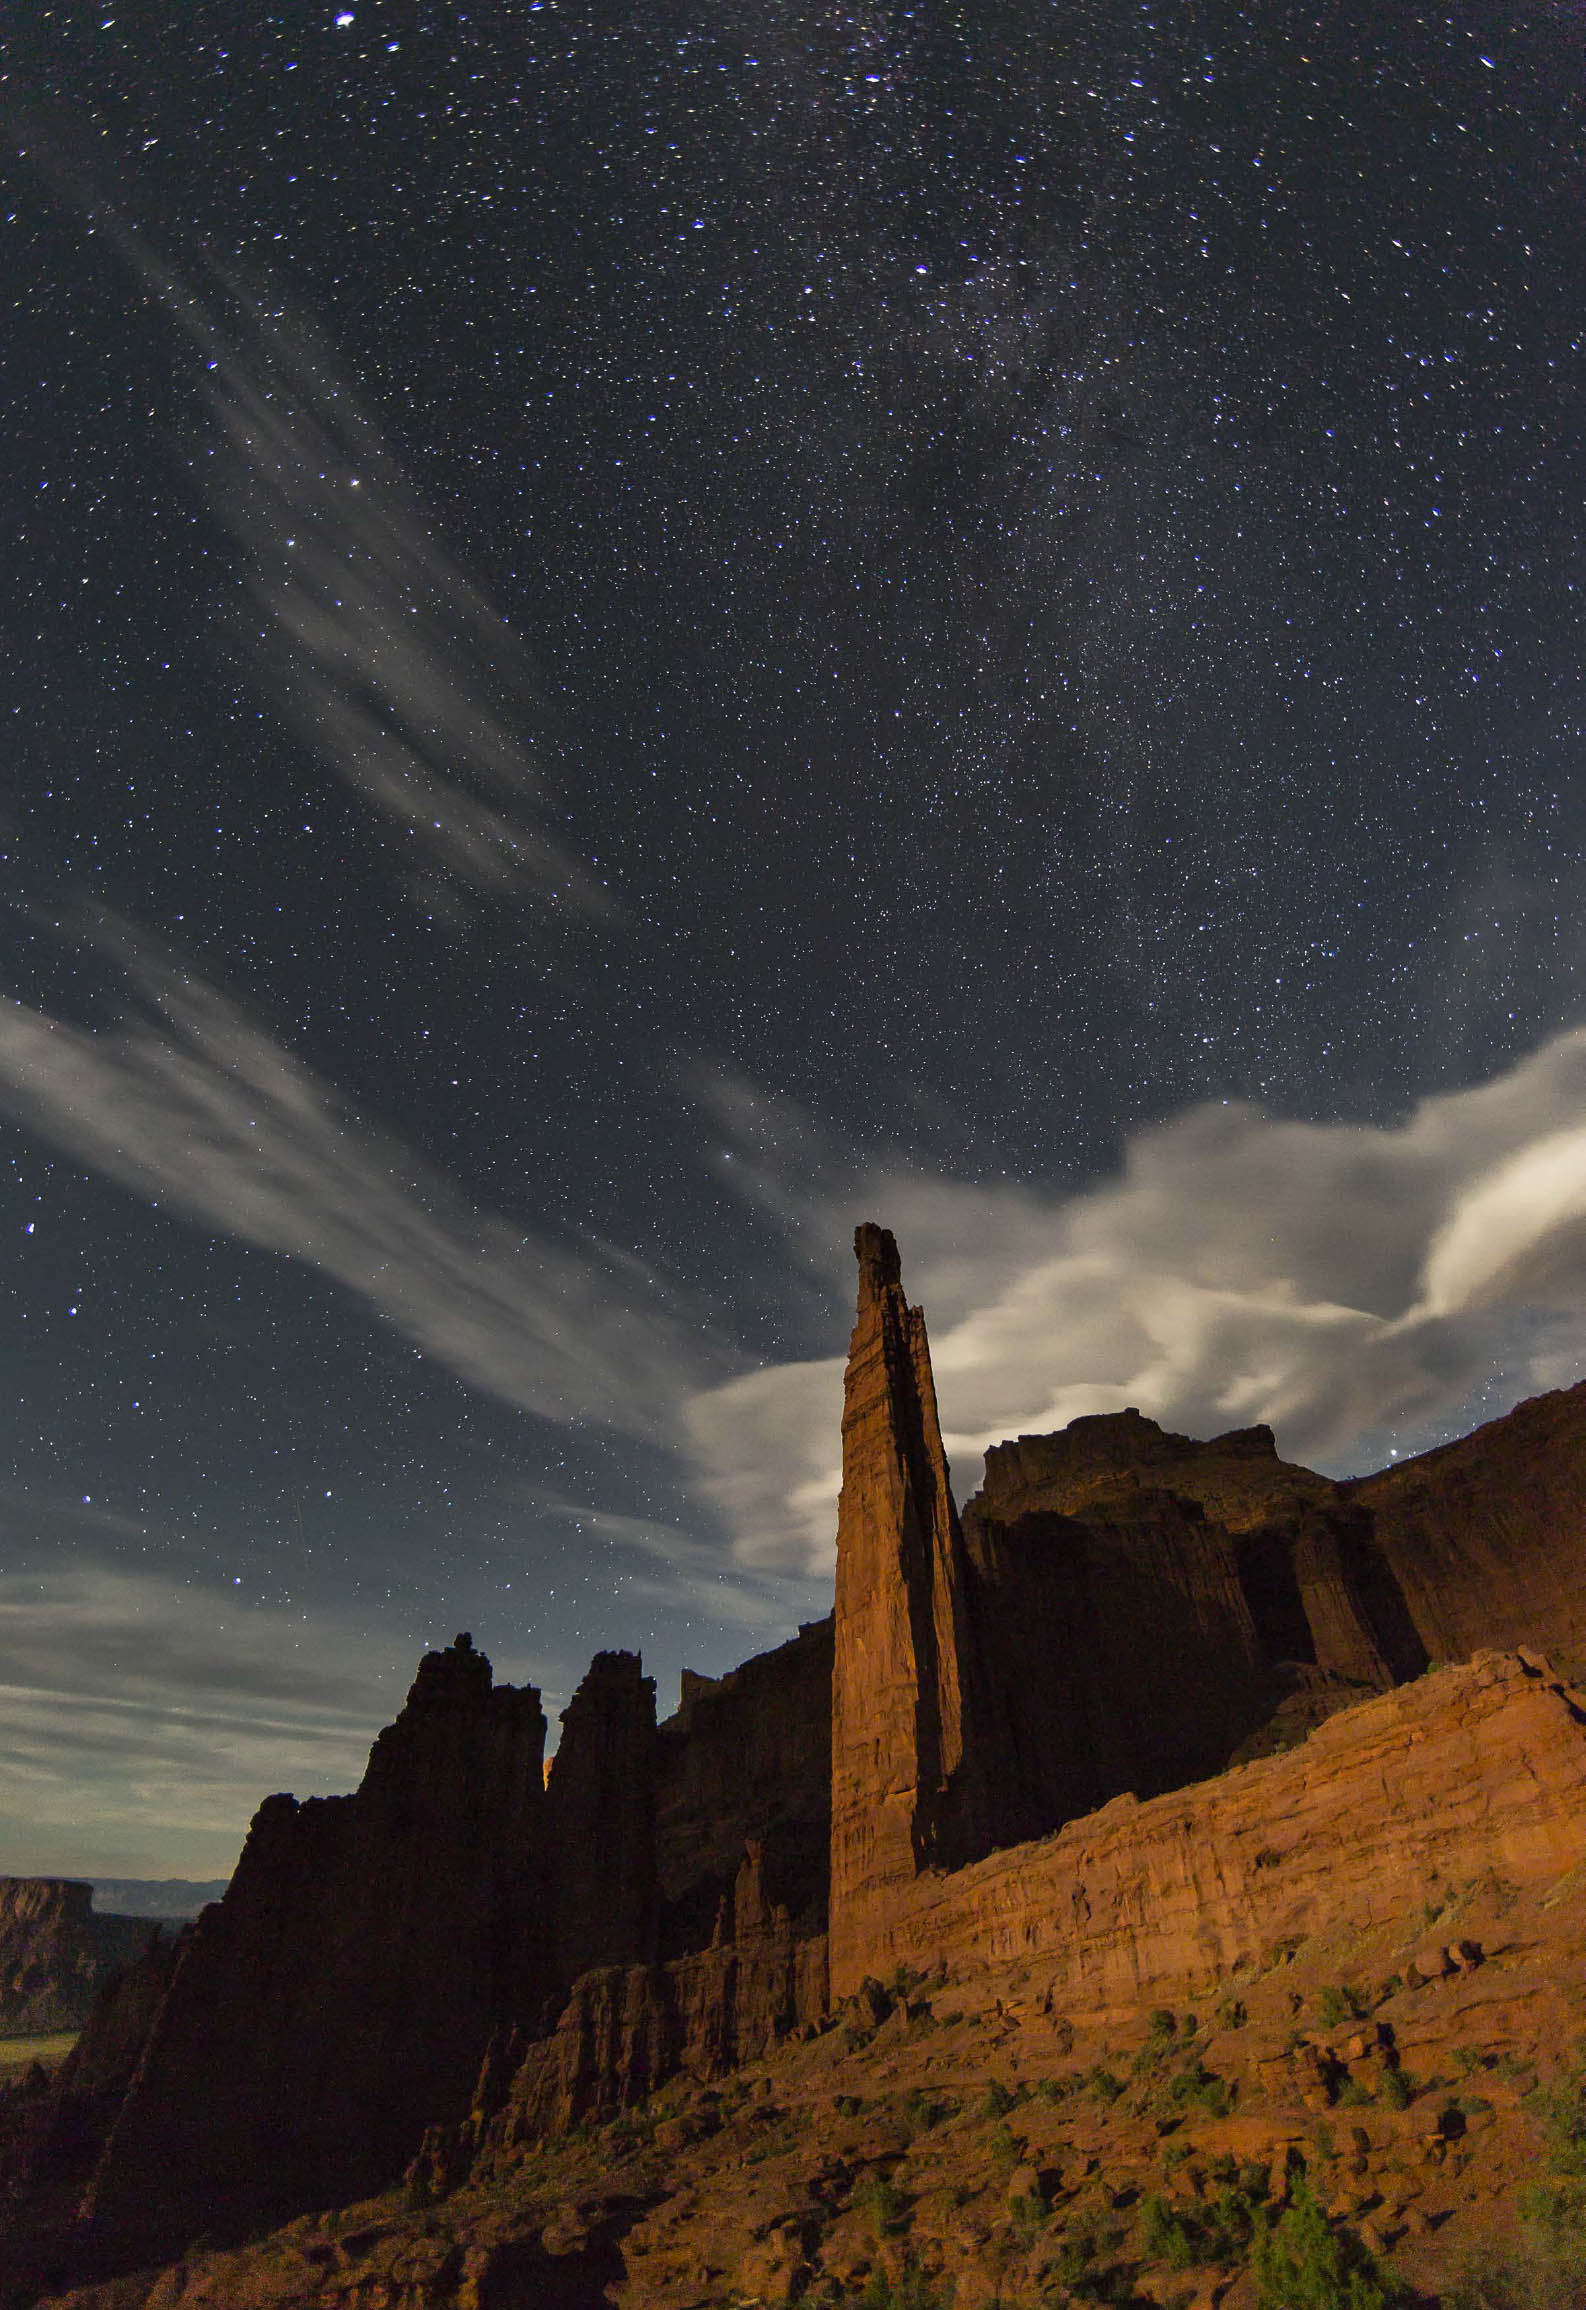
FIGURE 10-31 Milky Way and lenticular clouds over the Titan, Fisher Towers, Utah. The land was lit by the moon, which was 65 percent illuminated. Canon EOS 5D Mark III, Canon EF 14mm f/2.8L II USM, 30 seconds, f/2.8, ISO 6400.
Creating an image that evokes the feeling of moonlight is trickier than it may first appear. As I mentioned earlier, our visual system gives us the impression that moonlight has a silvery, bluish quality. In fact, the light of the full moon is actually warmer (more yellow) than noon daylight. A straightforward shot of a landscape by the light of the full moon can easily resemble a daylight shot with a few annoying white specks in the sky. To create the feeling of moonlight, I usually cool the image down by setting the Temp slider in Lightroom’s Basic panel to between 4,200 and 4,600. This is the same approach I use when processing the good-land exposure when shooting the Milky Way using the modified Rembrandt Solution. On a moonlit night, the sky will already be blue if you shot with a daylight white balance for the same reason the daytime sky is blue: Rayleigh scattering. There’s no need to alter the color of the sky; however, I usually make it darker than a daylight sky to enhance the nighttime feel. Lightroom’s Graduated Filter and Adjustment Brush are two good ways to darken the sky without darkening the land. Adding contrast to the land, so that shadows are inky black but highlights remain midtone, also helps create the feeling of moonlight. Darkening the image too much overall often results in an image that looks muddy and unappealing.

FIGURE 10-32 Sand dunes and the Sangre de Cristo Range by moonlight, Great Sand Dunes National Park, Colorado. The moon was 96 percent illuminated. Canon EOS 5D Mark III, Canon EF 50mm f/1.4 USM, 30 seconds, f/1.4, ISO 100.
Can Night Photographs Be Authentic?
Throughout my 26-year career as a landscape photographer, I have tried to make images I considered “authentic.” I have always told my customers, “What you see in my prints is what I saw through the lens.” Then I bought a camera with an extraordinarily sensitive sensor, the Canon 5D Mark III, and started shooting landscapes on moonless nights, when the only light sources were starlight and sky glow. The images revealed an amazing abundance of stars as well as the detailed structure of the Milky Way. Suddenly I faced a conundrum: how can I claim that my prints reveal what I saw through the lens when it’s so dark I can’t see anything through the lens?
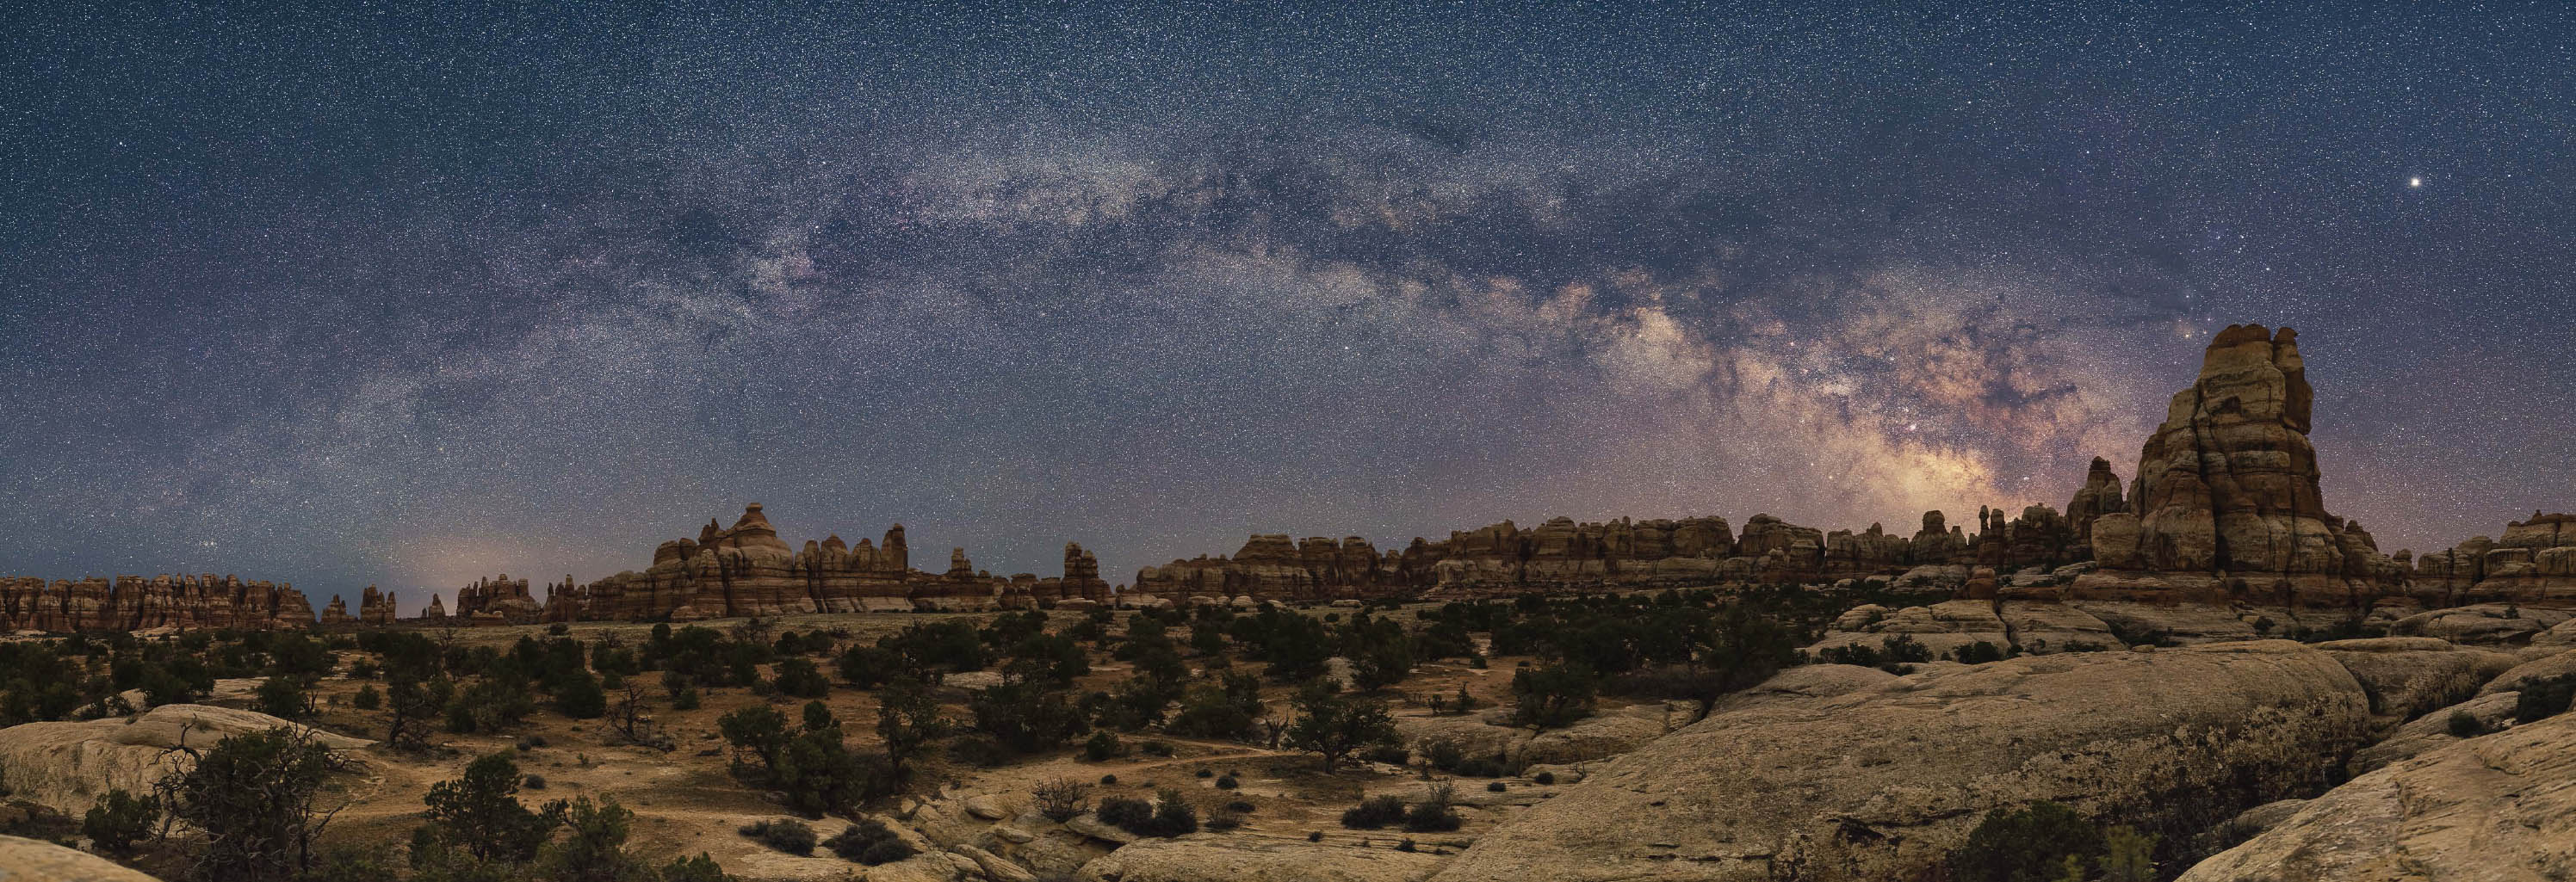
FIGURE 10-33 Milky Way panorama over Chesler Park, Needles District, Canyonlands National Park, Utah. I had scouted this location a year earlier, but ran out of time to make the shot. I returned the following year, waited out three nights of bad weather, and finally was able to make this image. Canon EOS 5D Mark IV, Canon EF 35mm f/1.4L II USM. Stitched panorama, two rows, one row exposed for the land, one row exposed for the sky, eight camera positions, four frames per camera position. Land: images stacked in Photoshop, noise reduced with Stack Mode>Median, 40 seconds, f/1.4, ISO 6400. Sky: images aligned and noise reduced in RegiStar, 10 seconds, f/1.4, ISO 6400.
In a way, the problem was ironic. For years I have battled the limitations of the capture medium. My philosophy was never, “What you see in my prints is what the film recorded.” That was always unsatisfying because my eyes could always see much better detail in the highlights and shadows than film could. A good DSLR has much better dynamic range than transparency film, but it’s still not as good as my eyes. High-dynamic-range techniques make it possible to capture an even wider range of brightness levels than my eyes can see, but also introduce their own problems, since our visual system doesn’t see high-contrast scenes in a simple, linear way. Turning an HDR image into something our visual system finds believable is fraught with challenges.

FIGURE 10-34 Aurora over Prosperous Lake, Prosperous Lake Territorial Park, along the Ingraham Trail near Yellowknife, Northwest Territories, Canada. Late September is a great time to shoot the aurora near Yellowknife because the nights are dark enough to offer a good chance of seeing auroras and the many lakes are not yet frozen. Canon EOS 5D Mark III, Canon EF 16-35mm f/2.8L II USM at 17mm, 5 seconds, f/2.8, ISO 3200.
Now for the first time I had a camera that was better than my visual system, at least in terms of its ability to record extremely faint light with a long exposure at a very high ISO. My eyes, no matter how well dark-adapted, could barely glimpse the colors and details my camera so easily recorded. Should I suppress those colors and create a near-monochrome image that resembled what I actually saw? Or should I celebrate the camera’s ability to reveal an unseen world and show night scenes in color as the camera recorded it? I experimented with desaturating my night images or converting them to black and white, and concluded quickly that while they might be closer to a literal representation of what I saw, they came nowhere close to evoking the emotions I felt when I was standing there. The reason, perhaps, is that I knew (or thought I knew) what colors ought to be there, so the black-and-white rendition seemed wrong.
I returned to the idea of rendering night scenes in color but quickly ran into another conundrum. The colors my camera recorded sometimes seemed jarringly out of sync with what I imagined those colors ought to be. We all have a lifelong association of the sky with the color blue. Sky is a memory color, one of those colors where we tend to substitute what we want to see (e.g., an idealized, pure blue) for what we actually saw. It’s also a color where we tend to have strong opinions about what looks “right.”
Look straight up on a clear day at noon and the sky is always some shade of blue. Look straight up as the light fades from a clear sky after sunset and the last color we see is blue. When light returns with the onset of dawn, the first color we see in the sky straight above us is once again blue. Naturally, we imagine that the night sky must be blue even if we can’t actually see the color. And indeed, on a night with a full moon, the sky really is blue, and your camera will record it as such.
On a moonless night, however, the sky is not blue. Its exact color varies, depending on atmospheric conditions and the distance to major cities, but it is often some shade of green. You may be shocked at the color of the sky that your camera records on a moonless night since it is so wildly at odds with what a lifetime on this planet would lead you to expect. So do you continue to celebrate your camera’s ability to record the unseen, or do you change the color of the sky to the blue you were expecting and that feels somehow “right”?
Ultimately, I reached this conclusion: photographing in color at night is like shooting in black-and-white during the day. It is an inherently subjective process. At high noon, what shade of gray should the sky be? Any shade of gray that looks good! At midnight, what shade of blue should the sky be? You can’t see the color of the midnight sky, so you once again have broad artistic latitude. My goal at night is to create an image that captures the feeling I had as I stood there under a magnificent starry sky. To that end, I shift the color of the sky toward blue while preserving the color of the brightest stars, which I can actually see with dark-adapted eyes. I shift the color of the land slightly towards blue to help preserve a nighttime feel. If the image shows the Milky Way, a lunar eclipse, a meteor shower, the aurora, or star trails over a particular mountain or desert spire, it’s because I actually saw those celestial phenomena soaring over that landscape. Are these images “authentic”? Certainly not in the sense that they show precisely what I saw, since my eyes couldn’t see the colors these images depict. I do hope, however, that they evoke for my viewers the same emotions that I experienced as I captured these images, and that they are authentic in that sense.
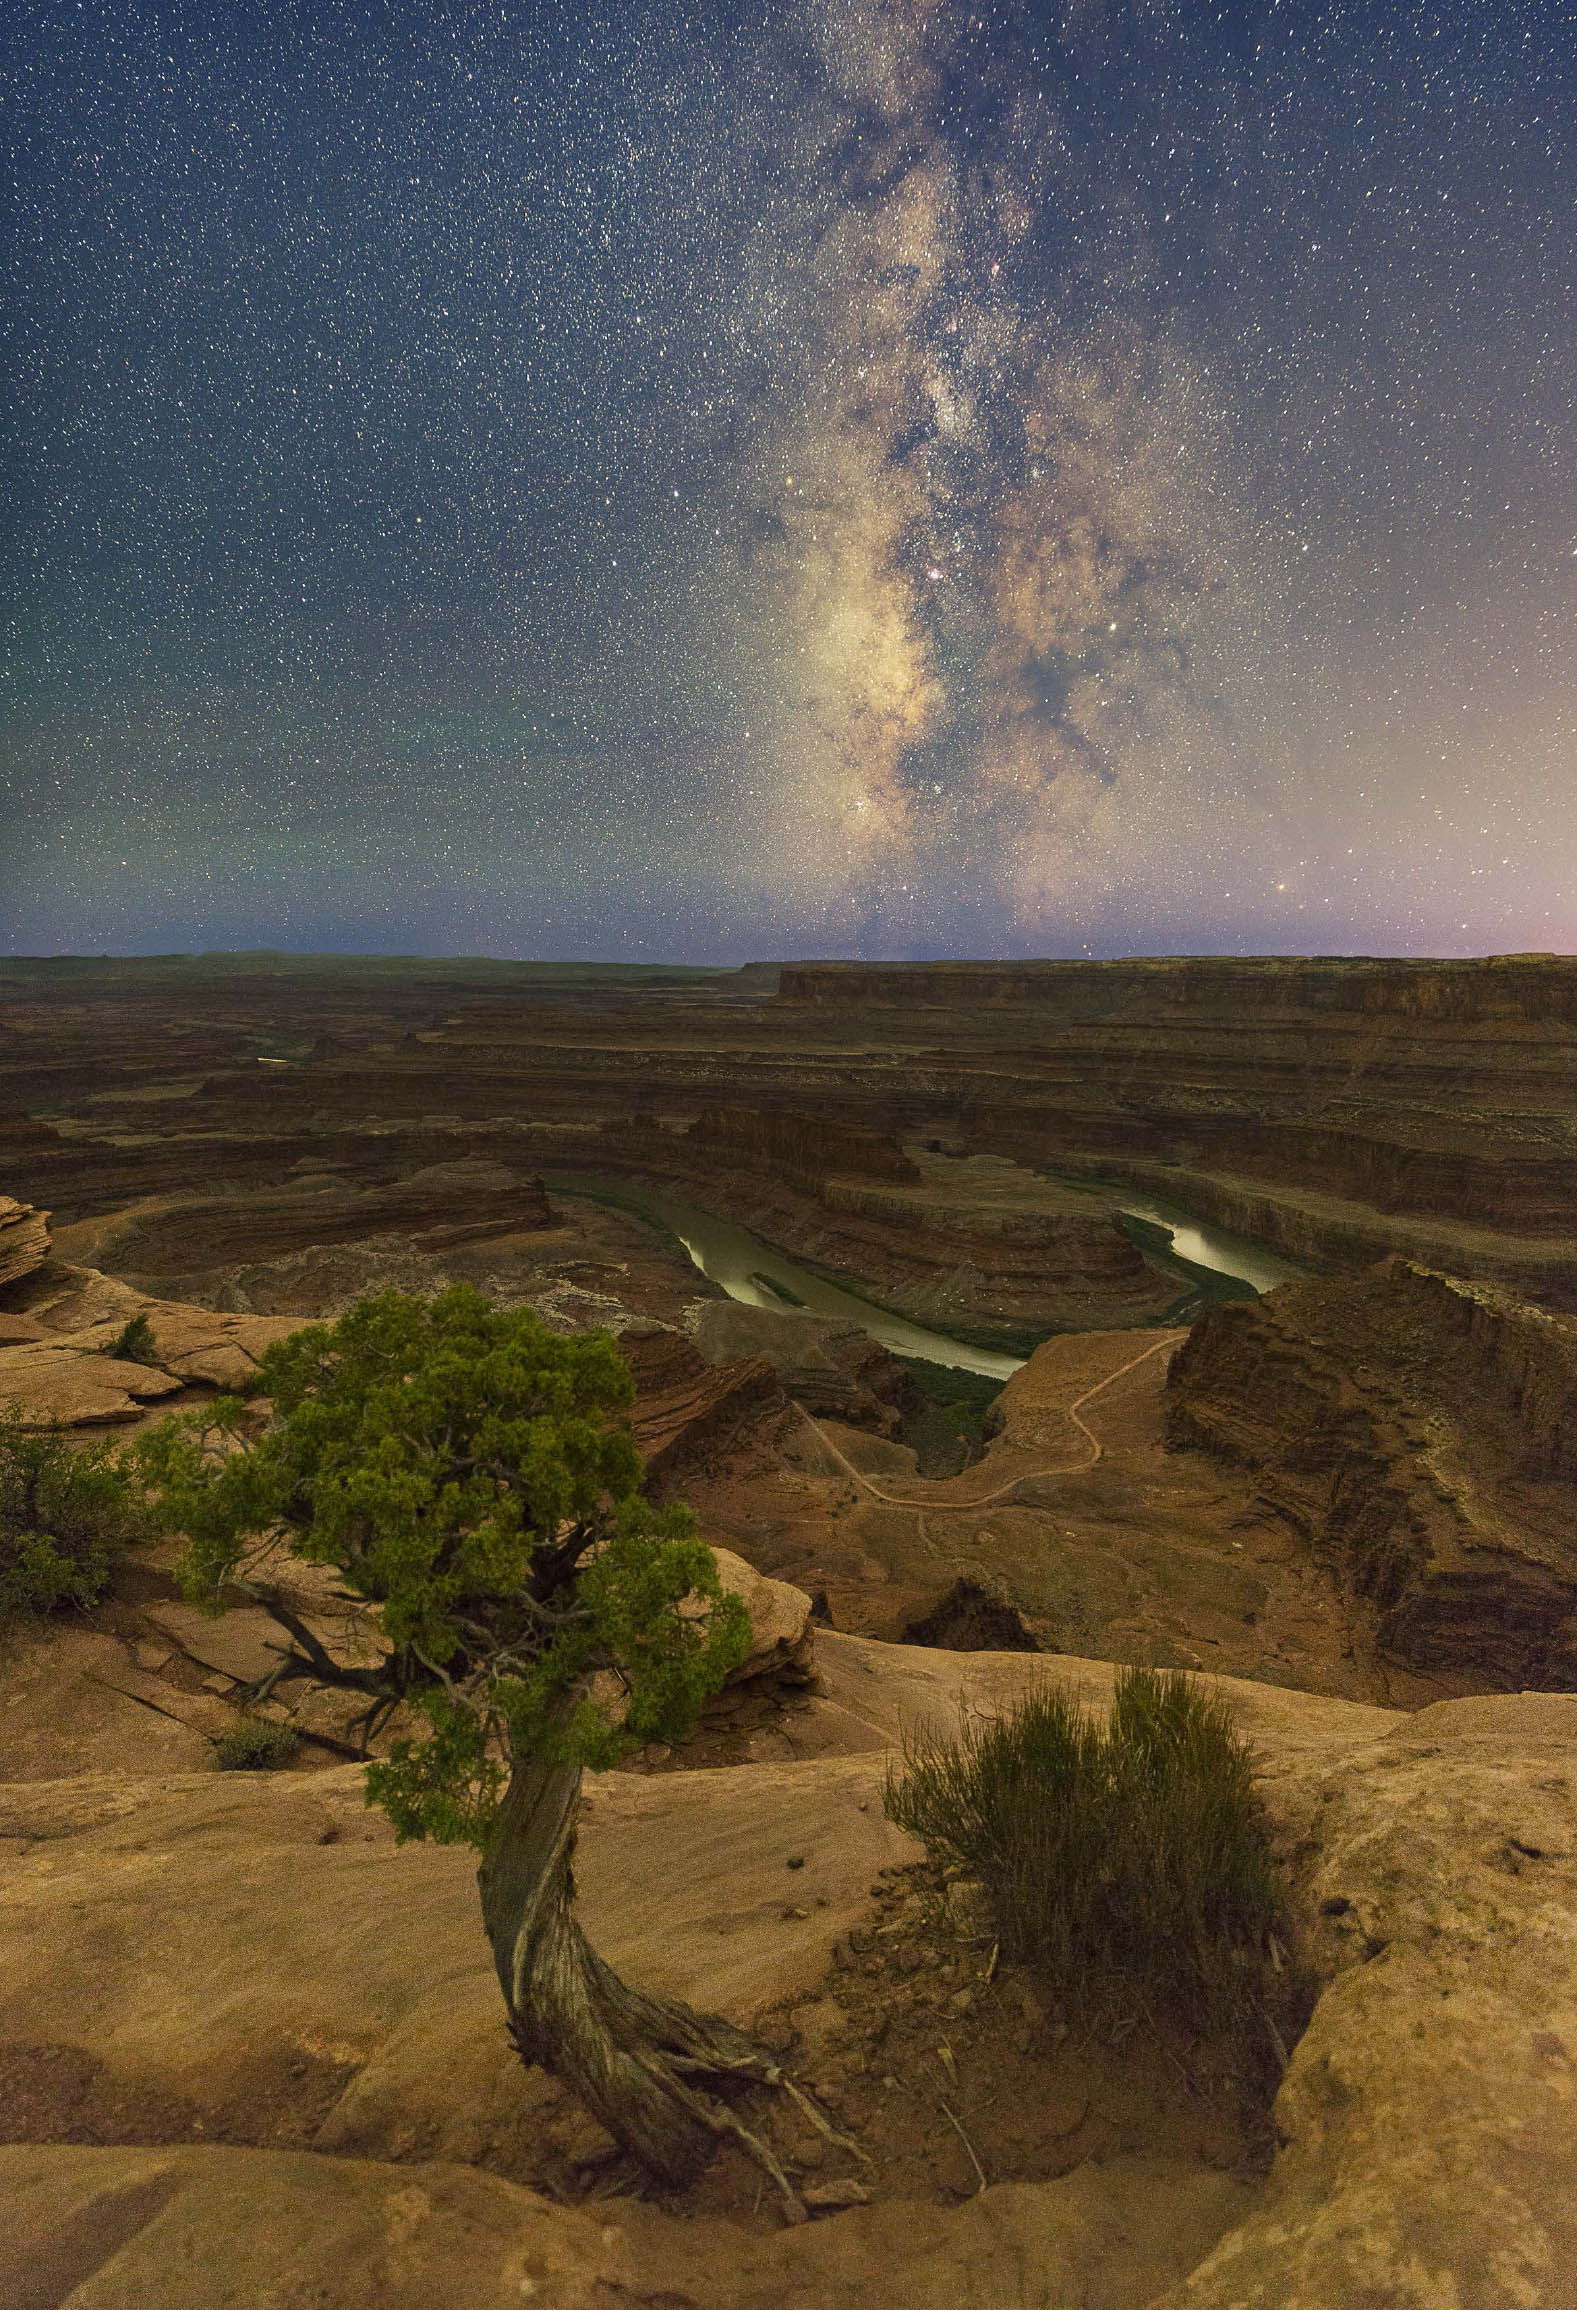
FIGURE 10-35 The Milky Way and the Colorado River from Dead Horse Point, Dead Horse Point State Park, Utah. The Milky Way is only in this position in the fall right after astronomical dusk. Canon EOS 5D Mark III, Canon EF 16-35mm f/2.8L III USM at 16mm. Land: four exposures, images stacked in Photoshop and noise reduced with Stack Mode>Median, 3 minutes, f/2.8, ISO 6400. Sky: Four exposures with camera mounted on iOptron Sky Tracker Pro equatorial mount, stars aligned and noise reduced in RegiStar, 2 minutes, f/2.8, ISO 1600.