We can add any object, such as a table or class, to source control as long as it is modified in the current layer and not in a higher layer.
When we created the models in Chapter 1, Preparing Our Solution, we added them to source control. This can be done afterwards by following these steps:
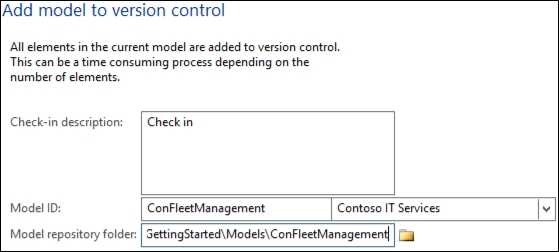
- Navigate to Version Control | Add model to version control.
- The Check-in description field is Check in by default and is usually suitable, but this can be changed if required.
- Select the model ID to add to source control.
- Ensure that a folder exists for the model under the folder set by navigating to Version Control | Version Control Parameters. If the
Repositoryfolder isC:ProjectsVCSAXand the application root folder is3579GettingStarted, create the folder underC:ProjectsVCSAX3579GettingStarted. Use the model's name as the folder name. - Enter or select the folder in the Model repository folder, as shown in the following screenshot:
The integration with TFS from AX is done by importing and exporting XPOs of the changed parts of an element. If we add a method to the table TMSParameters and add it to source control, it will create a file called TMSParameters.xpo, which only contains that method. Let's take a look at the following code example:
Exportfile for AOT version 1.0 or later
Formatversion: 1

***Element: DBT
; Microsoft Dynamics AX Table : TMSParameters unloaded
; --------------------------------------------------------------------------------
  TABLEVERSION 1

  TABLE #TMSParameters
    EnforceFKRelation 0
    FIELDS
    ENDFIELDS
    GROUPS
    ENDGROUPS

    INDICES
    ENDINDICES
    FULLTEXTINDICES
    ENDFULLTEXTINDICES
    REFERENCES
    ENDREFERENCES

    METHODS
      SOURCE #conFMSNumRefConFMSVehicleId
        #server static NumberSequenceReference conFMSNumRefConFMSVehicleId()
        #{
        #    return NumberSeqReference::findReference(extendedTypeNum(ConFMSVehicleId));
        #}
      ENDSOURCE
    ENDMETHODS
  ENDTABLE
***Element: END
Handling whether an object is checked in or out is done by telling TFS to check in and check out the XPO. AX understands whether the element is checked in or not by requesting the status for the file stored in the TFS repository. There is no table that holds this reference; it is done purely using the folder structure we configured in the version control settings.
Once source control is active, we get six new options available to us in the context/right-click menu:
These options are also available on the toolbar ribbon on the AOT and project windows.
We also have some useful tools on the Version Control option from the main menu.
The Changes option lists all change sets that have been checked in to TFS, and by whom. You can view the contents of each change set and compare the change to the current version or prior versions.
The Pending Objects option lists all objects that are pending to be checked in. This can be to add, edit, or delete from TFS. You can start the check in from this form. You can also create a project, which is useful when we wish to export the changes in case they need to be shelved.
The Synchronise option will synchronize the TFS repository with your local environment, applying all changes made by other developers; this includes any deleted elements, and this option does so without any warning. This may sound scary, but it is no different from a developer deleting an element in a shared development environment, except for the fact that we can get it back!
This can be run with a Force option that will fetch everything, and not just the changes made since the last synchronization.
When we start this, we are asked which model we need to synchronize, and will default to the layer. We must always change this to the model we are working with, and repeat the process for each model we wish to synchronize with.
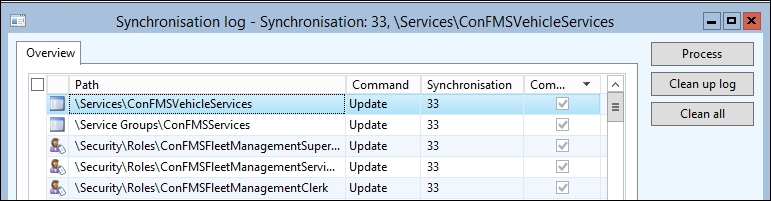
The Synchronisation log option shows a list of the elements affected by the last synchronization and is worth checking in case an element did not synchronize. You can see this by the Completed field on the list. You can reprocess the incomplete items using the Process button. Each synchronization will be added to this list, so we should use the Clean up log (all records for the current synchronization) or Clean all button to clear this. The following screenshot shows this: