
We now have the basic table structure and user interface. In this chapter, we will extend the solution further to add business logic and initial integration with the transport management solution provided by Microsoft. We will also see some of the benefits of the investments we made in the earlier chapters.
In this chapter, we will cover the following topics:
- Moving table validation and logic into a class
- Adding navigation
- Creating a number sequence reference and hook into the form
- Hooking into standard AX logic using eventing
- Creating a delegate for our own use and by other parties
We have discussed previously that there are various events we can hook into by overriding methods on a table. The typical events we override are shown in this table:
Over the course of this chapter, we will override these methods as appropriate, but before we do this, we should decide where the code should be placed: directly on the table or in a class.
The decision to move table validation and other logic to a class is based on complexity. We will typically do this for tables of type worksheet (for example, sales orders and purchase orders), as the logic tends to become complicated. Main tables, such as Customer, Item, and our Vehicle table will not normally have their logic placed in a class, unless the table requires complicated business logic.
Our example will be for the vehicle service data table, ConFMSVehServiceTable, as this is a worksheet table.
Apart from classes being a more suitable place to write more complicated code, they also allow us to construct a class based on the data in the record, for instance, the vehicle type field on the attached vehicle record.
A good example is the validateField method. Here, we would normally use a switch statement with a case per field. If we want different validation per vehicle type, we end up with a switch inside a switch.
This breaks two readability rules:
A common pattern is to have just one switch statement, and then each case will be handled by a separate "check" method (such as checkNextServiceDate()).These methods can then be called from the validateField method and other places where a message to the user is required.
This simplifies our switch statement to a couple of lines per field, like this for example:
switch(_fieldIdToCheck)
{
    case fieldNum(ConFMSVehServiceTable, NextServiceDate)
        ret = this.checkNextServiceDate();
        break;
        // and so on
}
This is a good idea because we can reuse this method. There is another, more extendable solution to this: we can create a class that handles the service data logic and have a specialized class per vehicle type. Since the service data table is associated with a vehicle, we can easily determine the vehicle type by navigating back to the vehicle record. We will follow this approach in the following paragraphs.
The pattern is implemented by creating a class named after the table, suffixed with Type. This will have a method per table event that we are handling.
To write code to this pattern, we will perform the following steps:
- Create the table type class.
- Create a method for each table event we will override (certainly the methods in the preceding table). These methods have the same parameter profile as the table method.
- Create an instance method named type on the table that constructs the class based on the current record.
- Override the table event methods to call
this.type().<eventMethod()>.
In our case, the class will be called ConFMSVehServiceTableType.
The best way to describe this is by example. The following steps will create a template that we will extend over the course of the project:
- In our project, right-click on the Classes node and go to New | Class.
- Rename the class to
ConFMSVehServiceTableType. - Open the classDeclaration and declare
serviceTableasConFMSVehServiceTable. - Create a
parmmethod for this variable (press Ctrl + N, clear the method's content, typeparm, press Tab, fill in the dialog, and press OK), the result of which should look like this:public ConFMSVehServiceTableType parmServiceTable(ConFMSVehServiceTable _serviceTable = serviceTable) { serviceTable = _serviceTable; return serviceTable; } - Create a
constructmethod, this time using the construct code snippet. This should result in the following:public static ConFMSVehServiceTableType construct() { return new ConFMSVehServiceTableType(); } - We should create a constructor that constructs the instance from a service table record, since this is how we will construct an instance of the class. This is done as follows:
public static ConFMSVehServiceTableType newFromServiceTable(ConFMSVehServiceTable _serviceTable) { ConFMSVehServiceTableType instance; instance = ConFMSVehServiceTableType::construct(); instance.parmServiceTable(_serviceTable); return instance; } - We can now write our code. We will create method stubs for the following table event methods:
validateWritevalidateDeletemodifiedFieldvalidateFieldupdateinsert
- For each of the preceding methods, right-click on the Methods node of the
ConFMSVehServiceTabletable and select Override method | <method name>. - In the
ConFMSVehServiceTableTypeclass, create the new method as usual: right-click New | Method for the first method and press Ctrl + N while in the code editor for subsequent methods. - The method signature must match, so copy the method signature from the equivalent table method. The purpose at this point is to avoid interfering with what the system will normally do:
public boolean validateWrite() { boolean ret = true; return ret; } public boolean validateField(FieldId _fieldIdToCheck) { boolean ret = true; return ret; } public boolean validateDelete() { boolean ret = true; return ret; } public void modifiedField(FieldId _fieldId) { } public void update() { serviceTable.doUpdate(); } public void insert() { serviceTable.doInsert(); } - We now need to wire the table's events to the class, but first, we need to create a
typemethod that will construct an instance of the class. This must be an instance method on the table, as it will pass the current record to the class. This is done by creating a new method on the table and typing the following:public ConFMSVehServiceTableType type() { return ConFMSVehServiceTableType::newFromServiceTable(this); } - We now need to modify the table methods so that they call our class. The code you need to write is highlighted:
public void modifiedField(FieldId _fieldId) { super(_fieldId); this.type().modifiedField(_fieldId); } public boolean validateDelete() { boolean ret; ret = super(); // only perform our validation if the system's succeeds if(ret) { ret = this.type().validateDelete(); } return ret; } public boolean validateField(FieldId _fieldIdToCheck) { boolean ret; ret = super(_fieldIdToCheck); if(ret) { this.type().validateField(_fieldIdToCheck); } return ret; } public boolean validateWrite() { boolean ret; ret = super(); if(ret) { ret = this.type().validateWrite(); } return ret; } - The
insertandupdatemethods are slightly different, as we don't want to callsuper(); it simply callsdoUpdate()ordoInsert(). We will do this in our class, and we can add code as required in our class. The methods will therefore be the following:public void update() { this.type().update(); } public void insert() { this.type().insert(); } - The main table events are now handled by the handler class, although we aren't adding any value to the process as yet. This comes later.
Note
There is another big benefit of using classes for this—we can create delegates that we can call within our class. Other developers can then subscribe to our delegates, adding new logic without directly modifying the code. This is covered towards the end of this chapter, in the Creating a delegate for use by other parties section.
Now that we have this framework in place, we can start adding validation and business logic. Some validation may be obvious, based on standard design patterns, and the rest will be provided in the functional requirements document.
The validation required in ConFMSVehServiceTable will be as follows:
- The primary key,
ServiceId, must be filled in and can't be changed after creation VehicleIdmust be populated, and cannot be changed after creationCurrentOdometermust be filled inServiceDatemust be filled inNextServiceDatemust be afterServiceDateand be set from the vehicle service scheduleNextServiceOdomust be greater thanCurrentOdometerand be set from the vehicle service schedule
In order to make fields mandatory, we will use the table fields' Mandatory property. This is checked by the standard validateField table method. Since we are calling super() before our method, this will still be processed. This property also highlights mandatory fields.
To make a field editable on creation, but read-only once it is saved, we set the field properties as follows: AllowEdit to No and AllowEditOnCreate to Yes.
We need to write code to handle the rest. To validate NextServiceDate and NextServiceOdo, we will modify the ConFMSVehServiceTableType.validateField method, as follows:
public boolean validateField(FieldId _fieldIdToCheck)
{
    boolean ret = true;
    switch (_fieldIdToCheck)
    {
        case fieldNum(ConFMSVehServiceTable, NextServiceDate):
            if(serviceTable.NextServiceDate <
               serviceTable.ServiceDate)
            {
                ret = checkFailed("The next service date must be
later than the service date");
            }
            break;
        case fieldNum(ConFMSVehServiceTable, NextServiceOdo):
            if(serviceTable.NextServiceOdo <
               serviceTable.CurrentOdometer)
            {
                ret = checkFailed("The next service odometer must
be greater than the current odometer reading");
            }
            break;
    }
    return ret;
}Since validateField is called using the field ID and not the field's name, we need to look up the field ID from the data dictionary. This is done by calling the fieldNum method.
You can test this in the table browser by right-clicking on the table and selecting Open. You can then enter data that should succeed and fail to test the various cases.
We now need to add some logic to set the NextServiceDate and NextServiceOdo fields. This will be done as we edit the ServiceDate and CurrentOdometer fields. It is done by adding logic to the class's modifiedField method, as shown in the following code:
public void modifiedField(FieldId _fieldId)
{
    switch (_fieldId)
    {
        case fieldNum(ConFMSVehServiceTable, ServiceDate):
            // TODO insert code to set NextServiceDate
            break;
        case fieldNum(ConFMSVehServiceTable, CurrentOdometer):
            // TODO insert code to set NextServiceOdo
            break;
    }
}The logic required in the preceding example is to check whether the vehicle has a service schedule. Then it has to look up the schedule to calculate the next service date and odometer settings. This would be too much code to place inside a case, so we will create a series of methods to do this.
We will create these methods on the class, since this is where they will be used.
Before we start, check whether that the relation ConFMSVehicleTable on ConFMSVehServiceTable has the CreateNavigationPropertyMethods property set to Yes. This will create a navigation property method that appears as the table name. You can change this using the NavigationPropertyMethodNameOverride property. This is useful because it is possible to have more than one relationship to the same table. This property allows you to give each relation method a unique name.
We will use this in the following code to get the service table's vehicle record in order to determine whether it has a schedule:
public boolean hasServiceSchedule()
{
    ConFMSVehicleSchedId serviceSchedId;

    serviceSchedId = serviceTable.ConFMSVehicleTable().VehicleSchedId;
    if(serviceSchedId != "")
    {
        if(ConFMSVehicleSchedule::exist(serviceSchedId))
            return true;
    }
    return false;
}
The choice to make this method public is because it may be useful outside the class.
The ConFMSVehicleTable method on ConFMSVehServiceTable was created for us by setting the relation's CreateNavigationPropertyMethods property to Yes. This method is not visible in the AOT; it is there just to be used. It uses the relation's definition, so if the relation changes, then so does the method. This saves time and simplifies navigation, especially when the tables become more complicated.
In the highlighted part of the preceding code, it may seem strange that we did not check whether a record was returned. AX will always return a record, and if none were found, the fields will be initialized with empty values; they will not be NULL. A normal way to check whether a record was returned is to check whether RecId is 0—its uninitialized value.
In this case, we are interested in the VehicleSchedId field. If a record is not found, then this will be an empty string. If a record that has no value for VehicleSchedId is found, then also it will be blank. In either case, it means the vehicle has no schedule.
The next method involves getting the service schedule record:
public ConFMSVehicleSchedule getServiceSchedule()
{
    ConFMSVehicleSchedId  serviceSchedId;
    ConFMSVehicleSchedule schedule;

    serviceSchedId = serviceTable.ConFMSVehicleTable().VehicleSchedId;
    if(serviceSchedId != "")
    {
        return ConFMSVehicleSchedule::find(serviceSchedId);
    }
    return schedule;
}
This method is similar, but what do we do if we don't have a schedule? Since the schedule is not mandatory, we shouldn't throw an error. We simply return the empty schedule record buffer, relying on the calling method to handle it properly.
We should therefore place a comment to this effect, which appears when we use the method.
Go to the top of the method and enter ///, like this:
///public ConFMSVehicleSchedule getServiceSchedule()
AX will replace this with the comment header template. Complete this as shown in the following code snippet:
/// <summary>
/// This method will lookup the <c>ConFMSVehicleSchedule</c>,
/// returning empty if not found
/// </summary>
/// <returns>
/// An instance of <c>ConFMSVehicleSchedule</c>, empty
/// if not found
/// </returns>
/// <remarks>
/// This method will not throw an exception if a record
/// is not found.
/// </remarks>
The special tag, <c>ConFMSVehicleSchedule</c>, can be read by AX, which understands that it is a type.
To see this in action, go to another method in the class and start typing this.get. Watch IntelliSense pick up the comment text, as shown in the following screenshot:

We should now create the methods to set NextServiceDate and NextServiceOdo.
The service schedule definition stores the number of days and distance between services. We can add days to a date variable by simply adding the number of days to it, as shown in the setNextServiceDate method:
public void setNextServiceDate()
{
    if(this.hasServiceSchedule())
    {
        serviceTable.NextServiceDate =
                serviceTable.ServiceDate +
                this.getServiceSchedule().Days;
    }
}
This sets NextServiceDate to ServiceDate plus the days returned from the vehicle's service schedule record. Again, if no record is found, the days will be zero and the next service date will be set to ServiceDate. We will therefore need to add validation to ConFMSVehicleSchedule to check whether days is greater than zero.
The next point of note is that this code will not trigger modifiedField or validateField for the change to NextServiceDate; remember that these are only called from the data bound form controls via the form data source. We can call validateField and modifiedField programmatically, but we run the risk of a recursive loop.
If we want to validate NextServiceDate, we should write a dedicated check method instead, like this:
public boolean checkNextServiceDate(TransDate _nextServiceDate = serviceTable.NextServiceDate).
{
// validate logic on _nextServiceDate
}
This method can be used to test a future state by passing a proposed NextServiceDate value, or check the current record's value using the default parameter.
The next method, setNextServiceOdo, is similar:
public void setNextServiceOdo()
{
    if(this.hasServiceSchedule())
        serviceTable.NextServiceOdo = serviceTable.CurrentOdometer
                             + this.getServiceSchedule().Distance;
}
Finally, we need to hook up these methods with the modifiedField method in our class so that they are triggered when the user alters the ServiceDate or CurrentOdometer fields.
In our class, open the modifiedField method and adjust it, as follows:
public void modifiedField(FieldId _fieldId)
{
    switch (_fieldId)
    {
        case fieldNum(ConFMSVehServiceTable, ServiceDate):
            this.setNextServiceDate();
            break;

        case fieldNum(ConFMSVehServiceTable, CurrentOdometer):
            this.setNextServiceOdo();
            break;

    }
}
This may seem complicated to create, but the way we have created specific methods simplifies readability and allows future changes to be made more easily than writing logic in a single method.
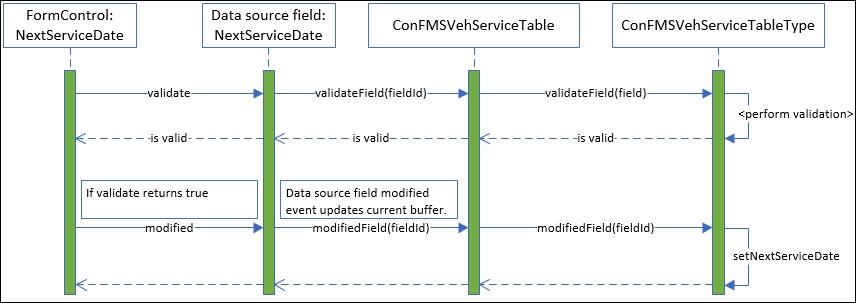
The preceding code is summarized by the following sequence diagram, which follows the events for a form control bound to the NextServiceDate field:
The test case for this is relatively straightforward, but necessary. In order to do this, some test data must be created. We should create the following test cases.
Open the form: ConFMSVehicleSchedule and create a record as shown in the following table:
|
VehicleScheduleId |
Distance |
Days |
|---|---|---|
|
D180-10K |
10,000 |
180 |
Then, open the form, ConFMSVehicleTable, and create the two records as defined in the following table:
|
VehicleId |
VehicleSchedId |
|---|---|
|
V0001 |
"" |
|
V0002 |
D180-10K |
Next, we define the required test data for our test, as shown in the following table, we could create this in Excel in order to compare the test against what we expect:
|
Test |
Expected results | |||
|---|---|---|---|---|
|
VehicleId |
ServiceDate |
CurrentOdometer |
NextServiceDate |
NextServiceOd o |
|
V0001 |
1st January 2015 |
123000 |
1st January 2015 |
123000 |
|
V0002 |
1st January 2015 |
123000 |
30th June 2015 |
133000 |
To perform the test we need to create the test records in ConFMSVehServiceTable as defined in the preceding table. To create these test records, use the table browser by right-clicking on the ConFMSVehServiceTable table and selecting Open.
Create a new row by pressing Ctrl + N and select the vehicle created earlier. The table browser is an auto-generated form that triggers normal form events. You should see that the changes made to the current service schedule record are automatically updated in the table browser.