
Status fields are set either manually by the user or by an external event; for example, the purchase order status is changed based on status change of the associated purchase order lines.
In the case where a status field is set manually by the user, which is our case, it is not normally appropriate to allow the user to edit this field directly. A change in status is an important event, and we should make this more of a deliberate action.
There are two patterns we can choose to edit a status: a menu item per status that is added to the form in a button group, or a drop dialog with a drop-down list control.
The menu item method gives us scope to disable or enable the buttons based on the current record. Since the status is an enumerated type, it has a fixed list of options; this is therefore the best method. You can see this used within the Project management module.
This also allows us to demonstrate further decoupling of the user interface and business logic. Decoupling the user interface from the business logic makes the code reusable. We will demonstrate this later in the chapter when we create a service to change the vehicle status.
We will start with writing the code to update the vehicle status. This class will need a vehicle ID and the desired status to change to. We can do this by adding public parameter methods or making the constructor accept these variables as parameters. This is how it used to be done before AX 2012, but in order to get the most out of the pattern, we will use a data contract class. This method has the additional benefit of being used more easily by a service, something we should always be conscious of when designing our solutions.
We define a class as a data contract class by adding the [DataContractAttribute] decoration to the class declaration and the [DataMemberAttribute] decoration to every method that should be exposed as a parameter.
These come into effect when we use the SysOperation framework, or if we ever want to use this contract as a service, as it is used to generate the Web Service Definition Language (WSDL).
We will call the class that changes the ConFMSVehicleStatusChange status. Therefore, we will call the ConFMSVehicleStatusChangeContract contract class.
This class is quite straightforward. It should be written as follows:
[DataContractAttribute]
class ConFMSVehicleStatusChangeContract
{
    ConFMSVehicleId vehicleId;
    ConFMSVehicleStatus status;
}
The two parameter methods do not need the parm prefix; this is true for all data contracts. You can add the parm prefix, and you may see this in some standard AX data contracts, but you will need to add a further decoration to tell the WSDL the exposed method name.
The parm prefix adds an automatic documentation for the method, and is mandatory for methods used in the AIF document service classes. Custom services such as this will never be used in this way, and the prefix is just inconvenient when used outside AX.
The two methods should be written as follows:
[DataMemberAttribute]
public ConFMSVehicleId vehicleID(ConFMSVehicleId
                                 _vehicleId = vehicleID)
{
    vehicleID = _vehicleID;

    return vehicleID;
}
[DataMemberAttribute]
public ConFMSVehicleStatus status(ConFMSVehicleStatus
                                  _status = status)
{
    status = _status;

    return status;
}Finally, we create a construct method as we have done previously.
We can now write our class to change the status, which will follow a pattern we will use many times. This pattern requires the structure to have the following methods:
constructnewFromContractparmContractvalidaterun
The run method will call validate, and simply return if validate returns false. The validate method is expected to display messages to the user if it fails.
If we intend to use this class with the SysOperation framework, the run method needs the contract as a parameter. We can, however, add a method called runContract that accepts the contract class and then calls run. The run method will usually call the various private methods to perform the required action, unless the code is very simple.
Our class will contain the following methods:
constructnewFromContractparmContractvalidaterun, which calls validate and thenupdateVehicleStatusrunContract, which updatescontractand callsrunupdateVehicleStatus
Based on the preceding methods, we can call the class like this:
ConFMSVehicleStatusChange::newFromContract(<contract>).run();
Alternatively, we can use the following line of code:
ConFMSVehicleStatusChange::construct().runContract(<contract>);
The reason for the first method is that we could call the classes validate to first check whether the process will succeed, like this for example:
//...
ConFMSVehicleStatusChange change;

change = ConFMSVehicleStatusChange::newFromContract(<contract>);
if(change.validate())
{
  change.run();
}
else
{
  //perform an action
  //...
}We will use this method later in this chapter when we use this pattern with a drop dialog. This is because it allows more control over the dialog. If the validate method returns false, we will not close the dialog, allowing the user to correct the issue.
The code for the class is again straightforward, and it should be written as follows:
class ConFMSVehicleStatusChange
{
    ConFMSVehicleStatusChangeContract contract;
}
Here is the code used to construct the class from the contract:
public ConFMSVehicleStatusChangeContract
            parmContract(ConFMSVehicleStatusChangeContract
                         _contract = contract)
{
    contract = _contract;

    return contract;
}
public static ConFMSVehicleStatusChange construct()
{
    return new ConFMSVehicleStatusChange();
}
public static ConFMSVehicleStatusChange
                 newFromContract(ConFMSVehicleStatusChangeContract
                                 _contract)
{
    ConFMSVehicleStatusChange instance =
            ConFMSVehicleStatusChange::construct();
    instance.parmContract(_contract);
    return instance;
}
The code used to validate and perform the required actions is as follows:
public boolean validate()
{
    if(contract.vehicleID() == "")
    {
        return checkFailed("Vehicle id is required");
    }
    if(!ConFMSVehicleTable::exist(contract.vehicleID()))
    {
        return checkFailed(strFmt("Vehicle %1 does not exist",
                           contract.vehicleID()));
    }
    return true;
}
The run method calls validate, and if this returns true, it starts a transaction, calls the method to update the vehicle, and completes the transaction. The code for both the methods is as follows:
public void run()
{
    if(!this.validate())
        return;
    ttsBegin;
    this.updateVehicleStatus();
    ttsCommit;
}
private void updateVehicleStatus()
{
    ConFMSVehicleTable vehicle = ConFMSVehicleTable::find(contract.vehicleID(), true);

    if(vehicle.RecId != 0)
    {
        vehicle.VehicleStatusId = contract.status();
        vehicle.update();
    }
}The two preceding methods need to be looked at together. The run method first checks validate and then calls ttsbegin. This starts a database transaction, or adds a further level if a transaction has already been started by the code calling this class. Once inside a transaction, a call is made to updateVehicleStatus(). Finally, this transaction is committed by calling ttsCommit.
A transaction is mandatory for performing any update to a record in AX. If an update is attempted outside a transaction's scope, then AX will throw an error.
The next part is that we select the forUpdate vehicle by passing the true parameter to the find method. The record is not locked at this point, as AX uses optimistic concurrency for updates, but after update is called, the vehicle record is locked. This prevents any updates from elsewhere until after the final ttsCommit.
This means that if the run method had been called without a current transaction, then the call to ttsCommit will release the lock. However, if the calling method had started a transaction, then the ttsCommit in this method will not release the vehicle lock.
The following diagram shows the effect of a nested TTS:
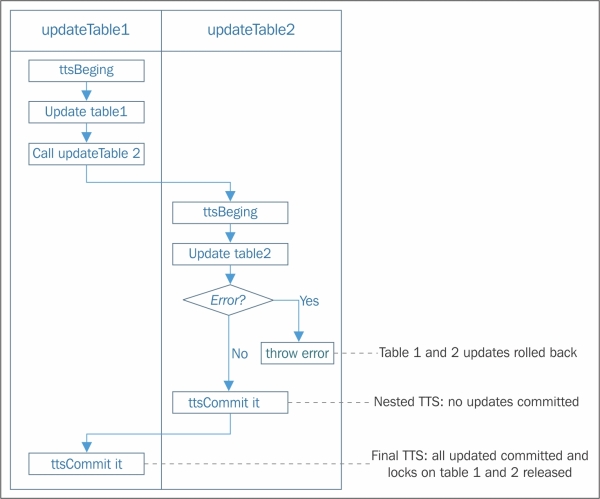
A transaction comprises of all updates from the first ttsBegin until the final ttsCommit. If you nest a transaction, it is the final ttsCommit that actually commits the transaction. If an error is thrown (or ttsAbort is executed) at any point before the final ttsCommit, all updates from the ttsBegin that started the transaction are rolled back.
This is closely linked with exception handling; see the Exception handling section in Chapter 10, Advanced Development Techniques.
This is important, as transactions should always be ACID, which means transactions should be:
- Atomic: If a transaction involves more than one entity, either all or none are committed to the database.
- Consistent: Should any part of the transaction fail, all of the data is rolled back to the state before failure.
- Isolation: Any update in the transaction must be isolated from any other transaction until the transaction is complete. So, reading a vehicle record in a separate transaction after
updateis called will not return the new data until the transaction is committed. - Durable: Once the transaction is committed the records must remain committed, even after subsequent system failure, for example, if SQL server fails.
All of this is done by specifying ttsbegin before we start and ttscommit once we are done.
For more information, see Transaction Integrity [AX 2012]: http://msdn.microsoft.com/en-us/library/aa622564.aspx.
A problem arises if, during the action, we produce an output that can't be rolled back; such as an e-mail. In this case, we would have to manually write a method to deal with this. This is called compensation, and it follows the coffee shop transaction scenario. For "performance," you pay before you have your coffee, completing a transaction. Should there be no coffee, you have to be compensated with your money back. This is a paradigm when designing high-performance data systems, for example, when we use asynchronous database updates using the SysOperation framework—something AX utilizes to a great effect when posting ledger updates. We will cover this in Chapter 9, Advanced Features and Frameworks.
We can take this further; let's say that the vehicle is on an appointment. Should we be allowed to make the vehicle status anything other than active? Well, if the vehicle is damaged, we have no choice, but we need to tell the user that they have to deal with this situation.
To do this, we will add a check method, as we want to show the user message. We will add it to the validate method as well, but ignore the result, as we will still want to update the status.
In this method, we are introducing an underused feature of the info log system, called SysInfoAction. This allows us to add a button to the Infolog that will perform the required action; in our case, open the TMSAppointment form with the appointment that the vehicle is on. We want to do this only if the vehicle is currently active, it is on an appointment in the future, and we are making the status not active. The code required is as follows:
public boolean checkAppointment()
{
    TMSAppointment             appt;
    ConFMSVehicleTable         vehicle;
    SysInfoAction_MenuFunction action;

    vehicle = ConFMSVehicleTable::find(contract.vehicleID());
    //if vehicle is found and we are changing it
    // from active to a non-active status.
    if(vehicle.RecId           != 0 &&
       vehicle.VehicleStatusId == ConFMSVehicleStatus::Active &&
       contract.status()       != ConFMSVehicleStatus::Active)
    {
        // look for an appointment in the future
        select appt
            where appt.ConFMSVehicleTableTruck == vehicle.RecId &&
                  appt.ApptFromUTCDateTime >
                                DateTimeUtil::getSystemDateTime();
        if(appt.RecId != 0)
        {
            // the action adds a button to the info log
            // to take the user to the appointment
            action = SysInfoAction_MenuFunction::newMenuItem(
                             menuitemDisplayStr(TMSAppointment),
                             MenuItemType::Display);
            action.parmCallerBuffer(appt);

            return checkFailed("Vehicle has a future appointment",
                               "", action);
        }
    }
    //vehicle does not exist, but return true
    //as this isn't the point of this check
    return true;
}
Add the following line to the validate method, just above the return true; line:
this.checkAppointment();
We have written the code, but we now need to add it to the UI. This will be done by creating a menu item for each status and a class to handle the menu item. We will start with the class.
Menu items will look for the entry point main on the class, and will pass in an object of type Args. The args object contains several pieces of useful information. We will use the following:
dataset: This is the table ID of the calling record on the form. It must be a vehicle record.parmEnumType: This is the enum type on the menu item. It must beConFMSVehicleStatus.parmEnum: This is the value of the enum, in this case our status.record: This is the record passed from the form.
We could, technically, add a main method to ConFMSVehicleStatusChange. But we won't, as this blurs the separation between the user interface and the code that performs the update, and more importantly, they have very different purposes. The main method is written purely to handle a menu item, whereas the class is designed to be used in any place that requires the vehicle status to be changed. This is a very important point, especially for those used to procedural programming.
We will call our class ConFMSVehicleStatusChangeHandler, and add a main method, as follows:
public static void main(Args _args)
{
    ConFMSVehicleStatusChangeContract contract;
    ConFMSVehicleTable                vehicleTable;
    ConFMSVehicleStatus               newStatus;
    FormDataSource                    vehicleTable_DS;
    // use the dataset to check we have a
    // vehicle table in the record buffer
    switch(_args.dataset())
    {
        case tableNum(ConFMSVehicleTable):
            // get the record buffer
            vehicleTable = _args.record();
            break;
    }
    if(vehicleTable.RecId == 0)
    {
        //show standard message and abort the update
        // 'Active buffer required'
        throw error("@SYS79604");
    }
    if(_args.parmEnumType() != enumNum(ConFMSVehicleStatus))
    {
        //show the standard message on being
        //incorrectly called
        //'Function %1 has been incorrectly called.'
        // and format it with the class name with strFmt
        throw error (strFmt("@SYS22828",
                       classStr(ConFMSVehicleStatusChangeHandler)));
    }

    //construct the contract
    contract = ConFMSVehicleStatusChangeContract::construct();
    contract.vehicleID(vehicleTable.VehicleId);
    contract.status(_args.parmEnum());

    // construct and run the update
    ConFMSVehicleStatusChange::newFromContract(contract).run();
    //if this was called from a form the
    //vehicle will have isFormDataSource set
    //if so, get the formDataSource object
    //and call research, true keeps the
    //current set
    if(vehicleTable.isFormDataSource())
    {
        vehicleTable_DS = vehicleTable.dataSource();
        vehicleTable_DS.research(true);
    }
}
The command throw error command is new. This will show an Infolog window type of error and abort the entire transaction, rolling everything back. We will cover this in more detail in the Exception handling section in Chapter 10, Advanced Development Techniques.
You can create the menu items by dragging the class onto the Action node under Menu items in our project. Try this and then right-click on the new menu item. You will get the Active buffer required error.
We need to configure the menu to have the following properties set:
- Name:
ConFMSVehicleStatusChangeCreated. - Label: The label of the first status is
Created. Copy this from the base enum'sCreatedelement. - EnumTypeParameter:
ConFMSVehicleStatus. - EnumParameter:
Created.
We could, for completeness, also populate the NormalImage property. This is an image resource number, and you can see the full list by going to Tools | Embedded resources. Enter the number of the desired resource in the NormalImage property and set ImageLocation to Embedded resource.
Duplicate this menu item for each status, setting the Name, Label, and EnumParameter properties appropriately.
For this, we need to add a form control of type MenuButton and drag our new menu items onto this new control. This is done as follows:
- On the
ConFMSVehicleTabeListPageform, go to Designs | Design | ActionPane | HomeTab | MaintainGroup. - Right-click on MaintainGroup and go to New Control| MenuButton.
- Rename this to StatusMenuButton and set the label to
Change status. - Drag the new menu items onto this MenuButton.
- Open the form to test.
Of course, we could have written all of this in the last class we wrote, but there wasn't much more effort, and we have the added advantage of making the code reusable. We can even write a service that will use this with very little effort.