
In this chapter, we will create the user interface for our fleet management system. The interface design will follow standard AX patterns, explaining the design paradigm we should employ when writing interfaces for Dynamics AX.
We will cover the following:
- Creating the menu structure
- Understanding the patterns used in interface design
- Creating setup forms
- Creating the vehicle list page
- Investigating form events
- Taking more control over the form layout
- Creating the vehicle create form with the handler class
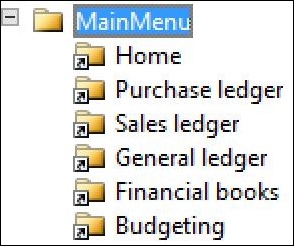
All main entry points to the UI and reports are access though the menu structure. This is presented in three ways: the left-hand navigation pane, the content area, and the navigation bar (at the top of the client). The menu design is controlled from the Menus node in the AOT.
Each module will have a menu, which is created by adding a menu reference (or shortcut) to the main menu:
The module names are displayed as the menu's label and not the actual menu name. AX does this by using your client's language, so in the preceding case, Sales ledger is shown. This references the AccountsReceivable menu, which you can see by right-clicking on the menu reference and viewing the properties.
On expanding the AccountsReceivable menu, we see how the menu is structured; this is shown along with its key properties in the following screenshot:
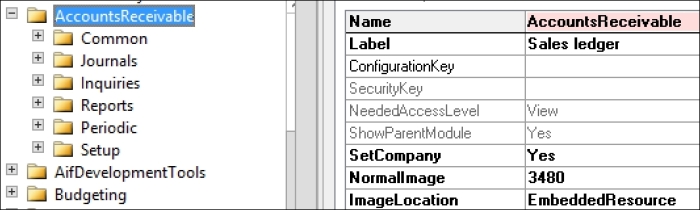
Each menu we create will have most of the following submenus that appear as sections in the content area in the client:
- Common: This hosts menu item pointers to list pages, the main entry point to our master or transactional data.
- Journals: This is for menu items that open journal entry forms, such as the vendor payment journal.
- Inquiries: These are menu items for general read-only inquiries into posted transactional or statistical data.
- Reports: These are menu items that allow us to print reports.
- Periodic: The menu items placed here are often routines that are accessed less frequently and are commonly placed in a periodic batch queue. For example, posting a set of sales invoices or performing a foreign currency revaluation.
- Setup: This includes forms used to configure the module.
Although we are free to design a menu structure as we see fit, we should adhere to this structure in order to meet the design goals of maintainability and ease-of-use.
We don't need to create all of the main submenus, but any items we add should fit under one of these submenus.
Each submenu can have further submenus. This can aid organization, but we should not nest submenus too far, as this will actually make the item harder to find. In terms of the number of items at each level, eight is a reasonable number. There is no rule here and user feedback is useful.
For our example system, we only need to provide interfaces to set up tables and the vehicle table. The vehicle table is master data and should be presented as a list page. We therefore require the Common and Setup submenus.
Before we create our main menu, we need to decide on its icon, which may likely be a logo we have designed. We will use AX's embedded resources (icons and images) for this example. This will be available when you navigate to Tools | Embedded resources, and the most suitable resources have a resource ID greater than 10,000. As this form will appear docked to the right of our development workspace, you will find it easier to use if you close the property sheet window first and if you have docked the property sheet window to the right side of the IDE.
To create the fleet management system menu, follow these steps:
- Open our project
ConFleetManagementSystem. - Right-click on the Menus node and select New | Menu.
- Rename the menu as
ConFleetManagementSystemand open the property sheet. - Enter the label
Fleet management systemand create a label. - As this menu will be a module with company-specific information, set the SetCompany property to
Yes. - Enter
10036in the NormalImage property and set ImageLocation toEmbeddedResource. - Create the main submenus by right-clicking on the ConFleetManagementSystem menu and navigating to New | Submenu. Although we only need Common and Setup this time, a full table is listed as follows for reference:
Name
Label
NormalImage
ImageLocation
Common
@SYS3338463495EmbeddedResource
Journals
@SYS3338793475EmbeddedResource
Inquiries
@SYS3338563474EmbeddedResource
Reports
@SYS3338603477EmbeddedResource
Periodic
@SYS3338653476EmbeddedResource
Setup
@SYS3338693478EmbeddedResource
- Once this is complete, press the Save all button on the project window.
For more information on menu properties, visit:
http://msdn.microsoft.com/en-us/library/aa674461.aspx
Finally, we need to add our menu as a module to the main menu, which is done as follows:
- Place the AOT window next to our project window (if required, open the AOT window by pressing Ctrl + D).
- Scroll down to Menus and expand MainMenu.
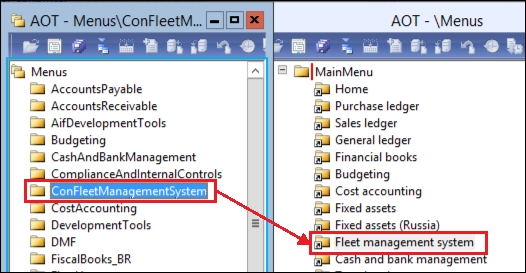
- Right-click on MainMenu and navigate to New | Menu reference.
- This opens a new window titled Select: Menus. Locate your ConFleetManagementSystem menu and drag it to MainMenu, as shown in the following screenshot (the title changes from Select: Menus to the path of the select node when you click on it):
- Close the Select: Menus form. It is very easy for the IDE to get cluttered with forms and code windows, so it is best to close windows when they are no longer required.
- Once complete, the new sub-menu should appear as a shortcut in MainMenu. Close the Select: Menus form and drag MainMenu to the Menus node of our project.
- Restart the AX client or open a new workspace by pressing Ctrl + W to see the changes reflected in the client.
Sometimes, we may wish to add a list page or report to an existing menu; and, this list may grow over time. Try to avoid adding menu items directly to the menu. Instead, create a menu such as ConInventReports to hold all of our inventory reports and add this to the Reports node within the InventoryManagement menu as a menu reference. This way, we add a shortcut as we did in the preceding section, making it easier to maintain.