In this chapter, we will cover the more advanced techniques of Dynamics AX development. The topics we will cover are as follows:
- Making data date-effective
- Utilizing metadata within AX
- Making your code extendable with metadata
- Exception handling
- Controlling how and where code is executed
- Code access permissions
- More on views – computed columns
Date-effective tables, or ValidTimeState tables, allow us to see a record at a point in time, such as an employee's details in the past, or even planned future changes. This feature is part of the table definition in AX, which makes this technology much easier to use. There is, therefore, very little coding required in order to implement it.
This is pretty exciting, but we shouldn't get too carried away by it. Each edit will result in a new, time stamped record. Main tables, such as customer and vendor tables, should not be made date-effective, as it will create a lot of unnecessary records and complicate the foreign key relations to them. For example, if we did make the customer table date-effective, we would need to determine the version of the customer record that should be found when navigating back from a customer transaction.
In some cases, AX makes deliberate use of this technology. The LogisticsPostalAddress record is date-effective, yet the foreign key relation on SalesTable is based on RecId. This means that it relates to a specific version, which is suitable since the sales order should go to the address at the point when the order was taken.
For our example, we'll use the vehicle service records, which will consist of two parts. The first part is to configure the table as being date-effective and the second is to update the interface so that the user can see the record at a specific point in time.
To configure the table as a date-effective table, follow these steps:
- Open the property sheet for the
ConFMSVehServiceTabletable. - Locate the ValidTimeStateFieldType property and select UtcDateTime. This makes the records valid at a point in time;
Datewill make the records valid on a day-by-day basis. - Expand the table's Fields node, and note that the table now has two new fields,
ValidFromandValidTo. They are of the UtcDateTime type. - Now, open the table in the table browser, and try to save a record. You will receive the following error:
Cannot edit a record in Vehicle service table (ConFMSVehServiceTable). Table does not contain a valid time state key. A unique index needs to be marked as a valid time state key.
- It will also give the same message as a compilation error if we compile the table. This is meant to force us to create or update a primary index that contains the two new fields and drag the
ValidFromandValidTofields onto theServiceIdxindex. - Change the index's ValidTimeStateKey property to
Yesand set ValidTimeStateMode toNoGap. - Open the table in the table browser and edit a record. On saving, nothing different happens. Also, if we write a job to update a record, it will update the record—it does not version the record.
- Open the
ConFMSVehServiceTableform and change the value of Current odometer. If you scan through the records or open the table's list page, it appears as if a version was not created. But, if you open the table browser to see what is actually stored, you will see that a new record was created, like this:
- The final change to the table is as follows: we need to update the
findandexistmethods to handle the fact thatServiceIdis no longer unique. By default, we want the current valid record, with the ability to select a record at a particular time. Modify thefindmethod as follows:public static ConFMSVehServiceTable find( ConFMSServiceId _id, utcdatetime _validFrom = DateTimeUtil::utcNow(), utcdatetime _validTo = _validFrom, boolean _forUpdate = false) { ConFMSVehServiceTable service; service.selectForUpdate(_forUpdate); if(_id != "") { select validTimeState(_validFrom, _validTo) service where service.ServiceId == _id; } return service; } - Make the same change for the
existmethod.
The next part is to update ConFMSVehServiceTable so that we can view the data at a point in time, which is done by the following steps:
- Open the
classDeclarationcode window and add the following code inside the braces:DateEffectivenessPaneController dePaneController
- On the control to Designs | Design, right-click and select New | Group.
- Rename the new group control to
VersionGroupand set the following properties:AutoDeclaration
YesVerticalSpacing
0(Pressing Ctrl + Space will change it so that numbers can be entered)HideIfEmpty
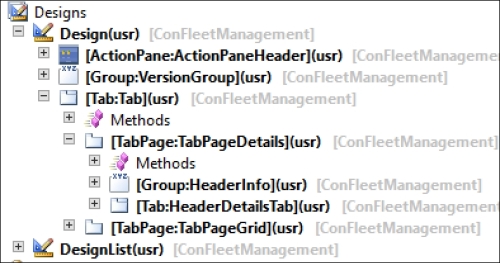
No(this is populated by code, so we don't want AX to hide it) - Order the controls (Alt + up or down arrow keys) so that they appear as shown in the following screenshot:

- Modify the
initmethod so that it reads like this:public void init() { super(); formHandler = ConFMSVehServiceTableForm::construct(); switch(element.args().dataset()) { case tableNum(ConFMSVehicleTable): formHandler.parmVehicleTable( element.args().record()); break; } dePaneController = DateEffectivenessPaneController::constructWithGroup( element, versionGroup, // the form group ConFMSVehServiceTable_ds, false, // use plural labels true, // allow show all records true); // use datetime } - Save the changes and open the form.
- Switch to the grid view using the controls at the bottom of the form, as shown in the following screenshot:

- Click on the new <||> control at the top of the form, which then expands, as shown in the following screenshot:

- Check Display all records and note that the edits made earlier appear in the grid view. You may find adding the
ModifiedDateTimeandmodifiedByfields useful in this scenario.
