
Now it's time to work with the dragon again. It's big, and so we need to do what we can to decrease its volume and reduce the cost. To do that, we will use a modifier called Solidify. What Solidify does is make a second wall parallel to the original wall, but at an offset. It does a good job, especially on simple objects. But our dragon is pretty complex, with thick and thin parts. So, we are going to have to clean up the model after finishing the Solidify operation.
In these following steps, we will investigate the Solidify modifier, apply it, and separate the inner wall we have just created from the original outer wall:
- Open up the dragon file you were working on in the last chapter. Press Tab to get into Object mode. Select Layer 1 and the dragon.
- Rotate the view so you can see the front and side of the dragon and center the dragon within the view so you can see it well. In the Blender Properties panel, select the Modifiers button in the header.
- Check the eye button for the Solidify modifier. Suddenly, the dragon looks like it got attacked by a delirious cubist sculptor.
- Whatever that is, it must be wrong. Open the Solidify modifier subpanel and check Thickness:. Is it set to 2 mm? Hmmm, that can't be the problem then. Let's figure this out.
- Scroll up in the 3D View window and scroll the Properties panel up until you can see what the Scale: of the dragon is. 10; there's the problem. The modifier is getting scaled as well as the object, so it's really giving the Solidify command a thickness of 20 mm, and not 2 mm. It's good that this was caught now. When you export a model for 3D printing, its scale must be at 1, 1, 1 or you will have problems getting the printer to print it at the proper size.
- So, press Ctrl + A or select Object in the 3D View header and navigate to Apply | Scale in the pop-up menus.
- Now the size of the dragon is the same, but the scaling is 1, 1, 1 and the dragon looks better.
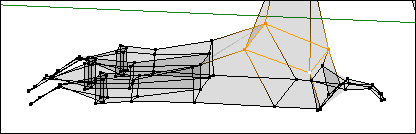
- Rotate your view of the dragon counter-clockwise and you can see that it has a thickness inside.
- We need two separate shells, not a solid object. One shell will become the inner surface. The other will become the outer surface. When they are finished and joined back together, they will define a solid shape with walls about 2 mm thick, but it is hollow in the center, like a ceramic vase. So look at the Solidify modifier panel and look at the bottom. Uncheck the Fill Rim checkbox. Now there are two separate surfaces.
- Press the Apply button in the Solidify modifier panel.
- We need to work on the inner shell, so switch to Edit Mode. Then choose Mesh from the header of the 3D View window and navigate to Vertices | Separate | By Loose Parts from the pop-up menus.
- Return to Object Mode. Press Z to change to wireframe shading in the 3D View.
- Select the inner shell.
Now, we must plan what to do to the inner shell of the dragon to prepare it for use as the inner wall of the dragon's body:
- The wing is like an unsupported wall and is pretty large. So, it should be removed from the inner shell to give the greatest strength to the wing of the outer shell.
- The rear foot will be a supporting structure, so it should be strong. It will be removed from the inner shell and the calf is scaled down to strengthen it.
- The front paw is a very large unsupported structure. For the best strength, it will be removed from the inner shell.
- The head has problems; the nose pokes backwards through the outer shell. The horns need all the thickness they can get for strength, so the inner horns must go. The neck, because it will have to support so much weight, must be made thicker.
- The tail needs some rebuilding.
So, let's get started in fixing up the inner shell. We need to prepare the shell so we can see what we are doing better by giving it a different material than we used for the outer shell:
- Just to be sure that nothing gets missed, press the Z key to return to solid shading.
- In the Properties panel, choose the Materials button and open the Materials panel.
- Click on the minus button to the right-hand side of where it says Dragon Skin to delete that material.
- Press the New button below that to make a new texture. Name it
Dragon Gutsand set the Diffuse color as R =0.224, G =0.58, and B =0.00. It is the color selected for the dragon's body in the second chapter. Then, set the Specular Intensity to0. - Now rotate the view and you can see the inner shell and the outer shell. The inner shell is green, but there are a few places where they intersect and you can see the grey of the outer shell. We will have to fix this.
- Select the outer shell of the dragon and press M to move it to layer 12.
- Make only layer 1 visible. Press Z to return to wireframe mode. Press 3 on the numpad to get the side view.
The first thing to do to the inner shell of the dragon is to remove the foot and narrow down the calf so the foot can be a load bearing structure as given in the following steps:
- Select the inner shell of the dragon. Go into Edit Mode and choose Vertex Select. Deselect all the vertices and press Shift + RMB to select all the vertices of the top of the foot as seen in the following screenshot:
- Press X to delete them. Select Vertices from the pop-up menu.
- Select any vertex on the foot. Press L, which selects linked vertices, to select all the other vertices on the foot. Press X to delete them.
- Rotate your view so you are looking up at the stump.
- Press Alt + RMB and select the four vertices at the bottom of the stump. Press F to make a face on it.
- Press Alt + RMB and select the edge loop above the stump. Set the pivot point to Median Point, press S, and make the calf of the leg narrower.
Next, the inner paw needs to be removed entirely so that the paw will be as strong as possible since it is entirely unsupported. This is illustrated as follows:
- Pan up to the paw.
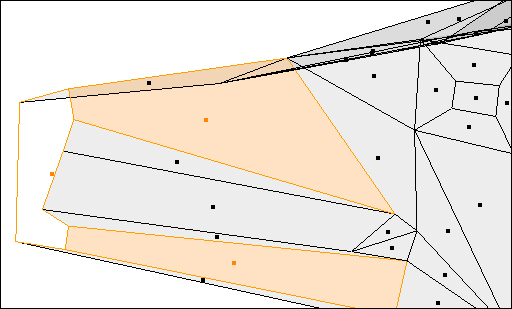
- Select the edge loop, one loop from the body, as seen in the following screenshot:
- Press X to delete the vertices and eliminate the paw as you eliminated the foot.
- Select the edges of the hole where the arm used to be by selecting an edge of the hole by pressing Alt + RMB.
- Press E Enter and then S 0 Enter. Then press W and choose Remove Doubles from the pop-up menu. This extrudes a face, scales it to zero, and removes the extra vertices. It's a handy generic way of cleaning up areas of an inner shell.
Now, the wing must be removed from the inner shell. This is similar to removing the paw. This is illustrated as follows:
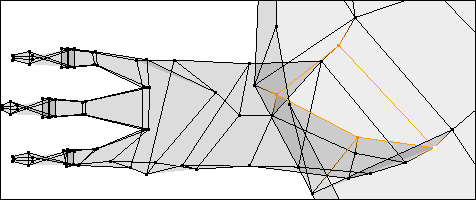
- Rotate your view so you can see the wing from the side, as shown in the following screenshot:

- By pressing Alt + RMB, select the edge loop at the dragon's elbow as seen in the preceding screenshot.
- Eliminate the wing as you eliminated the foot and paw.
- Next, select the five vertices as shown in the following screenshot and delete them:
- Next, by pressing Alt + RMB, select the edges on the perimeter of the hole you have created as seen in the following screenshot:
- Press E Enter and then S 0 Enter. Then press W and choose Remove Doubles from the pop-up menu.
Next, it's time to work on the dragon's head. I mentioned that the nose was a problem, so it will have to be removed. This is illustrated as follows:
- Press 3 on the numpad and pan the view so you can see the dragon's head.
- Delete the dragon's horns and fill the holes.
- Press Ctrl + 3 on the numpad to get the Left Ortho view. Deselect all faces.
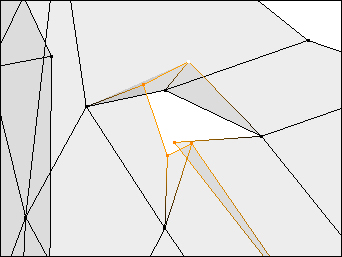
- Move the cursor just above and to the left of the nose. Press K and move the knife tool down with the mouse while holding down the LMB. This shows where the cuts to the faces of the snout will be, as seen on the left-hand side of the following screenshot. Let go of the LMB and then click on the LMB again. Then press Enter to complete the cut.
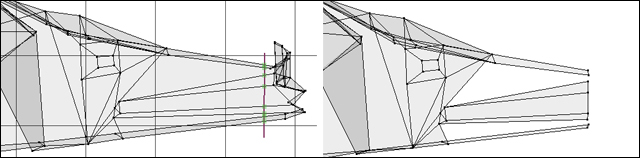
- Deselect all vertices and then press B and use the border select to choose all of the vertices to the right of the ones you just cut. Delete them as seen on the right-hand side of the preceding screenshot.
- Rotate the view so you can see the other side of the dragon's head. Fill in the holes in its upper and lower snout. Make a polygon to cap the end of its snout as seen in the preceding screenshot.
- Go into Object Mode. Display layers 1 and 12. Set the Viewport Shading to Solid. Inspect the head.
- There seems to be two places where the inner shell appears through the outer shell as seen in the following screenshot:

- This shouldn't be. Press Z to get wireframe shading. Rotate your view around the dragon's head. See if you can see what the problem is.
- I can't see any problem.
- The two shells don't appear to conflict. Open the Modifiers panel in the Properties panel. Darken the eye in the Subsurface modifier subpanel.
- Select the outer shell and do the same.
- Press Z to get solid shading. Inspect the dragon again. It looks good. So, there shouldn't be a problem after everything is done.
- Select Layer 1 to display only the inner shell of the dragon once more. Select the inner shell. Press Z to get wireframe shading and in the Properties panel, click on the eye in the Subsurface subpanel to turn the Subsurface modifier off.
- To support the head, the walls of the neck should be extra thick. Set the pivot point to Median Point. Return to Edit Mode.
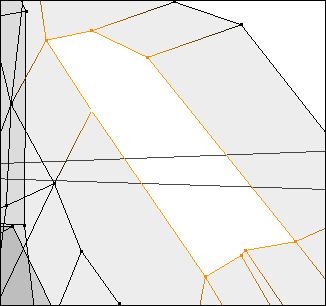
- Press Alt + RMB and select the first edge loop in the neck, as shown in the following screenshot. Press S 0.6 Enter. This scales the neck to 6/10ths of its former size:

- Repeat this for the other two edge loops in the neck.
The tail needs a little work. The geometry needs to be smoothed out a bit. Look at the left-hand side of the following screenshot and you will see that there seems to be a valley in the tail instead of it being nicely rounded. The right-hand side of the following screenshot shows a couple of vertices on the very tip of the tail that need to be moved to the left so that they are the same side of the x axis as the rest of the model.

- Press Ctrl + 1 on the numpad to get the back view. Zoom into the tail.
- For each of the four vertices highlighted in the left of the preceding screenshot, select it and move it up a little to make a decent curve as shown on the right-hand side of the screenshot.
- Select the two vertices at the end of the tail, highlighted on the right-hand side of the preceding screenshot, and move them so they are both to the left of center.
- The second vertex from the right on the bottom of the dragon is a little low. Move it up in line with the others.
- Press Home and rotate the view so you can see the open side of the dragon.
- Select all the edges on the open side of the dragon with Alt + RMB.
- Press Shift + S and choose Cursor to Center. Set the pivot point to 3D Cursor. Press S X 0 Enter. Now that edge is snapped to the center in the x axis.
- Now it's time to do a final check on the inner and outer shells of the dragon.
- Switch to Object Mode. Make both Layer 1 and Layer 12 visible. Make the Subsurface modifier of both shells visible. Press Z to switch to solid shading.
- Inspect the dragon and make sure that the inner shell does not penetrate the outer shell. Notice the gap between the shells in the neck area. It's thicker so the neck will be stronger, but there is plenty of room in the inner neck so any excess material inside the head can be shaken out.
- Press Z to enter wireframe mode, select the inner shell and note the differences between the two models. You've done well.
- As a precaution, to ensure that the mirror operation will work perfectly on the outer shell of the dragon, select the outer shell of the dragon, go into Edit Mode, and then choose Edge Select. Press Alt + RMB and select the center perimeter of the shell as you did for the inner shell.
- Press Shift + S and choose Cursor to Center. Set the pivot point to 3D Cursor. Press S X 0 Enter. Return to Object Mode. Save the file.
Now it's time to put things together. This is illustrated as follows:
- Select the dragon's inner shell. Open the modifications panel of the Properties panel. Make the Mirror modifier visible. Apply the Mirror modifier.
- Make the Subsurface modifier visible. Apply the Subsurface modifier.
- Select the dragon's outer shell. Repeat what you did to the inner shell.
- Inspect the two shells.
- Use the Print 3D Toolbox to double check that the shells are solid and manifold.
- Make sure that Layer 1, Layer 12, and Layer 20 are turned on. Press F12 to render the dragon. It should look just like it did in Chapter 2, Measuring and Texturing Techniques for 3D Printing.
- Save the file to a unique name.