Gradle supports a variety of tasks for build automation, either from Gradle's in-house plugins or from third-party plugins. As we know the software adage, change is the only constant thing in software; the requirements and complexity change over the time. Many a times we come across different automation requirements for which no task or plugin is available in Gradle. In such cases, you can extend Gradle by adding custom tasks to the build.
A custom task is an enhanced task, which you add to Gradle to fulfill custom requirements. It can have input, output, configurations and more. Its scope is not only limited to the build file where it is defined; it can be reused in other projects by adding custom task JAR in the classpath. You can write custom tasks in Groovy, Java, and Scala. In this section, we will create custom task examples in Groovy.
Gradle provides different ways to add custom tasks in the build script:
- The
buildfile - The
buildSrcdirectory inside the project directory - Create a standalone Groovy project
A custom task is a Java or Groovy class that extends from DefaultTask. We can use the @TaskAction annotation to define the task actions. You can add multiple actions in a single task. They will execute in the order they are defined. Let's start with a simple custom task in the build file.
Consider the file located at Chapter3/Customtask/build.gradle:
println "Working on custom task in build script"

class SampleTask extends DefaultTask {
  String systemName = "DefaultMachineName"
  String systemGroup = "DefaultSystemGroup"
  @TaskAction
  def action1() {
    println "System Name is "+systemName+" and group is "+systemGroup
  }
  @TaskAction
    def action2() {
      println 'Adding multiple actions for refactoring'
    }

}

task hello(type: SampleTask)

hello {
  systemName='MyDevelopmentMachine'
  systemGroup='Development'
}
hello.doFirst {println "Executing first statement "}
hello.doLast {println "Executing last statement "}
The output of the following file will be:
$ gradle -q hello
Executing first statement
System Name is MyDevelopmentMachine and group is Development
Adding multiple actions for refactoring
Executing last statement

BUILD SUCCESSFUL
In the preceding example, we have defined a custom task type, SampleTask. We have added two action methods action1() and action2(). You can add more actions as per the requirement. We have added two task variables systemName and systemGroup with some default values. We can reinitialize these variables in the project scope again while configuring the task (hello). Gradle also provides the flexibility to add more actions to a task with the help of the doFirst and doLast closures like any other task.
Once a task type is defined, you can create a task by using task <taskname>(type: <TaskType>).
You can configure the task in configuration closure either while declaring the task or as a separate closure, as mentioned in the preceding file.
If you want to keep the custom task code separate from the build file, but you do not want to create a separate project for it, you can achieve this by adding the custom task in the buildSrc directory.
Create a buildSrc directory in the project base directory and create the following mentioned folder hierarchy: buildSrc/src/main/groovy/ch3/SampleTask.groovy.
Move the preceding SampleTask class in the file. You also need to import two packages: org.gradle.api.DefaultTask and org.gradle.api.tasks.TaskAction. Now, the build file is left with the following code snippet:
task hello(type: com.test.SampleTask)
hello {
  systemName='MyDevelopmentMachine'
  systemGroup='Development'
}
hello.doFirst {println "Executing first statement "}
hello.doLast {println "Executing last statement "}
On executing the hello task, you will find the same output that was displayed earlier.
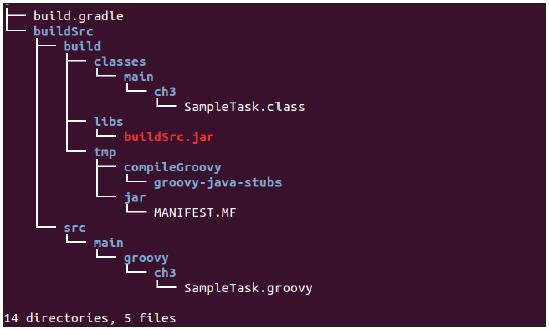
After execution, you will find the following folder structure in the project. Note that you do not need to compile the SampleTask class. All the required steps would be performed by Gradle. It will compile the classes, create JAR, and will automatically add the required class to the build class path. You can just define the task and execute it.

Figure 3.3
The limitation is that the SampleTask task is only available in the current project and its subprojects only. You cannot use this task in other projects.
To overcome the limitations of the buildSrc way of creating custom tasks, you need to create an independent Groovy project. Move the SampleTask class in a new project (SampleTaskProj), and then compile and package the project. You can even use Gradle to build this Groovy project. Just add build.gradle with the following statements to the SampleTaskProj project:
apply plugin: 'groovy'
apply plugin: 'eclipse'
version=1.0 // to generate jar with version
dependencies {
compile gradleApi() // It creates dependency on the API of current Gradle version
compile localGroovy() // it will use the Groovy shipped with Gradle
// these dependencies comes along with groovy plugin
}
If you are creating the project in Eclipse, you can run the following command to generate the Eclipse classpath:
$ gradle clean cleanEclipse eclipse
Now, execute the gradle build command to build the project. A JAR file will be created in the build directory. To use the tasks, in the build file (think of it as a new build.gradle file in another project), we need to reference the JAR file path in the repositories closure.
Create a new project and update the build.gradle file with the following content:
buildscript {
repositories {
  // relative path of sampleTaskProject jar file
  flatDir {dirs "../SampleTaskProj/build/libs"}
}
dependencies {
classpath group: 'ch3', name: 'SampleTaskProj',version: '1.0'
}
}
task hello(type: ch3.SampleTask)

hello {
  systemName='MyDevelopmentMachine'
  systemGroup='Development'
}

hello.doFirst {println "Executing first statement "}
hello.doLast {println "Executing last statement "}
Execute the hello task again and you will find the same output:
$ gradle hello
:hello
Executing first statement
Adding multiple actions for refactoring
System Name is MyDevelopmentMachine and group is Development
Executing last statement

BUILD SUCCESSFUL
