
We have explored many features of Gradle such as tasks, plugins, and dependency management. We have seen many examples of the build script involving in-built tasks, custom tasks, and dependencies between the tasks. Yet, we have not covered one of the main features of Gradle, which is Multi-Project Build. Until now we have seen build files for a single project. A single project build file represents only one project or one module. It is a very common scenario in any software world that it starts with a single module initially and as the software matures and grows over time, it turns into a big project. Then we need to divide it again into different submodules, but overall, we build the project using one file only. Gradle provides the capability of treating different modules as a different project, which can be grouped under a root project. It also gives the flexibility of building a submodule independently without building the complete project.
Multi-project is not a new concept. The only additional capability Gradle provides is to build the modules separately as an individual subproject, and whenever required, you can build the entire module using the root project. The subproject has all the properties and features, which a project object has in Gradle. You can define modular dependencies to other projects. Gradle allows you to define subproject tasks' dependencies to other subprojects. You can build only one subproject (and its dependencies) to optimize the build performance time and so on.
Consider a simple user management Java application, which authenticates and authorizes the user, allows the user to manage his profile, and perform transactions. Let's say we divided this into three different subprojects or modules: login module, profile module, and transaction module.
One more question might arise, when we have already defined three subprojects why do we need the root project UserManagement, as it does not contain any source code? One of the purposes of the root project is to coordinate among the subprojects, define dependencies between the projects, if any, define common behaviors to avoid duplicate build configurations in each project, and more.
The purpose of these three modules is to work on them independently, build them separately, and if required, publish its artifacts without any dependency.
The directory structure will look like the following diagram:
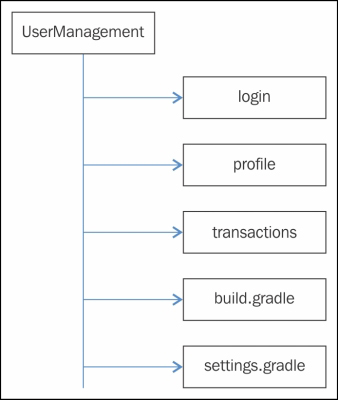
Figure 6.4
Here, we have created three subprojects: login, profile, and transaction, each module with its own src/main/java hierarchy. We have grouped the subprojects under the root project UserManagement. Additionally, the root project contains one
build.gradle file and a settings.gradle file.
The settings.gradle file is one of the key files in multi-project build. This file needs to be present in the root project's directory. It lists all the subprojects. The content of the settings.gradle file is shown in the following code:
settings.gradle:
include 'login', 'profile', 'transactions'
Here, we have included all the subprojects, which are part of the root project. On executing the following command, we get all the project details as output:
$ gradle projects
……
Root project 'UserManagement'
+--- Project ':login'
+--- Project ':profile'
--- Project ':transactions'
……

BUILD SUCCESSFUL
The output displays the root project UserManagement, and all the subprojects which are under the root project. Now, try to delete the settings.gradle file or remove the include statements in the settings.gradle file and run this command again. This time, it will display only root project details. The settings.gradle is an important file, which makes the root project aware of all the subprojects it should include. It is also possible to declare multiple levels of subprojects using 'subproject:subsubproject','subproject:subsubproject:subsubsubproject', and so on.
We talked about three phases of the Gradle build life cycle: initialization, configuration, and execution. Using the settings.gradle file during the initialization phase, Gradle adds all the subproject instances to the build process. You can also add projects by using the include(String[]) method to this object.
The settings.gradle file also has access to the gradle.properties file defined in the settings directory of the build or <USER_HOME>/.gradle directory and properties provided on the command line using the –P option. The settings.gradle file can also execute Gradle tasks, and include plugins and other operations, which can be done in any .gradle file.
To determine if the current build process is part of a multi-project build, it searches for the settings.gradle file first in the current directory and then in its parent hierarchy. If it finds settings.gradle in the same directory, it considers itself as a parent project and then checks for subprojects. In another case, if it finds the settings.gradle file in its parent hierarchy, it checks whether or not the current subdirectory is a subproject of the root project that is found. If the current project is part of the root project, then it is executed as a part of the multi-project build, otherwise, as a single project build.
The following is the sample build.gradle under the UserManagement directory:
println "Project name is $name"

project(':login') {
  apply plugin: 'java'
  println "Project name is $name"
  task loginTask << {
    println "Task name is $name"
  }
}

project(':profile') {
  apply plugin: 'java'
  println "Project name is $name"
  task profileTask << {
    println "Task name is $name"
  }
}
project(':transactions') {
  apply plugin: 'java'
  println "Project name is $name"
  task transactionTask << {
    println "Task name is $name"
  }
}
Now, try to execute the following command from the UserManagement directory:
/UserManagement$ gradle

Project name is UserManagement
Project name is login
Project name is profile
Project name is transactions
:help

...
Now, go to the login directory and execute the same command; you will find a similar output. The difference is, in the subproject, the help task would be replaced by: login:help, because Gradle automatically detects the subproject you are in.
In the first scenario, Gradle found the settings.gradle file in the same directory and found three subprojects. Gradle initialized three subprojects and during configuration phase it executed the configuration statements. We did not mention any tasks, so no task is executed.
In the second scenario, when we executed the Gradle command from the login module, Gradle again started searching for the settings.gradle file and found this file in the parent directory, and also found the current project to be a part of the multi-project build, and thus, executed the build script as a multi-project build.
One thing you might have noticed here is that we did not define any build.gradle for any of the subprojects. We added all the subprojects to the root project's build file. This is one of the ways you can define the multi-project build. The alternative is to create individual build.gradle files in each of the subprojects. Just remove the project closures from the main build file and copy it to its respective project build file. The new project structure is shown in figure 6.4:
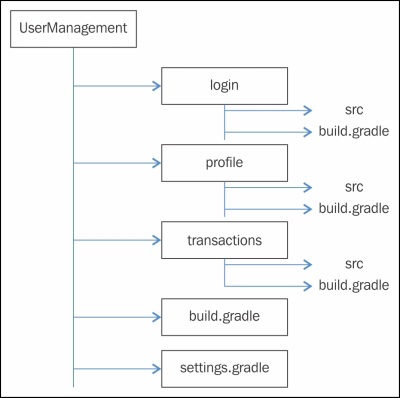
Figure 6.5
Before executing a task in the multi-project build, Gradle will search for the task in the root project and in all the subprojects. If the task are found in multiple projects, it will execute all the tasks consecutively. Execute the following command from the UserManagement directory:
$ gradle loginTask

Project name is UserManagement
Project name is login
Project name is profile
Project name is transactions
:login:loginTask
Task name is loginTask

BUILD SUCCESSFUL
Now, copy loginTask to the transaction project and try to execute the same command:
$ gradle loginTask
….
:login:loginTask
Task name is loginTask
:transactions:loginTask
Task name is loginTask

BUILD SUCCESSFUL
Here, you can see the Gradle-executed loginTask in both the login and transactions projects. To execute a project-specific task, prefix the task name with the project name and use colon (:) as a separator—gradle project:task. To execute loginTask for the login module, use the $ gradle login:loginTask command.
The multi-project build helps to avoid redundant configurations and allows optimizing and organizing the build file structure appropriately.
In the preceding example, we have three subprojects and all have a dependency on the Java plugin. These subprojects might depend on some common libraries as well. Instead of defining dependencies in each of the subproject build files, we can define a common configuration into the root project. By doing so, the entire subproject will inherit this common configuration. This can be done by using two closures: allprojects and subprojects. The configuration defined under allprojects will be shared by all the subprojects, including the root project, whereas configuration under subprojects will be shared by all the subprojects excluding the root project. Add the following subprojects{} and allprojects{} closures, which are used to build a file and remove the apply plugin: 'java' statement from each subproject:
println "Project name is $name"
allprojects {
  version = '2.0'
}
subprojects { // for all subprojects
  apply plugin: 'java'
  repositories {
    mavenCentral()
  }
  dependencies {
    compile 'log4j:log4j:1.2.16'
  }
}
Here, we have added the Java plugin, repositories closure, and common dependencies to the subprojects closure. So, it will be shared by all the subprojects. We have added a version in allprojects, which would be shared by all the subprojects, including the root subproject.
Now, try to execute the following command:
$ gradle clean
Project name is UserManagement
Project name is login
Project name is profile
Project name is transactions
:login:clean
:profile:clean
:transactions:clean

BUILD SUCCESSFUL
It has executed clean tasks in all the subprojects but not for the root project. Even if you try to execute UserManagement:clean task explicitly, it will throw an exception. If you add apply plugin: 'java' to the allprojects closure, it will add clean task to root project along with the subprojects.
Apart from the parent/child hierarchy, you can also create the subprojects at the same level, which can be included using the includeFlat '<projectname>' syntax.
Let's add one more subproject department at the same level with the UserManagement module.
The department module can be added as a subproject to the UserManagement project by adding the following code in the settings.gradle file:
includeFlat 'department'
// adding same level project as sub project
When you execute some common tasks such as clean and compile (after adding the Java plugin) on a multi-project build, the default execution order is based on their alphabetical order:
$ gradle clean

Project name is UserManagement
Project name is department
Project name is login
Project name is profile
Project name is transactions
:department:clean UP-TO-DATE
:login:clean UP-TO-DATE
:profile:clean UP-TO-DATE
:transactions:clean UP-TO-DATE

BUILD SUCCESSFUL
The first root project is getting evaluated and then all the subprojects as per their alphabetical order. To override the default behavior, Gradle provides you with a different level of dependency management.
The configuration-level dependency evaluates or configures a project after the execution of the project on which it depends upon. For example, you want to set some properties in the profile project and you want to use those properties in the login project. You can achieve this using evaluationDependsOn. To enable this feature, you should have separate build.gradle files for each subproject. Let's create independent build.gradle for each subprojects.
You can create each subproject and build.gradle in the following pattern.
/<project name>/build.gradle
println "Project name is $name"
task <projectName>Task << {
  println "Task name is $name "
}
The root project build.gradle will look like the following code:
UserManagement_confDep/build.gradle
println "Project name is $name"
allprojects {
  version = '2.0'
}
subprojects { // for all sub projects
  apply plugin: 'java'
  repositories {
    mavenCentral()
  }
}
Now, execute the following Gradle command:
/UserManagement_confDep$ gradle

Project name is UserManagement_confDep
Project name is login
Project name is profile
Project name is transactions
...
BUILD SUCCESSFUL
We have executed the Gradle command without any task. It has executed up to the configuration phase and you can see the preceding configuration order in alphabetical order (after root project configuration).
Now, add the following statement in your login project build.gradle file:
evaluationDependsOn(':profile')Then, execute the Gradle command:
/UserManagement_confDep$ gradle

Project name is UserManagement_confDep
Project name is profile    // Order is changed
Project name is login
Project name is transactions
……
BUILD SUCCESSFUL
Now, you can see that the profile configuration is evaluated before the login configuration.
There might be a situation when a task of a project may depend on another project task. Gradle allows you to maintain task-level dependencies across subprojects. Here is an example where loginTask depends on profileTask:
project(':login') {
  println "Project name is $name"
  task loginTask (dependsOn: ":profile:profileTask")<< {
    println "Task name is $name"
  }
}
Now the output shows the dependency between the tasks:
/UserManagement_taskDep$ gradle loginTask
….
:profile:profileTask
Task name is profileTask
:login:loginTask
Task name is loginTask

BUILD SUCCESSFUL
If you declare an execution dependency between different projects with dependsOn, the default behavior of this method is to also create a configuration dependency between the two projects.
If one of the subprojects needs a class file or JAR file of another subproject to compile, this can be introduced as a compile time dependency. If the login project needs a profile jar in its classpath, you can introduce dependencies at compile level:
project(':login') {
  dependencies {
    compile project(':profile')
  }
  task loginTask (dependsOn: ":profile:profileTask")<< {
    println "Task name is $name"
  }
}
/UserManagement_libDep$ gradle clean compileJava ... :login:clean :profile:clean :transactions:clean :department:compileJava UP-TO-DATE :profile:compileJava :profile:processResources UP-TO-DATE :profile:classes :profile:jar :login:compileJava :transactions:compileJava BUILD SUCCESSFUL
From the output, we can realize that all the dependent modules were compiled before the login compile tasks were executed.
During development, you might need to build the projects again and again. Sometimes you do not make any changes to your dependent subproject, but Gradle by default always builds the dependencies first and then builds the dependent subprojects. This process might affect overall build performance. To overcome this problem, Gradle provides a solution called partial builds. Partial builds enable you to build only the required project, not its dependency projects. In the preceding example, we have the compile dependency of the login module on the profile project. To compile the login project without the dependent profile project, command-line option -a can be applied:
$ gradle :login:compileJava -a
:login:compileJava

BUILD SUCCESSFUL
In an enterprise project, we have project dependencies. When you want to build a project and at the same time you want to build the other dependent projects, the Java plugin provides the buildDependents option.
In the previous example, the login project has compile time dependency on the profile project. We will try to build a profile with the buildDependents option:
/UserManagement_libDep$ gradle :profile:buildDependents
. . .
:profile:compileJava UP-TO-DATE
:profile:processResources UP-TO-DATE
:profile:classes UP-TO-DATE
:profile:jar UP-TO-DATE
:login:compileJava UP-TO-DATE
:login:processResources UP-TO-DATE
:login:classes UP-TO-DATE
:login:jar
:login:assemble
:login:compileTestJava UP-TO-DATE
:login:processTestResources UP-TO-DATE
:login:testClasses UP-TO-DATE
:login:test UP-TO-DATE
:login:check UP-TO-DATE
:login:build
:login:buildDependents
:profile:assemble UP-TO-DATE
:profile:compileTestJava UP-TO-DATE
:profile:processTestResources UP-TO-DATE
:profile:testClasses UP-TO-DATE
:profile:test UP-TO-DATE
:profile:check UP-TO-DATE
:profile:build UP-TO-DATE
:profile:buildDependents

BUILD SUCCESSFUL
Since the login module depends on the profile module, executing the profile project also builds the login project.
When you build the project, it only compiles the code and prepares the JAR file. If you have compile-time dependencies on the other project, it only compiles the other project and prepares the JAR file. To check the functionality of the complete component, you might want to execute the test cases as well. To execute the test case of the subproject as well as the dependent project, use buildNeeded:
/UserManagement_libDep$ gradle :login:buildNeeded
. . .
:login:processTestResources UP-TO-DATE
:login:testClasses UP-TO-DATE
:login:test UP-TO-DATE
:login:check UP-TO-DATE
:login:build UP-TO-DATE
:profile:assemble UP-TO-DATE
:profile:compileTestJava UP-TO-DATE
:profile:processTestResources UP-TO-DATE
:profile:testClasses UP-TO-DATE
:profile:test UP-TO-DATE
:profile:check UP-TO-DATE
:profile:build UP-TO-DATE
:profile:buildNeeded UP-TO-DATE
:login:buildNeeded UP-TO-DATE

BUILD SUCCESSFUL
Here, buildNeeded not only executes the login test cases, it also executes the profile test cases.