
In the last section, we have learned how to create a container like Apache Tomcat with Docker and how to deploy an application in the running container. Once the application is up and running, we can run some automated tests to verify the functionality. That should be easy! What else can be done? Well, throughout this book we have learned how to automate the build process with Gradle; also in Chapter 7, Continuous Integration, we discussed continuous integration tools, such as Jenkins. Now we should be able to apply all these knowledge to create a simple build, deploy, and test workflow to automate the complete process from build to deployment. Do not get confused with the continuous delivery pipeline. This is just a simple example to automate the build, deployment, and test together with tools, such as Gradle, Docker, and Jenkins. We can set up the pipeline with three simple steps:
- Automate the process of creating or building the artifacts with Gradle.
- Deploy the newly created libraries in a running container. The container is created and started with Docker.
- Run automated tests to verify the functionalities of the deployed application.
These steps can be sequentially configured and executed with the help of Jenkins. All we need to do is to create a new Freestyle project, say build_deployment_pipeline. Then, add the Source Code Management configuration such as Git (Git URL is https://github.com/mitramkm/mastering-gradle.git) as shown in the following screenshot. For more details please refer Chapter 7, Continuous Integration. After the basic Jenkins job configuration, we have to configure three build steps to automate the build, deployment, and test execution:
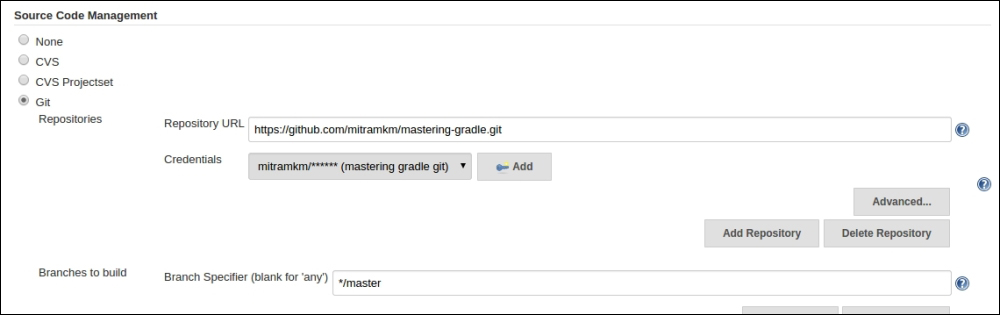
Figure 9.3
After the source code management configuration, we have to add a build step in Jenkins to build the web application. In this step, we will execute the clean war task on a Gradle project named UserDetailsService. This is a simple web application to expose a RESTful service. The Gradle task will create a WAR file in the build/libs directory of the project. In the build step configuration, we have specified the Root Build script as ${workspace}/Chapter9/UserDetailsService. So, the WAR file will be created in the %JENKINS_HOME%/jobs/build_deployment_pipeline/workspace/Chapter9/UserDetailsService/build/libs/ directory:
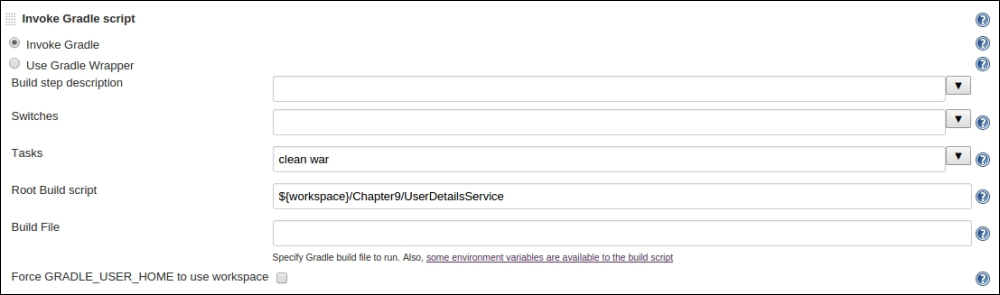
Figure 9.4
We are done with the first step. Next step is to create a Tomcat container and deploy the WAR file. This can be done by running a shell script that automates the following tasks:
The following shell script automates all the operations mentioned previously:
#!/bin/sh

if [ -z "$1" ]; then
  BUILD_HOME=$(pwd)/UserDetailsService
else
  BUILD_HOME=$1
fi

docker pull tomcat:7.0.57-jre7

runningContainer=`docker ps -l | grep userdetailsservice | awk '{print $1}'`

if [ ! -z "$runningContainer" ]
then
  docker stop $runningContainer
  docker rm $runningContainer
fi

docker run -d -v $BUILD_HOME/build/libs/userdetailsservice.war:/usr/local/tomcat/webapps/userdetailsservice.war -p 8181:8080 --name "userdetailsservice" tomcat:7.0.57-jre7
The script is ready. We will configure and execute the script as the second build step in the deployment pipeline job. Though we are using shell script to control docker commands, even this can be done using Gradle tasks (such as Exec) or Gradle plugin for Docker. Some Docker plugins are available at https://plugins.gradle.org/. You can also explore these plugins, if you want to do everything in Gradle way:

Figure 9.5
After the execution of the second build step, the web application is up and running in the Tomcat container. Finally, we have to verify the functionality of the application by running an automated test suite. The sample web application is a RESTful service, which exposes the getUsers() and createUser() type functionalities as HTTP GET and POST methods. The following code snippet is an example of TestNG cases that can be executed as sanity checks. It makes HTTP GET and HTTP POST calls at http://localhost:8080/userdetailsservice/userdetails:
@Test
public void createUser() {
  User request = new User("User1", "User user", "[email protected]");
  User response = resttemplate.postForObject(URL, request, User.class);
  Assert.assertEquals(response.getEmail(), "[email protected]");
}

@Test(dependsOnMethods="createUser")
public void getUsers() {
  User[] response = resttemplate.getForObject(URL, User[].class);
  Assert.assertEquals(response.length, 1);
}
To execute the test case, we will create a third build step in the Jenkins pipeline with the task as gradle test. In this example, for simplicity we have created integration test code in the src/test folder. Ideally, in the src/test directory, we should keep only unit test code. If you are writing any integration or regression test, it should be done in a separate Java project. Another point to remember is that, test task is primarily used to execute unit test code. If you are writing some integration test code, consider creating a new Gradle task (such as integrationTest) that runs JUnit, TestNG or any other test suite:
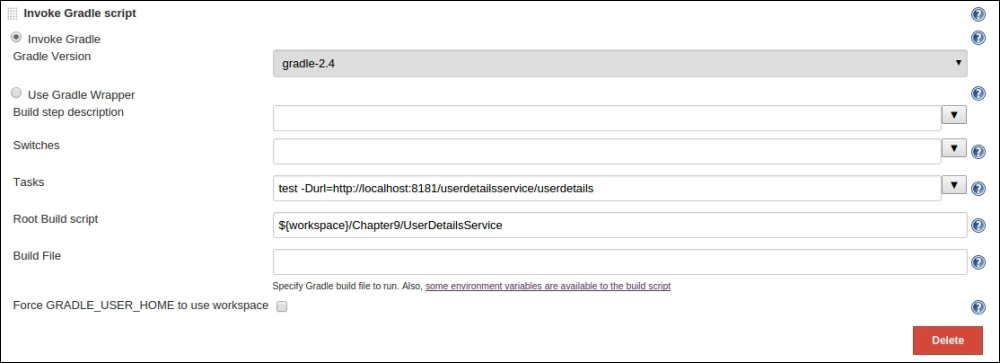
Figure 9.6
Now we are ready to run the job in Jenkins. The job executes three tasks sequentially—building a web application, deploying the application in a newly created container, and finally performing some integration tests. The console output of the complete job is displayed in the following screenshot:

Figure 9.7