
No piece of software is production ready unless it passes through a proper quality check. It helps to deliver software with minimum defects and saves lots of maintenance effort. However, manual test execution requires lots of time to execute tests and therefore the software release cycle is delayed. Release time and productivity can be improved if tests are automated.
Gradle provides an automated way to execute test code, especially for unit tests. In the following section, we'll explore how to integrate JUnit and TestNG with Gradle.
Gradle's Java plugin provides a predefined structure to keep test code and test resources for configuration and execution. As with the source code structure, the default test code location is src/test/java/<test_package>. If you follow this convention, you just need to execute the test task to run the unit test cases as shown in the following command:
$ gradle test
:compileJava
:processResources
:classes
:compileTestJava
:processTestResources
:testClasses
:test
BUILD SUCCESSFUL
This test task will perform all the required operations such as the compilation of the source code, compilation of the test code, process resources, and finally, execution of the test cases and creation of reports.
JUnit provides a user-friendly format to understand the result. You will find the following hierarchy after executing the test task:
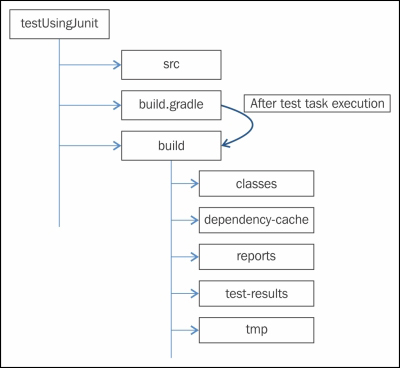
Figure 6.6
The reports folder contains a tests subdirectory, which has a test summary result in HTML format named index.html. If you open the index.html file, you will find the following output:
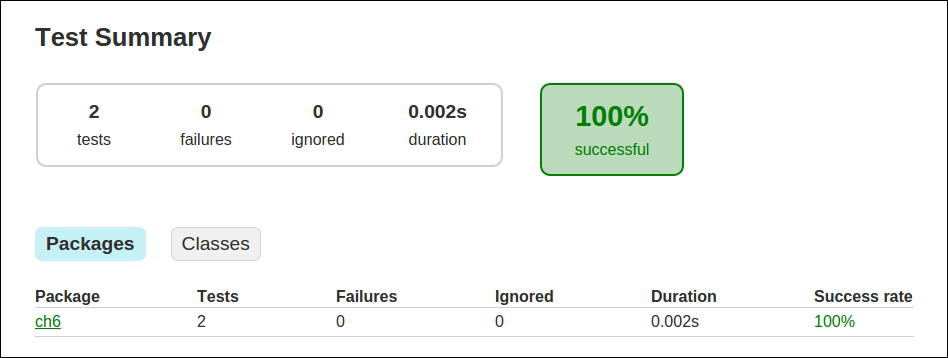
Figure 6.7
It provides a complete analysis of test case scenarios such as number of test cases executed, test cases failed, ignored, and so on. From the report, you can drill down further to the individual test case level by following the hyperlinks on the report page. The report will show a detailed explanation of the error/exception that occurred, if any, and the execution time in a tabular format.
Until now, we have only discussed the execution of the test cases using Gradle. To compile and execute test cases, we need a test framework library. Like any other configuration, you need to mention the JUnit JAR as a dependency for your project. Typically, the dependency is added as a testCompile configuration:
repositories {
  mavenCentral()
}
dependencies {
  testCompile 'junit:junit:4.12'
}
This configuration will download the junit-4.12.jar from the Maven repository and the JAR file will be added to the classpath during the compilation and execution phase.
There are different configuration parameters that can be set for test configuration, which help to optimize the resources and customize the behavior based on project requirements.
Sometimes, the test directory structure does not follow the default convention, that is, src/test/java. In a similar way to the source code directory configuration, you can configure the new test code location as follows:
sourceSets {
  test {
    java {
      srcDir 'testSrc'
    }
  }
}Gradle executes the test cases in a separate JVM. By default, Gradle executes all the tests in a single process. You can specify the number of parallel processes by configuring the maxParallelForks property in the test closure. Its default value is one:
test {
maxParallelForks = 3
}
To understand how it works exactly, we can modify our previous example. Just create multiple copies of the test class in src/test/java. In our example, in the TestUsingJunitParallel project, we have created a total of five copies of the same LoginTest class as LoginTest1, LoginTest2, and so on. Now, execute the Gradle command with the --info option:
TestUsingJunitParallel$ gradle clean --info test | grep 'Test Executor'
. . . .
. . . .
Successfully started process 'Gradle Test Executor 2'
Successfully started process 'Gradle Test Executor 1'
Successfully started process 'Gradle Test Executor 3'
Gradle Test Executor 2 started executing tests.
Gradle Test Executor 3 started executing tests.
Gradle Test Executor 1 started executing tests.
Gradle Test Executor 3 finished executing tests.
Gradle Test Executor 2 finished executing tests.
Gradle Test Executor 1 finished executing tests.
The command-line output shows that three processes were created by Gradle and all the test cases were executed in those processes.
This option allows setting the number of test classes per process. The default value is 0, that is, unlimited. If you set this option to a nonzero value, then a process will be created when this limit is reached.
In the previous example, we have five test classes and we have set the parallel process count to three. Now, we will set the forkEvery option to 1, so every process will execute only one test class:
test {
  ignoreFailures = true
  maxParallelForks = 3
  forkEvery = 1
}
TestUsingJunitParallel$ gradle clean --info test | grep 'Test Executor' . . . . Successfully started process 'Gradle Test Executor 1' Successfully started process 'Gradle Test Executor 3' Successfully started process 'Gradle Test Executor 2' Gradle Test Executor 1 started executing tests. Gradle Test Executor 2 started executing tests. Gradle Test Executor 3 started executing tests. Gradle Test Executor 1 finished executing tests. Starting process 'Gradle Test Executor 4'. Working directory: . . . . Successfully started process 'Gradle Test Executor 4' Gradle Test Executor 3 finished executing tests. Gradle Test Executor 2 finished executing tests. Starting process 'Gradle Test Executor 5'. Working directory: . . . . Successfully started process 'Gradle Test Executor 5' Gradle Test Executor 4 started executing tests. Gradle Test Executor 5 started executing tests. Gradle Test Executor 4 finished executing tests. Gradle Test Executor 5 finished executing tests.
From the output, we can observe that Gradle first created three processes, which executed three test classes. Then, other two processes, for example, 'Gradle Test Executor 4' and 'Gradle Test Executor 5', were created to execute another two test files.
Whenever any of the test cases fails, the build is marked as FAILED:
$ gradle test
. . .
:test

ch6.login.LoginTest > testLogin1 FAILED
  java.lang.AssertionError at LoginTest.java:26

4 tests completed, 1 failed
:test FAILED

FAILURE: Build failed with an exception.
. . .
BUILD FAILED
If you want the build to succeed irrespective of the test case outcome, you can add ignoreFailures=true in the build script test closure, as shown in the previous example. Its default value is false. On executing the test task again, the build will be successful as follows:
$ gradle test
. . .
ch6.login.LoginTest > testLogin1 FAILED
  java.lang.AssertionError at LoginTest.java:26

4 tests completed, 1 failed
. . .
BUILD SUCCESSFUL
Gradle allows you a selective execution of test cases by filtering them based on different patterns. Suppose we have two test packages with four test cases.
/src/test/java/ch6/login/LoginTest.java contains 2 test packages as follows:
testUserLogin1()testUserLogin2()
/src/test/java/ch6/profile/ProfileTest.java contains 2 test packages as follows:
testUserProfile1()testUserProfile2()
The following code snippet shows how to apply a filter based on different patterns:
test {
  filter {
    // 1: execute only login test cases
    includeTestsMatching "ch6.login.*"

    //2: include all test cases matching *Test
    includeTestsMatching "*Test"

    //3: include all integration tests having 1 in their name
    includeTestsMatching "*1"

    //4: Other way to include/exclude packages
    include "ch6/profile/**"
  }
}
The first filter will identify only two test cases from the ch6.login package. The second filter selects all four test cases, as test class names are matching the *Test pattern. The third statement finally filters only two test cases: testUserLogin1() and testUserProfile1().
Just comment the first two patterns and execute the test with filter pattern *1. Although we have a total of four test cases, you will find that Gradle executes one test case from each package. You can also include or exclude packages by using include or exclude with the package structure mentioned in the preceding example. If you only want to execute a single test class, you can also execute it by appending test classes to the command-line option --tests. Command gradle tests --tests ch6.login.LoginTest will execute only the test case mentioned in the LoginTest class:
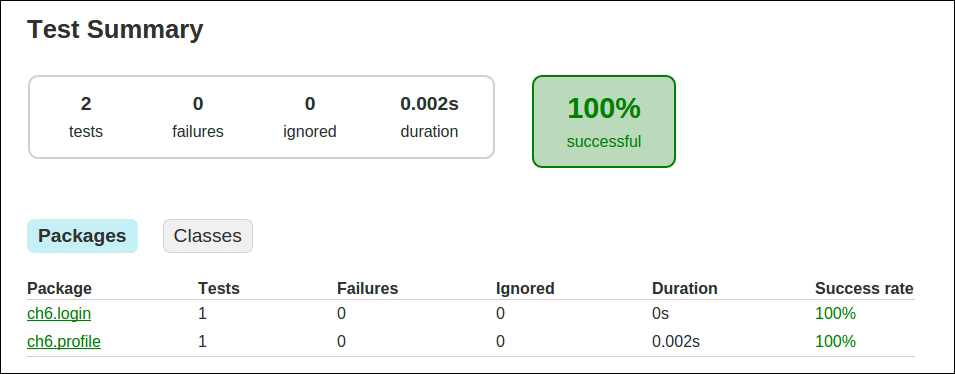
Figure 6.8
Gradle also provides integration with the TestNG framework. To write test cases in TestNG, you need to add the dependency in the build.gradle file:
dependencies {
  testCompile 'org.testng:testng:6.8.21'
}
In our example, we have created a TestNG test class with three test cases. Now, by executing the test task, we get the report file created under build/reports/tests:
$ gradle clean test
Now, open the index.html file and you will see the following output:

Figure 6.9
The look and feel of the report is similar to the JUnit that we saw earlier. Actually, JUnit and TestNG on their own generate completely different report formats, but Gradle reconciles them into a standard look and feel.
As explained in the JUnit section, you can also define other properties in the test closure such as ignoreFailures, maxParallelForks, and so on.
test{
  useTestNG()
  ignoreFailures = true
  maxParallelForks = 2
  forkEvery = 1
}In the preceding test closure, we have used the useTestNG option to enable TestNG support. You can also set other options such as groups and listeners in this closure. For example, the following setting only executes test cases with the group name Smoke and it creates an additional emailable TestNG report in the reports/tests folder:
useTestNG(){
  includeGroups 'Smoke'
  listeners << 'org.testng.reporters.EmailableReporter'
}
In useTestNG, you can group test cases based on the group attribute to the @Test annotation:
@Test(groups = "<group name>")
In our example, we have grouped the test cases as Smoke and Integration. On executing the test task, only the verifyArraySize and verifyArrayNotNull test cases will be executed:
@Test(groups = "Smoke")
public void verifyArraySize()

@Test(groups = "Smoke")
public void verifyArrayNotNull()

@Test(groups = "Integration")
public void verifyArrayPosition()
TestNG suite files provide better control to execute tests. In a test suite file, you can define all the test classes and methods that will be included to execute the test case, any filter based on group name, listener information, and so on.
We have created a testng.xml file in the src/test/resource folder. The file has three key pieces of information; the listener configuration to create an emailable report format, included the test group as Smoke and added the ArrayTest file as a test class. Using the test suite file, you can also configure other properties such as thread pool size, whether test classes or test methods will run in parallel, and many more:
<!DOCTYPE suite SYSTEM "http://testng.org/testng-1.0.dtd" >
<suite name="Suite1" verbose="1" >
  <listeners>
    <listener class-name="org.testng.reporters.EmailableReporter" />
  </listeners>
  <test name="Smoke Test">
    <groups>
      <run>
        <exclude name="Integration" />
        <include name="Smoke" />
      </run>
    </groups>

    <classes>
      <class name="ch6.testng.example.ArrayTest">
      </class>
    </classes>
  </test>
</suite>
This suite file can be included in the test closure as follows. Then, on executing the test task, reports will be created in the reports/tests folder:
test {
ignoreFailures = true
  useTestNG(){
    suites("src/test/resources/testng.xml")
  }
}