
Until now, we have discussed a lot about dependencies. How we can define project dependencies, customize them, and configure repositories to download libraries. Now, let's try to build the artifacts (JAR, WAR, and so on) and publish it to Artifact repositories (could be a local filesystem, remote location, or Maven repository) to make it available to all the other teams to share.
When we apply the Java plugin, Gradle adds some default configuration to the project such as compile, runtime, testCompile. The Java plugin also adds one more configuration archive, which is used to define the artifacts of your project. Gradle provides the default artifact with some of the plugins. For example, Java, Groovy plugin publishes JAR as a default artifact, war plugin publish WAR as a default artifact. This JAR can be uploaded or published to a repository using the uploadArchives task.
The following code snippet shows how to configure the repository to upload archives using the build_uploadarchives.gradle file:
apply plugin: 'java'
version=1.0

repositories {
  mavenCentral()
}
dependencies {
  compile group: 'log4j', name: 'log4j', version: '1.2.16'
  compile 'commons-httpclient:commons-httpclient:3.1'
  compile 'dom4j:dom4j:1.6.1'
}
uploadArchives {
  repositories {
    maven {
      credentials {
        username "guest"
        password "guest"
      }
      url "http://private.maven.repo"
    }
    //flatDir {dirs "./temp1" }
  }
}
Instead of the Maven repository, we can also use the flat directory as a repository. In the preceding example, replace the Maven closure with flatDir (flatDir {dirs "./temp1" }) configuration. Now, if you execute the gradle uploadArchives command, you will find the JAR file published in the temp1 directory.
For each configuration, Gradle provides Upload<configuration name>, by default, which assembles and uploads the artifacts in the specified configuration. The UploadArchives task provided by the Java plugin uploads the default artifact (jar) to the repository.
Sometimes, you might need to generate some additional artifacts with the JAR file such as the ZIP and XML files. This can be done by archive task to define an artifact.
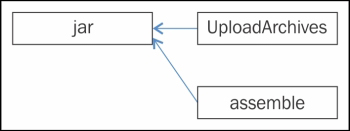
Figure 5.1
In the preceding figure, the
assemble task depends on the
jar task, which is nothing but the default artifact of your Java plugin project. You can configure additional artifacts using the archives configuration. The input to the archive configuration can be an artifact itself or a task which creates an artifact.
Let's take a look at the following two examples:
In this example, we will generate additional XML file with the JAR file and upload it to the repository. The following is the content of the CustomArtifact/build.gradle file:
apply plugin: 'java'
archivesBaseName="MySample" // to customize Jar Name
version=1.0
repositories {
  mavenCentral()
}
def confFile = file('configurations.xml') // artifact2
artifacts {
  archives confFile
}
uploadArchives {
repositories {
   flatDir {dirs "./tempRepo"}
}
}
Here, we have added configurations.xml as a separate XML file to the archive so that we can upload the file, along with the the JAR file, to the repository.
After executing Gradle's uploadArchives command, you will find the following files in the tempRepo directory:

Figure 5.2
Gradle also generates checksum and a deployment descriptor (here, ivy-1.0.xml) along with the artifact.
In the following section, we will learn how to upload a ZIP file as an artifact.
If you want to upload an additional ZIP file along with the JAR file, then you can mention the additional archives in the artifacts closure. The following is the CustomArtifact/build_zip.gradle file:
apply plugin: 'java'
archivesBaseName="MySample" // to customize Jar Name
version=1.0
repositories {
  mavenCentral()
}
task zipSrc(type: Zip) {
  from 'src'
}
artifacts {
  archives zipSrc
}
uploadArchives {
  repositories {
    flatDir {dirs "./temp1" }
  }
}
After executing the gradle -b build_zip.gradle uploadArchives command, verify the files in the temp1 directory:
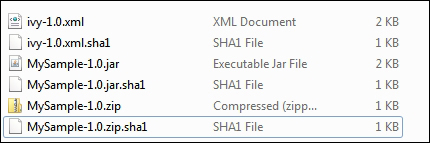
Figure 5.3
Here, an additional MySample-1.0.zip is generated with the JAR file. You may have noticed that we did not make any additional call to the zipSrc task, which is required to create the ZIP file. Gradle applies a declarative approach here. Whatever archives you have configured in the artifacts closure, Gradle will create those artifacts. Within this closure, you can assign different type of tasks, such as JAR, ZIP, TAR (org.gradle.api.tasks.building.AbstractArchiveTask), or any file to be archived.
In the same way as custom dependency, you can also define custom configurations for your artifacts. Consider the following example (CustomArtifacts/build_customconf.gradle):
apply plugin: 'java'

archivesBaseName="MySampleZip" // to customize Jar Name
version=1.0
configurations {
  zipAsset
}
repositories {
  mavenCentral()
}
task zipSrc(type: Zip) {
  from 'src'
}
artifacts {
  zipAsset zipSrc
}
uploadZipAsset {
  repositories {
    flatDir {dirs "./temp1" }
  }
}
Now, execute the gradle –b build_customconf.gradle uploadZipAsset command to create and upload files to the repository. In the example, we have defined a custom configuration zipAsset. We used that configuration inside the artifacts closure. As mentioned in the preceding example, Gradle automatically provides the upload<configname> task for each configuration. Thus, we have the cuploadZipAsset task available to upload the required ZIP file to the repository.
In the previous section, we discussed the Maven plugin and other repositories configuration. Here, we will discuss the new plugin (maven-publish plugin) introduced by Gradle.
To have more control over the publication process, Gradle provides the 'maven-publish' plugin. With the help of the following examples, you will see how it can help us in publication using the MavenPublish/build.gradle file:
You can configure publications by using following closure:
publishing {
  publications {
    customPublicationName(MavenPublication) {
      // Configure the publication here
    }
  }
}
The following is the file MavenPublish/build.gradle.
apply plugin: 'java'
apply plugin: 'maven-publish'

publishing {
  publications {
    mavenJava(MavenPublication) {
      from components.java
      groupId 'org.mygroup'
      artifactId 'MySampleProj'
      version '1.0'
    }
  }

}
This plugin adds the following tasks:
publish: This publishes all the publications produced by this projectpublishToMavenLocal: This publishes all the Maven publications produced by this project to the local Maven cache
When you add the preceding mentioned publications closure inside publishing, it will add two additional tasks, generatePomFileFor<publicationName>Publication and public<publicationName>PublicationToMavenLocal. You can find additional tasks in task list as follows:
generatePomFileForPluginPublication: This generates the Maven POM file for publication 'plugin'publishPluginPublicationToMavenLocal: This publishes Maven publication 'plugin' to the local Maven repository
To publish the artifacts in the local Maven repository, execute the following command:
$ gradle –i publishToMavenLocal

:publishMavenJavaPublicationToMavenLocal
Executing task ': publishMavenJavaPublicationToMavenLocal' (up-to-date check took 0.001 secs) due to:
  Task has not declared any outputs.
Publishing to repository org.gradle.api.internal.artifacts.repositories.DefaultMavenLocalArtifactRepository_Decorated@4a454218
[INFO] Installing /Chapter5/sent/MavenPublish/build/libs/MavenPublish.jar to <%USER_HOME>/.m2/repository/org/mygroup/MySampleProj/1.0/MySampleProj-1.0.jar
: publishMavenJavaPublicationToMavenLocal (Thread[main,5,main]) completed. Took 1.079 secs.

BUILD SUCCESSFUL
If you browse the local Maven repository, you will also find that the POM file has the following content:
<?xml version="1.0" encoding="UTF-8"?>
<project xsi:schemaLocation="http://maven.apache.org/POM/4.0.0 http://maven.apache.org/xsd/maven-4.0.0.xsd" xmlns="http://maven.apache.org/POM/4.0.0"
xmlns:xsi="http://www.w3.org/2001/XMLSchema-instance">
  <modelVersion>4.0.0</modelVersion>
  <groupId>org.mygroup</groupId>
  <artifactId>MySampleProj</artifactId>
  <version>1.0</version>
</project>
By default, it produces the JAR file for the Java project. If you want to add additional artifact along with JAR, you can customize the preceding configuration by adding additional artifact declaration in the following format.
Here is the sample code for MavenPublish/build_zip.gradle:
apply plugin: 'java'
apply plugin: 'maven-publish'

task zipSrc(type: Zip) {
  baseName = 'SampleSource'
  from 'src'
}

publishing {
  publications {
    mavenJava(MavenPublication) {
      from components.java
      groupId 'org.mygroup'
      artifactId 'MySampleProj'
      version '1.0'

      artifact zipSrc {
        classifier "sources"
      }
      // artifact can be <Jar,Zip tasks which will generate jar,zip file>

    }
  }
}
$ gradle –b build_zip.gradle – i publishToMavenLocal . . . Publishing to repository org.gradle.api.internal.artifacts.repositories.DefaultMavenLocalArtifactRepository_Decorated@434d54de [INFO] Installing /Chapter5/MavenPublish/build/libs/MavenPublish.jar to <USER_HOME>/.m2/repository/org/mygroup/MySampleProj/1.0/MySampleProj-1.0.jar [INFO] Installing /Chapter5/MavenPublish/build/distributions/SampleSource-source-.zip to <USER_HOME> /.m2/repository/org/mygroup/MySampleProj/1.0/MySampleProj-1.0-source-.zip :publishPluginPublicationToMavenLocal (Thread[main,5,main]) completed. Took 0.85 secs. . . . BUILD SUCCESSFUL
Now, in the local repository, along with the JAR file, you will also find an additional ZIP file.
To publish artifacts to the local-hosted repository with help of the maven-publish plugin, we can use the same configuration, which we discussed in the Maven plugin. The repositories closure is exactly the same as before, but it has to be surrounded by a publishing closure. You can define the closure as follows:
Publishing {
  repositories {
    maven {
      name "localRepo"
      url "http://local.maven.repo"
      credentials { // if required
        username  = 'username'
        password = 'password'
      }
    }
  }
}
You can even publish to a local file repository by mentioning the URL ./localrepo. Maven will automatically create a directory structure for you and you can find artifacts under localrepo/<group>/<version>/artifact-<version>.jar.
If you mention the name attribute in the maven { ….} closure, Gradle will automatically create a new task with the name publishPluginPublicationTo<name>Repository:
publishing {
  repositories {
    maven {
      name "localRepo"
      url "./localrepo"
    }
  }
}
Now, you will be able to use the publishMavenJavaPublicationToLocalRepoRepository task or simply the publish task to publish to the repository; such as gradle -b build_localrepo.gradle publish.
By default, Gradle generates the POM file for the artifact with default parameters. If you want to modify POM with additional details, you can utilize the pom.withXml closure. You can add any number of new nodes to the XML file and also update some of the existing details. Remember that groupId, artifactId and version are read only. You cannot modify these details. Consider the file build_custompom.gradle.
apply plugin: 'java'
apply plugin: 'maven-publish'
publishing {
  publications {
    mavenCustom(MavenPublication) {
      from components.java
      groupId 'org.mygroup'
      artifactId 'MySampleProj'
      version '1.0'

    pom.withXml {
      def root = asNode()
      root.appendNode('name', 'Sample Project')
      root.appendNode('description', 'Adding Additional details')
      def devs = root.appendNode('developers')
      def dev = devs.appendNode('developer')
      dev.appendNode('name', 'DeveloperName')
      }
    }
  }
}
Now, execute the publishToMavenLocal task and you will find pom.xml generated in the repository.