
As the previous diagram shows, HBase depends upon ZooKeeper. Given that I have a working ZooKeeper quorum on my CDH5 cluster (running on the hc2r1m2, hc2r1m3, and hc2r1m4 nodes), I only need to ensure that HBase is installed and working on my Hadoop cluster.
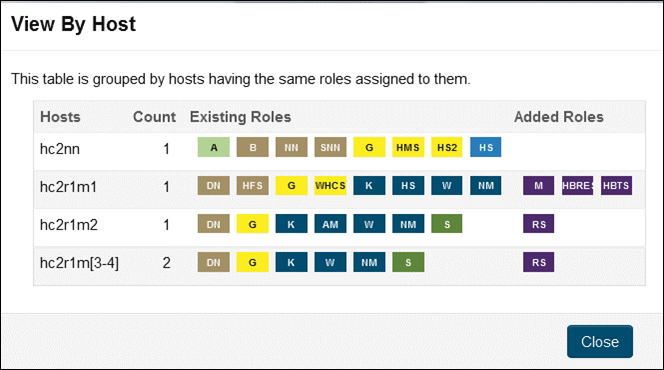
I will install a distributed version of HBase using the Cloudera CDH cluster manager. Using the manager console, it is a simple task to install HBase. The only decision required is where to locate the HBase servers on the cluster. The following figure shows the View By Host form from the CDH HBase installation. The HBase components are shown to the right as Added Roles.
I have chosen to add the HBase region servers (RS) to the hc2r1m2, hc2r1m3, and hc2r1m4 nodes. I have installed the HBase master (M), the HBase REST server (HBREST), and HBase Thrift server (HBTS) on the hc2r1m1 host.
I have manually installed and configured many Hadoop-based components in the past, and I find that this simple manager-based installation and configuration of components is both quick and reliable. It saves me time so that I can concentrate on other systems, such as Titan.
Once HBase is installed, and has been started from the CDH manager console, it needs to be checked to ensure that it is working. I will do this using the HBase shell command shown here:
[hadoop@hc2r1m2 ~]$ hbase shell
Version 0.98.6-cdh5.3.2, rUnknown, Tue Feb 24 12:56:59 PST 2015
hbase(main):001:0>
As you can see from the previous commands, I run the HBase shell as the Linux user hadoop. The HBase version 0.98.6 has been installed; this version number will become important later when we start using Titan:
hbase(main):001:0> create 'table2', 'cf1'
hbase(main):002:0> put 'table2', 'row1', 'cf1:1', 'value1'
hbase(main):003:0> put 'table2', 'row2', 'cf1:1', 'value2'
I have created a simple table called table2 with a column family of cf1. I have then added two rows with two different values. This table has been created from the hc2r1m2 node, and will now be checked from an alternate node called hc2r1m4 in the HBase cluster:
[hadoop@hc2r1m4 ~]$ hbase shell

hbase(main):001:0> scan 'table2'

ROW                     COLUMN+CELL
 row1                   column=cf1:1, timestamp=1437968514021, value=value1
 row2                   column=cf1:1, timestamp=1437968520664, value=value2
2 row(s) in 0.3870 seconds
As you can see, the two data rows are visible in table2 from a different host, so HBase is installed and working. It is now time to try and create a graph in Titan using HBase and the Titan Gremlin shell.
I have checked my Java version to make sure that I am on version 8, otherwise Titan 0.9.0-M2 will not work:
[hadoop@hc2r1m2 ~]$ java -version
openjdk version "1.8.0_51"
If you do not set your Java version correctly, you will get errors like this, which don't seem to be meaningful until you Google them:
Exception in thread "main" java.lang.UnsupportedClassVersionError: org/apache/tinkerpop/gremlin/groovy/plugin/RemoteAcceptor :
Unsupported major.minor version 52.0
The interactive Titan Gremlin shell can be found within the bin directory of the Titan install, as shown here. Once started, it offers a Gremlin prompt:
[hadoop@hc2r1m2 bin]$ pwd
/usr/local/titan/

[hadoop@hc2r1m2 titan]$ bin/gremlin.sh
gremlin>
The following script will be entered using the Gremlin shell. The first section of the script defines the configuration in terms of the storage (HBase), the ZooKeeper servers used, the ZooKeeper port number, and the HBase table name that is to be used:
hBaseConf = new BaseConfiguration();
hBaseConf.setProperty("storage.backend","hbase");
hBaseConf.setProperty("storage.hostname","hc2r1m2,hc2r1m3,hc2r1m4");
hBaseConf.setProperty("storage.hbase.ext.hbase.zookeeper.property.clientPort","2181")
hBaseConf.setProperty("storage.hbase.table","titan")

titanGraph = TitanFactory.open(hBaseConf);
The next section defines the generic vertex properties' name and age for the graph to be created using the Management System. It then commits the management system changes:
manageSys = titanGraph.openManagement();
nameProp = manageSys.makePropertyKey('name').dataType(String.class).make();
ageProp  = manageSys.makePropertyKey('age').dataType(String.class).make();
manageSys.buildIndex('nameIdx',Vertex.class).addKey(nameProp).buildCompositeIndex();
manageSys.buildIndex('ageIdx',Vertex.class).addKey(ageProp).buildCompositeIndex();

manageSys.commit();
Now, six vertices are added to the graph. Each one is given a numeric label to represent its identity. Each vertex is given an age and name value:
v1=titanGraph.addVertex(label, '1');
v1.property('name', 'Mike');
v1.property('age', '48');

v2=titanGraph.addVertex(label, '2');
v2.property('name', 'Sarah');
v2.property('age', '45');

v3=titanGraph.addVertex(label, '3');
v3.property('name', 'John');
v3.property('age', '25');

v4=titanGraph.addVertex(label, '4');
v4.property('name', 'Jim');
v4.property('age', '53');

v5=titanGraph.addVertex(label, '5');
v5.property('name', 'Kate');
v5.property('age', '22');

v6=titanGraph.addVertex(label, '6');
v6.property('name', 'Flo');
v6.property('age', '52');
Finally, the graph edges are added to join the vertices together. Each edge has a relationship value. Once created, the changes are committed to store them to Titan, and therefore HBase:
v6.addEdge("Sister", v1)
v1.addEdge("Husband", v2)
v2.addEdge("Wife", v1)
v5.addEdge("Daughter", v1)
v5.addEdge("Daughter", v2)
v3.addEdge("Son", v1)
v3.addEdge("Son", v2)
v4.addEdge("Friend", v1)
v1.addEdge("Father", v5)
v1.addEdge("Father", v3)
v2.addEdge("Mother", v5)
v2.addEdge("Mother", v3)

titanGraph.tx().commit();
This results in a simple person-based graph, shown in the following figure, which was also used in the previous chapter:

This graph can then be tested in Titan via the Gremlin shell using a similar script to the previous one. Just enter the following script at the gremlin> prompt, as was shown previously. It uses the same initial six lines to create the titanGraph configuration, but it then creates a graph traversal variable g:
hBaseConf = new BaseConfiguration();
hBaseConf.setProperty("storage.backend","hbase");
hBaseConf.setProperty("storage.hostname","hc2r1m2,hc2r1m3,hc2r1m4");
hBaseConf.setProperty("storage.hbase.ext.hbase.zookeeper.property.clientPort","2181")
hBaseConf.setProperty("storage.hbase.table","titan")

titanGraph = TitanFactory.open(hBaseConf);

gremlin> g = titanGraph.traversal()
Now, the graph traversal variable can be used to check the graph contents. Using the ValueMap option, it is possible to search for the graph nodes called Mike and Flo. They have been successfully found here:
gremlin> g.V().has('name','Mike').valueMap();
==>[name:[Mike], age:[48]]

gremlin> g.V().has('name','Flo').valueMap();
==>[name:[Flo], age:[52]]
So, the graph has been created and checked in Titan using the Gremlin shell, but we can also check the storage in HBase using the HBase shell, and check the contents of the Titan table. The following scan shows that the table exists, and contains 72 rows of the data for this small graph:
[hadoop@hc2r1m2 ~]$ hbase shell
hbase(main):002:0> scan 'titan'
72 row(s) in 0.8310 seconds
Now that the graph has been created, and I am confident that it has been stored in HBase, I will attempt to access the data using apache Spark. I have already started Apache Spark on all the nodes as shown in the previous chapter. This will be a direct access from Apache Spark 1.3 to the HBase storage. I won't at this stage be attempting to use Titan to interpret the HBase stored graph.
In order to access HBase from Spark, I will be using Cloudera's SparkOnHBase module, which can be downloaded from https://github.com/cloudera-labs/SparkOnHBase.
The downloaded file is in a zipped format, and needs to be unzipped. I have done this using the Linux unzip command in a temporary directory:
[hadoop@hc2r1m2 tmp]$ ls -l SparkOnHBase-cdh5-0.0.2.zip
-rw-r--r-- 1 hadoop hadoop 370439 Jul 27 13:39 SparkOnHBase-cdh5-0.0.2.zip

[hadoop@hc2r1m2 tmp]$ unzip SparkOnHBase-cdh5-0.0.2.zip

[hadoop@hc2r1m2 tmp]$ ls
SparkOnHBase-cdh5-0.0.2  SparkOnHBase-cdh5-0.0.2.zip
I have then moved into the unpacked module, and used the Maven command mvn to build the JAR file:
[hadoop@hc2r1m2 tmp]$ cd SparkOnHBase-cdh5-0.0.2
[hadoop@hc2r1m2 SparkOnHBase-cdh5-0.0.2]$ mvn clean package

[INFO] -----------------------------------------------------------
[INFO] BUILD SUCCESS
[INFO] -----------------------------------------------------------
[INFO] Total time: 13:17 min
[INFO] Finished at: 2015-07-27T14:05:55+12:00
[INFO] Final Memory: 50M/191M
[INFO] -----------------------------------------------------------
Finally, I moved the built component to my development area to keep things tidy, so that I could use this module in my Spark HBase code:
[hadoop@hc2r1m2 SparkOnHBase-cdh5-0.0.2]$ cd ..
[hadoop@hc2r1m2 tmp]$ mv SparkOnHBase-cdh5-0.0.2 /home/hadoop/spark
As in previous chapters, I will be using SBT and Scala to compile my Spark-based scripts into applications. Then, I will use spark-submit to run these applications on the Spark cluster. My SBT configuration file looks like this. It contains the Hadoop, Spark, and HBase libraries:
[hadoop@hc2r1m2 titan_hbase]$ pwd
/home/hadoop/spark/titan_hbase

[hadoop@hc2r1m2 titan_hbase]$ more titan.sbt
name := "T i t a n"
version := "1.0"
scalaVersion := "2.10.4"

libraryDependencies += "org.apache.hadoop" % "hadoop-client" % "2.3.0"
libraryDependencies += "org.apache.spark" %% "spark-core"  % "1.3.1"
libraryDependencies += "com.cloudera.spark" % "hbase"   % "5-0.0.2" from "file:///home/hadoop/spark/SparkOnHBase-cdh5-0.0.2/target/SparkHBase.jar"
libraryDependencies += "org.apache.hadoop.hbase" % "client"   % "5-0.0.2" from "file:///home/hadoop/spark/SparkOnHBase-cdh5-0.0.2/target/SparkHBase.jar"
resolvers += "Cloudera Repository" at "https://repository.cloudera.com/artifactory/clouder
a-repos/"
Notice that I am running this application on the hc2r1m2 server, using the Linux hadoop account, under the directory /home/hadoop/spark/titan_hbase. I have created a Bash shell script called run_titan.bash.hbase, which allows me to run any application that is created and compiled under the src/main/scala subdirectory:
[hadoop@hc2r1m2 titan_hbase]$ pwd ; more run_titan.bash.hbase
/home/hadoop/spark/titan_hbase

#!/bin/bash

SPARK_HOME=/usr/local/spark
SPARK_BIN=$SPARK_HOME/bin
SPARK_SBIN=$SPARK_HOME/sbin

JAR_PATH=/home/hadoop/spark/titan_hbase/target/scala-2.10/t-i-t-a-n_2.10-1.0.jar
CLASS_VAL=$1

CDH_JAR_HOME=/opt/cloudera/parcels/CDH/lib/hbase/
CONN_HOME=/home/hadoop/spark/SparkOnHBase-cdh5-0.0.2/target/

HBASE_JAR1=$CDH_JAR_HOME/hbase-common-0.98.6-cdh5.3.3.jar
HBASE_JAR2=$CONN_HOME/SparkHBase.jar

cd $SPARK_BIN

./spark-submit
  --jars $HBASE_JAR1
  --jars $HBASE_JAR2
  --class $CLASS_VAL
  --master spark://hc2nn.semtech-solutions.co.nz:7077
  --executor-memory 100M
  --total-executor-cores 50
  $JAR_PATH
The Bash script is held within the same titan_hbase directory, and takes a single parameter of the application class name. The parameters to the spark-submit call are the same as the previous examples. In this case, there is only a single script under src/main/scala, called spark3_hbase2.scala:
[hadoop@hc2r1m2 scala]$ pwd
/home/hadoop/spark/titan_hbase/src/main/scala

[hadoop@hc2r1m2 scala]$ ls
spark3_hbase2.scala
The Scala script starts by defining the package name to which the application class will belong. It then imports the Spark, Hadoop, and HBase classes:
package nz.co.semtechsolutions

import org.apache.spark.SparkContext
import org.apache.spark.SparkContext._
import org.apache.spark.SparkConf

import org.apache.hadoop.hbase._
import org.apache.hadoop.fs.Path
import com.cloudera.spark.hbase.HBaseContext
import org.apache.hadoop.hbase.client.Scan
The application class name is defined as well as the main method. A configuration object is then created in terms of the application name, and the Spark URL. Finally, a Spark context is created from the configuration:
object spark3_hbase2
{

  def main(args: Array[String]) {

    val sparkMaster = "spark://hc2nn.semtech-solutions.co.nz:7077"
    val appName = "Spark HBase 2"
    val conf = new SparkConf()

    conf.setMaster(sparkMaster)
    conf.setAppName(appName)

    val sparkCxt = new SparkContext(conf)
Next, an HBase configuration object is created, and a Cloudera CDH hbase-site.xml file-based resource is added:
    val jobConf = HBaseConfiguration.create()

    val hbasePath="/opt/cloudera/parcels/CDH/etc/hbase/conf.dist/"

    jobConf.addResource(new Path(hbasePath+"hbase-site.xml"))
An HBase context object is created using the Spark context and the HBase configuration object. The scan and cache configurations are also defined:
    val hbaseContext = new HBaseContext(sparkCxt, jobConf)

    var scan = new Scan()
    scan.setCaching(100)
Finally, the data from the HBase Titan table is retrieved using the hbaseRDD HBase context method, and the scan object. The RDD count is printed, and then the script closes:
    var hbaseRdd = hbaseContext.hbaseRDD("titan", scan)

    println( "Rows in Titan hbase table : " + hbaseRdd.count() )

    println( " >>>>> Script Finished <<<<< " )

  } // end main

} // end spark3_hbase2
I am only printing the count of the data retrieved because Titan compresses the data in GZ format. So, it would make little sense in trying to manipulate it directly.
Using the run_titan.bash.hbase script, the Spark application called spark3_hbase2 is run. It outputs an RDD row count of 72, matching the Titan table row count that was previously found. This proves that Apache Spark has been able to access the raw Titan HBase stored graph data, but Spark has not yet used the Titan libraries to access the Titan data as a graph. This will be discussed later. And here is the code:
[hadoop@hc2r1m2 titan_hbase]$ ./run_titan.bash.hbase nz.co.semtechsolutions.spark3_hbase2

Rows in Titan hbase table : 72
 >>>>> Script Finished <<<<<