
In order to examine the ANN (Artificial Neural Network) functionality in Apache Spark, I will need to obtain the latest source code from the GitHub website. The ANN functionality has been developed by Bert Greevenbosch (http://www.bertgreevenbosch.nl/), and is set to be released in Apache Spark 1.3. At the time of writing the current Spark release is 1.2.1, and CDH 5.x ships with Spark 1.0. So, in order to examine this unreleased ANN functionality, the source code will need to be sourced and built into a Spark server. This is what I will do after explaining a little on the theory behind ANN.
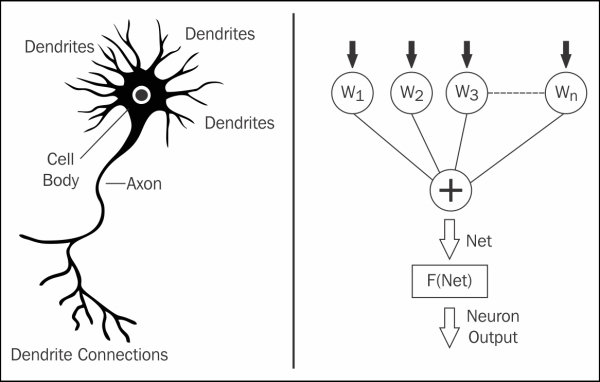
The following figure shows a simple biological neuron to the left. The neuron has dendrites that receive signals from other neurons. A cell body controls activation, and an axon carries an electrical impulse to the dendrites of other neurons. The artificial neuron to the right has a series of weighted inputs: a summing function that groups the inputs, and a firing mechanism (F(Net)), which decides whether the inputs have reached a threshold, and if so, the neuron will fire:
Neural networks are tolerant of noisy images and distortion, and so are useful when a black box classification method is needed for potentially degraded images. The next area to consider is the summation function for the neuron inputs. The following diagram shows the summation function called Net for neuron i. The connections between the neurons that have the weighting values, contain the stored knowledge of the network. Generally, a network will have an input layer, an output layer, and a number of hidden layers. A neuron will fire if the sum of its inputs exceeds a threshold.

In the previous equation, the diagram and the key show that the input values from a pattern P are passed to neurons in the input layer of a network. These values become the input layer neuron activation values; they are a special case. The inputs to neuron i are the sum of the weighting value for neuron connection i-j, multiplied by the activation from neuron j. The activation at neuron j (if it is not an input layer neuron) is given by F(Net), the squashing function, which will be described next.
A simulated neuron needs a firing mechanism, which decides whether the inputs to the neuron have reached a threshold. And then, it fires to create the activation value for that neuron. This firing or squashing function can be described by the generalized sigmoid function shown in the following figure:

This function has two constants: A and B; B affects the shape of the activation curve as shown in the previous graph. The bigger the value, the more similar a function becomes to an on/off step. The value of A sets a minimum for the returned activation. In the previous graph it is zero.
So, this provides a mechanism for simulating a neuron, creating weighting matrices as the neuron connections, and managing the neuron activation. But how are the networks organized? The next diagram shows a suggested neuron architecture—the neural network has an input layer of neurons, an output layer, and one or more hidden layers. All neurons in each layer are connected to each neuron in the adjacent layers.

During the training, activation passes from the input layer through the network to the output layer. Then, the error or difference between the expected or actual output causes error deltas to be passed back through the network, altering the weighting matrix values. Once the desired output layer vector is achieved, then the knowledge is stored in the weighting matrices, and the network can be further trained or used for classification.
So, the theory behind neural networks has been described in terms of back propagation. Now is the time to obtain the development version of the Apache Spark code, and build the Spark server, so that the ANN Scala code can be run.
I would not normally advise that Apache Spark code be downloaded and used before it has been released by Spark, or packaged by Cloudera (for use with CDH), but the desire to examine ANN functionality, along with the time scale allowed for this book, mean that I need to do so. I extracted the full Spark code tree from this path:
https://github.com/apache/spark/pull/1290.
I stored this code on the Linux server hc2nn, under the directory /home/hadoop/spark/spark. I then obtained the ANN code from Bert Greevenbosch's GitHub development area:
https://github.com/bgreeven/spark/blob/master/mllib/src/main/scala/org/apache/spark/mllib/ann/ArtificialNeuralNetwork.scala
https://github.com/bgreeven/spark/blob/master/mllib/src/main/scala/org/apache/spark/mllib/classification/ANNClassifier.scala
The ANNClassifier.scala file contains the public functions that will be called. The ArtificialNeuralNetwork.scala file contains the private MLlib ANN functions that ANNClassifier.scala calls. I already have Java open JDK installed on my server, so the next step is to set up the spark-env.sh environment configuration file under /home/hadoop/spark/spark/conf. My file looks like this:
export STANDALONE_SPARK_MASTER_HOST=hc2nn.semtech-solutions.co.nz
export SPARK_MASTER_IP=$STANDALONE_SPARK_MASTER_HOST
export SPARK_HOME=/home/hadoop/spark/spark
export SPARK_LAUNCH_WITH_SCALA=0
export SPARK_MASTER_WEBUI_PORT=19080
export SPARK_MASTER_PORT=8077
export SPARK_WORKER_PORT=8078
export SPARK_WORKER_WEBUI_PORT=19081
export SPARK_WORKER_DIR=/var/run/spark/work
export SPARK_LOG_DIR=/var/log/spark
export SPARK_HISTORY_SERVER_LOG_DIR=/var/log/spark
export SPARK_PID_DIR=/var/run/spark/
export HADOOP_CONF_DIR=/etc/hadoop/conf
export SPARK_JAR_PATH=${SPARK_HOME}/assembly/target/scala-2.10/
export SPARK_JAR=${SPARK_JAR_PATH}/spark-assembly-1.3.0-SNAPSHOT-hadoop2.3.0-cdh5.1.2.jar
export JAVA_HOME=/usr/lib/jvm/java-1.7.0
export SPARK_LOCAL_IP=192.168.1.103
The SPARK_MASTER_IP variable tells the cluster which server is the master. The port variables define the master, the worker web, and the operating port values. There are some log and JAR file paths defined, as well as JAVA_HOME and the local server IP address. Details for building Spark with Apache Maven can be found at:
http://spark.apache.org/docs/latest/building-spark.html
The slaves file in the same directory will be set up as before with the names of the four workers servers from hc2r1m1 to hc2r1m4.
In order to build using Apache Maven, I had to install mvn on to my Linux server hc2nn, where I will run the Spark build. I did this as the root user, obtaining a Maven repository file by first using wget:
wget http://repos.fedorapeople.org/repos/dchen/apache-maven/epel-apache-maven.repo -O /etc/yum.repos.d/epel-apache-maven.repo
Then, checking that the new repository file is in place with ls long listing.
[root@hc2nn ~]# ls -l /etc/yum.repos.d/epel-apache-maven.repo
-rw-r--r-- 1 root root 445 Mar  4  2014 /etc/yum.repos.d/epel-apache-maven.repo
Then Maven can be installed using the Linux yum command, the examples below show the install command and a check via ls that the mvn command exists.
[root@hc2nn ~]# yum install apache-maven
[root@hc2nn ~]# ls -l /usr/share/apache-maven/bin/mvn
-rwxr-xr-x 1 root root 6185 Dec 15 06:30 /usr/share/apache-maven/bin/mvn
The commands that I have used to build the Spark source tree are shown here along with the successful output. First, the environment is set up, and then the build is started with the mvn command. Options are added to build for Hadoop 2.3/yarn, and the tests are skipped. The build uses the clean and package options to remove the old build files each time, and then create JAR files. Finally, the build output is copied via the tee command to a file named build.log:
cd /home/hadoop/spark/spark/conf ; . ./spark-env.sh ; cd ..

mvn  -Pyarn -Phadoop-2.3  -Dhadoop.version=2.3.0-cdh5.1.2 -DskipTests clean package | tee build.log 2>&1

[INFO] ----------------------------------------------------------
[INFO] BUILD SUCCESS
[INFO] ----------------------------------------------------------
[INFO] Total time: 44:20 min
[INFO] Finished at: 2015-02-16T12:20:28+13:00
[INFO] Final Memory: 76M/925M
[INFO] ----------------------------------------------------------
The actual build command that you use will depend upon whether you have Hadoop, and the version of it. Check the previous building spark for details, the build takes around 40 minutes on my servers.
Given that this build will be packaged and copied to the other servers in the Spark cluster, it is important that all the servers use the same version of Java, else errors such as these will occur:
15/02/15 12:41:41 ERROR executor.Executor: Exception in task 0.1 in stage 0.0 (TID 2)
java.lang.VerifyError: class org.apache.hadoop.hdfs.protocol.proto.ClientNamenodeProtocolProtos$GetBlockLocationsRequestProto overrides final method getUnknownFields.()Lcom/google/protobuf/UnknownFieldSet;
        at java.lang.ClassLoader.defineClass1(Native Method)
Given that the source tree has been built, it now needs to be bundled up and released to each of the servers in the Spark cluster. Given that these servers are also the members of the CDH cluster, and have password-less SSH access set up, I can use the scp command to release the built software. The following commands show the spark directory under the /home/hadoop/spark path being packaged into a tar file called spark_bld.tar. The Linux scp command is then used to copy the tar file to each slave server; the following example shows hc2r1m1:
[hadoop@hc2nn spark]$ cd /home/hadoop/spark
[hadoop@hc2nn spark]$ tar cvf spark_bld.tar spark
[hadoop@hc2nn spark]$ scp ./spark_bld.tar hadoop@hc2r1m1:/home/hadoop/spark/spark_bld.tar
Now that the tarred Spark build is on the slave node, it needs to be unpacked. The following command shows the process for the server hc2r1m1. The tar file is unpacked to the same directory as the build server hc2nn, that is, /home/hadoop/spark:
[hadoop@hc2r1m1 ~]$ mkdir spark ; mv spark_bld.tar spark
[hadoop@hc2r1m1 ~]$ cd spark ; ls
spark_bld.tar
[hadoop@hc2r1m1 spark]$ tar xvf spark_bld.tar
Once the build has been run successfully, and the built code has been released to the slave servers, the built version of Spark can be started from the master server hc2nn. Note that I have chosen different port numbers from the Spark version 1.0, installed on these servers. Also note that I will start Spark as root, because the Spark 1.0 install is managed as Linux services under the root account. As the two installs will share facilities like logging and .pid file locations, root user will ensure access. This is the script that I have used to start Apache Spark 1.3:
cd /home/hadoop/spark/spark/conf ;  . ./spark-env.sh ; cd ../sbin
echo "hc2nn - start master server"
./start-master.sh
echo "sleep 5000 ms"
sleep 5
echo "hc2nn - start history server"
./start-history-server.sh
echo "Start Spark slaves workers"
./start-slaves.sh
It executes the
spark-env.sh file to set up the environment, and then uses the scripts in the Spark sbin directory to start the services. It starts the master and the history server first on hc2nn, and then it starts the slaves. I added a delay before starting the slaves, as I found that they were trying to connect to the master before it was ready. The Spark 1.3 web user interface can now be accessed via this URL:
http://hc2nn.semtech-solutions.co.nz:19080/
The Spark URL, which allows applications to connect to Spark is this:
Spark Master at spark://hc2nn.semtech-solutions.co.nz:8077
As defined by the port numbers in the spark environment configuration file, Spark is now available to be used with ANN functionality. The next section will present the ANN Scala scripts and data to show how this Spark-based functionality can be used.
In order to begin ANN training, test data is needed. Given that this type of classification method is supposed to be good at classifying distorted or noisy images, I have decided to attempt to classify the images here:

They are hand-crafted text files that contain shaped blocks, created from the characters 1 and 0. When they are stored on HDFS, the carriage return characters are removed, so that the image is presented as a single line vector. So, the ANN will be classifying a series of shape images, and then it will be tested against the same images with noise added to determine whether the classification will still work. There are six training images, and they will each be given an arbitrary training label from 0.1 to 0.6. So, if the ANN is presented with a closed square, it should return a label of 0.1. The following image shows an example of a testing image with noise added. The noise, created by adding extra zero (0) characters within the image, has been highlighted:

Because the Apache Spark server has changed from the previous examples, and the Spark library locations have also changed, the sbt configuration file used for compiling the example ANN Scala code must also be changed. As before, the ANN code is being developed using the Linux hadoop account in a subdirectory called spark/ann. The ann.sbt file exists within the ann directory:
 [hadoop@hc2nn ann]$ pwd
/home/hadoop/spark/ann

 [hadoop@hc2nn ann]$ ls
ann.sbt    project  src  target
The contents of the ann.sbt file have been changed to use full paths of JAR library files for the Spark dependencies. This is because the new Apache Spark code for build 1.3 now resides under /home/hadoop/spark/spark. Also, the project name has been changed to A N N:
name := "A N N"
version := "1.0"
scalaVersion := "2.10.4"
libraryDependencies += "org.apache.hadoop" % "hadoop-client" % "2.3.0"
libraryDependencies += "org.apache.spark" % "spark-core"  % "1.3.0" from "file:///home/hadoop/spark/spark/core/target/spark-core_2.10-1.3.0-SNAPSHOT.jar"
libraryDependencies += "org.apache.spark" % "spark-mllib" % "1.3.0" from "file:///home/hadoop/spark/spark/mllib/target/spark-mllib_2.10-1.3.0-SNAPSHOT.jar"
libraryDependencies += "org.apache.spark" % "akka" % "1.3.0" from "file:///home/hadoop/spark/spark/assembly/target/scala-2.10/spark-assembly-1.3.0-SNAPSHOT-hadoop2.3.0-cdh5.1.2.jar"
As in the previous examples, the actual Scala code to be compiled exists in a subdirectory named src/main/scala as shown next. I have created two Scala programs. The first trains using the input data, and then tests the ANN model with the same input data. The second tests the trained model with noisy data, to the test distorted data classification:
[hadoop@hc2nn scala]$ pwd
/home/hadoop/spark/ann/src/main/scala

[hadoop@hc2nn scala]$ ls
test_ann1.scala  test_ann2.scala
I will examine the first Scala file entirely, and then I will just show the extra features of the second file, as the two examples are very similar up to the point of training the ANN. The code examples shown here can be found in the software package provided with this book, under the path chapter2ANN. So, to examine the first Scala example, the import statements are similar to the previous examples. The Spark context, configuration, vectors, and LabeledPoint are being imported. The RDD class for RDD processing is being imported this time, along with the new ANN class ANNClassifier. Note that the MLlib/classification routines widely use the LabeledPoint structure for input data, which will contain the features and labels that are supposed to be trained against:
import org.apache.spark.SparkContext
import org.apache.spark.SparkContext._
import org.apache.spark.SparkConf

import org.apache.spark.mllib.classification.ANNClassifier
import org.apache.spark.mllib.regression.LabeledPoint
import org.apache.spark.mllib.linalg.Vectors
import org.apache.spark.mllib.linalg._
import org.apache.spark.rdd.RDD


object testann1 extends App
{
The application class in this example has been called testann1. The HDFS files to be processed have been defined in terms of the HDFS server, path, and file name:
  val server = "hdfs://hc2nn.semtech-solutions.co.nz:8020"
  val path   = "/data/spark/ann/"

  val data1 = server + path + "close_square.img"
  val data2 = server + path + "close_triangle.img"
  val data3 = server + path + "lines.img"
  val data4 = server + path + "open_square.img"
  val data5 = server + path + "open_triangle.img"
  val data6 = server + path + "plus.img"
The Spark context has been created with the URL for the Spark instance, which now has a different port number—8077. The application name is ANN 1. This will appear on the Spark web UI when the application is run:
  val sparkMaster = "spark://hc2nn.semtech-solutions.co.nz:8077"
  val appName = "ANN 1"
  val conf = new SparkConf()

  conf.setMaster(sparkMaster)
  conf.setAppName(appName)

  val sparkCxt = new SparkContext(conf)
The HDFS-based input training and test data files are loaded. The values on each line are split by space characters, and the numeric values have been converted into Doubles. The variables that contain this data are then stored in an array called inputs. At the same time, an array called outputs is created, containing the labels from 0.1 to 0.6. These values will be used to classify the input patterns:
  val rData1 = sparkCxt.textFile(data1).map(_.split(" ").map(_.toDouble)).collect
  val rData2 = sparkCxt.textFile(data2).map(_.split(" ").map(_.toDouble)).collect
  val rData3 = sparkCxt.textFile(data3).map(_.split(" ").map(_.toDouble)).collect
  val rData4 = sparkCxt.textFile(data4).map(_.split(" ").map(_.toDouble)).collect
  val rData5 = sparkCxt.textFile(data5).map(_.split(" ").map(_.toDouble)).collect
  val rData6 = sparkCxt.textFile(data6).map(_.split(" ").map(_.toDouble)).collect

  val inputs = Array[Array[Double]] (
     rData1(0), rData2(0), rData3(0), rData4(0), rData5(0), rData6(0) )

  val outputs = Array[Double]( 0.1, 0.2, 0.3, 0.4, 0.5, 0.6 )
The input and output data, representing the input data features and labels, are then combined and converted into a LabeledPoint structure. Finally, the data is parallelized in order to partition it for the optimal parallel processing:
  val ioData = inputs.zip( outputs )
  val lpData = ioData.map{ case(features,label) =>

    LabeledPoint( label, Vectors.dense(features) )
  }
  val rddData = sparkCxt.parallelize( lpData )
Variables are created to define the hidden layer topology of the ANN. In this case, I have chosen to have two hidden layers, each with 100 neurons. The maximum numbers of iterations are defined, as well as a batch size (six patterns) and convergence tolerance. The tolerance refers to how big the training error can get before we can consider training to have worked. Then, an ANN model is created using these configuration parameters and the input data:
  val hiddenTopology : Array[Int] = Array( 100, 100 )
  val maxNumIterations = 1000
  val convTolerance    = 1e-4
  val batchSize        = 6

  val annModel = ANNClassifier.train(rddData,
                                     batchSize,
                                     hiddenTopology,
                                     maxNumIterations,
                                     convTolerance)
In order to test the trained ANN model, the same input training data is used as testing data used to obtain prediction labels. First, an input data variable is created called rPredictData. Then, the data is partitioned and finally, the predictions are obtained using the trained ANN model. For this model to work, it must output the labels 0.1 to 0.6:
  val rPredictData = inputs.map{ case(features) =>

    ( Vectors.dense(features) )
  }
  val rddPredictData = sparkCxt.parallelize( rPredictData )
  val predictions = annModel.predict( rddPredictData )
The label predictions are printed, and the script closes with a closing bracket:
  predictions.toArray().foreach( value => println( "prediction > " + value ) )
} // end ann1
So, in order to run this code sample, it must first be compiled and packaged. By now, you must be familiar with the sbt command, executed from the ann sub directory:
[hadoop@hc2nn ann]$ pwd
/home/hadoop/spark/ann
[hadoop@hc2nn ann]$ sbt package
The spark-submit command is then used from within the new spark/spark path using the new Spark-based URL at port 8077 to run the application testann1:
/home/hadoop/spark/spark/bin/spark-submit
  --class testann1
  --master spark://hc2nn.semtech-solutions.co.nz:8077
  --executor-memory 700M
  --total-executor-cores 100
  /home/hadoop/spark/ann/target/scala-2.10/a-n-n_2.10-1.0.jar
By checking the Apache Spark web URL at http://hc2nn.semtech-solutions.co.nz:19080/, it is now possible to see the application running. The following figure shows the application ANN 1 running, as well as the previous completed executions:

By selecting one of the cluster host worker instances, it is possible to see a list of executors that actually carry out cluster processing for that worker:

Finally, by selecting one of the executors, it is possible to see its history and configuration, as well as the links to the log file, and error information. At this level, with the log information provided, debugging is possible. These log files can be checked for processing error messages.

The ANN 1 application provides the following output to show that it has reclassified the same input data correctly. The reclassification has been successful, as each of the input patterns has been given the same label as it was trained with:
prediction > 0.1
prediction > 0.2
prediction > 0.3
prediction > 0.4
prediction > 0.5
prediction > 0.6
So, this shows that ANN training and test prediction will work with the same data. Now, I will train with the same data, but test with distorted or noisy data, an example of which I already demonstrated. This example can be found in the file called test_ann2.scala, in your software package. It is very similar to the first example, so I will just demonstrate the changed code. The application is now called testann2:
object testann2 extends App
An extra set of testing data is created, after the ANN model has been created using the training data. This testing data contains noise:
  val tData1 = server + path + "close_square_test.img"
  val tData2 = server + path + "close_triangle_test.img"
  val tData3 = server + path + "lines_test.img"
  val tData4 = server + path + "open_square_test.img"
  val tData5 = server + path + "open_triangle_test.img"
  val tData6 = server + path + "plus_test.img"
This data is processed into input arrays, and is partitioned for cluster processing:
  val rtData1 = sparkCxt.textFile(tData1).map(_.split(" ").map(_.toDouble)).collect
  val rtData2 = sparkCxt.textFile(tData2).map(_.split(" ").map(_.toDouble)).collect
  val rtData3 = sparkCxt.textFile(tData3).map(_.split(" ").map(_.toDouble)).collect
  val rtData4 = sparkCxt.textFile(tData4).map(_.split(" ").map(_.toDouble)).collect
  val rtData5 = sparkCxt.textFile(tData5).map(_.split(" ").map(_.toDouble)).collect
  val rtData6 = sparkCxt.textFile(tData6).map(_.split(" ").map(_.toDouble)).collect

  val tInputs = Array[Array[Double]] (
     rtData1(0), rtData2(0), rtData3(0), rtData4(0), rtData5(0), rtData6(0) )

  val rTestPredictData = tInputs.map{ case(features) => ( Vectors.dense(features) ) }
  val rddTestPredictData = sparkCxt.parallelize( rTestPredictData )
It is then used to generate label predictions in the same way as the first example. If the model classifies the data correctly, then the same label values should be printed from 0.1 to 0.6:
  val testPredictions = annModel.predict( rddTestPredictData )
  testPredictions.toArray().foreach( value => println( "test prediction > " + value ) )
The code has already been compiled, so it can be run using the spark-submit command:
/home/hadoop/spark/spark/bin/spark-submit
  --class testann2
  --master spark://hc2nn.semtech-solutions.co.nz:8077
  --executor-memory 700M
  --total-executor-cores 100
  /home/hadoop/spark/ann/target/scala-2.10/a-n-n_2.10-1.0.jar
Here is the cluster output from this script, which shows a successful classification using a trained ANN model, and some noisy test data. The noisy data has been classified correctly. For instance, if the trained model had become confused, it might have given a value of 0.15 for the noisy close_square_test.img test image in position one, instead of returning 0.1 as it did:
test prediction > 0.1
test prediction > 0.2
test prediction > 0.3
test prediction > 0.4
test prediction > 0.5
test prediction > 0.6