
So far in this chapter, Titan 0.9.0-M2 has been installed, and the graphs have successfully been created using both HBase and Cassandra as backend storage options. These graphs have been created using Gremlin-based scripts. In this section, a properties file will be used via a Gremlin script to process a Titan-based graph using Apache Spark. The same two backend storage options, HBase and Cassandra, will be used with Titan.
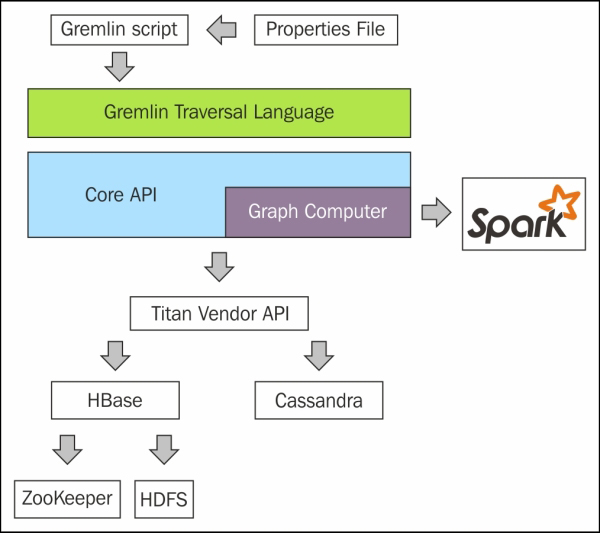
The following figure, based on the TinkerPop3 diagram earlier in this chapter, shows the architecture used in this section. I have simplified the diagram, but it is basically the same as the previous TinkerPop version. I have just added the link to Apache Spark via the Graph Computer API. I have also added both HBase and Cassandra storage via the Titan vendor API. Of course, a distributed installation of HBase uses both Zookeeper for configuration, and HDFS for storage.
Titan uses TinkerPop's Hadoop-Gremlin package for graph processing OLAP processes. The link to the documentation section can be found at: http://s3.thinkaurelius.com/docs/titan/0.9.0-M2/titan-hadoop-tp3.html.
This section will show how the Bash shell, Groovy, and properties files can be used to configure, and run a Titan Spark-based job. It will show different methods for configuring the job, and it will also show methods for managing logging to enable error tracking. Also, different configurations of the property file will be described to give access to HBase, Cassandra, and the Linux file system.
Remember that the Titan release 0.9.0-M2, that this chapter is based on, is a development release. It is a prototype release, and is not yet ready for production. I assume that as the future Titan releases become available, the link between Titan and Spark will be more developed and stable. Currently, the work in this section is for demonstration purposes only, given the nature of the Titan release.
In the next section, I will explain the use of Gremlin, and Groovy scripts before moving onto connecting Titan to Spark using Cassandra and HBase as storage options.
The Gremlin shell, which is used to execute Groovy commands against Titan, can be used in a number of ways. The first method of use just involves starting a Gremlin shell for use as an interactive session. Just execute the following:
cd $TITAN_HOME/bin ; ./ gremlin.sh
This starts the session, and automatically sets up required plug-ins such as TinkerPop and Titan (see next). Obviously, the previous TITAN_HOME variable is used to indicate that the bin directory in question is located within your Titan install (TITAN_HOME) directory:
plugin activated: tinkerpop.server
plugin activated: tinkerpop.utilities
plugin activated: tinkerpop.hadoop
plugin activated: tinkerpop.tinkergraph
plugin activated: aurelius.titan
It then provides you with a Gremlin shell prompt where you can interactively execute your shell commands against your Titan database. This shell is useful for testing scripts and running ad hoc commands against your Titan database.
gremlin>
A second method is to embed your Groovy commands inline in a script when you call the gremlin.sh command. In this example, the Groovy commands between the EOF markers are piped into the Gremlin shell. When the last Groovy command has executed, the Gremlin shell will terminate. This is useful when you still want to use the automated environment setup of the Gremlin shell, but you still want to be able to quickly re-execute a script. This code snippet has been executed from a Bash shell script, as can be seen in the next example. The following script uses the titan.sh script to manage the Gremlin server:
#!/bin/bash

TITAN_HOME=/usr/local/titan/

cd $TITAN_HOME

bin/titan.sh start

bin/gremlin.sh   <<  EOF

  t = TitanFactory.open('cassandra.properties')
  GraphOfTheGodsFactory.load(t)
  t.close()
EOF

bin/titan.sh stop
A third method involves moving the Groovy commands into a separate Groovy file, and using the –e option with the Gremlin shell to execute the file. This method offers extra logging options for error tracking, but means that extra steps need to be taken when setting up the Gremlin environment for a Groovy script:
#!/bin/bash

TITAN_HOME=/usr/local/titan/
SCRIPTS_HOME=/home/hadoop/spark/gremlin
GREMLIN_LOG_FILE=$TITAN_HOME/log/gremlin_console.log

GROOVY_SCRIPT=$1

export GREMLIN_LOG_LEVEL="DEBUG"

cd $TITAN_HOME

bin/titan.sh start

bin/gremlin.sh -e  $SCRIPTS_HOME/$GROOVY_SCRIPT  > $GREMLIN_LOG_FILE 2>&1

bin/titan.sh stop
So, this script defines a Gremlin log level, which can be set to different logging levels to obtain extra information about a problem, that is, INFO, WARN, and DEBUG. It also redirects the script output to a log file (GREMLIN_LOG_FILE), and redirects errors to the same log file (2>&1). This has the benefit of allowing the log file to be continuously monitored, and provides a permanent record of the session. The Groovy script name that is to be executed is then passed to the encasing Bash shell script as a parameter ($1).
As I already mentioned, the Groovy scripts invoked in this way need extra environment configuration to set up the Gremlin session when compared to the previous Gremlin session options. For instance, it is necessary to import the necessary TinkerPop and Aurelius classes that will be used:
import com.thinkaurelius.titan.core.*
import com.thinkaurelius.titan.core.titan.*
import org.apache.tinkerpop.gremlin.*
Having described the script and configuration options necessary to start a Gremlin shell session, and run a Groovy script, from this point onwards I will concentrate on Groovy scripts, and the property files necessary to configure the Gremlin session.
As already mentioned previously in this section, it is the TinkerPop Hadoop Gremlin package within Titan that will be used to call Apache Spark as a processing engine (Hadoop Giraph can be used for processing as well). The link available at http://s3.thinkaurelius.com/docs/titan/0.9.0-M2/titan-hadoop-tp3.html provides documentation for Hadoop Gremlin; remember that this TinkerPop package is still being developed and is subject to change.
At this point, I will examine a properties file that can be used to connect to Cassandra as a storage backend for Titan. It contains sections for Cassandra, Apache Spark, and the Hadoop Gremlin configuration. My Cassandra properties file is called cassandra.properties, and it looks like this (lines beginning with a hash character (#) are comments):
####################################
# Storage details
####################################
storage.backend=cassandra
storage.hostname=hc2r1m2
storage.port=9160
storage.cassandra.keyspace=dead
cassandra.input.partitioner.class=org.apache.cassandra.dht.Murmur3Partitioner
The previous Cassandra-based properties describe the Cassandra host and port. This is why the storage backend type is Cassandra, the Cassandra keyspace that is to be used is called dead (short for grateful dead—the data that will be used in this example). Remember that the Cassandra tables are grouped within keyspaces. The previous partitioner class defines the Cassandra class that will be used to partition the Cassandra data. The Apache Spark configuration section contains the master URL, executor memory, and the data serializer class that is to be used:
####################################
# Spark
####################################
spark.master=spark://hc2nn.semtech-solutions.co.nz:6077
spark.executor.memory=400M
spark.serializer=org.apache.spark.serializer.KryoSerializer
Finally, the Hadoop Gremlin section of the properties file, which defines the classes to be used for graph and non-graph input and output is shown here. It also defines the data input and output locations, as well as the flags for caching JAR files, and deriving memory:
####################################
# Hadoop Gremlin
####################################
gremlin.graph=org.apache.tinkerpop.gremlin.hadoop.structure.HadoopGraph
gremlin.hadoop.graphInputFormat=com.thinkaurelius.titan.hadoop.formats.cassandra.CassandraInputFormat
gremlin.hadoop.graphOutputFormat=org.apache.tinkerpop.gremlin.hadoop.structure.io.gryo.GryoOutputFormat
gremlin.hadoop.memoryOutputFormat=org.apache.hadoop.mapreduce.lib.output.SequenceFileOutputFormat

gremlin.hadoop.deriveMemory=false
gremlin.hadoop.jarsInDistributedCache=true
gremlin.hadoop.inputLocation=none
gremlin.hadoop.outputLocation=output
Blueprints is the TinkerPop property graph model interface. Titan releases it's own implementation of blueprints, so instead of seeing blueprints.graph in the preceding properties, you see gremlin.graph. This defines the class, used to define the graph that is supposed to be used. If this option were omitted, then the graph type would default to the following:
com.thinkaurelius.titan.core.TitanFactory
The CassandraInputFormat class defines that the data is being retrieved from the Cassandra database. The graph output serialization class is defined to be GryoOutputFormat. The memory output format class is defined to use the Hadoop Map Reduce class SequenceFileOutputFormat.
The jarsInDistributedCache value has been defined to be true so that the JAR files are copied to the memory, enabling Apache Spark to source them. Given more time, I would investigate ways to make the Titan classes visible to Spark, on the class path, to avoid excessive memory usage.
Given that the TinkerPop Hadoop Gremlin module is only available as a development prototype release, currently the documentation is minimal. There are very limited coding examples, and there does not seem to be documentation available describing each of the previous properties.
Before I delve into the examples of Groovy scripts, I thought that I would show you an alternative method for configuring your Groovy jobs using a configuration object.
A configuration object can be created using the BaseConfiguration method. In this example, I have created a Cassandra configuration called cassConf:
cassConf = new BaseConfiguration();

cassConf.setProperty("storage.backend","cassandra");
cassConf.setProperty("storage.hostname","hc2r1m2");
cassConf.setProperty("storage.port","9160")
cassConf.setProperty("storage.cassandra.keyspace","titan")

titanGraph = TitanFactory.open(cassConf);
The setProperty method is then used to define Cassandra connection properties, such as backend type, host, port, and keyspace. Finally, a Titan graph is created called titanGraph using the open method. As will be shown later, a Titan graph can be created using a configuration object or a path to a properties file. The properties that have been set match those that were defined in the Cassandra properties file described previously.
The next few sections will show how graphs can be created, and traversed. They will show how Cassandra, HBase, and the file system can be used for storage. Given that I have gone to such lengths to describe the Bash scripts, and the properties files, I will just describe those properties that need to be changed in each instance. I will also provide simple Groovy script snippets in each instance.
The Cassandra-based properties file called cassandra.properties has already been described, so I will not repeat the details here. This example Groovy script creates a sample graph, and stores it in Cassandra. It has been executed using the
end of file markers (EOF) to pipe the script to the Gremlin shell:
t1 = TitanFactory.open('/home/hadoop/spark/gremlin/cassandra.properties')
GraphOfTheGodsFactory.load(t1)

t1.traversal().V().count()

t1.traversal().V().valueMap()

t1.close()
A Titan graph has been created using the TitanFactory.open method and the Cassandra properties file. It is called t1. The graph of the Gods, an example graph provided with Titan, has been loaded into the graph t1 using the method GraphOfTheGodsFactory.load. A count of vertices (V()) has then been generated along with a ValueMap to display the contents of the graph. The output looks like this:
==>12

==>[name:[jupiter], age:[5000]]
==>[name:[hydra]]
==>[name:[nemean]]
==>[name:[tartarus]]
==>[name:[saturn], age:[10000]]
==>[name:[sky]]
==>[name:[pluto], age:[4000]]
==>[name:[alcmene], age:[45]]
==>[name:[hercules], age:[30]]
==>[name:[sea]]
==>[name:[cerberus]]
==>[name:[neptune], age:[4500]]
So, there are 12 vertices in the graph, each has a name and age element shown in the previous data. Having successfully created a graph, it is now possible to configure the previous graph traversal Gremlin command to use Apache Spark for processing. This is simply achieved by specifying the SparkGraphComputer in the traversal command. See the full TinkerPop diagram at the top of this chapter for architectural details. When this command is executed, you will see the task appear on the Spark cluster user interface:
t1.traversal(computer(SparkGraphComputer)).V().count()
When using HBase, the properties file needs to change. The following values have been taken from my hbase.properties file:
gremlin.hadoop.graphInputFormat=com.thinkaurelius.titan.hadoop.formats.hbase.HBaseInputFormat

input.conf.storage.backend=hbase
input.conf.storage.hostname=hc2r1m2
input.conf.storage.port=2181
input.conf.storage.hbase.table=titan
input.conf.storage.hbase.ext.zookeeper.znode.parent=/hbase
Remember that HBase uses Zookeeper for configuration purposes. So, the port number, and server for connection now becomes a zookeeper server, and zookeeper master port 2181. The znode parent value in Zookeeper is also defined as the top level node /hbase. Of course, the backend type is now defined to be hbase.
Also, the GraphInputFormat class has been changed to HBaseInputFormat to describe HBase as an input source. A Titan graph can now be created using this properties file, as shown in the last section. I won't repeat the graph creation here, as it will be the same as the last section. Next, I will move on to filesystem storage.
In order to run this example, I used a basic Gremlin shell (bin/gremlin.sh). Within the data directory of the Titan release, there are many example data file formats that can be loaded to create graphs. In this example, I will use the file called grateful-dead.kryo. So this time, the data will be loaded straight from the file to a graph without specifying a storage backend, such as Cassandra. The properties file that I will use only contains the following entries:
gremlin.graph=org.apache.tinkerpop.gremlin.hadoop.structure.HadoopGraph
gremlin.hadoop.graphInputFormat=org.apache.tinkerpop.gremlin.hadoop.structure.io.gryo.GryoInputFormat
gremlin.hadoop.graphOutputFormat=org.apache.tinkerpop.gremlin.hadoop.structure.io.gryo.GryoOutputFormat
gremlin.hadoop.jarsInDistributedCache=true
gremlin.hadoop.deriveMemory=true

gremlin.hadoop.inputLocation=/usr/local/titan/data/grateful-dead.kryo
gremlin.hadoop.outputLocation=output
Again, it uses the Hadoop Gremlin package but this time the graph input and output formats are defined as GryoInputFormat and GryoOutputFormat. The input location is specified to be the actual kyro-based file. So, the source for input and output is the file. So now, the Groovy script looks like this. First, the graph is created using the properties file. Then, a graph traversal is created, so that we can count vertices and see the structure:
graph = GraphFactory.open('/home/hadoop/spark/gremlin/hadoop-gryo.properties')
g1 = graph.traversal()
Next, a vertex count is executed, which shows that there are over 800 vertices; and finally, a value map shows the structure of the data, which I have obviously clipped to save the space. But you can see the song name, type, and the performance details:
g1.V().count()
==>808
g1.V().valueMap()
==>[name:[MIGHT AS WELL], songType:[original], performances:[111]]
==>[name:[BROWN EYED WOMEN], songType:[original], performances:[347]]
This gives you a basic idea of the available functionality. I am sure that if you search the web, you will find more complex ways of using Spark with Titan. Take this for example:
r = graph.compute(SparkGraphComputer.class).program(PageRankVertexProgram.build().create()).submit().get()
The previous example specifies the use of the SparkGraphComputer class using the compute method. It also shows how the page rank vertex program, supplied with Titan, can be executed using the program method. This would modify your graph by adding page ranks to each vertex. I provide this as an example, as I am not convinced that it will work with Spark at this time.