
The Databricks Tables menu option allows you store your data in a tabular form with an associated schema. The Tables menu option allows you to both create a table, and refresh your tables list, as the following screenshot shows:

You can create tables via data import, and specify the table structure, at the same time, in terms of column names and types. If the data that is being imported has a header, then the column names can be taken from that, although all the column types are assumed to be strings. The following screenshot shows a concatenated view of the data import options and form, available when creating a table. The import file location options are S3, DBFS, JDBC, and File.

The previous screenshot shows S3 selected. In order to browse my S3 bucket for a file to import to a table, I will need to enter the AWS Key ID, the Secret Access Key, and the AWS S3 Bucket Name. Then, I could browse, select the file, and create a table via preview. In the following screenshot, I have selected the File option:

I can either drop my file to import into the upload frame in the following screenshot, or click on the frame to browse the local server to select a file to upload. Once a file is selected, it is then possible to define the data column delimiter, and whether the data contains a header row. It is possible to preview the data, and change the column names and data types. It is also possible to specify the new table name, and the file type. The following screenshot shows a sample file data load to create the table called shuttle:

Once created, the menu table list can be refreshed and the table schema viewed to confirm the column names and types. In this way, a sample of the table data can also be previewed. The table can now be viewed and accessed from an SQL session. The following screenshot shows that the shuttle table is visible using the show tables command:

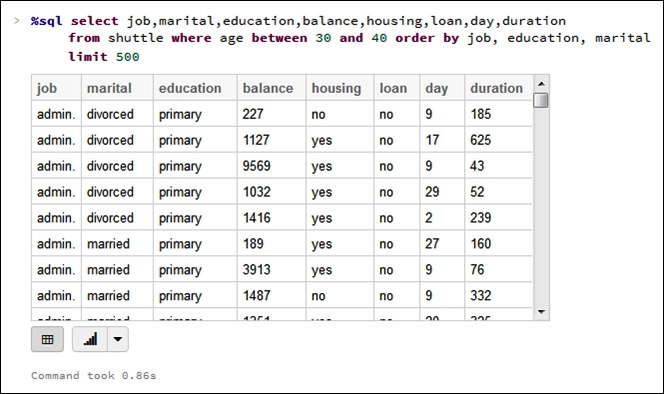
Once imported, the data in this table can also be accessed via an SQL session. The following screenshot shows a simple SQL session statement to show the data extracted from the new shuttle table:
So, this provides the means to import multiple tables from a variety of data sources, and create a complex schema in order to filter and join the data by columns and rows, just as you would in a traditional, relational database. It provides a familiar approach to big data processing.
This section has described the process by which tables can be created via data import, but what about creating tables programmatically, or creating tables as external objects? The following sections will provide examples of this approach to table management.
Databricks allows you to create tables against external resources, such as AWS S3 files, or local file system files. In this section, I will create an external table against an S3-based bucket, path, and a set of files. I will also examine both the permissions required in AWS and the access policy used. The following screenshot shows an AWS S3 bucket called dbawss3test2 being created. Permissions have been granted to everyone to access the list. I am not suggesting that you do this, but ensure that your group can access your bucket.

Also, a policy has been added to aid access. In this case, anonymous users have been granted read-only access to the bucket and sub contents. You can create a more complex policy to limit the access to your group and assorted files. The following screenshot shows the new policy:

With an access policy, and a bucket created with the correct access policy, I can now create folders and upload files for use with a Databricks external table. As the following screenshot shows, I have done just that. The uploaded file has ten columns in CSV file format:

Now that the AWS S3 resources have been set up, they need to be mounted to Databricks, as the Scala-based example shows next. I have removed my AWS and secret keys from the script for security purposes. Your mounted directory will need to start with /mnt and any of the / characters, and your secret key value will need to be replaced with %2F. The dbutils.fs class is being used to create the mount and the code executes within a second, as the following result shows:

Now, an external table can be created against this mounted path and the files that it contains using a Notebook-based SQL session, as the following screenshot shows. The table called s3test1 has been created against the files that the mounted directory contains, and a delimiter is specified as a comma, in order to parse the CSV-based content.

The Tables menu option now shows that the s3test1 table exists, as shown in the following screenshot. So, it should be possible to run some SQL against this table:

I have run a SELECT statement in an SQL-based Notebook session to get a row count from the external table, using the COUNT(*) function, as shown in the following screenshot. It can be see that the table contains 14500 rows.

I will now add another file to the S3-based folder. In this case, it is just a copy of the first file in CSV format, so the row count in the external table should double. The following screenshot shows the file that is added:

Running the same SELECT statement against the external table does indeed provide a doubled row count of 29000 rows. The following screenshot shows the SQL statement, and the output:

So, it is easily possible to create external tables within Databricks, and run SQL against content that is dynamically changed. The file structure will need to be uniform, and the S3 bucket access must be defined if using AWS. The next section will examine the DbUtils package provided with Databricks.