
If your object still can't fit in a box or a circle subshape, you can specify array points to create a body with an abnormal shape.
For this section, you will require the candyStick.png file from the resource and need to download the vertexHelper source file from GitHub.
While creating complex shapes, it is necessary to get the vertices of the shape of the object that you want to create. You can get this by importing the image into Photoshop or Paint and manually getting the individual points, which is the hard way of doing it. The easy way is to use the vertex helper app, in which you can just import the image and click on the points where you want the vertices, and it will generate the coordinates for you that can be easily imported into Chipmunk for use.
The link for vertexHelper is https://github.com/jfahrenkrug/VertexHelper. Click on the download link and extract it.
Double-click on the Xcode project and run the application. Drag and drop the HD version of the candyStick.png file into the center of the screen.
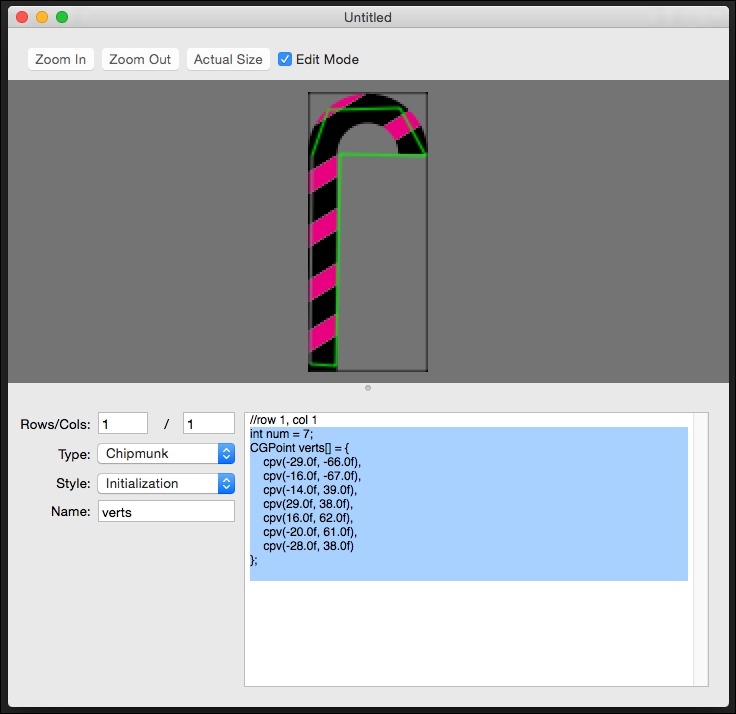
To get the points under Type, select Chipmunk, and under Style, select Initialization.
Take a look at EditMode at the top of the window. Now, from the lower-left corner, start creating points in an anticlockwise manner. Every time you click, a new point will be created.
Note that there is no undo or redo feature. You will have to close the application and start over if you are not satisfied with the result. As it is a simple shape, there shouldn't be any problems. There is also a pro version of the application available that you can download from the Mac App Store. For the undo and redo feature, the app needs to be purchased from the App Store.
I created seven points. The point locations are populated in the application, as shown in the lower part of the preceding image. Copy this information as we will need it later.
In the MainMenu.m file, we will add a new function to spawn the candy stick, as follows:
-(void)spawnCandy{

  CCSprite *candySprite = [CCSprite spriteWithImageNamed:@"candyStick.png"];

  float xOffset = candySprite.contentSize.width/2;
  float yOffset = candySprite.contentSize.height/2;

  float PTMratio = 4.0f;

  int num = 7;
  CGPoint verts[] = {
    ccp(-29.0f/PTMratio + xOffset, -66.0f/PTMratio + yOffset),
    ccp(-16.0f/PTMratio + xOffset, -67.0f/PTMratio + yOffset),
    ccp(-14.0f/PTMratio + xOffset, 39.0f/PTMratio + yOffset),
    ccp(29.0f/PTMratio + xOffset, 38.0f/PTMratio + yOffset),
    ccp(16.0f/PTMratio + xOffset, 62.0f/PTMratio + yOffset),
    ccp(-20.0f/PTMratio + xOffset, 61.0f/PTMratio + yOffset),
    ccp(-28.0f/PTMratio + xOffset, 38.0f/PTMratio + yOffset)
  };

  CCPhysicsBody *body = [CCPhysicsBody bodyWithPolygonFromPoints:verts count:num cornerRadius:0];

  body.type = CCPhysicsBodyTypeDynamic;

  candySprite.physicsBody = body;
  candySprite.position = ccp(winSize.width * 0.5f,  winSize.height * 0.7f);

  [_physicsWorld addChild:candySprite];
}
Most of the code is as usual. We created a sprite with the candyStick.png image.
While creating bodies with polyline, the lower-left corner of the image is taken as the anchor point, so we have to move each point according to the center of the image. Therefore, we will get half the width and half the height of the image content's size.
We also need a conversion factor to divide the coordinates by since the physics object is measured in meters and not pixels. So, we need a pixel-to-meter converter. So, I created a new float called PTMratio and set it equal to 4.
We will set it to an appropriate value so that the physics points match the shape of the sprite.
Next, we will paste the information that we generated from the vertex helper. We have to rename CVP as CCP for all the vertices. Also, for each coordinate value, we will divide by PTMratio and add the corresponding adjustment in width or height.
To create the physics body, we will use the bodyWithPolygonWithPoints function and pass in the points array and number of vertices and set the corner radius to 0.
We will then set the body type as dynamic, assign the body object to the physicsBody of the sprite, position it, and add it to the physics world.
Call the spawnCandyStick function in the init function, as follows:
[self spawnOrnament:CGPointMake(winSize.width/2 + winSize.width/16 , winSize.height * 0.9)];

[self spawnBasket];

[self spawnCandy];
Run the application to see it in action.

However, wait a second! Why does the shape look similar to the following image, instead of how we created it?
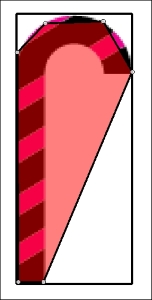
Well, this is plainly because there is a limitation to using polygons. The shape that is created from points needs to be convex. This means that the internal angle between each of the line segments shouldn't be greater than 180 degrees.
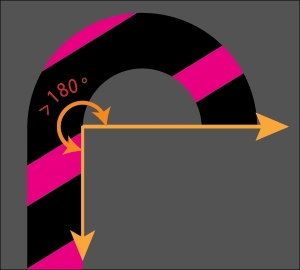
In this case, the third point is skipped, the next point is taken, and the loop is incomplete. Here, we just got lucky; the chances are that sometimes the loop won't be able to complete, or you will get weird shapes.
Later in the book, while looking at tools, we will see how we can overcome this concave shape problem when we look at the physics editor tool.