
Using hierarchies is another way of slicing and dicing our data. This gives us the ability to be able to drill up and drill down into the data at various granularities. We have already seen an example of a default hierarchy in Tableau when we use any Date field.
When we get any Date field in either the Rows or Columns shelf, Tableau automatically aggregates it to the highest possible level. For example, if the date field includes multiple years, the default level is year. But, if the date field contains data for just one year but includes multiple months, then the default level is month.
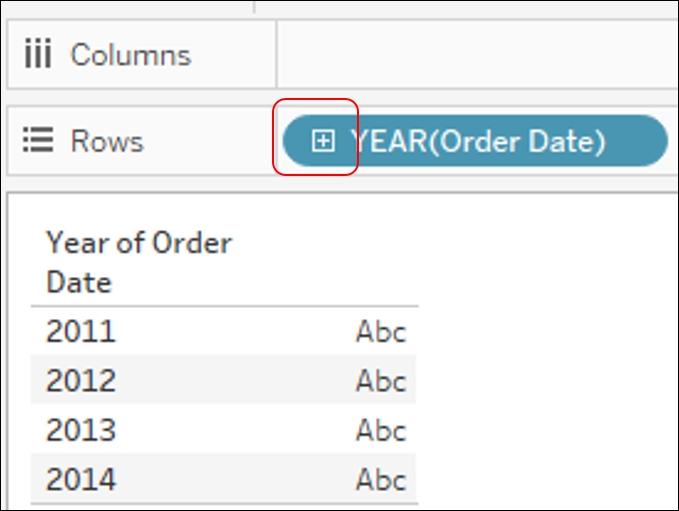
In our data, if we get the Order Date field in the Rows shelf, then Tableau aggregates it at the Year level and gives us a field called YEAR(Order Date). It also gives us the + button (expand button) so that we can easily break down the view by year, quarter, month, and so on. Refer to the following image:
When Tableau identifies a field as a Date or Date/Time field, it creates the Date hierarchy by default. There could, however, be instances when we would want to create some custom hierarchies in Tableau. Let's say we have region, country, state, city, and so on. and we want to create a hierarchy with these fields to quickly drill through each level. In the following recipe, let's look at the steps to create a custom hierarchy in Tableau.
We will continue with the above stated example and create a custom hierarchy. We will use the fields State, City, and Postal Code from our already connected Orders data of the Sample - Superstore.xlsx dataset. We will continue working in our existing workbook. Let us go through the recipe to create a custom hierarchy.
- Create a new sheet by pressing Ctrl + M on our keyboards. Rename this sheet
Custom Hierarchy. - We will then click on the dropdown or right-click on the State field in the Dimensions pane and select the option of Hierarchy | Create Hierarchy…. Refer to the following image:

- Once we do that, we will get an option for defining a Name for our hierarchy. Let us call it Geographic Hierarchy. Once we do that, we will get a new header in the Dimensions pane. Refer to the following image:

- Next, we will right-click on the next field that will follow State in the Hierarchy. This is going to be the City field from the Dimensions pane. When we right-click on the City field, we will get option of Hierarchy | Create Hierarchy… or Hierarchy | Add to Hierarchy. Select the Hierarchy | Add to Hierarchy | Geographic Hierarchy option. Refer to the following image:

- Repeat the process of Add to Hierarchy for Postal Code as well. This is how we create a Custom Hierarchy in Tableau. To use it, we will double-click on the State field from the Dimensions pane. This will automatically fetch the Latitude (generated) and Longitude (generated) fields into the Rows and Columns shelf respectively and also place the State field in the Detail shelf. This creates a geographic map at a State level. Then, we will drag Sales from the Measures pane and drop it into the Size shelf followed by dragging the Region field from the Dimensions pane and dropping it into the Color shelf. Refer to the following image:

- Further, in order to drill down, we will click on the + (expand) button on the Blue pill for State in Detail shelf. To drill up, we will click on the - (collapse) button.
When we click on the + (expand) button on the Blue pill for State in the Rows shelf, we will drill down to the City. Now the Blue pill for State gets a - (collapse) button and the Blue pill for City gets a + button. This will happen for each drill-down level. One very important point to remember when creating hierarchies is to select the Dimensions in the order of how we want the hierarchy to drill down.
Another way to create hierarchies is by selecting multiple dimensions (Ctrl + Select) in the Data window, right-clicking and selecting the Hierarchy | Create Hierarchy…option. However, one may need to rearrange the Dimensions in the hierarchy when using this option. Refer to the following image:
