
The filters that we created in the previous recipe were created on the fly and are not available for later use, meaning each time we want to use the 12 product Sub-Categories that were shown as an output in the previous recipe, we will have to recreate the filters all over again. This becomes cumbersome and it would be great if we could save the output of the filtering conditions and simply drag the new field whenever we need to analyze it rather than repeating all the steps that we followed in the previous recipe. Luckily, we have Sets in Tableau to do this for us.
I like to call Sets as Pre-computed filters which can be used for the creating a sub-set of the data and/or saving the filters for later use.
To create Sets, we will continue working in the same workbook and use the Orders data from the Sample - Superstore.xlsx dataset for the following recipe.
- Let us create a new sheet and rename it to
Sets. - We will then on the dropdown or right-click on the Customer Name field in the Dimensions pane and select the option Create | Set…. Refer to the following image:

- We will then get a new dialog box which looks similar to that of the Filters in the previous recipe. We will switch to the Top tab.
- In the Name input box, let us type Top 5 customers by Sales. This is the name of our Set.
- Next, let us select the By field: option and keep Top in the dropdown.
- Then we will type
5and select the field Sales in the next dropdown and keep the aggregation as Sum. Refer to the following image:
- Once we click on OK, we will see a new pane called Sets just below the Measures pane. This pane basically stores all the Sets that we will create. Currently, we have created only one set which is visible there. Let us drag and drop it into the Rows shelf. This action will result in an output as In and Out. Refer to the following image:

- We will then click on the dropdown arrow of the Blue pill in the Rows shelf and select the Show Members in set option. Refer to the following image:

- Doing this will give us the names of our Top 5 customers by Sales. You'll notice that when we select this option, the set will automatically get placed in the Filter shelf.
- As a next step, let us drag Sales from the Measures pane and drop it into the Columns shelf. Refer to the following image:

As mentioned earlier, Sets are like pre-computed filters. However, we can decide whether we want to use the Set as a Filter or use it for categorizing our data. By default, the Set acts as an In / Out set where it creates two headers: In and Out. These are like True (included in the result) or False (excluded from the result) values where if we put the Customer Name next to the Set in the Rows shelf, it will categorize Customer Name into two groups: customers that are In the Set, that is, customers who are among the Top 5 customers by Sales list, or customers that are Out of the Set, that is, customers who are not among the Top 5 customers by Sales list. Refer to the following image:
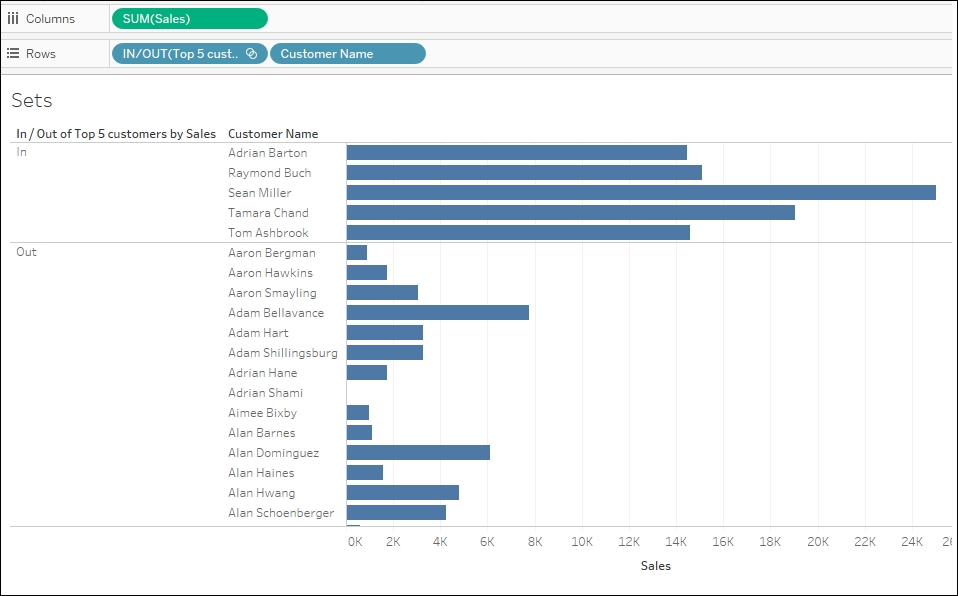
In this case, there is nothing that is getting filtered out. All the customers are shown and they are simply clubbed under either the In or the Out header. However, when use the option as Show Members in set, we are only getting the names of the customers that are part of the Set. The rest of the customers are filtered out.
Further, we can also create two sets and combine them. For example, we can create one set as Top 100 customers by Sales and another set as Bottom 100 customers by Profit. Refer to the following image:

Once we have these two sets, we can Combine them by doing an Ctrl + Select and then right-click to select the option of Create Combined Set…. Refer to the following image:

We will then see a new dialog box that shows the multiple ways in which we can combine our two Sets. Refer to the following image:

The options of combining two sets are as follows:
- All Members in Both Sets: In this case, the combined set will contain all of the members from both sets.
- Shared Members in Both Sets: In this case, the combined set will only contain members that exist in both sets. This is a kind of Intersection of two sets.
- Except Shared Members: In this case, the combined set will contain all members from the specified set that don't exist in the second set. These options are equivalent to subtracting one set from another. For example, if the first set contains Adam, Peter, and Silvia and the second set contains Silvia and Donna, then combining the first set except the shared members would contain just Adam and Peter, as Silvia is removed since she exists in the second set as well.