
Being able to create custom calculations is a very useful functionality of any tool. It gives the user an immense flexibility and power to do a lot of things. However, there are times when we would want to go beyond the calculations that are based on static hard coded conditions. So, for example, in the Logic statement that we saw earlier, we had hard coded the Sales Target value to 100K. Now the problem is that as we continue with our business, the 100K target may soon become redundant and the calculations will soon have to be revisited. Plus, hard coding the Target at the development stage may not be a good idea as the end user may have some different values in mind. In this case, it makes sense to have the option where, the end user can pass certain values at the viewing level.
To address the preceding requirement, we will use the parameter functionality provided by Tableau. Parameters are controls that can be given to the end user to dynamically modify values and/or replace the constant values in calculations. Thus, rather than manually editing the calculation and all its dependent calculations, we can use a parameter, which will ensure that when we select or enter the value in the parameter, all the calculations that are using the parameter will update accordingly.
Now that we have understood what Parameters are, let us explore them in detail and see how we can create and use them.
Let us see how to create and use parameters in the following recipe. We will continue with our existing Sample - Superstore.xlsx data source. Let's get started.
- Let us first create a new sheet and rename it Parameters.
- Let us right click on the Set named Top 5 customers by Sales and select the Duplicate option. We will then right click on the duplicated Set, which is called Top 5 customers by Sales (copy) and select the Edit Set… option. Let us rename the set as High sales customers.
- We will then click on the Top tab and keep most of the things as they are except for the dropdown, which has number 5. Let us click on that dropdown and see what options we get. Refer to the following screenshot:

- When we do that, we get to see two options; one is to Enter a Value…. This obviously will be a hard-coded value and the next is to Create a New Parameter… which is going to be dynamic. So, essentially, if we Enter a value, say 10, then we will get our Top 10 customers by sales, whereas if we create a parameter, then we will be giving the control to the end user to select the number of customers that they want to see. So, let us select the option of Create a New Parameter…. Once we do that, we will get the following view:

- Let's call this Parameter as Count of customers instead of Top 5 customers by Sales (copy) Parameter. Also, let us keep the selections as they are for all except the section called Range of values. Here, let's change the Minimum: from 1 to 5 and Maximum: from 100 to 25. Let's also select the Step size: checkbox and change the values from 1 to 5. Refer to the following screenshot:

- Let's click on OK and our set will look as follows:

- Let's click OK once again and then let's drag and drop this new set in the Rows shelf and we will change it from IN/OUT to Show Members in Set.
- Next, let's add the Sales field in the Columns shelf and our view will be updated, as shown in the following screenshot:

- Notice the slider on the right-hand side of the sheet; this is the Parameter that we have just created. If we change the slider from 5 to 10, our view will update and give us 10 names instead of the 5 names that are currently visible. In other words, it will give us the names of the top 10 customers who are having high sales. Refer to the following screenshot:

- This is how we can create and use a Parameter in the Filters / Sets. Now, as a next step, let's create another Parameter and use it in the Calculated field. For this, let us click on the dropdown of the Dimensions pane and select the option of Create Parameter…. Refer to the following screenshot:

- Once we do that, we will get a view as shown in the following screenshot:

- Let us call this Parameter as Sales Target. Since we want the user to enter integer values as Sales Target, we will change Data Type to Integer. Keeping the rest of the selection as is, we will click OK.
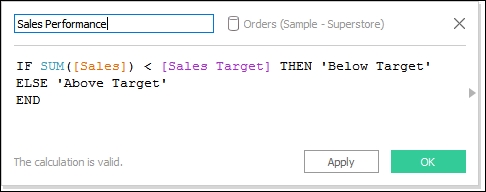
- Next, we will create a new calculated field called Sales Performance, which will be used to highlight the Customers with Sales below the value defined in the Sales Target parameter. Our formula will look as follows:
IF SUM([Sales]) < [Sales Target] THEN 'Below Target'
ELSE 'Above Target'
END
- Refer to the following screenshot:
- Let's fetch this new calculated field and drop it into the Color shelf. Now, when we created the Sales Target Parameter, the Current value: was predefined as 1. This has now become the current Sales Target. Since each and every Customer in the view is having Sales above 1, everything is shown as Above Target.
- This should change based on what we enter in the Sales Target Parameter. However, the problem is that there is no place to enter the value. The Parameter isn't available for us to use yet. In order to make the Parameter visible to the user, we will have to right click on the Parameter in the Parameter pane, which is on the left-hand side bottom corner of the Tableau workspace, just under the Sets pane or Measures pane and select the option to Show Parameter Control. Refer to the following screenshot:

- Once we do that, we will get a Type In box on the right-hand side section of the workspace where we will change the value from 1 to 15,000 and see how that affects our view. Refer to the following screenshot:

In the preceding recipe, Orange indicates Sales below target and blue indicates Sales above target. We also saw two examples of Parameters. Since Parameters are not called from the data source, but instead are created on the fly in Tableau, they don't have any relationship with the data source fields and hence will not affect any field or any view on their own. In order to make them useful, we need to call them in our view. It is of no use to create a Parameter and not call it in our view. In the preceding recipe, we called the Parameter in a Filter or a Set as well as in a Calculated field. We can also call Parameters in Bins to make the bin size flexible as well as in Reference Lines (we will discuss reference lines in future chapters).
There are three types of Parameter controls available in Tableau and these will help us specify how the Parameter can accept values. They are as follows:
- All: Provides a simple type-in field
- List: Provides a list of possible values for us to select from
- Range: Allows us to select values within a specified range
The availability of these Parameter control options is determined by the data type that is specified. For example, an integer parameter can accept All values, or a List, or even a Range, whereas a string parameter can only accept All values or a List, but does not support a Range.
We have already seen the All and Range parameter control in the preceding recipe. When we select the List parameter control as an option, then we must specify the list of values. The left column, which is labeled as Value, is where we type the value and the right column, which is labeled as Display As in the display alias. The display alias shows the values that the end user can see in the Parameter. Refer to the following screenshot:

Now, instead of typing the values and the display alias, we can also copy and paste a list of values by selecting the option of Paste from Clipboard, or we can also add the members of a field as the list of values by selecting the Add from Field option. However, we need to remember that even though we have the option of Add from Field, the Parameter will still be static in nature. This means that the Parameter will not dynamically update itself if a new entry is made in the field that we have used to create the Parameter. As of now, the Parameters are static in nature, and will not update automatically even if the backend data source updates.
As of now, the Parameters are available as a single select option, meaning we cannot select multiple values at a time. We can only have one value at a time. For example, if we want to have a Parameter from which we can enter or select a minimum threshold value and a maximum threshold value, then we will have to create two Parameters, one which will help us enter the minimum value and the other which helps us enter the maximum value.
Parameters can be used in many ways to give us immense flexibility. One interesting way to use Parameters is to swap the dimensions or measures on the fly or change the view on the fly. Refer to the following links to know more: