Marketing administration in Salesforce CRM provides closed-loop marketing automation from within the marketing app that can be accessed from App Menu in the top-right corner of the Salesforce CRM screen.
Marketing administration enables integrated marketing functions such as campaign management, lead management, reporting and analysis, response tracking, and campaign effectiveness, and it allows users from various departments to centrally access marketing activity.
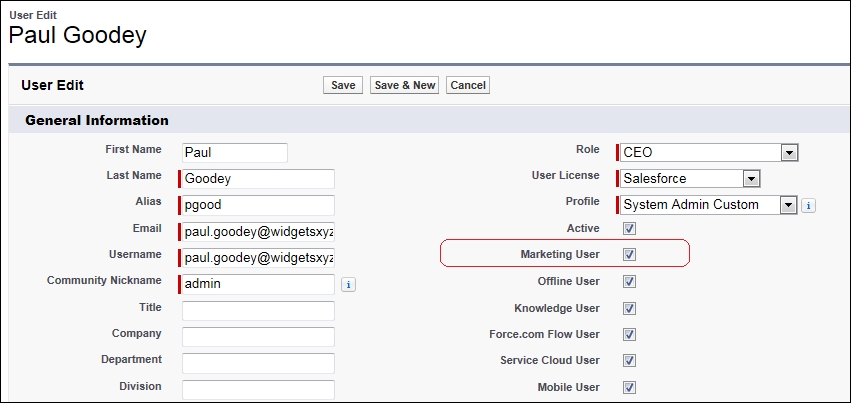
By default, the marketing administration features provide some level of read-only access to all users. However, to create, edit, and delete campaigns and carry out advanced campaign and lead management functions, users must have the Marketing User license set on their user record, as shown next:
The following key features are available within Salesforce CRM marketing administration:
- Campaign management
- Lead management
With targeted marketing campaigns, companies can build market awareness, generate leads, and learn from their campaign results to fine-tune offers to various customer segments.
The campaign management feature in Salesforce CRM allows your users to manage and track outbound marketing activities. These can be direct mail, road shows, online or print advertising, e-mail, or other types of marketing initiatives.
Some CRM systems have sales and marketing features separated, requiring marketing and sales users to log on to two separate modules; however, with Salesforce CRM, a dedicated Campaign tab is provided to enable marketing and sales users to work together within a single system.
Within the Campaign tab, the marketing team can access sales information for their campaigns and the sales team can have visibility into the marketing activities that affect their accounts, contacts, and leads. Campaigns can also be organized into hierarchies for flexible analysis of related marketing initiatives.
By integrating the marketing and sales effort for campaign and lead management activities, far greater collaboration can be achieved.
Essential success criteria for campaigns can be captured and used to further develop the definition of marketing targets. This enables marketing departments to become more accountable and better demonstrate their marketing Return On Investment (ROI).
The steps to consider when managing and working with campaigns in Salesforce CRM are as follows:
Before starting to build and run campaigns, it is useful to have an overall plan of the goals and objectives of the campaign, such as the core processes and the type of campaign—mass marketing e-mails, hosting a conference, sending direct mail, and so on.
The targets for the campaign need to be identified as well as whether they should be existing customers, existing leads, or new leads. With existing leads, you can use lead scoring and lead status to facilitate customer segmentation. For example, a series of archived status definitions could be used, such as No Interest, Future Interest, Nurture, and so on.
Consider how you need to analyze and report on campaigns.
It is worth considering this at an early stage and look to create custom campaign fields. You can customize campaigns so that you can improve the targeting and customer segmentation and help to compare and analyze which types of campaigns are the most effective for your sales and marketing teams.
Your marketing team might also want to target new leads through the use of third-party lists. These third-party lists of suspects, prospects, or leads can be flagged in Salesforce with a specific indicator. By flagging with a different record type, or assigning to a different queue, these lead records can be kept apart from existing prospects so that any prequalification or de-duplicating can be done before they are available for use in campaigns.
When setting up campaign management, you should identify who should have access to campaigns.
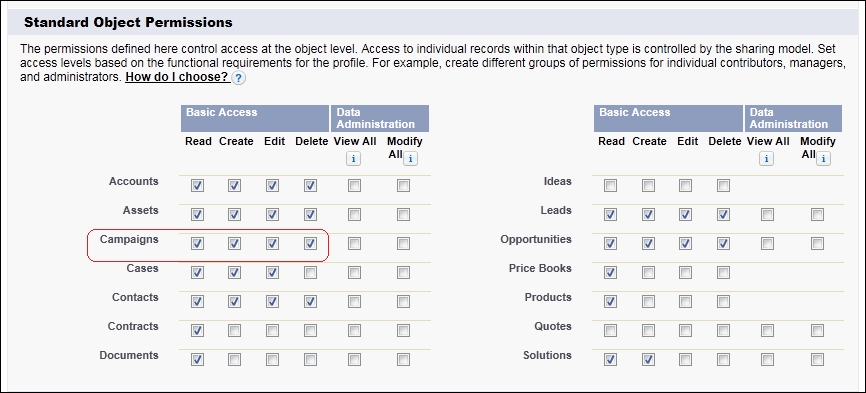
By default, all users have read-only access to campaigns but, to create, edit, or delete campaigns, users must have the Create permission on their profile, as shown:
When starting new types of campaigns, your marketing and sales teams should collaborate to agree on the customer information that is to be captured. Here, you can use the standard fields for both the Campaign and Campaign Member objects or create new custom fields, as appropriate.
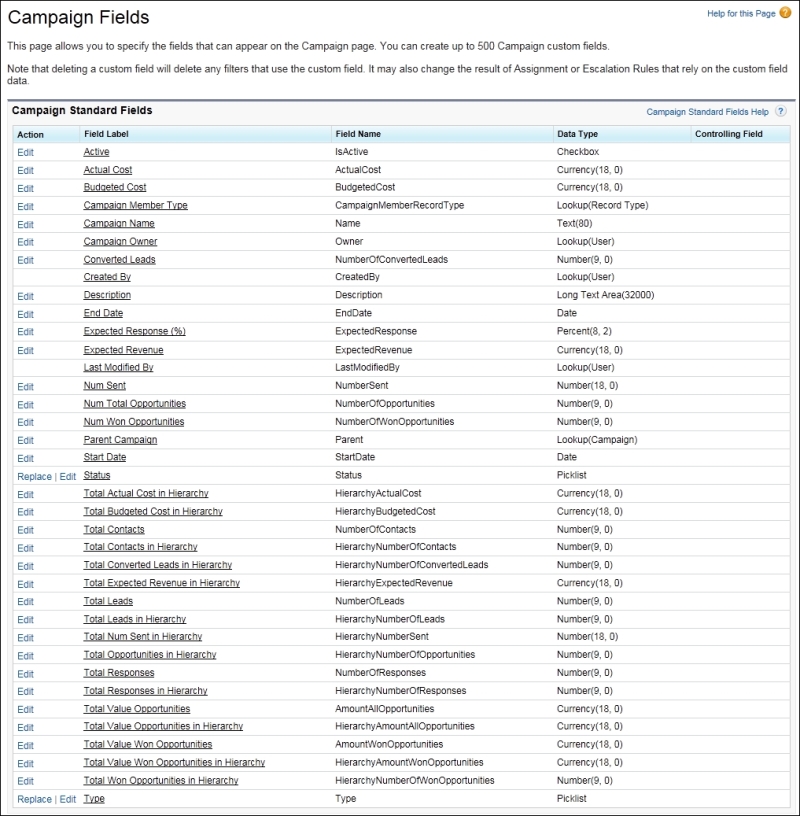
The following key standard fields are available on the Campaign object:
The complete set of fields is shown next, where the picklist values can be adapted to suit your organization. They are accessed by navigating to Setup | Customize | Campaigns | Fields.
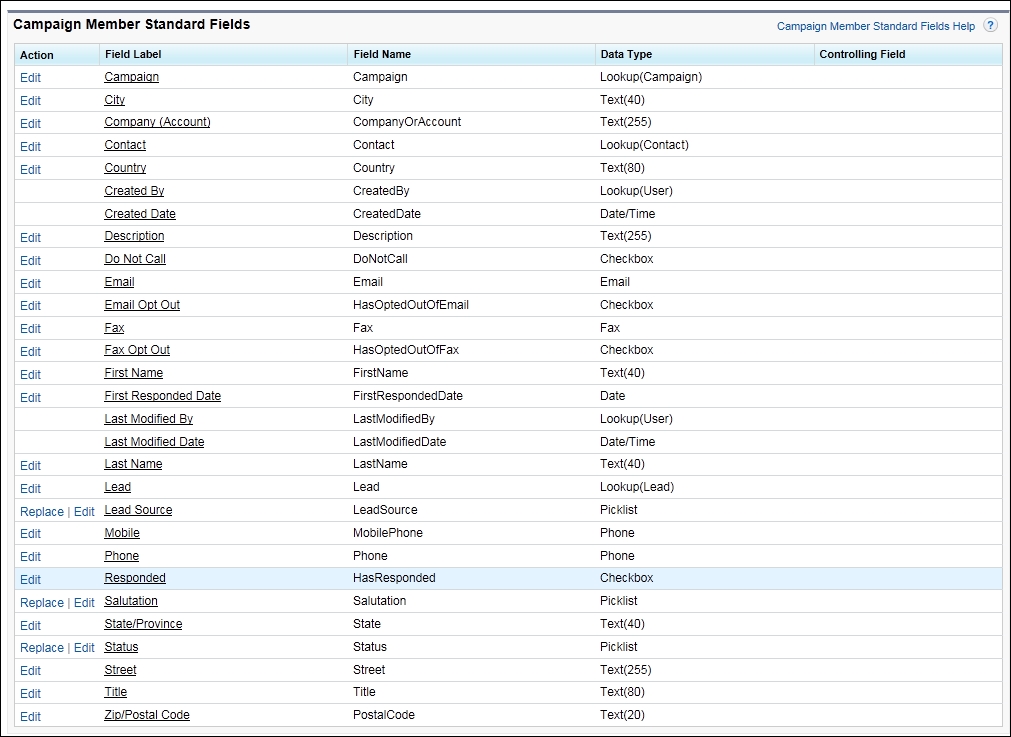
The following key standard fields are available on the Campaign Member object:
The complete set of fields is shown next where the picklist values can be adapted to suit your organization. They are accessed by navigating to Setup | Customize | Campaigns | Campaign Members | Fields.
Both your marketing and sales teams should also help define and agree on any required custom fields or picklist values, for example, segmentation definitions, status, and responses.
To create campaigns, users must have the Marketing User checkbox selected in their user record and have the Create permission on campaigns in their profile, as shown previously.
To create a campaign, follow these steps:
- Click on the Campaigns tab to view the campaign's home page or select Campaign from the Create New drop-down list in the sidebar.
- Enter values for the fields that apply to the campaign, as shown in the following screenshot:
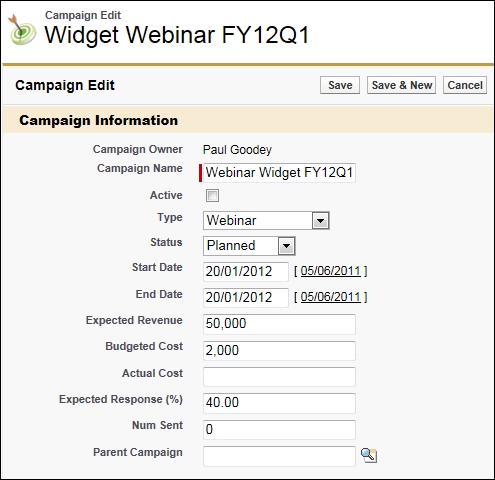
- Now click on Save; or click on Save & New to save the campaign and then add another.
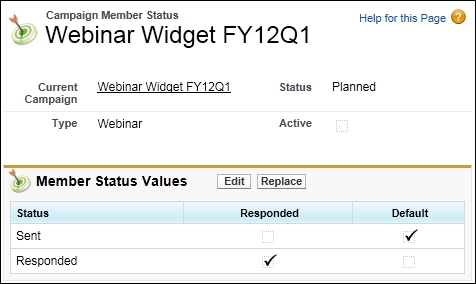
New campaigns have two default member status values: Sent and Responded. These are populated from the Campaign Member Status picklist that we looked at earlier.
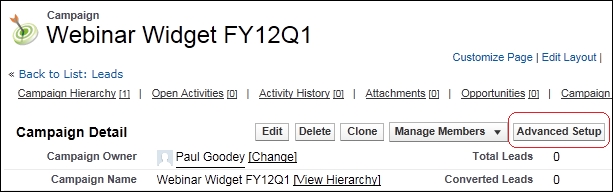
Nonsystem administrator users can, however, overwrite the status values (for the specific campaign record only) from within the campaign detail page by clicking on the Advanced Setup button, as shown in the following screenshot:
Here, your users can edit or replace status values, or create new ones as required:
Target lists is a marketing term used to describe the individuals or types of people that are to be included as part of the marketing campaign.
In some situations, such as with an online advertising campaign, people are not specifically set up as individual targets. Here, the campaign would usually be set up in Salesforce as one without members.
If your campaign is targeting individuals, it is important to create a target list that has been segmented according to criteria that will result in the highest quality returns.
To target existing leads or contacts, you can use the following methods in Salesforce CRM:
|
Method |
Description |
|---|---|
|
Use the Campaign Detail page |
Click on the Manage Members button to add multiple campaign members |
|
Create Lead or Contact reports |
Click on the Add to Campaign button to add multiple campaign members |
|
Use Lead or Contact List views |
Click on the Add to Campaign button to add multiple campaign members |
|
Use the Lead or Contact Detail pages |
Click on the Add to Campaign button to add a single campaign member |
To add multiple campaign members from the Campaign Detail page, users should select the Manage Members button, as shown in the following screenshot:
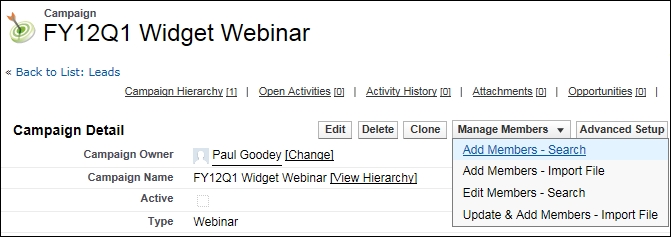
You can add existing contacts or leads by selecting Add Members - Search from the Manage Members drop-down button on the Campaign Detail page.
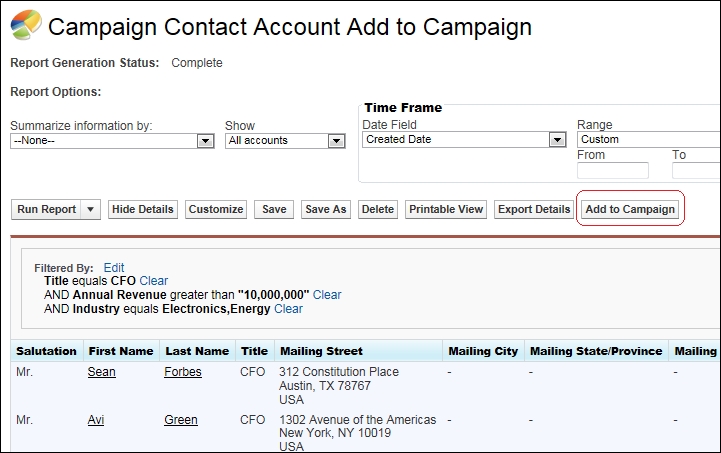
To add multiple campaign members from either lead or contact reports, perform the following steps:
- Create a custom lead or contact report.
- In the Select Criteria step, enter up to three criteria to segment the report data.
For example, to target all CFOs at Electronics or Energy companies with annual revenue greater than ten million, you would set the following:
- Title equals CFO
- Industry equals Technology, Telecommunications (using a comma to indicate an OR Boolean result)
- Annual Revenue greater than 10,000,000
Now, you can run the report and use the Add to Campaign button, as shown in the following screenshot:
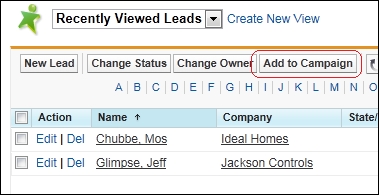
From within a lead or contact list view, you can click on the Add to Campaign button to add multiple campaign members, as shown in the following screenshot:
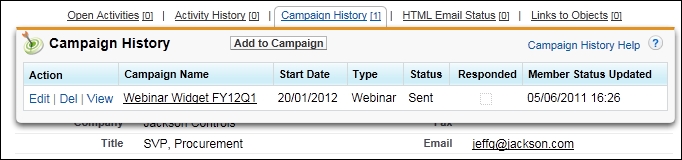
You can use the Add to Campaign button within the Lead Detail and Contact Detail pages to add that record as an individual campaign member, as shown in the following screenshot:

When using externally purchased lists of new prospects within Salesforce, it is advisable to flag the records with a specific third-party designation (say, by record type or custom picklist value). These records can then be prequalified before adding to any campaign or sales activity. Particularly important is the de-duplication of any new leads against existing records in your Salesforce database to determine which are existing customers or leads.
Salesforce does not recommend mass importing rented or purchased lists of prospects into Salesforce, as these lists are usually controlled by the list vendor and might have restriction or limited use policies. Here, you should simply make use of the list of names as your target list and only after the prospect has responded to your campaign should you import the lead record.
Although campaign execution activities occur outside the Salesforce CRM application during the execution of either an offline or an online campaign, there are some features of the campaign activity that can be aided using the export facilities within Salesforce.
Users can use Salesforce to generate lists of accounts and individuals for mailing houses or e-mailing specialist partners to send out the mass marketing e-mails used in both online and offline events (such as trade shows, advertisements, direct mail, and so on).
There are various options available to integrate Salesforce with other solutions, including provisions for mass e-mailing. Integration solutions are covered later in this book where sources include the AppExchange directory (a Salesforce.com sponsored market place for accredited products and services).
Salesforce can be used to deliver some mass e-mails, but the application is not intended for large volume mass e-mail marketing, and there are limits to the quantity of e-mails that can be sent.
For each Salesforce application, a total of 1,000 e-mails can be sent per day to external e-mail addresses. Using the Enterprise Edition, the maximum number of external addresses (unique or nonunique) you can include in a mass e-mail is 500 and for the Unlimited and Performance Edition, the limit is 1,000.
Note
The mass e-mail limits do not take unique addresses into account. For example, if you have [email protected] in your mass e-mail 500 times, it counts as 500 against any limit.
You can build an integrated web form to automatically capture individuals as leads in Salesforce. This is detailed later in this chapter in the Lead management section under Marketing administration.
After the campaign has been executed, your company will want to track the responses, which can include the following:
- Website response using a form on your website where you can set up a Web-to-Lead form to create a target page with a response form. All responses appear in Salesforce as leads but can be linked to the campaign. This is covered later in this chapter.
- Mass update or offline response using the campaign member import wizards to import a list of leads or contacts and their responses. Users need the Marketing User profile or the Import Leads permission to use these wizards.
- Manual response; for example, when prospects and customers respond by phone or e-mail, users can manually record these responses on the Campaign History related list on the lead or Contact Detail page.
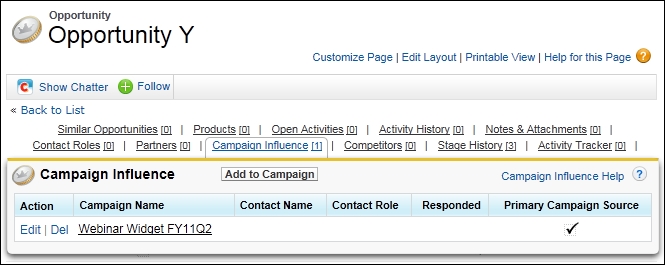
To ensure existing opportunities are included in the results for the campaign, you can add the campaign to the Campaign Influence related list on the opportunity, as shown next.
By setting the Primary Campaign Source flag (a checkbox on the Campaign Influence record), the opportunity amount is included in the campaign statistics and reports.
Campaign effectiveness can be analyzed using either the statistics on the campaign record or by running campaign reports.
The summary fields on the Campaign Detail page, as shown next, allow various statistics to be seen, such as the total number of responses, the amount of business generated from the campaign, and so on.
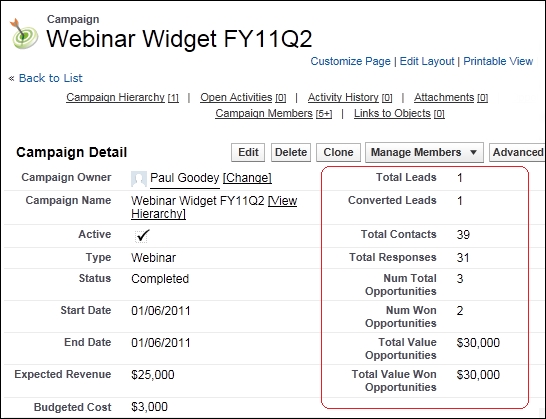
The campaign statistics are automatically recalculated every time a campaign is saved. When a lead gets converted to an opportunity, the campaign that was most recently associated to the lead will automatically pass over to the opportunity.
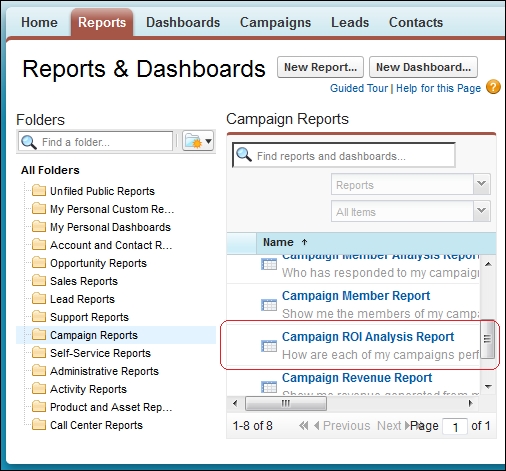
Reports can be accessed from the Reports tab by selecting the Campaign Reports folder, as shown in the following screenshot:
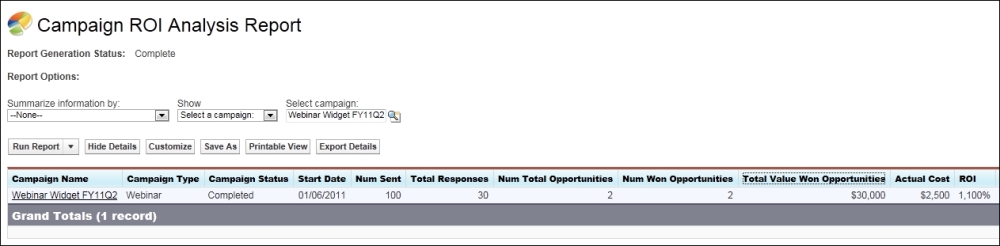
As an example, the Campaign ROI Analysis Report shows you performance metrics and gives you a figure for the return on investment for the campaign, as shown in the following screenshot:
Managing prospective customers appropriately often raises issues within companies. The status and quality of prospect data can cause obstacles when trying to automate processing through the sales process. Prospect data often comes from various sources that, if not carefully controlled, can make them difficult to accurately process.
Without a central system and agreed approach, there can be conflicts between the marketing team, who are often unable to trace what is happening to the prospects after distributing them to sales, and the sales team, who are unable to verify the quality of the data. Salesforce CRM helps bridge any gap between sales and marketing, and by using lead management mechanisms, it offers a way to improve the management and automation of the flow from potential customers to a closed sales deal.
Leads are prospects or potential opportunities and are accessed in Salesforce CRM from the Leads tab. They are sources of potential deals that usually need more qualification and can be visitors to your website who requested more information, respondents to marketing campaigns as described previously in managing campaigns, trade show visitors, and so on. Leads are stored and managed separately from account, contact, and opportunity records, which are covered later in this chapter.
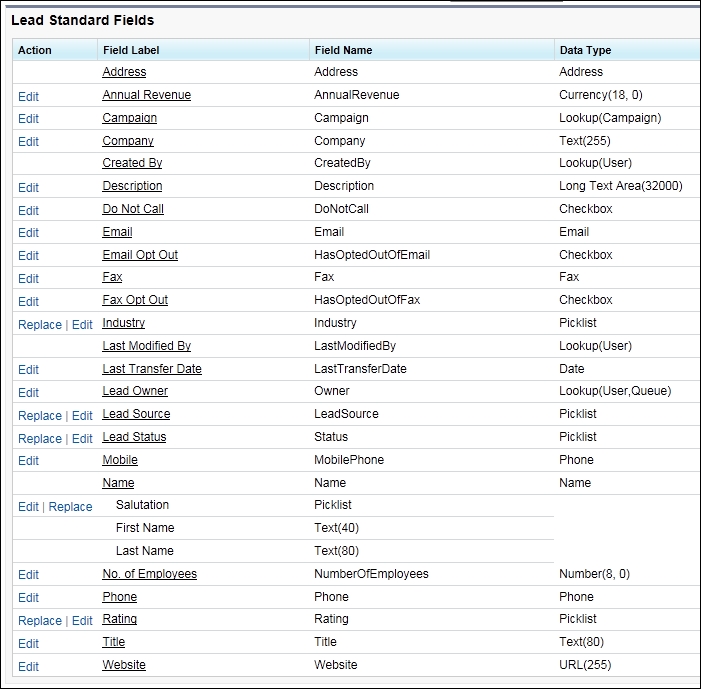
The following key standard fields are available on the Lead object:
The complete set of fields is shown next, where the picklist values can be adapted to suit your organization. They are accessed by navigating to Setup | Customize | Leads | Fields.
Creating a business process within the lead management function involves agreeing on and implementing the steps and field values that are to be recorded by the sales and marketing teams during the lead life cycle.
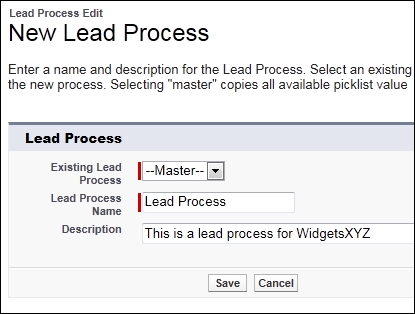
The lead processes are accessed by navigating to Setup | Customize | Leads | Lead Processes, where processes can be created or edited as shown in the following screenshot:
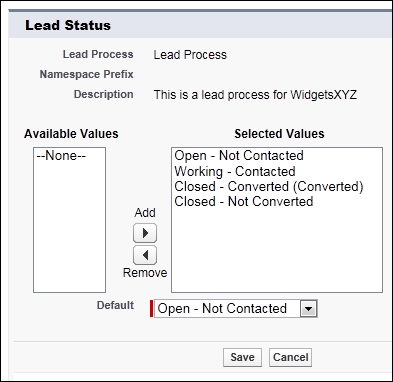
You can now assign the status values for the lead, as shown in the following screenshot:
Finally, associating the lead business process with one or more record types will make it available to your users (based on their profile).
There are several ways to create lead records within the Salesforce CRM application. This includes the manual entry of single leads by your users, the manual entry of leads by the prospects themselves (using public facing web forms known as Web-to-Lead), or the manual importing of multiple leads within the application by you or your users.
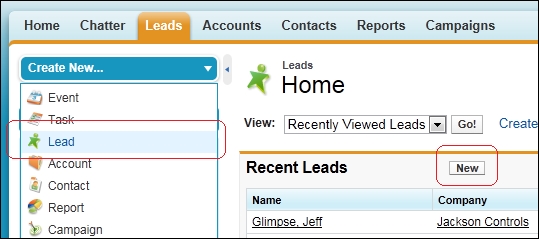
Leads can be manually created from either the Leads tab by clicking on the New button, or from the Create New selection in the left-hand side bar, as shown in the following screenshot:
With the Web-to-Lead functionality in Salesforce CRM, leads can be directly entered into your Salesforce application from a public-facing website. This means prospect information can be gathered directly from the individual. This feature is used to generate HyperText Markup Language (HTML) code that can then be incorporated into the required web page.
To enable the Web-to-Lead feature, you must first configure the appropriate lead settings by navigating to Setup | Customize | Leads | Settings. Now, click on the Edit button to display the page, as shown in the following screenshot:
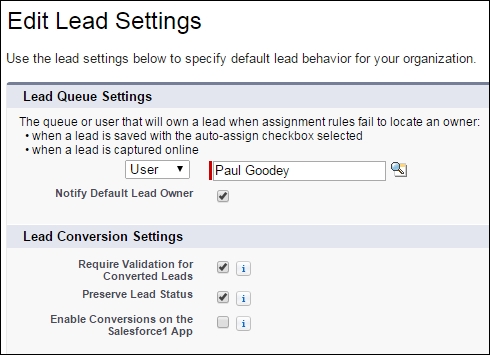
Now, select Default Lead Owner and select the Notify Default Lead Owner checkbox to automatically notify the default lead owner whenever a lead is assigned to them.
To enable the Web-to-Lead feature, you must first configure the Web-to-Lead settings by navigating to Setup | Customize | Leads | Web-To-Lead. Now, click on the Edit button to display the page, as shown in the following screenshot:
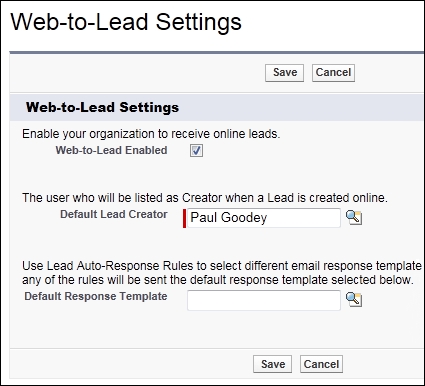
Now, select the Web-to-Lead Enabled checkbox, select the user who will be set as the creator whenever the lead is entered from an online web form, and finally, create Web-to-Lead e-mail auto-response rules to determine which e-mails are to be sent to prospects when they submit information online. Then, click on Save.
To generate the Web-to-Lead HTML code, navigate to Setup | Customize | Leads | Web-To-Lead. Now, click on the Create Web-To-Lead Form button to display the page, as shown in the following screenshot:
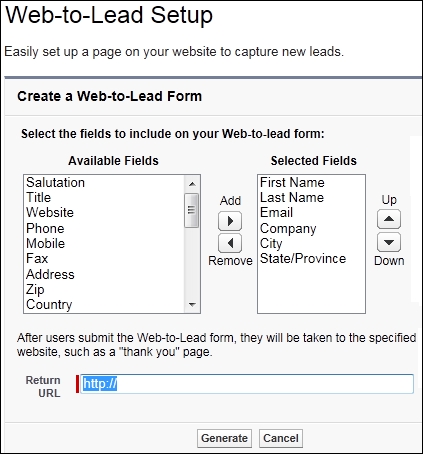
Now, select the fields to include in the form, and specify a URL that users will be taken to after submitting the form. Finally, click on the Generate button, and then copy the generated HTML code and send it to the team responsible for the website in your organization.
The page style can be customized for your website, but the core form elements that have been generated within the HTML code should not be changed.
With the Web-to-Lead feature, you can capture up to 500 leads per day.
Auto-response rules provide a method to customize any communication that is sent back to an individual after they have filled out a web lead form. These autoresponse rules can contain logic to determine which e-mail template and what content is to be sent to leads that have been generated using Web-to-Lead.
To enable auto-response rules, navigate to Setup | Leads | Auto-response Rules. Then, click on the New or Edit button, as shown in the following screenshot:
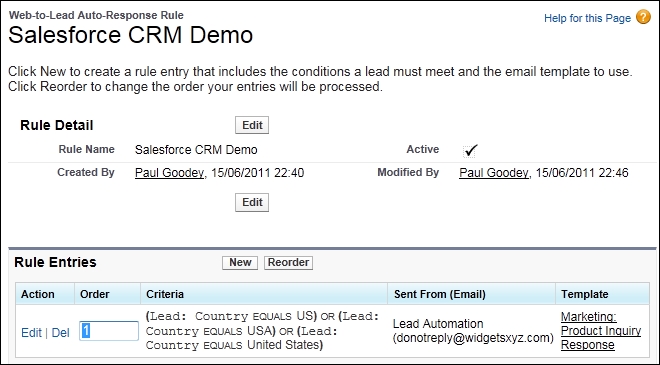
Here, you first create the rule detail and name and activate the rule. Then, you add the rule entries that contain the logic and where multiple rule entries can be created. Rule entries require the following:
To import leads, navigate to Setup | Data Management | Import Leads. Now, follow the onscreen instructions to export your data from its current source and label each column in the file with the correct field name, as shown in the following screenshot:

A lead assignment rule can automatically assign leads to users or queues based on values in lead fields. Alternatively, a Record Owner field in the import file can determine lead ownership for each imported lead.
Without a lead assignment rule or Record Owner field, imported leads are automatically assigned to the user who has carried out the import.
Import Queue shows you the status of the import. You will be notified by e-mail when your import is complete (this notification might take up to 24 hours).
Queues can be thought of as a storage location to group leads together, usually by geographic region or business function. Leads remain in the queue until they are assigned or accepted by users. Users who have been included as part of the queue can access and accept the records by clicking on the Accept button, as shown in the following screenshot:

To create and provide users with access to a lead queue, navigate to Setup | Manage Users | Queues | New.
Here, you can carry out these operations: name the queue, select the supported object (either lead or case), and assign the queue member (either users, public groups, roles, or role and subordinates).
You can also set up the queue so that e-mails are sent to the queue members (using a default e-mail address for the queue) whenever a case is assigned to the queue.
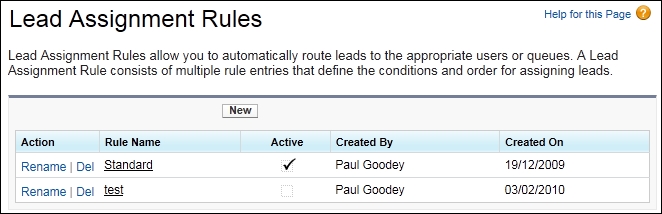
Lead assignment rules determine how leads are automatically assigned to users or a queue. They contain rule entries that are predefined business rules that determine the lead routing.
Lead assignment rules can be accessed by navigating to Setup | Customize | Leads | Assignment Rules.
Only one lead assignment rule can be active at any given time, but each rule can have multiple criteria, as shown here:
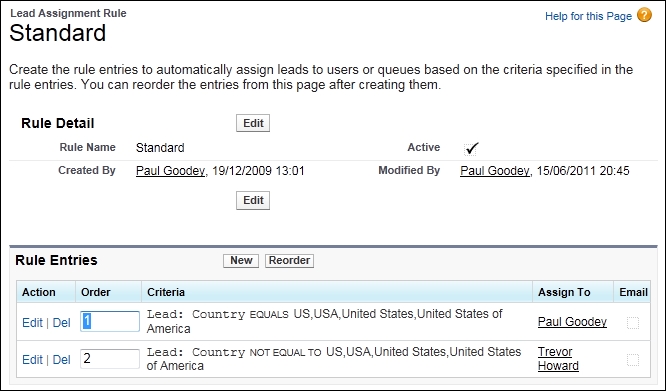
Criteria are evaluated in the order in which they appear in the list. When there are multiple rules that could be applied, you can set the priority for the criteria by setting the most specific criteria at number 1 and then adding more criteria numbers that are more generic. The following screenshot shows you a simple example and the use of multiple criteria rules that are used to assign leads according to a geographic flag using the Country field:
Lead qualification depends on your business process and should have been developed in conjunction with both the marketing and sales teams.
As part of the lead conversion routine, certain key information contained on the lead record is mapped to the Salesforce CRM objects' account, contact, and optionally, the opportunity records. During lead conversion, new records are created for these objects where the account record name field will contain the Company Name field value from the lead, and the contact record name field will be populated from the Name field within the lead record.
Opportunities that are created upon lead conversion contain default values for the required fields where Close Date defaults to the last day of the current quarter and Sales Stage is set to the first value in the Stage picklist.
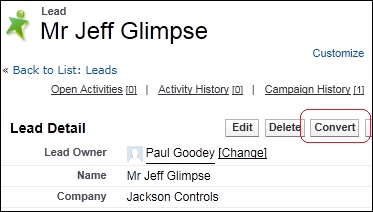
To convert a lead, select the lead that is to be converted either by clicking on the Lead tab and selecting from the list view or by searching and then clicking on Convert on the Lead Detail page, as shown in the following screenshot:
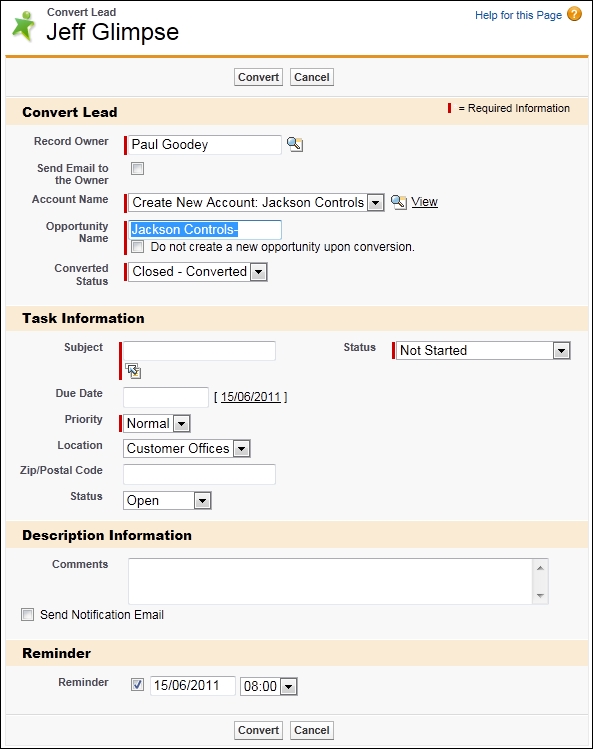
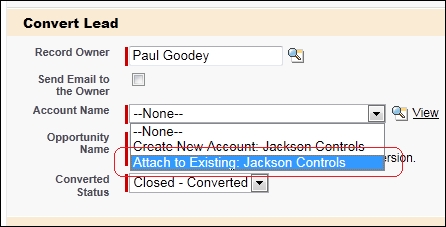
The lead conversion screen will be displayed, where you can check the owner of the new records. Here, you can choose to send the record owner an automated notification e-mail. You can also set the status of the converted lead and specify that a new task is created for the record owner to act as a follow-up task, as shown in the following screenshot:
Before creating any new account or contact records, the Salesforce CRM application attempts to match existing account and contact names and the name of the lead. When there is a match, you will have the option of selecting the existing records, as shown in the following screenshot:
Clicking on the Convert button completes the lead conversion process and results in the following:
- The company name from the lead becomes the account name
- The lead name from the lead becomes the contact name
- The opportunity and contact are associated with the account
- Any campaigns related to the lead are associated with the opportunity
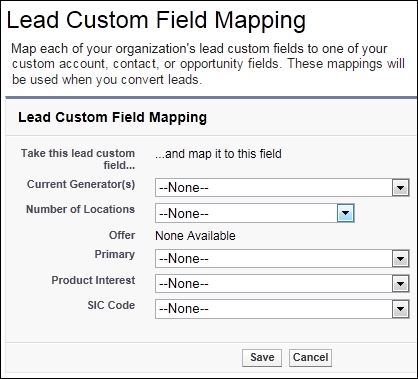
There are standard field mappings between the lead and account, contact, and opportunity records that are provided by Salesforce for the lead conversion process; however, you can extend these. To extend the mappings, navigate to Setup | Customize | Leads | Fields. Now, go to the Lead Custom Fields & Relationships section at the bottom of the page, as shown in the following screenshot:

Extending the field mappings might become necessary whenever you add required custom fields on either the account, contact, or opportunity records that are to be populated from the lead records. This is done as shown in the following screenshot:
It is important to ensure the field mapping is in place whenever you have certain mandatory fields or rules for your account, contacts, or opportunities. This is because the validation logic for required custom fields and workflow or validation rules is enforced by the Salesforce application during the lead conversion process.