In this chapter, we'll build on the basic knowledge and competency that we acquired in Chapter 6, Writing Simple Behaviors with the Stencyl visual programming system. Going beyond the basic events and blocks, we'll learn how to:
- Create custom blocks and events
- Handle advanced conditional logic scenarios
- Communicate between the scene and actor behaviors using a series of special-purpose blocks built into Stencyl's proprietary visual programming language
Before there can be any ostensible gameplay, we must accept and react to some form of player input. This gives the player some level of agency within the game. Let's learn how to do this now.
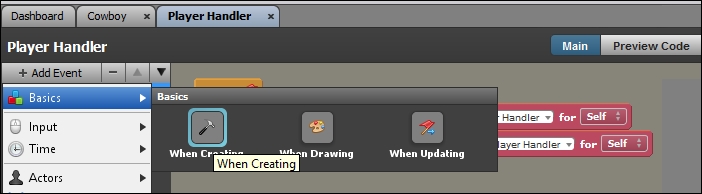
The very first thing we need to do is initialize the values of our attributes. We can do this when the actor is first loaded into the scene, using the When Creating event. Let's add a When Creating event to the Player Handler behavior now by performing the following steps:
- From the Dashboard, under LOGIC, select Actor Behaviors and open up the Player Handler behavior.
- Navigate to Add Event | Basics | When Creating to add a when created event to the behavior, as shown in the following screenshot:
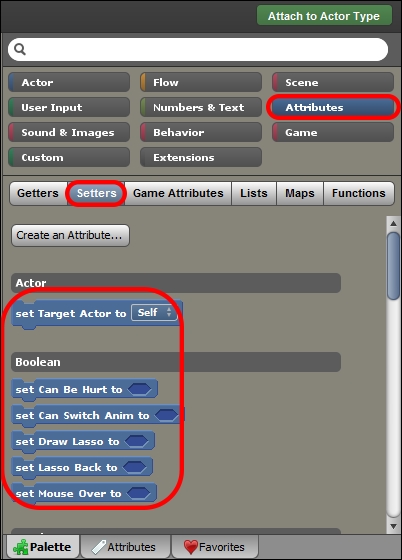
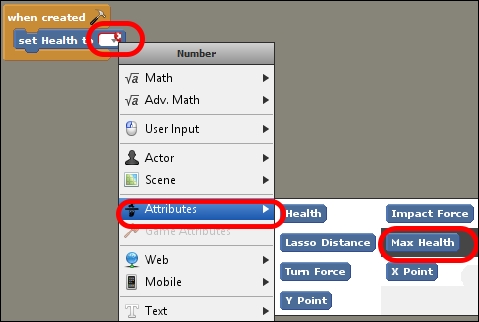
- In the blocks Palette, select the Attributes tab, then click on Setters, and you will see a range of setters for each attribute, which we have already created, broken down into their attribute types, as shown in the following screenshot:
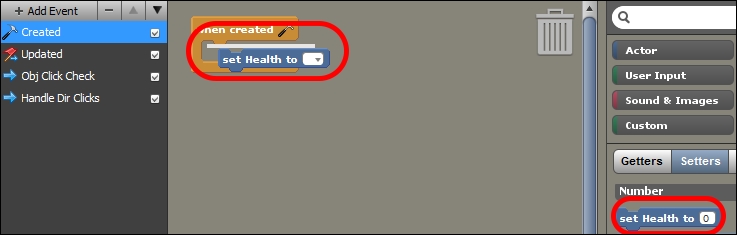
- Scroll down to the Number attributes. Drag the set Health to block onto the Canvas, and then snap it into the Created block, as shown in the following screenshot:
- Next, set the value of Health to Max Health, as shown in the following screenshot. This will initialize health to be equal to the value of Max Health, which we will set later.
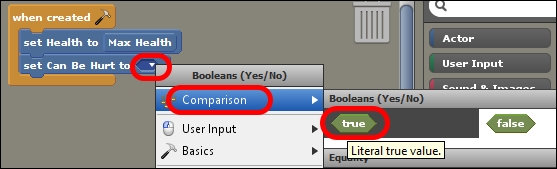
- Now, under Booleans, drag the set Can Be Hurt to block into the Created block, and set it to true, as shown in the following screenshot:
- Do the same thing with the set Draw Lasso to block, but set it to false instead of true.
- Do it again with the set Mouse Over to block, and set it to false.
- Under Text, drag the set MouseState to block into the Created block, and enter
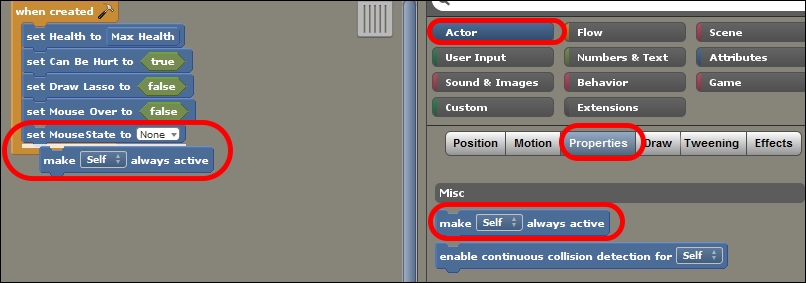
Nonein its value field. - Finally, let's make this actor always simulate even if it is off the screen. In the blocks Palette, go to Actor | Properties | Misc, then drag the make Self always active block, and snap it into the when created block, as shown in the following screenshot:
Great work! Now we're ready to begin writing the conditional code to handle the input. One of the key things that we need to establish with this part of our code is whether the player is clicking on an interactive object or not. If he is not, we treat the click as directional in nature. Let's start by writing some conditional logic and input code! Perform the following steps to do so:
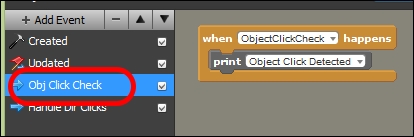
- Switch to the custom Obj Click Check event shown in the following screenshot, which we created in the previous chapter:
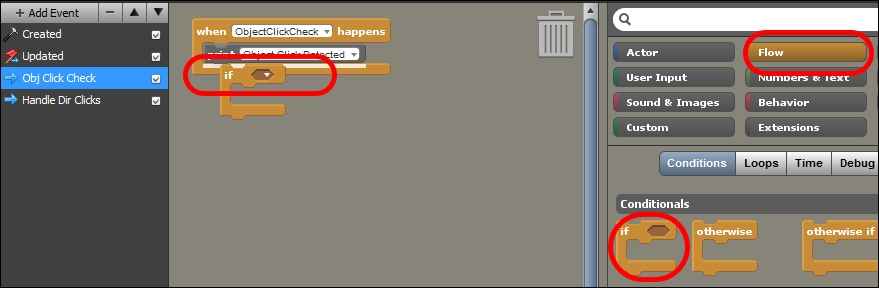
- Navigate to Flow | Conditions, drag an if block out, and click on the when ObjectClickCheck happens block, as shown in the following screenshot:
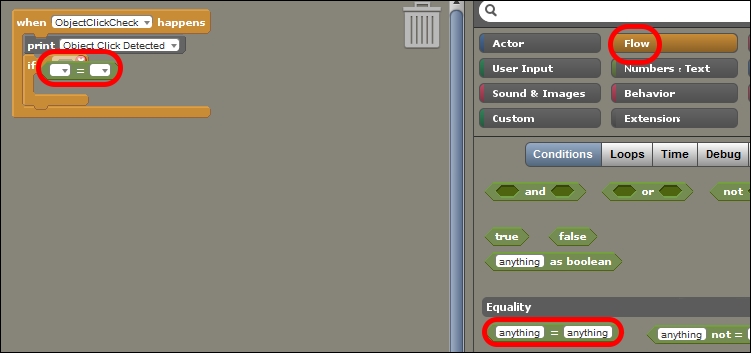
- For the condition field of the if block we just added, we'll insert an anything = anything block to check for an equality condition. This block can be found by navigating to Flow | Conditions | Equality, as shown in the following screenshot:
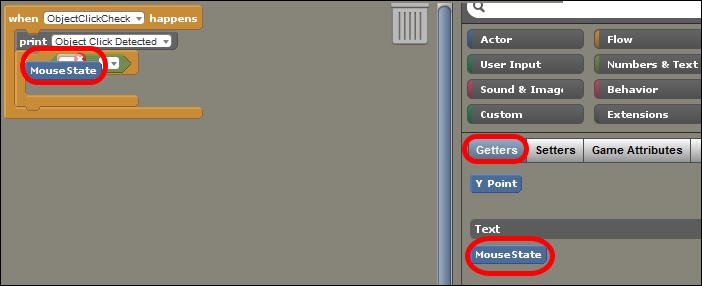
- In the first field of the anything = anything block, let's insert a Getters block for the MouseState attribute (go to Attributes | Getters in the blocks palette to access it):
- In the second field of the anything = anything block, enter the text value
None, as shown in the following screenshot: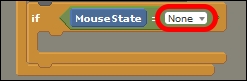
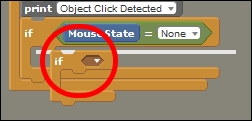
- Great work! The next thing we will check for in our nested if statements is whether or not the left mouse button is being pressed by the player. Add another if block inside the existing one, as shown in the following screenshot:
- Now, navigate to User Input | Keyboard & Mouse | Mouse / Touch, find and add the mouse is down block, as shown in the following screenshot:

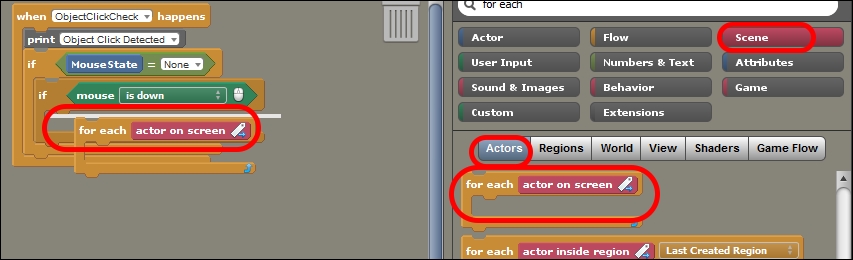
- The next thing we need to do is insert a for each actor on screen block, which acts as a loop, to check a condition or a set of conditions for each actor showing on the screen for the current iteration of the game loop, as shown in the following screenshot:
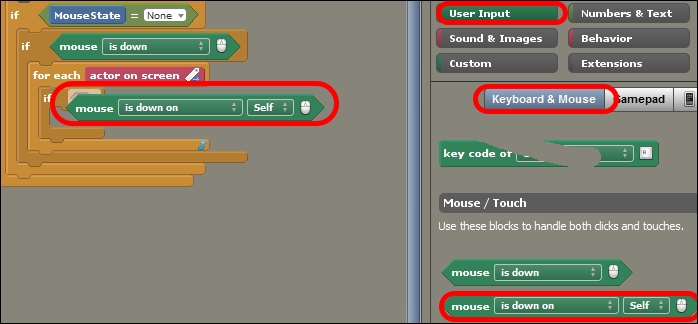
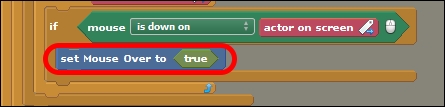
- Add another if block. For this if statement's condition, we'll use another input block, but this time, instead of the mouse is down block, we'll use mouse is down on that allows us to check whether the mouse is over a certain actor when it is being pressed, as shown in the following screenshot:
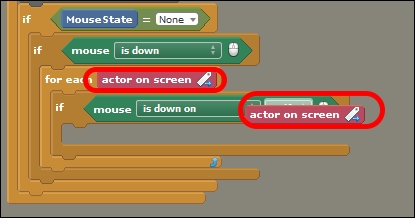
- You will notice that the for each actor on screen block has an embedded actor on screen reference block, as seen in the previous screenshot. The next thing we need to do is drag a copy of this reference block into the Self field of the mouse is down on block, as shown in the following screenshot:
- Now we'll use a Setter block for the Mouse Over attribute, which is a Boolean attribute, and hence can only be set to either true or false. Let's set it to true, as shown in the following screenshot:
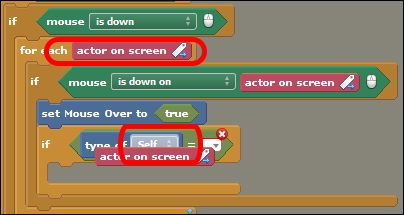
- Now we must create a series of if statements, which check what type of an actor the player has clicked on, and react accordingly. Add another if statement beneath the set Mouse Over to block, which we added a moment ago.
- Next, add an anything = anything block to the condition field for this if block, as shown in the following screenshot:

- In the first field of the anything = anything block, let's insert a type of block, as shown in the following screenshot:

- Next, drag another copy of the actor on screen reference block into the field called Self for the type of block, as shown in the following screenshot:
- In the second field of the anything = anything block, we will insert an Actor Type block, as shown in the following screenshot:
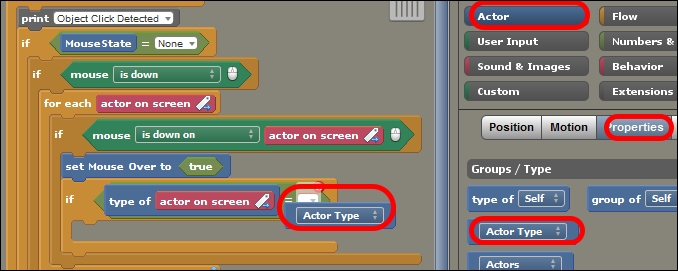
- Click on the Actor Type field within the block we just placed, and select Choose Actor Type.
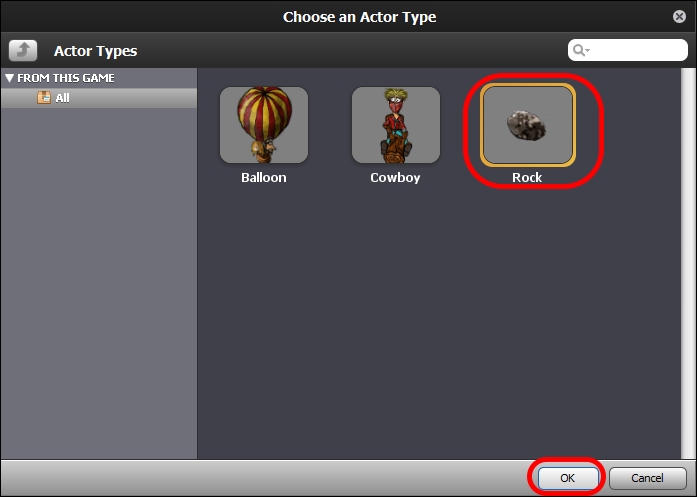
- A menu that contains all of the Actor Types within our game so far will be presented. Choose the Rock actor type, and click on OK, as shown in the following screenshot:
Excellent work! You've just created some pretty elaborate conditional game logic code there! To make it work, though, we need to create our own custom block. Let's do this right now by performing the following steps:
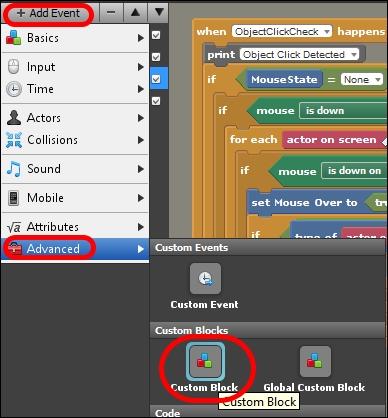
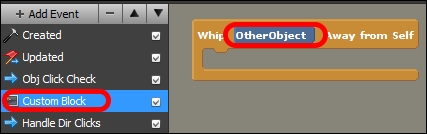
- Navigate to Add Event | Advanced | Custom Block, as shown in the following screenshot:
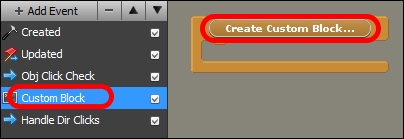
- Make sure the new Custom Block is selected in the events stack, and click on Create Custom Block..., which will launch the Create a New Custom Block window, as shown in the following screenshot:
- Set the Name to
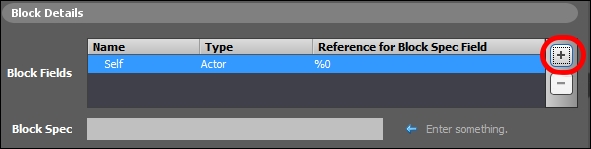
WhipAwayFromSelf. - Click on the + button to add a new block field, as shown in the following screenshot:
- In the ensuing window, set the Name to
OtherObject, Type to Actor, and click on OK, as shown in the following screenshot: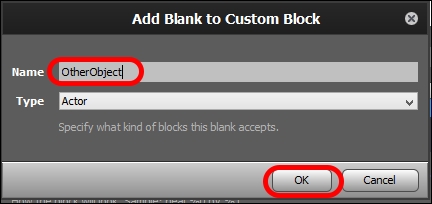
- Set Block Spec to
Whip %1 Away from Self. This %1 is a reference to the OtherObject field that we just added to our custom block, as shown in the following screenshot: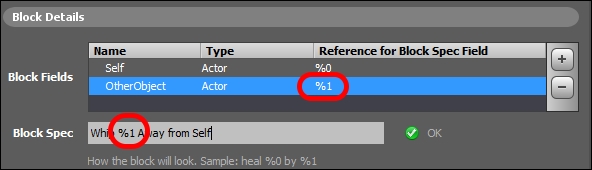
- Leave the Description field blank and Return Type as None. Then, click on Create, and you will see the shell of your custom block appear. It doesn't actually do anything, other than accept an actor reference through OtherObject, as shown in the following screenshot:
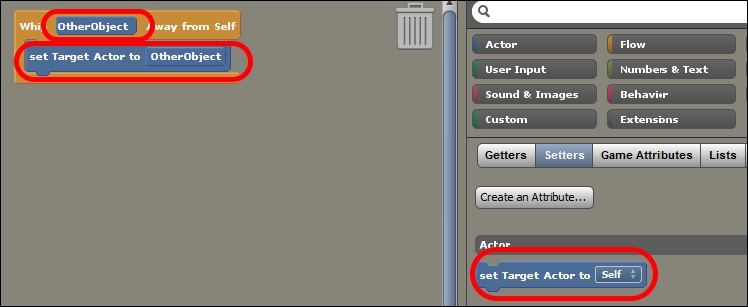
Now let's tell our new custom block what to do when Whip OtherObject Away from Self is called, by performing the following steps:
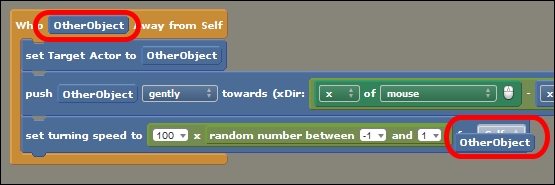
- Go to Attributes in the blocks palette, and under Setters, drag the set Target Actor to block into Whip OtherObject Away from Self. Drag a copy of the OtherObject reference block into the Self field for the Setter that we just added, as shown in the following screenshot:
- Now we must use a physics block. How exciting! In the Palette blocks, navigate to Actor | Motion | Force, find and add the push block highlighted in the following screenshot:
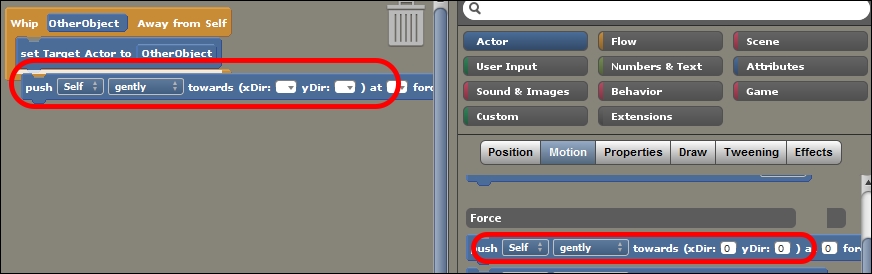
- Drag a copy of the OtherObject reference block into the Self field of the push block.
- Add a subtract (-) block to xDir, as shown in the following screenshot:

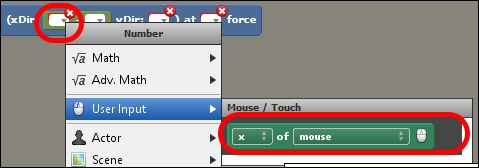
- On the left-hand side field of the - block, add an x of mouse block, as shown in the following screenshot:
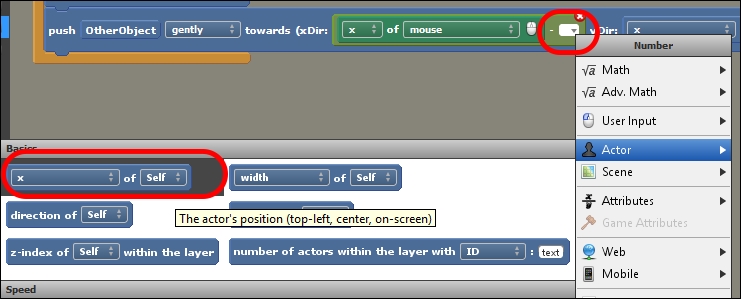
- Next, on the right-hand-side field, add an x of self block, as shown in the following screenshot:
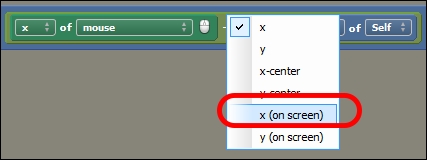
- Click on the x drop-down menu in the x of self block, and change the value to x (on screen), as shown in the following screenshot:
- We'll be doing something similar with the yDir field of the push block. Follow the same steps we just used for the xDir field, but change the values to the corresponding y of mouse and y (on screen) drop-down options. What you create should match this exactly, as shown in the following screenshot (you could copy the contents of the xDir field by holding Alt and left-click, dragging to the yDir field to speed things up):

- Now we need to provide a force value. Let's set the force to
400. - We'll add one extra physical force to the affected object before we move on to handle the directional clicks. We must manipulate the object's angular velocity. To do this, navigate to Actor | Motion | Turning Speed, and add a set turning speed to block underneath the existing push block, as shown in the following screenshot:

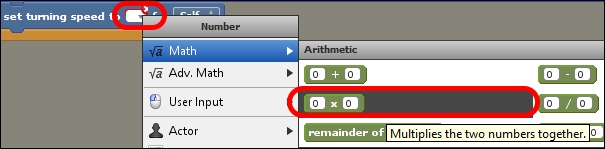
- Add a multiplication block to the to field of the set turning speed to block, as shown in the following screenshot:
- In the first field of the multiplication block, we'll insert the value
100. In the second field, we'll insert a random number between block (found by navigating to Numbers & Text | Math | Random Numbers), and give it a range of-1to1, as shown in the following screenshot:
- Currently, the set turning speed to block is configured to the Self effect, which refers to the actor this behavior is attached to. We must change this to OtherObject, which is a reference that we created earlier to the object on which the player has clicked. Drag a copy of the OtherObject block into the Self field of set turning speed to, as shown in the following screenshot:
Excellent work! You just created your very first custom block. Now all that we need to do is call this block somewhere in our game loop, and we can whip rocks away from the avatar by clicking on them. This is our very first gameplay mechanic! To add the call to run the Whip OtherObject Away from Self block, follow these steps:
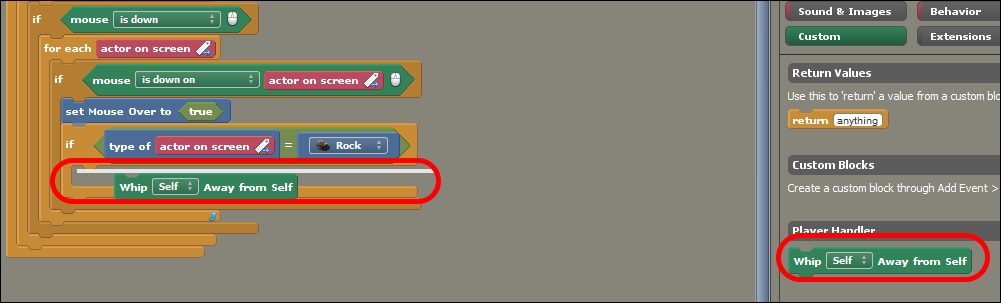
- Switch back to Obj Click Check in the events stack.
- In the blocks palette, navigate to Custom | Player Handler, and add the Whip Away from Self block, as shown in the following screenshot:
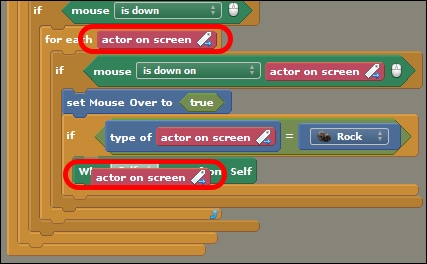
- Drag an actor on screen reference block into the Self field of Whip Away from Self:
Great job! Now, when you test the game (go on, give it a go), you should see the rocks change direction and spin when you click on them. Just make sure you open up Level 1, and first add some rock actors to one of the layers. It feels good to see your game code working, doesn't it!
It's time to write the code that allows the player to steer the Cowboy avatar down the mountain. This code goes in the second of the two custom events that we created in the previous chapter. Perform the following steps:
- In the events stack of the Player Handler behavior, switch to Handle Dir Clicks, as shown in the following screenshot:

- Remove the print block from when HandleDirectionClicks happens, as it is no longer needed.
- Add the if MouseState =
Noneand if mouse is down conditions, just as we did earlier for the Obj Click Check event, as shown in the following screenshot:
- We must create a new custom event (navigate to Add Event | Advanced | Custom Event) that will calculate the direction in which the Player Character should move. Let's call it
CalculateDirection, and label it Calculate Dir in the events stack, as shown in the following screenshot: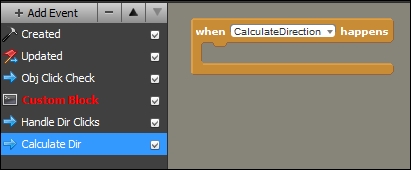
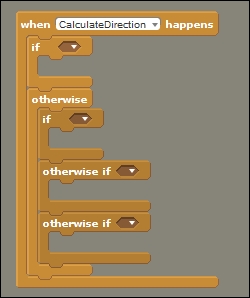
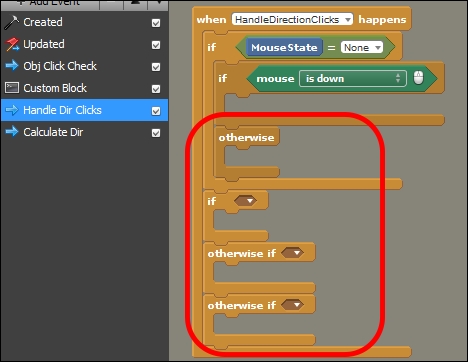
- Add an if block and an otherwise block to when CalculateDirection happens.
- Inside the otherwise block we just inserted, add another if block and two otherwise if blocks. What you have created should look exactly like the following screenshot:
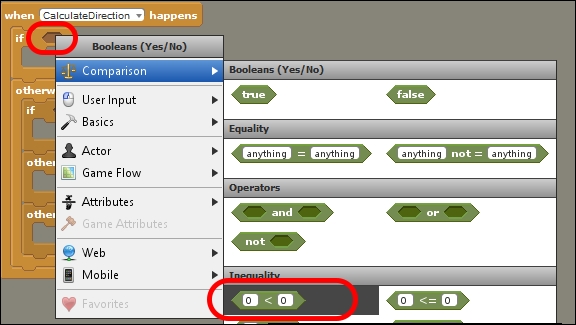
- Add a < (less than) block to the first if block, as shown in the following screenshot:
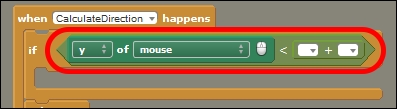
- Let's put a y of mouse block on the left-hand side field of the < (less than) block, and a + (addition) block on the right-hand side field, as shown in the following screenshot:
- Now we'll put an x of self block in the first field of the addition (+) block, then change its drop-down from x to y (on screen), and insert a width of Self block in the second field:
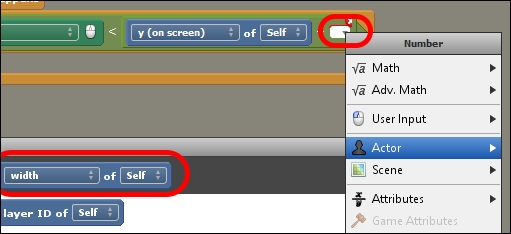
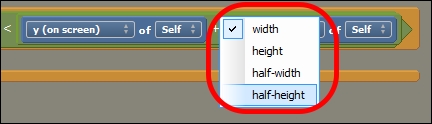
- Change from width to half-height of Self using the drop-down for the left-hand value, as shown in the following screenshot:
- Insert a set MouseState to block, and give it the value
SlowDown, as shown in the following screenshot:
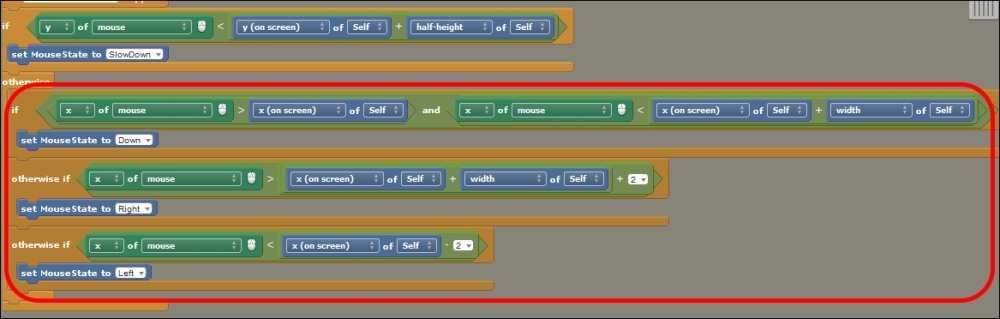
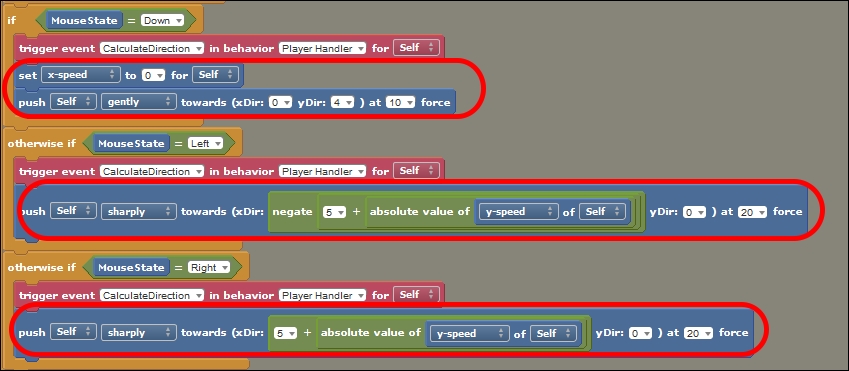
- Great! Having learned the process, your next task is to finish off the CalculateDirection block so that it matches the following screenshot perfectly (please note that the last two conditions contain plus 2 and minus 2 elements, respectively, to serve as a horizontal offset value):
- We're getting very close now! In the events pane, switch back to Handle Dir Clicks, and modify your conditional logic structure until it looks like the following screenshot:
- Navigate to Behavior | Triggers | For Actor in the blocks palette, drag out a trigger event in behavior for the Self block and place it inside if mouse is down. Set the event to
CalculateDirectionand behavior toPlayer Handler, as shown in the following screenshot: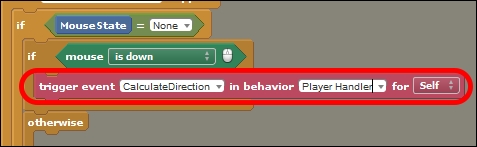
- In the otherwise event, set the value of the set MouseState to block to
None, as shown in the following screenshot: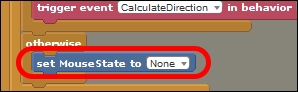
- Copy (hold Alt and drag) the MouseState = None condition to all the four if and otherwise if statements. Do the same with the trigger event block. Change
Nonefor the MouseState condition toSlowDown,Down,Left, andRight, in that order, as shown in the following screenshot: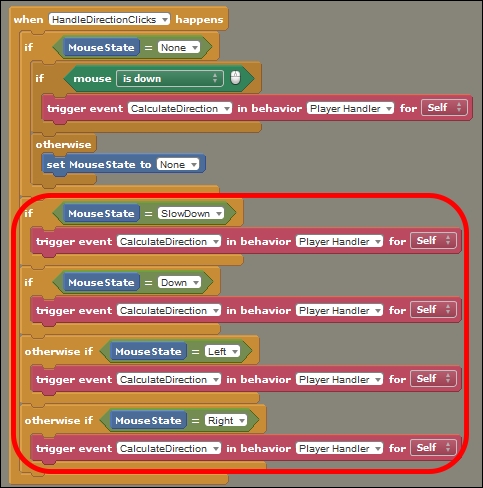
- For the SlowDown condition, add another if block under the trigger event block, and give it a > (greater than) condition. For the left parameter, insert a y-speed of Self block, which can be found by navigating to Actor | Motion | Speed, in the blocks palette. Set the right parameter to
3, as shown in the following screenshot: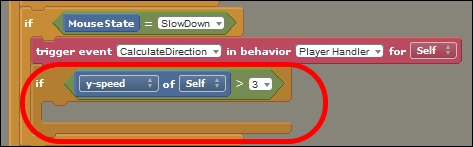
- Insert a set y-speed to block (navigate to Actor | Motion | Speed), and then subtract
0.1from the current y-speed of Self, as shown in the following screenshot: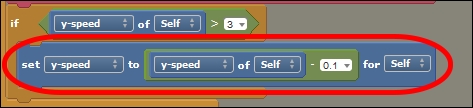
- Insert four additional physics blocks and configure them exactly as shown in the following screenshot:
Great work! You've created an extensive, detailed conditional logic to control the movement of your Player Character, depending where the cursor is on the screen when the player presses the left mouse button. You also created some complex custom events and blocks, enabling us to accomplish a lot more with far less code. Not too shabby! Now perform the following steps:
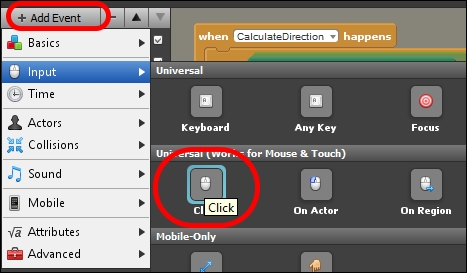
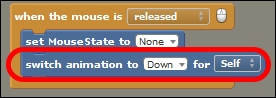
- Now, we just need to create a when the mouse is released event to make our movement code functional, as shown in the following screenshot:
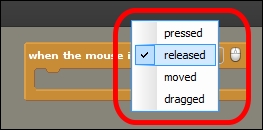
- The new mouse event will be set to pressed by default. Let's change it to released now, as shown in the following screenshot:
- Add a set MouseState block to this event, and give it the value
None, as shown in the following screenshot: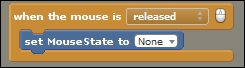
Now test it! If you followed the previous instructions correctly, you should see the Cowboy actor moving faster down the screen when you click below him, more slowly when you click above him, and sliding left and right respectively, when you click to the side of him. You've accomplished a lot so far, so be proud of yourself!
The last thing we need to do before we finish up in this chapter is switch animations as the Player Character's movements change, according to the code we just clicked together. In the Handle Dir Click event, perform the following steps:
- Add a switch animation to block (navigate to Actor | Draw | Animation) to the otherwise block, as shown in the following screenshot, and give it the value
Down: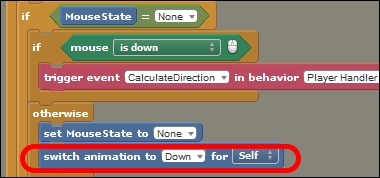
- Next, insert the exact same switch animation block with the very same value in the when the mouse is released event, as shown in the following screenshot:
- Finally, put one of these switch animation to blocks in every condition of the CalculateDirection event, and alter the values to
RightandLeftfor the last two conditions, as shown in the following screenshot: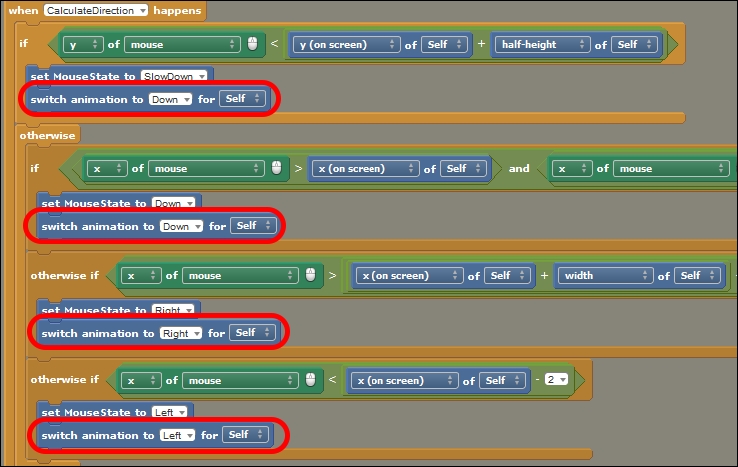
That's it! Test your game, and see the animations switching as you move the Cowboy around the level.