A tileset is a collection of reusable tiles that we can use to create complex and varied level geometry with marginal impact on file size and memory consumption, when compared with the equivalent impact that would be incurred were we to custom paint every detail of our levels without the use of such repeatable units. At 1X scale, the tiles in our tileset are 32 by 32 pixels; at 4X scale, they are 128 by 128 pixels. As with all of our graphical assets, we will be importing our tileset at 4X scale, allowing Stencyl to automatically generate all of the other scales.
Let's bring the tileset into our game. The process is not dissimilar to the steps we followed when importing the backgrounds earlier.
Go to the Dashboard, and select Tilesets from the list of RESOURCES in the left-hand pane. Click on the This game contains no Tilesets. Click here to create one button, and you'll be prompted to provide a name. Name it Green Tileset, and click on Create. You will see the following window. Do not click on anything as yet:

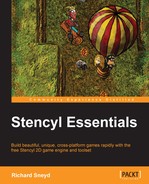
Click on Choose Image, and the file browser will open, as it did during the importing process for our backgrounds. Navigate to the game assets folder as before. The tileset can be found in the Game Assets/Graphics/Tilesets/green grass tileset.png directory. If successful, you should see the tileset fill the window like the following screenshot:
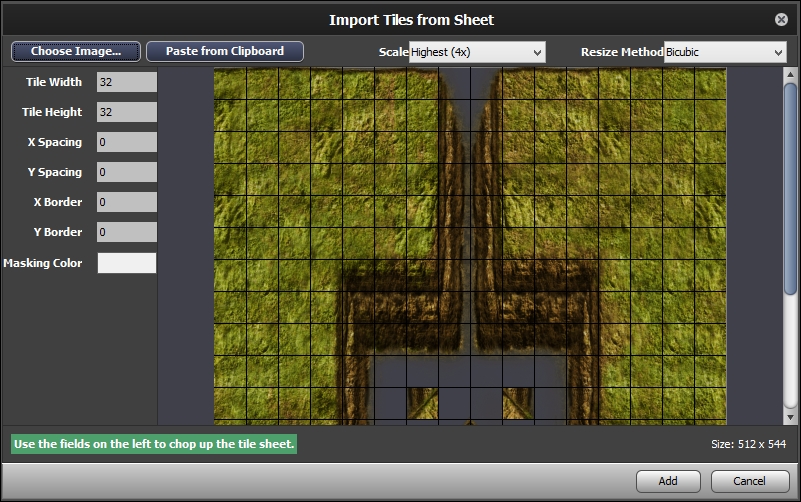
When working in Stencyl, we always see the 1X scale graphics, as this is the default resolution for desktop targets (Windows, Mac, and Linux). The higher resolution graphics are only used when we test or run the game. Which particular resolution is utilized at runtime depends on the platform and device being targeted, screen dimensions, and so on. Now click on an individual tile to edit its settings. The two most important settings to be configured are as follows:
- Collision Bounds: Here, we can set either a box or polygonal collision shape for the various tiles in our tileset by clicking on the required shape, as shown in the panel. If the tile is blank, or if it's a tile that actors should be able to pass through, we must set it to No Collisions, which is the top-left option in the collision bounds shapes window. All the tiles are set to the square collision shape by default and must be altered if this does not fit the particular tile.
- Frames: By default, all the tiles have just one frame—most tiles are static. If you wish to animate a tile (water, lava, and so on), you can import additional frames and set their duration in milliseconds, as shown in the following screenshot:
Each tile in the set has its own collision bound, highlighted in the Collision Bounds pane to the right. Be sure to match the Collision Bounds pane to the visible part of the tile as closely as possible, using the various shapes available under Collision Bounds to the right of the screen. You can create custom shapes, if you want to be very precise, by clicking on the plus (+) button at the top left of the Collision Bounds window, as shown in the preceding screenshot. When you are satisfied, save your progress, and click on the close (x) icon on the Tileset tab, which is to the right of the Dashboard tab toward the top of the screen, to close out the editor for now.