Now it's time for the exciting stuff! As we move forward with building our first project, we are going to use the design process we talked about in the last chapter and start with a level sketch. You might be tempted to just open up Unreal and jump right in, right? Why spend time drawing when I could be building that sweet level I've always wanted? Well, here's why. The best way to avoid multiple revisions and costly time spent redoing sections of your level is to plan in advance. Figure out the setting, architecture, background, and story of your level. Put some thought into where you will place story cues and power ups. Run your ideas by friends, players, and team members. Incorporate the feedback you receive and then build your level. It's the level designer's equivalent of "measure twice, cut once".
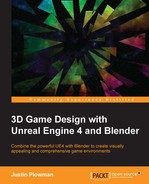
Let's take a look at our level sketch:

Our first level map!
So here is our first level. The level itself is pretty basic. We have two rooms connected by a hallway, with some stairs that lead up to a second tier. After we finish the basic layout, we can add a cargo elevator off to the side and working doors for the player to interact with. I have tried to lay out the level in the form of a small cargo ship, to fit the theme of our science fiction horror game. The level will function as an introduction to the setting, as well as a way to transport the player to the haunted space station environment we will be building later.
In this chapter, we will be covering the following topics:
- Building the level using Unreal's Content Browser
- Using different types of light
- Adding interactive elements using Triggers and Blueprints
- Playtesting our level
Go ahead and open Epic Games Launcher, and pull up the project we started at the end of the last chapter. Unreal Engine 4 was a huge upgrade over the last version of the engine, as it gave users a simple drag-and-drop interface. This was accomplished using two important panes in the interface: the Modes pane and the Content Browser. These portions of the interface allow level designers to drag elements into the level and place them where they need to go. Of these two, we will use the Content Browser the most:

The Content Browser contains all of the game assets we will use
The Content Browser holds all of the objects, sounds, materials, and particles that can be used in your creation. These are sorted into folders that mirror the file structure where your project is stored. Unreal does this to make it easy to move project files around, should the need arise. Navigating the browser is easy. Double-clicking a folder opens that folder, while the top portion of the panel displays a breadcrumb trail that can be clicked on to move back through your selections. I like to ensure that the sources panel is on as well; this makes navigation and finding specific files easier. When we created our project, we told Unreal to include the Starter Content folder. This folder includes many basics for us to get started with, such as a variety of basic shapes, architecture pieces, materials, and more. With these, we can start whiteboxing our design.
Start by creating the first room:

The first room of our project
Tip
Hint: Moving forward, we will begin building our level in Unreal. This book assumes the reader has a basic understanding of using Unreal Engine 4. If you are having issues following along, check out the UnrealEngine channel on YouTube for some great introductory tutorials from Epic Games. It can be found at https://www.youtube.com/channel/UCBobmJyzsJ6Ll7UbfhI4iwQ/.
To start building our first room, we are going to take advantage of the assets we have in the Architecture folder. Using its selection of floors, walls, and doors, we are going to assemble the first room of our design:
- First let's start a new level in our project. Head up to the File menu, click it, and select new level. Choose Empty Level in the dialog box that appears.
- The new level contains absolutely nothing. Perfect for our foray into space! Drop in a Floor_400x400 piece as a place to start. This is done by clicking and dragging the piece into the level from the Content Browser. Head over to the details panel and make sure its location is set to
x=0 y=0 z=0. This will make it easy to line up our other pieces. - Duplicate the floor five times. This can be easily done by holding ALT and moving the object to create a copy. Line them up in a 2x3 rectangle to create a good-sized room.
- Next, let's grab some walls. Drag a Wall_400x300 into the level, on top of one of your floor pieces:

Sometimes we use the four window view to line up our static meshes
- We are going to use the 4-viewport view to line up our wall section. In the top-right corner of your viewport, there is a row of icons, that control several different items such as grid snaps, angle snaps, scaling snaps, and camera speed. All the way over to the right of those icons is a minimize/maximize button. Click that to bring up your four viewports. Using two of those viewports, line up your wall section with a corner of your floor.
- Copy the wall section and use the Move and Rotate tools to enclose the space.
- Lastly, enclose the space by taking floor pieces and using them as a roof to complete the room.
At this point, I'm sure you are just dying to drop into the level and run around inside your new room. However, to test our level, we need to add a couple of things: lights and a player start. For testing purposes, let's drop in a couple of PointLights. Head over to the Modes panel on the left-hand side of the screen and drag two PointLights into your room. Again, use the 4-viewport configuration to make sure they are where you want them to be. Secondly, from the same panel, drag in a PlayerStart. The PlayerStart has an arrow sticking out from its center. That is what direction the player will be facing when they spawn. Always try to point your PlayerStart in the direction you want the player to go first. This ensures that the player is engaged from the start and can enjoy your creation with the minimum of confusion. Lastly, we need to save the file (using the File menu or Ctrl + S) and build the level using the Build button.
Testing your level while it's being constructed is an important part of the design process. Through testing, you can discover if your level has any flaws or issues and fix them before things get too complicated. To test your level, press the Play button. This will start a play session in the current viewport and allow you to run around inside your level. If you click the little down arrow next to the Play button, you will be given the option to open other types of play windows, such as the New Editor Window. It can be helpful to be able to see the whole play screen. Now test your level and make sure everything is lined up properly. Once you feel good about your first room, let's build the rest of the design:

It is a good habit to add as much detail as you can to your whitebox level so you have a good idea of what your design will look like
Now let's build the hallway. We can easily build out our hallway by copying existing pieces in our level. I will also show you how to swap pieces in the level without deleting them:
- Select one of the floor pieces in your first room. Duplicate it and line it up with where you would like to place the doorway into the hallway space.
- Go into the Content Browser and select Wall_Door_400x300. We are going to replace one of the wall sections with this piece. Now select the wall piece that you would like to replace in the viewport. Right-click on it and select Replace Selected Actors with Wall_Door_400x300 from the menu:

Replacing our wall static mesh with a wall that contains a door
This will swap the existing static mesh with the one we selected and add in that perfect-sized doorway.
- Copy the floor section twice more to lengthen the hallway. Don't forget to make sure all the pieces line up properly with your existing floor.
- Copy a wall section and add it to your hallway. Copy that a few more times to enclose the length of your hallway.
- Finally, copy the floor to create the ceiling and enclose your hallway, and add a light inside it.
Build your level and give it a test. If the hallway does not feel long enough, add a couple more sections. Once you are happy with the feel of your level so far, save your file. Now let's add the final room:

Working on the cargo bay
For this room, we will add some vertical elements to the design. We will also build both stairs and an elevator to access the walkways above, so let's begin:
- As we have done for previous additions, let's copy a floor piece from the hallway and line it up with the doorway. This will be the start of our new room. This room will be larger than the last room, so let's copy our new floor section twice in each direction, creating a row of five floor pieces.
- Now let's select all the floor pieces in that row by holding Ctrl and clicking on each piece. Copy this row four times to create our large room:

Creating the second story by duplicating the walls
- Copy a wall section from the hallway into our room and use it to enclose the whole space, as we did in the hallway. Now select all of those wall pieces and copy them. Set those pieces on top of the originals to create a second floor:

Duplicating the first floor section for the catwalk
- Now let's create the catwalk for the second floor. Copy a floor piece toward the back of the room. Align it with the top of the wall.
- Over in the Details panel, go over to Scale and type in
0.7in the green box. This will scale our floor piece in the Y axis and decrease how wide our catwalk is:
Using the top view to duplicate our catwalk floor sections
- Copy our walkway piece around the outside of the room to create a U-shaped section. This will leave space for our stairs and elevator:

Creating the spiral staircase to give the player access to the second floor
- Time for the stairs! Add in a Curved Staircase from the BSP menu in the Modes panel. Align it with our corner so that it will connect with our walkway. However, the default stairs aren't high enough. We can fix this by adding stairs in the Details panel and messing with the Num Steps option. We can adjust the size of our stairway by adjusting the Step Width option. The settings that worked for me were Num Steps:
15and Step Width:275. - Our last feature will be adding in the pieces we will need for our elevator:

Starting to lay out our elevator components
For the elevator, I copied a floor piece and moved it to line up with my walkway above. I moved it up and down a few times to ensure it fit, before leaving it sitting on the floor in its down position. We will animate this piece to make the elevator work later in the chapter.
- Grab a Pillar_50x500 piece from the Architecture folder and arrange them around our elevator, and we are done.
Now that we have our basic level geometry set inside the level, let's think about what other more decorative elements could be added to help reinforce the theme. Science fiction levels come in many different flavors. Some environments might be clean and simple, such as in the Star Trek universe. Others might be more industrial, with pipes and cabling everywhere, such as what we see in the Alien franchise. The aesthetics of a level can be used to reinforce the theme of an environment and communicate information to the player. In this case, we would like to reinforce the survival horror aspects. To do that, I will lean more toward an industrial style. Collecting reference art to help inspire your item placement can help you get the right feel and I strongly suggest taking a look at images online for some great examples. Remember that these props are just placeholders for art that can be created later. Ready? Let's get started with our first room:
- Head on over to the Shapes folder within the Starter Content folder. This folder contains many basic shapes that will help approximate different props that could be created in Blender for this level.
- Grab a Shape_Cylinder and drag it into the room. I envision this first room as being the bridge of our small cargo ship and the cylinder could serve as the hologram projector of a heads-up display for flying the ship. I added a Shape_TriPyramid on top of it and scaled that down a bit to make it look more techy.
- Add in a couple of Shape_Cube pieces and scale them to look like control consoles. This allows us to approximate the actual size of the 3D piece to make.
- Using the Shape_Pipe, Shape_Pipe_90, and Shape_Pipe_180 pieces, add some pipes around the room to add more detail. A good rule of thumb in square spaces is to add details to the corners to hide the fact that the room is square. It makes the space more interesting and provides visual variety.
- Using the Shape_Trim, Shape_Trim_90_In, and Shape_Trim_90_out pieces, add some trim where the floor and walls meet. Once you finish that, select all your trim pieces, copy them, and flip them over to trim the area where the walls meet the ceiling.
- The Props folder contains several completed pieces we can use, not unlike the pieces we will make using Blender later in this book. Grab a couple of chairs to add to our bridge, near our "computer console" placeholder shapes.
- Using the Shape_Cube piece again, add some variety to the back and side walls.
Here is my completed whitebox of the bridge:

The final bridge whitebox
And my completed whitebox of the cargo bay:

The final whitebox of the cargo bay
Is it starting to feel more like an environment? If not, add a few more shapes or props until your level feels more natural. However, do not go too far. We want our level to have some objects in it to convey story and immerse the player in our environment. We don't want to overcrowd the level and have it feel clunky and cluttered. Take some time to add some detail to the hallway and the second room. In the next section, we will take a look at techniques to light our level with our theme in mind.