Throughout the level, we have been using basic lights just to give our work in progress some illumination. In this section, we are going to transform our lighting into something that seems more realistic for our theme and communicates it to the player. Proper lighting is something that is important to make a scene or environment seem believable. It can make an audience feel anxious or scared, and create a sense of tension. It can communicate danger or safety. In games, it can even be a game mechanic. In our scene, we are going to use lighting to communicate a sense of mystery and a tension that something just might be going on beyond the player's ability to see.
To create this feel, let's think about what we might need. Plunging our corners into shadow and limiting the player's line of sight can go a long way to making them think that something might be stalking them, just out of sight. Using different colored lights to denote danger and safety can communicate those things to the player and thus create or relieve tension. Just like when we were gathering inspiration from online images to help with item placement, images from other games, and especially real life, can help with figuring out the right lighting for your level. Unreal provides a few different types of light to help us achieve these goals. PointLights are a type of light we are already familiar with. They cast light in all directions from a fixed point in space. Next we have SpotLights. These lights throw light in a cone shape toward a target point. This can be used to highlight specific things in an environment. Lastly, we have DirectionalLights and SkyLights. These are large light sources that create a universal amount of light throughout the level. DirectionalLights are often used to create the sun or moon in an outdoor environment. For each type of light, the Details panel provides several options for tweaking the intensity, shadows, falloff, and color. Ready to add some emotion to our environment?
- Let's start our lighting process by deleting all but one light from each room. This will allow us to start with something very basic. Don't forget to build the level after you have made lighting changes. This allows Unreal to process the changes to the shadows and give you an accurate look at your changes.
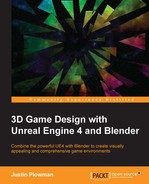
- Select the light located near the PlayerStart. The bridge area of our small ship is where the player starts and should feel at least marginally safer than the rest of the ship:

Creating a green light for the bridge
- Change the color of the light to a pale green. This is done by selecting the light and clicking the Light Color option. This will bring up a color wheel that allows you to select a new color for the light.
- At the default level, the light is too bright for our purposes. In the details panel, find the Intensity property and put in a lower value. I set my light to
250. - Lights have an area of effect that is governed by a property called Attenuation. This is essentially the radius in which the light goes from full power to zero. A light that has its Attenuation set to
0does not have any falloff at all and is at full intensity. We want the light to not be much more than what might be put out by a computer screen. Let's set it to250. - Since we wanted the light to put out only as much light as a computer screen, go ahead and move it over near our computer console shape.
- If we look at the shadows cast by our light, they are very harsh and hard edged. Not at all what we would see in reality. Most lighting tends to create very soft and diffuse shadows and we would like to mimic that here. We do that by adding a Source Radius in the Details panel. Mine is set to
150:
The final lighting setup on the bridge
- Now that we have all of our settings for the light completed, let's copy the light over to our other computer console and above where our holographic display is (above the pyramid shape).
- The following screenshot shows the final lighting setup in the cargo bay:

Final lighting setup for the cargo bay
Make sure to build your level and play it to check out your fully-lit bridge. Once you are happy, apply some of the same techniques we learned to the hallway and the second room, our cargo bay. Remember we are going for tension and mystery. Since these areas are outside our "safe" bridge, I like to use red and yellow light. Now let's add some fun interactive elements to our level by making the doors and elevator work.