At this point, we have the geometry, or basic shape of our crate down, but it still doesn't really look like the objects we see in other games. The reason is textures. Texturing our object will create all those little details that will make our game asset worthy of the level we have built. Making our textures and getting them on the object is a two-step process. First, we need to tell our textures how to behave and that takes a UV map:

Learning unwrapping with a basic cube
A UV map is a set of coordinates that tell texture maps we have placed on a game asset how to wrap themselves around our object. The principle is to take your 3D object and flatten it, so that we can apply an image to the outside in a manner that doesn't tear or stretch the texture. This allows us to create detailed texture maps that apply things like scraped edges, rust spots, paint colors, visual screens, and more. Without it, Unreal will not know how to texture our object in game. It will also not be able to apply lighting correctly, since Unreal uses UV maps to apply light and shadow:
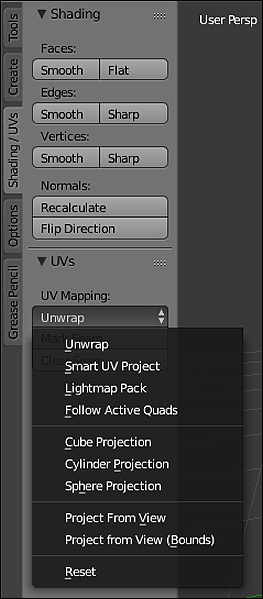
The UV mapping menu
So how do we do this in Blender? The application gives us several options for adding a UV map, some of which are more useful for what we have created than others:
- Smart UV Project: Useful for architectural and mechanical objects, Smart UV Project creates a custom UV layout based on angular changes to your geometry. It does its best to lay everything out in a logical fashion and can minimize stretching. The tool tries to lay things logically but may need a bit of tweaking.
- Cube Projection: Cube mapping breaks your object into six faces and projects them on to planes. This creates six separate UV islands that can be manipulated.
- Project From View: Creates a UV map based on what is selected and the angle of the 3D view. For example, you can select all of the polygons on the left-hand side of the object and select the Left Side view for the viewport and use this option.
- Lightmap Pack: Unreal and other game engines use a lightmap to bake shadows on to objects during building. Lightmap Pack can create a UV layout that is more suited to lightmaps by using as much UV space as possible. This maximizes the amount of lighting information the object can take and will improve the results.