As with the free offerings, there are a number of commercial environments that we'd do well to explore in this book. We will look at both type 1 and type 2 virtualization solutions.
vSphere is an extremely powerful continuation of the capabilities discussed with the VMware hypervisor; the added capabilities and features make it well worth the investment to deploy sophisticated and complex virtual architectures. The tool provides many additional options above and beyond the free variant. These options are as follows:
- Pool computing and storage resources across multiple physical hosts
- Centralized management of multiple hosts using VMware vCenter Server
- Improved service levels and operational efficiency
- Live migration of virtual machines
- Automatic load balancing, business continuity, and backup and restore capabilities for your virtual machines
As you can see, there are many optimization options in the tool; however, unless you are building a complex and sophisticated testing lab, this tool goes beyond what we need as a solution. If you do find yourself running large global teams, then it is definitely an option that you should consider if it is within your budget.
The group at Citrix has developed a powerful competitor to the solutions offered by VMware, and this is evident in their XenServer offering. They make the statement that they are the leading data center platform for cloud and desktop solutions; furthermore, according to their claims, four out of five of the largest hosting clouds are hosted by XenServer, and this is quite a claim indeed. Some examples of what the product can provide solutions for are as follows:
- A highly secure and flexible network fabric
- Creation and delegation rights
- High availability and load-balancing support
As with the vSphere commercial solution, this is not something we really require for building our labs, but it is a possibility for those who want to use something other than a VMware offering. You can find out more and also download it from http://www.citrix.com/products/xenserver/how-it-helps.html.
The team at VMware has been in the virtualization game for some time, and it shows when you use their workstation product. The thing that separates VMware Workstation Pro (formerly VMware Workstation) from the masses to me is the fact that you can integrate with most, if not all, devices you plug into your host machine relatively seamlessly. While it does cost you to use VMware Workstation Pro, the cost is relatively cheap, and it provides a lot of power for creating extremely diverse and complex architectures. It is, by far, my favorite tool, and I will be using it in the next chapter and the consecutive ones as well. As I have mentioned, the Microsoft offering, having only been on the scene for a short period, is definitely improving, and it will make for an interesting race as they continue to mature their product. This is a good thing for us! As consumers, we can only benefit from these vendors each trying to outdo the others.
As mentioned, it is highly recommended that you consider purchasing the software. You can download the latest version of VMware Workstation from http://www.vmware.com/products/workstation/workstation-evaluation. As with other versions of software, you have to register and obtain a key to be able to power on virtual machines.
Once you have downloaded it, you can install the software, and it is pretty straightforward. If you do have any questions, the VMware Workstation user guide is well written and is an excellent reference for you. You can also download it by visiting http://pubs.vmware.com/workstation-12/topic/com.vmware.ICbase/PDF/workstation-pro-12-user-guide.pdf.
There is a large community forum that is also an excellent reference for information about the tool. Support is another reason VMware continues to lead in the major categories of virtualization. Once you have installed the program and opened it, you should see a display on your screen similar to this:
As you can see in the preceding screenshot, there are a number of options for us to start with. As we used ISO images earlier, we will continue that trend here and also add another task of creating a virtual machine. For simplicity, we will use the same Kali_2.0_Attacker.iso ISO that we used earlier, but you are welcome to download an ISO image of your choice and create the machine from this. Once you have made your choice of the ISO image, we will be ready to begin the installation. To start using this virtual machine, we will execute the following steps:
- Click on Create a New Virtual Machine. This will start the New Virtual Machine Wizard. Accept the default setting of Typical, and click on Next.
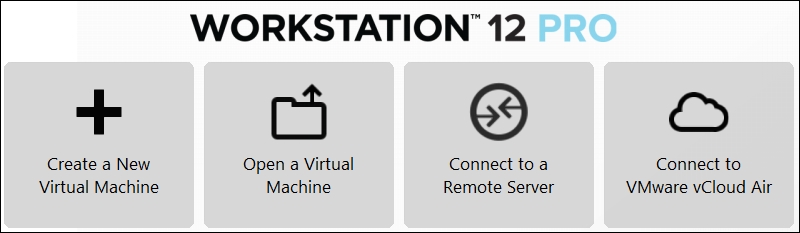
- In the next window, select the radio button for Installer disc image file (iso), and browse to the location of the ISO file. Then, click on Next, as shown in the following screenshot:
- In the guest operating system window, select Linux, and in the drop-down menu, click on OtherLinux 3.6 kernel. Once you have made your selection, click on Next. Accept the defaults, and click on Next.
- On the Specify disk Capacity screen, read through the information on the advantages and disadvantages of splitting a disk. If you prefer to change the default setting, you may do so, but for most purposes, the default is acceptable unless you intend to have large machines.
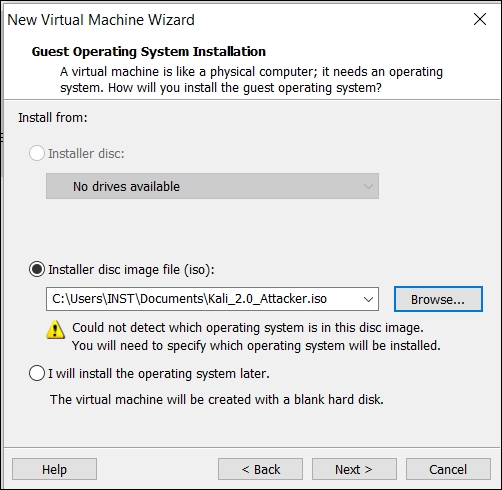
- Once you have made your choices, click on Next. This should be the last screen; take a moment and review the information. The next thing to do is click on Customize Hardware and increase Memory to at least
1 GB; then, click on Finish and create your virtual machine. You should see the machine you created and the information for the machine configuration, as shown in the following screenshot:
- The only thing left to do is to power on the virtual machine. Click on Power on this virtual machine, and your machine will boot.
Now, we are going to create a virtual machine for one of the machines that we will use in other chapters in the book. The machine we are going to use has already been created and is available as a virtual machine in the VMware Virtual Machine Disk (VMDK) file format. We will cover more about the different formats for virtual hard drives later in the chapter. We want to download the Broken Web Applications Project virtual machine from Open Web Application Security Group (OWASP), available at https://www.owasp.org/. The virtual machine has been sponsored by Mandiant and is an excellent tutorial to practice web application testing. You can download the VM from http://sourceforge.net/projects/owaspbwa/files/.
Once the VM has been downloaded, extract it to a folder on your machine. Once the files have been extracted, we need to start VMware Workstation and start the access process. The following steps need to be executed:
- Click on Open a Virtual Machine. Navigate to the folder where you extracted the files, and locate the configuration file for OWASP Broken Web Applications Project.
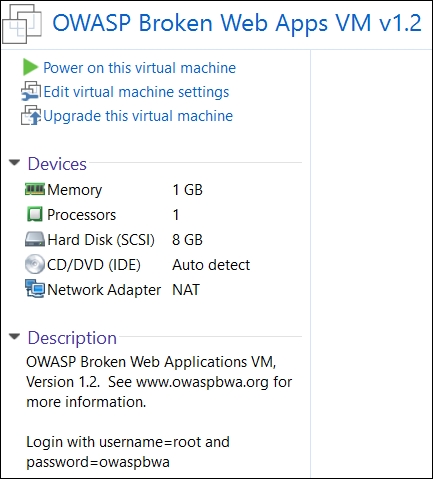
- Once you have located the file, select it and click on Open to open it. This will open the VM, and you should be in the configuration screen, as shown in the following screenshot:
- We now want to start the machine: click on Power on this virtual machine, and your machine will boot. If you are prompted, accept the defaults and continue with the boot process.
- Once the machine has booted, you will see the login information for the machine to access it across the network. We could log in to the machine locally, but there really is no reason to do this. You are welcome to do this if you want to check the machine out or look around, but for our purposes, we will access it from the network. This is the preferred way to access it because it provides us with a GUI to all of the different tools within the VM. The VM screen that shows the status after the boot looks like this:
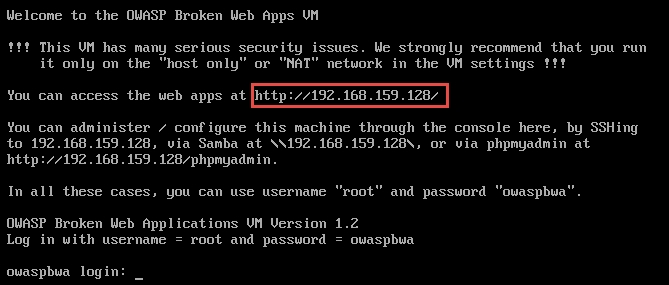
The information that we want here is the IP address that is assigned to the VM so that we can access it and check it out! Open the browser of your choice, enter the highlighted IP address, and bring up the web interface to the Broken Web Application Project VM. An example of the web page that is presented to you is shown in the following screenshot:
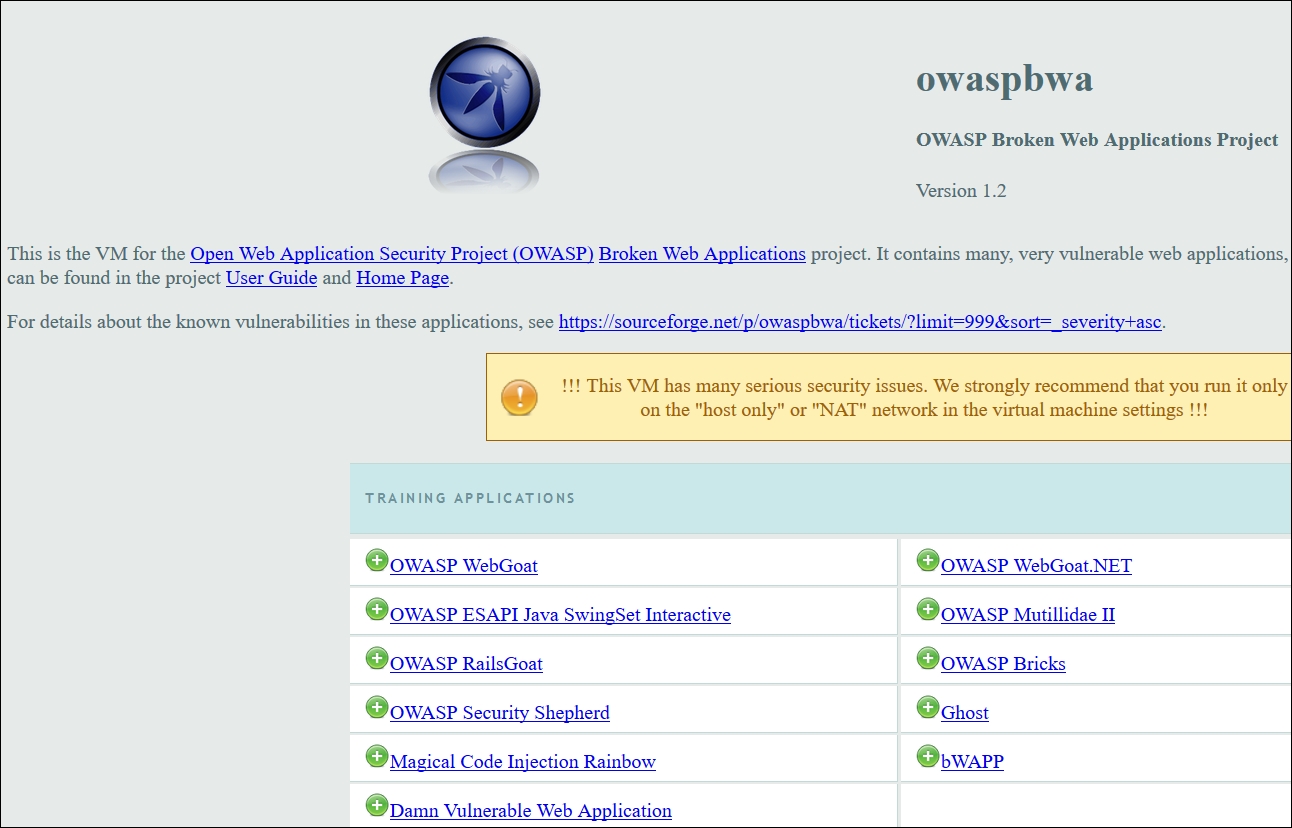
As the screenshot shows, there are many tools in this VM distribution, and it is something that any tester can benefit from. The tutorials and applications that are contained here allow a user to practice his or her skills and try to crack the included challenges, which are set up at different skill levels. I encourage you to spend a lot of time here and come back often. We will be using it throughout the book when the situation requires it. Again, since the sponsorship of Mandiant, the VM has had a number of additional challenges added to it. Some of you reading this book might be familiar with the OWASP's excellent tutorial, WebGoat. This project is just an extension of that tutorial, and it has also added the Irongeek tool Mutillidae. You can read more about Mutillidae at http://www.irongeek.com/i.php?page=mutillidae/mutillidae-deliberately-vulnerable-php-owasp-top-10 or even watch some of the informative videos at http://www.irongeek.com/.
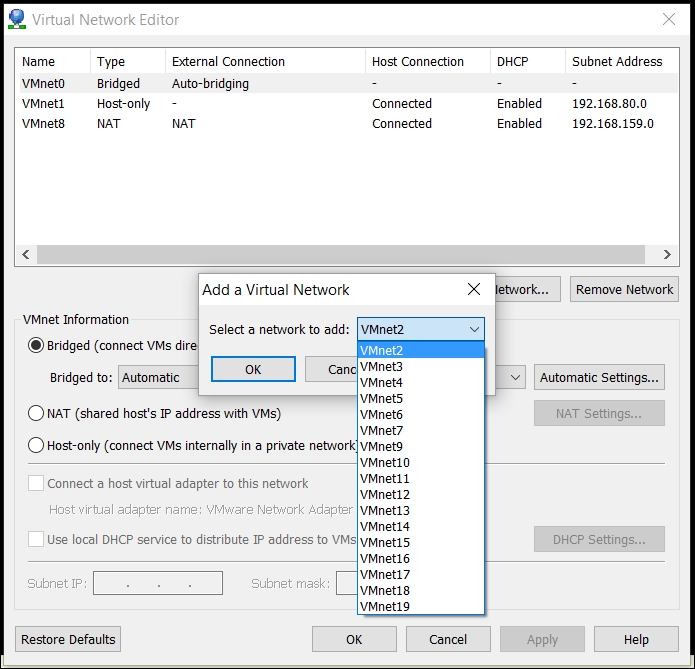
We have one more topic to look at before we continue with this chapter: the power of networking within VMware Workstation Pro. This is one of the main reasons I paid for and continue to pay for VMware Workstation Pro. In your VMware Workstation Pro instance, navigate to Edit | Virtual Network Editor. When the window appears, you will see the current switches that are configured in VMware. By default, VMware configures three virtual switches, and they are VMnet0 for the Bridged interface, VMnet1 for the Host-only interface, and VMnet8 for the NAT interface. We will not go into detail here as there are many sources from which we can learn more about the networks and what they mean, and one of the best is the VMware Workstation Pro user guide I mentioned earlier in this chapter. The power of VMware Workstation Pro is that we can have up to 20 virtual switches! What this means is that we can effectively architect 20 different network segments. VMware network configuration allows us to set the IP address ranges that we want and also provides a DHCP server. For the most part, 20 is more than we need, and we can now have 255 network segments on Linux. That is a lot of networks! It is this and other factors that make it my software of choice. We need the switching capability when we build layered and segmented architectures. An example of this is shown in the following screenshot:
It is more than likely that you have the three default switches that are installed by the software. Feel free to add a switch if you want to see how the process is done. This is what allows us to build a true layered architecture that emulates something we could see in an engagement. In fact, it is rare to have a single segment or flat architecture you are testing, especially in any type of external testing. Therefore, it is imperative as we build and test advanced techniques that we have the ability to provide layers of protection so that we can either hack through or get around in some way to achieve a compromise. One of the methods I like is isolating the machine from other machines while we are testing so that we don't inadvertently attack an innocent machine on another network. As an example of the power of this, the next screenshot is from one of my development laptops:
