
Next, we want to attack the firewall, like we did earlier when we encountered the router. Our success will be determined by the administrator and how they have configured their environment.
We will use the Smoothwall and pfSense firewall that we created, and we will attack them from the external interface. We will use the same process we used against the router and see what we can discover when we go against the firewall. Our testing range is shown in the following diagram:
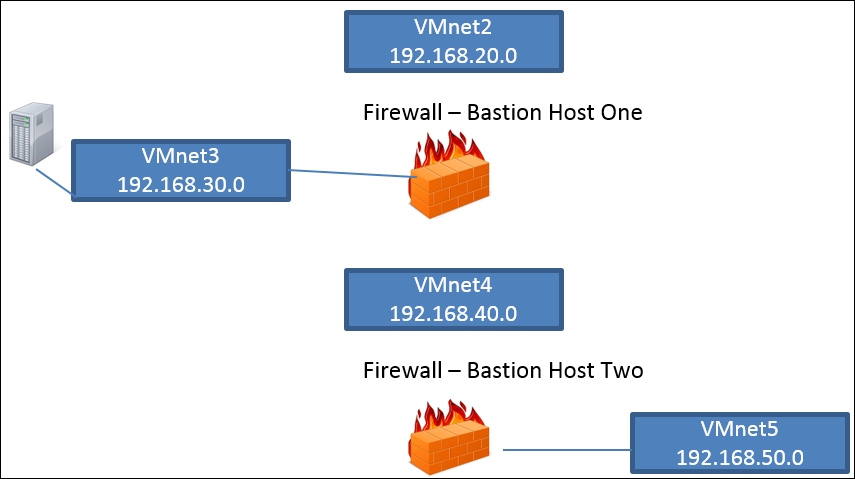
As the previous diagram shows, we will just concentrate on the external interface of the Smoothwall (Bastion Host One) and pfSense (Bastion Host Two) machine. The first thing we want to do is to use our popular network scanning tool, Nmap, and see what we can discover from the machines. We need to have our Kali Linux distribution connected to the VMnet2 switch.
Once you have verified your settings in the Kali machine, log in and enter ifconfig eth0 in your Smoothwall machine to display the information for the IP address of the machine, since we need this to enter into our tool.
Now that we have the IP address, we are ready to conduct our scan. In your Kali Linux machine, enter nmap -A <target IP> to scan the eth0 interface of the Bastion Host One machine. If your IP address is different, then you will enter that as the target. An example of a portion of the results is shown in the following screenshot:
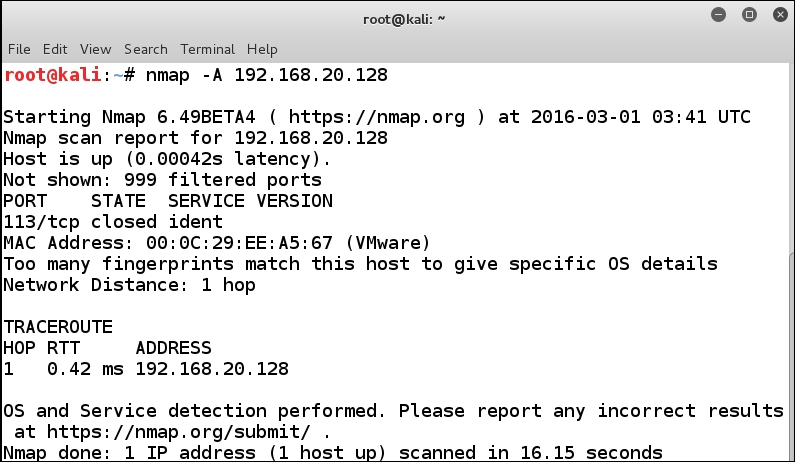
Once again, we really do not have much to go on. We see that there is only one port open on the machine, and, since the case is that there is not enough for the Nmap tool to attempt a fingerprint of the operating system, we need to look at the packet level. Start Wireshark on Kali by entering wireshark &, and start a packet capture on the eth1 interface. Once you have the packet capture started, run the Nmap scan again, and then review the scan in Wireshark.
As you review the previous screenshot, you see that the ident port does respond as being closed. Virtually, all of the other ports do not respond, so at least we have something to go on. This is because the Smoothwall installation is registered if there is an Internet connection, and the identity is controlled over port 113.
As we worked through this chapter, there was one thing that we discovered during our scan of the router; it is the use of ICMP error messages, so we want to see if there are any ICMP messages being returned by the Smoothwall machine. It is always a good idea to start with a fresh capture, so in Wireshark, navigate to Capture | Restart to start a new capture on the interface. To make your task easier, enter a filter of ICMP and click on Apply. Then, return to your terminal window, run the Nmap scan again, and observe the results in Wireshark.
An example of the results is shown in the following screenshot:
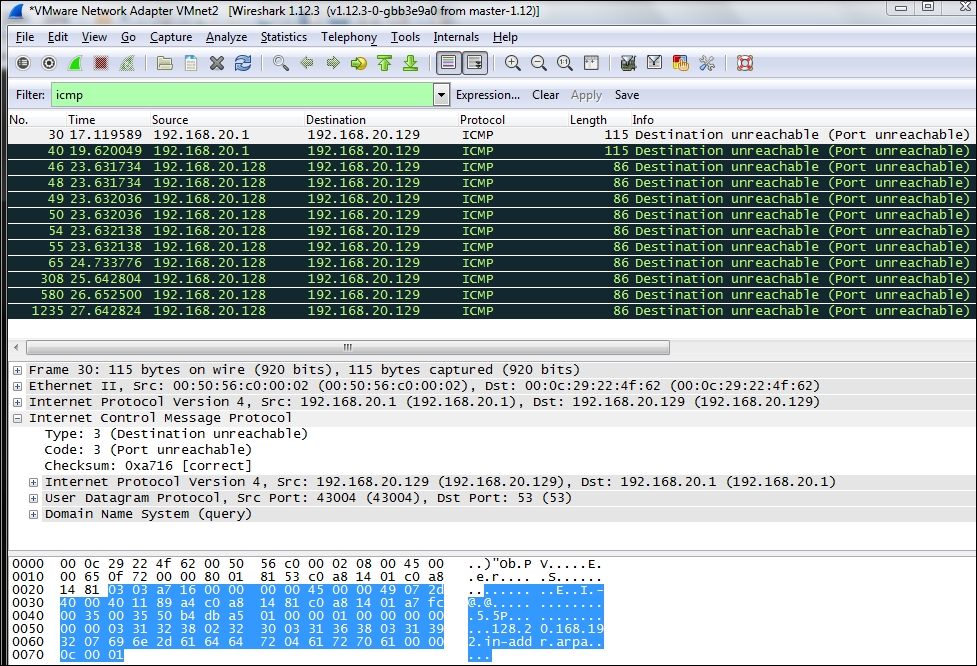
We do have the ICMP traffic, and this could assist us in determining whether we will encounter a firewall. Next, we will want to know what port is responding with the ICMP message. We know that according to RFC 793, this is a valid response for a UDP port that is closed. So, we need to determine if this is a UDP port that responds, or if it is a TCP. We will run our scan again and only look at TCP traffic, and we will do that by entering nmap -sS <target IP> and observing Wireshark during the scan. An example of the results is shown in the following screenshot:
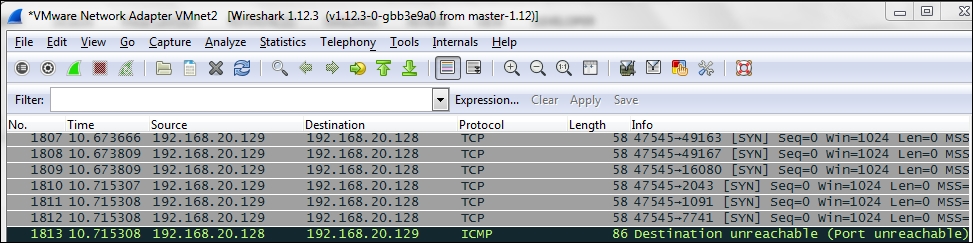
From the previous screenshot, we see that the TCP port causes the response, and therefore, it does not follow the RFC. We can now conclude that we have a firewall in place, and we can try to attack it or get through it.
This again is the reality of testing; we can find a firewall, and unless we gain something about the firewall, it can be difficult, if not impossible, to successfully attack it. In this case, if we did not have the advantage of knowing this is the Smoothwall firewall, we would pretty much be in the dark as to what type of firewall we encountered.
You are welcome to continue to try and get information about the firewall so that you can attack it, but we will move on because having worked with the Smoothwall firewall for a number of years, it is much easier to discover ways through it or use some form of social engineering to get access behind it.
Now, let us turn our attention to the pfSense firewall to get a comparison to what we saw with Smoothwall. Boot the pfSense machine, and connect the Kali Linux machine to the VMnet4 interface so we can do the scan against the pfSense interface. Once you have configured Kali, carry out the scan and enter nmap -A 192.168.40.40.
An indication of the output of this scan is shown in the following screenshot:
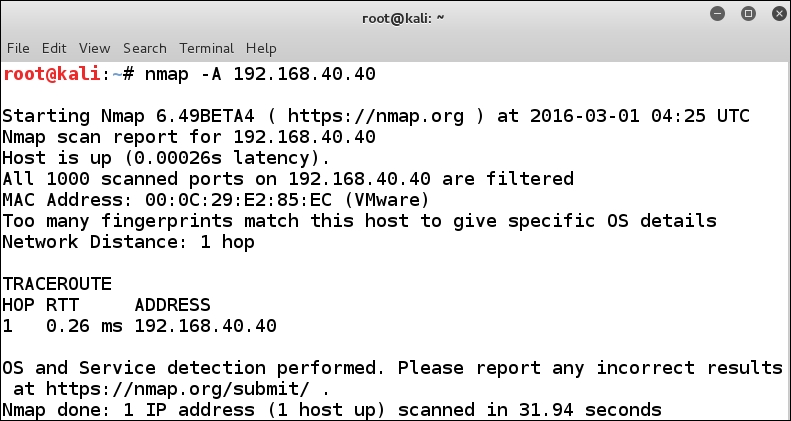
Again, we do not have really anything to go on from the scan; if we do a scan with just one port it will come back filtered, and as such we can deduce there is an ACL in place. We will stop here with the scans, since we have provided a number of different ways to experiment and practice the process of dealing with firewalls.