
When we are testing, one of the things that we want to treat as a valuable asset is the databases for our clients. This is where the company usually has most of the data that, if compromised, could cost the company a great amount of revenue. There are a number of different databases that are out there. We will concentrate on only three of them: Microsoft SQL, MySQL, and Oracle.
The MS SQL database has provided us with a number of vulnerabilities over the years, but as the versions of the database became more mature, the vulnerabilities decreased dramatically. We will start off by searching to see whether we can find any database exploits in the Exploit DB site for MS SQL. The results of the search are shown in the following screenshot:

As the previous image shows, we do not have a lot of current exploits against the Microsoft SQL server service itself, but the good news for us is there are applications that are running, and that is usually where we will find the exploitability, and not in the service itself. Of course we covered this in the web application testing section.
As we really did not discover much in our search of the exploit database, we will turn our attention to the process we use when we encounter a MS SQL target. As with all the testing, the sequence to follow is very similar to the methodologies that we have discussed throughout the book. The first approach we will use is the Nmap tool in our Kali Linux distribution. You will need an SQL Server as a target. If you do not have one, you can download the software from the Microsoft site. Bear in mind that the newer the version you install, the more you will have to change the settings so that it is vulnerable. Open a terminal window and enter nmap -p 1433 --script ms-sql-info <target>. An example of the results from this command is shown in the following screenshot:

As the previous screenshot shows, we have an old version of SQL Server, and this should make our job easier. Once we have the information on the database, we need to see if we can determine the password of the administration account, which is the SA account in MSSQL. We have a script in Nmap that will perform a brute-force attempt to find the password. In the terminal window, enter nmap -p 1433 --script ms-sql-brute
<target> to determine the password.
An example of an attempt at this is shown in the following screenshot:

Unfortunately, our attempt has failed, and in this case, we were not able to crack the SA password. Often, the password will be the default, which is <blank>. As we have failed at this, we will face more challenges as we attempt to extract more data from this database. As we are in control of the targets, we can just create a target that has the default or a known password so that we can continue our testing. One of the things we can do if we do get the credentials of the SA account is that we can attempt to dump the password hashes. To do this, enter nmap -p 1433 --script ms-sql-empty-password,ms-sql-dump-hashes <target> in the terminal window in Kali. An example of this is shown in the following screenshot:

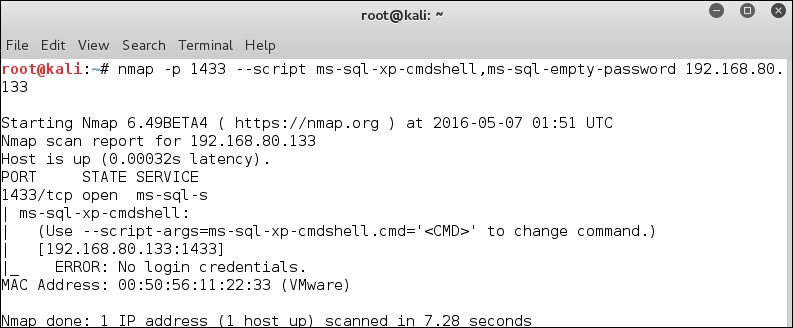
The thing that we want to explore is the stored procedures within the SQL Server. As we have identified that the credentials are default, we can execute commands on the server. In the terminal window, enter nmap -p 1433 --script ms-sql-xp-cmdshell,ms-sql-empty-password
<target> to run a command on the server machine. By default, the command will be ipconfig /all, but you can change it if you want to run another command. It is important to note that this command shell access is the same as opening a command prompt window on the server machine. An example of this is shown in the following screenshot:

We now have virtually complete access to this machine. Of course, it is running SQL Server 2000; however, what if it is running SQL Server 2005? We will now take a look at a Windows Server 2003 machine. The main thing to remember is that with SQL Server 2005, these stored procedures are disabled by default and the administrator will have to enable them. Also, the SA password will have to remain as the default, so when you encounter Server 2005, you might not be able to gain the information as with an SQL Server 2000 configuration. Furthermore, if the password cannot be determined, you will not be able to execute the commands. An example is shown in the following screenshot, where SQL Server 2000 is not configured with the default password:
So far, we have only used the scripting capability within Nmap. We also have the capability for database testing in Metasploit. Start the Metasploit tool by entering msfconsole in a terminal window. Once the Metasploit tool comes up, enter use auxiliary/scanner/mssql/mssql_ping, then set RHOSTS and run the module. An example of the output of the module is shown in the following screenshot:
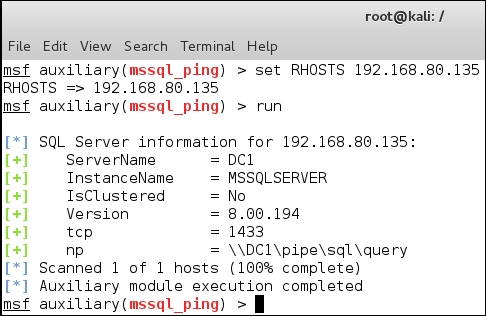
We now have information about the database server and the version of SQL that is running. We now have enough information about our target, the database it is running, and the configuration of that database. It is time to attempt enumeration methods on the database using Metasploit. In the Metasploit window, enter use auxiliary/admin/mssql/mssql_enum to enumerate information about the database.
The output from this command is quite extensive. An example of the first portion of the output from this command is shown in the following screenshot:
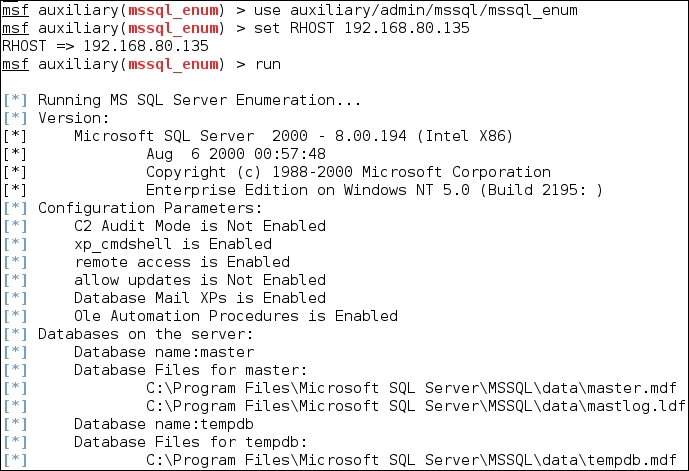
As the previous screenshot shows, we have been able to determine a number of configuration parameters and we have the names of the databases that have been created.
We now have a list of the admin logins and the stored procedures that are allowed by the database configuration. The list is truncated here, but you are encouraged to review all of the possible stored procedures that you can find in an MSSQL database.
As you might expect, we have the capability to execute commands using these stored procedures just as we did with Nmap. We will do this now. In the terminal window, enter use auxiliary/admin/mssql/mssql_exec to access the module. Once you are in the module, enter set CMD 'dir' to display a directory on the machine. Remember that this is a command shell with system privileges, and as such, the only limit is your imagination. An example of the output of this command is shown in the following screenshot:

The next database that we will look at is the . An example of the search results is shown in the following screenshot:

As the previous screenshot shows, we have a number of vulnerabilities that have exploits for them with respect to MySQL. For now, we will continue with the methodology of identifying and enumerating information from a MySQL database.
We need a MySQL database to work with first, so we can use our CentOS virtual machine. To install the database, enter yum install mysql-server mysql. Once the installation is completed, you need to check it. Enter chkconfig mysqld on, and once this completes, enter /etc/init.d/mysqld start to start the database.
This is what we need to do for our testing purposes. We will use Nmap, as we did in the previous sections, against the database. The first command we will enter is to take advantage of the fact that the database has been set up with the default settings, and as such, there is no password on the root account. In the terminal window on Kali, enter nmap -p 3306 --script mysql-empty-password,mysql-databases <target>.
As you have discovered, this version of MySQL does not allow the connection. This is a change in the default install configuration. We have a couple of options. We can attempt enumeration without a password; this probably will not get us very far. Additionally, we can set a password and configure the database to see what we can discover; however, to save us the time, we will use the metasploitable virtual machine. We just need to start the MySQL server. In the metasploitable virtual machine terminal window, enter sudo /etc/init.d/mysql start. When prompted, enter the required password. Return to your Kali machine and enter nmap -p 3306 --script mysql-empty-password,mysql-databases <target>. An example of the output of this command is shown in the following screenshot:

Now that we have the MySQL database with an empty password, we can continue to explore the different commands within Nmap. In the Kali terminal window, enter nmap -sV --script mysql-empty-password,mysql-databases,mysql-users <target> to enumerate the users from the database. An example of the output from this command is shown in the following screenshot:

The Metasploit tool also has a number of modules for the MySQL database. We will not explore them here, as it is very similar to the process we covered when we were looking at the MSSQL database. We have covered the process, and as such, you are encouraged to explore on your own.
This is one of the most popular databases that we could run into. The Oracle database is used quite extensively, from small to large corporations. As such, it is more likely something that we will encounter when testing; therefore, we need to take a look at some of the techniques to test it. The product is a commercial one, but they do offer an express version that you can use for free. You can download it from the Oracle site, but you are required to register it.
There are many references on the Internet that you can use to assist with the setup of Oracle to view the one that is put out by Oracle itself; refer to http://docs.oracle.com/cd/E11882_01/server.112/e10897/install.htm#ADMQS021. Once you have the Oracle box set up, we can try a number of techniques to extract information and test it.
The Oracle database, after version 9, has started to protect the information in the database. The first thing we need to do is determine the SID of the Oracle database. We will attempt this using the Metasploit module for it. In the Metasploit terminal window, enter use auxiliary/scanner/oracle/sid_enum to enter the module. Once you are in the module, you need to set the RHOSTS value and then enter run. An example of this is shown in the following screenshot:
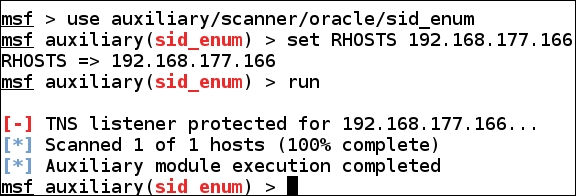
As the previous screenshot shows, if you encounter an Oracle database that is newer than v9, the SID is protected. We can run a brute force attack to determine the SIDs. It is also good to note that there are some defaults. When you install the Oracle database, you can review the information there and see what default SIDs there are! To attempt a brute force on the SIDs, enter use auxiliary/admin/oracle/sid_brute in the Metasploit terminal window to enter the module. Set the RHOST and then run the module.
An example of the output from the module is shown in the following screenshot:

As the previous screenshot shows, we now have some SIDs to refer. As the installation package that we installed was the Express Edition, it is nice to see that there is a default SID of XE.
The next thing we can do is attempt to brute force the passwords for the database accounts. We do this with another module within Metasploit. In the Metasploit window, enter use auxiliary/scanner/oracle/oracle_login to enter the module. Once you are in the module, you have to set the RHOSTS value as well as the RPORTS value. The default port for Oracle is 1521, so this is the port that you will more than likely set. An example of a portion of the output from this command is shown in the following screenshot:

As the previous screenshot shows, we have now locked out all of the accounts. This is always the danger when attempting to brute force, but at least we did it in our test lab and not our client's live database!