
In the previous chapters, we've mostly focused on writing code that's used in our apps. The apps we've built are small and can be tested manually, quite quickly. However, this approach doesn't scale well if your apps become larger. This approach also doesn't scale if you want to verify lots of different user input, lots of screens, complex logic, or even if you want to run tests on many different devices.
Luckily, Xcode comes with built-in testing tools. These tools allow you to write tests for your apps so you can make sure that all of the business logic for your app works as expected. More importantly, you can test that your user interface works and behaves as intended in many different automated scenarios.
Many developers tend to shy away from testing, postpone until the end of the project, or simply don't do it at all. The reason for this is often that it's pretty hard to figure out how to write proper tests if you just start out. Writing a test that simply tests if an API returned a response or if a certain object was saved to CoreData can feel really silly. More importantly, if not approached properly, tests can be more of a burden than a relief by being high maintenance and not testing the important things.
This chapter aims to be an introduction to writing both logic and interface tests using Xcode and its built-in tools. By the end of this chapter, you should be able to set up a solid, basic suite of tests and understand how you can make use of the tools provided by both Xcode and Swift to write better code that is testable and reliable.
This chapter is divided into the following segments:
- Testing logic with
XCTest - Testing the user interface with
XCUITest
Let's not waste any time and dive straight into the wonderful world of testing your app logic.
If you're just starting out with testing your app logic, there are a couple of views you might already have on the subject, or maybe none at all. To start testing your code, you don't need to have a computer science degree or spend days studying the absolute best way to test your code. In fact, chances are that you're already sort of testing your code and you don't even know it.
So, what exactly does it mean to test code?, you might be wondering right now. That's exactly what we'll cover in this section. First, we'll look at testing code and the different types of tests you might want to write. Then we'll dive into XCTest and setting up a test suite for an app. Finally, we're going to see how we can optimally test real-world code and how we can refactor it to improve testability.
When you test your code, you're essentially making sure that certain inputs produce the desired outputs. A very basic example of a test would be to make sure that calling a method that increments its input by a given value does, in fact, produce the output we expect.
Any time you launch your application in the simulator or on a device and test whether you can perform certain actions, you are testing your code. Once you think about testing this way, a concept that might have sounded hard before actually becomes tangible. This probably raises a new question for you, and if it doesn't, let me raise it for you. What exactly should you be testing?
When you start testing, it's often hard to decide what logic you want to test and what logic you won't test. Reasons for this could vary from certain logic being too trivial, too hard, or just not important enough to test.
The above implies that you don't have to test absolutely everything in your application and that's true. Certain pieces of code are really too trivial to write a test for. Or sometimes a certain piece of code only calls out to another piece of code that's part of UIKit or another iOS framework. Determining what to test is important, and the longer you wait with deciding whether you're going to test a certain piece of logic, the harder it might become to write tests for it.
A simple rule of thumb is that you don't need to test Apple's frameworks. It's safe to assume that Apple makes sure that any code they ship is tested and if it contains bugs, there's not much you can do to fix it. And you don't want your own tests to fail where Apple's tests should have.
What you should at least test is the call-site of your methods, structs, and classes. The call-site can be defined here as the methods that other objects use to perform tasks. It's actually good practice to make anything that's not on the call-site of your objects private, meaning that outside code can't access that part of the code. We'll look more into that later when we refactor code to be more testable.
You should also test code that you might deem too trivial to write tests for. These parts of your code are likely to receive the "too trivial" approach in other aspects of the process as well. This leads to you and your coworkers paying less and less attention to this trivial piece of code and before you know it, a bug is introduced that you might not catch until your app is in the App Store. Writing trivial tests for trivial code costs very little time and saves you from minor oversights leading to large complications.
So, to sum up some simple guidelines that you might want to follow when you're writing tests:
- Test trivial code, it's a minimal effort to make
- Test the call-site of your objects, they will make sure that your public APIs are consistent and work as expected
- Don't test Apple's frameworks or any other dependencies, doing this is the responsibility of the framework vendor
Once you've determined what you're going to test, it's time to start writing the actual tests. However, if you've heard about testing before, you might have heard of terms like integration tests, unit tests, sanity tests, and a couple of others. The next segment will focus on a couple of the most important and well-known types of testing.
Whenever you're writing tests, it's often a good idea to ask yourself what type of test your writing. The type of testing you want to do will typically guide you toward the way your test should be structured and scoped. Having tests that are well-scoped, structured, and focused will ensure that you're building a stable test suite that properly tests your code without unintended side effects that influence the quality of your tests.
Probably the most well-known type of test is the unit test. A lot of people call virtually any test they write to test their code a unit test, which is probably why this is such a well-known term for testing. Another reason for the unit test being so popular is that it's a very sensible test type.
A unit test is intended to make sure that a unit of code works as intended. A unit of code is often an entire object like a class or struct, but it could just as well be a standalone method. It's important that unit tests do not rely on the cooperation of any other test or object. It's okay to set up an environment where certain preconditions are met as we'll see later, but it's extremely important that a unit test does not accidentally test other objects or even worse, depends on other tests being executed first.
When you're writing unit tests, it's not uncommon to create instances of models that are stored in an array to represent a dummy database or fake REST APIs. This is all done to ensure that a unit test does not fail due to, for example, a network error. When you're testing a unit, you should test that specific unit and eliminate as many outside influences as possible.
An integration test ensures that a certain piece of code is able to integrate with other parts of the system. Similar to unit tests, an integration test should never rely on other tests. This is important for any test you write. Whenever a test depends on a certain precondition, the test must set this up on its own. Not doing this will create implicit dependencies between your tests, meaning that your tests must execute in a certain order. This type of implicit dependency can cause tests to fail in unexpected ways and it makes your test suite unreliable.
If you can't depend on other tests, an integration test requires a little more setup than a unit test. For example, you might want to set up an API helper, fetch some data from the API, and feed it into a database. A test like this verifies that the API helper can cooperate with the database layer. Both layers should have their own unit tests to ensure they work in isolation while the integration test ensures that the database and API can work together as well.
There are many other types of tests that you can write or learn about, but for now, we'll stick to these two definitions. Sticking to just two definitions of testing will prevent you from getting lost in the world of testing before you even get started. Also, it's important to not pretend that testing is more than it really is; writing code that tests other code.
It's been mentioned earlier that tests should never rely on other tests. Let's expand on that a little bit more before we start setting up our test suite in Xcode.
Assumptions are a huge risk when you're testing. Any time you assume anything about the environment you're testing in, your test is not reliable. If you're just getting into writing tests, it's tempting to make assumptions like: I'm testing on the simulator and my test user is always logged in so my tests can be written under the assumption that a logged in user exists. This assumption makes a lot of sense to a lot of people, but what if something happened that made the user log out? Like a test that makes sure your user can log out, which would leave the simulator without a logged in user.
When this happens, a lot of your tests will fail due to assumptions that were made about the test environment. More importantly, these tests might fail even if the code they're testing works flawlessly.
As mentioned before, tests should test a single thing in your app. They should rely on as little outside code as possible and they should be properly focused. A common pattern that people use to structure their tests and improve reliability is the 3-As or AAA approach. The name of this pattern is short for Arrange, Act, and Assert. The following is an explanation for each of the As.
The arrange step is all about preparation. Make sure a logged-in user exists, populate the (in memory) database, and create instances of your fake API or other helpers. You essentially arrange everything to be in place for your testing environment. Note that this step should not involve too much setup. If you find yourself writing a lot of code in the arrange step, your test might be too broad. Or the code you're testing relies on too much on other pieces of code. This can't always be avoided but if it happens, make sure to consider refactoring your code and test to keep the quality on-par with what you're trying to achieve.
During the act stage, you set everything for your test in motion. You call methods on the object your testing, you feed it data, and you manipulate it. This is essentially where you take your code for a proverbial spin. Don't perform too many actions in succession though, as too much acting will lead to problems during the next step, assert.
The final A in the 3-As approach is for assert. During the assert step, you make sure that the state of the object your testing is as you'd expect. Act and assert can be used multiple times in a single test. For instance, you might want to assert that doing something once places the object in a certain state and that doing it again places the object in another state. Or possibly that the state stays the same. Just as with the other two steps, if you're asserting a lot of things, or if you're acting and asserting over and over again in a test, chances are that your test is too broad. This can't always be avoided but long tests with a lot of acting and asserting are often an indication of testing too much at once.
Reading about testing can be quite boring and it tends to get rather abstract quickly, so let's leave theory for now. We'll set up a test suite for an existing project in Xcode and we'll start writing some tests so all of the information you've been sucking in so far becomes a bit more tangible.
In this chapter, we're going to add a test suite for a new app: MovieTrivia. You'll find the basic setup for this project in the Git repository. If you open the project, there are some view controllers, an Info.plist, and all the other files you would normally expect to exist in any project. There's also a JSON file in the project named TriviaQuestions.json. This file contains a couple of dummy questions that you can load by uncommenting a couple of lines in LoadTriviaViewController.swift.
By default, this file attempts to load questions from a non-existing web server. This is intentional, to demonstrate how one would normally set up a project like this. Since we don't have a web server at our disposal right now, you can swap out the dummy networking code for the JSON file to test this app.
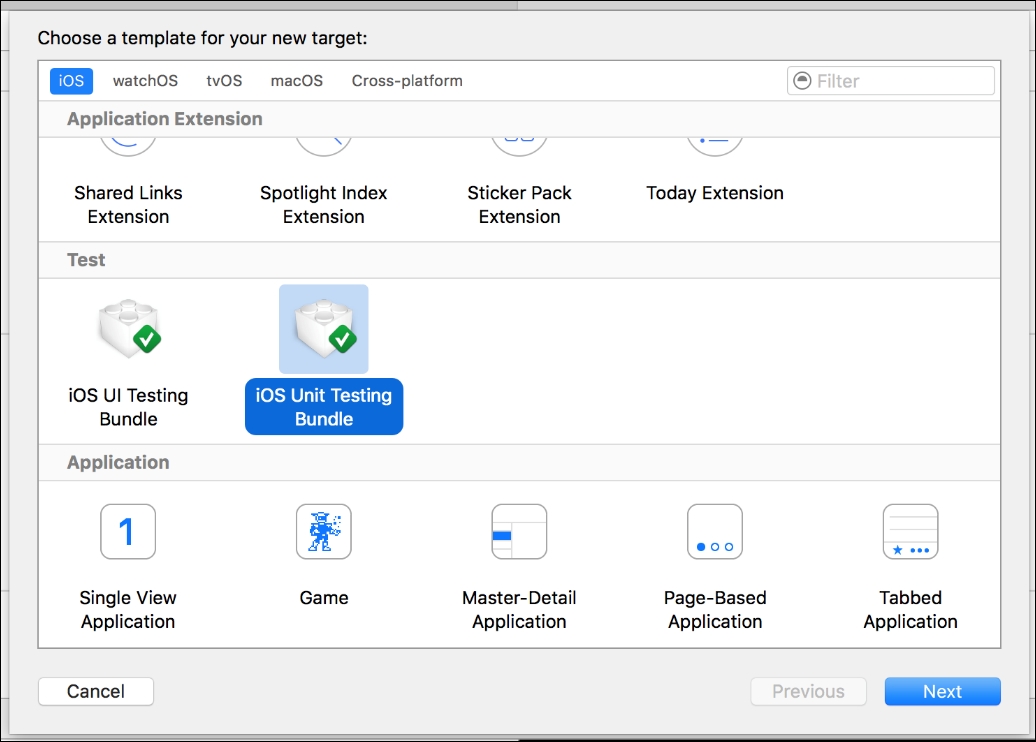
Before we write tests or perform any optimization, we'll add a test target to the project. A test target is added similarly to how you added extensions before; you just select a different type of target: the iOS Unit Testing Bundle.
After adding the target, a new folder has been created in your project. If you choose the default name for the test target, it's called MovieTriviaTests. In this target, we'll write all of our tests.
If you think about when we used files in multiple targets with extensions, you might expect that we're going to need to add all of the files we want to test to both of our targets. Fortunately, this isn't the case. When we write tests, we can import our entire app, enabling us to write tests for all of the code we have in the app target.
If you look inside of the MovieTriviaTests folder, you'll find a single file: MovieTriviaTests.swift. This file contains a couple of hints about what tests should look like for your test suite. First of all, note that the test class inherits from XCTestCase. All of your test classes should inherit from this superclass to be discovered as a test.
First of all, you'll find a setUp() method in the test class. This method is used mainly for you to fulfill the first stage of the AAA pattern in testing: arrange. You use this method to ensure that all of the preconditions for your test are met. You could make sure that your user is logged in or that your database is populated with test data. Note that the nature of this setup forces you to do something interesting. You can't write all of your tests in the same class because not every test has the same preconditions.
This should encourage you to create a test class for every unit of code that you're testing. One test class should typically not test more than a single class or struct in your app. If you're writing an integration test there might be more than one class involved in the test but you should still make sure that you're only testing a single thing: the integration between the classes.
Also note that there are two methods prefixed with test in the test class. These methods will be called when the tests run and they are expected to fulfill the act and assert steps. This means that the test methods are the backbone of your test suite, and the majority of work should be performed in the test methods. Do note that it's often better to have multiple short test methods rather than a single test method that tests everything. The larger the methods, the harder it will be to maintain and debug your tests.
Finally, you'll find a tearDown() method. This method is intended to give you an opportunity to clean up after yourself. When you inserted dummy data into your database, it's often desirable to remove this data when your tests are done. This will ensure a clean slate for the next test that runs and it minimizes the chances that your first test accidentally influences the second test that runs. As mentioned before, we don't want our tests to depend on other tests. This means that we also don't want to pollute other tests by leaving traces of previous tests.
Now that you have a test suite in place, let's see how we can write tests for our existing code and how it can be refactored to be properly tested.
With a test target available in Xcode, we can start writing tests for our code. Before we do this, we should determine what to test. Take some time to look at the app and the code and try to think of things to test. Assume that the app is finished and that we're loading the trivia questions from a server.
Some of the things you might have thought of to test are:
- Making sure that we can display the data we load from the network
- Testing that selecting the correct answer triggers the expected code
- Testing that selecting a wrong answer triggers the expected code
- Ensuring that the first question is displayed after we show the last one
- Testing that the question index increments
If you came up with most of the tests on this list, good job. You've successfully identified a lot of valid test cases. But how do we test these cases? The project has been made hard to test intentionally, but let's see how far we can get with the current architecture.
Remove the test class that Xcode has generated for you and create a new one called LoadQuestionsTest. Use the following bit of boilerplate code in this file's implementation so we have a starting point to write our test:
import XCTest
@testable import MovieTrivia

class LoadQuestionsTest: XCTestCase {
 override func setUp() {
 super.setUp()
 }

 func testLoadQuestions() {

 }
}
We import the app module, define our class, a setUp method, and a single test method is added. Before we can test the question loading, we need to think about what we're testing very carefully. If you look at the code, we start loading the trivia questions in LoadTriviaViewController's viewDidAppear(_:). Once the questions are loaded, we segue to the next screen. An important detail is that the triviaJSON property on LoadTriviaViewController is set once the questions are loaded.
Based on this information, our test should create an instance of our view controller, make it appear, then the questions will load and we'll have to wait until the triviaJSON property has a value.
In order to test this, we need to work with a lot of moving parts, way more than we should be comfortable with. Also, because we're using a storyboard, we would have to involve a storyboard in our test to make sure that we can instantiate our view controller. This means that any changes or breakages in the user interface would cause our logic test to fail.
This is a great moment for us to start refactoring our code and making it more testable. The first piece of code that we'll revamp for testability will be the question loading code.
To make our code more testable, we'll create a special helper that can load questions for our view controller. The helper will go to the network and fetch the questions. After doing this, a callback is used to inform the caller about the loaded questions. Because we already know that we're going to be testing this code, we'll need to think of a way to make sure that the helper works with both an offline and an online implementation.
Our tests should rely on as little outside factors as possible, so removing the networking layer from this test would be great. This means that we're going to need to split our helper up in two parts: the actual helper and a fetcher. The fetcher will implement a protocol that defines the interface that a question fetcher must have which will allow us to inject either an online or offline fetcher into the helper.
If this seems a little bit abstract and confusing to you, that's okay. We're going to slowly work our way to the nicely abstracted, testable implementation that we want to end up with. First, let's create the helper struct. Add a new Swift file named QuestionsLoader.swift and add the following implementation to it:
struct QuestionsLoader {
  typealias QuestionsLoadedCallback = (JSON) -> Void
  func loadQuestions(callback: @escaping QuestionsLoadedCallback) {
    guard let url = URL(string: "http://questions.movietrivia.json")
      else { return }
    URLSession.shared.dataTask(with: url) { data, response, error in
      guard let data = data,
        let jsonObject = try? JSONSerialization.jsonObject(with: data, options:
            []),
        let json = jsonObject as? JSON
        else { return }
      callback(json)
    }
  }
}
This struct defines a method to load questions with a callback. This is already nice and a lot more testable than before. We can now isolate the question loader and test it separated from the rest of our app. A test for the helper in its current state would look like the test shown in the following code:
func testLoadQuestions() {
 let questionsLoader = QuestionsLoader()
 let questionsLoadedExpectation = expectation(description: "Expected the
     questions to be loaded")
     questionsLoader.loadQuestions { _ in
       questionsLoadedExpectation.fulfill()
     }
     waitForExpectations(timeout: 5, handler: nil)
}
First, an instance of the QuestionsLoader is created. Next, we create an expectation. An expectation is used when you expect something to eventually happen. In our case, we're loading the trivia questions asynchronously. This means that we can't expect the questions to be loaded by the time our test method is finished executing. The callback that's called when the questions are loaded has a single purpose in our tests: it must fulfill the expectation.
So after we call loadQuestions(callback:), we tell XCTest to wait for our expectation to fulfill for 5 seconds. If we don't fulfill the expectation within this time window, the test fails.
You should be able to see all of the A's that you read about earlier. The first A, arrange, is where we create the loader and set up the expectation. The second A, act, is when we call loadQuestions(callback:) and tell XCTest to wait for any unfulfilled expectations. The final A, assert, is inside of the callback. We're currently not validating anything inside of the callback, but we'll get to that later.
One issue that we still have with the loader is the reliance on an active connection to the Internet. We also assume that the server we're calling is up and that the data it returns is valid. These are all assumptions that influence the reliability of our test. If we don't have an Internet connection or if the server is down, our test fails even though our code might be valid. That is not an ideal situation to find yourself in.
We can improve this by utilizing some Protocol-Oriented Programming and the dependency injection pattern. This means that we'll create a protocol that defines the public API for a networking layer. Then we'll implement a networking struct in the main project that conforms to the protocol and we'll create a property on the QuestionsLoader that holds anything that implements the networking logic. We'll also add a struct in our test target that implements the networking protocol.
By setting the test up like this, we can take the entire networking logic out of the equation and arrange our test in such a way that the networking doesn't matter. Our mock networking layer will respond with valid, reliable responses that we can test.
It's common practice to mock API responses when you're testing. In this segment, we're going to implement the mock API that was described before in order to improve the quality and reliability of our test. First, let's define our protocol. Create a new file in the app target and name it TriviaAPIProviding:
typealias QuestionsLoadedCallback = (JSON) -> Void
protocol TriviaAPIProviding {
    func loadTriviaQuestions(callback: @escaping QuestionsLoadedCallback)
}
The protocol only requires a single method right now. If you want to expand this app later, everything related to the Trivia API must be added to the protocol in order to make sure that you can create both an online version for your app and an offline version for your tests.
Next, create a file named TriviaAPI and add the following implementation to it:
import Foundation
struct TriviaAPI: TriviaAPIProviding {
    func loadTriviaQuestions(callback: @escaping QuestionsLoadedCallback) {
        guard let url = URL(string: "http://quesions.movietrivia.json")
           else { return }
    URLSession.shared.dataTask(with: url) { data, response, error in
           guard let data = data,
             let jsonObject = try? JSONSerialization.jsonObject(with: data, options:
                 []),
             let json = jsonObject as? JSON
             else { return }
           callback(json)
        }
     }
  }
Lastly, update the QuestionsLoader struct with the following implementation:
struct QuestionsLoader {
    let apiProvider: TriviaAPIProviding
    func loadQuestions(callback: @escaping QuestionsLoadedCallback) {
        apiProvider.loadTriviaQuestions(callback: callback)
    }
}
The questions loader now has an apiProvider that it uses to load questions. Currently, it simply delegates any load call over to its API provider but we'll update this code soon to make sure that we convert the raw JSON data that the API returns to us, to question models. First, update our view controller and we'll implement the mock API struct in our test so we can create our first passing test.
Update the viewDidAppear(_:) method of the LoadTriviaViewController as shown in the following code. This implementation uses the loader struct instead of directly loading the data inside of the view controller:
override func viewDidAppear(_ animated: Bool) {
    super.viewDidAppear(animated)
    let apiProvider = TriviaAPI()
    let questionsLoader = QuestionsLoader(apiProvider: apiProvider)
    questionsLoader.loadQuestions { [weak self] json in
        self?.triviaJSON = json
        self?.performSegue(withIdentifier: "TriviaLoadedSegue", sender: self)
    }
}
The preceding code is not only more testable, it's also a lot cleaner. Next up, is creating the mock API inside of our test target.
First of all, the JSON file in the app target should be removed from the app target and added to the test target. Drag it into the correct folder and make sure to update the Target Membership so the JSON file is only available in the test target. Now add a new .swift file named MockTriviaAPI to the test target and add the following code to it:
import Foundation
@testable import MovieTrivia

struct MockTriviaAPI: TriviaAPIProviding {
    func loadTriviaQuestions(callback: @escaping QuestionsLoadedCallback) {

        guard let filename = Bundle(for: LoadQuestionsTest.self).path(forResource: "TriviaQuestions", ofType: "json"),
            let triviaString = try? String(contentsOfFile: filename),
            let triviaData = triviaString.data(using: .utf8),
            let jsonObject = try? JSONSerialization.jsonObject(with: triviaData, options: []),
            let triviaJSON = jsonObject as? JSON
            else { return }

        callback(triviaJSON)
    }
}
This code fetches the locally stored JSON file from the test bundle. We use one of the test classes as the class that we load the bundle for. This is not the absolute best way to retrieve a bundle, because we rely on an external factor being in our test target. However, we can't use structs to look up the current bundle and if we remove the class we rely on, we'll get a compile time error which is good enough for now. Once the file is loaded, we call the callback and we have successfully handled the request.
Mocking APIs is often done with external frameworks. This is mostly because not all APIs are as straightforward as the ones we've just mocked. A lot of apps have way more complex interactions than we've just tested. The main ideas behind your architecture would remain the same, regardless of the application complexity. Protocols can help you to define a common interface for certain objects. Combining this with dependency injection like we just did for the QuestionsLoader helps to isolate the pieces of your code that you're testing, and it enables you to switch out pieces of code to make sure that you don't rely on external factors if you don't have to.
So far, our test is not particularly useful. We only test if the QuestionsLoader passes our request on to the TriviaAPIProviding object and if the callbacks are called as expected. Even though this technically qualifies as a test, wouldn't it be better if we'd test whether we can covert the JSON from the API into question objects that our app can display? And when doing so, wouldn't it be nice if we would be able to do so by creating instances of a model class instead of JSON?
Testing whether our QuestionsLoader can convert JSON into a Question model is a test that's a lot more interesting than solely testing whether the callback is called. We're now confronted with the question of whether we should add a new test, or modify the existing test. If we create a new test, we're saying that we want to test whether the callback is called and we also want to test whether the loader converted the JSON response to valid models.
If we choose to modify the existing test, we're essentially saying that we assume that the callback will be called. It's been established before that assumptions are bad and we shouldn't make them. But testing if the callback is called and testing whether the callback is called with the correct information could be considered testing the same thing twice. If the callback isn't called, it also won't be called with the correct information.
We'll write a single test with one expectation and multiple assertions. Doing this will make sure that we can fulfil our expectation of the callback being called and at the same time we can use assertions to ensure that the data that's passed to the callback is valid and correct. Using the QuestionsLoader to create instances of a model rather than using it like we do now has the added benefit of improving our app's code as well.
Right now, the app uses raw JSON to display questions. If the JSON changes, we'll need to update our view controller. If our app grows, this process would become more painful because we'd have to search in multiple view controllers. The more manual labor we have to perform in that kind of situation, the bigger the chance that we forget or overlook something.
Adding a question model involves quite a lot of refactoring. First, we'll need to define the Question model. Create a new Swift file named Question and add the following implementation to it:
import Foundation

struct Question {

    let title: String
    let answerA: String
    let answerB: String
    let answerC: String
    let correctAnswer: Int

    init?(json: JSON) {
        guard let title = json["title"] as? String,
            let answerA = json["answer_a"] as? String,
            let answerB = json["answer_b"] as? String,
            let answerC = json["answer_c"] as? String,
            let correctAnswer = json["correct_answer"] as? Int
            else { return nil }

        self.title = title
        self.answerA = answerA
        self.answerB = answerB
        self.answerC = answerC
        self.correctAnswer = correctAnswer
    }
}
We're using a failable initializer for this model. This allows us to stop initialization whenever we encounter invalid or incomplete JSON. This approach is really good because if we handle our optional Questions correctly, our app won't crash if we pass invalid JSON around. The rest of the code in this struct is straightforward. We extract data from the JSON and we set it as properties on the struct.
Once we've added the model, we need to make a minor adjustment to the typealias that was created for the callbacks we've used so far. Change the QuestionsLoadedCallback typealias in the TriviaApiLoading protocol file as shown here:
typealias QuestionsFetchedCallback = (JSON) -> Void
Make sure to also update the object type in the loadTriviaQuestions(callback:) function for the protocol and both implementers of the protocol. Next, rename the triviaJSON property on LoadTriviaViewController to the following.
var questionsArray: [Question]?
Make sure to replace all usage of triviaJSON to the new variable. Also, make sure to change the following line in prepare(for:sender:):
questionViewController.triviaJSON = triviaJSON
Change this line to:
questionViewController.questionsArray = questionsArray
In QuestionViewController, change the type of questionsArray to [Question] and remove the triviaJSON property. At this point, you can clear all of the JSON-related code from the guards. You should be able to do this on your own since the compiler should guide you with errors. If you get stuck, look at the finished project in the Git repository.
Lastly, we must update the QuestionsLoader struct so it converts JSON data into Question models. Replace the current implementation as shown in the following code. Most of the changes have been highlighted:
import Foundation
typealias QuestionsLoadedCallback = ([Question]) -> Void
struct QuestionsLoader {
    let apiProvider: TriviaAPIProviding
    func loadQuestions(callback: @escaping QuestionsLoadedCallback) {
        apiProvider.loadTriviaQuestions { json in
            guard let jsonQuestions = json["questions"] as? [JSON]
                else { return }
            let questions = jsonQuestions.map { jsonQuestion in
                return Question(json: jsonQuestion)
            }.flatMap { $0 }
            callback(questions)
       }
    }
 }
Note that we use both map and flatMap to create the array of questions. Since the initializer for Question can fail, map gives us an array of [Question?]. Calling flatMap on this array will unwrap all of the optionals, filtering out any nil values and returning an array of [Question] which is exactly what we need for the callback.
By now, you should be able to run the tests and they should pass. To run your tests, click the Product menu item and select
Test
. Alternatively, press cmd + U to run your tests. The tests run fine but currently we haven't made sure that all of our questions in the JSON data have been converted to Question models. To make sure this worked, we'll load the JSON file in our test case, count the number of questions in the JSON file, and assert that it matches the number of questions in the callback.
Update the testLoadQuestions() method as shown in the following code. The lines that have changed are highlighted:
func testLoadQuestions() {
    let apiProvider = MockTriviaAPI()
    let questionsLoader = QuestionsLoader(apiProvider: apiProvider)
    let questionsLoadedExpectation = expectation(description: "Expected the questions to be loaded")
    questionsLoader.loadQuestions { questions in
        guard let filename = Bundle(for: LoadQuestionsTest.self).path(forResource:
           "TriviaQuestions", ofType: "json"),
            let triviaString = try? String(contentsOfFile: filename),
            let triviaData = triviaString.data(using: .utf8),
            let jsonObject = try? JSONSerialization.jsonObject(with: triviaData,
                                                   options: []),
            let triviaJSON = jsonObject as? JSON,
            let jsonQuestions = triviaJSON["questions"] as? [JSON]
            else { return }

        XCTAssert(questions.count > 0, "More than 0 questions should be passed to the
          callback")
        XCTAssert(jsonQuestions.count == questions.count, "Number of questions in json
          must match the number of questions in the callback.")

        questionsLoadedExpectation.fulfill()
    }

    waitForExpectations(timeout: 5, handler: nil)
}
We use the same code as the code that's used in the fake API to load the JSON file. Once the JSON is loaded, we use XCTAssert to make sure that more than zero questions were passed by the callback and that the amount of questions in the JSON file matches the number of questions that were loaded.
XCTAssert takes a Boolean expression and a description. If the assertion fails, the description is shown. Adding good descriptions will help you to easily figure out which assertion in your test has made your test fail.
This new test method is a small addition to our test that has huge consequences. By improving our test, we have improved the quality of our app because we are now sure that our questions loader correctly transforms JSON into model objects. By adding model objects, we have improved the code in our view controllers because instead of reading raw JSON, we're reading properties from a model. And the final improvement that this modification gives us is that our view controllers are a lot cleaner.
One more metric that has improved by refactoring our code is the amount of code that is covered by our tests. We can measure this metric with Xcode's built in code coverage tracking. We'll look at how to use this tool next.
With the introduction of Xcode 7, apple has greatly improved it's testing tools. One of the newly introduced tools we have since Xcode 7 is Code Coverage. The Code Coverage tool aims to provide us with insights about how thorough our tests are. Not only that, it also informs us about which parts of our code are tested in our unit tests and which parts of our code aren't.
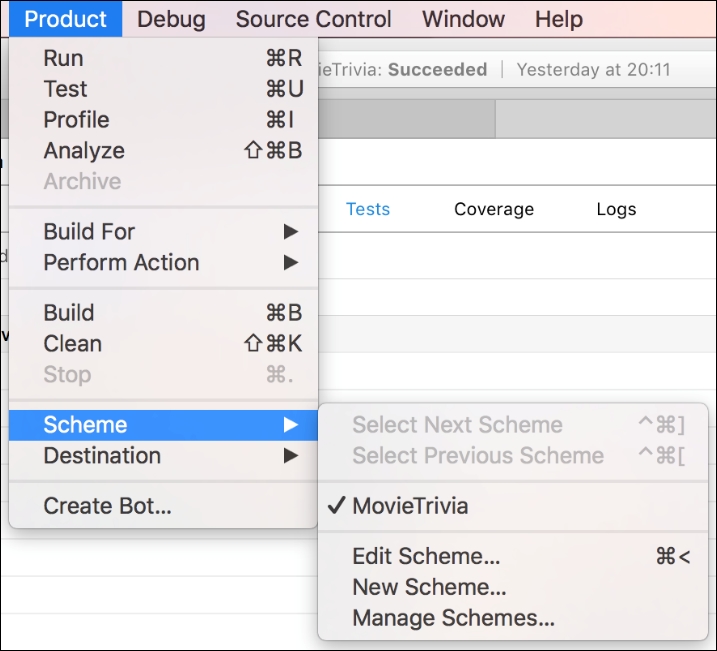
To enable Code Coverage, we must enable this feature first. To do this you must first open the scheme editor through the Product | Scheme menu. You can also press cmd + < to quickly open the scheme editor.
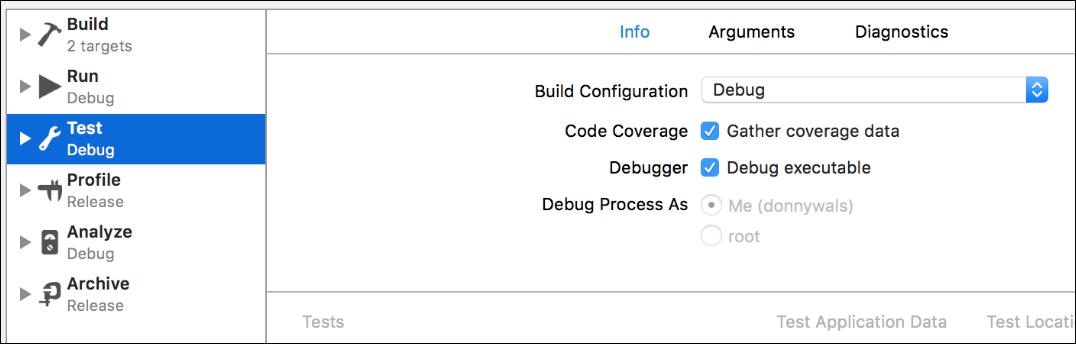
Select the testing action and make sure the Gather coverage data checkbox is checked:
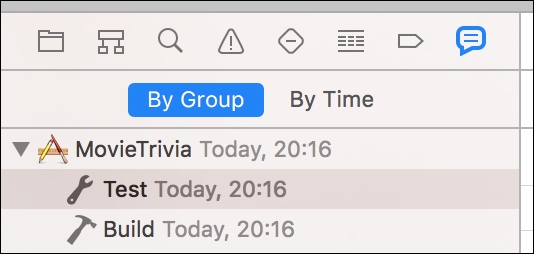
After doing this, close the scheme editor and run your tests. This time, Xcode will monitor which parts of your code have been executed during this tests, and which parts haven't. This information can give you some good insights about which parts of your code could use some more testing. To see the coverage data, open the Report navigator in the leftmost sidebar in Xcode. The rightmost icon in this sidebar represents the Report navigator.
If you expand the contents for your app, you can select the test report. This report will open in the Editor area of Xcode and you'll be presented with three tabs: Tests, Coverage, and Logs. We're only interested in the Coverage tab right now. If you select this tab, you're presented with several bars that are filled to indicate the amount of code that's tested in the corresponding file.
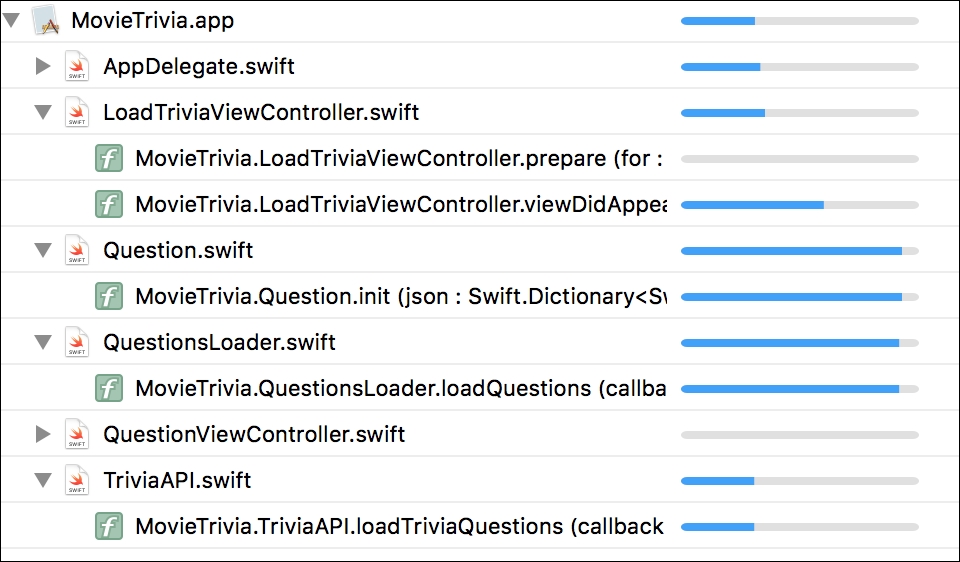
The more a bar is filled, the more lines of code in that file or method were executed during your test. You'll notice that our AppDelegate.swift file is covered under the tests even though we haven't written any tests for it. The reason this happens is that the app must launch during the test to act as a host for our tests. This means that parts of the code in AppDelegate.swift is actually executed during the test and therefore Xcode considers it covered under the tests.
If you expand the file, you'll see that a lot of methods are not tested at all. If you open up the AppDelegate.swift file, you can see that these untested methods are, in fact, empty methods. To improve your test coverage and to avoid accidental bugs, you should remove these empty implementations.
One last feature of Code Coverage that's worth mentioning is inline Code Coverage. Inline Code Coverage will show you how often a certain block of code has been executed during testing. This will give you insights into your Code Coverage inline, in your files without having to navigate to the Reports Navigator. To enable this feature, open up your Xcode preferences and navigate to the Text Editing tab. Check the Show iteration counts checkbox at the bottom of the tab. If you open a file now, you'll see the iteration count for your code on the right side of the editor window.

Even though Code Coverage is a great tool for gaining insights into your tests, you shouldn't let it influence you too much. Regularly check the Code Coverage for your app and look for methods that are untested and are either easy to write tests for or should be tested because they contain important logic. Code Coverage is also great for discovering parts of your code that should be tested but are hard to test because they're nested deep inside of a view controller, for example.
What you should not do is aim for a full 100% coverage. Doing this will make you jump through crazy hoops and you'll invest way more time in testing than you should. Not all paths in your code have to be tested. However, don't shy away from doing some refactoring like we've done before. Proper testing helps you to avoid bugs and structure your code better. Code Coverage is just one extra tool in your tool belt to help identify which parts of your code could benefit from some tests.
If we look at the current state of the coverage in the MovieTrivia app, we're actually doing quite well. Most of the logic in the app is tested. The only part of our app that's not tested thoroughly are the view controllers. If you're using storyboards, like we are, it's not necessarily easy to test view controllers. Even if you opt for an all code approach where you omit storyboards and write all of your layout purely in code, it can be tedious to test your view controllers.
Luckily, there is one last testing tool that we'll discuss in this chapter; XCUITest.