
In order to finish the login screen, you'll need to make sure that you have the correct prerequisites present from the CoreLocation examples. First and foremost, you'll need to make sure that the correct privacy keys are present in the app's Info.plist. Once you've done this, it's time to write the code that will query the user's location and update the user interface. After implementing the code, we'll get to implement the interface and hook up the outlets. Most of the code we need to add is already covered in the section on CoreLocation, so most of the code presented now won't be covered in depth.
Add the following two properties to the ViewController class:
@IBOutlet var nearbyArtLabel: UILabel!
let locationManager: CLLocationManager = CLLocationManager()
The need for these properties should speak for itself. We need a label in order to display the information we want to communicate to our user, and the location manager should be implemented to be able to query the user's location. We don't need a property for the location because we will use the location updates we receive from the location manager right away.
The following method should also be present in your ViewController; it's unchanged from the CoreLocation section:
func setupLocationUpdates() {
    locationManager.delegate = self

    let authStatus = CLLocationManager.authorizationStatus()
    switch authStatus {
    case .notDetermined:
        locationManager.requestWhenInUseAuthorization()
    case .authorizedWhenInUse:
        startLocationTracking()
    default:
        break
    }
}
Finally, the following three methods should be in your ViewController:
func locationManager(_ manager: CLLocationManager, didChangeAuthorization status:
  CLAuthorizationStatus) {
    if status == .authorizedWhenInUse {
        startLocationTracking()
    }
}

func startLocationTracking() {
    if CLLocationManager.locationServicesEnabled() {
        locationManager.startUpdatingLocation()
    }
}

func locationManager(_ manager: CLLocationManager, didUpdateLocations locations:
  [CLLocation]) {
    guard let location = locations.last
        else { return }

    let geocoder = CLGeocoder()
    geocoder.reverseGeocodeLocation(location, completionHandler: { [weak self]
      placemarks, _ in
        guard let placemark = placemarks?.first,
            let city = placemark.locality
            else { return }

        self?.nearbyArtLabel.text = "Explore 17 pieces of art in (city)"
    })

    manager.stopUpdatingLocation()
}
Again, the preceding code is not much different from the code you have already seen. The implementation of locationManager(_:didUpdateLocations:) has been updated so it sets the text on for the nearbyArtLabel. Apart from that, there should be no surprises here.
Let's implement the layout.
Drag a UILabel from the Object Library into the login form stack view; add it above the login fields and use the Attributes Inspector to align the text in the center and adjust the font size to 19. Since some city names won't fit in the screen, we should make sure that we set the number of lines for the label to 0 so it will automatically resize to accommodate the city name on the next line if needed.
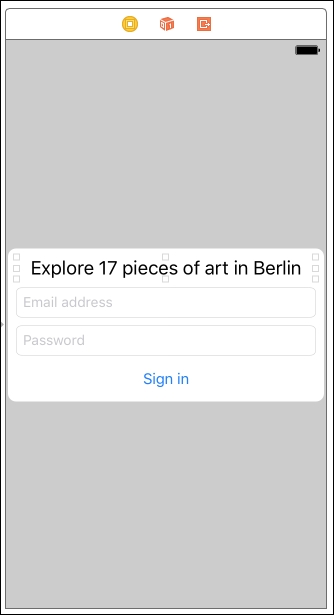
Refer to the preceding image to verify your work. All you need to do now is to hook up the new UILabel to the ViewController through the Outlet Inspector. Once you've done this, you can build and run your app to see all the pieces of the puzzle put together.