
Stickers in iMessage are a fun way to share images with your friends. Stickers can be slapped onto a message as a response to a message you've received or just for fun with no particular reason at all.
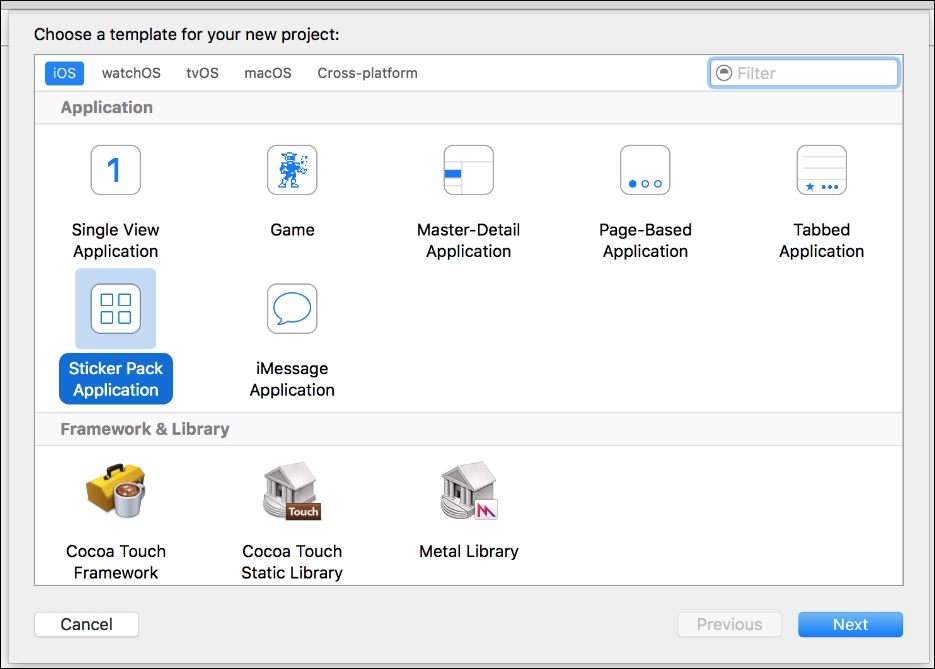
To create a sticker pack, open Xcode and create a new project. One of the available project templates is the Sticker Pack Application; select it and click Next. Give your sticker pack a name and click Next again to create your project:
In the generated project, you'll find two folders. One is named Stickers.xcstickers and the other is named Products. We're only interested in the sticker folder. If you open it, you'll find an app icon template and a folder named Sticker Pack.
All you need to do to create your sticker pack is to drag images into this Sticker Pack folder. After doing this, you can build and run your extension and try it out in the simulator. You'll find that the simulator comes with two active conversations in the Messages app. These are dummy conversations and you use them to test your iMessage app.
The simulator cannot send messages outside of the simulator so you must use these predefined conversations while testing. Tapping a sticker or dragging it onto an existing speech bubble will send it from one conversation to the other. Go ahead and give that a shot. You can also send text messages and any other type of message you would normally send in the dummy conversation.
Creating a sticker pack is really easy and to make the best sticker packs, you should make sure that you properly optimize your image assets. Stickers can be displayed to the user in three sizes: small, medium, and large. To change the size of stickers in your sticker pack, simply click the Sticker Pack folder and open the attributes inspector. You can pick the sticker size there.
You should optimize the size of the stickers you provide according to the display size you choose. The following is a list of sticker sizes and their recommended asset sizes:
- Small: 100x100@3x
- Medium: 136x136@3x
- Large: 206x206@3x
Note that all sizes have an @3x annotation. This means that the exported dimension of your images should be three times larger than the size listed to accommodate for screens with a 3x resolution, like the plus-sized iPhones. So, a small sticker should be exported at 300x300 pixels. Unlike other image assets on iOS, you only supply a single image for each resource; the 3x image. Normally you supply a 1x, 2x, and 3x version of each asset you provide.
Sticker packs can contain png images, animated png images, gifs, and jpegs. All images you supply must be smaller than 500 kb It's recommended that you provide all of your assets as either png or animated png because this image format has superior image quality and supports transparency. Transparent stickers are recommended because they look a lot better when placed on top of other stickers or messages.
Now that you're familiar with sticker packs and testing them in the simulator, let's see how we make our sticker pack a bit more special by customizing the sticker-picking interface a bit.
The sticker app you created before doesn't contain a lot of user interface elements. They basically see your stickers on a white background and that's about it. Sticker apps shouldn't be more complex than this but wouldn't it be great if we could at least change the background color for our sticker app? This isn't possible if you're using the simple sticker pack template. You can, however, create your own sticker pack app and customize the background. Figuring out how to do this will allow you to familiarize yourself with the code that's involved in creating an iMessage app, so let's create a custom sticker pack.
In the source code repository for this book, you'll find a project named CustomStickers. This project already contains the stickers we're going to display. The images for these stickers are made available through https://openclipart.org/ by a user named bocian. Note that the images have not been added to the Assets.xcassets folder but to the Stickers folder in MessagesExtension. The project was set up like this because the Assets.xcassets folder belongs to the containing app that we don't have.
In the MessagesExtension folder, you'll find a view controller file and a storyboard file. The first thing you should do is open up the storyboard and remove the default UILabel that was placed in the interface. We're not going to add any interface elements through Interface Builder because our interface elements simply aren't directly available in Interface Builder.
In the MessagesViewController, you'll find several boilerplate methods. We'll get into them soon; you can ignore them for now. We're going to use viewDidLoad to set up an MSStickerBrowserViewController to display our stickers in. The MSStickerBrowserView instance that is being contained inside of the MSStickerBrowserViewController behaves somewhat like a UITableView does because it requires a data source to determine how many and which stickers to display.
The first step in implementing our own sticker app is to add a property for an instance of MSStickerBrowserViewController to MessagesViewController:
var stickerBrowser = MSStickerBrowserViewController(stickerSize: .regular)
Next, add the following implementation for viewDidLoad:
override func viewDidLoad() {
    super.viewDidLoad()
    stickerBrowser.willMove(toParentViewController: self)
    addChildViewController(stickerBrowser)
    stickerBrowser.didMove(toParentViewController: self)

    view.addSubview(stickerBrowser.view)
    stickerBrowser.stickerBrowserView.dataSource = self
    stickerBrowser.stickerBrowserView.reloadData()

    stickerBrowser.stickerBrowserView.backgroundColor = UIColor.red
}
This snippet should not contain any surprises for you. First, we're adding stickerBrowser as a child view controller of the messages view controller. Then we add the stickerBrowser class view as a subview of the messages view controller's view. Next, we set a dataSource on stickerBrowserView and we tell it to reload its data. And finally, we set the background color for the stickerBrowserView, the whole reason we implemented a custom sticker app. Again, nothing that should be strange or surprising.
Xcode should complain about the fact that MessagesViewController does not conform to MSStickerBrowserViewDataSource. Add this protocol to the MSMessagesViewController class declaration and implement the following two methods to conform to MSStickerBrowserViewDataSource:
func stickerBrowserView(_ stickerBrowserView: MSStickerBrowserView,
  stickerAt index: Int) -> MSSticker {
    return OwlStickerFactory.sticker(forIndex: index)
}

func numberOfStickers(in stickerBrowserView: MSStickerBrowserView)
  -> Int {
    return OwlStickerFactory.numberOfStickers
}
The first method is expected to return a sticker for a certain index and the second returns the number of stickers in our app. The logic for this has been abstracted into a sticker factory. This is done in order to keep the code in the view controller nice, compact, and to the point.
Add a Swift file to the project and name it OwlStickerFactory. Add the following implementation to this file:
import Foundation
import Messages

struct OwlStickerFactory {
    static private let stickerNames = [
        "bike", "books", "bowler", "drunk", "ebook",
        "family", "grill", "normal", "notebook", "party",
        "punk", "rose", "santa", "spring"
    ]

    static var numberOfStickers: Int { return stickerNames.count }

    static func sticker(forIndex index: Int) -> MSSticker {
        let stickerName = stickerNames[index]

        guard let stickerPath = Bundle.main.path(forResource:
          stickerName, ofType: "png")
            else { fatalError("Missing sicker with name:
                   (stickerName)") }
        let stickerUrl = URL(fileURLWithPath: stickerPath)

        guard let sticker = try? MSSticker(contentsOfFileURL:
          stickerUrl, localizedDescription: "(stickerName) owl")
            else { fatalError("Failed to retrieve sticker:
                     (stickerName)") }

        return sticker
    }
}
Most of this code should speak for itself. We have an array of sticker names, and a computed variable that returns the number of stickers for our app. The interesting part of this code is the sticker(forIndex:) method. This method retrieves a sticker name from our array of names. Then it retrieves the file path that can be used to retrieve the image file from the application bundle. Finally, it creates a URL with this path in order to create a sticker.
Note that the MSSticker initializer can throw errors so we prefix our initialization call with try? since we're not interested in handling the error. Also, note that the sticker initializer takes a localizedDescription. This description is used by screen readers to read back the sticker to users that have certain accessibility features enabled.
Any time we add an MSSticker to the view, regardless of whether we're using a sticker browser or not, the Messages framework takes care of the sticker peel, drag, and drop action for us. This means that you can create a completely different, custom interface for your stickers if you'd like. Keep in mind that most sticker apps will make use of the standard layout and your users might not be too pleased if your app presents them with an unexpected sticker sheet layout.
However, apps that aren't about stickers do require a special layer of design and interaction. This is the next topic we'll cover.