
To display contacts in your UITableView, you will need to set up a few more things. First and foremost, you'll need to create a UITableViewCell that displays contact information. To do this, you'll create a custom UITableViewCell by creating a subclass. The design for this cell will be created in Interface Builder, so you're going to add @IBOutlets in your UITableViewCell subclass. These @IBOutlets are the connection points between Interface Builder and your code.
The first thing you need to do is drag a UITableViewCell out from the Object Library and drop it on top of UITableView. This will add the cell as a prototype.
Next, drag out UILabel and a UIImageView from the Object Library to the newly added UITableViewCell, and arrange them as they are arranged in the following figure. After you've done this, select both UILabel and UIImage and use the Reset to Suggested Constraints option you used earlier to lay out UITableView. If you have both the views selected, you should also be able to see the blue lines that are visible in the following screenshot:
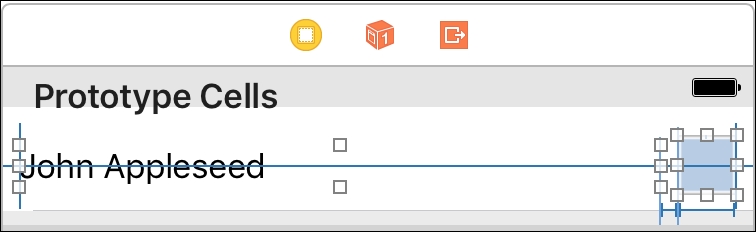
These blue lines represent the constraints that were added to lay out your label and image. You can see a constraint that offsets the label from the left side of the cell. However, there is also a constraint that spaces the label and the image. The horizontal line through the middle of the cell is a constraint that vertically centers the label and image inside of the cell. You can inspect these constraints in detail in the Document Outline on the right. Now that our cell is designed, it's time to create a custom subclass for it and hook up @IBOutlets.
To get started, create a new file (File | New | File...) and select a Cocoa Touch file. Name the file ContactTableViewCell and make sure it subclasses UITableViewCell, as shown in the following screenshot:

When you open the newly created file, you'll see two methods already added to the template for ContactTableViewCell.swift: awakeFromNib and setSelected(_:animated:). The awakeFromNib method is called the very first time this cell is created; you can use this method to do some initial setup that's required to be executed only once for your cell.
The other method is used to customize your cell when a user taps on it. You could, for instance, change the background color or text color or even perform an animation. For now, you can delete both of these methods and replace the contents of this class with the following code:
@IBOutlet var nameLabel: UILabel!
@IBOutlet var contactImage: UIImageView!
The preceding code should be the entire body of the ContactTableViewCell class. It creates two @IBOutlets that will allow you to connect your prototype cell with them so that you can use them in your code to configure the contact's name and image later.
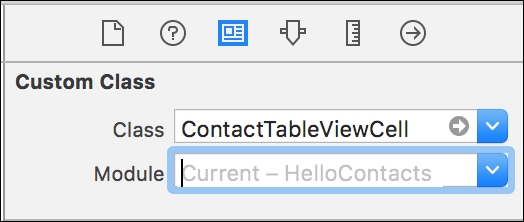
In the Main.storyboard file, you should select your cell, and in the Identity Inspector on the right, set its class to ContactTableViewCell (as shown in the following screenshot). This will make sure that the Interface Builder knows which class it should use for this cell, and it will make the @IBOutlets available to the Interface Builder.
Now that our cell has the correct class, select the label that will hold the contact's name in your prototype cell and click on Connections Inspector. Then, drag a new referencing outlet from the Connections Inspector to your cell and select nameLabel to connect the UILabel in the prototype cell to @IBOutlet in the code (refer to the following screenshot). Perform the same steps for UIImageView and select the contactImage option instead of nameLabel.

The last thing we need to do is provide a reuse identifier for our cell. Click on Attributes Inspector after selecting your cell. In Attributes Inspector, you will find an input field for the Identifier. Set this input field to ContactTableViewCell. The reuse identifier is the identifier that is used to inform the UITableView about the cell it should retrieve when it needs to be created.
Since the custom UITableViewCell is all set up now, we need to make sure UITableView is aware of the fact that our ViewController class will be providing it with the required data and cells.