
When you implemented the UITableViewCell in the previous chapter, you designed a custom cell. This cell was a view that was reused by the UITableView for every contact in the contacts array. UICollectionView also uses cells but you can't use UITableViewCell in a UICollectionView. However, the two different cells do share some functionalities, such as the prepareForReuse method and the awakeFromNib method, we saw in the previous chapter.
When you replaced the table view with a collection view, you might have noticed that the collection view immediately contained a default cell. This cell is a lot more flexible than the table view cell was; you can resize both its width and its height.
If you look at the Document Outline on the left-hand side, you can see an object called Collection View flow layout. This object is responsible for the layout of UICollectionView, and we'll have an in-depth look at it soon. For now, select it and go to the Size Inspector in the right panel and set the item size properties for the layout object. The width should be set to 110 and the height to 90. Your cell will resize accordingly.
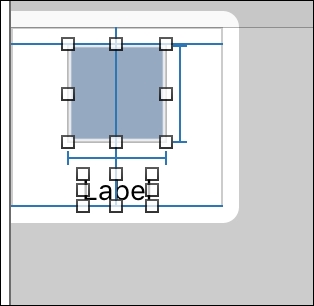
Now that the cell size is set up, drag out UILabel and UIImageView to the cell. Attempt to position these views as they are in the following screenshot:
After dragging these views into their respective positions, you'll need to add constraints to them. Try to make Xcode add the constraints for you. You'll notice that this time Xcode doesn't do a very great job. Instead of aligning the image in the middle, it gets offset from the left. That might be fine for now; but if you decide to resize your cell later on, the current constraints will misplace the elements. Undo this step by using cmd + z or navigating to Edit | Undo. This time you'll need to manually set up the required constraints.
Whenever you add constraints, there are a few rules you should use to make your life easier. In fact, these rules are so important that they deserve to be in their own information box.
So, applying this to your layout means that the following constraints need to be added to the UIImageView:
- Center horizontally in the container (x position)
- Stick to the top of the container (y position)
- Be 50 points wide (width)
- Be 50 points high (height)
For the UILabel, the constraints are as follows:
- Center horizontally in the container (x position)
- Stick to the bottom of the container (y position)
There is no need to set up size constraints for the UILabel because it implements the intrinsicContentSize method. This method returns the size that fits the text for the label, and the layout engine will use this size instead of constraints in case no size constraints are given.
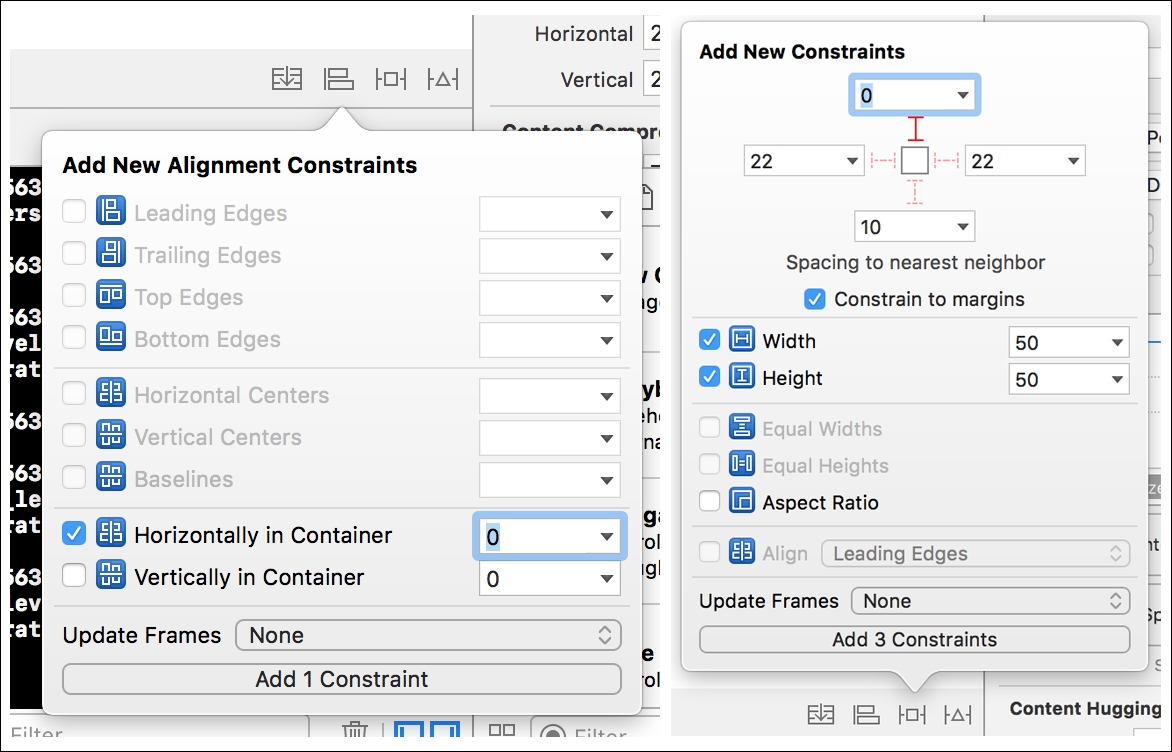
To add constraints to the UIImageView, select it from your storyboard. Then, click on the Align button in the bottom-right corner. There are a couple of options available here, but the one you need is the Horizontally in Container option. Add that constraint with a value of 0. This means that you want 0 offset from the container's center (refer to the following screenshot). After doing this, go to the Pin button that's next to the Align button. Select the Width and Height constraints and set both to 50. Also, provide the constraint at the top with a value of 0, with Constrain to margins checked. This will pin the image to the top of the view with some margin (see the following screenshot):
Repeat the centering step for the label. Also, instead of pinning it to the top of the container, pin it to the bottom. This provides Auto Layout with enough information to properly render it.
Remember that old UITableViewCell class that you didn't have to delete earlier? Now is the time to refactor that into a UICollectionViewCell. This new cell displays the same data as the UITableViewCell used to do. The prepareForReuse method exists on both classes; this means that all you need to do to refactor UITableViewCell into UICollectionViewCell is, rename it and change its superclass. Technically, you only need to change the superclass, but that would leave you with a UICollectionViewCell that calls itself a ContactTableViewCell. Not very pretty, is it? Replace the class definition as follows:
class ContactCollectionViewCell: UICollectionViewCell
Replacing the class definition like this enables you to use this class as the class for the UICollectionViewCell you just created in Interface Builder. Before connecting the @IBOutlets and updating the UICollectionViewCell class, you'll want to take a moment to rename the file your ContactCollectionViewCell is in. If you don't rename the file you could confuse yourself or others because you wouldn't expect a collection view cell to exist inside of a file that says it's a table view cell.
Now switch back to your storyboard and assign the ContactCollectionView as the class for the collection view cell.
Just like UITableView, UICollectionView uses delegation to retrieve cells. Currently you won't see any cells if you build and run your project because there are no data source methods implemented yet. The following is a code snippet that implements the required data source methods; but this would actually be a great exercise for you.
Go ahead and try to implement these methods on your own by using the knowledge you gained in the previous chapter. The data source methods are roughly the same so Xcode's autocomplete and Apple's documentation should provide you with enough information to figure this out on your own:
import UIKit
import Contacts

class ViewController: UIViewController, UICollectionViewDataSource {
    var contacts = [HCContact]()
    @IBOutlet var collectionView: UICollectionView!

    override func viewDidLoad() {
        super.viewDidLoad()

        collectionView.dataSource = self

        let store = CNContactStore()

        if CNContactStore.authorizationStatus(for: .contacts) ==
          .notDetermined {
            store.requestAccess(for: .contacts, completionHandler:
              {[weak self] authorized, error in
                if authorized {
                    self?.retrieveContacts(fromStore: store)
                }
            })
        } else if CNContactStore.authorizationStatus(for: .contacts) ==
         .authorized {
            retrieveContacts(fromStore: store)
        }
    }

    func retrieveContacts(fromStore store: CNContactStore) {
        let keysToFetch = [CNContactGivenNameKey, CNContactFamilyNameKey,
          CNContactImageDataKey, CNContactImageDataAvailableKey]
        let containerId = store.defaultContainerIdentifier()
        let predicate = CNContact.predicateForContactsInContainer(withIdentifier:
          containerId)

        contacts = try! store.unifiedContacts(matching: predicate, keysToFetch:
           keysToFetch).map { contact in
            return HCContact(contact: contact)
        }

        collectionView.reloadData()
    }

    func collectionView(_ collectionView: UICollectionView,
      numberOfItemsInSection section: Int) -> Int {
        return contacts.count
    }

    func collectionView(_ collectionView: UICollectionView,
      cellForItemAt indexPath: IndexPath) -> UICollectionViewCell {
        let cell = collectionView.dequeueReusableCell(withReuseIdentifier:
          "contactCell", for: indexPath) as! ContactCollectionViewCell
        let contact = contacts[indexPath.row]

        cell.nameLabel.text = "(contact.givenName) (contact.familyName)"

        contact.prefetchImageIfNeeded()
        if let image = contact.contactImage {
            cell.contactImage.image = image
        }

        return cell
    }
}
The details regarding this code are covered in Chapter 1, UITableView Touch Up . The preceding code implements methods for cell count and cell creation. It also loads the contacts and reloads the collection view when the contacts are fetched.
If you build and run the app now the cells won't look amazing. Images will seem to be a little distorted, and the fact that we're using plain squares for the images isn't very appealing either. This can be fixed by setting up the UIImageView so that the image it holds will stretch to fill while maintaining its aspect ratio instead of stretching (and deforming) to fit. Some rounded corners won't hurt this design either, so let's add those as well. Also finally, it would be nice to have a background color for the image so that the design doesn't fall apart as much when there's no image available.
Open your storyboard and select the UIImageView that's inside of your cell. In the Identity Inspector, you'll find an option that's called Content Mode. This option describes the way images should be rendered inside of this image view. The default is set to Scale to Fill. A better value would be Aspect Fill. This mode will make the image scale while maintaining its aspect ratio until it covers the available space. You can experiment with the other options if you'd like; just choose one and build the project to see what happens.
Next, look for the Background option on the image. Open up the drop-down menu and pick a color. The light gray one will be perfect for this cell. You might notice that there is no option to set rounded corners in the Identity Inspector or in any other panel, really. Despite this option being unavailable in Interface Builder, we can still implement it with some code. One final thing before we do this: make sure that Clips to Bounds is enabled for the UIImageView. You can find this option in the Identity Inspector.
One of the methods that you saw but didn't use in the previous chapter was the awakeFromNib method in UITableViewCell. This method is executed only once for every cell and is intended for any additional setup you want to run once and only once. A great example of something that should be done only once for every cell is setting its corner radius. The radius will never change, and it will never require an update. To set the corner radius on the image view, add the following code to ContactCollectionViewCell.swift:
override func awakeFromNib() {
    super.awakeFromNib()

    contactImage.layer.cornerRadius = 25
}
All that's being done here is changing the cornerRadius value of the contactImage layer. Every view has a layer. This layer is used for rendering and animation. You can't change the corner radius for a UIView, but you can change the corner radius for a CALayer. This layer can also be used to add or manipulate drop shadows, borders, and more.
Just assigning a value to the corner radius is everything that's required to give the image rounded corners. If you run your project now, you'll see that the cells look much better. The next step is to explore the layout of the collection view.