
Knowing that most of your app logic is covered with tests is great. What's not so great however, is adding your view controllers to your logic test. Before Xcode 7 came out, you had to put quite some effort into testing view controllers. This led to people simply not testing a lot of view controller code which would ultimately lead to bugs in the user interface that could have been prevented with tests. We were able to perform some degree of tests using UI Automation in Instruments but it simply wasn't great.
In Xcode 7, Apple introduced interface testing and the XCUITest framework. With this feature, we suddenly gained a great framework to write interface tests in; we also gained a tool that allows us to record these tests as we go through them manually.
To top it all off, XCUITest uses the accessibility features in iOS to gain access to the interface. This means that implementing user interface tests forces you to put at least a little bit of effort into accessibility for your applications. Apps that are hard to navigate through accessibility features will be harder to test than apps that are accessible.
So, XCUITest has two really great features that we should look at in greater detail. First of all, it helps us to enhance accessibility for our app. Secondly, it's easy to get started with UI testing and it allows us to test different paths in the view layer which drives up the amount of code that's covered under the tests.
Before we start recording our first UI test, let's have a quick look at accessibility.
One of the lesser-known killer features in iOS is accessibility. The design teams at Apple work really hard to ensure that iOS is accessible for everybody. This includes blind people and people with other disabilities that could somehow affect the user's ability to operate their iOS device.
Just looking at the accessibility settings in the iOS settings app makes it evident that this is a subject that Apple invests a lot of time in. If you're working on an app, Apple expects you to put in the same kind of effort. Doing this will be rewarded by more app downloads and if you're lucky even a couple of reviews. In their talk on iOS accessibility from WWDC 2015, Apple has even mentioned that implementing accessibility features can be helpful if you ever want to be featured in the App Store. Only the best apps get featured by Apple and if your app is accessible to all people, that really boosts your app's quality.
A common myth surrounding accessibility is that it's hard to implement or that it takes a lot of time. Some people even go as far as saying that it looks ugly or gets in the way of beautiful design. None if this entirely true. Sure, making your app accessible requires some effort but the UIKit framework is very helpful in terms of accessibility. Using standard components and keeping your user in mind while you design your app will make sure that your app is both accessible and looks good.
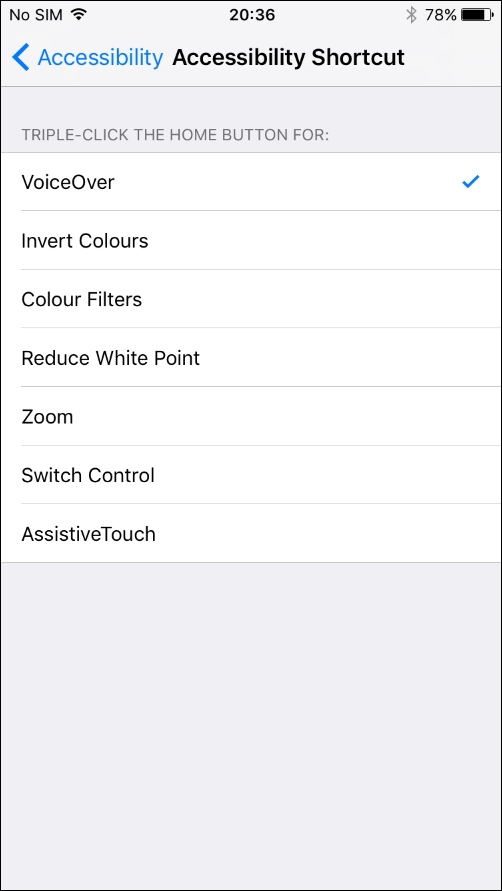
So, how does accessibility work on iOS? And how can we make sure our app is accessible? A fun way to experiment with this is to turn on VoiceOver on your device. To enable VoiceOver, go to the Accessibility menu. You'll find several vision related accessibility settings, VoiceOver should be the topmost one. To quickly enable and disable VoiceOver, scroll all the way to the bottom of the settings page and select VoiceOver as your accessibility shortcut. This will allow you to toggle VoiceOver off and on by triple clicking the home button.
After enabling this, go ahead and run the MovieTrivia app on your device and triple click your home button to enable VoiceOver. Swipe around and try to use the app. This is how a person with a vision impairment uses your app. You won't get past the loading screen because we're not loading dummy questions, but the splash screen is actually pretty accessible. Especially considering we haven't done anything to make this happen. UIKit helps us a great deal in the accessibility realm because most labels and button titles are used as accessibility labels.
You can set your own accessibility information through the Identity Inspector in Interface Builder. You can add custom labels, hints, identifiers, and traits to your interface to aid accessibility and, coincidentally, your UI tests.

For most UIKit interface elements you won't have to touch these settings yourself. UIKit will make sure that your objects have sensible defaults that automatically make your app accessible. Now that you have a little bit of background information about accessibility, let's have a look at testing our (accessible) UI.
Before we can record our UI tests, we need to add a UI testing target to our project. Follow the same steps as before to add a new testing target but pick the iOS UI Testing Bundle this time around. If you look inside of the newly-created group in your project, the structure for your UI tests looks very similar to the structure for unit tests.
One very important difference between UI test targets and unit test targets is that your UI tests do not gain access to any code that's inside of your app. A UI test can purely test the interface of your app and make assertions based on that.
If you open the MovieTriviaUITest.swift file, you'll notice that there are setUp() and tearDown() methods present. Also, all of the tests that must be executed are methods with the test prefix. This is all similar to what you've already seen.
One big difference is that we must manually launch the app in the setup stage. This is due to the fact that the UI test target is essentially just a different app that can interact with your main app's interface. This limitation is very interesting and it's also the reason why it's important to make your app accessible.
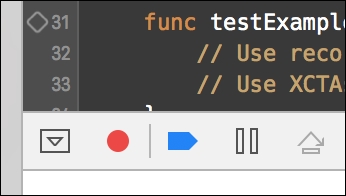
To start recording a UI test in Xcode, you must start a recording session. If you're editing code in a UI test target, a new interface element is visible in the bottom-left corner of your code editor area: a red dot:
Place your typing cursor inside of the testExample() method and click the red dot. Your app will be launched and anything you do is recorded as a UI test and played back when you run your tests. If you tap on the label and the activity indicator, Xcode will produce the following Swift code in the testing method:
let app = XCUIApplication()
app.staticTexts["Loading trivia questions..."].tap()
app.otherElements.containing(.activityIndicator, identifier:"In
progress").element.tap()
The UI test we recorded is basically just a set of instructions that get sent to the app. We look for a certain element in the app's UI and we tap() it. This test doesn't do a lot so it's not particularly useful. To make our test more useful, we should somehow let the app know that it should run in test mode so we can load questions from the JSON file instead of loading it from the network. To do this, we will use launch arguments.
Launch arguments are arguments that get passed to your app when it launches. These arguments can then be used to adjust the app's behavior based on these arguments. In our current example, we want to let our app know that we're testing it so it can load questions from the JSON file like we did before, rather than attempting to load trivia questions from the server.
To prepare for this, create a Shared folder in your project and move the TiviaQuestions.json file to it. Make sure to add it to the test target, the app target, and the UI test target. We won't need it in the UI test target just yet but we will later so you might just as well add it to the UI test target while you're at it.
In order to pass launch arguments to the app, we're going to modify the setUp() method in the UI test:
override func setUp() {
    super.setUp()

    continueAfterFailure = false

    let app = XCUIApplication()
    app.launchArguments.append("isUITesting")
    app.launch()
}
The XCUIApplication instance we create has a launchArguments property. We can add new strings to this array before we launch the app. We can then extract this launch argument in our app. Modify the loadTriviaQuestions(callback:) method in TriviaAPI.swift as shown here:
func loadTriviaQuestions(callback: @escaping QuestionsFetchedCallback) {
    if ProcessInfo.processInfo.arguments.contains("isUITesting") {
        loadQuestionsFromFile(callback: callback)
        return
    }
    // existing implementation...
}
The code highlighted in bold should be inserted above the existing implementation of this method. The snippet checks whether we're UI testing and if we are, we call the loadQuesionsFromFile(callback:) method to load the questions from the JSON file instead of loading it from the network.
Note that it's not ideal to perform checks like this in your production code. Ideally you'd make use of a configuration class that contains information about whether the app is in test mode. You would then use this class throughout your app instead of reading the process info all over the place in your production code.
The implementation for this method is shown in the following code:
func loadQuestionsFromFile(callback: @escaping QuestionsFetchedCallback) {
    guard let filename = Bundle.main.path(forResource: "TriviaQuestions",
                                ofType: "json"),
        let triviaString = try? String(contentsOfFile: filename),
        let triviaData = triviaString.data(using: .utf8),
        let jsonObject = try? JSONSerialization.jsonObject(with: triviaData,
                                               options: []),
        let triviaJSON = jsonObject as? JSON
        else { return }

    callback(triviaJSON)
}
It's very similar to the question loading method we wrote for the unit tests; the only difference is that we're using a different way to obtain the bundle from which we're loading the questions.
If you run your UI tests now, they will fail. The reason for this is that when the test framework starts looking for the elements we tapped before, they don't exist. This results in a test failure because we can't tap elements that don't exist.
We should adjust our tests a bit because tapping loaders is not the most useful UI test. It's a lot more useful for us to make sure that we can tap buttons and that the UI updates according to the result of tapping a button.
To do this, we're going to write a UI test that waits for the question and buttons to appear, taps them, and checks whether the UI has updated accordingly. We'll also load the questions file so we can check that tapping a wrong or right answer works as intended.
We're going to write two tests to make sure that our trivia game works as expected. The first test will test that the question and answer buttons appear and that they have the correct labels. The second test will make sure that we can tap the answers and that the UI updates accordingly.
Instead of recording the tests, we're going to write them manually. Writing tests manually gives you a bit more control and allows you to do much more than just tapping on elements. Before we do this, you should open the Main.storyboard file and give accessibility identifiers to our UI elements. Select the question title and give the UILabel an identifier of QuestionTitle. Select each of the answers and give them the identifiers AnswerA, AnswerB, and AnswerC respectively.

Remove the existing UI test from the MovieTriviaUITests class and add the one shown in the following code:
func testQuestionAppears() {
    let app = XCUIApplication()

    let buttonIdentifiers = ["AnswerA", "AnswerB", "AnswerC"]
    for identifier in buttonIdentifiers {
        let button = app.buttons.matching(identifier: identifier).element
        let predicate = NSPredicate(format: "exists == true")
        _ = expectation(for: predicate, evaluatedWith: button, handler: nil)
    }

    let questionTitle = app.staticTexts.matching(identifier: "QuestionTitle").element
    let predicate = NSPredicate(format: "exists == true")
    _ = expectation(for: predicate, evaluatedWith: questionTitle, handler: nil)

    waitForExpectations(timeout: 5, handler: nil)
}
We select each element through their accessibility identifier. We can easily do this because the XCUIApplication instance we create provides easy access to our elements. Next, we create a predicate that will check whether the existing property of our element is true. Then we create an expectation that will evaluate the predicate for the UI element. Lastly, we wait for these expectations to fulfill. Our expectations are considered fulfilled whenever the predicate we pass to it is true. If this never happens, our tests fail and we'll know that something's amiss.
To make sure that our questions are loaded correctly, we'll need to load the JSON file like we did before. Add the following property to the test so we have a place to store the trivia questions:
var questions: [JSON]?
Next, add the following code to the setUp() method right after calling super.setUp():
guard let filename = Bundle(for: MovieTriviaUITests.self).path(forResource:
   "TriviaQuestions", ofType: "json"),
    let triviaString = try? String(contentsOfFile: filename),
    let triviaData = triviaString.data(using: .utf8),
    let jsonObject = try? JSONSerialization.jsonObject(with: triviaData, options: []),
    let triviaJSON = jsonObject as? JSON,
    let jsonQuestions = triviaJSON["questions"] as? [JSON]
    else { return }

questions = jsonQuestions
This code should look familiar to you because it's similar to the code we've already used to load JSON before. To make sure that the correct question is displayed, update the test method as shown in the following code:
func testQuestionAppears() {
    // existing implementation...

    waitForExpectations(timeout: 5, handler: nil)

    guard let question = questions?.first
        else { fatalError("Can't continue testing without question data...") }

    validateQuestionIsDisplayed(question)
}

func validateQuestionIsDisplayed(_ question: JSON) {
    let app = XCUIApplication()
    let questionTitle = app.staticTexts.matching(identifier: "QuestionTitle").element

    guard let title = question["title"] as? String,
        let answerA = question["answer_a"] as? String,
        let answerB = question["answer_b"] as? String,
        let answerC = question["answer_c"] as? String
        else { fatalError("Can't continue testing without question data...") }

    XCTAssert(questionTitle.label == title, "Expected question title to match json
      data")

    let buttonA = app.buttons.matching(identifier: "AnswerA").element
    XCTAssert(buttonA.label == answerA, "Expected AnswerA title to match json data")

    let buttonB = app.buttons.matching(identifier: "AnswerB").element
    XCTAssert(buttonB.label == answerB, "Expected AnswerB title to match json data")

    let buttonC = app.buttons.matching(identifier: "AnswerC").element
    XCTAssert(buttonC.label == answerC, "Expected AnswerC title to match json data")
}
This snippet will be run after we know for sure that our UI elements exist because it's executing after waiting for the expectations we created. The first question is extracted from the JSON data and all of the relevant labels are then compared to the question data using a method that we can reuse to validate that a certain question is currently shown.
The second test we'll add is intended to check whether the game UI responds as expected. We'll load a question, tap the wrong answers, and make sure that the UI doesn't show the button to go to the next question. Then we'll tap the correct answer and tap the next question button. Finally, we'll validate that the second question is properly displayed and that the next question button is hidden again:
 func testAnswerValidation() {
    let app = XCUIApplication()

    let button = app.buttons.matching(identifier: "AnswerA").element
    let predicate = NSPredicate(format: "exists == true")
    _ = expectation(for: predicate, evaluatedWith: button, handler: nil)
    waitForExpectations(timeout: 5, handler: nil)

    let nextQuestionButton = app.buttons.matching(identifier: "NextQuestion").element

    guard let question = questions?.first,
        let correctAnswer = question["correct_answer"] as? Int
        else { fatalError("Can't continue testing without question data...") }

    let buttonIdentifiers = ["AnswerA", "AnswerB", "AnswerC"]
    for (i, identifier) in buttonIdentifiers.enumerated() {
        guard i != correctAnswer
            else { continue }

        app.buttons.matching(identifier: identifier).element.tap()

        XCTAssert(nextQuestionButton.exists == false, "Next question button should be
           hidden")
    }

    app.buttons.matching(identifier: buttonIdentifiers[correctAnswer]).element.tap()
    XCTAssert(nextQuestionButton.exists == true, "Next question button should be
            visible")

    nextQuestionButton.tap()

    guard let nextQuestion = questions?[1]
        else { fatalError("Can't continue testing without question data...") }

    validateQuestionIsDisplayed(nextQuestion)
    XCTAssert(nextQuestionButton.exists == false, "Next question button should be
      hidden")
}
The preceding code depicts the entire test that we should write to validate that our UI responds properly to good and bad answers. Tests like these are quite verbose but they save you a lot of manual testing; making tests like these are absolutely worth writing.
When you're able to test your UI like this, you can rest assured that your app will at least be somewhat accessible. The beauty in this is that both UI testing and accessibility can greatly improve your app quality and doing one strongly aids the other.
Testing your UI is mostly a matter of looking for elements in the UI, checking their state or availability, and making assertions based on that. In the two tests we've written for MovieTrivia, we've combined expectations and assertions to test both existing UI elements and elements that might not be on screen yet. Note that your UI tests will always attempt to wait for any animations to complete before the next command is executed. This will make sure that you don't have to write expectations for any new UI that gets pushed using a transition.