
Implementing something as big and complex as a custom UICollectionViewLayout looks like quite the challenge for most people. Creating a custom layout involves calculating the position for each and every cell that your collection view will display. You will have to make sure that your code does this as fast and efficiently as possible because your layout code will directly influence the performance of the entire collection view. Luckily, the documentation for implementing a custom layout is pretty good.
If you look at the documentation for UICollectionViewLayout, you can read about its role in a UICollectionView. This information shows that a custom layout requires you to handle layout for cells, supplementary views, and decoration views. Supplementary views are header and footer views. The HelloContacts app doesn't use these views so we can skip those for now. Decoration views are views that aren't related to the UICollectionView data, but are part of the view hierarchy. The only purpose of these views is decoration, as the name already suggests. The HelloContacts app doesn't use these either so we'll skip those as well for the sake of simplicity.
The documentation also outlines methods that any custom layout should implement according to Apple. Not all of these are mandatory. For example, methods that relate to supplementary views or the ones that involve decoration views are completely optional. The methods that we will implement are the ones that affect the cells. The following is a list of all of these methods:
collectionViewContentSize()layoutAttributesForElements(in:)layoutAttributesForItem(at:)shouldInvalidateLayout(forBoundsChange:)prepare()
When you scroll down the documentation page, you'll find some information about updating layout, which we won't have to worry about for now. A method that is of interest to us is the prepare method. This method is the perfect point for a UICollectionViewLayout to calculate all of the layout attributes that will be used for all of the cells. All of the cells in the HelloContacts app are of the same size and most of the users won't have millions of contacts so precalculating the layout for all of these items is a great idea.
A custom layout should always be a subclass of UICollectionViewLayout. The first thing you'll need to do is create a new cocoa touch class and name it ContactsCollectionViewLayout. Make sure that UICollectionViewLayout inherits this class.
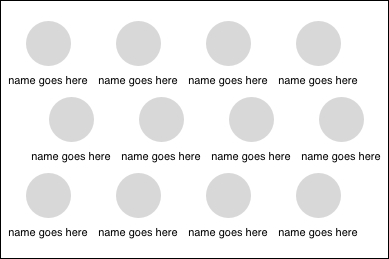
We're going to implement the design in the following screenshot. This design is very similar to a grid layout that scrolls horizontally; the main difference is that all of the odd-numbered rows (if you start counting at 0 like a true programmer) are indented a bit:
Since all elements in this layout have a predictable size that doesn't depend on any external factors, such as the bounds of the collection view this layout belongs to, all of the heavy lifting will be done in the prepare method. This is where all of the layout attributes for every cell will be calculated so they are available right away whenever the collection view needs to lay out some cells.
The steps required to implement the layout are as follows:
- Precalculating the
layoutin the prepare method. - Implementing
collectionViewContentSizeto provide the collection view with enough information to configure its scrolling. - Implementing
layoutAttributesForElements(_:)to provide the layout attributes for all elements in a certain area. - Implementing
layoutAttributesForItem(_:)to provide the layout attributes for a specific item. - Implementing
shouldInvalidateLayout(_:)to determine whether the layout should invalidate for certain changes in the bounds of the collection view. - Assigning the custom layout to the collection view.
In order to calculate the layout for the collection view, it will be nice to use a playground. A playground will allow you to quickly experiment with values, and you don't have to wait for your entire app to build and run every time you want to quickly make a change and test the effects it has. You can create a playground by navigating to File | New | Playground.
The approach we'll take to calculating this layout is to assign a row and column to each cell. You don't have to create an actual property that assigns these but you do need a way to map each cell to a position in the grid.
There should be as many contacts on the screen as possible so step one is to figure out how many cells fit on the vertical axis of the collection view. The horizontal axis isn't relevant because the layout will scroll horizontally. Imagine the collection view has a height of 667 points. Every cell is 90 points high and has 10 points of spacing in between them. This means that (667+10) / 100 = 6.77 cells fit on the vertical axis. You need to add 10 points to the height of the collection view because a margin was added to every cell earlier. In reality, the amount of cells that have a margin is one less than the total amount of cells, so we need to compensate for the 10 extra points that are involved in the calculation. The amount of cells per row can now be calculated as well. If there are 60 cells that need to be divided on 6 rows, the amount of cells per row is 60 cells / 6 rows = 10 cells per row.
Now that this information is available, a loop can be written that calculates the frame for every cell. Open the playground you created earlier and add the following code to it:
import UIKit

let collectionViewHeight = 667
let itemHeight = 90
let itemWidth = 100
let itemSpacing = 10

let numberOfItems = 60

let numRows = (collectionViewHeight + itemSpacing) / (itemHeight + itemSpacing)
let numColumns = numberOfItems / numRows
The preceding snippet sets up some variables based on the rules that were established earlier. An important thing to note is that numRows isn't 6.77 but just 6. This is due to the way numbers work in programming. Int, which is the type that was used in the playground, don't have floating points. It is always rounded down to the nearest integer value. With this setup, it's possible to write a loop that calculates the frame for every cell. To do this, you can create a range from 0 to the total amount of items and iterate over it to calculate the frame based on the row and the column the item would be in, as follows:
var allFrames = [CGRect]()
for itemIndex in 0..<numberOfItems {
let row = itemIndex % numRows
let column = itemIndex / numRows

    var xPos = column * (itemWidth + itemSpacing)
    if row % 2 == 1 {
        xPos += itemWidth / 2
    }

    var yPos = row * (itemHeight + itemSpacing)

    allFrames.append(CGRect(x: xPos, y: yPos, width: itemWidth, height:
      itemHeight))
}
The preceding code creates an array. This array is then populated with the frame for every item. Note that the modulus operator is used to determine whether an item is in an even row or not. If it isn't, the x position is offset by half the itemWidth. If you print the result of this loop, you'd see the following output:
[(0.0, 0.0, 100.0, 90.0), (50.0, 100.0, 100.0, 90.0), (0.0, 200.0, 100.0, 90.0), (50.0, 300.0, 100.0, 90.0), (0.0, 400.0, 100.0, 90.0), (50.0, 500.0, 100.0, 90.0), (0.0, 600.0, 100.0, 90.0), (50.0, 700.0, 100.0, 90.0), (0.0, 800.0, 100.0, 90.0), (50.0, 900.0, 100.0, 90.0), (110.0, 0.0, 100.0, 90.0), (160.0, 100.0, 100.0, 90.0), (110.0, 200.0, 100.0, 90.0), (160.0, 300.0, 100.0, 90.0), (110.0, 400.0, 100.0, 90.0), (160.0, 500.0, 100.0, 90.0), (110.0, 600.0, 100.0, 90.0), (160.0, 700.0, 100.0, 90.0), (110.0, 800.0, 100.0, 90.0), (160.0, 900.0, 100.0, 90.0), (220.0, 0.0, 100.0, 90.0), (270.0, 100.0, 100.0, 90.0), (220.0, 200.0, 100.0, 90.0), (270.0, 300.0, 100.0, 90.0), (220.0, 400.0, 100.0, 90.0), (270.0, 500.0, 100.0, 90.0), (220.0, 600.0, 100.0, 90.0), (270.0, 700.0, 100.0, 90.0), (220.0, 800.0, 100.0, 90.0), (270.0, 900.0, 100.0, 90.0), (330.0, 0.0, 100.0, 90.0), (380.0, 100.0, 100.0, 90.0), (330.0, 200.0, 100.0, 90.0), (380.0, 300.0, 100.0, 90.0), (330.0, 400.0, 100.0, 90.0), (380.0, 500.0, 100.0, 90.0), (330.0, 600.0, 100.0, 90.0), (380.0, 700.0, 100.0, 90.0), (330.0, 800.0, 100.0, 90.0), (380.0, 900.0, 100.0, 90.0), (440.0, 0.0, 100.0, 90.0), (490.0, 100.0, 100.0, 90.0), (440.0, 200.0, 100.0, 90.0), (490.0, 300.0, 100.0, 90.0), (440.0, 400.0, 100.0, 90.0), (490.0, 500.0, 100.0, 90.0), (440.0, 600.0, 100.0, 90.0), (490.0, 700.0, 100.0, 90.0), (440.0, 800.0, 100.0, 90.0), (490.0, 900.0, 100.0, 90.0), (550.0, 0.0, 100.0, 90.0), (600.0, 100.0, 100.0, 90.0), (550.0, 200.0, 100.0, 90.0), (600.0, 300.0, 100.0, 90.0), (550.0, 400.0, 100.0, 90.0), (600.0, 500.0, 100.0, 90.0), (550.0, 600.0, 100.0, 90.0), (600.0, 700.0, 100.0, 90.0), (550.0, 800.0, 100.0, 90.0), (600.0, 900.0, 100.0, 90.0)]
This output isn't the easiest to read but if you examine it closely you'll notice that this result is exactly what it is supposed to be. Every cell has the correct width (100) and height (90), and every other row is indented by 50 points. Now that the formula to calculate these frames is complete, let's create the actual implementation. You've already created a placeholder class for the layout so open ContactsCollectionViewLayout.swift and add the following skeleton code to it:
import UIKit

class ContactsCollectionViewLayout: UICollectionViewLayout {
    var itemSize = CGSize(width: 110, height: 90)
    var itemSpacing: CGFloat = 10

    var layoutAttributes = [UICollectionViewLayoutAttributes]()

    override func prepare() {

    }

    override func shouldInvalidateLayout(forBoundsChange newBounds: CGRect)
    -> Bool {
        return false
    }

    override func collectionViewContentSize() -> CGSize {
        return CGSize.zero
    }

    override func layoutAttributesForElements(in rect: CGRect) -> [UICollectionViewLayoutAttributes]? {
        return nil
    }

    override func layoutAttributesForItem(at indexPath: IndexPath) ->
      UICollectionViewLayoutAttributes? {
        return nil
    }
}
The preceding code implements some placeholders. An important thing to note is that the itemSize and itemSpacing are mutable variables. This allows external sources to update these values if they'd prefer to do so. The default values are the values that make sense for the HelloContacts app so our app won't have to customize these. Also, instead of using an array of CGRect instances, this class uses an array of UICollectionViewLayoutAttributes. This is the type of object that's used to lay out collection view cells.
The implementation for prepare should end up as follows:
private var numberOfItems = 0
private var numRows = 0
private var numColumns = 0

override func prepare() {
    guard let collectionView = collectionView else { return }

    numberOfItems = collectionView.numberOfItems(inSection: 0)

    numRows = Int(collectionView.bounds.height + itemSpacing) /
      Int(itemSize.height + itemSpacing)
numColumns =
      Int(ceil(CGFloat(numberOfItems) / CGFloat(numRows)))

    layoutAttributes.removeAll()

    for itemIndex in 0..<numberOfItems {
        let row = itemIndex % numRows
        let column = itemIndex / numRows

        var xPos = column * Int(itemSize.width + itemSpacing)
        if row % 2 == 1 {
            xPos += Int(itemSize.width / 2)
        }

        let yPos = row * Int(itemSize.height + itemSpacing)

let attributes = UICollectionViewLayoutAttributes(forCellWith:
  IndexPath(row: itemIndex, section: 0))

        attributes.frame = CGRect(x: CGFloat(xPos), y: CGFloat(yPos),
          width: itemSize.width, height: itemSize.height)

        layoutAttributes.append(attributes)
    }
}
This implementation is very similar to the playground implementation. The most important differences are highlighted. The number of items isn't a fixed number anymore but it's determined by asking the collection view for the number of items in section 0. This works because the collection view in HelloContacts only has a single section. If it had more sections, the implementation would have been a bit more complex because it would need to keep track of these sections somehow.
Another difference is the use of UICollectionViewLayoutAttributes. This class contains information about the cell's IndexPath and its frame. The frame is assigned right after it's created and that line is basically the same as it was already in the playground.
This wraps up step 1. The implementation of prepare is complete, and the content size can be derived because of it. Let's move on to the next step and implement the collectionViewContentSize computed property.
The collectionViewContentSize property is used by the collection view to determine the size of its contents. It's important for the collection view to know the size because this size is used for the scroll indicators that hint to the user how far along they are when scrolling in a list. Another reason this property is important is because it will give the collection view enough information to determine in which direction it should scroll.
The implementation for this property will use the number of rows in the collection view and the number of columns in the collection view. These numbers will be multiplied by the sizing of each item while the spacing between the items is taken into account.
Finally, a CGSize is returned that represents the size of the collection view's entire contents. The following snippet shows the implementation:
override var collectionViewContentSize: CGSize {
    let width = CGFloat(numColumns) * itemSize.width +
      CGFloat(numColumns - 1) * itemSpacing
    let height = CGFloat(numRows) * itemSize.height +
      CGFloat(numRows - 1) * itemSpacing

    return CGSize(width: width, height: height)
}
Because the layout has been properly prepared, determining the size for the entire layout isn't very complex. Two simple calculations are enough to figure out the size of the collection view's contents.
The layoutAttributesForElements(_:) method is a more complex method to implement. This method is used by the collection view when it needs the layout for multiple items at once. The collection view will specify the visible section of its contents, and the layout is expected to figure out which layout attributes to return for the items that fall within the specified CGRect.
Even though only a certain number of cells is displayed at the same time, the collection view knows about the fact that there's a lot more contents outside of the viewport that may not be visible. If the collection view needs to suddenly jump to a certain point in the collection view that wasn't visible before, it will use the layout object to ask for the layout attributes for items that will be visible. Based on these attributes, the collection view will fetch the required cells and render them on screen. This is possible because UICollectionViewLayoutAttributes doesn't just contain the frames for the cells, it also knows about the IndexPath for all cells.
This is all pretty complex and just reading about it won't make it any less complex. The most important takeaway from this is that the collection view layout should be able to figure out which cells, or layout attributes, overlap with any given CGRect inside of the collection view. It's probably best that we dive right into an example so you can immediately see what we're trying to achieve.
To determine which attributes have overlap with a given CGRect, the intersects method on CGRect is used as follows:
override func layoutAttributesForElements(in rect: CGRect) ->
  [UICollectionViewLayoutAttributes]? {
    return layoutAttributes.filter { attributes in
        attributes.frame.intersects(rect)
    }
}
For something that required a couple of paragraphs to explain, the preceding code is pretty simple. To find out which attributes overlap the given CGRect, the filter method is used on the layoutAttributes that were calculated by prepare. Filter is a powerful and convenient method, just like the map method that was demonstrated previously, to convert fetched CNContact objects to HCContact objects.
The filter method loops over every item in the layoutAttributes array and calls the supplied closure (which must return true or false), once for each attribute instance in the array. If the closure returns true, the attributes instance will be included in the output array; if it returns false, then it will be omitted. If it's included, we check if attributes.frame intersects with the given CGRect and return all matches. Once again, the extensive preparation pays off because we have a very simple, concise, and fast way to implement this functionality.
You're almost ready to make use of your beautiful custom layout. Just a few more methods remains to be tackled. The method you need to implement next is layoutAttributesForItem(_:). This method will receive the IndexPath for a single item, and the layout is supposed to return the correct layout attributes for it. The following is the implementation:
override func layoutAttributesForItem(at indexPath: IndexPath) ->
  UICollectionViewLayoutAttributes? {
    return layoutAttributes[indexPath.row]
}
This implementation is nice and clean, once again owing to the preparation we did earlier. You can simply use the row property of the IndexPath to retrieve the required layout attributes from the stored array of attributes.
The shouldInvalidateLayout(_:CGRect) method is pretty important. This method is responsible for determining whether or not the layout for the collection view needs to be recalculated. If this method returns true, the layout will be reset, and if it returns false, the layout will remain the same. We want to carefully implement this method to make sure that we only invalidate the layout if we believe that the attributes for the layout will change. The simplest implementation would check whether the new bounds are different from the old bounds. This would be an okay solution, but for this layout, we can do better! Let's have a look at the following screenshot:
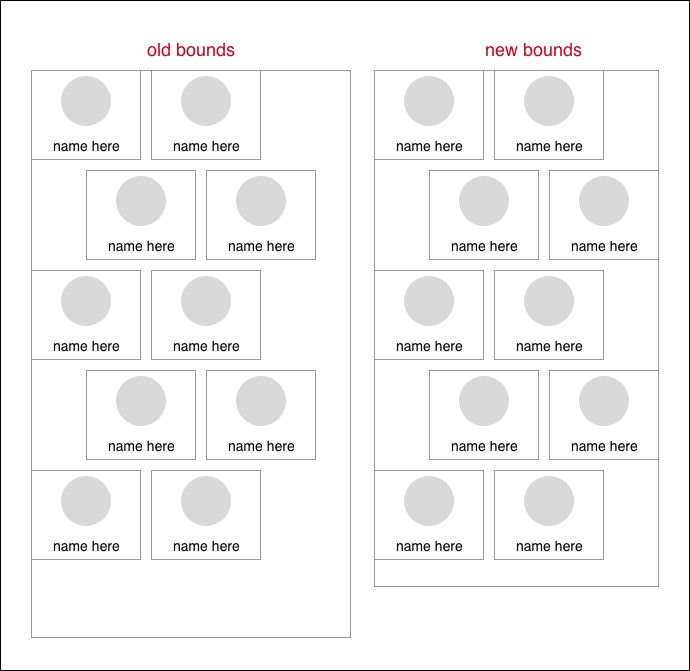
This screenshot illustrates that the layout wouldn't change if the collection view's bounds still allow for the same number of rows to be displayed. So, the best implementation for this layout would check this and only return true if the collection view's new bounds would either have more room, so we can render more rows, or if it has less room, so we need to render less rows. Refer to the following code snippet for the implementation:
override func shouldInvalidateLayout(forBoundsChange
  newBounds: CGRect) -> Bool {
    guard let collectionView = collectionView else { return true }

    let availableHeight = newBounds.height - collectionView.contentInset.top -
      collectionView.contentInset.bottom
    let possibleRows = Int(availableHeight + itemSpacing) / Int(itemSize.height +
      itemSpacing)

    return possibleRows != numRows
}
This snippet uses the same calculation as before, except it uses the height for the new bounds instead of the collection view's height. The return value is the result of comparing the inequality between the possible amount of rows and the current amount of rows. If they are the same, this method returns false. In case they are different, true is returned, and the layout will be recalculated.
The final step is to assign this new layout to the collection view. You saw that Interface Builder has the option to assign a custom class to the layout for the UICollectionView. However, we can't use this. Setting a custom class on this only works if the UICollectionViewFlowLayout inherits custom layout. Our UICollectionViewLayout inherits custom layout. To assign the layout to the collection view, you'll need to use some code. Open ViewController.swift and add the following code; the code that's different than before is highlighted and should be added by you:
collectionView.dataSource = self
collectionView.delegate = self
collectionView.collectionViewLayout = ContactsCollectionViewLayout()

let store = CNContactStore()
The highlighted line in the preceding snippet assigns the custom layout to the collection view. All that's needed to make this work is to assign an instance of the custom layout to the collectionViewLayout. After assigning this layout, the layout delegate methods that you added earlier aren't needed anymore. You can delete those, and you can also remove the conformance to UICollectionViewDelegateFlowLayout from the class definition.
The custom layout that was created in this subsection is a great example of the powers of UICollectionView. However, with great power comes great responsibility. The implementation that's provided isn't entirely reusable since it doesn't deal with headers or multiple sections. If you're building your own app, this might be completely fine. If all you'll ever deal with is a single array of items that isn't divided in sections or uses decoration views, you'll be good. However, if you want to create a layout that can be reused and is ready for anything, you should take care of implementing all of the methods that can affect layout.
More importantly, even simple layouts can make an otherwise fast collection view really slow. It's very easy to do a recursive or complex calculation that will run more times than needed, resulting in a collection view that will scroll exponentially slower until it won't scroll at all. These situations are frustrating for users, and instead of praising you and your creative layout, they will be annoyed by it.
If you are able to properly create and implement a beautiful custom layout, you have a very powerful tool in your toolbox. You know now that implementing something different than a standard grid isn't rocket science and the implementation isn't overly complex. With some careful planning and experimenting in playgrounds, you can make amazing layouts for your users.
Note
Reader exercise: The current layout is aligned to the top of the collection view and fills up the view as much as possible. There is space left at the bottom. A great exercise is to adapt the layout to be centered vertically within the collection view. You will need to change the layout preparation method and the layout invalidation method. Good luck!