
Every notification you see on iOS has been scheduled or pushed in one way or the other. But before an app is even allowed to send notifications, we actually have to go through a few steps. The steps you need to follow can be roughly divided as follows:
- Registering for notifications.
- Creating notification content.
- Scheduling your notification.
- Handling incoming notifications.
Not every step is identical for push and local notifications, so whenever relevant, the difference will be described. Because of the UserNotifications framework, these differences will be minimal, but they're there. We'll expand the quotes app from the previous chapter with a daily notification as a way to showcase and test notifications.
The first step you need to go through if you're planning on showing notifications to your user is asking permission to do so. We call this registering for notifications. It's important that you make sure your user understands why they're being prompted for this permission. After all, you're interrupting your user while they're trying to achieve something in your app and the permission alert prevents them from doing so. It's often a great idea to hold off on asking permission for notifications until the user does something that can be improved if they turn on notifications.
When you ask permission for notifications, you have the option to specify the kind of notifications that you want to send the user. You can pick the following types:
- Alerts
- Badges
- Car play
- Sounds
The user can go into your app's page in the settings app at any time to change these settings themselves. With the UserNotifications framework, you can read these settings, use them to inform your users about the current notification status, and ask them to turn notifications on if needed.
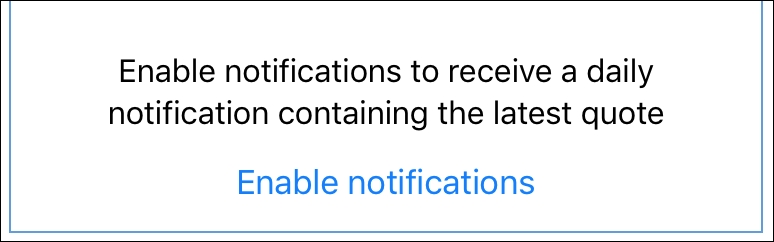
In The Daily Quote, we're going to add a small piece of UI that informs the user about the benefits of enabling notifications for this app. We'll display a button below the text that the user can tap in order to make the notification permissions dialog appear. This strategy is common in many apps because we only ask permission to send notifications if the user is likely to say yes. They initiated the prompt voluntarily after all.
If the user has denied notifications or disabled them at a later stage, we'll still inform the user about the benefits of notifications, but the button below the text will link to the app's settings instead of opening the initial prompt.
Add the following outlets and action to ViewController.swift:
@IBOutlet var notificationSugestionLabel: UILabel!
@IBOutlet var enableNotificationsButton: UIButton!

@IBAction func enableNotificationsTapped() {

}
Also, add a button and a label in the app's Main.storyboard. The button should stick to the bottom margin of the screen and the label is added above. Make sure to center everything and use the blue lines in Interface Builder to help you position the views. Refer to the following screenshot to make sure that you've set up the layout correctly:
Don't forget to connect the outlets and actions to the interface in your storyboard by dragging from the Outlets Inspector for ViewController to the UI elements. The TouchUpInside event should be used as the trigger for the button-tap action.
Reading the current notification settings and asking permission to send notifications is always done through a UNNotificationCenter instance. We can obtain such an instance through the current() class method on UNNotificationCenter.
Since we'll be using the UNNotificationCenter in more than one place, add the following property to ViewController.swift:
let notificationCenter = UNUserNotificationCenter.current()
Every time the view appears, we'll want to update the user interface to reflect the current state of notification permissions. We can override the viewWillAppear method to make this happen. Add the following implementation:
override func viewWillAppear(_ animated: Bool) {
    super.viewWillAppear(animated)

    notificationCenter.getNotificationSettings {[weak self] settings in
        let authorizationStatus = settings.authorizationStatus

        switch(authorizationStatus) {
        case .authorized:
            self?.hideNotificationsUI()
        case .denied:
            self?.showNotificationsUI()
        default: return
        }
    }
}

func hideNotificationsUI() {
    DispatchQueue.main.async { [weak self] in
        self?.notificationSugestionLabel.isHidden = true
        self?.enableNotificationsButton.isHidden = true
    }
}

func showNotificationsUI() {
    DispatchQueue.main.async { [weak self] in
        self?.notificationSugestionLabel.isHidden = false
        self?.enableNotificationsButton.isHidden = false
    }
}
This code retrieves the current notification settings from the notification center and reads these settings in order to determine the current authorization status. Once the current status has been determined, we can figure out whether we should show or hide the notifications UI. Because we call the show and hide methods from a callback that's not necessarily executed on the main thread, we manually make sure to dispatch the UI code on the main thread.
There is a total of three possible authorization statuses: authorized, denied, and notDetermined; the following is a list for each status and what the status means:
notDetermined: This means that we haven't asked for permissions beforeauthorized: This means that we have asked for permissions and we're allowed to send notifications to the usernotAuthorized: This means that we have asked for permissions and we're not allowed to send notifications to the user because they either declined the permissions prompt or they turned off notifications in their settings
We don't need to check for notDetermined in viewWillAppear because it's the default status and the notifications UI will always be visible if we're in this state.
Add the following implementation for the enableNotificationsTapped action:
@IBAction func enableNotificationsTapped() {
    notificationCenter.getNotificationSettings { [weak self]
      settings in
        let authorizationStatus = settings.authorizationStatus

        switch(authorizationStatus) {
        case .notDetermined:
            self?.notificationCenter.requestAuthorization(options:
              [.alert, .sound]) { [weak self] granted, error in
                guard error == nil, granted == true
                    else { return }

                self?.hideNotificationsUI()
            }
        case .denied:
            let settingsUrl = URL(string:
              UIApplicationOpenSettingsURLString)
            UIApplication.shared.open(settingsUrl!,
                                      options: [:],
                                      completionHandler: nil)
        default: return
        }
    }
}
If the notification status hasn't been determined before, we request authorization. If the user grants permission for notifications, we hide the notifications interface. If the user taps this button and the current status is denied, we open the settings app on the section for our app so the user can enable notifications.
If we want to register for push notifications, we'll have to enable this capability in our app's capabilities tab. Note that this feature is only available if you're on the paid developer program. Free developer accounts cannot enable this capability.
After enabling the push notifications capability, we need to add a couple of lines of code to make sure that we properly register the current device with the APNS. To do this, we call a method on UIApplication that will register the device on APNS. Then a delegate method in AppDelegate is called with the current device token that we should upload to our server so we can send messages to the device through the device token.
Because the token could change at any time, we should always register for remote notifications whenever we're sure about being authorized. For our app, we should register both in viewWillAppear and enableNotificationsTapped, right after we hide the notifications UI. Add the following line right after both hideNotificationsUI calls in ViewController:
UIApplication.shared.registerForRemoteNotifications()
In AppDelegate, add the following method:
func application(_ application: UIApplication, didRegisterForRemoteNotificationsWithDeviceToken deviceToken: Data) {
    print("received device token: (deviceToken)")
}
If you want to support push notifications, you should upload the device token to your server instead of printing to the console. You're all set to send notifications to your user now. Let's look at creating content for our notifications.
Notifications in iOS 10 typically consist of a couple of pieces of content. First of all, every notification has a title, a subtitle, and a message body. Not all fields have to be present, but you'll often want to provide a little bit more information than just a bit of body text. You can also add media attachments to notifications. These attachments provide a preview of a photo, video, or audio file that is stored locally on the device, and are great for providing better looking, richer notifications to your user.
Creating content for notifications is where the biggest gap between push and local notifications is present. Push notifications are always created on the server and are pushed to the device in a JSON format, while local notifications are created on the device. Let's look at each notification type separately.
If you disregard the complexities of setting up and hosting your own server, push notifications are actually pretty simple to create. Push notifications are always delivered using a JSON payload that your own server sends to APNS. APNS will then take care of sending your notification through to the device that's intended to receive the notification. Let's look at a simple example of a JSON payload that we could use to inform users about a new quote in The Daily Quote:
{
    "aps" : {
        "alert" : {
            "title" : "A new quote is available",
            "body" : "Stay hungry, stay foolish"
        },
        "badge" : 1
    },
    "quote_id" : "10"
}
This notification only contains a title and a body. We also add the number 1 to the app icon to indicate the number of quotes available. You'll notice that this content is inside of the aps dictionary. This aps dictionary contains the push notification's content. The quote_id is not part of this content on purpose; it's a custom property that we can read in the app so we can find data for this quote from a local database or fetch it from a backend using the ID.
If you want to send a silent push notification to trigger a background data refresh action, you should add the content-available key to the aps dictionary with a value of 1. If you want to use a custom sound for your notification, you can add a sound key to aps. The value of this key should point to an audio file that's embedded in your app. Finally, a notification can be part of a category of notifications. If this is the case, add a category key to the aps dictionary where the value is the category identifier. We'll go in-depth on categories later.
Local notifications are created locally on the device. They are very similar to push notifications in terms of the content they contain. The way the content is set up is slightly different, though, because we can't schedule notifications locally for content that is not available yet.
In the context of The Daily Quote, this means that a server could push a quote to the application every 24 hours. If we create the notification locally, we don't know what tomorrow's quote should be, so we can't schedule a notification with content for this new quote yet. This is actually an important distinction between local and push notifications that you should keep in mind when choosing whether you should create a notification locally or leave it up to a server to create the notification.
Let's have a look at how we would recreate a notification similar to the one we've seen created before in JSON. While you're looking at this method, you should add it to ViewController.swift in The Daily Quote so we can use it later when we're actually scheduling notifications:
func createNotification() -> UNNotificationContent {
    let content = UNMutableNotificationContent()

    content.title = "New quote available"
    content.body = "A new quote is waiting for
                           you in The Daily Quote"
    content.badge = 1

    return content
}
This code looks somewhat similar to the JSON we looked at earlier. The main difference is that we have to create an instance of UNMutableNotificationContent and assign values to it. A lot of the options we had for push notifications are present on this class as well. We can add custom properties to the userInfo dictionary. We can assign a value to the sound property, or we can assign a notification category through the categoryIdentifier property. We can even add media attachments through the attachments property.
Now that we know how to create notification content, let's see how we can schedule them.
In order to deliver local notifications to your users, you'll need to schedule them somehow. Scheduling remote notifications is not needed; they are pushed through the server and delivered as soon as possible. When you schedule a local notification, you make use of a notification trigger. As discussed previously, there are multiple triggers for a local notification: location-based, calendar-based, or timed.
We'll look at scheduling a very simple notification first. We'll schedule it to be timed so it fires in a couple of seconds. Then we'll look at repeating this notification with a time interval. Next, we're going to use a calendar to schedule a notification, and finally, we'll look at location-based triggers.
A timed notification is probably the simplest notification to schedule, which makes it a great candidate to explore first. Before we start, you should add the following method call after both calls to hideNotificationsUI in ViewController.swift:
self?.scheduleNotification()
This method will provide us with a nice spot to implement the scheduling of different notifications. Add the following implementation for this method to the ViewController class:
func scheduleNotification () {
    let trigger = UNTimeIntervalNotificationTrigger(timeInterval:
                      10, repeats: false)

    let request = UNNotificationRequest(identifier: "new-quote",
                    content: createNotification(), trigger: trigger)

    notificationCenter.add(request, withCompletionHandler: nil)
}
First, we create a trigger for our notification. In this case, we're creating a notification that is set up to fire after a certain amount of time has passed, in this case 10 seconds, so we create an instance of UNTimeIntervalNotificationTrigger. Next, we create a notification request and pass it an identifier, the trigger we just created, and the content we want to display. Finally, we ask the notification center to add our notification request.
The identifier attribute for a notification should be unique for the content of your notification. The system uses this identifier to avoid sending multiple notifications with the same content. For our app, we wouldn't want the user to have multiple unread notifications, because the content will always be the same. If you do want to display multiple entries in the Notification Center, you should make sure that every notification you schedule has a unique identifier.
If we want to send a repeating notification to our user, we must set the repeats property of the time interval trigger to true. Note that the minimum time interval for repeating notification is 60 seconds. Scheduling a repeating trigger with an interval of less than 60 seconds will crash your application.
Calendar-based notifications make use of date components to determine when they should be fired. The only difference with time-interval-based scheduling is in the trigger we use to determine when the notification should be displayed.
Let's dive right in and look at an example of how a calendar-based trigger can be set up:
var components = DateComponents()
components.day = 1
components.hour = 8

let trigger = UNCalendarNotificationTrigger(dateMatching:
  components, repeats: false)
The preceding code sets up a trigger that will fire on the first day of the month at 08:00AM. If we want this notification to trigger every month, we just need to set the repeats property to true. Setting up the preceding notification will fire the notification the very next time it's 08:00AM on the first day of a month. Date components are very powerful because you could even use them to schedule a notification that fires next week on the current day. The following example shows how you would set up the date components for this:
let cal = Calendar.current
var components = cal.dateComponents([.year, .weekOfYear,
  .day], from: Date())
let scheduleWeek = components.weekOfYear! + 1
components.weekOfYear = scheduleWeek > 52 ? 1 : scheduleWeek

let trigger = UNCalendarNotificationTrigger(dateMatching:
  components, repeats: false)
We fetch the current calendar and use it to extract the year, day, and the week of the year from the current date. Then we increment the week of the year by one and that's all we have to do. The ternary operator is used to do a quick check to make sure that we don't schedule notifications in a non-existing week.
Calendar-based notifications provide a powerful way for you to schedule both recurring and one-time-only notifications that are tied to being fired at a certain offset in time that's easier to express in days, hours, weeks, or months than in a time interval.
The last type of notification you're allowed to schedule is a location-based notification. To set up a location-based trigger, you'll need to make use of CoreLocation to set up a region to which the trigger applies. So, if you're following along, don't forget to import CoreLocation at the top of your file.
A location-based trigger is actually a lot like geofencing. The main difference is that if a geofence triggers, the user is not necessarily informed about this. If a location-based notification triggers, its intent is to inform the user about it. Let's look at an example:
let coords = CLLocationCoordinate2D(latitude: 52.373095,
  longitude: 4.8909129)
let region = CLCircularRegion(center: coords,
  radius: 1000, identifier: "quote-notification-region")
region.notifyOnExit = false
region.notifyOnEntry = true

let trigger = UNLocationNotificationTrigger(region: region,
  repeats: false)
This snippet sets up a location-based notification using a circular region with a radius of 1,000 meters. The notifyOnExit and notifyOnEntry properties are used to specify whether we want to be notified if the user enters or exits the region or both.
Just like before, we have the option to choose whether we want this notification to repeat or if we just want to fire it once.
We've covered all the ways for you to schedule notifications. Let's explore the last piece of the notifications puzzle: handling incoming notifications and notification actions.
Once a user receives a notification, it's typically displayed on the lock screen and in the Notification Center. The user can see the contents of the notification and they can tap it. For a while now, Apple has been working to make notifications on iOS more useful and more interactive.
People can swipe on a notification to make special actions appear that enable them to take quick actions, such as accepting a calendar invite or quickly replying to a message. It wasn't until iOS 9 that Apple opened up the APIs so developers could implement these quick interactions in their own apps. In iOS 10, Apple has expanded the ways in which we can handle notifications even further. In this section, we'll cover the following features of notification handling:
- Handling notifications in your app
- Managing pending and delivered notifications
- Adding actions to notifications
These three aspects of handling notifications will provide you with enough knowledge to provide a great notification experience to your users.
Incoming notifications are most often received when the user is not using your app. This means that your app is not directly aware of the incoming notification and doesn't get to handle it until the user actually taps the notification to enter your application.
When this happens, the UNUserNotificationCenterDelegate of the UNUserNotificationCenter is called. This delegate is responsible for handling the incoming notification whether the app is currently in the foreground, background, or not active at all because it's been killed by the system or force-closed by the user.
The UNUserNotificationCenterDelegate must be set before the app has finished launching. This means that you should set this delegate as soon as possible, and application(_:didFinishLaunchingWithOptions:) is a great candidate for this.
When the user has tapped a notification or selects one of the custom actions we will add later, the userNotificationCenter(_:didReceive:withCompletionHandler:) method is called. If the app is in the foreground and a notification is received, the userNotificationCenter(_:willPresent:withCompletionHandler:) method is called. Before iOS 10, it was not possible for apps to display the native notification interface if the receiving app was already in the foreground. This delegate method enables us to do that.
Let's have a look at what these delegate methods look like when we implement them. Update AppDelegate with the following code. Don't forget to import the UserNotification framework at the top of the file and add UNUserNotificationCenterDelegate to the declaration of AppDelegate to make it conform to the protocol:
func application(_ application: UIApplication,
  didFinishLaunchingWithOptions launchOptions:
  [UIApplicationLaunchOptionsKey: Any]?) -> Bool {
    UNUserNotificationCenter.current().delegate = self
    return true
}

func userNotificationCenter(_ center: UNUserNotificationCenter,
  didReceive response: UNNotificationResponse, withCompletionHandler
  completionHandler: @escaping () -> Void) {
    let notification = response.notification
    let action = response.actionIdentifier

    let notificationTitle = notification.request.content.title
    let customAttributes = notification.request.content.userInfo

    completionHandler()
}

func userNotificationCenter(_ center: UNUserNotificationCenter,
  willPresent notification: UNNotification, withCompletionHandler
  completionHandler: @escaping (UNNotificationPresentationOptions) -> Void) {
    completionHandler([.alert, .sound])
}
Both delegate methods provide access to the original notifications and their contents. You can use this information to determine exactly which actions should be taken by your app to properly handle the notification. When a notification is tapped, userNotificationCenter(_:didReceive:withCompletionHandler:) is called. This method receives a UNNotificationResponse, which provides information about the selected action in addition to the notification information.
If your app receives a notification and it's in the foreground, userNotificationCenter(_:willPresent:withCompletionHandler:) allows you to determine what should happen with the notification. This method is passed as a callback that you need to call to inform iOS about what should happen with the notification. If you want to handle the notification yourself, you can simply call the callback without any display options. In the preceding snippet, the desired behavior is to display all notification alerts to the user and play the corresponding sounds.
You have full access to the notification, so it's entirely up to you to decide what to do with it. You could check the notification category, content, or userInfo dictionary to determine the desired behavior on a per-notification basis. This is really powerful, because you are now in full control of the notification characteristics of your application.
When we looked at scheduling notifications, we saw that we needed to provide a unique identifier to each notification that we schedule. If we add a new notification with an existing identifier, the new notification will overwrite the existing notification, limiting the amount of similar and duplicate notifications in the Notification Center.
The preceding example describes what happens if a notification has already been delivered. However, this overwrite behavior is not limited to notifications that have already been delivered. You can also manipulate pending notifications in the same fashion. Imagine that we've scheduled a recurring notification notifying the user about a certain event every morning. A silly example might be to notify the user about the number of times they opened your app the day before.
To do this, all you need to do is schedule the same recurring notification over and over again with a different number associated to it. As long as the notification uses the same identifier, the pending notification will simply be replaced with the new one.
You can also remove delivered notifications by calling removeDeliveredNotifications(withIdentifiers:) on the Notification Center in your app. If your app allows the user to select the types of notifications they want to receive, you could use this feature to remove all notifications of a certain type. That way, the user won't see the notifications anymore.
To update notifications that have been sent by your server, you simply push a new notification with the apns-collapse-id header set on the request that your server sends to APNS. If this header is present, the new notification will overwrite any existing notifications that have been pushed with the same apns-collapse-id.
Updating your notifications instead of pushing new ones all the time is a great alternative which will avoid clutter in the Notification Center and, more importantly, there won't be any duplicate, redundant, or outdated messages fighting for the user's attention.
Let's see how we can further improve the notification experience through custom actions.
When we covered the different ways for you to handle notifications in your app, you briefly saw that the notification response that is passed to userNotificationCenter(_:didReceive:withCompletionHandler:) contains information about the action the user chose for the notification. By default, every notification has a single action, which is triggered when the user taps or swipes your notification, depending on where it appeared, to open your app.
This default action isn't the only type of action we can associate with a notification. There are three main kinds of actions we can add to notifications. The first is a background action. Background actions dismiss the notification and wake the app in the background so it can take appropriate measures for the selected action. An example of this is accepting a calendar invite through an action. If a user accepts or declines an invite inside of the notification, we don't really need to take them to the app. We can handle their response in the background.
The second type of action is a foreground action. A foreground action will take the user right into your app. It's up to your app to handle the selected action in a way that makes sense. Finally, you can add test input actions to your notifications. These types of actions are basically background actions, except they take user input. A text input action is great if you're building a messaging app, for example. On iOS 10, a user can 3D-touch a notification to make the available custom actions appear. Let's see how we can add these custom actions to our notifications.
All notification actions are associated with a notification category. These categories must be registered on the Notification Center at app launch. Again, the perfect place to set this up is application(_:didFinishLaunchingWithOptions:). Add the following implementation to this method:
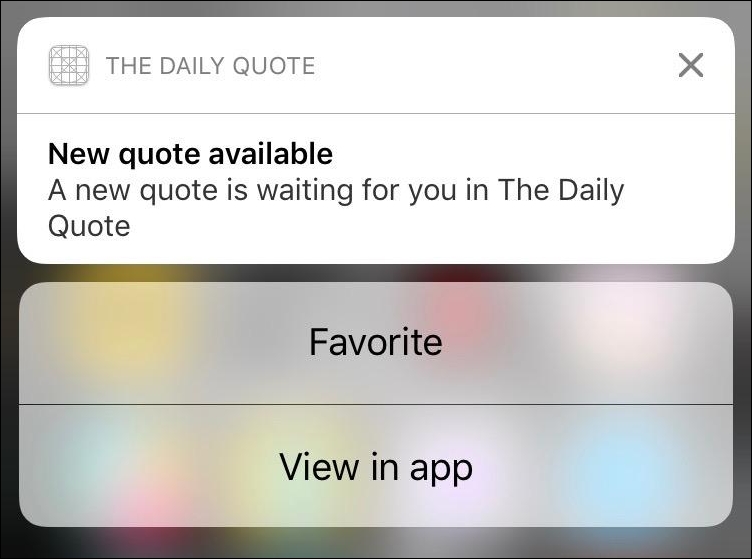
let favoriteAction = UNNotificationAction(identifier:
  "addfavorite", title: "Favorite", options: [])
let viewAction = UNNotificationAction(identifier:
  "view", title: "View in app", options: [.foreground])

let quoteCategory = UNNotificationCategory(identifier:
  "quote", actions: [favoriteAction, viewAction],
  intentIdentifiers: [], options: [])
UNUserNotificationCenter.current().setNotificationCategories([quoteCategory])
The preceding snippet adds two custom actions to a category we've named quote. One action is used to mark a quote as favorite and is handled in the background. The other allows the user to view the quote in the app and is marked explicitly to run in the foreground. If we hadn't done this, the action would have been handled in the background. Finally, the category is added to the Notification Center, allowing us to associate this category with new notifications.
Associating a category with a notification is done through the categoryIdentifier property of UNNotificationContent. Add the following line of code to the createNotification method in ViewController to add the quote category to the notifications we're scheduling:
content.categoryIdentifier = "quote"
If we receive a notification now and we 3D-touch it, we're presented with our two custom actions:
Notification actions are a great way to add quick interactions to your notifications, and they are already a huge improvement over simply sending a plain notification. There is one more feature that has been introduced in iOS 10 that greatly improves notifications and what we can do with them: Notification Extensions.