
Sticker apps are nice, but they're not particularly useful for every use case. We can build far more interesting and interactive applications for iMessage through the Messages framework. Some of the larger, well-known apps on iOS have been able to implement iMessage applications that make sharing content from the app easier. There are people that have built games in iMessage already. The Messages framework enables developers to build a wide range of extensions straight into the Messages app.
We've just seen how you can build sticker packs and how you can create a somewhat customized sticker pack by picking the app template instead of the sticker pack template in Xcode. We haven't gone in-depth for the different lifecycle methods that Xcode generates for us when we create a new iMessage app.
Let's do this while we build an iMessage app for The Daily Quote, the app we've already built a notification extension and a widget for. First, we'll look at the lifecycle of an iMessage app. Then we'll implement the compact view for our app. Finally, we'll implement the expanded view for our app. What the compact and expanded view are exactly will be made clear when we cover the lifecycle of iMessage apps.
An iMessage app lives inside of the Messages app, just like you would expect from an extension. As mentioned before, iMessage apps are a special kind of extension which makes them behave a lot like apps at times, even though they are still extensions at their core.
The main view controller for an iMessage app must always be a subclass of MSMessagesAppViewController. You can't have a primary view controller that is not a subclass of this class. When the user navigates to your extension through the iMessage apps drawer, this view controller is added in the compact mode. You've already seen this mode in action when you created your sticker pack.
When the Messages framework instantiates your extension, the willBecomeActive(with:) method is called, followed by didBecomeActive(with:). These messages are called after viewDidLoad in the view controller lifecycle but before viewWillAppear. When it's time to dismiss your extension, the viewWillDisappear and viewDidDisappear lifecycle methods are called. Next, willResignActive(with:) and didResignActive(with:) are called.
Once the resignation methods are called, the process for your app is killed shortly thereafter. You do not get any time to do work in the background, just like with other extensions. Again, even though Messages extensions behave a lot like apps, they're not.
There are two more methods you should know about for now. These methods are called whenever we're transitioning from one display mode to another. The display mode is changed whenever the user taps the upward chevron in the bottom-right part of the iMessage interface:

You can also trigger this transition from your code by calling requestPresentationStyle(_:). The delegate methods that get called are willTransition(to:) and didTransition(to:). The first is called right before the transition occurs; the second is called right after. Just like their names suggest.
To start implementing our iMessage app, we must add a new extension to The Daily Quote. Pick the iMessage extension and name it The Daily Quote Messages. Enable the App Groups capability for this extension and include Quotes.swift in the extension target just like you've done before.
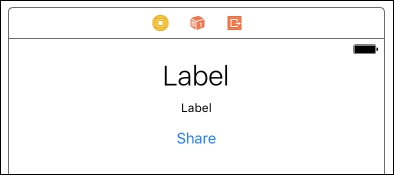
We're going to use the same view controller containment technique we've used before when we built our custom sticker pack. This time, we're going to need to add the view controller we want to display to Main.storyboard without connecting it to the MessagesViewController. Before we create the interface, let's implement the code for our compact view. The compact view will feature a quote, the creator of the quote, and a share button.
Create a new UIViewController subclass and name it CompactViewController. Make sure to add it to The Daily Quote target by selecting its group before creating the new file. The setup for this view controller will be really similar to all of the other view controllers we've created for The Daily Quote and its extensions. We'll need two outlets, one for the quote and one for its creator. In viewDidLoad, the current quote must be fetched and the labels should be populated with their corresponding values. I trust you to be able to do this on your own. When in doubt, check the other projects. Alternatively, check the source code in this book's Git repository.
When the share button is tapped, we want to share the message into the conversation. This means that we're going to have to notify MessagesViewController of the button tap inside of CompactViewController somehow. To do this, we'll create a QuoteSelectionDelegate protocol that MessagesViewController can conform to.
The delegate and the share action should be implemented in CompactViewController as follows:
var delegate: QuoteSelectionDelegate?

@IBAction func shareTapped() {
    delegate?.shareQuote(Quote.current)
}
The delegate is optional because we can't set it before we have initialized the view controller elsewhere. The tap action simply calls a method on the delegate and passes the current quote along with it. Create a new file to define the protocol and name it QuoteSelectionDelegate. The protocol should be implemented as follows:
protocol QuoteSelectionDelegate {
    func shareQuote(_ quote: Quote)
}
This is a simple protocol with just a single method requirement.
Now, let's write all the required code in MessagesViewController before we implement the interface for CompactViewController. First of all, add the following property to the messages view controller so we can hold on to the compact view controller. Also, update your viewDidLoad implementation as shown:
var compactViewController: CompactViewController?

override func viewDidLoad() {
    super.viewDidLoad()

    compactViewController = storyboard?.instantiateViewController(withIdentifier:
      "CompactViewController") as? CompactViewController
    compactViewController?.delegate = self
}
We're using the instantiateViewController(withIdentifier:) method from UIStoryboard to obtain an instance of CompactViewController.
Make sure to add QuoteSelectionDelegate to the declaration of MessagesViewController and add an empty implementation for shareQuote(_:). We'll implement the share functionality later. We'll use a separate method to display the compact view. This will make our code a bit more readable once we add the expanded view and we need to remove views:
func showCompactView() {
    guard let compactViewController = self.compactViewController
        else { return }

    compactViewController.willMove(toParentViewController: self)
    self.addChildViewController(compactViewController)
    compactViewController.didMove(toParentViewController: self)

    view.addSubview(compactViewController.view)
    compactViewController.view.frame = view.frame
}
This code is very similar to what you've seen earlier when we implemented the sticker pack. Finally, let's implement willBecomeActive(with:). This is where we'll call showCompactView() from:
override func willBecomeActive(with conversation: MSConversation) {
    if self.presentationStyle == .compact {
        showCompactView()
    }
}
Lastly, open MainInterface.storyboard and drag out a view controller. Add two labels and a button to this view controller. Lay them out as follows:
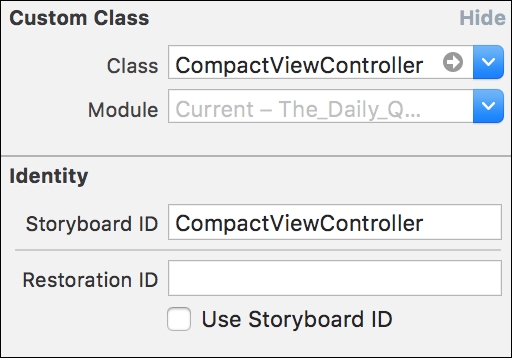
The quote is styled as a title and has 0 lines so it automatically expands to fit the content. The creator is styled as a caption one below the title. The button should be laid out below the caption. Make sure to set CompactViewController as both the subclass and the storyboard ID for the view controller you just dragged out. And to wrap it up, connect the outlets to the views. Make sure to select touch up inside as the required action for shareTapped():
Add the following implementation of viewDidLoad() to the CompactViewController in order to populate the labels that you just set up:
override func viewDidLoad() {
    super.viewDidLoad()

    let quote = Quote.current
    quoteLabel.text = quote.text
    creatorLabel.text = quote.creator
}
If you build and run your application now, the quote for today should pop up right inside of iMessage. This is all we have to do for the compact view. Now let's go ahead and implement an expanded view for our iMessage app.
The expanded view for our iMessage app will be a table view that lists all of the quotes in the Quote struct. We'll use a similar setup as we've used before by creating a new view controller file and using the delegate protocol we defined earlier to communicate the selection of a quote back to the MessagesViewController.
First, create a new UITableViewController subclass and name it QuotesTableViewController. You can remove most of the commented template code; the only methods you should keep are tableView(_:cellForRowAt:), tableView(_:numberOfRowsInSection:), and numberOfSections(in:). Also remove the viewDidLoad() and didReceiveMemoryWarning() methods; we don't need them.
For starters, we're going to need to implement the following methods. These methods provide the table view with its data:
override func numberOfSections(in tableView: UITableView) ->
  Int {
    return 1
}

override func tableView(_ tableView: UITableView,
  numberOfRowsInSection section: Int) -> Int {
    return Quote.numberOfQuotes
}

override func tableView(_ tableView: UITableView, cellForRowAt
  indexPath: IndexPath) -> UITableViewCell {
    let cell = tableView.dequeueReusableCell(withIdentifier:
      "QuoteTableViewCell", for: indexPath)
    let quote = Quote.quote(atIndex: indexPath.row)

    cell.textLabel?.text = quote?.text
    cell.detailTextLabel?.text = quote?.creator

    return cell
}
The numberOfQuotes property does not exist in the Quote struct yet. Add it as follows:
static var numberOfQuotes: Int { return quotes.count }
The last thing we need to take care of before we create and connect the interface is the quote selection delegate and implementing cell selection in the QuotesTableViewController. The code to do this is pretty straightforward:
var delegate: QuoteSelectionDelegate?

override func tableView(_ tableView: UITableView, didSelectRowAt
  indexPath: IndexPath) {
    guard let quote = Quote.quote(atIndex: indexPath.row)
        else { return }
    delegate?.shareQuote(quote)
}
This leaves us with a complete implementation of the table view in code. Let's create the interface in Interface Builder. Open MainInterface.storyboard and drag out a table view controller. Assign QuotesTableViewController as its class and storyboard ID. Also, click the prototype cell and set its style to Subtitle. The identifier for the cell should be set to QuoteTableViewCell. That's all we need to do for now. Let's make sure that we display this view controller when our iMessage app is in the expanded presentation mode.
In MessagesViewController, update willBecomeActive(with:) so it can display both the expanded and compact mode as the initial view:
override func willBecomeActive(with conversation: MSConversation) {
    if self.presentationStyle == .compact {
        showCompactView()
    } else if self.presentationStyle == .expanded {
        showExpandedView()
    }
}
Also, we should take into account that the view can transition from one display mode to the other. Add the following implementation for willTransition(to:):
override func willTransition(to presentationStyle:
  MSMessagesAppPresentationStyle) {
    if presentationStyle == .compact {
        showCompactView()
    } else if presentationStyle == .expanded {
        showExpandedView()
    }
}
Finally, we should take care of showing the correct view. We should always remove any existing view controllers before we show a new one. We also haven't implemented showExpandedView() yet but if you think about this method's contents for a second, it should look very similar to what we've already done for showCompactView(). We'll implement a special cleanup method and we'll refactor showCompactView() so we can reuse it for showExpandedView(). First, add the following method that we'll use to clean up our view controllers:
func cleanupChildViewControllers() {
    for viewController in childViewControllers {
        viewController.willMove(toParentViewController: nil)
        viewController.removeFromParentViewController()
        viewController.didMove(toParentViewController: nil)

        viewController.view.removeFromSuperview()
    }
}
One last thing we need to do before we can implement the presentation of our expanded view controller is adding a property for it in MessagesViewController and updating viewDidLoad() so it creates a new instance of QuotesTableViewController that will be used as the expanded view controller. The updated lines have been highlighted in bold:
var expandedViewController: QuotesTableViewController?

override func viewDidLoad() {
    super.viewDidLoad()

    compactViewController = storyboard?.instantiateViewController(withIdentifier: "CompactViewController") as? CompactViewController
    compactViewController?.delegate = self

    expandedViewController = storyboard?.instantiateViewController(withIdentifier: "QuotesTableViewController") as? QuotesTableViewController
    expandedViewController?.delegate = self
}
Next, let's implement the refactored view controller presentation methods:
func showCompactView() {
    guard let compactViewController = self.compactViewController
        else { return }

    showViewController(compactViewController)
}

func showExpandedView() {
    guard let expandedViewController = self.expandedViewController
        else { return }

    showViewController(expandedViewController)
}

func showViewController(_ viewController: UIViewController) {
    cleanupChildViewControllers()

    viewController.willMove(toParentViewController: self)
    self.addChildViewController(viewController)
    viewController.didMove(toParentViewController: self)

    view.addSubview(viewController.view)
    viewController.view.frame = view.frame
}
After doing this, build and run the app to see our extension in action. It flawlessly switches between showing the list of quotes and the single daily quote. The simulator might seem a bit jumpy; unfortunately, this seems to be an issue with messages in the simulator that we can't really work around.
The final step in implementing our iMessage app is to implement the shareQuote(_:) method. This method is supposed to compose a message that can be shared. Let's have a look at message composing and everything related to it.