
13
Using Animation Assist for 2D Animation
Animation works by creating the illusion of motion by placing one drawing after another. Each drawing is called a frame. The drawings change slightly from frame to frame, making the final output appear as if it’s moving.
Aside from illustration, Procreate also offers robust tools for 2D animation. These tools are organized under a feature called Animation Assist. It works by converting your workspace from an illustration-focused interface to an animation-focused one.
In this chapter, you will be introduced to this feature in detail. This will help you create your own animations on the app. We will learn about the interface of Animation Assist, and how to use its specialized tools for animating.
We’re going to cover the following broad topics here:
- Using the Animation Assist interface
- Fine-tuning motion using animation settings
- Editing frames with Frame options
By the end of this chapter, you will have learned how to create 2D animated clips in Procreate.
Using the Animation Assist interface
To start animating on Procreate, you must first switch to the animation interface, by activating something called Animation Assist.
Animation Assist can be toggled on and off using the Canvas tab of the Actions menu (the wrench-shaped icon in the top left-hand corner of the screen). To turn it on, follow these steps:
- Tap the wrench icon to open the Actions menu popover and select the Canvas tab, as shown in the following screenshot:
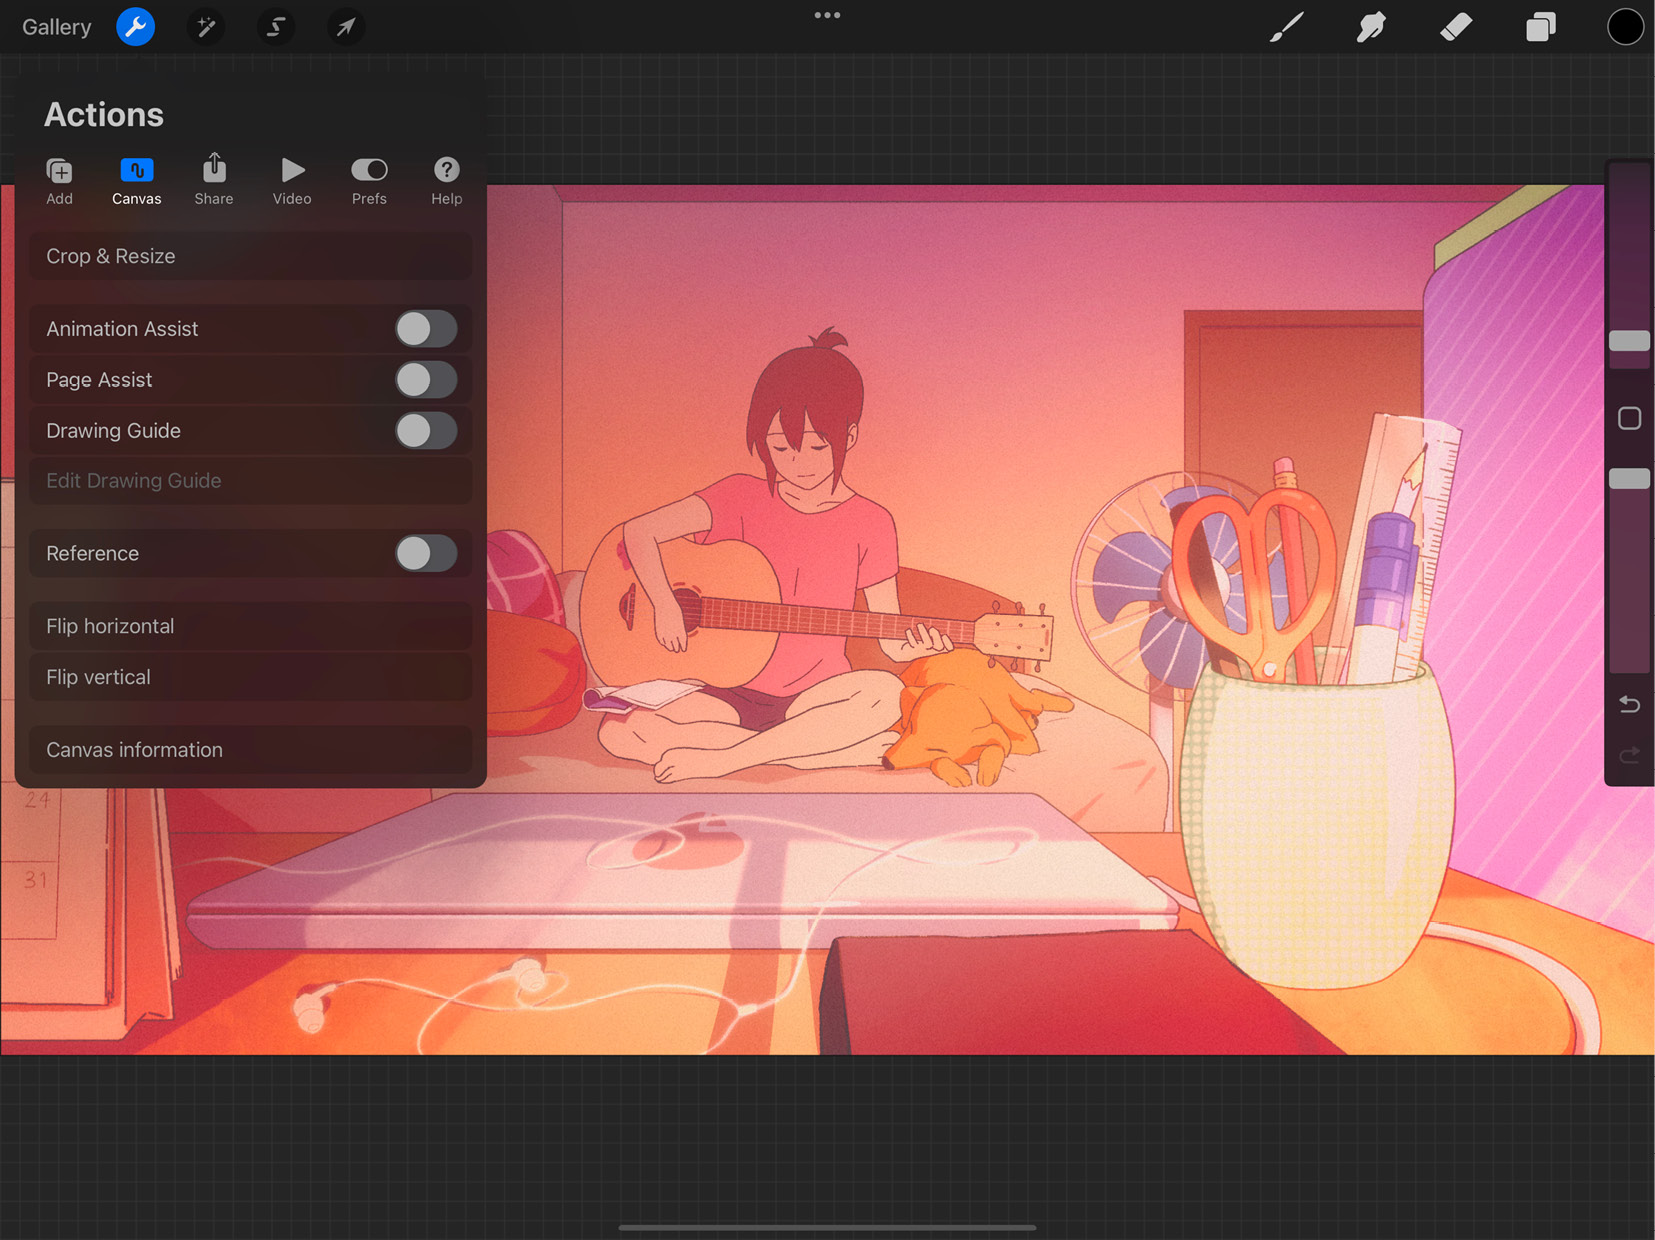
Figure 13.1: Canvas tab
- Toggle on the Animation Assist option. A timeline will appear at the bottom of the screen. This timeline houses the frames of your animation, as shown in the following screenshot:
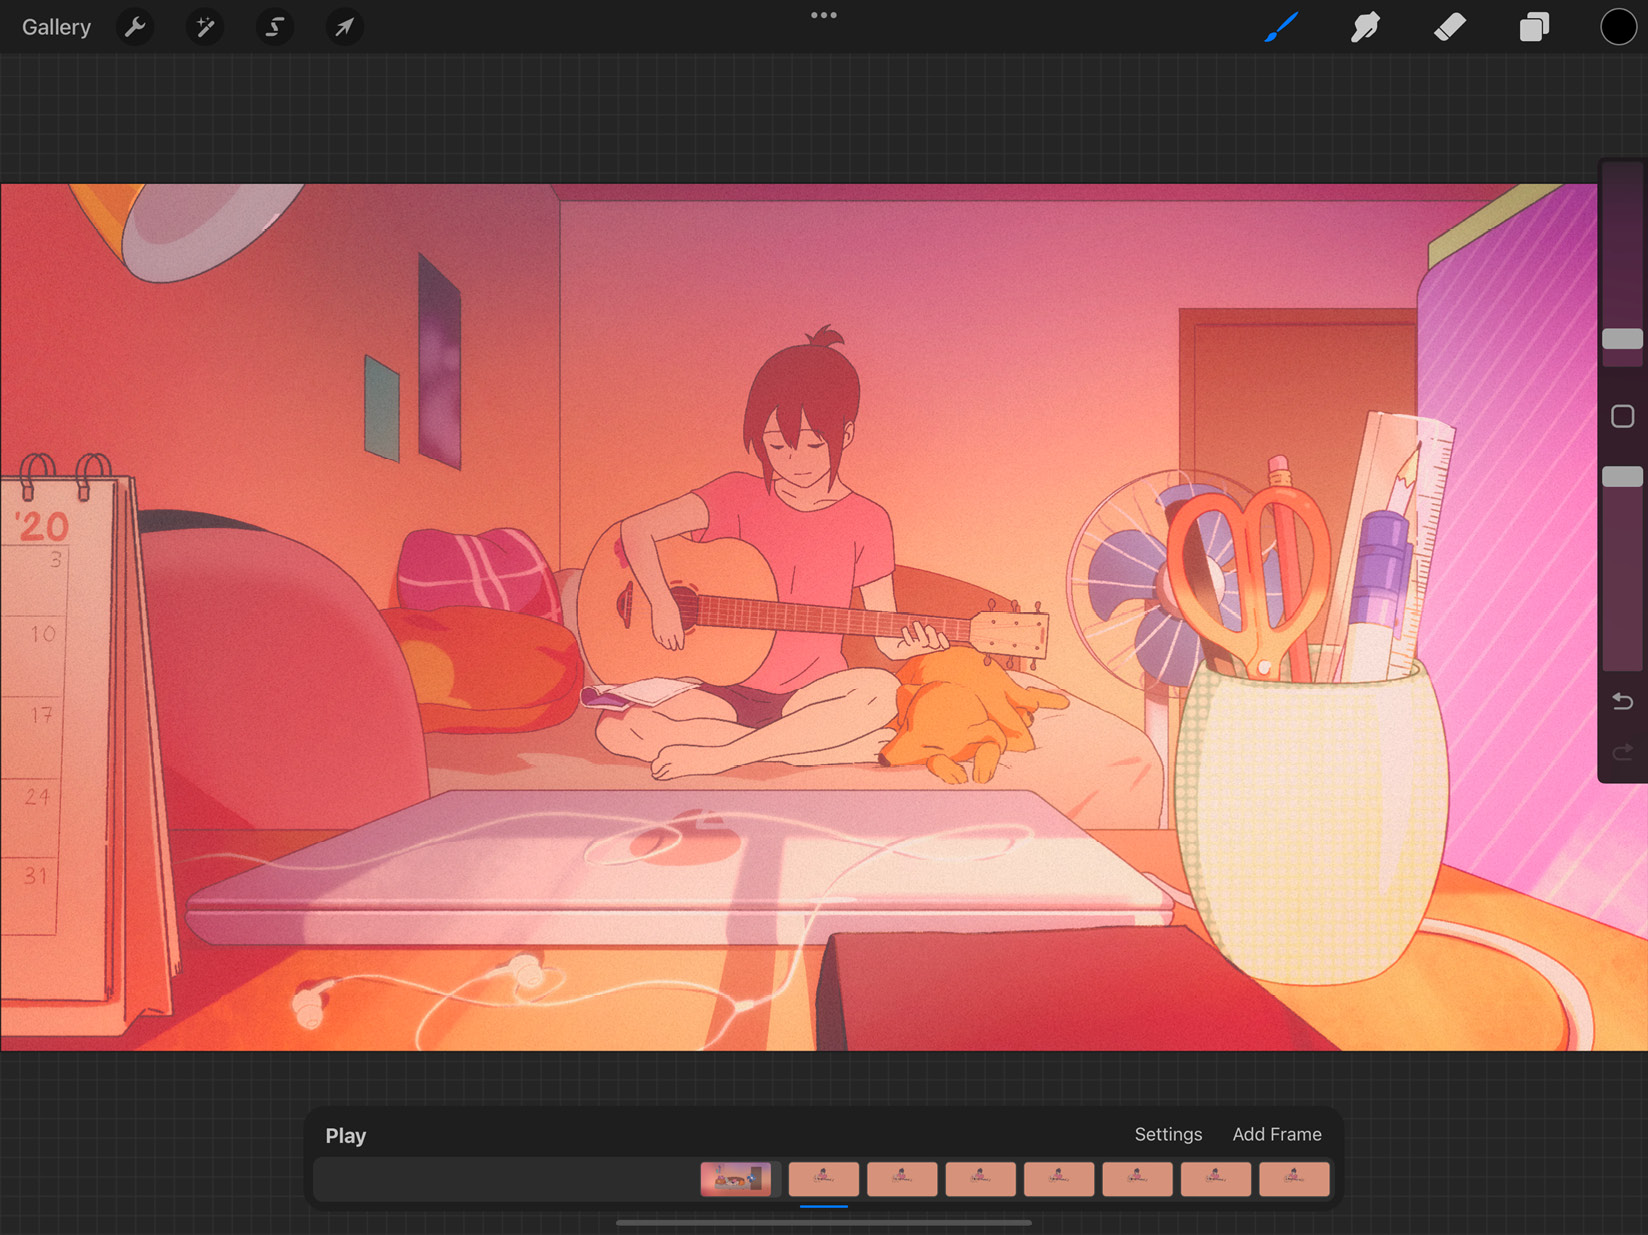
Figure 13.2: Animation Assist interface
- This will activate Animation Assist on your canvas. This means that the canvas is now all set up for animating.
Important Note
Each layer is treated as a separate frame of animation. The layers on the bottom appear first on the timeline. If you want to have several elements in one frame, group them into a layer group. Each layer group is treated as a separate frame.
In the following sub-section, we’ll go over the basics of how the Animation Assist interface works.
Animation Assist interface
The interface of the Animation Assist screen has the following elements:
- Canvas: When Animation Assist is on, the canvas shows only the currently selected frame as a solid opaque layer. This refers to the contents of the selected layer or layer group. This is unlike the regular illustration canvas, which shows all the visible layers. By default, the canvas also has onion skins turned on, which shows colored, transparent versions of the previous and next layers. The following screenshot shows onion skins. Only the lines have been made visible to clearly show the effect:

Figure 13.3: Animation canvas with onion skins
- Timeline: The timeline houses the frames of your animation in order. The primary frame, or the one you are working on, is indicated by a blue line underneath. Tap on any frame to jump to it and draw on it. The timeline can also be scrubbed with your finger to preview the animation on the canvas. When the visibility of a layer or group is turned off, its respective frame also disappears from the timeline.
- Play/Pause button: In the top-left corner of the animation toolbar, you will find a button labeled Play. This button can be used to play or pause your animation preview. When a preview is playing, the button says Pause.
- Add Frame: This button is placed in the top-right corner of the animation toolbar. It adds a frame right after your primary frame. Every frame gets added as a new layer.
- Settings: This button sits next to Add Frame. It brings up a popup when tapped, as shown in the following screenshot:

Figure 13.4: Settings
These are the settings that control various attributes of your animation. We will learn more about them later in this chapter.
- Frame options: Tap on any frame to bring up frame-specific options, as shown in the following screenshot:

Figure 13.5: Frame options
We will learn more about them further ahead in this chapter.
Important Note
Animation Assist allows you to import videos into Procreate. When a video clip is imported into the Procreate Gallery, the resulting canvas turns on Animation Assist automatically. The frames of the video, in order, make up the frames on the animation timeline, until the layer limit is reached.
Now that you are familiar with the Animation Assist interface, let us look more closely at animation settings.
Fine-tuning motion using animation settings
Animation settings refers to a set of tools that allow you to fine-tune your animation to look how you want it to. These settings also let you choose how your animation preview will appear. To bring up this menu, tap on the Settings button in the animation toolbar, as shown in the following screenshot:
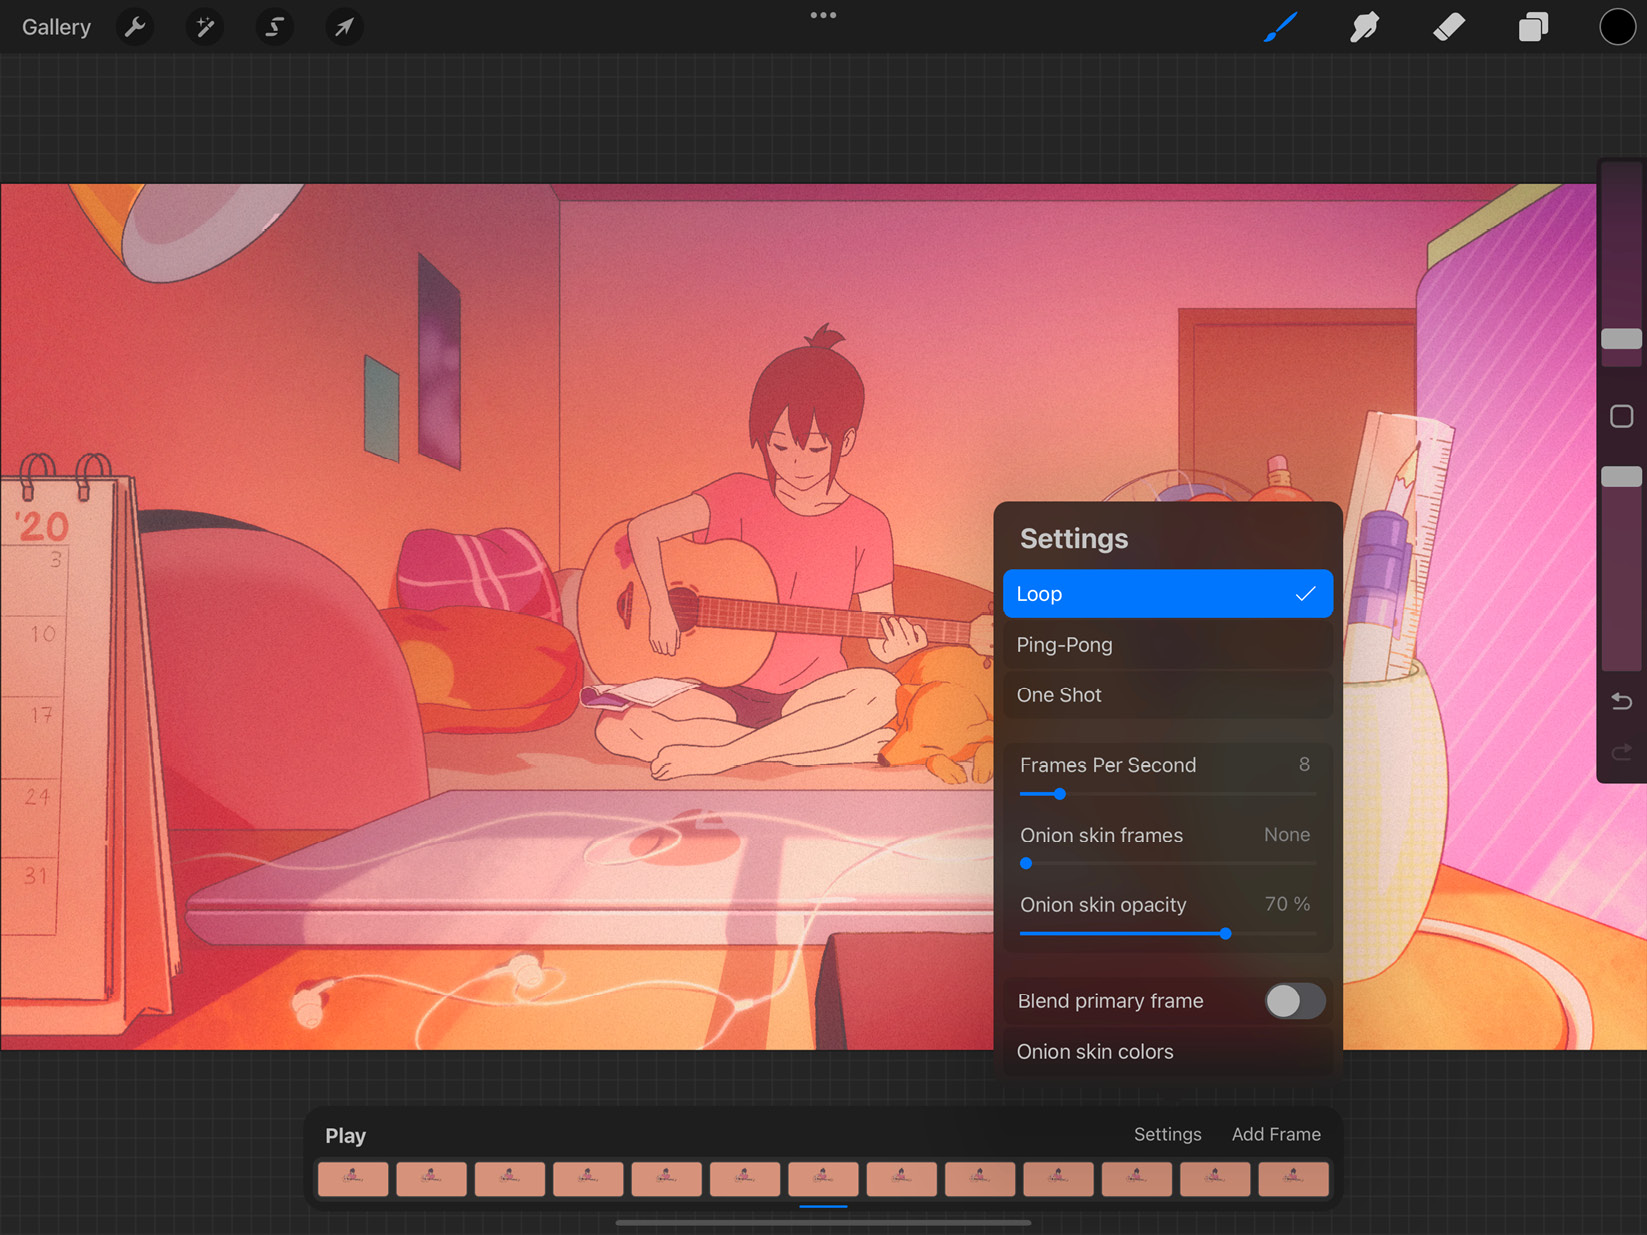
Figure 13.6: Animation settings
We will now look at the interface of this popup.
Preview settings
The first three options on the panel, Loop, Ping-Pong, and One Shot, control how the preview of your animation plays.
These are the playthrough options:
- Loop: This option is selected by default. It plays your animation from beginning to end on a loop until you press Pause.
- Ping-Pong: This option plays your animation from beginning to end and then in reverse, and repeats this way, going back and forth. Exporting an animation with Ping-Pong exports a clip that loops back and forth, just like the preview. For instance, this mode will be useful for animating a pendulum.
- One Shot: This option plays your animation from start to finish only once, and then stops until you press Play again.
In the next sub-section, we will discuss the next set of animation settings.
Frame settings
The next three options on the panel, Frames Per Second, Onion skin frames, and Onion skin opacity, affect the frames of your animation.
These settings work in the following ways:
- Frames Per Second: This option decides how many frames will be played through in 1 second. It is controlled by a slider that runs from 1 to 58 FPS. The higher the frame rate, the more frames you must draw to create a 1-second clip.
- Onion skin frames: This option controls how many frames on either side of the primary frame will show up on the canvas as onion skins.
Onion skin frames are colored, low-opacity frames on both sides of the selected frame, as shown in the following screenshot:
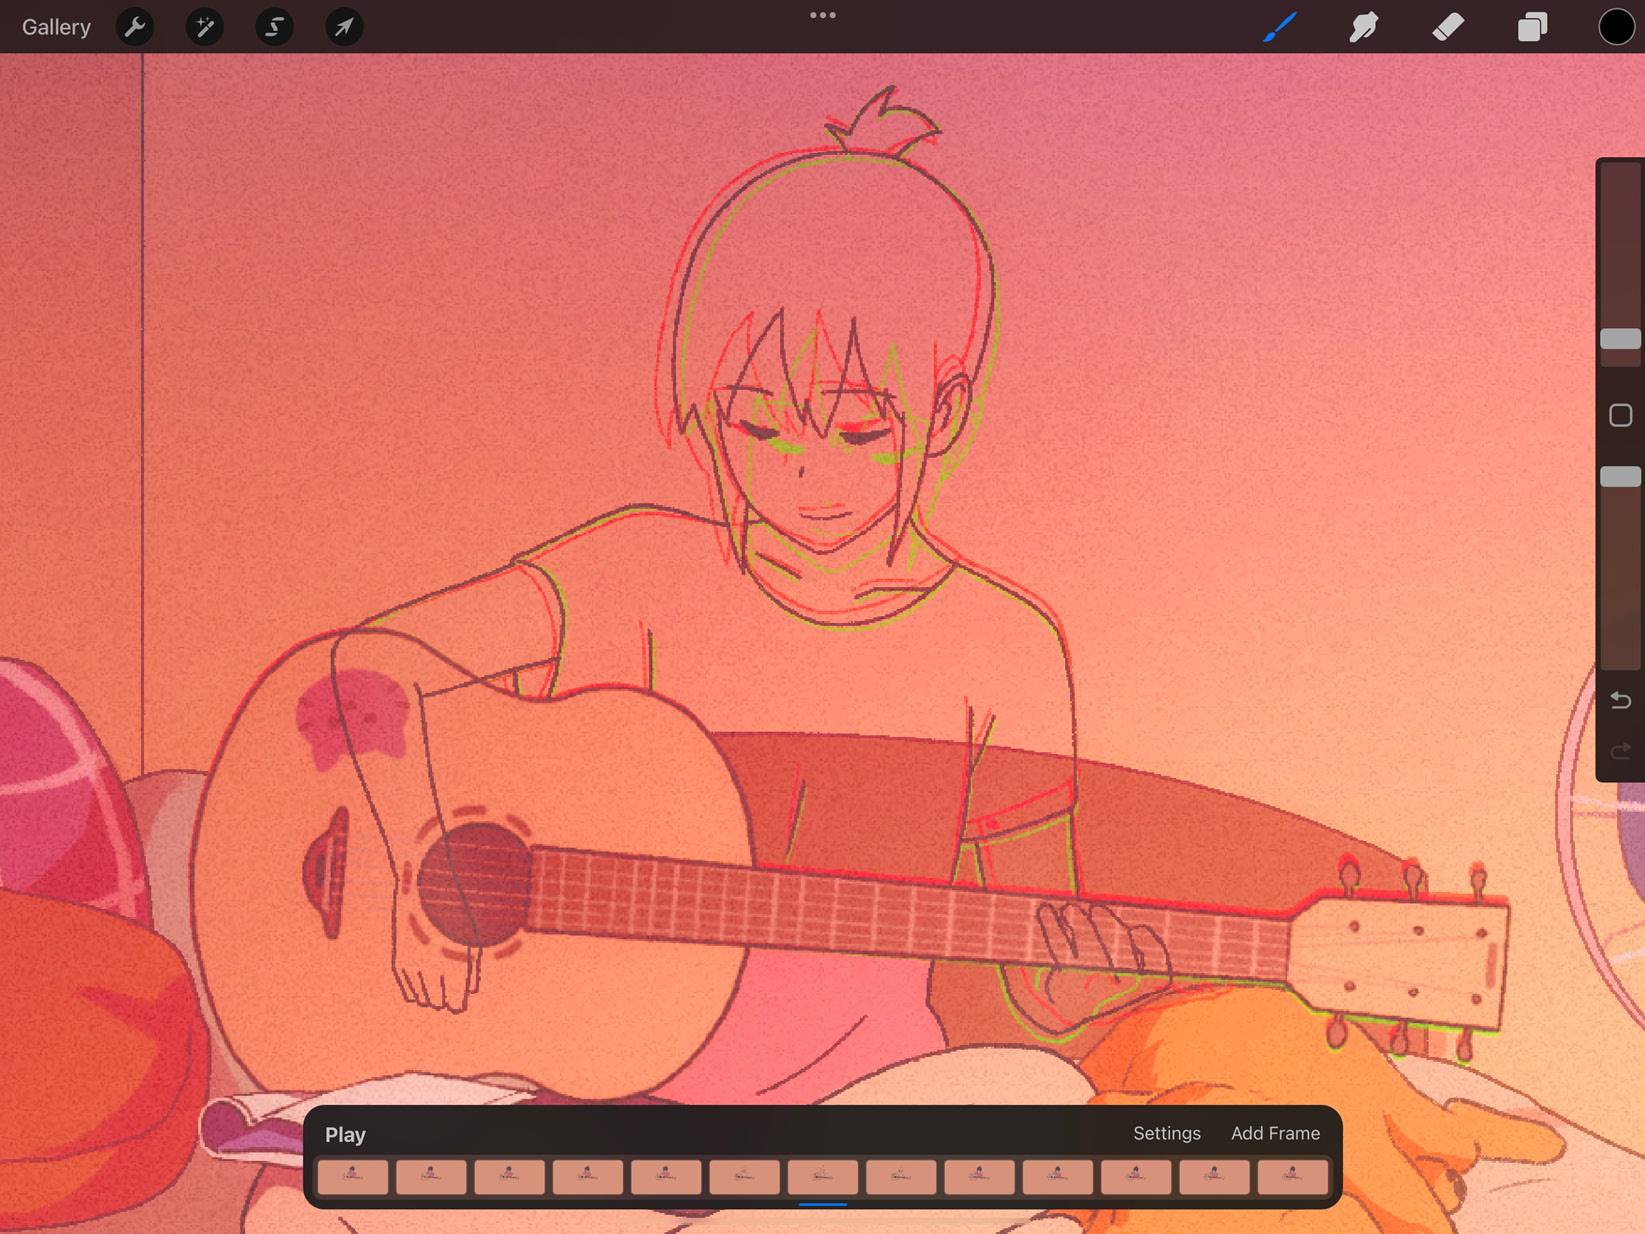
Figure 13.7: Onion skins
This helps you animate accurately since both the initial and final frames are clearly visible. By default, this slider is set to 1. This means the canvas will show your primary frame at full opacity, as well as onion skins of one frame before it (in red) and after it (in green). Using the slider, you can set this range to include as many frames on both sides as you wish. At 0, no onion skins show up. At Max value, all the existing frames on either side of the primary frame are visible.
In the next sub-section, we will discuss the last two options.
Appearance settings
The last two animation settings, Blend primary frame and Onion skin colors, have to do with how the frames appear on the canvas.
These settings work in the following ways:
- Blend primary frame: By default, the primary frame has a solid appearance. This setting is a toggle, which blends the primary frame, making it transparent like an onion skin.
- Onion skin colors: This option controls the colors of the onion skin frames. Tap on it to bring up a color companion popup, as shown in the following screenshot:
Figure 13.8: Onion skin colors editor
The bar at the top left represents the frames prior to the primary frame, and the one on the right represents the frames after. Tap on each bar to edit the color assigned to it. Once happy, tap the arrow to go back to the Settings menu, or tap anywhere outside the popup to resume animating.
In this section, we discussed the settings that can be used to control aspects of your animation and fine-tune it.
In the next section, you will be introduced to tools specific to individual frames of animation.
Editing frames with Frame options
Frame options are certain settings that can be applied to each frame individually, without affecting the others. To bring up this popup, tap on the frame you want to edit, as shown in the following screenshot:
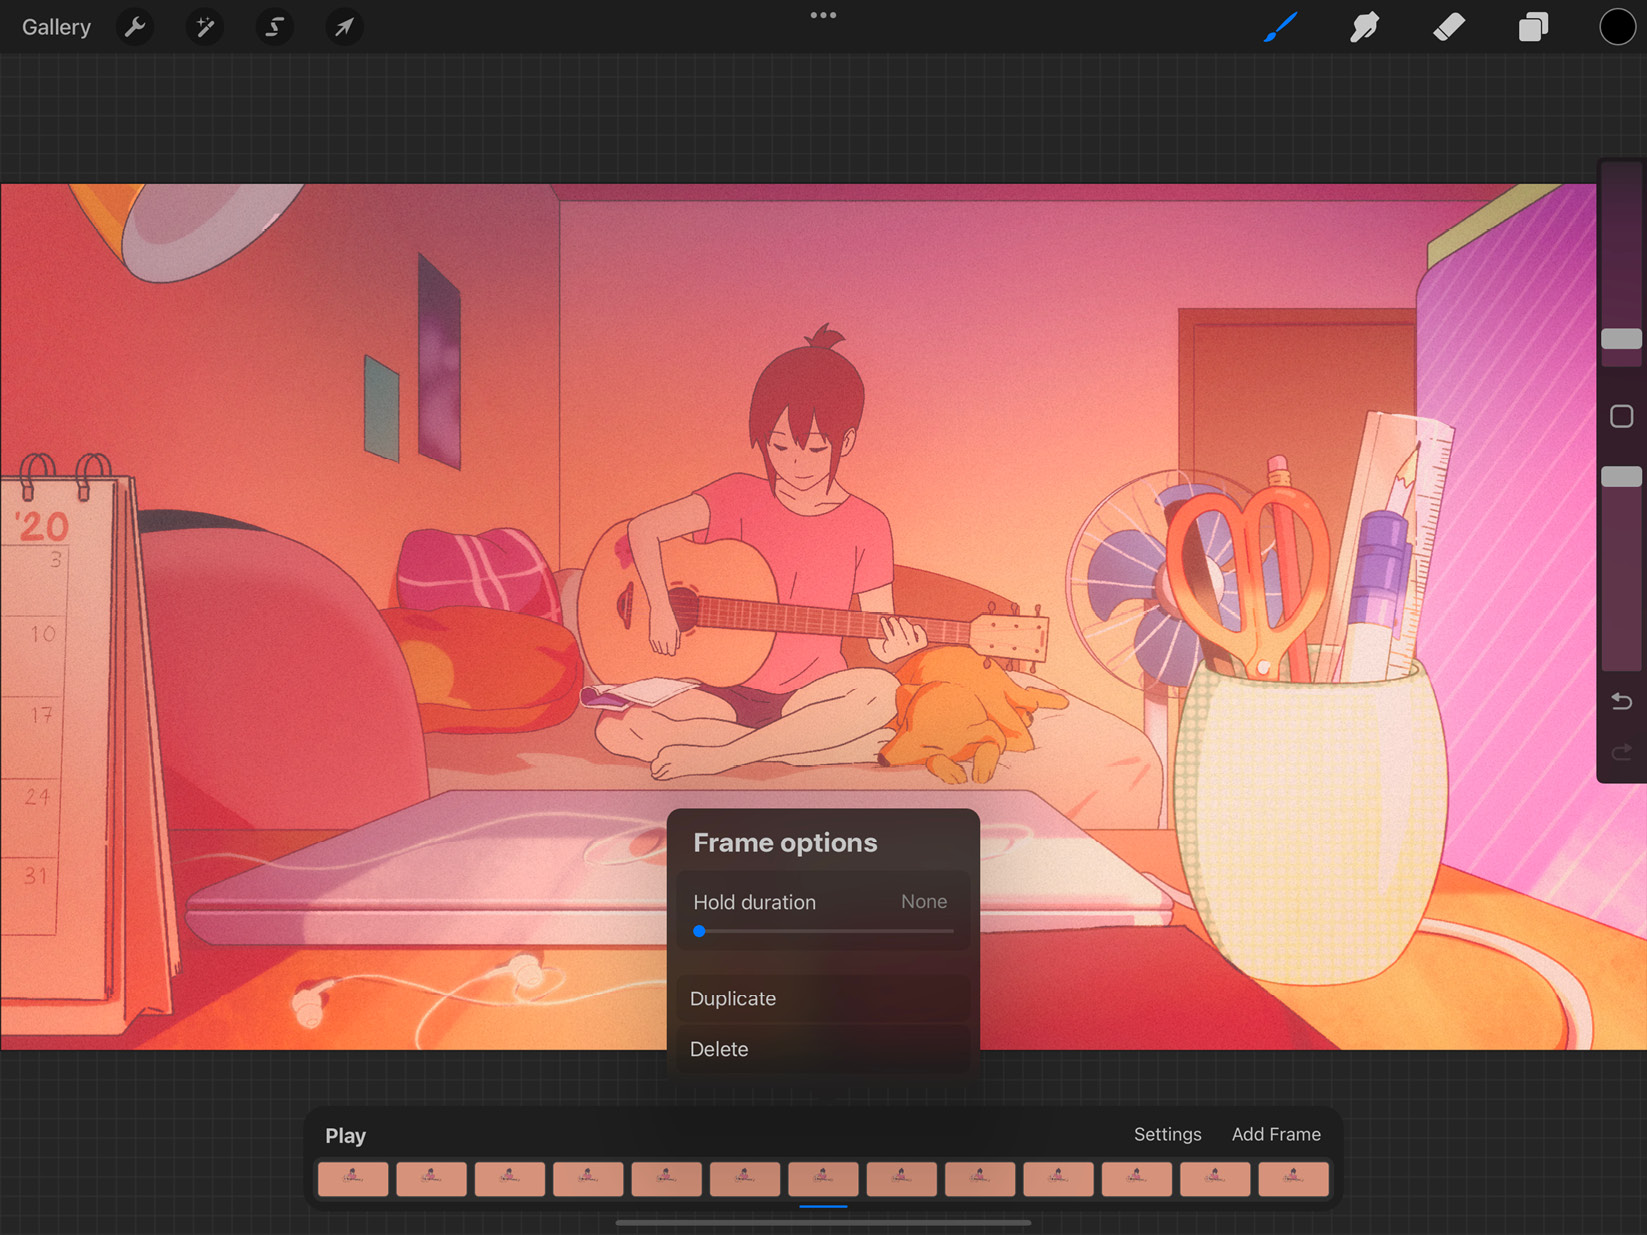
Figure 13.9: Frame options
Let’s take a closer look at these options:
- Hold duration: Timing is important in animation. Sometimes, you may want to hold a drawing for longer than one frame. This slider lets you do so without needing to duplicate a frame, and by extension, without disturbing the layer count.
- Duplicate: This option creates a duplicate of the frame after it. This function is different from increasing the hold duration as it creates a fresh new frame on a new layer/group. This layer or group can be edited independently of the original one.
- Foreground: The rightmost frame, corresponding to the topmost layer/group of the canvas, can be set as the animation foreground. This means that the contents of that frame will consistently appear as a still frame over the rest of your animation. The Frame options popup for only this frame has a toggle labeled Foreground, as shown in the following screenshot:
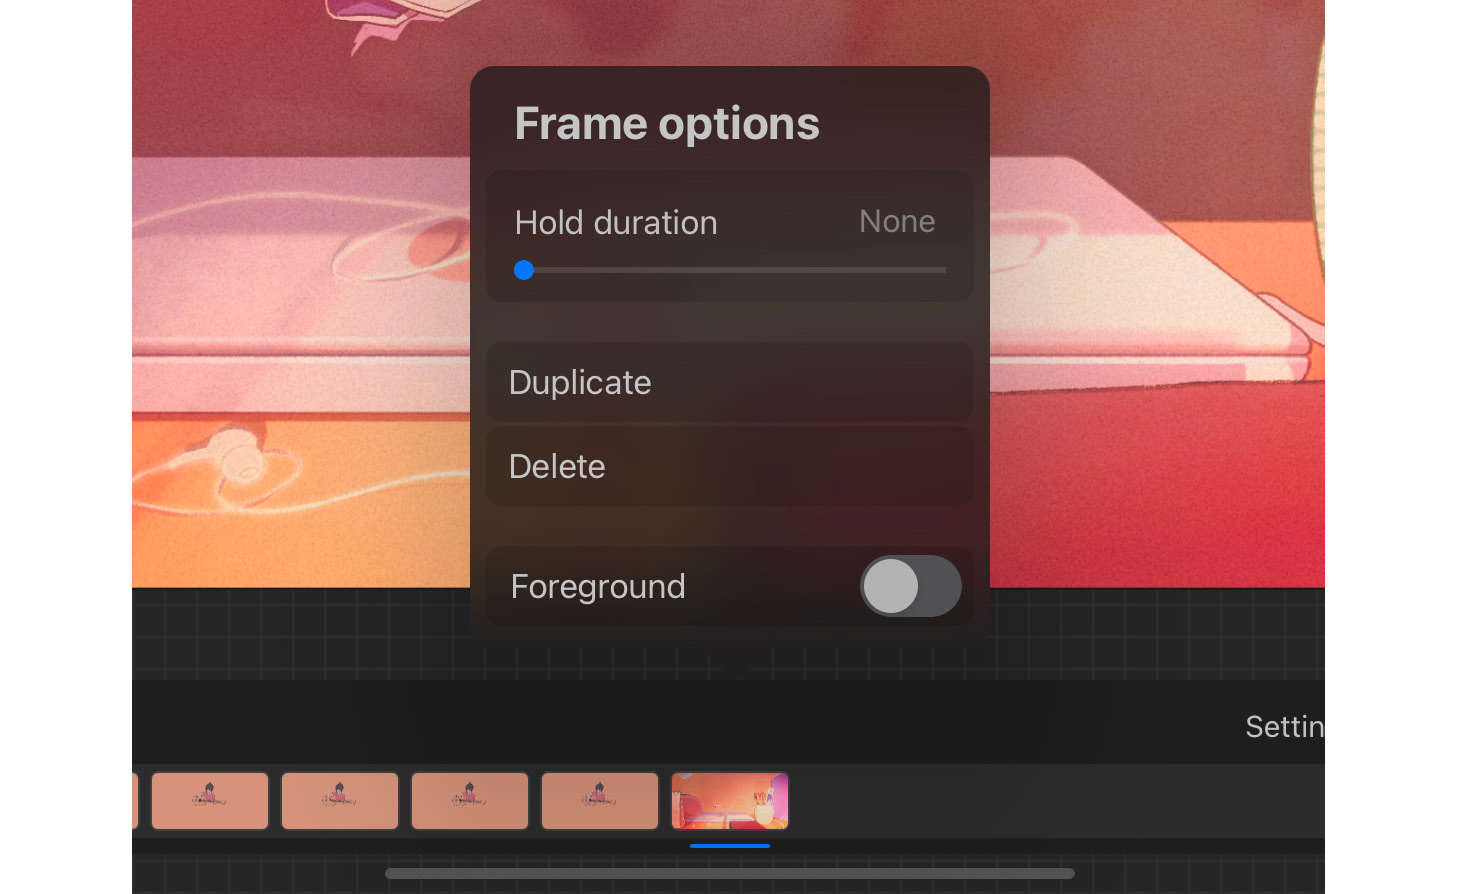
Figure 13.10: Foreground toggle
Once a frame has been made the foreground, it can’t be moved from the rightmost spot on the timeline. The layer position is likewise locked to the top. No other frames can be moved past it to the right unless Foreground is toggled off. There can’t be multiple foreground frames. You may, however, choose to have multiple objects in the foreground, by grouping those layers into a single frame. The following screenshot shows multiple objects in the foreground and their corresponding layer group:
_B16577.jpg)
_B16577.jpg)
Figure 13.11: (Top) the foreground; (bottom) the foreground layer group
- Background: The leftmost frame, corresponding to the lowest layer/group of the canvas, can be set as the animation background. This means that the contents of that frame will consistently appear as a still frame behind the rest of your animation. The Frame options popup for only this frame has a toggle labeled Background, as shown in the following screenshot:
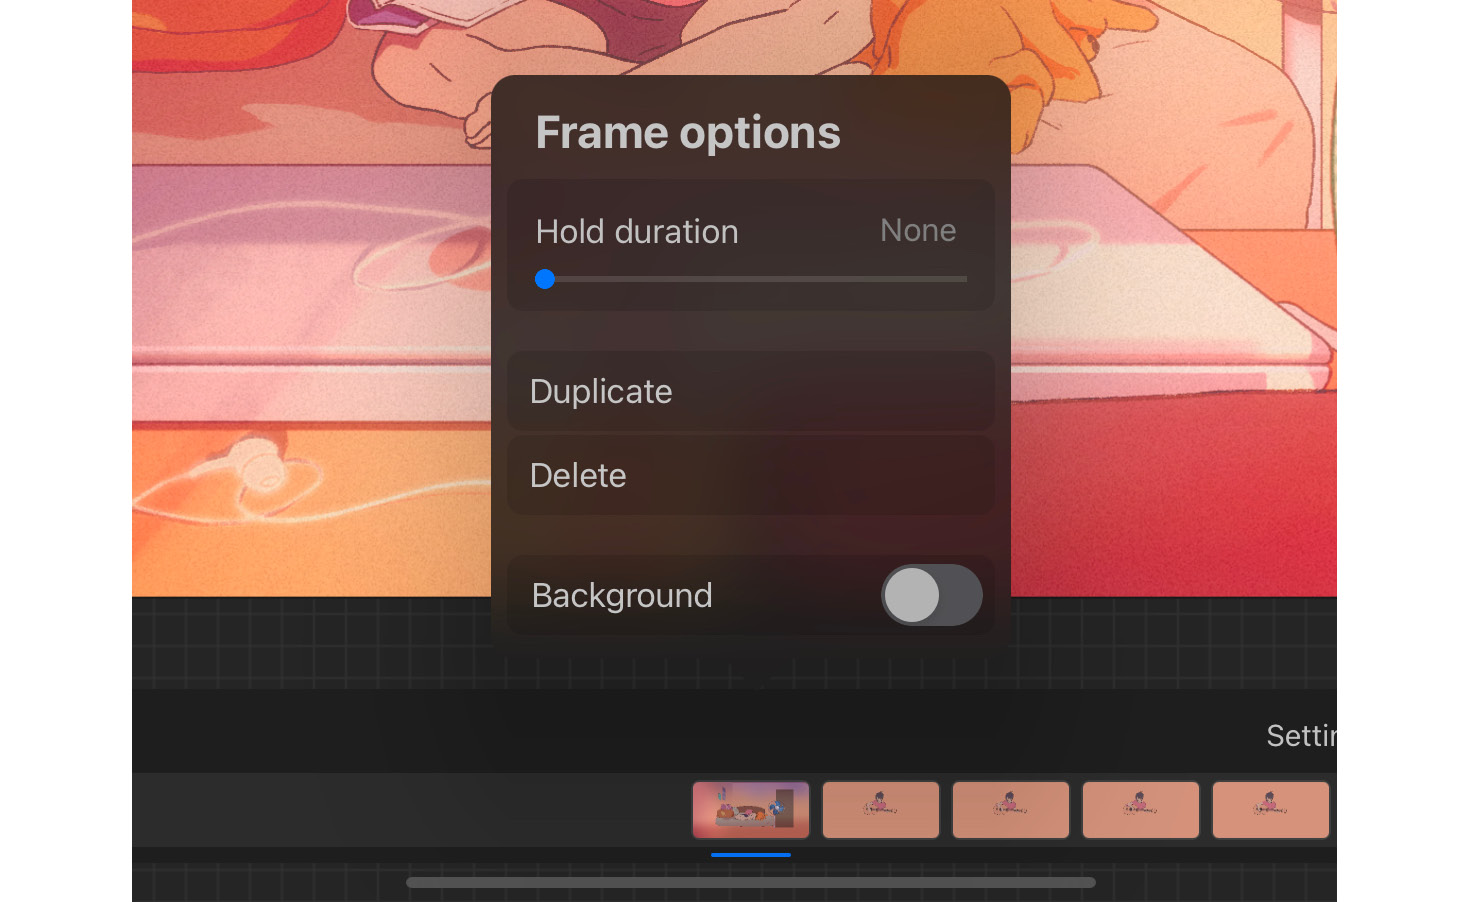
Figure 13.12: Background toggle
Once a frame has been made the background, it can’t be moved from the leftmost spot on the timeline. The layer position is likewise locked to the bottom. No other frames can be moved past it to the left unless Background is toggled off. There can’t be multiple background frames. You may, however, choose to have multiple objects in the background, by grouping those layers into a single frame. The following screenshot shows multiple objects in the background and their corresponding layer group:
_B16577.jpg)
_B16577.jpg)
Figure 13.13: (Top) the background; (bottom) the background layer group
- Delete: This option deletes the frame. If the frame is a layer group consisting of multiple layers, all of those layers will be deleted.
In this section, we learned about the options used to edit frames and give them specific roles, such as Foreground and Background.
With this, we have covered all the features of Animation Assist. We can now summarize this chapter.
Summary
Procreate is a versatile tool that enables you to draw as well as animate. The Animation Assist interface is optimized to facilitate your needs as a 2D animator. In this chapter, you were introduced to the features of this interface, which allow you to easily animate by making subtle changes in your drawings over time to create smooth and natural motion.
Animation Assist has specialized tools to preview your animation, tweak its settings, and edit individual frames. With animation settings, we discussed how aspects such as frame rate and onion skins are useful while creating an animation. Under Frame options, we talked about how each frame can have its own settings and take on specialized roles. At the end of this chapter, you are now familiar with all these tools and are able to use them to create polished 2D animations.
The next chapter will introduce you to a feature similar to Animation Assist, but with a special focus on using Procreate as a sketchbook.